
17. Fun with Layers

Now that you’re familiar with many of the basic controls in Photoshop, it’s time to explore some fun commands that can be applied to layers.
In this chapter, you will learn how to clip (hide the visibility of) multiple layers using a mask, blend pixels between layers using advanced controls, apply transformation commands to a layer (including normal and Content-Aware scaling), apply the Puppet Warp and Warp commands, and apply the Liquify filter. Note: To speed the preview of edits of the transform, Puppet Warp, Liquify, and Warp commands, check Use Graphics Processor in Preferences > Performance. ![]()
Using clipping masks
When layers are put into a clipping mask, the content of the bottommost layer, called the “base” layer, clips (limits which areas are visible on) the layers above it. The mode and opacity of the base layer are also applied to the clipped layers. You can edit or reposition individual layers in a clipping mask at any time, including the base layer. If you use type as the base layer, you can warp it via the Warp Text command (it will remain fully editable).
To create a clipping mask
1. On the Layers panel, make sure the layers to be clipped are listed consecutively. The base layer can be a type, image, or shape layer or a Smart Object; stack it below the layers to be clipped.A
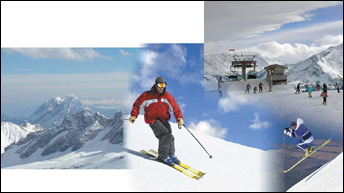
A This document contains five layers (including an editable type layer that is currently hidden behind the image layers).
2. Do either of the following:
Click a layer to be clipped, or Shift-click multiple layers to be clipped (not the base layer) (A, next page), then press Ctrl-Alt-G/Cmd-Option-G (B–C, next page).

A We Shift-clicked four layers ...

B ... then pressed Ctrl-Alt-G/Cmd-Option-G to put them in a clipping group. The base layer name has an underline, whereas the clipped layers are indented.

C The type (base) layer is clipping the four image layers (it’s a “ski mask,” ha-ha).
To clip one layer at a time, Alt-click/Option-click the line between two layers (the pointer becomes a square next to a downward pointing arrow), or right-click one of the layers to be clipped (not the base layer) and choose Create Clipping Mask.
3. Optional: To include more layers in the mask, either restack them between existing layers in the mask or repeat the preceding step.
• To use grouped layers in a clipping mask, all the layers (including the base layer) must be in the group.
• To reposition two or more clipped layers, Ctrlclick/Cmd-click their listings, then hold down the V key to spring-load the Move tool and drag in the document.D

D We selected and moved the clipped image layers to the left with the Move tool, while the base layer stayed put.
When you release a layer from a clipping mask, any and all of the masked layers above it are also released.
To release one or more layers from a clipping mask
Do either of the following:
Alt-click/Option-click the line below the layer to be released.
Click a layer to be released (not the base layer), then press Ctrl-Alt-G/Cmd-Option-G.
To release an entire clipping mask
Alt-click/Option-click the line above the base layer.
Click the layer directly above the base layer, then press Ctrl-Alt-G/Cmd-Option-G.
• To merge clipped layers, see pages 148–149.
Blending layers
In these steps, you’ll edit a duplicate image layer, then blend the original and duplicate layers via the Opacity and blending mode controls on the Layers panel. You can use this method to soften the effect of a filter or other image edits or simply to see how various blending modes or Opacity settings affect your document.
To blend a modified layer with the original one
1. On the Layers panel, click an image layer, then press Ctrl-J/Cmd-J to duplicate it.
2. Optional: If you want to apply a filter as an editable Smart Filter (next step), right-click the duplicate image layer and choose Convert to Smart Object (see page 344).
3. Apply some creative edits to the duplicate layer, such as brush strokes or a filter.A (To learn about the Filter Gallery, see pages 342–343.)

A We duplicated the Background in this image, converted the duplicate layer to a Smart Object, then applied the Ocean Ripple filter.
4. Keep the duplicate layer selected, then on the Layers panel, do either or both of the following:
Choose a different blending mode. You can press Shift - – or Shift- + to cycle through the blending modes.
Adjust the Opacity for the desired level of transparency.B–C

B We chose Lighten mode for Layer 1 and lowered the layer Opacity to 84%.

C The final image combines characteristics of the original Background and the filtered Smart Object.
The Advanced Blending options in the Layer Style dialog let you control how a layer blends with underlying layers. Here, we’ll focus on the Blend If sliders.
To choose blending options for a layer
1. Double-click next to the name of a layer or layer group on the Layers panel,A–B or right-click a layer or group and choose Blending Options from the context menu.

A We opened a photo of a surface texture, then created some editable type in a dark color.

B We double-clicked the type layer name to open the Layer Style dialog.
2. The Layer Style dialog opens (Blending Options should be selected in the upper left). Check Preview.
The first three controls — Blend Mode, Opacity, and Fill Opacity — are the same as on the Layers panel. (The Fill Opacity changes the layer opacity without altering the opacity of any layer effects. To learn about layer effects, see Chapter 20.)
3. Use the Blend If sliders to control which pixels in the current layer stay visible and which pixels from the underlying layer show through the current layer:
Move the black This Layer slider to the right to drop out shadow areas from the current layer.
Move the white This Layer slider to the left to drop out highlight areas from the current layer.
Move the black Underlying Layer slider to the right to reveal shadow areas from the underlying layer.A
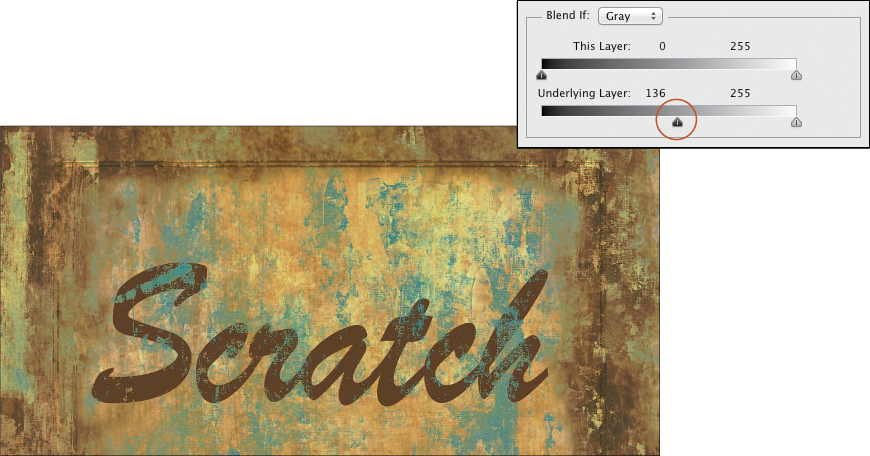
A In the Blend If area of the Layer Style dialog, we dragged the black Underlying Layer slider to the right. Dark colors from the texture layer now show through the type layer.
Move the white Underlying Layer slider to the left to reveal highlight areas from the underlying layer.
To adjust midtone colors separately from the lightest and darkest colors, Alt-drag/Option-drag a slider (it will divide in two).B
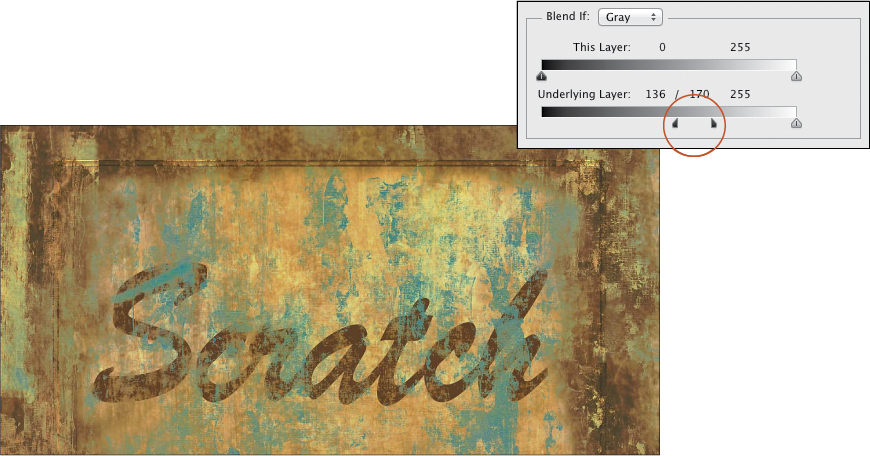
B Next, we held down Alt/Option and dragged the Underlying Layer sliders to enable midtone colors from the underlying texture layer to show through the type layer. Now the type looks as if it’s been worn away by the elements.
4. Click OK. On the Layers panel, the layer will have this badge, ![]() indicating that the Advanced Blending options currently have nondefault settings.
indicating that the Advanced Blending options currently have nondefault settings. ![]()
• To display only layers that contain nondefault Advanced Blending settings, choose Attribute from the Filter Type menu on the Layers panel, and Advanced Blending from the second menu. ![]()
Applying transformations
You can apply scale, rotate, skew, distort, and perspective transformations to a layer or layer group, among other things (see the sidebar at right). We’ll show you how to apply multiple transformations via the Free Transform command and the Move tool — the methods we find to be the most intuitive.
Note: To help preserve the image quality, if you need to apply multiple transformations, do them consecutively and accept the edits only after the last one; Photoshop will resample the image data just once.
You can transform any of the following: an image, type, or shape layer; a layer group; a Smart Object; a selection of pixels on an image layer or on the Background; or the white area in an alpha channel. Note that you can scale, rotate, or skew an editable type layer, but in order to apply a distortion or perspective transformation to type, you must rasterize it first (see page 368). To transform a selection border (not the contents), choose Select > Transform Selection. Read about the Snap Vector Tools and Transforms to Pixel Grid preference on page 434. ![]()
Using Smart Guides
To apply transformations using the Free Transform command or the Move tool
1. On the Layers panel, click a layer, a Smart Object, a layer group, or the Background, or Shift-select multiple layers.A Any layers that are linked to the one(s) you have selected will also be transformed.
A This is the original image.
To transform the Background, you must create a selection, you must use the Free Transform command in step 3 (not the Move tool), and you need to choose a Background color (Photoshop will fill any exposed areas with that color).
2. Optional: If you clicked a single image layer, you can create a selection to limit which area is transformed.
3. Do either of the following:
Choose Edit > Free Transform, or for a shape layer, choose Edit > Free Transform Path (Ctrl-T/Cmd-T).
Choose the Move tool ![]() (V), check Show Transform Controls on the Options bar, then click any handle on the transform box to display transform features on the Options bar.
(V), check Show Transform Controls on the Options bar, then click any handle on the transform box to display transform features on the Options bar.
4. If you chose the Free Transform command, you can select a resampling method from the Interpolation menu (Options bar) (not available for a shape layer or Smart Object). Choose Bicubic Automatic to let Photoshop use the most suitable method. ![]()
5. A transform box with handles now surrounds either the whole selection or just the opaque part of the layer. Do one or more of the following:
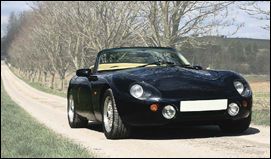
To scale the item horizontally and vertically, drag a corner handle; to scale it just horizontally or vertically, drag a side handle; to scale it proportionally, Shift-drag a corner handle; or to scale it from the current reference point (represented by crosshairs in the transform box), Alt-drag/Option-drag a handle (add Shift to scale it proportionally from the reference point).B

B We selected the car, then copied it to a new layer. Here, we’re scaling the new layer.
To rotate it, position the pointer outside the transform box (the pointer becomes a curved, two-headed arrow), then drag. Shift-drag to constrain the rotation to a multiple of 15°.
To skew it, Ctrl-drag/Cmd-drag a side handle. Include Shift to constrain the movement.
To distort it, Ctrl-drag/Cmd-drag a corner handle.A–B

A This is the original shape layer.
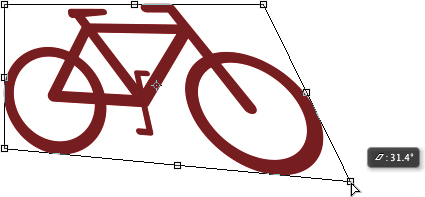
B We’re applying a distort transformation.
To apply perspective, Ctrl-Alt-Shift-drag/Cmd-Option-Shift-drag a corner handle along the horizontal or vertical axis (the pointer becomes an arrowhead, and an adjacent corner also moves).C

C We’re applying a perspective transformation.
• As you perform a transformation, a dynamic readout that lists the dimensions or angle of your edits displays next to the pointer. ![]() To undo the last handle edit, choose Edit > Undo.
To undo the last handle edit, choose Edit > Undo.
6. To resume normal editing, you must either accept or cancel the transformation:
To accept the edit(s), double-click inside the bounding box, press Enter/Return, or click the Commit Transform button ![]() on the Options bar.
on the Options bar.
To cancel the edit(s), press Esc or click the Cancel Transform button. ![]()
• Before dragging a handle, you can drag the reference point, from which the layer or selection is transformed, to a new location.


Applying Content-Aware scaling
The standard transform features in Photoshop scale an entire layer uniformly, regardless of the layer content. The Content-Aware Scale command is fairly smart in that it tries to scale background areas without distorting shapes that have clearly defined borders, such as figures or objects. You can help protect areas from distortion by creating and using an alpha channel.

We selected the buildings in this image, then saved the selection as an alpha channel.

We chose the Content-Aware Scale command, selected the channel name from the Protect menu, then dragged the middle right handle of the bounding box to the left.

The channel protected the buildings while allowing the rest of the image to be scaled.
To apply Content-Aware scaling
1. Duplicate an image layer to be scaled, then hide the original layer (A, next page).

A This is the original image.
2. Optional: To minimize distortion in an area of the layer, select that area, then on the Channels panel, click the Save Selection as Channel button. ![]() Deselect.
Deselect.
3. Choose Edit > Content-Aware Scale (Ctrl-Alt-Shift-C/Cmd-Option-Shift-C).
4. On the Options bar, do either of the following:
If you created an alpha channel (step 2, above), select the channel name from the Protect menu.
If the image contains figures, check the Protect Skin Tones button ![]() to help prevent distortion. Note that this feature does a better job of recognizing skin than clothing.
to help prevent distortion. Note that this feature does a better job of recognizing skin than clothing.
5. Slowly drag a handle on the bounding box (B, next page), or Shift-drag a corner handle for proportional scaling.

B We chose Edit > Content-Aware, then dragged a side handle to the left.
6. Optional: To permit some normal (non Content-Aware) scaling, lower the Amount below 100%. The lower the Amount, the greater the distortion and the less protective the effect of the alpha channel.
7. To accept the transformation, press Enter/Return or click the Commit Transform button ![]() on the Options bar (C–D, next page). To cancel the edits, press Esc or click the Cancel Transform button.
on the Options bar (C–D, next page). To cancel the edits, press Esc or click the Cancel Transform button. ![]()

C The figures scaled less than the surrounding landscape.

D For comparison, we scaled the original image with the Move tool instead of the Content-Aware Scale command. The whole picture looks squashed, including the figures.
• You can’t apply the Content-Aware Scale command to an adjustment, type, shape, or video layer, or to a layer mask, multiple selected layers, a layer group, or a Smart Object.
• To specify the stationary point from which the layer is scaled, click a square on the reference point locator. ![]()
• To scale the layer based on a percentage of its original size, enter a W (width) or H (height) percentage. Activate the Maintain Aspect Ratio button ![]() first to scale proportionally.
first to scale proportionally.
Applying the Puppet Warp command
With the Puppet Warp command, you stretch or bend areas of a layer by dragging pins on a mesh, as you might pull the strings of a puppet.
To apply the Puppet Warp command
1. Duplicate an image layer or the Background. To warp an object or figure without its background, duplicate a layer that contains imagery and transparency. To keep the warp results editable, convert the duplicate layer to a Smart Object.
2. Choose Edit > Puppet Warp.
3. On the Options bar, choose these settings:
A Mode option to control the elasticity of the mesh: Rigid for limited 2-dimensional distortion, Normal for 2-dimensional distortion across a larger area, or Distort for 3-dimensional distortion and scaling.
A Density option to control the spacing of points in the mesh: Fewer Points for a faster but less precise warp; Normal for an average number of points; or More Points for a warp that takes longer to process but is more precise.
An Expansion value to expand or contract the mesh, and therefore the total area that is warped.
Optional: Uncheck Show Mesh.
4. In the document, click to set pins in both the areas to be warped and the areas that you want to anchor in place.A
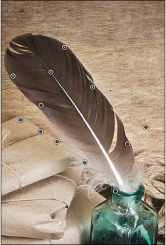
A To reshape the feather in this photo, we duplicated the image layer, chose the Puppet Warp command, then clicked to set pins on and around the feather.
5. Drag any individual pin,B or to move multiple pins, Shift-click them first (selected pins have a white dot in the center) (see also A–D, next page).
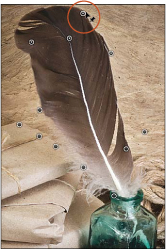
B We Shift-clicked four pins, then dragged one of the selected pins upward to elongate the feather.
6. To apply rotation, do either of the following:
Click one pin, choose Auto from the Rotate menu on the Options bar, then drag the pin. The angle of rotation changes as you drag.
To rotate imagery around a pin, click the pin, position the cursor near (but not over) it, hold down Alt/Option, and when a circle with handles appears, drag in a circular direction. The Rotate menu for that pin will now be set to Fixed and the angle of rotation won’t change, even if you drag that pin or a different one. To unfix the rotation angle of a pin at any time, click it, then choose Auto from the Rotate menu.
7. Optional: To remove a pin and its warp effect, Alt-click/Option-click it (scissors pointer). To remove all the pins, click the Remove All Pins button ![]() on the Options bar, or right-click in the image and choose Remove All Pins.
on the Options bar, or right-click in the image and choose Remove All Pins.
8. To hide the mesh, if showing, press Ctrl-H/Cmd-H. To hide all the pins temporarily, press and hold H.
9. Make any further adjustments, then press Enter/Return or click the Commit Puppet Warp button ![]() (Options bar). (To cancel the warp, press Esc.)
(Options bar). (To cancel the warp, press Esc.)
Note: Because you applied the Puppet Warp command to a Smart Object, you can double-click the Puppet Warp listing on the Layers panel at any time to edit the warp.
• To move a shape (e.g., an extremity on a figure) in front of or behind another extremity, click its pin, then click the Pin Depth: Set Pin Forward ![]() or Set Pin Backward
or Set Pin Backward ![]() button on the Options bar.
button on the Options bar.
Applying the Puppet Warp Command

A To add some character to this boring stack of books (not the books, mind you, the photo!), we copied a selection of just the books to a separate layer, chose the Puppet Warp command, then clicked to set four pins.

B To accentuate the perspective, we dragged the top and bottom pins away from each other (one at a time), with the pins on the sides serving as anchors.

C We deleted the pin from the middle right side and added a pin to the upper-left corner.

D Finally, to bend and rotate the books, we simultaneously dragged two pins (shown in the highlight circles) toward the right.
Using the Liquify filter
Using the tools in the Liquify dialog (preferably with restraint), you can slim or reshape a waistline, chin, or oddly shaped clothing — instant liposuction! If only dieting were this easy ...
To use the distortion tools in Liquify
1. Open an RGB image.A Duplicate the Background, and keep the duplicate layer selected. Note: If you copy a selection of pixels to a separate layer, you won’t have to worry about protecting background areas.

A The shirt and pants on this fellow are billowing out in a rather unflattering way.
2. Choose Filter > Liquify (Ctrl-Shift-X/Cmd-Shift-X). In the dialog, check Advanced Mode ![]() and zoom in on the area to be reshaped.
and zoom in on the area to be reshaped.
3. Click the Twirl Clockwise tool ![]() (C), Pucker tool
(C), Pucker tool ![]() (S), Bloat tool
(S), Bloat tool ![]() (B), or Push Left tool
(B), or Push Left tool ![]() (O).
(O).
4. Under Tool Options on the right side of the dialog, do all of the following:
To control the amount of feathering and soften the distortion that occurs at the edge of the brush, set the Brush Density.
To control the strength of the distortion, set the Brush Pressure.
To control the speed at which the distortion occurs, choose a Brush Rate.
If you’re using a stylus (recommended), check Stylus Pressure and lower the Brush Pressure value.
5. Press [ or ] to size the brush cursor so that it covers the width of the area to be edited. ![]() (The maximum diameter for brushes is larger in CS6.
(The maximum diameter for brushes is larger in CS6. ![]() )
)
6. To use the Push Left tool to push areas to the right (e.g., to slim down the left edge of a waistline), drag downward; B or to push areas to the left, drag upward.C–D Repeat, if necessary. To push pixels in the opposite direction from the default behavior, hold down Alt/Option while dragging.
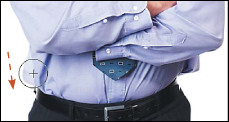
B With the Push Left tool, we dragged downward along the left side of the shirt a few times (here the Show Backdrop option is on).

C Next, we dragged upward with the same tool (smaller brush size) on the right side of the shirt...

D ...and the hip area (here the Show Backdrop option is off).
If you’re using the Twirl Clockwise, Pucker, or Bloat tool, click and hold on an area. Repeat for a stronger effect (A, next page).

A With the Pucker tool, we clicked and held the mouse down on the billowy shirt to contract it inward.
7. To compare the Liquify layer with the original Background, check Show Backdrop and choose All Layers from the Use menu.
8. Click OK (B, next page). If you want to intensify the results, reapply the last Liquify filter edits by pressing Ctrl-F/Cmd-F immediately. ![]()

B This image contains all of our Liquify edits.
There are several ways to restore layer pixels to their original, pre-Liquify state.
To remove individual Liquify edits
Do either of the following:
Under Reconstruct Options, click Reconstruct. In the Revert Reconstruction dialog, set the Amount slider to 100% to undo the edits fully or a lesser value to undo the edits partially. ![]()
Choose the Reconstruct tool ![]() (R), then press and hold on the areas to be restored.
(R), then press and hold on the areas to be restored.
To remove all of your Liquify edits
Click Restore All (or Cancel out of the dialog).
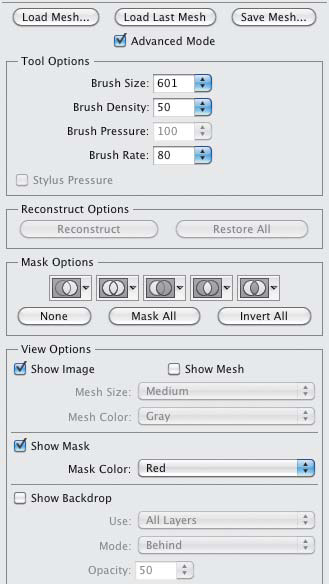
Protecting Areas of an Image from Liquify Edits
• To paint a mask to protect areas of an image from distortion (or to add to an existing mask), choose the Freeze Mask tool ![]() (F), choose settings under Tool Options (e.g., a maximum Brush Pressure setting), then draw strokes over areas in the preview. You can show or hide the mask via the Show Mask check box.
(F), choose settings under Tool Options (e.g., a maximum Brush Pressure setting), then draw strokes over areas in the preview. You can show or hide the mask via the Show Mask check box.
• To remove areas of the mask, choose the Thaw Mask tool ![]() (D), then draw strokes on areas in the preview.
(D), then draw strokes on areas in the preview.
• To apply a mask based on a selection, layer transparency, a layer mask, or an alpha channel (and thereby prevent those areas from being edited), choose that option from the first menu under Mask Options.
• To reload the last-used mesh, click Load Last Mesh. ![]()
• To reverse the masked and unmasked areas, click Invert All.
• To unmask the entire image at any time (make all the pixels editable again), click None.
Applying the Warp command
To apply warp edits to a layer
1. Click a type or image layer or a Smart Object, then choose Edit > Transform > Warp; or click a shape layer, then choose Edit > Transform Path > Warp.
2. Do either or both of the following:
On the Options bar, choose a preset style from the Warp menu.A–C You can also click the Warp Orientation button to toggle horizontal and vertical distortion (not available for all presets), or reshape the grid by using the scrubby sliders for Bend, H (horizontal distortion), or V (vertical distortion).

A When the Edit > Transform > Warp command is chosen, these commands appear on the Options bar.
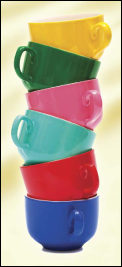
B We copied a selection of cups to a layer above a yellow Background.
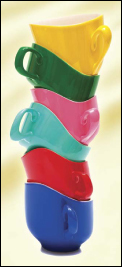
C We applied the Warp command to the cups layer (Twist preset).
Choose Warp: Custom on the Options bar (not available for editable type), then drag any of the interior squares, square corner points, grid lines, or direction line handles in the grid.D Note: If you don’t see the grid, turn on View > Extras.

D We chose the Custom option, then dragged a few control handles on the grid.
3. To accept the warp edits, press Enter/Return or click the Commit Transform button ![]() on the Options bar (to cancel the edits, click the Cancel Transform button
on the Options bar (to cancel the edits, click the Cancel Transform button ![]() or press Esc).E
or press Esc).E
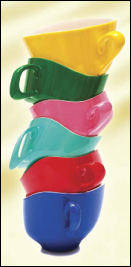
E This is the result (it reminds us of the Mad Hatter tea party!).
• The Type > Warp Text dialog has the same controls as the Warp command, except it’s just for type.
• While warp or transform controls are showing in your document, you can click the Switch Between Free Transform and Warp Modes button ![]() on the Options bar to toggle the two modes. In fact, to minimize resampling and preserve the image quality, when you need to apply multiple transform and/or warp edits, it’s best to toggle between the two commands, then accept them all at once.
on the Options bar to toggle the two modes. In fact, to minimize resampling and preserve the image quality, when you need to apply multiple transform and/or warp edits, it’s best to toggle between the two commands, then accept them all at once.
• To access and edit the warp settings for a type or shape layer or a Smart Object, repeat step 1 at left. (If you want to remove the warp, choose None from the Warp menu on the Options bar.)
• To remove warp edits from an image layer, click the state prior to the “Warp” one on the History panel.