
In this chapter we discuss OpenJPA, an implementation of the Java Persistence API 1.0 specification. We will fill in our evaluation template and implement our common example with OpenJPA. We will discuss OpenJPA extensions to the specification and finish with a brief look forward at JPA 2.0.
In Chapter 1, “A Brief History of Object-Relational Mapping,” we gave some history of the Java Persistence space. We discussed the development of the EJB spec from a persistence standpoint, how it grew in developer dissatisfaction over the years, and how open-source frameworks like Hibernate began to grow. We also discussed how this led to the creation of JPA.
As discussed in Chapter 1, by the time version 2 of the Enterprise Java Beans specification started to make its way into products, a counter-current was building in the Java community that began looking for other ways of doing persistence. When the EJB 3.0 committee began meeting, it became clear that revisiting persistence would need to be a key feature of the new specification. The opinion of the committee was that something significant needed to be changed—and as a result, the committee made the following decisions:
The EJB 3.0 persistence model would need to be a POJO-based model and would have to address the issue of “disconnected” or detached data in a distributed environment.
The specification would need to support both annotations and XML descriptors to define the mapping between objects and relational databases.
The mapping would need to be complete—specifying not only the abstract persistence of a class, but also its mapping to relational tables and mappings of attributes to columns.
So the EJB committee combined the best ideas from several sources—TopLink, Hibernate, and Java Data Objects API—to create a new persistence architecture, which was released as a separate part of EJB 3.0 and dubbed the Java Persistence API. JPA represents the confluence of a number of different threads in the Java persistence arena and has since been adopted by all the major persistence vendors and various open-source projects.
In the preceding chapter, we evaluated Hibernate. You will find many features in JPA similar to Hibernate. Hibernate itself has a full-blown JPA implementation as part of its Entity Manager that you can read about for more details [Hibernate]. In this chapter, however, we are going to use Apache OpenJPA.
The Apache OpenJPA project is an Apache-licensed open-source implementation of the Java Persistence API. OpenJPA is focused on building a robust, high-performance, scalable implementation of the JPA specification. You can read more about the Apache Open JPA project at the website [OpenJPA 1].
The original source code contribution was provided by BEA (via their SolarMetric Kodo acquisition, discussed in the “History” section to follow). Several other companies and individuals are participating as committers, contributors, and users in the OpenJPA project, including IBM. The OpenJPA community continues to grow and prosper, with the expectation of graduating from incubation sometime in the near future.
Much like Hibernate, OpenJPA is a full Domain Mapper, allowing you to map a whole set of objects to your database tables, and abstracting the SQL language from the developer.
OpenJPA started its life with another specification called JDO, as discussed in Chapter 1. SolarMetric was one of the first implementers of the JDO specification back in 2001, with a product called Kodo. As the JPA specification began to finalize, SolarMetric began making Kodo both a JPA and JDO implementation. In 2005, BEA purchased SolarMetric and contributed most of the JPA code to Apache as the project OpenJPA. As stated earlier, other vendors like IBM are part of the OpenJPA community. BEA continues to have the SolarMetric Kodo product based on OpenJPA. OpenJPA will be the core persistence engine of BEA WebLogic Server, IBM WebSphere, and the Apache Geronimo Application Server. In May 2007, OpenJPA graduated from the incubator to a top-level project and also passed Sun’s Technology Compatibility Kit compliant with the Java Persistence API. In September 2007, OpenJPA released its first GA version.
OpenJPA is an implementation of the JPA 1.0 Specification that is a subspecification under the SUN EJB 3.0 specification, developed under JSR 220. At the time of this writing, JPA 2.0 is being developed under its own JSR 317, and EJB 3.1 is being developed under JSR 318. The website is the definitive source for the JPA 2.0 specifications [JPA 2].
Before Java EE 5.0 and EJB 3.0, the persistence layer of the Java EE platform required a full-blown Java EE Application Server. JPA changes this. OpenJPA applications can be written to run in both Java SE and Java EE environments. However, there are some differences in JPA applications hosted inside a Java EE environment as opposed to a Java SE environment. Rather than discuss the differences here, we will highlight them where they exist throughout the remainder of this chapter.
OpenJPA comes bundled with several other JARs needed to make it run. Like many Apache projects, it makes use of other Apache licensed packages:
Several of the Apache Commons projects :
commons-lang,commons-logging,commons-pool, andcommons-collections. Please refer to the Apache Commons website for more information [Apache].Apache OpenJPA relies on the Serp project for Java “bytecode enhancement” to add persistence behavior to annotated Java files as a separate step. The Serp JAR comes bundled with OpenJPA. We discuss this step in the later section “Development Process for the Common Example.” You can read more about Serp at their website [Serp].
A valid JDBC database driver.
For Java EE applications, any JARs required to run OpenJPA in a target Java EE Server.
OpenJPA is distributed under an Apache License. As mentioned in Chapter 2, an Apache License is more liberal in what you can do with the source because you can change parts of the code, and you don’t need to distribute them back to the original authors. In addition, several commercial products ship an OpenJPA implementation, such as IBM WebSphere Application Server and BEA WebLogic Server.
It is worth noting that because JPA is a specification, there are other JPA implementations available beyond the OpenJPA version:
Hibernate JPA. Refer to Chapter 7, “Hibernate Core,” or the Hibernate website [Hibernate] for license information.
TopLink Essentials, which is an open-source implementation that Oracle built on top of TopLink. We discussed TopLink briefly in Chapter 1. See their website for more information [TopLink].
OpenJPA is very well documented on their website. In addition, there are several articles available. Table 8.1 shows some examples.
Table 8.1. OpenJPA Resources
Link | Description | |
|---|---|---|
OpenJPA Manuals [OpenJPA 2] | Comprehensive OpenJPA Module | |
Integrating OpenJPA with Application Servers [OpenJPA 3] | List of other articles for integrating OpenJPA with other Application Server. | |
Building EJB 3 Applications with WebSphere Application Server | www.ibm.com/developerworks/websphere/techjournal/0712_barcia/0712_barcia.html | Tutorial on using OpenJPA inside the WebSphere EJB 3 Container |
Leveraging OpenJPA with WebSphere Application Server
A.8.1 | www-128.ibm.com/developerworks/websphere/techjournal/0612_barcia/0612_barcia.html | Tutorial on using OpenJPA inside WebSphere Application Server |
Java Persistence with Hibernate [Bauer] A.8.2 | Book on using Hibernate JPA API | |
Enterprise JavaBeans, 5th Edition [Monson-Haefel] | Comprehensive sourcebook on EJB 3 | |
Migrating Legacy Hibernate Applications to OpenJPA and EJB 3 A.8.3 | www.ibm.com/developerworks/websphere/techjournal/0708_vines/0708_vines.html | Techniques useful to migrate a Hibernate Core Application to OpenJPA |
Besides OpenJPA, there are many other resources available on the JPA programming model.
OpenJPA is a persistence framework based around persisting common POJOs. It relies on Java Annotations and/or XML to add the persistence behavior. Both options are available. OpenJPA also provides a very rich Object Query Language, batch statement features, and other useful features. As a last resort, OpenJPA allows a developer to drop down to Native SQL.
The basic programming model is relatively straightforward, with an EntityManager (created using an EntityManagerFactory or injected by the environment such as an EJB 3 container) being used to establish a persistent session context in which Plain Old Java Objects (POJOs) can be moved in and out of a persistent context.
It is worth mentioning here that an object association with an EntityManager defines the state in which it is managed. Figure 8.1 illustrates the life cycle of a Java object with respect to persistence in OpenJPA.
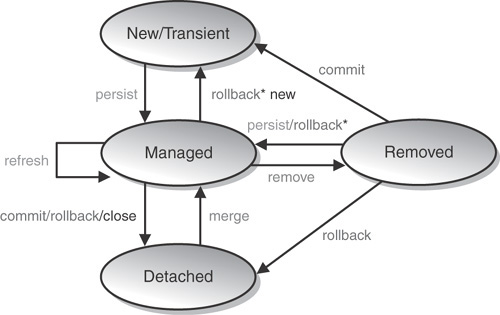
This life cycle is interesting because it brings together the notion of an EntityManager and a POJO, resulting in four states to consider in the programming model:
New/Transient—. The Object is instantiated, but there is no relational data in the database.
Managed—. The Object is associated with the persistent manager, and therefore the instance has a database record and the Java instance is connected to its record. Executing
getters()andsetters()imply database operations.Detached—. The EntityManager is closed but the instance is still around. It is just a Value Object at this point. Executing
getters()andsetters()do not imply database updates. You can move a detached instance back to a Managed state by callingmergeon the EntityManager.Removed—. This is an instance that is no longer in the database because it has been deleted. After the transaction is committed, the object is just like any other transient Java Object.
Within this context, we will consider the specific details of how to do initialization, make connections, create transactions, invoke CRUD methods, and so on.
The heart of persisting POJOs relies on a special object called an EntityManager. The goal for a developer is to initialize an EntityManager with the proper mappings and database information necessary. JPA provides several ways to load an EntityManager, depending on the environment.
To initialize the framework, you need to create a file called persistence.xml, as shown in Figure 8.1, and define a persistence unit, as shown in Listing 8.1. The listing contains the information necessary for a Java SE Application to configure a persistence unit.
Example 8.1. Java SE Persistence Unit
<persistence-unit name="pie-db-JAVA-SE">
   <provider>
   org.apache.openjpa.persistence.PersistenceProviderImpl
   </provider>
   <properties>
      <property name="openjpa.ConnectionURL"
         value="jdbc:derby://localhost:1527/PWTE"/>
      <property name="openjpa.ConnectionDriverName"
         value="org.apache.derby.jdbc.ClientDriver"/>
      <property name="openjpa.jdbc.DBDictionary" value="derby"/>
      <property name="openjpa.Log"
         value="DefaultLevel=WARN,
         Runtime=INFO,
         Tool=INFO,
       SQL=TRACE"/>
      <property name="openjpa.jdbc.Schema" value="APP"/>
   </properties>
</persistence-unit>
The first thing you do is define your provider, which in this case is OpenJPA. Then you use the properties to set up the name of the Driver or DataSource implementation and any additional properties. A full list of properties can be found in the Open JPA Manual referenced earlier [OpenJPA 2l].
In a Java EE environment, the configuration will be slightly different. Application Servers, like WebSphere Application Server, will often provide a default JPA implementation, and it is therefore not necessary to provide a JPA provider. Listing 8.2 shows an example of a persistence.xml file in a Java EE environment. In it, you can provide the JNDI name of a configured DataSource. The DataSource implementation is vendor specific. Some Application Server vendors allow for swapping the default implementation.
Example 8.2. Java EE Persistence Unit
<persistence-unit name="pie-db-JAVA-EE">
    <jta-data-source>jdbc/orderds</jta-data-source>
    <properties>
        <property name="openjpa.jdbc.DBDictionary" value="derby"/>
        <property name="openjpa.jdbc.Schema" value="APP"/>
    </properties>
</persistence-unit>After you configure the persistence unit, JPA will have the necessary information to instantiate a persistence context. A persistence context is a set of managed entity instances in which, for any persistent entity identity, there is a unique entity instance. Within the persistence context, the entity’s association with the underlying persistence store is managed by the EntityManager (EM). If you are familiar with Hibernate, the EntityManager is similar to the Hibernate Session.
All the connections to the underlying database are encapsulated within the EM. So getting an instance of the EntityManager will get a connection for you as needed without any explicit coding on your part. However, getting an instance of the EntityManager varies between a Java SE and Java EE environment. In a Java SE environment, an application-managed EM instance is created by calling the EntityManagerFactory, and the lifetime of that instance is controlled by the application. For each application-managed EM instance, there are one or more corresponding application-managed persistence contexts, which are not linked with any transaction and are not propagated to other components. It is important to realize that you must open and close the Entity Manager yourself in an application coded to run in a Java SE environment.
The Persistence class is used as a bootstrap to get access to an EntityManagerFactory for a particular persistence unit configured in a Java SE environment. After you get access to the EntityManagerFactory, you can use that to get an instance of an EntityManager that can be used throughout your code to implement the persistence code. Listing 8.3 shows an example of this process. In this code, we illustrate the three steps just discussed. Notice that in this example, the EntityManager is scoped to each business method. This is one common pattern in a Java SE environment.
Example 8.3. Look Up Entity Manager Factory
public class CustomerOrderServicesJavaSEImpl{
    protected EntityManagerFactory emf  =
        Persistence.createEntityManagerFactory(
        "pie-db-JAVA-SE"
    );
    public Order openOrder(int customerId)throws Exception {
        EntityManager em = emf.createEntityManager();
        em = emf.createEntityManager();
        //Code
        em.close();
    }
...
}
It is worth noting that opening and closing an Entity Manager may be slower than keeping an instance around in some scenarios.
In a Java EE environment, the container can “inject” an EntityManagerFactory into a Java EE artifact, such as a Stateless Session Bean or an HttpServlet. Listing 8.4 shows an example of injecting an EntityManagerFactory into a Stateless Session Bean. Once injected, it is used the same way we illustrated earlier. Notice that you still must programmatically close the EntityManager because you used a factory to create the EntityManager. This is because you are still using an application-managed EntityManager.
Example 8.4. Inject Entity Manager Factory
@Stateless
public class CustomerOrderServices {
    @PersistenceUnit (unitName = "pie-db-JAVA-EE")
    protected EntityManagerFactory emf;
    public Order openOrder(int customerId)throws Exception
    {
        EntityManager em = emf.createEntityManager();
        //Code
        em.close();
    }
...
}
In an EJB 3 environment, a container-managed EM instance is created by directing the container to inject one instance (either through direct injection or through JNDI lookup). The lifetime of that EM instance is controlled by the container; the instance matches the lifetime of the component into which it was injected. Container-managed Entity Managers will also provide automatic propagation of transactions, connections, and other services. We will discuss this further after transactions are discussed.
An EntityManager can be injected directly into an EJB, using a Java annotation called PersistenceContext. Listing 8.5 shows an example of this. In this case, the developer does not have to worry about a factory. Furthermore, you delegate to the container the management of the EntityManager and the propagation of the proper persistence context from EJB component to EJB component. This is a more common pattern in Java EE. If you are using the PersistenceContext in an EJB 3 component, the EJB 3 container will automatically propagate the persistence context for a particular request across components. It is important to keep in mind that an EJB 3 Session Bean is a thread-safe component, and therefore, only one client request is being serviced by the EJB component at a time. This means the EntityManager can safely be used by the instance without fear of another thread accessing it. The container can also take advantage of this and pass the current persistence context which can contain an active transaction.
To illustrate the object states shown in Figure 8.1 in context of the code to get access to the EntityManager, see Listing 8.6. This listing shows objects in various states and how they move from one state to another. The comments within the listing describe the action.
Example 8.6. Object States
//Set up EM and Transient POJO instance
em = emf.createEntityManager();
Order newOrder = new Order();
newOrder.setStatus(Order.Status.OPEN);
newOrder.setTotal(new BigDecimal(0));

//Make POJO Managed by persisting it
em.persist(newOrder);
newOrder.setTotal(new BigDecimal(1));

//Make POJO Detached by closing
em.close();
newOrder.setTotal(new BigDecimal(2));

//Make POJO Managed by merging detached instance
em2 = emf.createEntityManager();
em2.merge(newOrder;)
As long as a POJO is associated with an EntityManager, updates to the database are implied and the instance is managed. Managed Entities are either (a) loaded by the EntityManager via a find method or query, or (b) associated with the EntityManager with a persist or merge operation. We discuss this more in later sections on the Create, Retrieve, Update, and Destroy operations.
You can demarcate transactions in OpenJPA in the following ways:
Using a standard programmatic API such as the JTA interfaces
Using the special
javax.persistence.EntityTransactioninterface provided by JPAUsing declarative transactions within an EJB 3 Container
We have covered JDBC and JTA transactions in previous chapters. Listing 8.7 shows an example of using the EntityTransaction interface. A developer can get an instance of an EntityTransaction by calling getTransaction() on the EntityManager. After they have an instance, you can call begin, commit, or rollback. This is often the norm when using OpenJPA in a Java SE environment or in the web container.
Example 8.7. Entity Manager Transaction Demarcation
public Order openOrder(int customerId)
throws CustomerDoesNotExistException,
       OrderAlreadyOpenException,
       GeneralPersistenceException {
    EntityManager em = null;
    try {
        em = emf.createEntityManager();
        em.getTransaction().begin();
        //use em to manage objects
        em.getTransaction().commit();
        return newOrder;
    }
    catch(CustomerDoesNotExistException e){
        em.getTransaction().rollback();
        throw e;
    }
    //Handle other Exceptions not listed
    finally {
        if (em != null) em.close();
    }
}
If a developer uses an external API like JTA to demarcate transactions and you are using an application-managed EntityManager, you need to have your EntityManager instance “join” the transaction. Listing 8.8 illustrates this situation and shows the code needed to cause the join.
Example 8.8. Join Transaction
@PersistenceUnit (unitName = "pie-db-JAVA-EE")
protected EntityManagerFactory emf;

public Order openOrder(int customerId)throws Exception {
    javax.transaction.UserTransaction tran =
        //code to lookup UserTransaction in JNDI

    EntityManager em = emf.createEntityManager();
    try {
        // Start JTA transaction
        tran.begin();

        // Have em explicitly join it
        em = emf.createEntityManager();
        em.joinTransaction();

        //Code in transaction scope ready to commit
        tran.commit();

        //Code outside of transaction scope
    }
    catch(Exception e) {
        tran.rollback();
        throw e;
    }
    finally {
        em.close();
    }
}
When OpenJPA is used in an EJB 3 container, OpenJPA will allow for transactions to be controlled by EJB transaction demarcation. Listing 8.9 shows an example of JPA being used within an EJB 3 Session Bean. The EJB 3 method is marked with a Required transaction. In addition, the EntityManager is injected into the EJB 3 POJO. In this scenario, you get the benefit of having the container manage the EntityManager for you using the container-managed Entity Manager discussed in the preceding section.
Example 8.9. EJB 3 Transaction Demarcation
@Stateless
public class CustomerOrderServicesImpl implements CustomerOrderServices
{
    @PersistenceContext(unitName="pie-db-JAVA-EE")
    protected EntityManager em;

    @TransactionAttribute(value=TransactionAttributeType.REQUIRED)
    public Order openOrder(int customerId)
    throws CustomerDoesNotExistException,
           OrderAlreadyOpenException,
           GeneralPersistenceException {
        // use em
    }
For each container-managed EM instance, there are one or more corresponding container-managed persistence contexts (PCs). At the time the PC is created, it is linked with the transaction currently in effect and propagated by the container, along with the transaction context to other called components within the same JVM.
The container-managed usage scenario is further subcategorized into transaction-scoped (lifetime is controlled by the transaction) and extended (lifetime is controlled by one or more stateful session bean instances). This means that in the transaction case, inside an EJB 3 container, the persistence context life cycle is governed by the transaction. You get automatic flushing of cache at the end of the transaction. JPA also provides an extended PersistenceContext that will be managed by some greater scope, such as a Stateful Session Bean or perhaps an Http Session. Listing 8.10 shows how you can inject a longer-lived Persistence Context.
In Chapter 5, “JDBC,” we discussed savepoints. Savepoints allow for fine-grained control over the transactional behavior of your application. The JPA specification does not allow for savepoints; however, some vendors, like OpenJPA, may have extensions. OpenJPA’s savepoint API allows you to set intermediate rollback points in your transaction. You can then choose to roll back changes made only after a specific savepoint, then commit or continue making new changes in the transaction. OpenJPA’s OpenJPAEntityManager (subtype of JPA’s EntityManager) supports these savepoint operations:
void setSavepoint(String name);void releaseSavepoint(String name);void rollbackToSavepoint(String name);
Savepoints require some configuration, so refer to the OpenJPA documentation for more details.
The EntityManager has most of the methods needed to persist Java objects, or entities. Persistence actions usually occur by passing instances of entities to and from the EntityManager. So for creating data, you would just create an instance of an entity and persist it using the persist method of the EntityManager. Listing 8.11 shows an example of this.
This will correspond to an INSERT into the database. The Order object in the example is mapped to a table in the database. A POJO mapped to a database is called an Entity in JPA. We will discuss mappings in the “ORM Features Supported” section.
Reading data can be done several ways. The simplest read is to read an object by primary key. The EntityManager find method provides an easy way to do this. Listing 8.12 illustrates this. The find method takes the name of the class and a primary key value as a parameter. We discuss mapping primary keys in the later section, “ORM Features Supported.”
Using the find methods, OpenJPA can load a whole Object Graph. Listing 8.13 shows an example of accessing the Order Object after loading the customer. If the Order Object is mapped as a relationship and the proper fetching strategies are set, OpenJPA will load more than the root object with the find method. Later in the chapter, fetching is discussed.
JPA also comes with a rich query language called EJB-QL (sometimes called JPQL). You can issue queries against the object model. We will not provide a detailed tutorial on the query languages, and instead recommend that you read the reference guide [JPQL]; but the query language provides syntax to execute complex queries against related objects. Listing 8.14 shows an example of executing a query. As a developer, you can create a query using the createQuery against the EntityManager. Notice you can use :name to mark places where you want to use parameters. OpenJPA also supports using the ? approach used by JDBC Prepared Statements. However, both approaches will translate to Prepared Statements.
Example 8.14. Executing JPA Queries
Query query = em.createQuery(
"select l from LineItem l
where l.productId = :productId and l.orderId = :orderId "
);
query.setParameter("productId", productId);
query.setParameter("orderId", existingOpenOrder.getOrderId());
LineItem item = (LineItem) query.getSingleResult();OpenJPA also supports the capability to externalize queries from the code using the “named query” concept, which allows you to associate a query to a name using an annotation or the XML mapping file. Listing 8.13 shows how you annotate a POJO with the NamedQuery. The rest of the annotations in the listing are explained in the later section, “ORM Features Supported.” After you define the NamedQuery, you can execute somewhere else in your code, as shown in the second part of Listing 8.15. It is worth mentioning that if you want to truly externalize the queries, you should use the XML deployment descriptor.
Example 8.15. Executing JPA Queries
@Entity @Table(name="LINE_ITEM") @IdClass(LineItemId.class) @NamedQuery( name="existing.lineitem.forproduct", query=" select l from LineItem l where l.productId = :productId and l.orderId = :orderId" ) public class LineItem { ... Query query = em.createNamedQuery("existing.lineitem.forproduct"); query.setParameter("productId", productId); query.setParameter("orderId", existingOpenOrder.getOrderId()); LineItem item = (LineItem) query.getSingleResult();
With EJB-QL, when you are querying for Objects, you can load related objects as well, depending on the mapping. You can also load objects using joins. OpenJPA also extends EJB-QL with some value adds.
For the majority of the cases, you should be able to get data you need. There are cases when you need to drop down to native SQL. This could be to call a Stored Procedure, to get an optimized SQL, or because you cannot get OpenJPA to generate the correct SQL needed for the use case. OpenJPA supports the notion of native queries. You can execute SQL and project onto a POJO. An example is shown in Listing 8.16.
You can also have Native Named Queries if you want to externalize the SQL.
OpenJPA supports updating existing data in a few ways. Figure 8.1 showed you the life cycle of a POJO with respect to the EntityManager. Any field updated on a POJO that is associated with the EntityManager implies a database update. Listing 8.17 shows an example of code finding an instance of LineItem and executing an update.
Any update to related objects also implies an update. In Listing 8.18, we show that after finding the customer Entity, you can traverse to the Order. Because the customer is still being managed by the EntityManager, so is the Order.
Example 8.18. Updating Related Entities
AbstractCustomer customer = em.find(AbstractCustomer.class, customerId); Order existingOpenOrder = customer.getOpenOrder(); BigDecimal amount = product.getPrice().multiply(new BigDecimal(quantity)); existingOpenOrder.setTotal(amount.add(existingOpenOrder.getTotal()));
OpenJPA also supports updating of detached Entities using the merge method. Listing 8.19 shows an example of a detached case. In the first part of the listing, you can see a fragment of Servlet code calling a service. The Service implementation is shown in the second part of the listing. A web request first reads the data using an HTTP GET, which gets access to the data and stores it in sessions. The service implementation uses a find to access the data and finish the request. Then an HTTP POST comes in to update the data in session. The Servlet doPost passes the detached instance into the updateLineItem method. The implementation of updateLineItem will attempt to merge the instance to the EntityManager.
Example 8.19. Updating via merging
public void doGet(
HttpServletRequest request, HttpServletResponse response)
{
String customerId = populateFromRequest(request);
LineItem li = customerService.getLineItem(li);
writeToSession(li);
}
public void doPost(
HttpServletRequest request, HttpServletResponse response
)
{
LineItem li = populateFromSession(request);
customerService.updateLineItem(li);
}
...
public LineItem getLineItem(int liId) throws GeneralPersistenceException
{
EntityManager em = //Get Entity Manager
LineItem li = emf.find(LineItem.class,liId);
return li;
}
public void updateLineItem(LineItem li) throws GeneralPersistenceException {
EntityManager em = //Get Entity Manager
em.merge(li);
}OpenJPA allows you to use EJB-QL to issue updates as well, such as shown in Listing 8.20. This feature enables you to update many instances with one statement. You also avoid hydrating objects in certain scenarios where performance is important.
You can delete data several ways using OpenJPA. A managed instance can be removed by calling remove on the EntityManager, as shown in Listing 8.21. (Listing 8.23 shows an even better option.)
You can configure OpenJPA to propagate deletes along an object graph. We will show you mapping relationships later; however, in Listing 8.22, you can see that Order has a relationship to a Set of LineItem instances. On the relationship, you can see that we have set the cascade to REMOVE. This means that when you delete an Order, all associated Lineitem instances will be deleted as well.
Example 8.22. Deleting via Cascading
@Entity
@Table(name="ORDERS")
public class Order implements Serializable {
...
@OneToMany(cascade=CascadeType.REMOVE, fetch=FetchType.EAGER )
@ElementJoinColumn(
name="ORDER_ID",referencedColumnName="ORDER_ID"
)
protected Set<LineItem> lineitems;Finally, much as with Updates, OpenJPA allows you to delete, using EJB-QL Queries. Listing 8.23 shows an example of deleting via a query. This approach is useful if you want to delete many rows with one network call.
Example 8.23. Deleting via a Query
Query query = em.createQuery(
"DELETE FROM LineItem l
WHERE l.productId = :productId
and l.orderId = :orderId"
);
query.setParameter("productId", productId);
query.setParameter("orderId", existingOpenOrder.getOrderId());
query.executeUpdate();We already showed how you can use native queries in OpenJPA. Native queries can be used to call stored procedures as shown in Listing 8.24.
As we showed in the Update and Delete sections, OpenJPA supports batching updates and deletes using EJB-QL. The Apache version of OpenJPA (1.0.0) currently does not support automatic statement batching for persistent operations. However, vendors that build on top of OpenJPA sometimes provide this function. The EJB 3 implementation of WebSphere Application Server provides an enhanced version of OpenJPA. They provide a configuration option for deferring update operations to commit time and batching them together. Other vendors may provide similar optimizations. The optimizations can make mass updates several orders of magnitude faster; see also the “Batch Operations” section in Chapter 5 for details of how this approach works.
When writing OpenJPA plug-ins or otherwise extending the OpenJPA runtime, however, you will use OpenJPA’s native APIs. OpenJPA allows you to extend the framework in various ways, including these:
You can extend the default EntityManager or EntityManagerFactory. This is often done by Vendors offering enhanced JPA implementations on top of OpenJPA.
You can extend the query engine. This is usually done to provide optimized solutions, such as integrating with cache technologies.
Data Caches can be added to back the OpenJPA cache.
Other areas support extending behavior, such as fetch and primary key generation strategies.
The OpenJPA implementation shows the specific interfaces and classes that need to be extended to provide your own extensions.
JPA Exceptions are unchecked. Figure 8.2 shows the JPA Exception Architecture. JPA uses standard exceptions where appropriate, most notably IllegalArgumentExceptions and IllegalStateExceptions. These exceptions can occur when you perform persistence actions without the proper setup—for example, sending an Entity to an EntityManager that is not managing it.
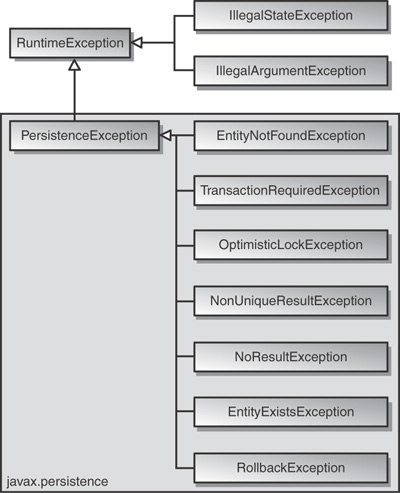
The specification also provides a few JPA-specific exceptions in the javax.persistence package. Listing 8.25 shows an example of catching an EntityNotFoundException. Alternatively, because the exceptions are unchecked, you can choose to not catch it and handle it at a higher level.
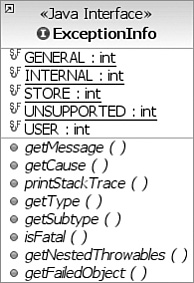
All exceptions thrown by OpenJPA implement org.apache.openjpa.util.Exception Info to provide you with additional error information. Figure 8.3 shows the class diagram of the ExceptionInfo interface.
We have shown you how a programmer would use Entities to perform the runtime persistence operations. We will now show you how to map Entities to a database using OpenJPA. OpenJPA allows mapping Entities via Java Annotations and XML. The choice is up to the developer and usually depends on whether you want to expose the underlying relational database details into the code; or in some cases, whether you have “legacy” Java objects that are not easy to change.
Throughout this book, we have been showing meet-in-the-middle Mapping. OpenJPA supports top-down, bottom-up, and meet-in-the-middle. It is worth mentioning that the JPA spec defines a common standard for top-down generation of database schemas. Listing 8.26 shows the minimum annotation needed to make a POJO a JPA Entity. Simply by marking a class with the @Entity annotation, you have a persistent capable class. If your database schema follows the JPA naming convention, or if you want to have the database schema generated, then the class can be used. In this case, OpenJPA will look for a table named Customer. The table will have two columns: id and name. The table names and column names will match whether they contain upper- or lowercase spellings.
As mentioned earlier, you can also use XML as an alternative to Java Annotations. Listing 8.27 shows an XML entity mapping for the same Customer. As noted previously, some developers prefer to externalize their database mappings to keep the Java code “pure.” Some other developers prefer to use Annotations together with XML. In some cases XML and Annotations can be used. In this case, XML will serve as an override for Annotations. This might not make sense when an entity is always mapped to a relational table; however, in other cases XML overrides can provide benefits (for example, enabling you to change a schema name or optimize a query without changing the Java code).
Example 8.27. Creating an Entity with XML
<entity-mappings
xmlns="java.sun.com/xml/ns/persistence/orm"
xmlns:xsi="www.w3.org/2001/XMLSchema-instance"
xsi:schemaLocation=
"java.sun.com/xml/ns/persistence/orm orm_1_0.xsd"
version="1.0"
>
<entity class=" Customer" />
</entity-mappings>OpenJPA does a lot of defaulting for you; as long as you match the naming conventions, things will fall into place. This includes naming conventions for relationships and other complex types. For the rest of the section, though, we will show explicit mappings to illustrate the important concepts. In addition, it is often the case that the database schema will not always match the Object model, and will require a meet-in-the-middle mapping—as occurs in our example throughout the book.
Mapping Entities to tables with different names is easy. Listing 8.28 shows the Order Entity mapped to a table called ORDERS. You use a simple annotation called @Table.
Similarly, you can map Entities to a table using XML, as shown in Listing 8.29.
Example 8.29. Mapping an Entity to a Table with XML
<entity-mappings xmlns="java.sun.com/xml/ns/persistence/orm"
xmlns:xsi="www.w3.org/2001/XMLSchema-instance"
xsi:schemaLocation=
"java.sun.com/xml/ns/persistence/orm orm_1_0.xsd"
version="1.0"
>
<entity class=" Order ">
<table name="ORDERS"/>
...
</entity>The Table annotation and XML both let you specify a schema name as well.
OpenJPA fully supports inheritance in persistent classes. It allows persistent classes to inherit from nonpersistent classes, persistent classes to inherit from other persistent classes, and nonpersistent classes to inherit from persistent classes. It is even possible to form inheritance hierarchies in which persistence skips generations. There are, however, a few important limitations:
Persistent classes cannot inherit from certain natively implemented system classes such as
java.net.Socketandjava.lang.Thread.If a persistent class inherits from a nonpersistent class, the fields of the nonpersistent superclass cannot be persisted.
All classes in an inheritance tree must use the same identity type. Identifiers will be covered in the next section.
OpenJPA supports three strategies for Inheritance:
Single Table
Joined
Table Per Class
We described each of these in detail in Chapter 3, “Designing Persistent Object Services.”
All JPA providers have to provide an implementation of the Single Table and the Joined strategy. Table Per Class is optional. Single Table mandates all classes in the inheritance hierarchy map into one table. In our book example for OpenJPA, this is our default implementation.
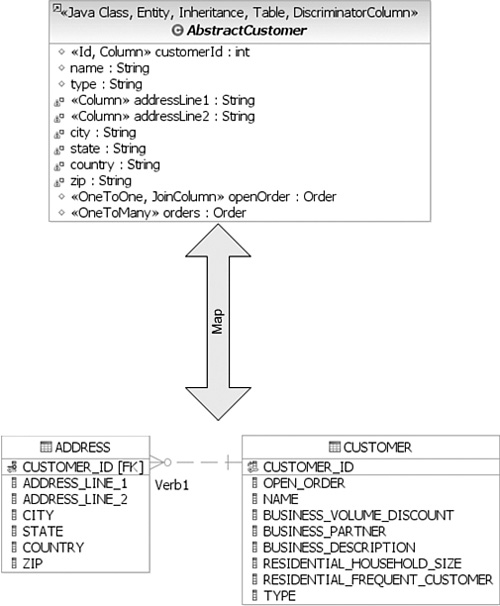
The AbstractCustomer superclass contains a type discriminator. This discriminator will be used to create the correct type at runtime. All the fields are mapped into a single table. Listing 8.30 shows how this mapping would look in OpenJPA.
Example 8.30. Superclass Mapping with a Single Table
@Entity @Inheritance(strategy=SINGLE_TABLE) @Table(name = "CUSTOMER") @DiscriminatorColumn(name="TYPE", discriminatorType = STRING) public abstract class AbstractCustomer implements Serializable { @Id protected int customerId; ....
The subclasses would then specify a discriminator value. Listing 8.31 shows the mapping for ResidentialCustomer (each subclass would have a similar mapping). Notice that you do not have to specify a table mapping because the superclass handles the mapping.
In Listing 8.32, the same mapping is shown in XML. We show it here just to highlight that mappings can be done in XML.
Single table inheritance mapping is the most performant of all inheritance models because it does not require a join to retrieve the persistent data necessary to populate the class hierarchy of a single instance from the database (it still may require a join to retrieve related objects, of course). Similarly, persisting or updating a single persistent instance can often be accomplished with a single INSERT or UPDATE statement. Finally, relations to any other class within a single table inheritance hierarchy are just as efficient as relations to a base class.
However, the larger the inheritance model gets, the “wider” the mapped table gets—in that for every field in the entire inheritance hierarchy, a column must exist in the mapped table. This may have undesirable consequences on the database size, because a wide or deep inheritance hierarchy will result in tables with many mostly empty columns. In addition, changes to any class in the hierarchy would result in changes to the table. This issue is significant because after systems are deployed, it is generally very difficult to change database schemas of existing tables.
The Joined Strategy is really the table per class strategy we discussed in Chapter 3. Here, every class in the inheritance chain gets its own table. Each subclass’s primary key would also be a foreign key to the primary key table.
Listing 8.33 shows the AbstractCustomer with the Inheritance strategy of Joined. Notice it is mapped to an ABSTRACT_CUSTOMER table.
In Listing 8.34, you will notice that the Residential subclass is mapped to its own table. Notice the use of the @PrimaryKeyJoinColumn annotation to link the primary key to the superclass. The Business Customer class will be similar.
Example 8.34. Mapping Subclass with the Joined Strategy
@Entity @Table(name = "RESIDENTIAL_CUSTOMER") @PrimaryKeyJoinColumn(name="CUSTOMER_ID", referencedColumnName="CUSTOMER_ID") public class ResidentialCustomer extends AbstractCustomer implements Serializable { protected short householdSize; protected boolean frequentCustomer;
The joined strategy has the following advantages:
Using joined subclass tables results in the most normalized database schema, meaning the schema with the least spurious or redundant data.
As more subclasses are added to the data model over time, the only schema modification that needs to be made is the addition of corresponding subclass tables in the database (rather than having to change the structure of existing tables).
Relations to a base class using this strategy can be loaded through standard joins and can use standard foreign keys, as opposed to the machinations required to load polymorphic relations to Table-per-Class base types, described next. The joined strategy is often the slowest of the inheritance models, unless provisions are made to “lazily load” levels of the hierarchy. Retrieving any subclass can require one or more database joins, and storing subclasses can require multiple INSERT or UPDATE statements.
The Table-per-Class strategy is what we defined as the Concrete Table Inheritance Strategy in Chapter 3. In this model, each concrete subclass will have its own table, and the superclass information is repeated in each of the tables. Listing 8.35 shows how you would configure the AbstractCustomer superclass with the TABLE_PER_CLASS strategy option. All that is needed is setting the inheritance type because the class is Abstract Class.
Listing 8.36 shows both subclasses, each mapping to its corresponding table.
Example 8.36. Mapping Subclass with Table-per-Class
@Entity @Table(name = "RESIDENTIAL_CUSTOMER") public class ResidentialCustomer extends AbstractCustomer implements Serializable { protected short householdSize; protected boolean frequentCustomer; ... @Entity @Table(name = "BUSINESS_CUSTOMER") public class BusinessCustomer extends AbstractCustomer implements Serializable { protected boolean volumeDiscount; protected boolean businessPartner;
As mentioned in Chapter 3, you need a way to manage the primary keys across the various concrete classes. Some databases support the notion of a sequence to generate keys across tables.
The Table-per-Class strategy is very efficient when operating on instances of a known class. Under these conditions, the strategy never requires joining to superclass or subclass tables. Reads, joins, inserts, updates, and deletes are all efficient in the absence of polymorphic behavior. Also, as in the joined strategy, adding new classes to the hierarchy does not require modifying existing class tables, as is required in the Single-Table strategy.
Polymorphic relations to nonleaf classes in a Table-per-Class hierarchy have many limitations. When the concrete subclass is not known, the related object could be in any of the subclass tables, making joins through the relation impossible. This ambiguity also affects identity lookups and queries; these operations require multiple SQL SELECTs (one for each possible subclass), or a complex UNION.
Table-per-Class inheritance mapping has the following limitations:
You cannot traverse polymorphic relations to nonleaf classes in a Table-per-Class inheritance hierarchy in queries.
You cannot map a one-sided polymorphic relation to a nonleaf class in a Table-per-Class inheritance hierarchy using an inverse foreign key.
You cannot use an order column in a polymorphic relation to a nonleaf class in a Table-per-Class inheritance hierarchy mapped with an inverse foreign key.
Table-per-Class hierarchies impose limitations on eager fetching. We will discuss fetching later in the section on “Tuning Options.”
A more serious issue with the Table-per-Class strategy is what happens when a non-leaf (superclass) in the hierarchy is changed. In this case, every concrete class that inherits from that class—either directly or indirectly—must change. Therefore, you should only use the Table-per-Class strategy when the hierarchy is relatively stable.
Any Entity instance is uniquely identified by an ID in JPA. The ID property is then mapped to the primary key. You can mark a field on your entity as an ID using the @Id annotation. Listing 8.37 shows an example.
It some cases, primary keys need to be generated at Entity Creation Time. OpenJPA supports a number of mechanisms to do this.
JPA includes the GeneratedValue annotation for this purpose. It has the following properties:
GenerationType.AUTO—. The default. Assign the field a generated value, leaving the details to the JPA vendor.GenerationType.IDENTITY—. The database will assign an identity value on insert.GenerationType.SEQUENCE—. Use a datastore sequence to generate a field value.GenerationType.TABLE—. Use a sequence table to generate a field value.
OpenJPA also offers two additional generator strategies for non-numeric fields, which you can access by setting strategy to AUTO (the default), and setting the generator string to one of the following:
uuid-string—. OpenJPA will generate a 128-bit UUID unique within the network, represented as a 16-character string. For more information on UUIDs, see the IETF UUID draft specification at www1.ics.uci.edu/~ejw/authoring/uuid-guid/.uuid-hex—. Same asuuid-string, but represents the UUID as a 32-character hexadecimal string.
Listing 8.38 shows an example of using the Identity mapping. In this case, OpenJPA will defer to the database’s implementation of generating an identity. The Sequence and Identity columns require that your database support these features.
Example 8.38. Generating an ID Using the Identity Strategy
@Entity
@Table(name="ORDERS")
public class Order implements Serializable {
private static final long serialVersionUID = 7779370942277849463L;
@Id
@GeneratedValue(strategy=GenerationType.IDENTITY)
@Column(name="ORDER_ID")
protected int orderId;
protected BigDecimal total;For the Table Generator Strategy, you must define a table in the database. (The OpenJPA documentation contains details on the schema for this table.) Listing 8.39 shows an example of using the Table Strategy. In this case, you define a specific generator that points to a table. Then you point your generated strategy to the table. The Sequence would work in a very similar fashion. Sequence and table generators usually work better when you have to define an ID across several tables. For example, when using the Table-per-Concrete method of mapping Inheritance, all of your subclasses may need to share a common sequence or generator to ensure data integrity across instances.
Example 8.39. Generating an Identity with the Table Strategy
@Entity
@Table(name="CUSTOMER")
public class Customer {
@Id
@GeneratedValue(
strategy=GenerationType.TABLE, generator="AuthorGen"
)
@TableGenerator(
name="AuthorGen", table="AUTH_GEN", pkColumnName="PK",
valueColumnName="AID"
)
@Column(name="AID", columnDefinition="INTEGER64")
private long id;
...
}The JPA specification requires you to declare one or more identity fields in your persistent classes. OpenJPA fully supports this form of object identity, called application identity. OpenJPA, however, also supports datastore identity. In datastore identity, you do not declare any primary key fields. OpenJPA manages the identity of your persistent objects for you through a surrogate key in the database.
You can control how your JPA datastore identity value is generated through OpenJPA’s org.apache.openjpa.persistence.DataStoreId class annotation. This annotation has strategy and generator properties that mirror the same-named properties on the standard javax.persistence.GeneratedValue annotation just described.
To retrieve the identity value of a datastore identity entity, use the OpenJPAEntity Manager.getObjectId(Object entity) method. Listing 8.40 shows an example of using this method.
If you choose to use application identity, you may want to take advantage of OpenJPA’s application identity tool. The application identity tool generates Java code implementing the identity class for any persistent type using application identity. The code satisfies all the requirements the specification places on identity classes. You can use it as-is, or simply use it as a starting point, editing it to meet your needs. Refer to the OpenJPA documentation for more details.
When your entity has multiple identity fields, at least one of which is a relation to another entity, you must use an identity class. You cannot use an embedded identity object. Identity class fields corresponding to entity identity fields should be of the same type as the related entity’s identity.
Your identity class must meet the following criteria:
The class must be public.
The class must be serializable.
The class must have a public no-args constructor.
The names of the nonstatic fields or properties of the class must be the same as the names of the identity fields or properties of the corresponding entity class, and the types must be identical.
The
equalsandhashCodemethods of the class must use the values of all fields or properties corresponding to identity fields or properties in the entity class.If the class is an inner class, it must be
static.All entity classes related by inheritance must use the same identity class, or else each entity class must have its own identity class whose inheritance hierarchy mirrors the inheritance hierarchy of the owning entity classes.
Listing 8.41 shows an example of an ID class that can be used as an Identity. This class can be used then in the find operation as input.
Example 8.41. An ID class in OpenJPA
@Embeddable
public class LineItemId implements Serializable{
private static final long serialVersionUID =
2160402020032769707L;
private int orderId;
private int productId;
//getters and setters
@Override
public int hashCode() {
//calculate hash
}
@Override
public boolean equals(Object obj) {
//implement equals
}
}After you do this, you can use the @IdClass annotation to specify the class, as shown in Listing 8.42. The ID fields on the Entity must match that on the ID class.
Example 8.42. IdClass Annotation Usage
@Entity @Table(name="LINE_ITEM") @IdClass(LineItemId.class) @NamedQuery( name="existing.lineitem.forproduct", query="select l from LineItem l where l.productId = :productId and l.orderId = :orderId" ) public class LineItem implements Serializable { @Id @Column(name="ORDER_ID") private int orderId; @Id @Column(name="PRODUCT_ID") private int productId;
Alternatively, you can use the @EmbeddedId annotation and have the ID class as a member of the entity. This is assuming the ID class is annotated as embeddable, as in Listing 8.40. We will discuss embeddable classes later in the chapter. Listing 8.43 shows an alternative implementation of the LineItem Entity with the EmbeddedId.
The JPA specification limits identity fields to simple types. OpenJPA, however, also allows ManyToOne and OneToOne relations to be identity fields. To identify a relation field as an identity field, simply annotate it with both the @ManyToOne or @OneToOne relation annotation and the @Id identity annotation. Listing 8.44 shows an example of how this looks.
OpenJPA allows you to specify an ID through XML mapping as well. For details, we again refer you to its extensive documentation [OpenJPA 2].
A field on an Entity is a primitive Java type. By default, all fields on an Entity are persistent. Therefore, all you have to do is declare a POJO as an entity and define its Ids. Listing 8.45 shows an example of a persistent Product class.
Alternatively, you can use the @Basic annotation to denote that a field is persistent. That @Basic annotation is usually not used because fields are persistent by default; however, if you need to override the default handling, you can use it. You will see an example later. To map the field to a column, you can use the @Column annotation. An example is shown in Listing 8.46. Notice that you do not have to specify a column annotation for attributes whose name matches that of the column. OpenJPA will map each field to the column with the same name.
You can express the same mappings using XML, as shown in Listing 8.47.
Fields that you do not want to persist can be marked as transient using the @Transient annotation. An example is shown in Listing 8.48. It is left up to the developer to populate this field. We will discuss derived fields later.
The JPA specification defines default mappings between Java Types and Database types. It will handle most basic conversions between Strings and VARCAR and even Strings to number types. The @Column annotation and XML equivalent have additional attributes to customize the mapping.
String name—. The column name. Defaults to the field name.String columnDefinition—. The database-specific column type name. This property is used only by vendors that support creating tables from your mapping metadata. During table creation, the vendor will use the value of thecolumnDefinitionas the declared column type. If nocolumnDefinitionis given, the vendor will choose an appropriate default based on the field type combined with the column’s length, precision, and scale.int length—. The column length. This property is typically used only during table creation, though some vendors might use it to validate data before flushing.CHARandVARCHARcolumns typically default to a length of 255; other column types use the database default.int precision—. The precision of a numeric column. This property is often used in conjunction withscaleto form the proper column type name during table creation.int scale—. The number of decimal digits a numeric column can hold. This property is often used in conjunction withprecisionto form the proper column type name during table creation.boolean nullable—. Whether the column can storenullvalues. Vendors may use this property both for table creation and at runtime; however, it is never required. Defaults totrue.boolean insertable—. By setting this property tofalse, you can omit the column from SQLINSERTstatements. Defaults totrue.boolean updatable—. By setting this property tofalse, you can omit the column from SQLUPDATEstatements. Defaults totrue.String table—. Sometimes you will need to map fields to tables other than the primary table. This property allows you to specify that the column resides in a secondary table. We will see how to map fields to secondary tables later in the chapter.
The JPA specification also helps deal with more complicated mapping like dates. The @Temporal annotation allows you to map a Java Date field to the appropriate database date type. Listing 8.49 shows an example of mapping a Java Date to a TIMESTAMP using the @Temporal annotation.
Example 8.49. Declaring a Date Field to be Temporal
@Entity
@Table(name="ORDERS")
public class Order implements Serializable {
@Id
protected int orderId;
protected BigDecimal total;
protected BigDecimal tax;
@Transient
protected BigDecimal totalAndTax;
@Temporal(TemporalType.TIMESTAMP)
protected java.util.Date orderCreated;OpenJPA also supports mapping fields to CLOB or BLOB columns using the @Lob annotation. Listing 8.50 shows an example of using @Lob to map a JPEG of the picture into a database column.
In Java 5, you can use Enumerations. You can mark your mapping to say which value (ordinal or String) you want to persist. Listing 8.51 shows how you can mark the status enumeration to be treated as the String value in the mapping.
Example 8.51. Declaring Enumerated Field Mapping Types
@Entity
@Table(name="ORDERS")
public class Order implements Serializable {
@Id
@GeneratedValue(strategy=GenerationType.IDENTITY)
@Column(name="ORDER_ID")
protected int orderId;
protected BigDecimal total;
public static enum Status { OPEN, SUBMITTED, CLOSED }
@Enumerated(EnumType.STRING)
protected Status status;The default is Ordinal, but you can change the default value using OpenJPA-specific settings.
JPA supports customizing the fetch option of a field as well. You can fetch any field eagerly (loaded when the object is loaded) versus lazy (loaded when a field is accessed on the managed object). Eager is the default setting. Listing 8.52 shows an example of mapping the JPEG field with a fetch pattern of lazy.
OpenJPA provides an @ExternalValues annotation for extending the default mapping. In addition, you can create custom types. See the OpenJPA documentation for more details.
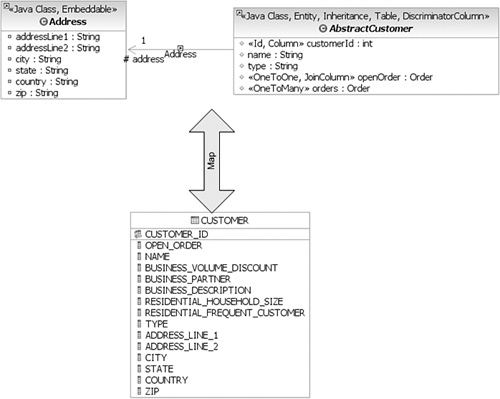
JPA supports contained objects, which are called embedded objects. For example, suppose there is an Address object associated with a Customer object in our domain model, but the database has only the Customer table with the address fields in it. Figure 8.4 shows this mapping.
When creating the Address class, you would annotate it as @Embeddable. You can add column mappings on that class as well. Listing 8.53 shows the Address class.
Example 8.53. Marking an Object as Embeddable
@Embeddable
public class Address implements Serializable{
@Column(name="ADDRESS_LINE_1")
private String addressLine1;
@Column(name="ADDRESS_LINE_2")
private String addressLine2;
private String city;
private String state;
private String country;
private String zip;Then you can declare an address instance as a member of the class and mark it as Embedded, as shown in Listing 8.54.
Example 8.54. Embedding an Embeddable Object
@Entity
@Inheritance(strategy=SINGLE_TABLE)
@Table(name = "CUSTOMER")
@DiscriminatorColumn(name="TYPE", discriminatorType = STRING)
public abstract class AbstractCustomer implements Serializable {
@Id
@Column(name="CUSTOMER_ID")
protected int customerId;
protected String name;
protected String type;
...
@Embedded
protected Address address;The Embedded annotation also allows you to override the mapping in case you want to embed the Address into another object where the column names in the associated relational table are likely different. You would use special override annotations to do this; refer to the OpenJPA specification for more details.
OpenJPA supports the reverse scenario as well—in which you may have a single object but multiple tables. Suppose that this time your domain model has a Customer object with the address information declared as properties rather than as a separate Address object, but in the relational database there were a CUSTOMER table and an ADDRESS table. Figure 8.5 shows the mapping.
In this case, the ADDRESS table’s primary key is also a foreign key to the CUSTOMER table. The mapping for the Customer object will look as shown in Listing 8.55. In JPA, you use the @SecondaryTable annotation to denote the address table. Then you add the table attribute to each @Column annotation you want mapped to the secondary table. You can have several secondary tables allowing you to map several tables that share a primary key to a single object.
Example 8.55. Secondary Table Annotation
@Entity
@Inheritance(strategy=SINGLE_TABLE)
@Table(name = "CUSTOMER")
@SecondaryTable(name="ADDRESS")
@DiscriminatorColumn(name="TYPE", discriminatorType = STRING)
public abstract class AbstractCustomer implements Serializable {
@Id
@Column(name="CUSTOMER_ID")
protected int customerId;
protected String name;
protected String type;
@Column(name="ADDRESS_LINE_1",table="ADDRESS")
private String addressLine1;
@Column(name="ADDRESS_LINE_2",table="ADDRESS")
private String addressLine2;
...OpenJPA supports mapping one-to-one, one-to-many, many-to-one, and many-to-many relationships. It allows relationships to be either unmanaged (unidirectional) or managed (bidirectional). The annotations or XML match the type of relationship: @OneToOne, @OneToMany, @ManyToOne, and @ManyToMany. Without any database mappings, the default mapping will use a naming convention for foreign keys. However, you can specify the keys by using the @JoinColumn, as shown in Listing 8.56. This listing shows an example of a One-to-One relationship between Customers. You can also define the fetch behavior much like you can with a field, and the behavior for operations against the root object. Cascading operations were shown earlier in the chapter.
Example 8.56. One-to-One Relationship
@Entity
@Inheritance(strategy=SINGLE_TABLE)
@Table(name = "CUSTOMER")
@DiscriminatorColumn(name="TYPE", discriminatorType = STRING)
public abstract class AbstractCustomer implements Serializable {
@Id
@Column(name="CUSTOMER_ID")
protected int customerId;
protected String name;
protected String type;
@OneToOne(
fetch=FetchType.EAGER,
cascade = {CascadeType.MERGE,
CascadeType.REFRESH},
optional=true
)
@JoinColumn(name="OPEN_ORDER", referencedColumnName = "ORDER_ID")
protected Order openOrder;In our example, the Customer also has a one-to-many relationship with all the Orders, as shown in Listing 8.57. You will notice that no Join Column is specified. Instead, the mappedBy attribute is used to define a bidirectional relationship.
Example 8.57. One-to-Many Relationship
@Entity
@Inheritance(strategy=SINGLE_TABLE)
@Table(name = "CUSTOMER")
@DiscriminatorColumn(name="TYPE", discriminatorType = STRING)
public abstract class AbstractCustomer implements Serializable {
@Id
@Column(name="CUSTOMER_ID")
protected int customerId;
protected String name;
protected String type;
@OneToOne(
fetch=FetchType.EAGER,
cascade = {CascadeType.MERGE,
CascadeType.REFRESH},
optional=true
)
@JoinColumn(name="OPEN_ORDER", referencedColumnName = "ORDER_ID")
protected Order openOrder;
@OneToMany(mappedBy="customer",fetch=FetchType.LAZY)
protected Set<Order> orders;Listing 8.58 shows the other side of the relationship. The Order has a reference to Customer and it has a many-to-one relationship. Notice it defines all the metadata for the bidirectional relationship.
Example 8.58. Many-to-One Relationship
@Entity
@Table(name="ORDERS")
public class Order implements Serializable {
private static final long serialVersionUID = 7779370942277849463L;
@Id
@GeneratedValue(strategy=GenerationType.IDENTITY)
@Column(name="ORDER_ID")
protected int orderId;
protected BigDecimal total;
public static enum Status { OPEN, SUBMITTED, CLOSED }
@Enumerated(EnumType.STRING)
protected Status status;
@ManyToOne
@JoinColumn(
name="CUSTOMER_ID", referencedColumnName="CUSTOMER_ID"
)
protected AbstractCustomer customer;Listing 8.59 shows Order’s one-to-many relationship to LineItems. This is a unidirectional relationship because LineItem does not have a reference to Order. In this case, notice the use of a special @ElementJoinColumn. This is an OpenJPA extension that allows you to define the metadata for a one-to-many one-way mapping.
Example 8.59. One-to-Many Relationship
@Entity
@Table(name="ORDERS")
public class Order implements Serializable {
// Removing code that is the same as in Listing 8.58
@OneToMany(cascade=CascadeType.REMOVE,fetch=FetchType.EAGER )
@ElementJoinColumn(
name="ORDER_ID", referencedColumnName="ORDER_ID"
)
protected Set<LineItem> lineitems;Another way to map relationships in OpenJPA is through a join table, as described in Chapter 3. This is actually used for many-to-many relationships, but it can also be used for one-to-many and many-to-one relationships. As a matter of fact, join tables are the only implementation of unidirectional one-to-many relationships that the JPA specification demands for compliance. In Chapter 3 we show a PRODUCT_CATEORGY table that defines both keys for the product and category tables. A Product can belong to different categories, and a category groups many products.
Listing 8.60 shows a bidirectional relationship between products and categories.
Example 8.60. Many-to-Many Relationship
@Entity
@NamedQuery(name="product.all",query="select p from Product p")
public class Product implements Serializable {
@Id
@Column(name="PRODUCT_ID")
protected int productId;
protected BigDecimal price;
protected String description;
@ManyToMany
@JoinTable(name="PRODUCT_CATEGORY",
joinColumns={@JoinColumn(name="PRODUCT_ID")},
inverseJoinColumns={@JoinColumn(name="CAT_ID")}
)
protected Collection<Category> categories;
...
@Entity
public class Category implements Serializable {
@Id
protected int CAT_ID;
protected String name;
@ManyToMany(mappedBy="categories")
protected Collection<Product> products;
public int getCAT_ID() {
return CAT_ID;
}
...Collection-based Entities can also be ordered using the @OrderBy annotation, as shown in Listing 8.61.
Example 8.61. Order Constraint
@Entity
@Inheritance(strategy=SINGLE_TABLE)
@Table(name = "CUSTOMER")
@DiscriminatorColumn(name="TYPE", discriminatorType = STRING)
public abstract class AbstractCustomer implements Serializable {
@Id
@Column(name="CUSTOMER_ID")
protected int customerId;
protected String name;
protected String type;
@OrderBy("status")
protected Collection orders;OpenJPA allows you to define constraints on various mappings as well as work with database constraints. Some constraints have special annotations, whereas others are attributes on another annotation. Listing 8.62 shows an example of a unique constraint that declares the field as suitable for a key.
Example 8.62. Unique Constraint
@Entity
@Inheritance(strategy=SINGLE_TABLE)
@Table(name = "CUSTOMER")
@DiscriminatorColumn(name="TYPE", discriminatorType = STRING)
public abstract class AbstractCustomer implements Serializable {
@Id
@Column(name="CUSTOMER_ID")
protected int customerId;
protected String name;
protected String type;
@Unique
protected String ssID;Refer once again to the associated OpenJPA documentation for a list of other constraints supported [OpenJPA 2].
Earlier, we showed that we can make a field transient with annotations in the code or XML mapping file. Often, you need to calculate transient fields based on other persistent fields. To do this properly, you need to know when data is loaded and persisted to manage the state of the object. Although Entities are just POJOs in OpenJPA, you can define Entity Listener methods on the POJO, or attach an EntityListener class to the POJO. Listing 8.63 shows an example of marking a method with the @PostLoad annotation, which causes the method to be invoked after the data is loaded.
Example 8.63. Life Cycle Methods
@Entity
@Table(name="ORDERS")
public class Order implements Serializable {
@Id
protected int orderId;
protected BigDecimal total;
protected BigDecimal tax;
@Transient protected BigDecimal totalAndTax; //Not persisted
@PostLoad
protected void calculateTotal() {
totalAndTax =
total+tax;
}
}As you can see from Listing 8.63, the totalAndTax field will not be set until the object is loaded and the persistent fields have been set.
JPA also supports the following callbacks for life cycle events and their corresponding method markers:
PrePersist—. Methods marked with this annotation will be invoked before an object is persisted. This could be used for assigning primary key values to persistent objects. This is equivalent to the XML element tagpre-persist.PostPersist—. Methods marked with this annotation will be invoked after an object has transitioned to the persistent state. You might want to use such methods to update a screen after a new row is added. This is equivalent to the XML element tagpost-persist.PostLoad—. Methods marked with this annotation will be invoked after all eagerly fetched fields of your class have been loaded from the datastore. No other persistent fields can be accessed in this method. This is equivalent to the XML element tagpost-load.PreUpdate—. This is the complement toPostLoad. While methods marked withPostLoadare most often used to initialize nonpersistent values from persistent data, methods annotated withPreUpdateare normally used to set persistent fields with information cached in nonpersistent data.PostUpdate—. Methods marked with this annotation will be invoked after changes to a given instance have been stored to the datastore. This is useful for clearing stale data cached at the application layer. This is equivalent to the XML element tagpost-update.PreRemove—. Methods marked with this annotation will be invoked before an object transactions to the deleted state. Access to persistent fields is valid within this method. You might use this method to cascade the deletion to related objects based on complex criteria, or to perform other cleanup. This is equivalent to the XML element tagpre-remove.PostRemove—. Methods marked with this annotation will be invoked after an object has been marked as to be deleted. This is equivalent to the XML element tagpost-remove.
You can also externalize the callback methods to a different class using the @EntityListener annotation on the class. Refer to the OpenJPA documentation for more details.
Some vendors allow an option to compile the associated SQL at build time, which can greatly improve performance. Also, it is possible to create named queries that enable specifying the SQL in the external configuration file. The SQL can then be tuned separately from the code.
The JPA specification defines two levels of caching: one that is scoped to the Entity Manager and another that is scoped to the Persistent Unit. The Entity Manager level cache is associated with a current transaction unless you are using the Extended Context—in which you can scope the cache to the life cycle of a Stateful Session Bean. We discussed this life cycle earlier in the “Programming Model” section. The JPA Entity Manager has a flush method you can invoke to clear the cache and push changes to the database.
The Entity Manager cache is there is for keeping data around during a multi-request flow, often called a “conversation;” however, the persistence unit cache is meant to really be a performance booster for read-only or read-mostly data. OpenJPA provides a data-level cache at the persistence unit level. OpenJPA provides a Single JVM cache provider. This may be ideal for read-only data that is initialized during the startup of an application. To use it, you can configure a cache provider on the persistence unit. Listing 8.64 shows an example of configuring the single JVM cache.
Example 8.64. Caching
<persistence-unit name="pie-db-JAVA-SE">
<provider>
org.apache.openjpa.persistence.PersistenceProviderImpl
</provider>
<properties>
<property name="openjpa.MaxFetchDepth" value="5"/>
<property name="openjpa.jdbc.MappingDefaults"
value="StoreEnumOrdinal=false"/>
<property name="openjpa.ConnectionURL"
value="jdbc:derby://localhost:1527/PWTE"/>
<property name="openjpa.ConnectionDriverName"
value="org.apache.derby.jdbc.ClientDriver"/>
<property name="openjpa.jdbc.DBDictionary" value="derby"/>
<property name="openjpa.jdbc.Schema" value="APP"/>
<property name="openjpa.DataCache" value="true"/>
</properties>
</persistence-unit>After you configure the cache, you can configure whichever entity you need to cache. For example, in Listing 8.65 we cache the product data. In the listing, the timeout attribute of the annotation specifies when the provider should invalidate the cache from when the data was first created.
Example 8.65. Life Cycle Methods
import org.apache.openjpa.persistence.DataCache;
@Entity
@NamedQuery(name="product.all",query="select p from Product p")
@DataCache(timeout=6000000)
public class Product implements Serializable {
@Id
@Column(name="PRODUCT_ID")
protected int productId;A.8.4
A single JVM often will not work for read-mostly cases or distributed cache facilities meant to deal with large volumes of data in a distributed fashion to alleviate database contention. There are some distributed cache technologies that specialize in these situations. IBM WebSphere Extended Data Grid [DataGrid] also allows you to work with distributed cache technologies as a second-level cache to OpenJPA, as well as supporting other patterns for using JPA with cached data.
OpenJPA also supports a QueryCache to cache the results of queries so that they can be reused without going back to the database. See the OpenJPA documentation for more details.
OpenJPA supports both eager and lazy loading. We showed in the “Attributes” and “Relationships” sections that you can mark a field or relationship with a fetch type. In addition, OpenJPA supports fetch groups that allow you to link objects that are logically linked together in your application. If you have a class with two lazy fields, but you know in your application that when you load one, you will most likely load the other, you can configure a fetch group. Listing 8.66 shows how to load Customer and LineItem objects together whenever the other is accessed in the context of a lazily loaded Order.
This FetchGroups feature can be very important to minimize the number of round trips to the database at the same time that you minimize the initial load time of an object.
A.8.5
OpenJPA provides both configuring and an API option for affecting the desired locking level. For more details on database locking, see the paper titled “Locking Strategies for Database Access.”
In addition, because OpenJPA supports disconnected patterns, you can use the @Version annotation to map a particular version column to a database. Listing 8.67 shows how simple this task can be.
Remember that when an object becomes disassociated with its EntityManager, it becomes disconnected. When the object is reattached, OpenJPA will check whether the version number has changed in the database before performing the updates. When the JPA runtime detects an attempt to concurrently modify the same record, it throws an exception to the transaction attempting to commit last. This prevents overwriting the previous commit with stale data.
A version field is not always required, but without one, concurrent threads or processes might succeed in making conflicting changes to the same record at the same time.
Now that we have gone through OpenJPA in detail, we will show you the steps required to develop a complete application. To run it yourself, follow the directions in Appendix A, “Setting Up the Common Example.” Keep in mind that Chapter 2, “High-Level Requirements and Persistence,” and Chapter 3, “Designing Persistent Object Services,” describe the requirements and design of our example. This section focuses on the details related to developing OpenJPA applications after you understand the requirements and settle on a design.
When developing an OpenJPA application, you define your objects by coding Java Classes with annotations, and then coding XML mapping files. The following listings show our domain model implemented in Java with OpenJPA annotations being used to specify the mapping metadata. We only show subsets of the classes to illustrate the mapping. You can examine all the code by downloading the sample as shown in Appendix A. Listing 8.68 lists the AbstractCustomer superclass. It is mapped using a Single Table Strategy. Besides the defaulted primitive value fields, we explicitly map the open order field as a one-to-one relationship to the ORDERS table because a Customer object may have at most one open order, and we map the orders field as a one-to-many relationship with respect to the ORDERS table because a Customer might refer to more than one in any state, including open. The orders field is declared a bidirectional relationship, and therefore additional details are defined on the Order side. We also define an Eager fetching strategy, because we want to fetch the open order record whenever the customer is accessed. We use a Lazy option to load the orders collection only when we specifically access the history.
Example 8.68. Abstract Customer
@Entity
@Inheritance(strategy=SINGLE_TABLE)
@Table(name = "CUSTOMER")
@DiscriminatorColumn(name="TYPE", discriminatorType = STRING)
public abstract class AbstractCustomer implements Serializable {
@Id
@Column(name="CUSTOMER_ID")
protected int customerId;
protected String name;
protected String type;
@OneToOne(
fetch=FetchType.EAGER,
cascade = {CascadeType.MERGE,CascadeType.REFRESH},
optional=true
)
@JoinColumn(name="OPEN_ORDER", referencedColumnName = "ORDER_ID")
protected Order openOrder;
@OneToMany(mappedBy="customer",fetch=FetchType.LAZY)
protected Set<Order> orders;
... //Gettters and Setters...
}Listing 8.69 shows the ResidentialCustomer subclass. Notice we used the DiscriminatorValue to determine the type. We described this in the Inheritance section of the template.
Example 8.69. Residential Customer
@Entity
@DiscriminatorValue("RESIDENTAL")
public class ResidentialCustomer
extends AbstractCustomer implements Serializable {
@Column(name="RESIDENTIAL_HOUSEHOLD_SIZE")
protected short householdSize;
@Column(name="RESIDENTIAL_FREQUENT_CUSTOMER")
protected boolean frequentCustomer;
//Getters and Setters...
}Listing 8.70 shows the BusinessCustomer subclass, which is similar to the ResidentialCustomer subclass.
Example 8.70. Business Customer
@Entity
@DiscriminatorValue("BUSINESS")
public class BusinessCustomer extends AbstractCustomer implements Serializable {
@Column(name="BUSINESS_VOLUME_DISCOUNT")
protected boolean volumeDiscount;
@Column(name="BUSINESS_PARTNER")
protected boolean businessPartner;
@Column(name="BUSINESS_DESCRIPTION")
protected String description;
//Getters and Setters...
}Listing 8.71 shows the Order object. We elected to generate the Order ID using the Identity Strategy because this primary key is bound to a single table. We also map a relationship back to the AbstractCustomer using ManyToOne. The detail of this bidirectional relationship is defined on the Order object.
The Order object also has a Set of LineItems for the Order that implements a unidirectional relationship between the Order and LineItem classes. We have no requirement to navigate from a LineItem to an Order; defining a single-sided relationship will make the underlying SQL optimal.
Example 8.71. Order Object
@Entity
@Table(name="ORDERS")
public class Order implements Serializable {
@Id
@GeneratedValue(strategy=GenerationType.IDENTITY)
@Column(name="ORDER_ID")
protected int orderId;
protected BigDecimal total;
public static enum Status { OPEN, SUBMITTED, CLOSED }
@Enumerated(EnumType.STRING)
protected Status status;
@ManyToOne
@JoinColumn(
name="CUSTOMER_ID", referencedColumnName = "CUSTOMER_ID"
)
protected AbstractCustomer customer;
@OneToMany(cascade=CascadeType.REMOVE,fetch=FetchType.EAGER )
@ElementJoinColumn(name="ORDER_ID",referencedColumnName="ORDER_ID"
)
protected Set<LineItem> lineitems;
//getters and setters
}Listing 8.72 shows the LineItem class. You will notice that the LineItem class is a composite key. This choice was made to illustrate how to map to certain legacy schemas. ORM technologies tend to work better with generated keys. The LineItem also has a one-to-one relationship to the Product. This is also a unidirectional relationship because there is no requirement to navigate from a Product instance to the LineItem objects that reference it. Product instances also usually are cached because the product catalog changes infrequently.
Example 8.72. LineItem
@Entity @Table(name="LINE_ITEM") @IdClass(LineItemId.class) @NamedQuery(name="existing.lineitem.forproduct", query="select l from LineItem l where l.productId = :productId and l.orderId = :orderId" ) public class LineItem implements Serializable { @Id @Column(name="ORDER_ID") private int orderId; @Id @Column(name="PRODUCT_ID") private int productId; protected long quantity; protected BigDecimal amount; @ManyToOne(fetch = FetchType.EAGER) @JoinColumns({ @JoinColumn(name="PRODUCT_ID", referencedColumnName = "PRODUCT_ID" )} ) protected Product product; //getters and setters }
Listing 8.73 shows the composite primary key for the LineItem Entity.
Listing 8.74 shows the Product. The Product is a simple class that is mapped to the PRODUCT table. It has no relationships. (Real products usually have many more details and belong to categories and such.) We have added a NamedQuery to the Product annotations to specify a query that retrieves the list of products. As noted previously, we also cache the Product. This example should not be considered complete and is for demonstration purposes only; products in real enterprise systems are usually indexed, categorized, and related to extensive catalog and inventory management systems.
Example 8.74. Product
@Entity
@NamedQuery(name="product.all",query="select p from Product p")
@DataCache(timeout=6000000)
public class Product implements Serializable {
@Id
@Column(name="PRODUCT_ID")
protected int productId;
protected BigDecimal price;
protected String description;
//getters and setters
}We did not employ the option to provide XML mapping files. OpenJPA is meant to reduce the number of artifacts one has to develop. We could have chosen to minimize the annotations and specify the mapping inside XML descriptors. For example, in a real application, we recommend externalizing the cache period and the named query so that the code need not change to modify these parameters.
This section shows the implementation of the Service. For OpenJPA, we provided both an EJB 3 version of the service and a Java SE version. Because EJB 3 Session Beans are Java classes, the Java SE version just extends the proper EJB 3 class and bootstraps the EntityManager as described earlier. Figure 8.6 shows all the exceptions for our services. See the downloadable sample or refer to Chapter 3 for details.
We have two implementations of our service: one for Java SE using OpenJPA and another using IBM JPA (built on OpenJPA) for EJB 3. The interface for the service was introduced in Chapter 3, so refer to the details there. For the EJB 3 version, the service interface has an extra @Local annotation to denote a Local EJB. The service implementations vary slightly from a bootstrapping standpoint with Java SE.
Specifically, the Java SE version of the application looks up the EntityManager using the EntityManagerFactory, as illustrated earlier in Figure 8.3. The EJB 3 version is illustrated earlier in Figure 8.5.
The loadCustomer operation uses the EntityManager find method to look up the customer. Because the mapping file defined the proper eager loading, it will load the customer record, an open order if it exists, and any line items for that order. The Inheritance is also automatic; based on the type, it will return the correct subclass. All this happens with one call. Listing 8.75 shows the loadCustomer method as implemented in the EJB 3 version. The Java SE version uses transaction demarcation. You can examine the downloadable source to see the difference. Appendix A shows how to load the code into your Eclipse-based development environment.
The openOrder operation creates an order Java Object and persists it. It then sets the new order onto the customer instance. The transaction is implied because of the nature of EJBs. The openOrder routine will check if an order is open and throw an exception if it is. Listing 8.76 shows the implementation.
Example 8.76. The openOrder Implementation
public Order openOrder(int customerId)
throws CustomerDoesNotExistException, OrderAlreadyOpenException,
GeneralPersistenceException{
AbstractCustomer customer = loadCustomer(customerId);
Order existingOpenOrder = customer.getOpenOrder();
if(existingOpenOrder != null) {
throw new OrderAlreadyOpenException();
}
Order newOrder = new Order();
newOrder.setCustomer(customer);
newOrder.setStatus(Order.Status.OPEN);
newOrder.setTotal(new BigDecimal(0));
em.persist(newOrder);
customer.setOpenOrder(newOrder);
return newOrder;
}The implementation for the addLineItem operation first checks to see whether the Product exists using the EntityManager find method as seen in the other examples. It then queries to check whether a Line Item already exists, and updates the quantity if it does. Otherwise, it creates a new instance. Again, the transaction is implied due to the EJB 3 method. Listing 8.77 shows the implementation of addLineItem.
Example 8.77. The addLineItem Implementation
public LineItem addLineItem(
    int customerId,
    int productId,
    long quantity)
throws CustomerDoesNotExistException,
       OrderNotOpenException,
       ProductDoesNotExistException,
       GeneralPersistenceException,
       InvalidQuantityException {
    Product product = em.find(Product.class,productId);
    if(quantity <= 0 ) throw new InvalidQuantityException();
    if(product == null) throw new ProductDoesNotExistException();
    AbstractCustomer customer = loadCustomer(customerId);
    Order existingOpenOrder = customer.getOpenOrder();
    if(existingOpenOrder == null) {
        throw new OrderNotOpenException();
    }
    BigDecimal amount = product.getPrice().multiply(
        new BigDecimal(quantity)
    );
    existingOpenOrder.setTotal(
        amount.add(existingOpenOrder.getTotal())
    );
    LineItemId lineItemId = new LineItemId();
    lineItemId.setProductId(productId);
    lineItemId.setOrderId(existingOpenOrder.getOrderId());
    LineItem existingLineItem = em.find(LineItem.class,lineItemId);
    if(existingLineItem == null) {
        LineItem lineItem = new LineItem();
        lineItem.setOrderId(existingOpenOrder.getOrderId());
        lineItem.setProductId(product.getProductId());
        lineItem.setAmount(amount);
        lineItem.setProduct(product);
        lineItem.setQuantity(quantity);
        em.persist(lineItem);
        return lineItem;
    }
    else {
        existingLineItem.setQuantity(
            existingLineItem.getQuantity() + quantity
        );
        existingLineItem.setAmount(
            existingLineItem.getAmount().add(amount)
        );
        return existingLineItem;
    }
}
The removeLineItem operation simply deletes the LineItem by finding the record and removing it. Listing 8.78 shows the implementation.
Example 8.78. The removeLineItem Implementation
public void removeLineItem(
    int customerId,
    int productId
)
throws CustomerDoesNotExistException,
       OrderNotOpenException,
       ProductDoesNotExistException,
       NoLineItemsException,
       GeneralPersistenceException {
    Product product = em.find(Product.class,productId);
    if(product == null) throw new ProductDoesNotExistException();
    AbstractCustomer customer = loadCustomer(customerId);
    Order existingOpenOrder = customer.getOpenOrder();
    if(existingOpenOrder == null ||
       existingOpenOrder.getStatus() != Order.Status.OPEN)
        throw new OrderNotOpenException();
    LineItemId lineItemId = new LineItemId();
    lineItemId.setProductId(productId);
    lineItemId.setOrderId(existingOpenOrder.getOrderId());
    LineItem existingLineItem = em.find(LineItem.class,lineItemId);
    if(existingLineItem != null) {
        em.remove(existingLineItem);
    }
    else {
        throw new NoLineItemsException();
    }
}
The submitOrder operation is almost as simple—it changes the status of the order and removes it from the openOrder property of the abstract customer class. Listing 8.79 shows the submitOrder implementation.
Example 8.79. The submitOrder Implementation
public void submit(int customerId)
throws CustomerDoesNotExistException, OrderNotOpenException,
       NoLineItemsException,
       GeneralPersistenceException {
    AbstractCustomer customer = loadCustomer(customerId);
    Order existingOpenOrder = customer.getOpenOrder();
    if(existingOpenOrder == null ||
       existingOpenOrder.getStatus() != Order.Status.OPEN)
        throw new OrderNotOpenException();
    if(existingOpenOrder.getLineitems() == null ||
       existingOpenOrder.getLineitems().size() <= 0 )
        throw new NoLineItemsException();
    existingOpenOrder.setStatus(Order.Status.SUBMITTED);
    customer.setOpenOrder(null);
}The environment you deploy to will affect how the application is packaged. A Java SE environment may require you to copy files, or package the code into a JAR. You most likely have to write some deployment scripts. Figure 8.7 shows the Java Project in Eclipse. It is a plain Java Project with the persistence.xml defined in the meta-inf directory. The persistence.xml is necessary to obtain the connection.
In a Java EE application, you usually have to package an application in an EAR file. Figure 8.8 shows the layout of the EAR file, which is made up of other files, such as EJB-JAR files for EJBs or WAR files for web applications. See the Java EE specification for details. Notice that we can use the same Java SE JAR as an EJB 3 module as well.
The persistence.xml file is packaged in the meta-inf directory and contains our persistence units. We illustrated the format earlier. As with the operation implementations, you can examine the downloadable source for more details.
Depending on the methodology, you may have coded your unit test before or after implementing the service operations. Agile methods usually push a test-driven approach and encourage coding test cases first. Regardless, our OpenJPA example contains the unit test to run the application. Figure 8.9 shows the Unit Test project for the common example.
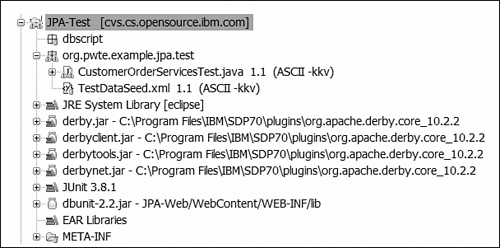
Chapter 3 explains the aspects of the unit test that are the same regardless of the persistence mechanism used (as it should be). The only difference with OpenJPA is that we also provide the option to look up the Session Bean in the Java EE case and use JUnitEE to run it. There is no JPA-specific information within the unit test, but there is EJB information. As long as you have the Java EE API JARs, this unit test can run in both a Java SE environment and a standard Java EE environment. Examine the downloadable source for details and Appendix A for instructions on how to run them.
Deploying to production involves setting the proper configuration values for the target environment. Other than the common testing needed to move an application to production, there are no additional considerations other than those already specified in this section. In a Java SE environment, you have to run the bytecode enhancer yourself. In a Java EE container, like WebSphere Application Server, the bytecode enhancer is run automatically when the installation tools are run, so it will not be an explicit step.
OpenJPA is a very capable persistence technology. In addition to providing much function, it is based on a standard. Products like WebSphere Application Server provide enhanced versions of OpenJPA, and caching technologies like ObjectGrid can provide enterprise-quality applications. In this chapter, we showed you how to code against the OpenJPA APIs, map entities, and configure the system for your applications. The OpenJPA documentation can provide you with many more details. In addition, we showed you how to implement the services from the common example.
The JPA 2.0 specification was being written at the time of this writing. Some extensions from OpenJPA, Hibernate, and others may eventually be included in the specification. The Specification group is looking at the following items:
Expanded object/relational mapping functionality, including greater flexibility in combining existing mapping options, support for collections of embedded objects, multiple levels of embedded objects, ordered lists, combinations of access types, and so forth.
Additions to the Java Persistence query language.
An API for “criteria” queries. Hibernate contains a Criteria API we covered in the previous chapter.
Standardization of sets of “hints” for query configuration and for Entity Manager configuration.
Standardization of additional metadata to support DDL generation and “Java2DB” mapping.
Expanded pluggability contracts to support efficient passivation and replication of extended persistence contexts in Java EE environments.
Standardization of additional contracts for entity detachment and merge, and persistence context management.
Support for validation.
You should keep an eye on the progress of this specification and see which of these features actually get added to the standard.
Building EJB 3.0 applications with WebSphere Application Server | |
This article shows you how to create EJB 3 style applications with IBM’s JPA provider, which is built on OpenJPA. | |
www.ibm.com/developerworks/websphere/techjournal/0712_barcia/0712_barcia.html2007 | |
A.8.2 | Leveraging OpenJPA with WebSphere Application Server |
This article discusses configuring Apache OpenJPA with WebSphere Application Server version 6.1 when the EJB 3 Feature Pack is present. | |
www.ibm.com/developerworks/websphere/techjournal/0612_barcia/0612_barcia.html | |
A.8.3 | Migrating legacy Hibernate Applications to OpenJPA and EJB 3 |
This article discusses best practices for migrating a Hibernate Core Application to OpenJPA | |
www.ibm.com/developerworks/websphere/techjournal/0708_vines/0708_vines.html | |
A.8.4 | Build Grid-Ready Apps with ObjectGrid |
Tutorial on building application for IBM ObjectGrid (renamed WebSphere XD DataGrid) | |
A.8.5 | Locking Strategies for Database Access |
Excellent paper on database locking. | |
www.ibm.com/developerworks/websphere/techjournal/0603_ilechko/0603_ilechko.html |