This book comes with sample code (available on the book’s companion website) that implements the common example used throughout the technology evaluation chapters, 5-9. This appendix will show you how to set up and run the example for each persistent technology. In addition, this appendix documents how to set up Apache Derby with the schema for the common example, how to import each sample into a Java Eclipse Development Environment, and how to run the Unit Test to test our persistence action.
We must begin with a caveat: This appendix and the links necessary to download materials were accurate at the time we went to press. However, there is no guarantee that the links will still be active when you are reading this. If you find that links are broken, try to use a popular search engine from your browser to find the materials.
We also need to mention that we treat some references a bit differently in this appendix than we do in the other chapters. Because this appendix is basically a checklist you need to follow, we include links associated with instruction steps directly in the text—to keep you from getting the “whiplash” that can occur from jumping back and forth. Where we do have references to material that provides extra background or details that may be of interest to some of you, we will treat them in the usual way.
In this section, we give a brief overview of other technologies we used to run the example. Specifically, we discuss the database we used, Apache Derby. We briefly talk about the Eclipse platform as an IDE, and we discuss JUnit and DbUnit.
Apache Derby is an open-source, standards-based database written purely in Java. Its diminutive footprint makes it especially attractive for development testing. The database system is based on technology donated to the Apache Software Foundation by IBM. The database is released under the Apache Derby project.
Apache Derby traces its roots back to 1996, when Cloudscape, Inc. embarked on the task to build a database server written in the Java language. As history would have it, a year later, Cloudscape, Inc. produced its first database release, called JBMS. Shortly after, that database was named Cloudscape®. In 1999, Cloudscape, Inc. was acquired by Informix® Software Inc. IBM bought Informix in 2001, and the IBM Cloudscape found its way into a number of IBM middleware products as an embedded database engine. IBM donated the Cloudscape database to the Apache Software Foundation in April 2004. That event marked the birth of the Apache Derby project. In July 2005, the Derby project hatched from the Apache incubator and is now a subproject of the “DB” top-level project at Apache. Sun Microsystems joined the Derby project right before Derby graduated from incubation. In December 2006, with the release of Java 6, Sun started packaging Derby in the JDK as Java DB.
Apache Derby is ideal for development and proof of concept efforts. Apache Derby’s ease of use and small footprint were some of the key motivators for using it as the testbed of examples in this book.
Eclipse is an extensible open-source IDE (Integrated Development Environment). The Eclipse Project was launched in November 2001, when IBM donated $40 million worth of source code derived from its WebSphere Studio Workbench. The tandem combination of the Eclipse platform combined with the Java Development Tools (JDT) produced by the Eclipse Project yields an IDE that has gained great respect throughout the Java development community. Most of IBM’s modern suite of application development tools, including Rational Application Developer, Rational Software Architect, and the WebSphere Application Server Toolkit, are built on top of the Eclipse Platform.
For this book, the familiarity of much of the Java development community with Eclipse was our motivator for choosing it as the IDE for development. Of course, there is nothing binding you to use a particular IDE (or any at all, for that matter). You could opt to be a purist and stick to the command line. Of course, you can also mow your lawn with a pair of scissors. We just don’t find it to be very efficient.
JUnit [Junit] is a unit-testing framework for the Java programming language that we explained briefly in Chapter 3, “Designing Persistent Object Services.” Because JUnit and DbUnit are so important to the setup, we feel the information is worth repeating.
Created by Kent Beck and Erich Gamma, JUnit is one of, and arguably the most successful of, the xUnit family of frameworks that originated with Kent Beck’s SUnit. JUnit has spawned its own ecosystem of JUnit extensions. “JUnit” is also a synonym for unit tests in general, as in, “Did you run the junits before you checked in?”
Experience gained with JUnit has been important in the development of test-driven development, and as a result, some knowledge of JUnit is often presumed in discussions of agile test-first approaches—for example, in the book Test-Driven Development: By Example [Beck].
One extension of JUnit is DbUnit [DbUnit]. DbUnit is a JUnit extension targeted for database-driven projects that, among other things, puts your database into a known state between test runs. This is an excellent way to avoid the myriad of problems that can occur when one test case corrupts the database and causes subsequent tests to fail or exacerbate the damage. DbUnit is an open-source framework created by Manuel Laflamme.
DbUnit has the capability to export and import your database data to and from XML datasets. Since version 2.0, DbUnit can work with very large datasets when used in streaming mode. DbUnit can also help you verify that your database data matches the expected set of values.
In our common example, we use JUnit and DbUnit to test our Service Interface.
Download PWTE.zip from the book website, ibmpressbooks.com/title/9780131587564.
Once unpacked, the zip file includes the directory structure shown in Figure A.1.

The examples require a Java 5.0 development environment. A Java 5.0 development kit can be acquired from the following online resources:
Acquire and install the Apache Derby Core and UI plug-ins for Derby 10.2 or later from the following website:
In this section, we give you step-by-step instructions on how to load the source code for each of the technologies and how to run the unit test. We assume that you will read the chapters that accompany each technology for an understanding of the application. We also assume that you have set up the prerequisites in the preceding section.
This section walks you through importing the code for the various technologies that run in a Java SE application. From your Eclipse workspace you will import the JDBC Project into your Eclipse workspace. You can right-click from the Project or Package Explorer and select Import, as shown in Figure A.2.

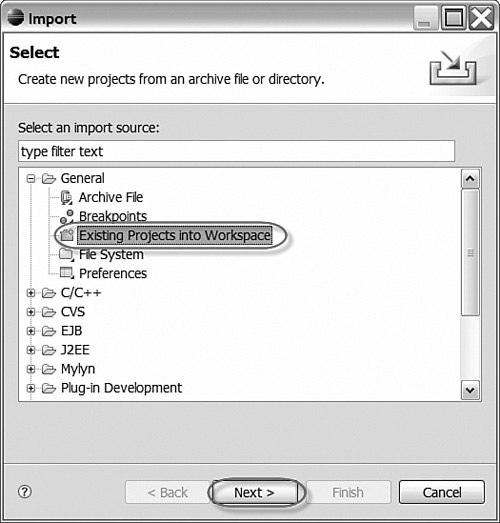
Select Existing Projects into Workspace, as shown in Figure A.3, and then click Next.
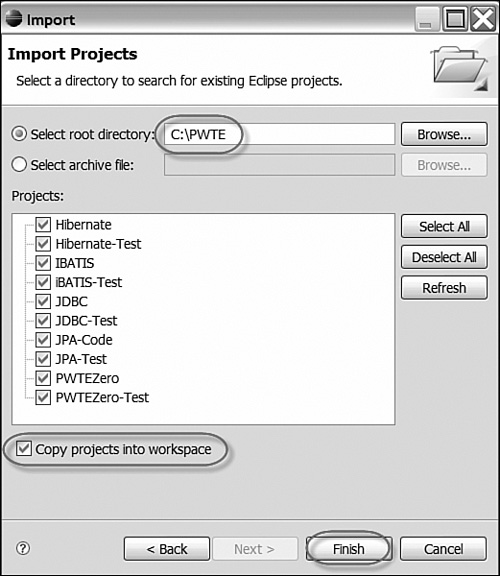
Inside the Import Projects screen, the root directory should be <Location to where you extracted the Zip>/PWTE, as shown in Figure A.4. Select all the projects under Projects. Ensure that the Copy Projects into Workspace option is selected. Click Finish.
The Test Projects depend on DbUnit. All Test Projects except for Project Zero (we will configure that one later) have an Eclipse User Library configured for DbUnit. Right-click on the DbUnit folder and select Configure, as shown in Figure A.5, for the JDBC-Test, iBatis-Test, Hibernate-Test, and JPA-Test.

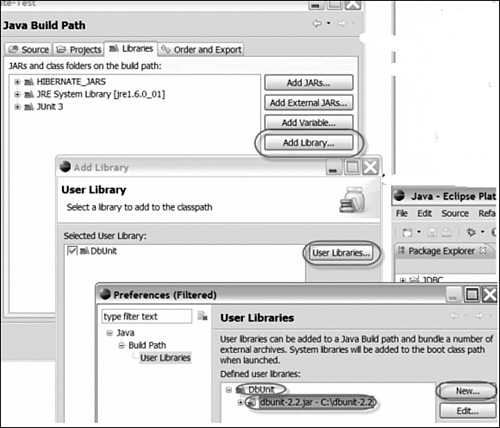
Click the User Libraries button. Then select DbUnit and click Add Library, as shown in Figure A.6. There you can add the dbunit-2.2.jar file that you downloaded from the DbUnit site discussed in the section “Setting Up the Prerequisites.”
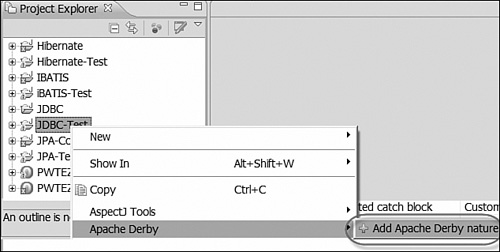
Next, right-click on JDBC-Test (or any Test Project) project and select Apache Derby, Add Apache Derby Nature, as shown in Figure A.7.
Right-click the project again and select Apache Derby, Start Derby Network Server, as shown in Figure A.8.
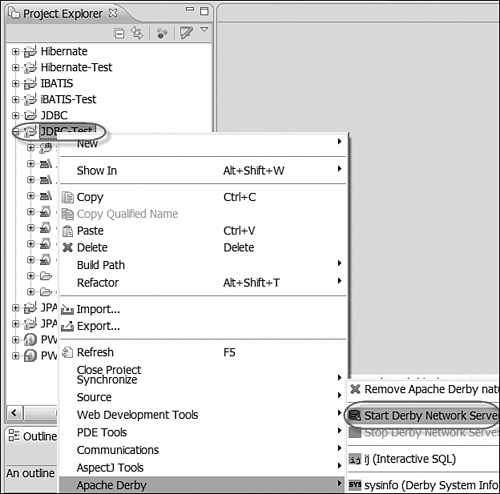
The Console should display the Apache Derby Network Server with a status showing it as started.
Under the JDBC-Test Project, expand the dbscript folder and right-click on schema-1.4.sql. Select Apache Derby, Run SQL Script Using “ij”. As a brief explanation, ij is the command-line tool for Derby that runs the SQL scripts. The step shown in Figure A.9 will create the necessary tables for the common example applications.
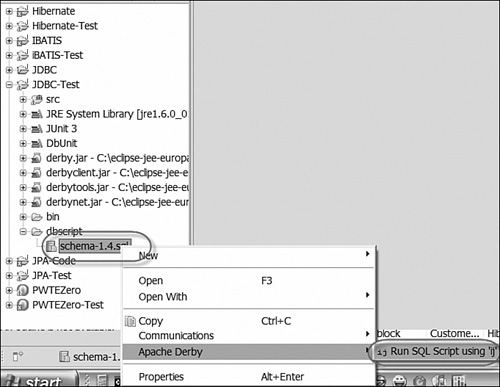
The console should display the result of the table it creates. There will likely be some errors the first time you run a script because the script will attempt to delete the tables in case they existed already. Do not worry too much about any delete errors you see. This extra delete step makes the script more robust so that it can be run in any state to initialize the database tables.
From the Package Explorer, in the Java Perspective, expand the src folder. Expand the Java package com.pwte.example.jdbc.test. Right-click on CustomerOrderServices Test.java and select Run As, then JUnit Test, as shown in Figure A.10.
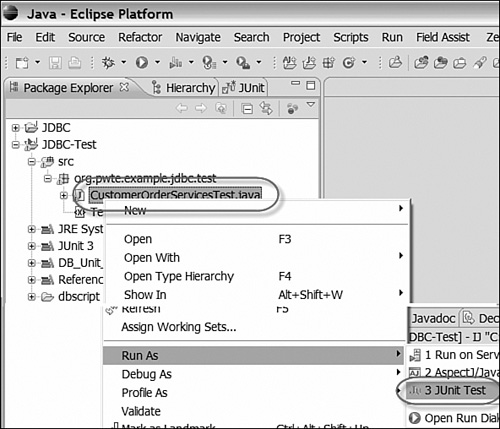
The JUnit View should open and display six successful JUnit results, as shown in Figure A.11.

This section walks you through running the application for the iBATIS application shown in Chapter 6, “Apache iBATIS.” You need to download version 2.3 of iBATIS from here: ibatis.apache.org/javadownloads.cgi.
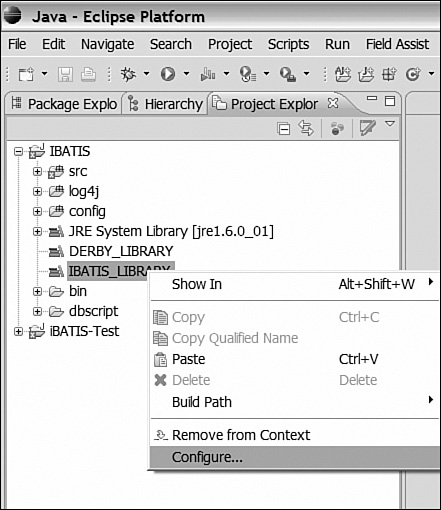
You need to add your dependency to iBATIS. Expand the iBATIS Project. From the Project Explorer, right-click IBATIS_LIBRARY and select Configure, as shown in Figure A.12.
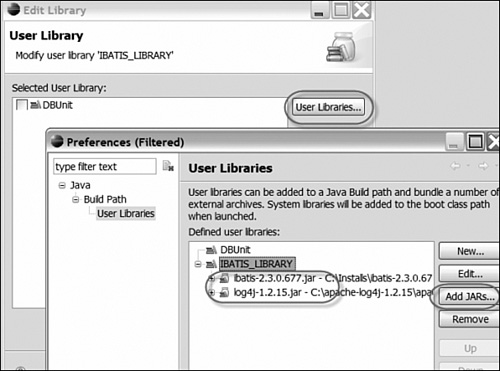
Click the User Libraries button. Then select the DbUnit and click Add JARs, as shown in Figure A.13. There you can add the ibatis-2.3.0.xxx.jar and log4j-1.2.15.jar files that you downloaded from the ibatis site shown in the beginning of this section.
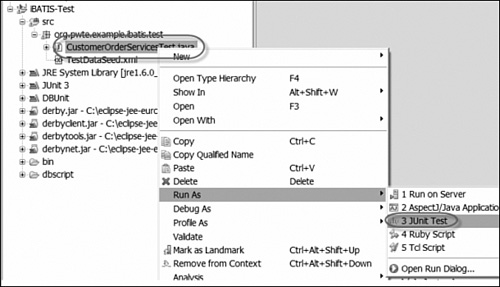
From the Package Explorer, in the Java Perspective, expand the src folder. Expand the Java package com.pwte.example.ibatisc.test. Right-click on CustomerOrderServices Test.java and select Run As, then JUnit Test, as shown in Figure A.14.
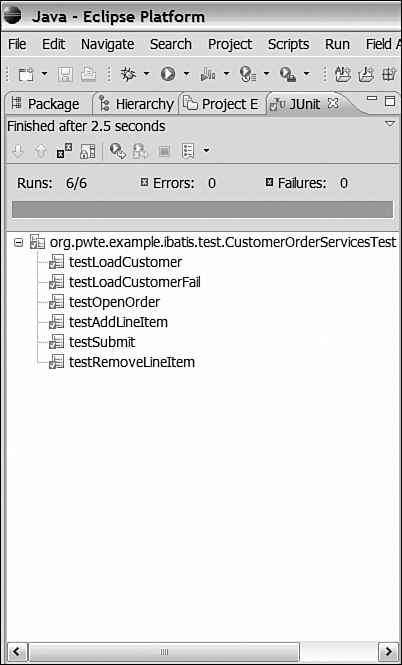
The JUnit View should open and display six successful JUnit results, as shown in Figure A.15.
This section walks you through setting up the code and application for the JDBC application shown in Chapter 7, “Hibernate Core.” You need to download Hibernate 3.2 from here: sourceforge.net/project/showfiles.php?group_id=40712&package_id=127784&release_id=529023.
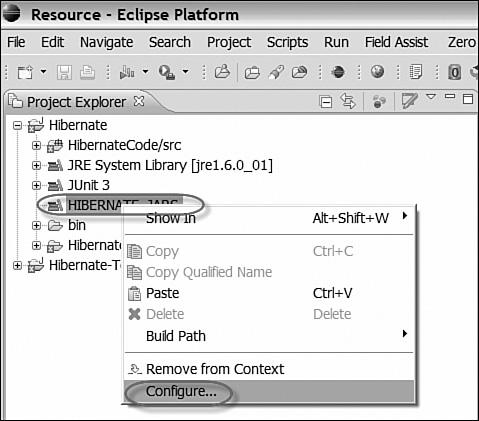
You need to add your dependency to Hibernate. Expand the Hibernate Project. From the Project Explorer, right-click HIBERNATE_JARS and select Configure, as shown in Figure A.16.
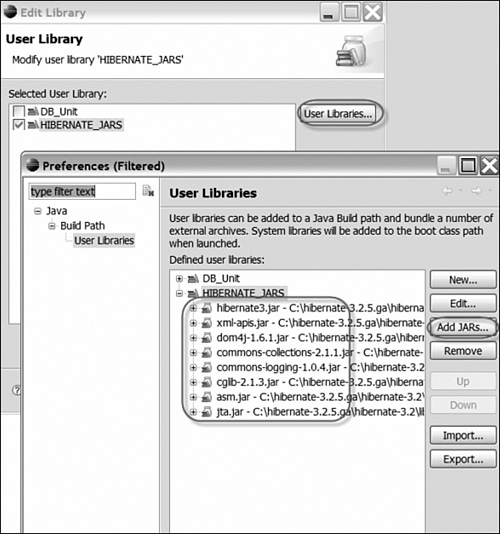
Click the User Libraries button. Then select HIBERNATE_JARS and click Add JARs, as shown in Figure A.17. Add the following JARs (available as part of the Hibernate distribution):
hibernate3.jarxml-apis.jardom4j-1.6.1.jarcommon-collections-2.1.1.jarcommons-logging-1.0.4.jarcglib-2.1.3.jarasm.jarjta.jar
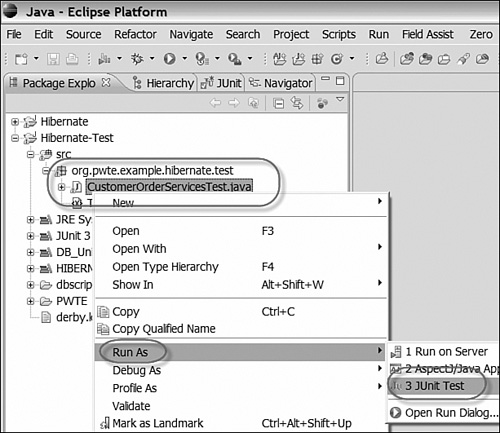
From the Package Explorer, in the Java Perspective, expand the src folder. Expand the Java package com.pwte.example.hibernate.test. Right-click on CustomerOrderServices Test.java and select Run As, then JUnit Test, as shown in Figure A.18.
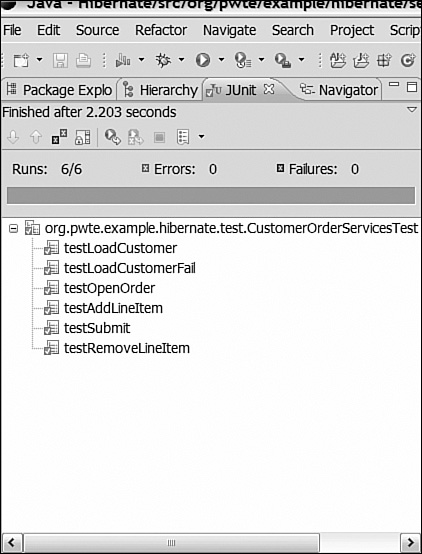
The JUnit View should open and display six successful JUnit results, as shown in Figure A.19.
This section walks you through setting up the code and running the application for the OpenJPA application in Chapter 8, “Apache OpenJPA.” This is the Java SE version. The next section shows you how to run the Java EE version. To do this, you first need to download version 1.0.1 of OpenJPA from here:
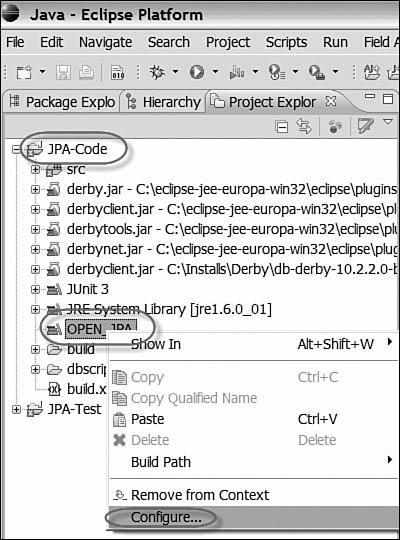
You need to add your dependencies to OPEN_JPA. Expand the OpenJPA Project. From the Project Explorer, right-click OPEN_JPA and select Configure, as shown in Figure A.20.
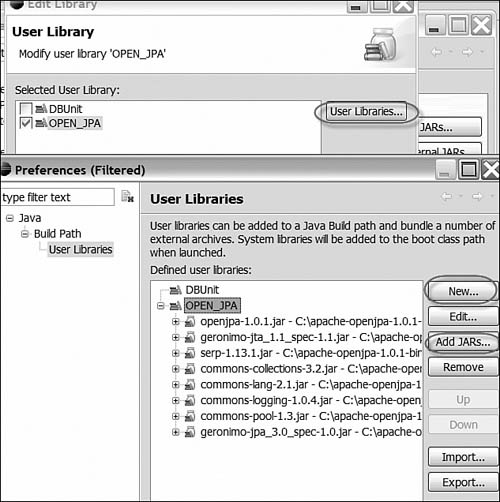
Click the User Libraries button. Then select OPEN_JPA and click Add JARs, as shown in Figure A.21. Add the following JARs (available as part of the Open distribution):
openjpa-1.0.1.jargeronimo-jta_1.1_spec-1.1.jarserp-1.13.1.jarcommons-collections-3.2.jarcommons-lang-2.1.jarcommons-logging-1.0.4.jarcommons-pool-1.3.jargeronimo-jpa_3.0_spec_1.0.jar
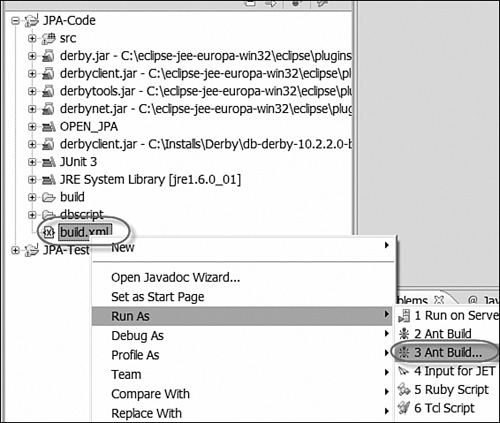
OpenJPA needs bytecode enhancement of the persistent classes, as described in Chapter 8, to the persistent classes. We provided a build script that runs the enhancer. Right-click the build.xml file, as shown in Figure A.22, and select Run As, then Ant Build (the second option with the 3).
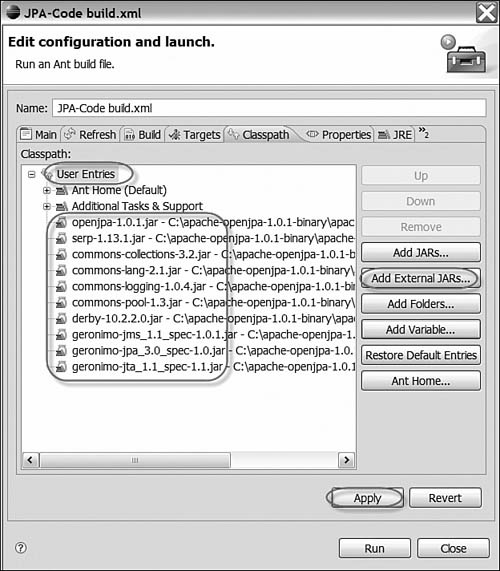
Click on the Classpath tab and add the OpenJPA JARs included in the distribution, as shown in Figure A.23.
Under the Targets tab, select Enhance. Then click Run, as shown in Figure A.24.
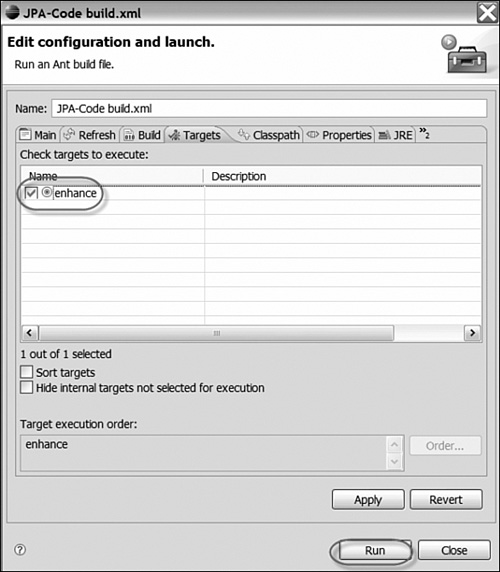
The console should display the results, as shown in Figure A.25.

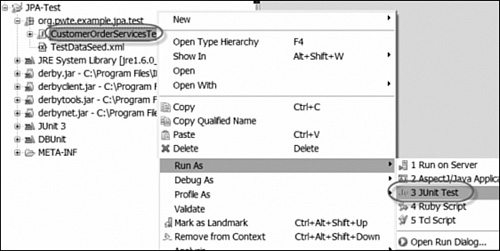
From the Package Explorer, in the Java Perspective, expand the src folder. Expand the Java package com.pwte.example.jdbc.test. Right-click on CustomerOrderServices Test.java and select Run As, then JUnit Test, as shown in Figure A.26.
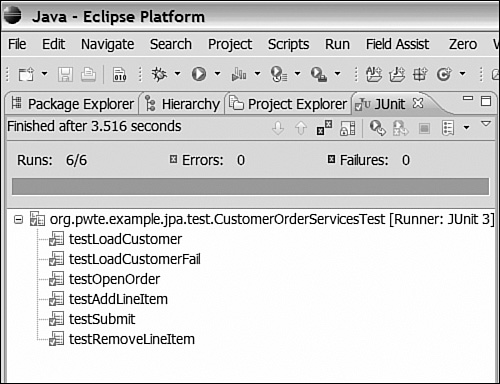
The JUnit View should open and display six successful JUnit results, as shown in Figure A.27.
This section walks you through setting up the code and running the application for the Project Zero application shown in Chapter 9, “pureQuery and Project Zero,” utilizing the pureQuery technology.
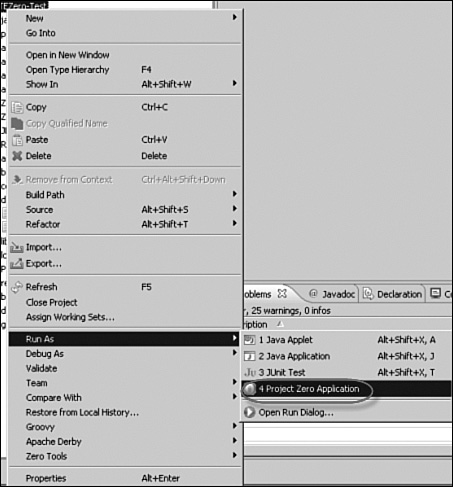
Install the M1 release to work with the sample, right-click the PWTEZero-Test application, and select Run As, then Project Zero Application, as shown in Figure A.28.
Enter the following address into a browser:
localhost:8080/resources/ZeroTestRunner?format=html
The result should be a page that successfully runs the unit tests, as shown in Figure A.29.
Stop the database.
This section walks you through setting up the code and running the application for the OpenJPA application, shown in Chapter 8, inside a Java EE. Unlike in the preceding section, we will use Rational Application Developer version 7.5, which is in beta. You can download the Open Beta for Rational Application Developer here:
Rational Application Developer comes with WebSphere Application Server 6.1 with the EJB 3 Feature Pack preconfigured. (The installation instructions are available on the site.) After you have it installed, follow the directions that follow.
You can right-click from the Project or Package Explorer and select Import.
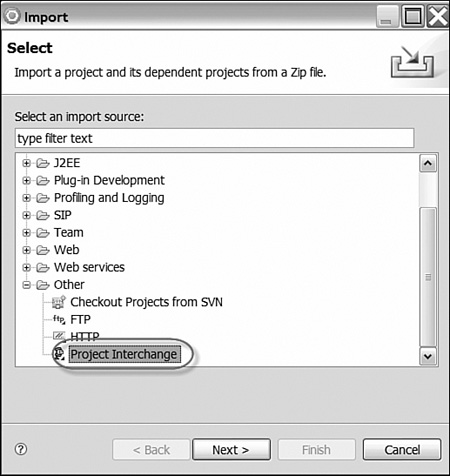
Select Project Interchange under the Other folder, as shown in Figure A.30.
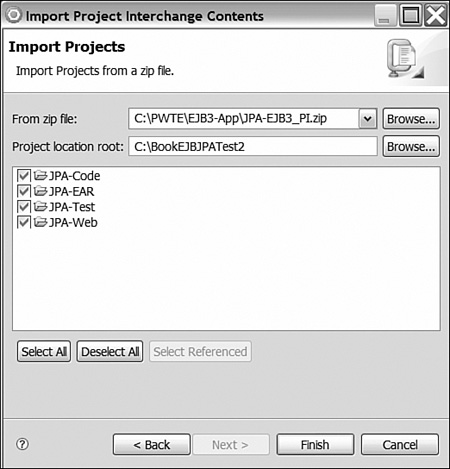
Enter <place where you unzipped download>/PWTE/EJB3-App/JPA-EJB3_PI.zip and select the four projects, as shown in Figure A.31.
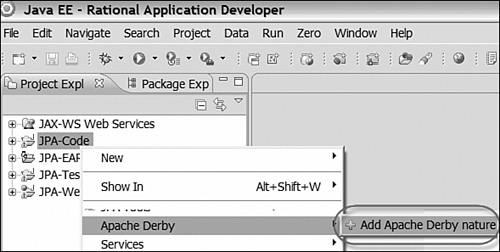
Next, right-click on the JPA-Code project and select Apache Derby, Add Apache Derby Nature, as shown in Figure A.32.
Right-click the Project again and select Apache Derby, then Start Derby Network Server, as shown in Figure A.33.

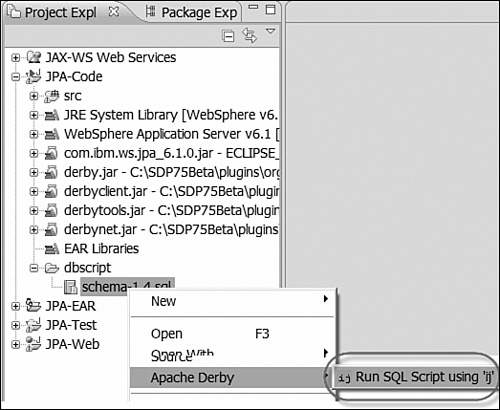
Under the JPA-Code Project, expand the dbscript folder and right-click on schema-1.4.sql. Select Apache Derby, then Run SQL Script Using “ij”. (As noted previously, ij is the command-line tool for Derby that runs the SQL scripts. This will create the necessary tables for creating the example.) Figure A.34 shows the example.
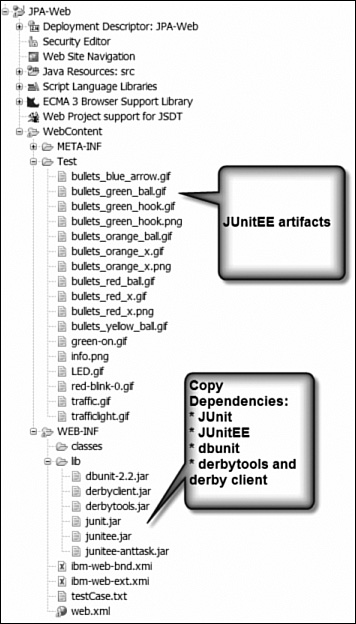
The unit tests run inside of a Java EE Container. To run the tests, copy the dependencies shown in Figure A.35 into the directories shown (JUnit 3.8, JUnit EE, Derby client and tools, and DbUnit).
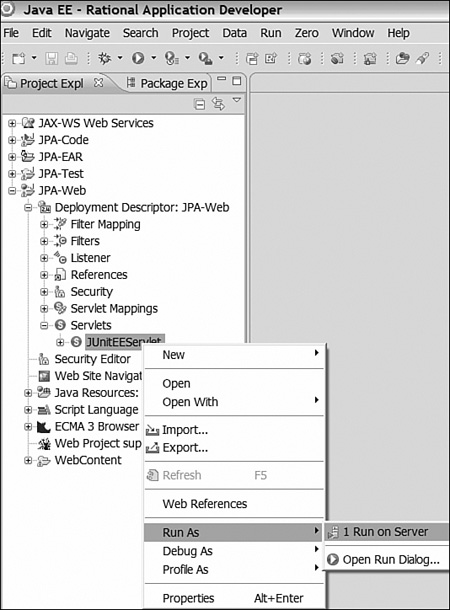
Next, you will run the application in the Server. You can do this by expanding the JPA-Web project from the Project Explorer as shown in Figure A.36. Right-click on the JUnitEEServlet and select Run As, then Run on Server.
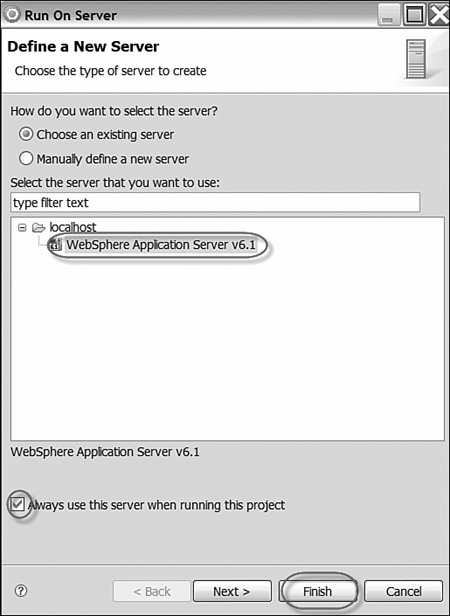
From within the Run on Server Wizard, shown in Figure A.37, check the Always Use This Server When Running This Project option (this will keep you from repeating this test on subsequent runs).
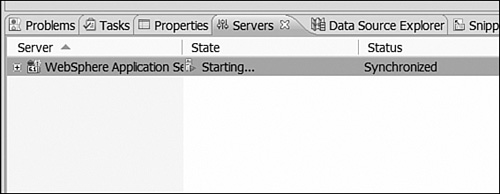
The Servers View should show a State of Starting, as shown in Figure A.38.
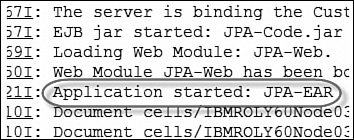
Examine the console to ensure that the Server starts and the application is started, as shown in Figure A.39.
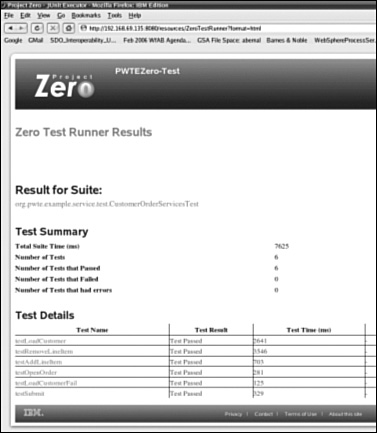
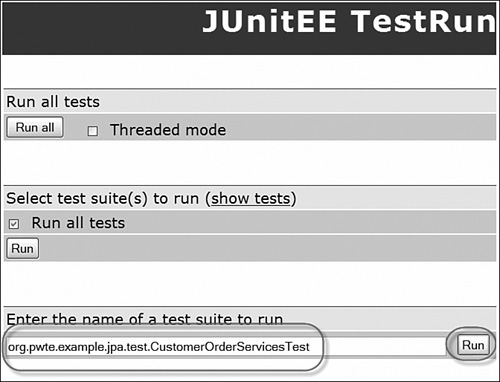
RAD 7.5 should load a browser with the JUnit EE Servlet to run the test case from within the container. Enter the test class (org.pwte.example.jpa.test.CustomerOrderServices Test) in the Test Suite section, as shown in Figure A.40.
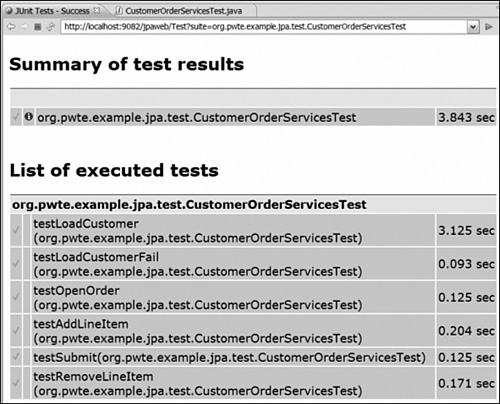
The test cases should run and the results displayed as shown in Figure A.41.
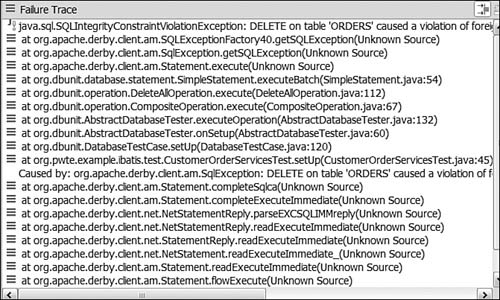
If the unit test cases fail due to a violation, it is most likely because of a previous failure in running the test cases causing the data to be in an inconsistent state. If you rerun the database script to drop and re-create the tables, it should remove this issue and bring you back to a consistent state. Figure A.42 shows an example.