
A very common technique in computer graphics called alpha blending is used to make whole objects, or only parts of them, appear translucent. In this recipe you will learn how to add an additional texture layer, an alpha mask, which controls the opacity of an object.
This recipe uses Setting up the game structure found in Chapter 1 as a starting point on which the rest of the sample will be built. Please revisit this recipe to set things up before proceeding.
Analogous to the models and sounds directories, you need to add a directory called textures and add it to Panda3D's asset search path.
You will need two texture images—one that contains the color information and an additional grayscale texture that controls opacity. The color texture will simply be mapped onto our model, while the grayscale image will be used to determine the translucency of each color texture pixel. The whiter the pixel in the grayscale opacity map, the more opaque it will be rendered. Gray and black pixels cause the according parts of the color map to be rendered more translucent. This example uses the following two textures:

Complete these tasks to create the sample application:
- Copy your texture files to the
texturesdirectory and rename the color texture totexture.pngand the grayscale texture tomask.png. - Copy the following code to
Application.py:from direct.showbase.ShowBase import ShowBase from panda3d.core import * class Application(ShowBase): def __init__(self): ShowBase.__init__(self) self.box = self.buildCube(2) tex = loader.loadTexture("texture.png", "mask.png") self.box.setTexture(tex) self.box.setTransparency(TransparencyAttrib.MAlpha, 1) self.box.setTwoSided(1) self.cam.setPos(10, -10, 10) self.cam.lookAt(0, 0, 0) def buildCube(self, size): center = render.attachNewNode("cubeCenter") cm = CardMaker("plane") cm.setFrame(-size, size, -size, size) front = center.attachNewNode(cm.generate()) front.setY(-size) back = center.attachNewNode(cm.generate()) back.setY(size) back.setH(180) left = center.attachNewNode(cm.generate()) left.setX(-size) left.setH(270) right = center.attachNewNode(cm.generate()) right.setX(size) right.setH(90) top = center.attachNewNode(cm.generate()) top.setZ(size) top.setP(270) btm = center.attachNewNode(cm.generate()) btm.setZ(-size) btm.setP(90) return center - Press the F6 key to start the program. You will see the following output:
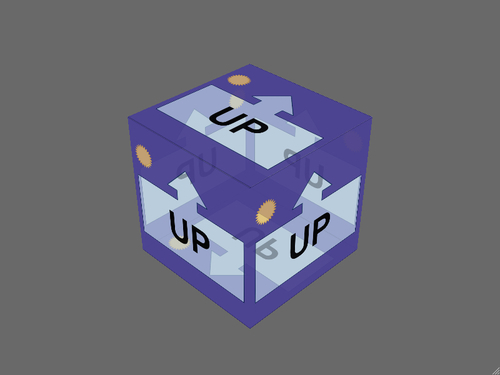
First, we use the CardMaker class, which is used for generating quad geometry at runtime, and the buildCube() method to build a cube from four quads.
After the geometry is set, the following four lines of code are responsible for producing the final image. First we use loadTexture() to load the color image together with the grayscale alpha texture, whose filename is passed in the second parameter. The transparency values are encoded in the mask texture using shades of gray—a value closer to white means more opaque, while darker shades mean more transparent, as can be seen in the previous sample mask. We are working with PNG textures here, but Panda3D supports some other image file formats like JPEG, TGA, and DDS too.
The next line of code applies the texture data we just loaded to the cube, followed by a call to setTransparency() that enables alpha blending. Without this, the mask texture would simply be ignored!
Finally, we need to mark the cube as two-sided geometry. Otherwise we wouldn't be able to see the backsides of the cube through the transparent parts of its faces, due to a technique called backface culling. Per default, the renderer discards all triangles facing away from the camera, because they are on the backside of the object and can't be seen anyway. This gives a nice performance boost as usually a lot of geometry can be discarded and doesn't have to be rendered. While this optimization works fine for opaque objects, it can't be used for transparent ones because we can actually see the backside of the rendered object.