7
Security Features in Autonomous Database
Security is always one of the high-priority topics to discuss in terms of the cloud environment. With respect to Autonomous Database, it is very interesting to discuss the security aspects to understand how security is managed automatically. Since an autonomous database is a self-driven database, it’s also exciting to see how it automatically ensures the database is safe from all outside attacks. In this chapter, we are going to discuss Autonomous Database infrastructure security, and then security related to data management such as Data Safe and Activity Auditing. Let’s discuss all the security topics in detail one by one.
The agenda of this chapter includes the following topics:
- Operating system access restriction
- Security Assessment
- Data Discovery
- Data Masking and Activity Auditing
- Customer-managed keys with Autonomous Database
Let’s begin!
Operating system access restriction
Usually, in a database environment, the database administrator (DBA) accesses the server to install and manage the database. They will create the necessary data files and then load the data into the database. DBAs and system administrators also access the servers to perform day-to-day maintenance tasks, such as database backup generation, archive logs generation, data files growth, and rectifying physical corruption. They also access the operating system structure to perform the scaling of the CPU, memory, and storage. Here, in the Autonomous Database, the provisioning and management are automated. All database management tasks are taken care of automatically. Hence, Autonomous Database only provides database connectivity. The underlying operating system is not accessible from the outside. We can’t connect the database server via SSH. The Autonomous Database server is secured and managed by Oracle.
Not allowing access to the operating system makes this environment more secure. Unwanted operations to the operating system are avoided. In general, when performing database maintenance tasks, there are chances of human mistakes being made, such as mistakenly deleting files (data files or archived logs) or sometimes forgetting to purge unneeded files (obsolete backups or archived logs) after their use. These challenges are completely avoided in an autonomous environment. All database admin-related activities are taken care of by the autonomous database. Zero human interaction reduces the opportunity for human error.
Certain Oracle utilities require server access, such as Data Pump, which is a server-side utility. Data Pump generates dump files and log files in the database server. You may ask “If I don’t have server access, how will I generate a dump file using this utility?” For the autonomous database, the dump file can go directly into the Object Storage bucket, instead of into the server. Logs will be stored in the database server anyhow, but they can be copied to the Object Storage bucket using the DBMS_CLOUD package.
DBMS_CLOUD is a PL/SQL package that comes along with Oracle Database. It provides complete support for working with data in OCI Object Storage.
In the following example, export.log is generated by Data Pump and stored in the autonomous database server. We can move it to Object Storage using the DBMS_CLOUD package:
BEGIN
  DBMS_CLOUD.PUT_OBJECT(
    credential_name => 'DEF_CRED_NAME',
    object_uri => 'https://objectstorage.<region>.oraclecloud.com/n/namespace-string/b/bucketname/o/import.log',
    directory_name  => 'DATA_PUMP_DIR',
    file_name => 'export.log');
END;
export.log will be in DATA_PUMP_DIR by default. Since we don’t have access to the autonomous database server, we can execute the preceding procedure to move the log file to Object Storage.
Dedicated ADMIN users for the database
Autonomous Database restricts SYS and SYSTEM schema access. These are high-privileges users in the database with the right to modify the database structure. Since the autonomous database is a managed database, these users are restricted from login. The SYSDBA privilege is also restricted, which means we can’t grant the SYSDBA privilege to other users. If we try to grant the SYSDBA privilege, we will get an error as shown here:
SQL> Grant sysdba to admin;
Error starting at line : 8 in command -
Grant sysdba to admin
Error report -
ORA-01031: insufficient privileges
01031. 00000 -  "insufficient privileges"
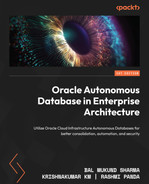
Instead of SYS or SYSTEM users, Autonomous Database provides an ADMIN user. The ADMIN user has a PDB_DBA role. The PDB_DBA role is applicable to multitenant environments. By default, Autonomous Database comes with a multitenant model. A non-multitenant model has been deprecated since Autonomous Database version 12.2. ADMIN can create additional schemas and add or revoke privileges. The ADMIN user password can be reset at any time through the OCI portal, as shown in the screenshot:

Figure 7.1 – Changing the administrator password
By clicking the Administrator Password option, a new window for specifying the password details will open, as shown in Figure 7.2:
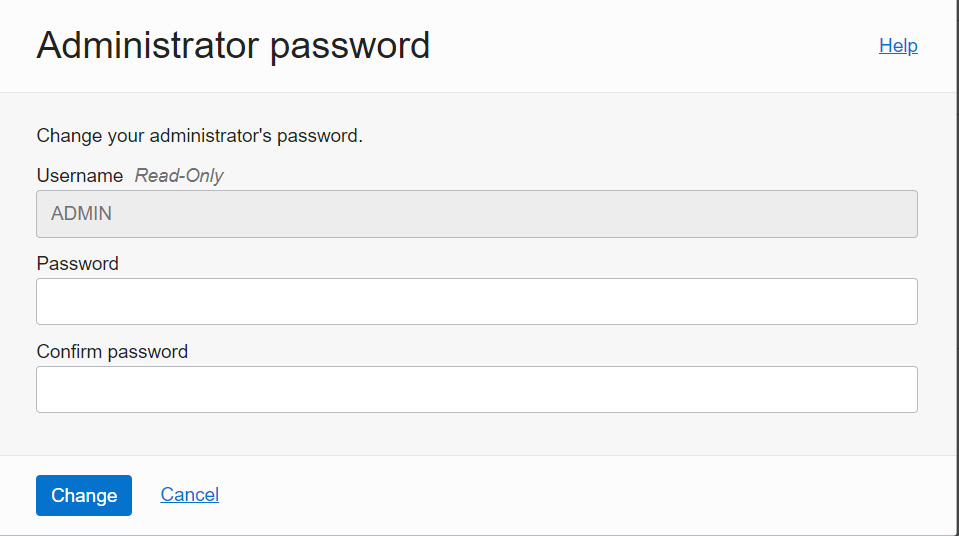
Figure 7.2 – Specifying a new password for the administrator user
The password should follow a few criteria:
- Contains from 12 to 30 characters
- Contains at least one lowercase letter
- Contains at least one uppercase letter
- Contains at least one number
- Does not contain the double quotation mark (“)
- Does not contain the admin string, regardless of its case
- Is not one of the last four passwords used for the database
- Is not a password you previously set within the last 24 hours
Once the password is provided, click on the Change button, as shown in Figure 7.2. It will take a few seconds to modify the password.
Private endpoint
Autonomous Database provides the option to define the mode of SQLPLUS connectivity. It allows three SQLPLUS connectivity options, such as connectivity from the internet, connectivity from specific IPs or VCNs, and private endpoints.
On the autonomous database details page, click More Actions. On there, you’ll see the Update Network Access option, as seen in the following screenshot. Click on that:

Figure 7.3 – Updating network access
A new window will open requesting you to choose the desired network access. Private endpoint access only is one of the options available to choose, as shown in Figure 7.4:

Figure 7.4 – Private endpoint access only
A private endpoint connection makes Autonomous Database connectivity secure. It only allows chosen OCI VCN and subnet CIDR ranges to connect with the autonomous database. It also needs a Network Security Group (NSG) to restrict the protocol and port to make the connection. Let’s learn more about it in the next subsection.
NSG
In the private endpoint, we can restrict the database access to a particular VCN or subnet. With an NSG, we can filter traffic to a specific VM in that VCN or a specific IP or CIDR range.
An NSG is similar to a security list that consists of a set of ingress and egress rules. In the security list, the rules are applied at the subnet level, whereas NSG rules are applied only to a set of VNICs for a particular VCN. Consider you have multiple VMs in a subnet and you want to block a few ports on certain VMs – this can be achieved via an NSG.
In OCI, an NSG can be created from the VCN page. On the VCN details page, under the Resources section, you can find Network Security Groups, as shown in Figure 7.5:

Figure 7.5 – NSGs
Click on the Network Security Groups link. This brings up the page where we can find the button to Create Network Security Group, as shown in Figure 7.6:
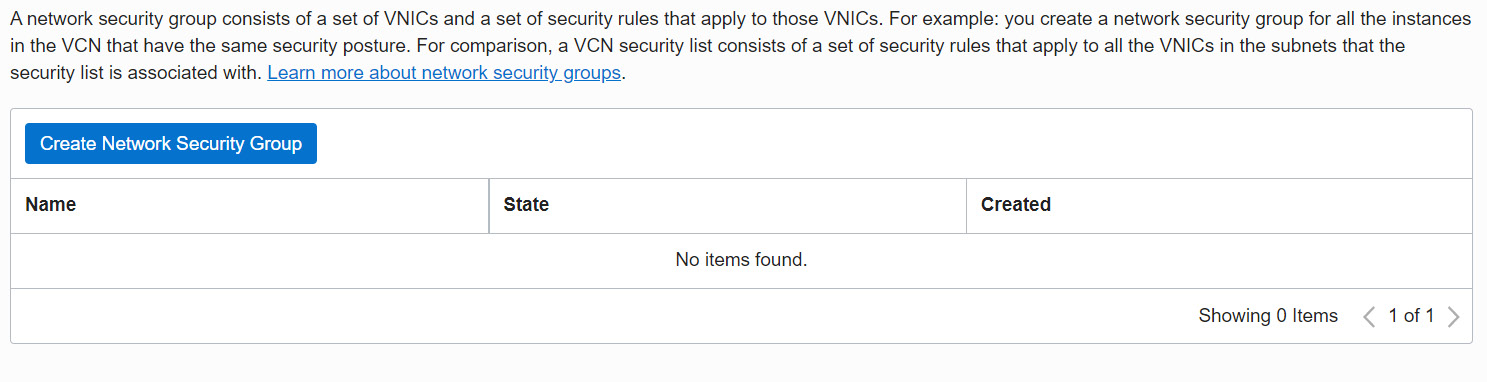
Figure 7.6 – Creating an NSG
Now, click on the Create Network Security Group button. It will invoke the window shown in Figure 7.7:
Figure 7.7 – Basic info to create an NSG
Enter a given name and the Create In Compartment details, which dictate where the NSG needs to be created. On the next page, we can find the security rule fields for the NSG, as shown in Figure 7.8:

Figure 7.8 – Security rules for the NSG
Now, provide the details of the source connection and create the NSG.
This NSG can be added to the autonomous database private endpoint. On the Private endpoint page, choose the VCN and subnet, and right under it is a field in which to pick the NSG. Here, we can choose the NSG that we have created in that VCN as shown in Figure 7.9:

Figure 7.9 – Updating network access
Once the details are provided, click on the Update button to complete the private endpoint configuration.
Data Safe
Data Safe is a tool provided by OCI for analyzing the database to ensure its security. With data breaches growing every day, along with an evolving set of data protection and privacy regulations, protecting business sensitivity and regulated data became mission-critical. The Data Safe tool analyzes databases, whether on-premises or cloud databases (Database Cloud Service or Autonomous Database or databases on a bare metal server, compute, or Cloud@Customer), in terms of their configuration, operation, and implementation and then recommends changes and controls to mitigate any risks.
Data Safe identifies configuration settings that may increase risk exposure and also identifies sensitive user accounts, their entitlements, and security policies. An autonomous database also can be analyzed by Data Safe.
First, the database needs to be registered with Data Safe. To register the databases, they should be accessible to OCI. This applies whether it is on-premises or on the cloud. We will discuss the prerequisites with corresponding screenshots in detail:
- In the OCI portal, the Data Safe service is available under the Oracle Database section,as shown in Figure 7.10:

Figure 7.10 – Data Safe in the OCI portal
- By clicking on the Data Safe link, we will come to the Overview page:
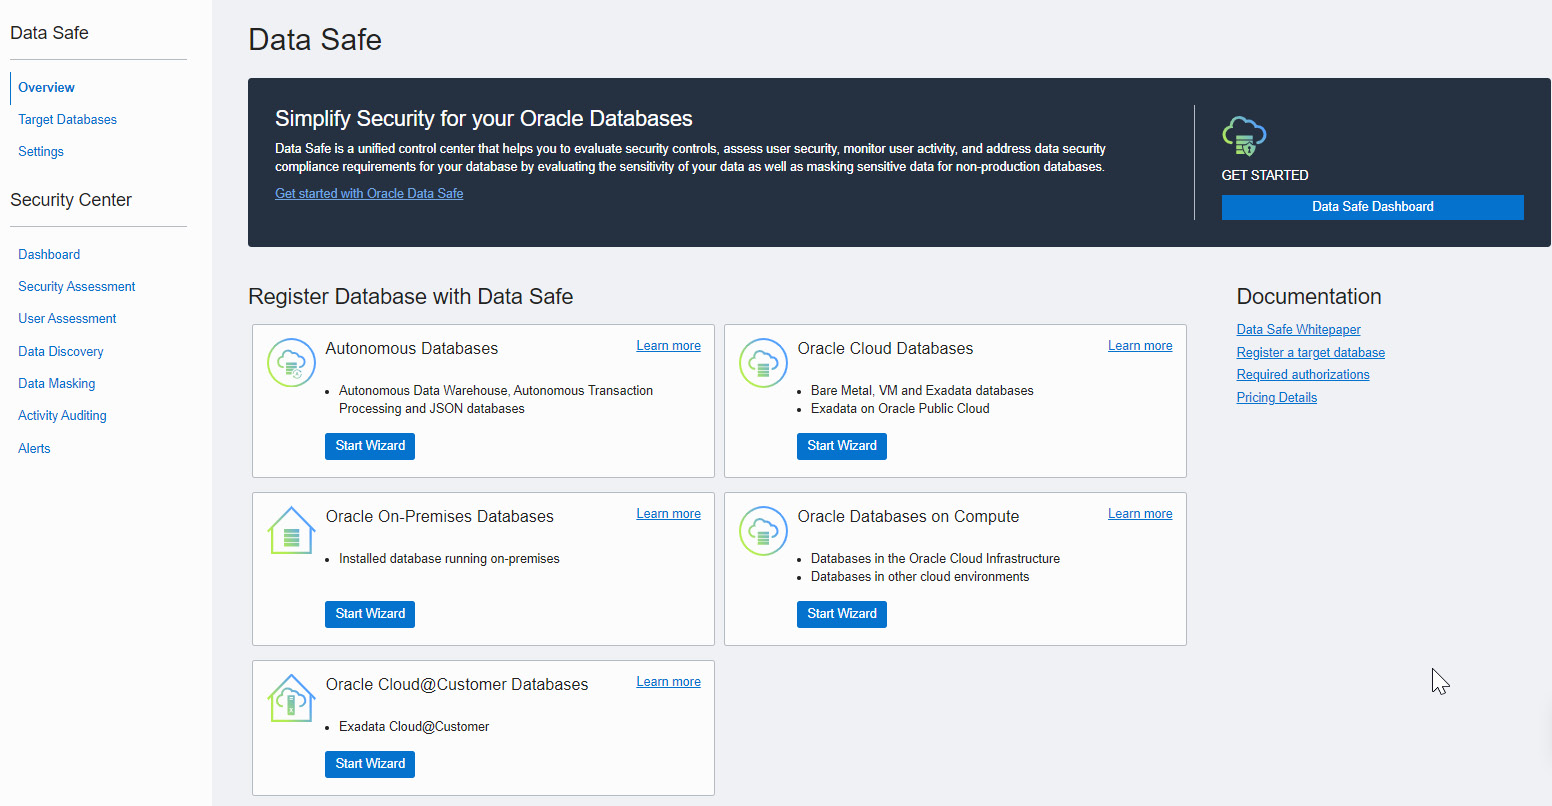
Figure 7.11 – Overview of Data Safe
- To analyze a database, the first step is to register it with Data Safe. This registration can be done using the Target Databases link or the wizard.
Using the wizard, it’s a five-step process:

Figure 7.12 – Selecting a database
The actions performed in this step collect the details of the autonomous database. Based on the network setup, the connectivity and security rule options will then be enabled. If the database is open for public access, then there is no need to specify the connectivity or security rule options. After reviewing the details, click on the Register button.
- Another way we can register the database is by clicking the Target Databases link available on the Overview page. Click on the Target Databases link and then click on the Register Database button on the Target Databases page:
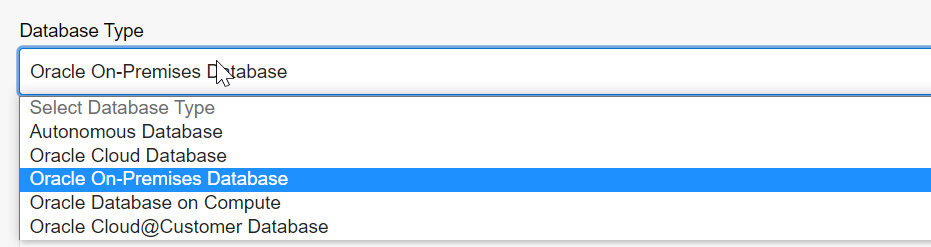
Figure 7.13 – Choosing the database type
It accepts Autonomous Database, Oracle Cloud Database, Oracle On-Premises Database, Oracle Database on Compute, and Oracle Cloud@Customer Database. Each option has different arguments for making a connection to the database. For example, an on-premises database requires a connection descriptor that has details about the database server and port. The database should be reachable by OCI.
- Choose Autonomous Database from the dropdown. Make sure the database has been started already. In the Data Safe Target Information section, we can find all the active autonomous databases. Choose the desired database and then provide a name under Data Safe Target Display Name. A description is an optional addition and a given Compartment for the target database can be chosen, as shown in Figure 7.14:

Figure 7.14 – Registering a target database
- After providing all the details, click on the Register button. The database will be registered with Data Safe. The Target Database Details page will be displayed after a successful registration, as shown in Figure 7.15:

Figure 7.15 – Target database after registration
Essentially, Data Safe connects with the database through a schema called DS$ADMIN in Autonomous Database. This user is created by default in Autonomous Database and this user is going to be permanent. Hence, we see the Update Database User button is disabled in the preceding screenshot. For other database flavors, this button will be enabled.
If we are registering a non-autonomous database, then before registering the target database, we need to create a DATASAFE$ADMIN schema there. This schema performs the necessary collection from the target database and for that, it requires a few privileges. The required privileges are scripted into an SQL file and are available to download on the registration page itself. We can download and execute it in the target database.
Once the target database is registered, we can move to the Data Safe Security Center where we can view the results after analysis. For an autonomous database, we don’t need to download and execute the SQL file – here, everything is automated.
The Security Center shows the collected details in different sections, as shown in Figure 7.16:

Figure 7.16 – Data Safe dashboard
The overview shows details of all sections with respect to all registered target databases. If we want the details of a particular database, then the Filters option can be used. The Filters option is available on the left-hand side after Compartment, as shown in Figure 7.17:
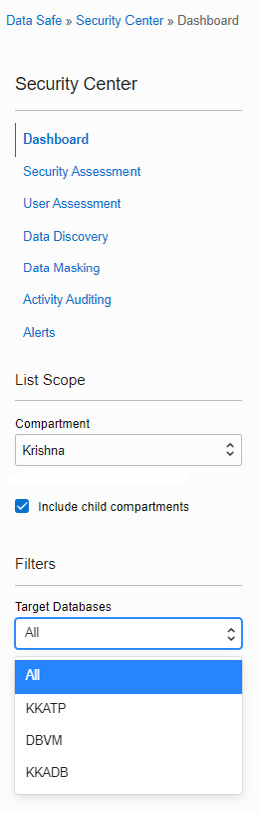
Figure 7.17 – Target databases list in Data Safe
Let’s discuss each section of the Security Center in detail.
Security Assessment
In Security Assessment, Data Safe evaluates the security posture of the databases and provides recommendations to overcome any issues. It enables us to identify security vulnerabilities and verify that encryption, auditing, and access controls have been implemented. It categorizes the findings into different sections, as shown in Figure 7.18:

Figure 7.18 – Security Assessment
As you can see in Figure 7.18, the risks are categorized into different sections:
- User Accounts
- Privileges and Roles
- Authorization Control
- Fine-Grained Access Control
- Auditing
- Data Encryption
- Database Configuration
It also categorizes the risk level into five categories based on the severity involved:
- High: An item that needs immediate attention
- Medium: It is not very urgent, but planning is required to address it in the near future
- Low: It’s a low-severity risk and can be taken care of in the next maintenance window
- Advisory: It’s recommended to address it in order to improve the security posture
- Evaluate: It requires manual analysis
All risk levels have a link for showing the details. By clicking on Risk Level, we can find the risk details and the associated registered databases:

Figure 7.19 – High risks in Security Assessment
Figure 7.19 shows the details of a high-level risk related to the patch level. The patch of the database software is not up to date. This alert has been reported for the KKADB and DBVM databases. By clicking on the database, we can find out more details on the alert:

Figure 7.20 – High risk
In this example, the autonomous database was down for a long time – hence, the patch is not up to date. The patching will be taken care of automatically in the next maintenance period.
We can also check all the alerts for a particular registered database by clicking on the Target Summary option, as shown in the following figure:

Figure 7.21 – Target Summary in Security Assessment
By clicking on View Report, as shown in Figure 7.21, we are able to see all the Security Assessment information for a registered database.
User Assessment
User Assessment collects reports by analyzing the database user accounts and helps to identify potential risks present in the database user accounts. It assesses the user account along with its metadata, such as roles, privileges, and profiles, and calculates a risk score for each user:

Figure 7.22 – User Assessment
The risk levels are categorized as Critical, High, Medium, and Low, as shown in Figure 7.22:
- Critical: It lists the risks at the database level that have an impact on database availability and integrity, such as having direct access to read, modify, copy, or access data.
- High: It lists the risks at the feature level. It talks about the ability to read, modify, or copy data indirectly through the use of the privileges granted.
- Medium: It lists risks that don’t have serious effort but can damage user management, such as setting lists during user sessions.
- Low: The risks with the least impact, such as those affecting a particular user.
By clicking on the risk level, we get to the User Details page, as shown in Figure 7.23:
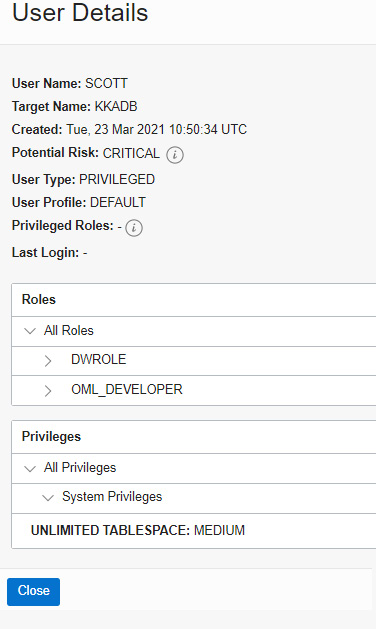
Figure 7.23 – A critical risk in User Assessment
The preceding risk talks about privileges granted to SCOTT. This user has DWROLE and OML_DEVELOPER roles and the Unlimited Tablespace privilege. DWROLE provides common privileges for a database developer and data scientist to perform real-time analytics. OML_DEVELOPER is related to machine learning. Assigning these privileges to SCOTT is considered a security threat and that has been reported as a risk.
The next section is about Data Discovery.
Data Discovery
Data Safe scans the database for sensitive data. The sensitive data will be identified based on column names, actual data, and comments. Data Safe provides over 170 predefined sensitive types that are used to search for sensitive data in the database. We can add new sensitive types to search for, but existing types can’t be altered.
The top-level categories for predefined sensitive types are as follows:
- Identification information: Sensitive identifiers such as a US Social Security number or Indian Aadhaar number
- Biographic information: Sensitive types such as a complete address, date of birth, or religion
- IT information: Sensitive types such as a user ID, password, or IP address. Data related to user IT data
- Financial information: Sensitive information such as credit card information and bank account details
- Healthcare information: Sensitive types such as a health insurance number or blood type
- Employment information: Sensitive information such as an employee title, income, stock, or an employee number
- Academic information: Sensitive data such as a college student ID and grade or degree information
Data Safe saves the discovery results as a sensitive data model. You can find the Discover Sensitive Data button in the Data Discovery section, as shown in Figure 7.24:
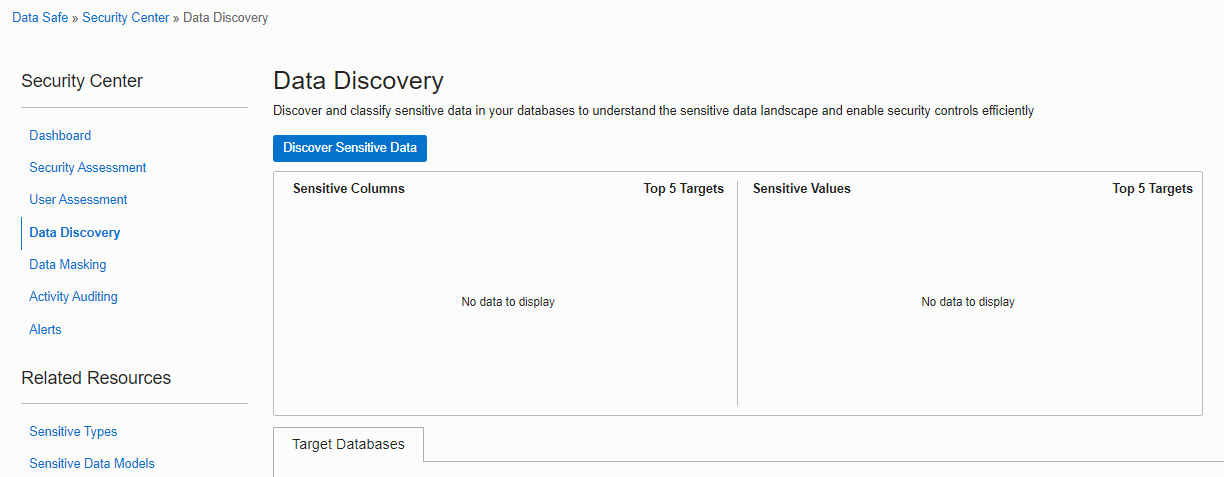
Figure 7.24 – Data Discovery
Click on Discover Sensitive Data to examine the sensitive data in the database. It will invoke the Create Sensitive Data Model page, as shown in the following screenshot:

Figure 7.25 – Sensitive data model information
Provide the Compartment and Target Database name details on the first page, as shown in Figure 7.25. On the next page, we need to choose either all schemas or a particular schema to discover the sensitive data, as shown in the following screenshot:

Figure 7.26 – Selecting the schemas for the sensitive data model
On the next page, choose the sensitive types that we want to discover:

Figure 7.27 – Sensitive types
We can choose a particular type or all types, as shown in Figure 7.27. On the next page, we have discovery options:
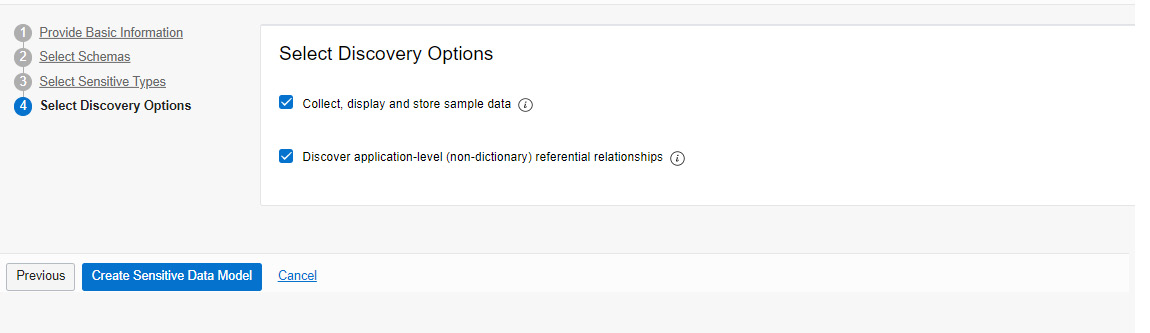
Figure 7.28 – Discovery options
As shown in Figure 7.28, the available options are Collect, display, and store sample data (collect sample data from the database) or Discover application-level (non-dictionary) referential relationships.
Click on Create Sensitive Data Model as the last step.
Data Safe will start the discovery process with the provided details and a sensitive data model will be created, as shown in Figure 7.29:

Figure 7.29 – Sensitive data model
The data model shows that it has detected sensitive schemas, tables, and columns. We can find the details of the information on the same page, as shown in Figure 7.30:

Figure 7.30 – Sensitive columns
We can also carry out Incremental Discovery at a later point in time.
Now, if we move to the Data Discovery page, an overview of the collected information will be shown, as we can see in Figure 7.31:
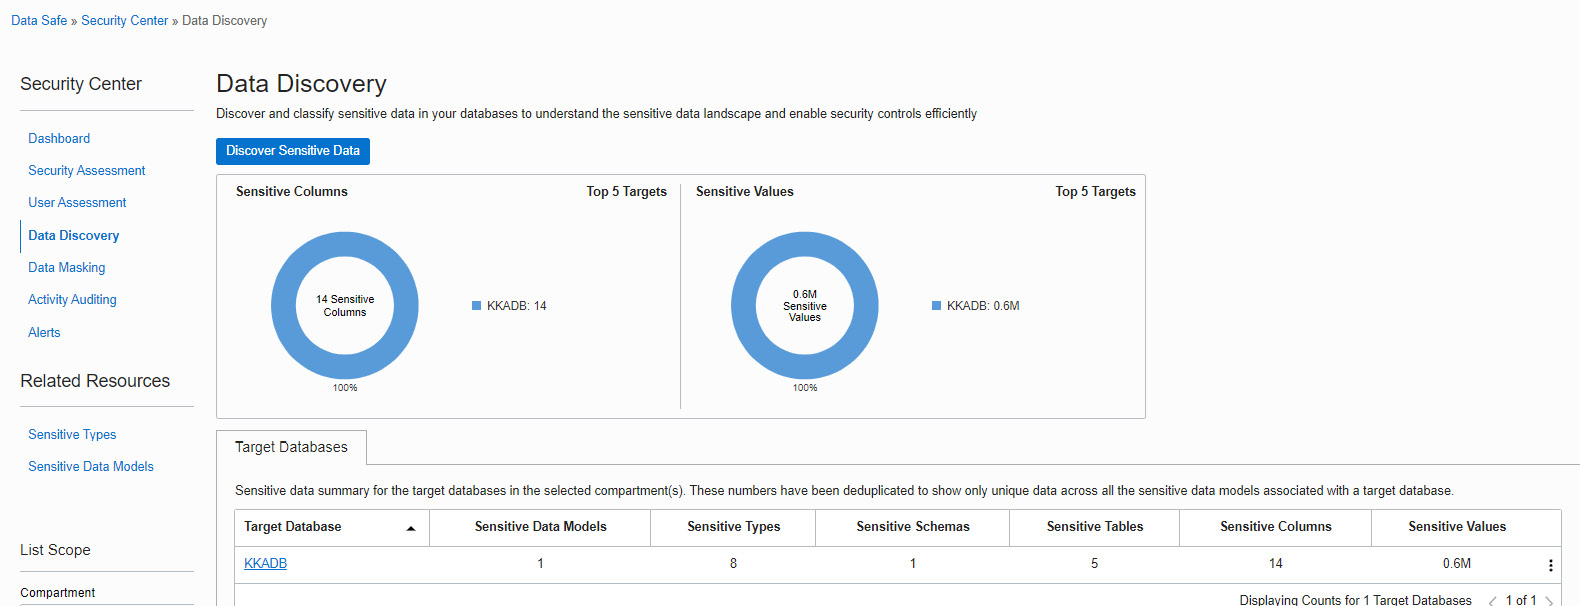
Figure 7.31 – Data Discovery
We can also find the predefined sensitive types on the same page under Related Resources, as shown in Figure 7.31. Now, click on the Sensitive Types link:
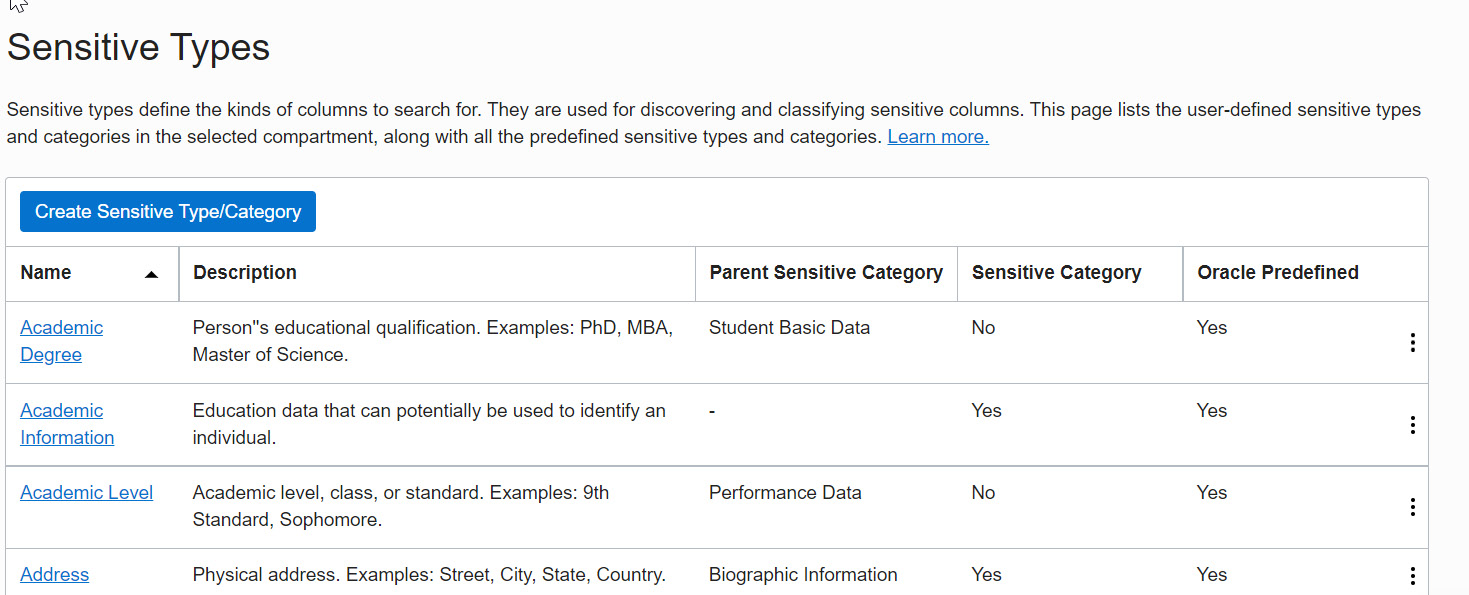
Figure 7.32 – Sensitive types template
You can find all the predefined sensitive types on the page. In total, 178 sensitive types are displayed on 12 pages.
Data Safe also offers Data Masking, which we are going to discuss in the next section.
Data Masking
Data Safe masks the sensitive data that it has identified in the target databases. It provides an option to create a masking policy for the sensitive data model that we have seen in the previous section.
Click on Masking Policies under Related Resources, as shown in Figure 7.33:

Figure 7.33 – Masking policies
Click on the Create Masking Policy button, as shown in Figure 7.34:

Figure 7.34 – Creating a masking policy
On the Create Masking Policy page, provide the details of the policy name and specify whether the policy has to be created using an available sensitive data model or using an empty masking policy that is associated with the selected target database:
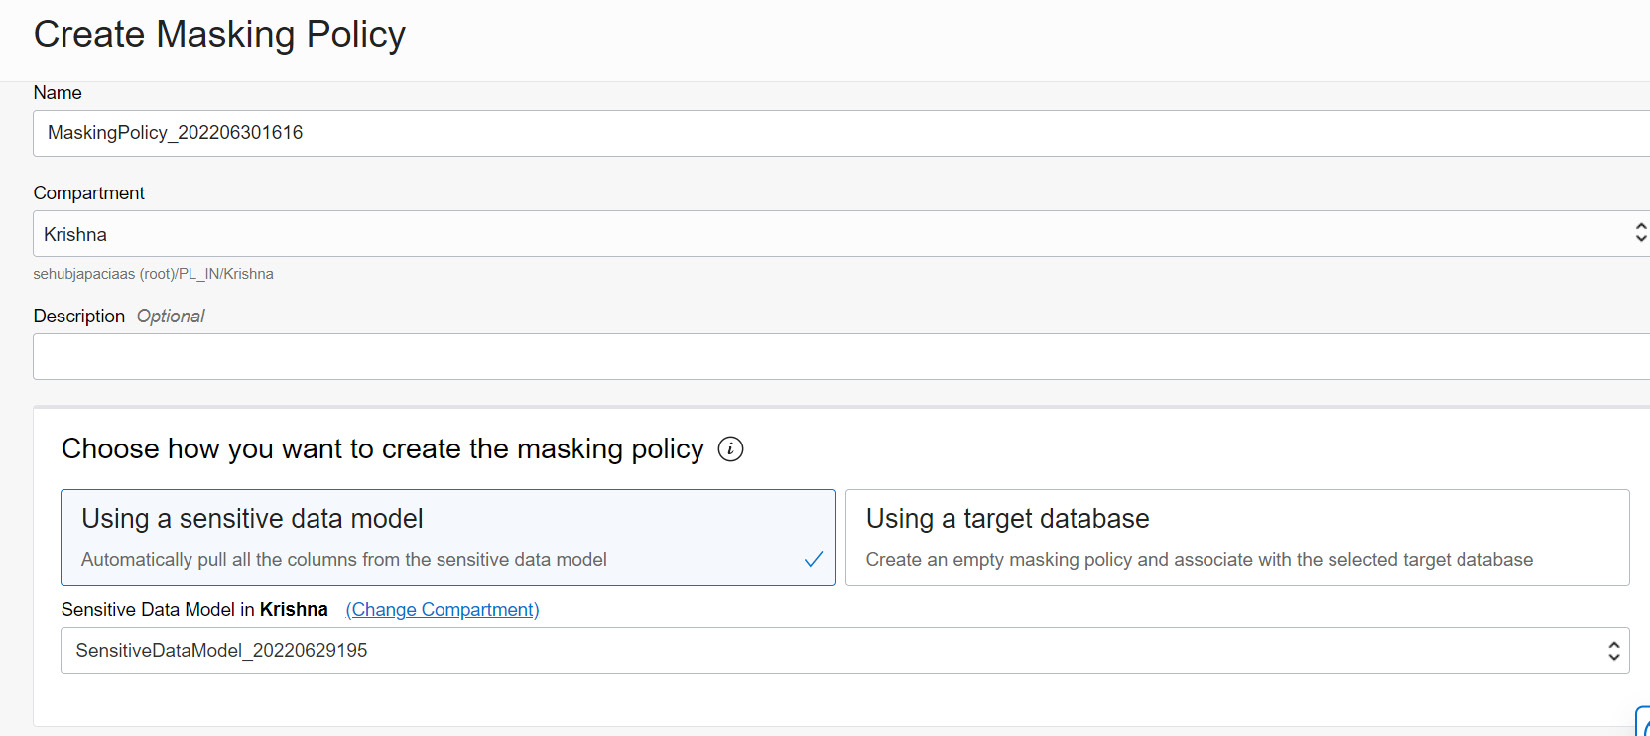
Figure 7.35 – Creating a masking policy using a sensitive data model
And here's how the screen looks like when you upload scripts

Figure 7.36 – Uploading masking scripts
Click on Create Masking Policy to create a masking policy and add columns from the sensitive data model. Once the policy has been created successfully, it will list masking columns that it has considered, as shown in Figure 7.37:

Figure 7.37 – Masking columns
Each masking column will be listed with details on the schema, table name, column name, sensitive type, data type, and masking format. Data Safe identifies a suitable masking format for each sensitive column. The masking format can be edited. Each masking format has a different kind of masking algorithm:

Figure 7.38 – Editing the masking format
Figure 7.38 shows the masking format for Random Name. The examples show how the masking will be carried out. It replaces the column value with different characters.
Now that the masking policy is ready, let’s start masking sensitive data using the policy that we have created. Click on Mask Sensitive Data. It will invoke a window in which to choose the target database and masking policy, as shown in Figure 7.39:

Figure 7.39 – Masking sensitive data
Click on the Mask Data button, which will create the masking job:

Figure 7.40 – Masking job
Download Masking Logs is available, which will generate the log as a text file. The log contains all the SQL commands and their output.
Activity Auditing
Data Safe collects audit data from target databases and helps to ensure accountability and improve regulatory compliance and monitor user activities in target databases. We can audit sensitive data, security-related events, and activities that are chosen to be monitored. As we see in Figure 7.41, all events are monitored and reported on the Activity Auditing page:

Figure 7.41 – Auditing events
The details of each activity auditing are given here:
|
Report Name |
Description |
|
All Activity |
All database activities will be audited. |
|
Admin Activity |
Activities performed by Administrative users. |
|
User/Entitlement Changes |
User related activities such as user creation/deletion/privilege and role changes. |
|
Audit Policy Changes |
All changes in audit policies. |
|
Login Activity |
Database login attempts. |
|
Data Access |
Database query operations. |
|
Data Modification |
Data modification activities (DMLs). |
|
Database Schema Changes |
Database schema changes (DDLs). |
|
Data Safe Activity |
Activity generated by the Oracle Data Safe service. |
|
Database Vault Activity |
Auditable activities of enabled Oracle Database Vault policies in target databases. It includes mandatory Database Vault configuration changes, realm violations, and command rule violations. |
Up to 1 million audit records per month per target database are included in Oracle Data Safe at no additional cost.
We have discussed all sections of Data Safe. Let’s move on to the next security feature, data encryption.
Data encryption
An autonomous database encrypts data by default at rest and in transit. It can’t be turned off. There are two ways to perform data encryption. These are encryption of data at rest and encryption of data in transit. Let’s discuss these.
Encryption of data at rest
All tablespaces are encrypted using TDE (Transparent Data Encryption). TLS (Transport Layer Security) 1.2 protocol has been applied. Encryption protects the processing, transmission, and storage of data. Each database and its backup have different encryption keys. Database cloning creates a new set of keys.
An autonomous database manages the keys by default and stores them in the Public Key Cryptography Standards (PKCS) 12-key store, but it also has provision to use customer-managed keys created using the OCI Vault service. The customer-managed keys can be rotated regularly to meet the best security standards.
To configure custom-managed keys for Autonomous Database, log in to the OCI portal and find the autonomous database details page. Click on the More actions button and then the Manage Encryption Key option, as shown in Figure 7.42:

Figure 7.42 – Managing the encryption key
A new window will pop up, as shown in Figure 7.43, where we can specify the OCI Vault and custom encryption key to perform the encryption:

Figure 7.43 – Custom encryption key
From the drop-down box, we can choose the vault first. This will populate the keys associated with that vault and list them in the master encryption key drop-down box. We can choose the key and click on the Save Changes button:
Encryption of data in transit
As we discussed earlier, Autonomous Database only provides the database connections and not server access. The connection could be SQL*Net, JDBC, or ODBC.
The autonomous database supports Mutual Transport Layer Security (mTLS) and TLS connections. By default, mTLS connections are supported. We can find the details on the autonomous database page, as shown in Figure 7.44:

Figure 7.44 – TLS authentication
mTLS clients connect through a TCPS (secure TCP) database connection using standard TLS 1.2 with a trusted client Certificate Authority (CA) certificate. The mTLS connections require a wallet to be downloaded to make a connection with the database. In Chapter 5, Backup and Restore with Autonomous Database in OCI, we discussed the wallet and how to download and make connections using it. Users who have the wallet can make connections to the database along with user authentication. The data encryption happens via the wallet. With mTLS connections, the wallet is located at both the client and the database server. The certificate authentication uses the key stored in the wallet to do the encryption. The key needs to match the client and the server to make a connection.
TLS clients connect through a TCPS database connection using standard TLS 1.2. A client uses its list of trusted certificates to validate the server’s CA root certificate. TLS connections are used by a JDBC Thin driver client, which doesn’t need to download the wallet.
Database backup encryption
Database backups are also encrypted. The autonomous database takes a backup of the database automatically. It also has a provision to make database backups manually. We discussed the database in detail in Chapter 5. From a security point of view, we can highlight that all database backups are encrypted by default in an autonomous database. The encryption keys are rotated by default.
We can verify the backup encryption using the following command:
SQL> select count(*) from v$backup_set_details where encrypted='NO' order by completion_time desc;
Count(*)
-------------
0
While decrypting the backup, the wallet is mandatory. The wallet also will be backed up during the regular backup process.
Access control lists
An Access Control List (ACL) configures an autonomous database that only allows traffic from allow-listed source applications, systems, and individual IP addresses. By default, all traffic is blocked by the ACL. It protects data from random user queries, unknown or uncertified applications, or user access:

Figure 7.45 – ACL
We can find whether the ACL is enabled at the database level on the autonomous database details page, as shown in Figure 7.46:
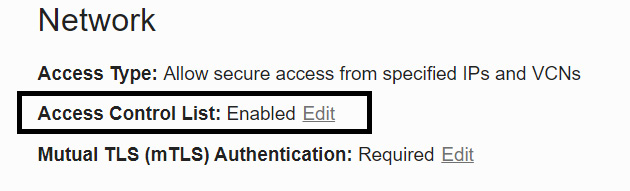
Figure 7.46 – ACL for an autonomous database
Click on the Edit button to configure the ACL settings. By clicking on the Edit button, we will get a window as shown in Figure 7.47:

Figure 7.47 – Editing an ACL
The following options are available on the Edit Access Control List page:
- IP Address: Public IP addresses of the clients that are allowed to connect to the autonomous database. It could be an IP for an on-premises system or OCI VM IP or a third-party cloud VM IP. The Add My IP Address button will identify the currently connected system IP address and place the value.
- CIDR Block: Public CIDR block of the clients that are visible on the public internet and need access to an autonomous database.
- Virtual Cloud Network: A particular VCN available in that region can be chosen to make connectivity with the database. It means only the VMs and applications that are part of the VCN can connect to the autonomous database.
- Virtual Cloud Network (OCID): It’s similar to the previous option. Here, we can directly feed the OCID of the VCN instead of choosing from the drop-down list.
After choosing the appropriate option, click on the Save Changes button. The changes will be reflected on the details page:

Figure 7.48 – ACL of the autonomous database
We can see the ACL is enabled on the details page, as shown in Figure 7.48.
SQL*Net Connection
All client connections to the autonomous database must use TCP/IP and SSL. This has been configured via the SSL_SERVER_DN_MATCH parameter in the sqlnet.ora file. The sqlnet.ora file is available in the wallet_<servicename>.zip file, which is downloaded through the autonomous database client credential, as shown in Figure 7.49:

Figure 7.49 – Downloading a wallet
The SSL_SERVER_DN_MATCH parameter enforces that the given DN (distinguished name) for the database server matches its service name. Setting the parameter to yes enforces the match verifications and SSL ensures that the certificate is from the database server.
Suppose this parameter is set to no – then, we get the following error:
ORA-28860: Fatal SSL error
SQL command restrictions
To avoid security violations, certain SQL commands are restricted in the autonomous database. An autonomous database is a self-driven and self-secured database. Hence, it will restrict commands that will affect its security functions. For example, encryption is mandatory in an autonomous database. Hence, SQL commands that close the wallet are not allowed. Tablespaces are managed by an autonomous database. Deletion or addition of tablespaces is not allowed. You will get an error as follows if you try to add or delete tablespaces:
SQL> create tablespace users;
Error starting at line : 1 in command -
create tablespace users
Error report -
ORA-01031: insufficient privileges
SQL> Drop tablespace data including contents;
Error starting at line : 6 in command -
Drop tablespace data including contents
Error report -
ORA-01031: insufficient privileges
SQL> administer key management set keystore close;
Error starting at line : 3 in command -
administer key management set keystore close
Error report -
ORA-01031: insufficient privileges
01031. 00000 -  "insufficient privileges"
We are also not allowed to close the wallet, as shown here.
Automatic security patch update
Oracle Database gets security patches every quarter. These patches have security bug fixes. In the autonomous database, the security patches are applied automatically every quarter without application downtime. This makes the database secure and not vulnerable to security attacks.
A few environments require a one-off patch to be applied to fix a few bugs seen in that environment. These bugs are specific to the environment and are not generic ones. When the environment migrates to an autonomous database, the patches need to be applied there as well. In an autonomous environment, one-off patches are applied by the support team. We need to raise a support request with patch details and the patch application process will be taken care of by the Oracle team. In case a maintenance window is required for applying the patch, then the customer will be informed in advance.
The Autonomous Dedicated environment has released a new capability for one-off patches. Here, the Oracle engineering team applies the one-off patch immediately rather than waiting for the quarterly planned maintenance window. The default schedule is set in the off-hours of the upcoming weekend with a minimum of 72 hours from the time the patch is available. Off-hours are calculated by Autonomous Database based on database usage. This gives customers the ability to change their schedule to any other suitable time. The Patch now option is also provided to apply the patch immediately.
Audit logs
All Autonomous Database operations (start, stop, create, delete, list, get, etc.) are audited by the OCI Audit service. The operations may have been performed by the user or any other utilities such as Cloud Guard or Optimizer. The operations may also have been performed either in the Cloud console or using an API. All activities will be recorded by the OCI Audit service.
In the OCI console, select the Audit service under Identity & Security. We can see Audit Events, as shown in Figure 7.50. Choose Autonomous as a keyword to list only events related to the autonomous database:

Figure 7.50 – Audit events
We can find the event name, the user who performed the action, at which service it has been performed, the kind of action that has been performed, and the response to that action.
Summary
This chapter explained the security aspects provided by OCI for autonomous databases, in addition to the standard database security features such as Data Redaction and Database Vault. The chapter provided detailed information about Data Safe, which is a free tool for analyzing databases and discovering and masking sensitive data for protection. Having covered security, we have concluded all the topics on Autonomous Database.
FAQs
- In an autonomous database, can we manage our own encryption keys?
Yes, Autonomous Database allows customer-managed encryption keys. For this, the user needs to create an OCI vault and keys. These have to be rotated by the user at regular intervals.
- Is Data Redaction available with Oracle Autonomous Database?
Yes, Data Redaction and Data Vault are available with Autonomous Database. All standard database security features are also available with Autonomous Database.
- I am planning to migrate from an on-premises database to Autonomous Database (the ATP variant). Can Data Safe analyze my on-premises database and recommend safety measures before migrating the database?
Yes. Data Safe can analyze on-premises databases. The database will come under the external database. The database should be reachable by OCI.
- I would like to migrate data to Autonomous Database using the Data Pump method. Since Autonomous Database doesn’t provide server access, where can I place the dump files?
Upload the dump files into an Object Storage bucket and create a database directory in Autonomous Database for the storage location. Autonomous Database can access this storage location to import the dump.