3
Migration to Autonomous Database
With some understanding gained about what exactly an autonomous database service offering is in Oracle Cloud Infrastructure, as discussed in Chapter 1, Introduction to Oracle's Autonomous Databases, , we will now set the stage in this chapter to enable you to simplify your migration approach to an autonomous database service. Throughout this chapter, we will discuss at a high level what options are available for you to migrate to an autonomous database, understand the restrictions currently existing in the service, and then deep dive into one of the simplified tools available that can automate your migration to an autonomous database service. By the end of this chapter, you will have obtained a detailed understanding of how this automation works, enabling you to put this into practice when migrating one or more databases to an autonomous database, irrespective of the type Autonomous Data Warehouse (ADW)/Autonomous Transaction Processing (ATP) database, with less manual effort. So, let’s start by taking into account some key considerations.
We will cover the following main topics in this chapter:
- Migrating to autonomous methods
- Online and continuous data migration
- Test master creation
Let’s begin!
Migration considerations
Oracle Autonomous Database has been designed to be fast, easy, and secure, with the objective of overcoming most of the management overheads usually associated with any database. We learned about these capabilities in Chapter 1, Introduction to Oracle's Autonomous Databases. Now, the question is, can your application database be hosted on an autonomous database so that you can take advantage of autonomous capabilities? Well, the answer is yes in most cases. However, there is also a word of caution. Autonomous Database, although it is an Oracle database, does have certain restrictions compared to a usual enterprise Oracle database, and it is worth reviewing the limitations once by clicking on the following link and reviewing the details to see what features are not supported:
These limitations exist for one or more reasons to make the database more secure, fast, and efficient in performance, taking away a large share of the usual database manageability or administration overhead that you would otherwise be involved in, allowing you to focus more on your business operations.
For example, you cannot create tablespaces in Autonomous Database, you cannot alter certain initialization parameters, you don’t need to create indexes on tables, and you can leave query optimization to Autonomous Database, as it can apply the best query optimization technique with built-in machine learning capabilities to give you the best query response time of any database on the market today, with exactly the same workload type. However, noting the restrictions is equally important in order to make the right decision when planning your migration to the Autonomous Database platform. Additionally, you must perform validation of applications in a non-production environment to rule out any incompatibility and resolve them with minimal changes. Nevertheless, Autonomous Database has been certified with many Oracle and third-party data integration and analytical tools, and it is being widely adopted by several customers to meet their analytical or transactional database requirements in a public cloud or Cloud@Customer.
Once a decision has been made to migrate to Autonomous Database, choosing the right migration approach is very crucial. Oracle provides a Cloud Migration Advisor tool that suggests the optimal method for migrating to Autonomous Database based on the Oracle source database, with releases starting from 11g. It also suggests a method that can be used when migrating to an autonomous data warehouse from AWS Oracle database deployments on EC2, RDS, or Redshift. Take a look at the Cloud Migration Advisor by clicking on the following link, and play around by selecting the source version and target you want to migrate to:
https://www.oracle.com/webfolder/s/assets/webtool/cloud-migration-advisor/index.html
As a recommendation, I would suggest that you first check the advisor while planning your migration to Autonomous Database. As an example, suppose I wish to migrate an 11g database to an autonomous transaction processing database; the Cloud Migration Advisor would suggest different approaches, such as Zero Downtime Migration (ZDM), OCI Data Migration Service (DMS), and the Database Migration Workbench in Oracle Enterprise Manager 13.4 Release Update 7 and above, which can automate your migration, in addition to convention tools/utilities such as Oracle GoldenGate, Data Pump, SQL Developer, and SQL *Loader that you can adopt, as depicted in Figure 3.1.
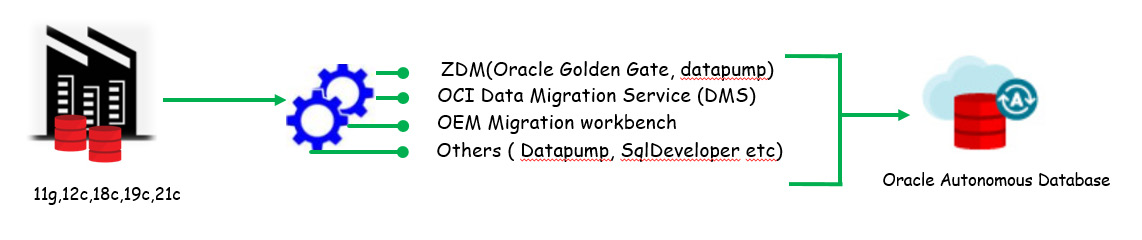
Figure 3.1: Migration approaches
Database migration is a critical operation, and several considerations need to be made before eventually migrating the database. These could be resizing the target database based on the source database, the compatibility of your in-house application with the target database, the needful configuration of compute resources that must deliver better performance in comparison to your source system, target platform support, and so on. The advantage of Autonomous Database is that it offloads the majority of your database manageability activity. It is a self-tuning database optimized for the kind of workload while leveraging the high-performing Exadata infrastructure on which it is hosted. Depending on the type of workload, you can choose to migrate to either an autonomous data warehouse or an autonomous transaction processing database. Each of them provides predefined service consumer groups that your applications can be configured to connect with, in order to meet the different levels of parallelism or concurrency requirements to run the different application queries.
When migrating Oracle databases to Autonomous Database, it is essential that all the incompatibilities are identified and resolved before the migration task is executed. Oracle provides a Java-based tool named the Cloud Premigration Advisor Tool (CPAT) that can automate this action. It can assess the source Oracle database and target Autonomous Database to perform a series of checks and determine the possibility of a successful migration to Autonomous Database. For example, it can perform checks at the schema level, it can check for tables that are using deprecated/unsupported features, or it can check for features that are not supported in Autonomous Database. It can even perform checks at the data level within the schema or just at the database instance level, such as identifying instance parameters not editable in Autonomous Database. You can also control the scope of whether the checks should run on all user database schemas or a selected list of schemas. The output of the tool is a report containing the results of the different checks – that is, whether the check passed, failed, a review is suggested, a review is required, or action is required. For each of the results, you get more details about the checks, and you can take appropriate action as necessary. The best part is that the tool is integrated into a ZDM solution, which is our main focus in this chapter. Database migration activity does incur some downtime, and depending on the method you adopt for migration, you can keep downtime to a minimum, but you must estimate that by performing a migration exercise on the non-production image of your database that closely resembles your production database size. Oracle does provide a near-zero downtime migration approach using Oracle GoldenGate, which reduces your application downtime to a bare minimum, with the downtime being proportional to the time needed to switch your application connection to the migrated autonomous database, syncing 100% with your source database. Discussing the migration approach with Oracle GoldenGate would be an elaborative subject, as you must have prior knowledge of it before we can discuss how it needs to be configured to achieve near-zero time migration; hence, it is beyond the scope of this book. This chapter is restricted to discussing one of the most recommended automated approaches for migration to Autonomous Database.
Migration to Autonomous Database can be carried out from an Oracle or non-Oracle database. Migration from Oracle databases is simplified, as there are already existing database utilities such as Data Pump and SQL *Loader that can be used. Migration from a non-Oracle database can also be done by using tools such as SQL Developer, although at the time of writing, only MSSQL or Sybase database migration support this tool. If your organization has certain third-party database migration tools that have a certified autonomous database, you may opt for those, but it is recommended to use SQL Developer. For databases that do not have direct support with any of the available migration tools, migration can be done with data integration tools such as Oracle Data Integrator or Oracle GoldenGate. For mission-critical applications with little to no downtime constraint, it is preferable to use Oracle GoldenGate, which is a near-zero downtime migration solution.
Some of the other approaches you can adopt are as follows:
- Use database links in the case of Oracle data sources (using the datapump network_link option), but this has great dependency on your network bandwidth; hence, you must be on a fast-connect network infrastructure to import faster.
- Take a Data Pump export of Oracle data, store it in OCI Object Storage, and import it using Data Pump Import, but this requires you to use Oracle client 18c (which is automated with the mv2adb package tool).
- Store your data in a delimited text file or even an Avro or Parquet format in Oracle Object Storage, and then use the DBMS_CLOUD APIs to load data directly into Autonomous Database.
- Store your data in a delimited format in OCI Object Storage and create an external table on the files to be read, and then load it into database tables.
So, that’s some insight into how we can migrate our databases, which could be on-premises or on cloud database services such as Oracle DBCS, to Autonomous Database. Now, let’s discuss one of the migration methods to migrate an on-premises database to Oracle Autonomous Database, which is called zero-downtime migration and is the recommended tool from Oracle to automate your entire database migration process while moving workloads to Oracle Cloud Infrastructure.
About the Zero-Downtime Migration tool
ZDM is Oracle’s recommended solution to migrate Oracle databases on-premises, Oracle Cloud Infrastructure Classic, or a non-Oracle cloud into Oracle Cloud Infrastructure Database Services, which can be on virtual machines, bare-metal, an Exadata Cloud service, or the flagship Autonomous Database services. ZDM supports migration from 11.2.0.4, 12.1.0.2, 12.2.0.1, 18c, 19c, and 21c database releases to OCI database services. The current release, ZDM 21.3, supports cross-version migration, thus allowing you to perform an in-flight upgrade as part of the migration workflow. You can easily migrate from non-CDB databases to a pluggable database in one workflow instead of using a multi-level migration workflow. You can suspend, resume, abort, query status, modify, audit, add, or delete a running migration job, which can be performed either on a single database or a fleet of databases.
ZDM leverages Oracle Maximum Availability Architecture best practices that automate the entire migration process, reducing the chances of human error. It is robust, flexible, resumable and under the hood, using proven technologies that include Data Pump, Oracle Data Guard, Oracle GoldenGate, and Oracle RMAN, giving you the capabilities for both an online and offline logical and physical migration, with zero-data loss assurance. ZDM is available as downloadable software that is installed on a host and runs as a service. Post-installation, it provides all the CLIs needed to automate migration, which we will see in this chapter as we migrate an on-premises database to Autonomous Database. Currently, it is only supported on the Linux platform – that is, Oracle Linux 7.
This is just a brief introduction to zero-downtime migration, and I would recommend checking the public documentation on zero-downtime migration for more details.
Migrating on-premises database to Autonomous Database using ZDM
As discussed briefly in the previous section, ZDM offers different methods to automate migration to Autonomous Database, and which method you choose depends upon the source and target Oracle database, the version, and the amount of downtime that your organization can afford. At a high level, here are the four different approaches that can be used for migration:
- Physical online migration
- Physical offline migration
- Logical online migration
- Logical offline migration
In this section, we are going to learn about the ZDM logical online migration method for migrating from an Oracle database to Autonomous Database. We will discuss the different steps and configurations needed to completely automate the migration of an on-premises transaction database to an Oracle autonomous transaction-processing database in Oracle Cloud Infrastructure, with the ZDM tool.
The overall architecture typically would work in the manner shown in Figure 3.2. The ZDM service is the central entity that orchestrates the entire migration process from the source database to the target database, which in this case is an Oracle autonomous transaction-processing database. This migration process involves various components in Oracle Cloud Infrastructure, which includes Oracle GoldenGate and OCI Object Storage – instrumental in completing the zero-downtime online migration to Autonomous Database.

Figure 3.2: Logical online migration using ZDM – architecture
The migration workflow, as shown in Figure 3.3, is a series of steps that are automated by ZDM. Let’s discuss the different steps involved while performing zero-downtime migration to Autonomous Database using ZDM.

Figure 3.3: Logical online migration using ZDM – workflow
Let’s go through the workflow steps in the following list:
- Install and configure ZDM: Designate a host to be used to configure the ZDM service. This host is called the ZDM host, configured with Oracle Linux 7. In this step, you download the ZDM software and configure the service. We will discuss this more in the forthcoming sections.
- Complete Prerequisites: Perform some of the prerequisites needed, which could be SSH key generation, OCI CLI setup, Object Storage bucket creation, GGHUB setup, and so on.
- Prepare response file: Use the response file template and modify the parameters required to perform migration into Autonomous Database from the source database.
- Dry-Run: Invoke the ZDM CLI to first evaluate the response file, where it does a pre-check with the response file parameters to ensure that the configuration is correct to proceed with the migration. Once completed, invoke the ZDM CLI to initiate the migration job.
- Invoke zdmcli migration: If the dry run of the zdmcli command returns COMPLETED for each step, then you invoke zmdcli to initiate the migration.
These are the high-level steps that are involved when performing migration using ZDM. This entirely automates your migration, with just one standard template file that has the inputs that ZDM needs to automate the migration.

Figure 3.4: ZDM migration steps
Figure 3.4 is a high-level representation of all the steps performed when zdm migration is invoked using zdmcli:
- Validation: Here, ZDM will perform validation of the connectivity to the source database, the target database, the backup location, Data Pump settings, and the GoldenGate hub
- Configure GGHUB source extract: Here, ZDM prepares the GGHUB for extracting active transactions from the source database before Data Pump is initiated.
- Data pump Export and transfer: In this step, ZDM takes a Data Pump export of the source schemas and transfers them to the OCI Object Store bucket
- Data pump Import into target: The dump that exists in the Object Store bucket is imported into Autonomous Database
- Synchronize Target Using GG replication: Here, the replication process is prepared in GGHUB and the process is started to replicate all active transactions that were generated from the point when the Data Pump export was started, until they are imported into the target autonomous database. This ensures that data in Autonomous Database is in sync with the source database.
- Switch Application: The implementer decides when to switch the application to point to the Autonomous Database instance, which would basically mean a change to the database connection entries provided the network connectivity between the application network and Autonomous Database virtual cloud network has been previously enabled and validated.
- Cleanup: ZDM does an auto cleanup of the different resources it has created as part of the migration process.
At a high level, we have discussed the different steps involved in the entire end-to-end ZDM to Autonomous Database. In the following sections, we will learn about steps we must follow while performing actual database migration to Autonomous Database.
Implementing migration to Autonomous Database using ZDM
Here onward, we are going to follow the steps sequentially – that is, to be carried out actually while performing an actual migration of database schemas from an on-premises database to an Oracle autonomous transaction-processing database in OCI. The workflow would remain the same for an online logical ZDM into an Autonomous Database target, which may be on an OCI public cloud, Exadata Cloud@Customer, or Dedicated Region Cloud@Customer.
Installing and configuring ZDM software on a dedicated host
ZDM software is preferably set up on a host that is different from the database server; however, it can be shared for other purposes, but there should be no Oracle grid infrastructure running on the host. The supported OS platform is the Oracle Linux 7 platform, and it should have 100 GB of storage available. It should be possible to establish network communication between this host and the source and target databases. ZDM runs as a service, and this host is named the ZDM service host.
Before you can begin downloading and installing ZDM software, there are few prerequisites to be completed, as follows.
Installing the required packages:
You must install the glibc-devel, libaio,expect, and Oraclelinux-developer--release-el7 packages:
[root@zdmhost ~]# yum list expect
[root@zdmhost ~]# yum list libaio*
[root@zdmhost ~]# yum list Oraclelinux-developer-release-el7
Here is an example:
[root@zdmhost ~]# yum list expect
Loaded plugins: langpacks, ulninfo
Available Packages
expect.x86_64           5.45-14.el7_1                        ol7_latest
[root@zdmhost ~]# yum install -y expect.x86_64
Creating a zdm group and users
Create an OS group named zdm and a user named zdmuser:
[root@zdmhost ~]# whoami
 root
[root@zdmhost ~]# groupadd zdm
[root@zdmhost ~]# useradd -g zdm zdmuser
[root@zdmhost ~]# su - zdmuser
[zdmuser@zdmhost ~]$
Downloading ZDM software
Browse and download ZDM software from the following link, stage it in the ZDM host, and unzip it:
https://www.oracle.com/database/technologies/rac/zdm-downloads.html:
[zdmuser@zdmhost ~]$ pwd
/home/zdmuser
[zdmuser@zdmhost ~]$ ls -ltrh
total 741M
-rwxr-xr-x. 1 zdmuser zdm 741M Feb 21 18:00 zdm21.2.zip
[zdmuser@zdmhost ~]$ unzip zdm21.2.zip
[zdmuser@zdmhost ~]$ cd zdm21.2/
Creating and exporting directories
ZDM software installation requires the creation of certain directories and exporting them as environment variables. We need to create ZDM_BASE and ZDM_HOME, where ZDM_HOME is the path to the binary installation. You can also add these environment variables to the zdmuser login profile.
Installing ZDM
This is pretty straightforward, as shown in the following instruction set:
[zdmuser@zdmhost zdm21.2]$ mkdir /home/zdmuser/zdmbase /home/zdmuser/zdmhome
[zdmuser@zdmhost zdm21.2]$ export ZDM_BASE=/home/zdmuser/zdmbase
[zdmuser@zdmhost zdm21.2]$ export ZDM_HOME=/home/zdmuser/zdmhome
[zdmuser@zdmhost zdm21.2]$ ./zdminstall.sh setup oraclehome=$ZDM_HOME oraclebase=$ZDM_BASE ziploc=/home/zdmuser/zdm21.2/zdm_home.zip -zdm
This will install the zdm binary into the ZDM_HOME path and create an OS service called zdmservice, which by default is not started.

Figure 3.5: Service status
We need to manually start the service using the zdmservice CLI start option and check the status:
[zdmuser@zdmhost zdm21.2]$ cd $ZDM_HOME/bin
[zdmuser@zdmhost bin]$ ./zdmservice start
Note that ZDM internally uses MySQL, and as part of the installation step, it configures the service to the default port of 8897. You can check the port number by running the status command.
Target Autonomous Database creation
Since the target database we are planning to migrate our source database to is an autonomous transaction-processing database in OCI, we should therefore complete the provision of the autonomous database. That includes creating OCI users that would have privileges to access and create groups, compartments, and a VCN, defining IAM policies, and then provisioning the Autonomous Database. You may have to configure additional network configuration between your on-premises data center and Autonomous Database, as you might prefer placing your autonomous database in a private subnet. Such discussions have been omitted from this chapter, as they are beyond its scope. It is expected that you have a prior understanding of OCI and its various component services before you plan to work on actual database migration to Autonomous Database.
Generating an OCI API key pair in the pem format
We need to create and use an OCI API key pair to authenticate access to OCI services when invoking from the OCI CLI/SDKs. On the Linux platform, you can follow the following steps to create an OCI API RSA key pair in the pem format without a passphrase. For Windows, you can use Git Bash and run the commands, for which you must first install Git Bash for Windows. Here, we demonstrate the steps to create an RSA key pair in the pem format in zdmhost that will be used by the ZDM service. Follow the following instructions to create the key pair in the pem format without a passphrase:
# Create .oci directory in zdmuser home directory
[zdmuser@zdmhost ~]$ mkdir ~zdmuser/.oci
[zdmuser@zdmhost ~]$ cd ~zdmuser/.oci
# create private key in pem format without passphrase
[zdmuser@zdmhost .oci]$ openssl genrsa -out ~/.oci/oci_api_key.pem 2048
[zdmuser@zdmhost .oci]$ chmod 600 oci_api_key.pem
# create public key in pem format from the private key file
[zdmuser@zdmhost .oci]$ openssl rsa -pubout -in oci_api_key.pem -out oci_api_key_public.pem
# View the content of public pem file.
[zdmuser@zdmhost .oci]$ cat oci_api_key_public.pem
# Copy output to be used when adding public key in OCI for authenticating API request
You need to copy the output of the cat command for the public key and add it to the OCI logged-in user API keys by clicking on the Add API Key button, as shown in the following figure:
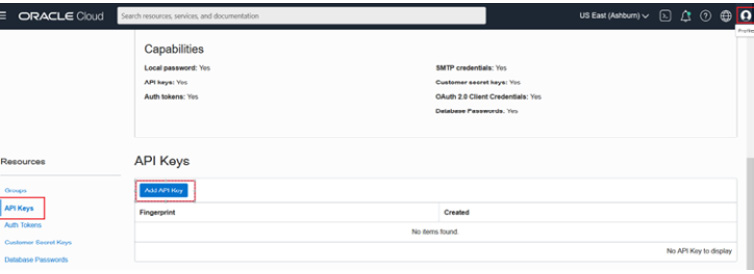
Figure 3.6: Add API Key
This will open up a popup to provide the public key file in the pem format. It gives you three options, as shown in the following figure:

Figure 3.7: Adding a public API
Since we already have the file saved locally on our desktop, we will choose the second option and select the public key file in the pem format, as shown in the following figure:

Figure 3.8: Adding a public API
As you can see in the figure, the publicKey.pem file has been selected:

Figure 3.9: publicKey.pem
Click Add, which opens up a pop-up confirmation screen, as shown in Figure 3.10. Copy the contents under the Configuration File Preview Read-Only box, as they will be used to create the CLI config file in the zdm host.

Figure 3.10: AddPublicAPI_Key_5
Click Close. This will store the file with fingerprint information, as shown in Figure 3.11. Save this fingerprint information to be used later while preparing the response file.

Figure 3.11: AddPublicAPI_Key_6
As the concluding step of OCI API key pair creation, you must create the config file that will be used by the OCI CLI. Using the copied contents, as seen in Figure 3.11, create a config file in the .oci directory and fill in the respective values from your OCI-privileged user account:
# Create .oci directory in zdmuser home directory
[zdmuser@zdmhost ~]$ cd ~zdmuser/.oci
[zdmuser@zdmhost ~]$ vi config
user=<fill it>
fingerprint=<fill it>
tenancy_id=<fill it>
region=<fill it>
key_file=/home/zdmuser/.oci/oci_api_key.pem
Fill in the values and save the config file.
Installing the OCI CLI
These steps can be directly referred to in the OCI documentation. For the sake of simplicity, the steps performed to install the OCI CLI are mentioned as follows. These steps should be performed either as the root user or, if zdmuser has sudo privilege, they can be directly executed, as shown here:
# Create .oci directory in zdmuser home directory
[zdmuser@zdmhost ~]$ sudo yum install -y python36-oci-cli
[zdmuser@zdmhost ~]$ oci –version
# Test command line
[zdmuser@zdmhost ~]$ oci iam region list
Preparing an SSH key pair
In order to freely log in from zdmhost to a source database server or vice versa, generate a passwordless SSH key pair and use the same key pair for both the source database server and zdm host. You can find a lot of online references on how to create an SSH key pair. For the sake of simplicity, store the same public key in both the source database server and the zdm host .SSH directory. Validate passwordless access from zdmhost to the source database server and vice versa.
The following represents an example of how zdmuser logs in from zdmhost to an on-premises database host:
[zdmuser@zdmhost ~]$ ssh -i /home/zdmuser/.ssh/privateKey opc@opdb
Creating an Object Store bucket
During the migration process, as part of the initial synchronization of the source database to the target database, the migration process creates a Data Pump backup of the database schemas and stores it in an OCI Object Store bucket. Here, we are not going to see the entire steps for how to create an OCI Standard Object Store bucket, but instead just a two-point reference to how it looks after creating the storage bucket.
As shown in Figure 3.12, navigate to Buckets in the OCI console:
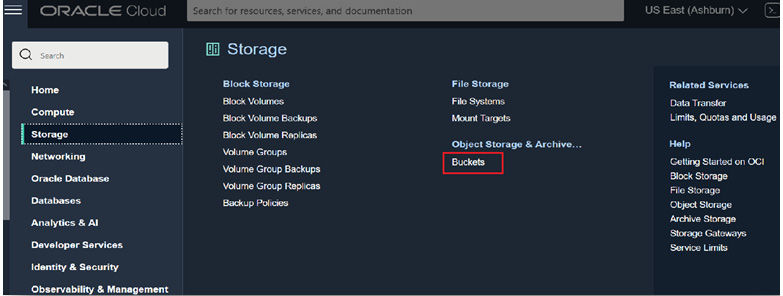
Figure 3.12: OCI_ObjectStore_Bucket_1
This will list the previously created bucket, zdm_bucket, as shown in Figure 3.13:

Figure 3.13: OCI_ObjectStore_Bucket_2
Creating an OCI user authentication token
Data dumps stored in an Object Storage bucket can be uploaded into Autonomous Database. This is done using the Autonomous Database APIs that can authenticate with the OCI Object Store bucket, read the files, and upload them to Autonomous Database. This authentication mechanism is achieved by creating an authentication token for the OCI user. See the following figure:

Figure 3.14: Authentication_Token_Navigate
This generates the following token:

Figure 3.15: Authentication_Token_Generate
Such a generated token looks like the following:

Figure 3.16: Authentication_Token_Generated
Keeping the same time zone
You must validate that the source database, ZDM service host, and target database are all in the same time zone. If not, liaise with your system administrator to ensure they are all in the same time zone before attempting to perform the migration.
Database character set
You must ensure that the database character set of the source and target are the same for the migration to be successful.
Setting up the GoldenGate Microservices hub in the OCI marketplace
Let’s go through each step in detail.
Provisioning
Zero-downtime logical migration to Autonomous Database can be performed using Oracle GoldenGate. In this migration process, we will provision Oracle GoldenGate microservices from the OCI Marketplace. Completing the provisioning of the Autonomous Database prior to provisioning Oracle GoldenGate microservices will automatically import the Autonomous Database wallet, while setting the environment for deployment. Here, we will learn about the basic steps to provision Oracle GoldenGate in OCI and perform the required configuration. I would also advise you to refer to the public-facing document for Oracle GoldenGate to get a more detailed understanding of its capabilities.
Let’s now move on to learn about the steps involved in provisioning Oracle GoldenGate. Log in to your OCI account and navigate to All Applications under Marketplace, as shown in the following figure:

Figure 3.17: OCI_Marketplace
In the next window, search for goldengate, as shown in the following figure, which will shortlist applications with that naming pattern. Choose the application listed as Oracle GoldenGate for Oracle – Database Migrations, which has a price mentioned as Free. This service can be used for 183 days without charge; hence, you should prepare a proper migration plan for all the databases that are going to be migrated using ZDM, in the logical migration process. If your current Oracle Golden Gate for Oracle – Database Migrations service exceeds the mandated 183 days, then the service instance will become inactive, in which case you have to provision another instance of the service and redo all the configurations you made earlier for the purpose of migration; hence, it is very important to have a proper migration strategy to migrate databases within the service timeline limit. Note that it’s the service that is free but not the compute on which the service will be provisioned; hence, you must pay for the compute and storage.
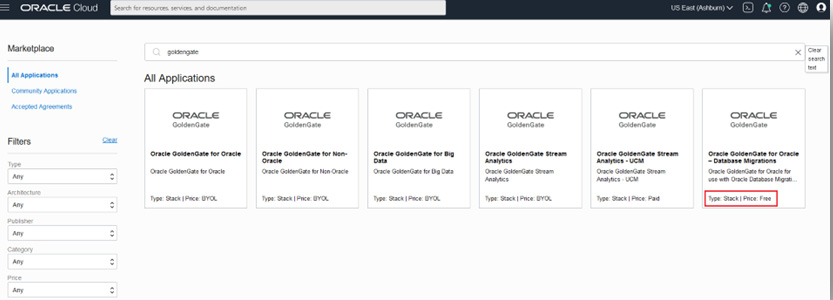
Figure 3.18: Search_GoldenGate
You can find the software price per OCPU, as shown here:

Figure 3.19: GoldenGate_Microservices_For_DB_Migration
As highlighted in the box in Figure 3.19, the charge you pay for this service is $0. The current version of Oracle GoldenGate Microservices available is 19.1.0.0.211019. From the dropdown, select the compartment where you already have your Autonomous Database instance in order to automate some of the prerequisite actions.
Check the checkbox that says I have reviewed and accept the Oracle terms of use, and this will enable Launch Stack, which you can click on, as shown in the following figure:
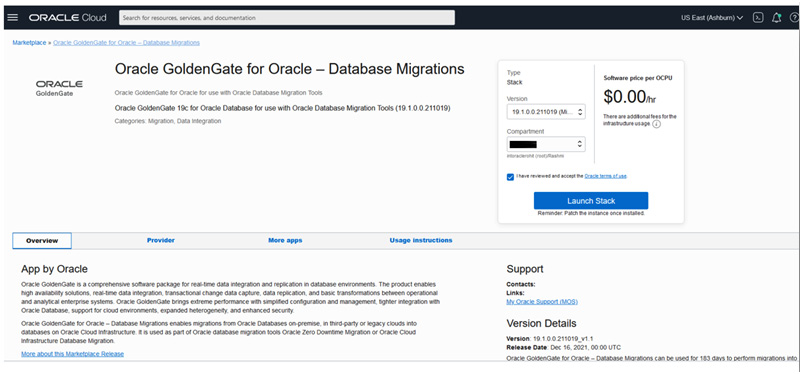
Figure 3.20: Launch_OGGMA_Stack
Fill in the details for the stack, as shown here:

Figure 3.21: Fill_OGGMA_Stack_1
Click Next and fill in the required details, as per your environment. As shown in Figure 3.22, fill in Network Settings:

Figure 3.22: Fill_OGGMA_Stack_Nw
The following figure shows the chosen availability domain and shape based on your available quota limits:
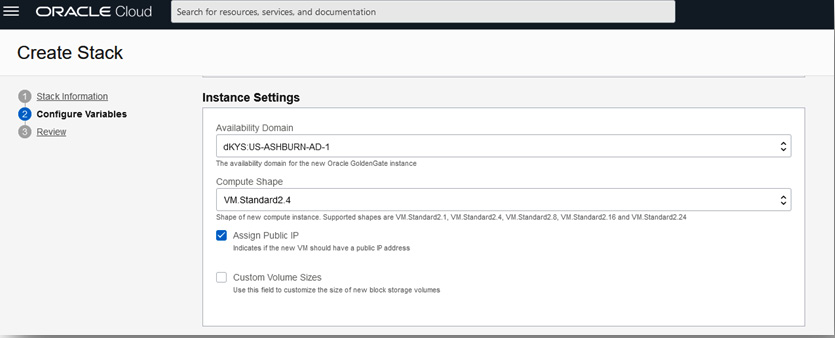
Figure 3.23: Fill_OGGMA_Stack_Inst
The next figure is a crucial one where you choose the deployment – that is, the source is your on-premises database and the target is your Autonomous Database deployment:

Figure 3.24: Fill_OGGMA_Stack_Deployment
Fill in the SSH public key and check the summary of your inputs using which the stack is ready for execution using Terraform, as shown in the following figure:

Figure 3.25: OGGMA_Stack_Summary_1
Here’s another example of the stack summary:
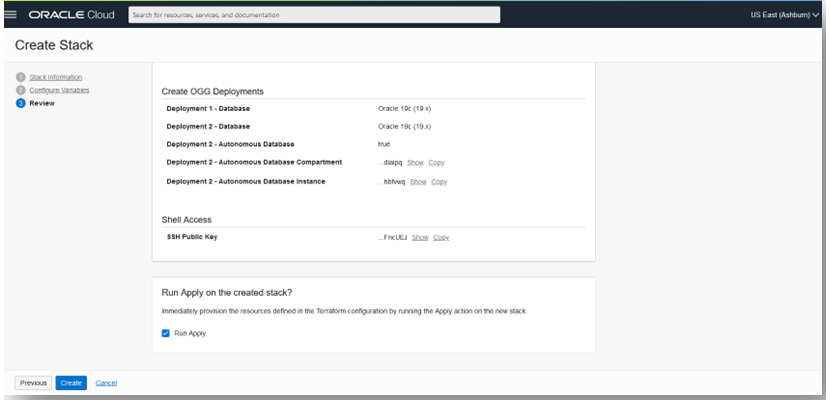
Figure 3.26: OGGMA_Stack_Summary_2
Click Create. This will submit a resource manager job and provision the necessary resources, using the inputs you provided for the instance creation. You can wait for its completion, as shown in Figure 3.26:

Figure 3.27: OGGMA_Stack_RMJ
Meanwhile, you can monitor the logs to get the IP of the OGG microservices compute, as shown in Figure 3.28:

Figure 3.28: OGGMA_Stack_RMJ_Logs
After completion of the job, navigate to the compute instance section in OCI, where you can see the compute instance provisioned for Oracle GoldenGate, as shown in Figure 3.29:

Figure 3.29: OGGMA_Compute
Click on the compute to view the details, as shown in Figure 3.30:
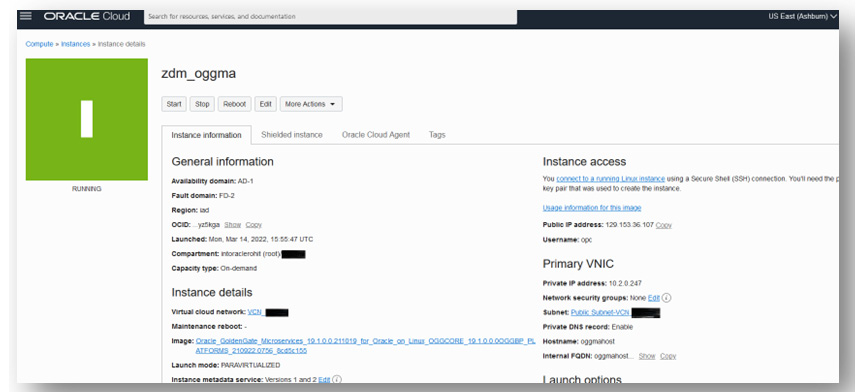
Figure 3.30: OGGMA_Compute_Details
Copy the public IP and log in to the host as the OPC user using the SSH private key pair of the public key that you uploaded during the provisioning steps. Run the OS “cat” command to check the contents of the /home/opc/ ogg-credentials.json file. This file contains the initial login credentials to log in to the OGGMA UI in the browser, as shown in Figure 3.30:

Figure 3.31: oggadmin_Initial_Credential_.jpg
You will initially use these credentials for first-time login to the OGGMA Service Manager or the admin server after logging in. You can change the password after you log in.
Open the Service Manager using the public IP in the URL as shown in the compute – for example, https://129.153.36.107/. Accept the risk and continue.
To log in, use oggadmin as the username and the same password contained in the ogg-credentials.json file, as shown here:
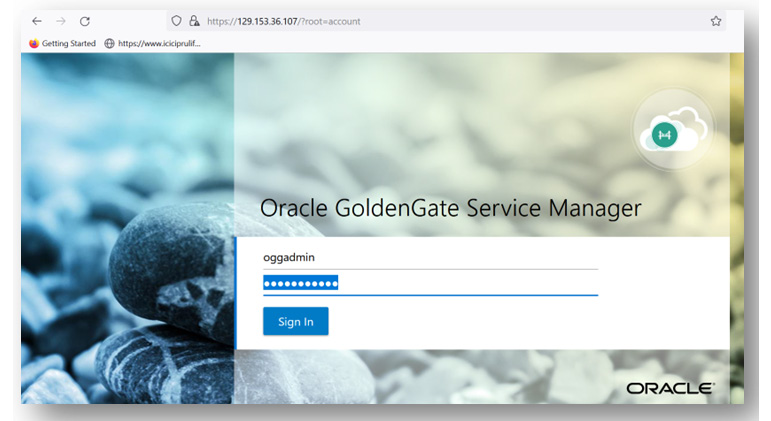
Figure 3.32: OGGMA_Service_Manager_Login
This will show the different deployments and associated ports for each deployment, as shown here:
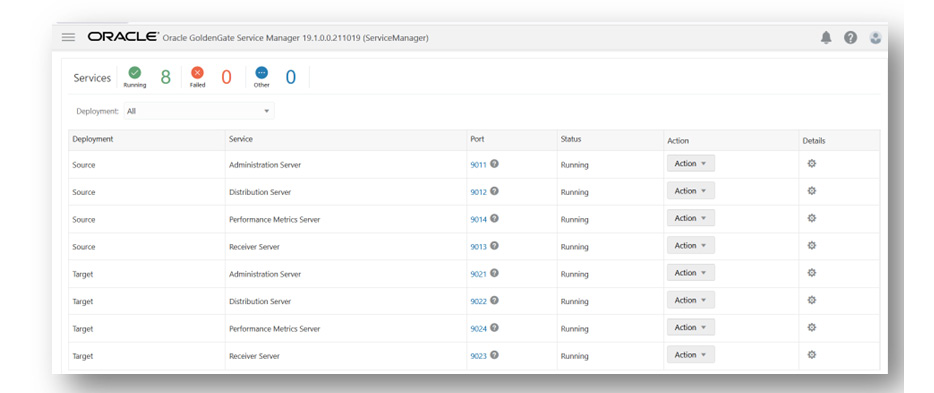
Figure 3.33: OGGMA_Service_Manager
The Change Password settings can be found in the path, as shown here:

Figure 3.34: OGGMA_Service_Manager_ChangePwd
You can change the password by clicking on Change Password, as shown in the top right corner of the previous figure. Similarly, you can change the password for the oggadmin user after you log in to the administration server for source deployment (click on port 9011) and target deployment (click on port 9021). After changing the password, you will have to log in again with a new password.
GoldenGate configuration in the source database
After provisioning, the next step requires configuring the database setting for Oracle GoldenGate before ZDM can use it to prepare the zero-downtime logical replication.
Once patching is done, the following are a few of the database configuration steps required for Oracle GoldenGate, and if you are familiar with it, then you should already be familiar with the complete steps.
Execute the following steps in the source database, as shown in the following code block:
SQL> sqlplus / as sysdba
# If database is not in archivelog mode
SQL> shutdown immediate
SQL> startup mount
SQL> alter database archivelog;
# enable force logging and supplemental logging
SQL> alter database force logging;
SQL> alter database add supplemental log data;
SQL> alter system set enable_goldengate_replication=true;
SQL> alter system set streams_pool_size=2048M;  # for running integrated extract
SQL> alter database open;
SQL> archive log list
SQL> sho parameter goldengate
SQL> alter system switch logfile;
SQL> select supplemental_log_data_min, force_logging,log_mode from v$database;
# To process certain updates for object types like user-defined types, Nested tables, XML Types #objects, Oracle Golden Gate uses flashback queries on UNDO tablespaces, hence you may set #below if you have these data types
SQL> alter system set undo_management=auto;
SQL> alter system set undo_retention=86400; # set the value as suitable
# For sizing of undo tablespaces and LOB data types, please check the golden gate documentation under section "Preparing the database for Oracle GoldenGate" for guidance on additional configuration steps
Next, create an Oracle GoldenGate admin user in the source database that will be responsible for capturing real-time database changes. If you have a container database, then you must have two sets of users, as explained here:
***** Source Database User credentials for Oracle GoldenGate configuration ******
# If source database is a multitenant database, you have to create a goldengate administrator user in the container as well as pluggable database. In case of non-container database, just create a goldengate administrator user. After that, you must grant specific privileges to that user
# In container database
sqlplus / as sysdba
# Prefix "c##" in user name, as in this example
SQL> create user c##ggadmin identified by <&pwd> default tablespace users temporary tablespace temp;
SQL> grant connect, resource to c##ggadmin;
SQL> grant unlimited tablespace to c##ggadmin;
SQL> alter user c##ggadmin quota unlimited ON USERS;
SQL> grant select any dictionary to c##ggadmin;
SQL> grant create view to c##ggadmin;
SQL> grant execute on dbms_lock to c##ggadmin;
SQL> exec dbms_goldengate_auth.grant_admin_privilege('C##GGADMIN',container=>'ALL');
# In pluggable database or if it's a non-container database (login as sys user)
SQL> alter session set container=&pdb ; --applicable for pluggable database only
SQL> create user ggadmin identified by <&pwd> default tablespace users temporary tablespace temp;
SQL> grant connect, resource to ggadmin;
SQL> alter user ggadmin quota 100M ON USERS;
SQL> grant unlimited tablespace to ggadmin;
SQL> grant select any dictionary to ggadmin;
SQL> grant create view to ggadmin;
SQL> grant execute on dbms_lock to ggadmin;
SQL> exec dbms_goldengate_auth.GRANT_ADMIN_PRIVILEGE('GGADMIN');
When you have completed the user creation, you have to install the UTL_SPADV or UTL_RPADV (in 19c) package in the source database (a container database in the case of a multitenant) for Integrated Extract performance analysis:
# Command to be executed taking the multitenant database into example.
[oracle@opdb ~]$ cd $ORACLE_HOME/rdbms/admin
[oracle@opdb ~]$ sqlplus / as sysdba
SQL> grant execute on DBMS_LOGREP_UTIL to C##GGADMIN;
SQL> grant select on SYSTEM.AQ$_QUEUE_TABLES to C##GGADMIN;
SQL> grant select on SYSTEM.AQ$_QUEUES to C##GGADMIN;
SQL> grant execute on DBMS_LOGREP_UTIL to C##GGADMIN;
SQL> conn c##ggadmin@<pdb>
SQL> @utlrpadv.sql
So, this completes all the steps that are required for source configuration.
Preparing a target deployment DB environment
In this scenario, the target database chosen for migration is Oracle Autonomous Database. Connection to Autonomous Database is protected using a wallet. In order to establish a connection to the Autonomous Database from the Oracle GoldenGate target deployment, you have to download your Autonomous Database wallet file from the Autonomous Database details page in the OCI console and transfer it to the /u02/deployments/Target/etc/adb location in the GoldenGate compute, and extract the ZIP file to the same location, as shown in the following figure:
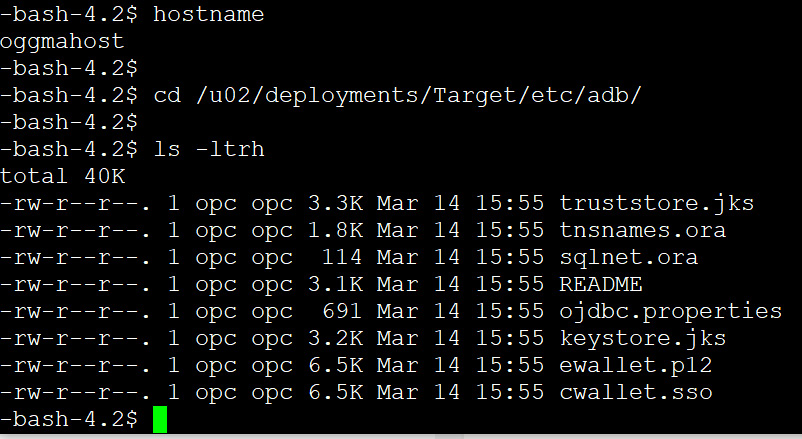
Figure 3.35 – GoldenGate compute
During migration, this wallet file will be used to set up a database connection in Oracle GoldenGate.
Activating a target GoldenGate Admin user
Oracle Autonomous Database by default includes the GoldenGate admin user with the name ggadmin, which has a locked account status. You have to unlock the user account with an admin user login. By default, one of the GoldenGate database parameters named enable_goldengate_replication is also enabled. Hence, you can also check the status of the parameter by querying the database. The following are the steps that you can follow to unlock and check the parameter value:
Connect with admin user in autonomous database and unlock the ggadmin account
sqlplus admin@<atp db name>_low
SQL> select username,account_status from dba_users where username='GGADMIN';
SQL> alter user ggadmin identified by Oracle123456 account unlock;
# Check the status of parameter enable_goldengate_replication
SQL> select name, value from v$parameter where name = 'enable_goldengate_replication';
Setting up the OCI CLI in the source database server for file transfer
You need to set up the OCI CLI in the source database server, which will be used to transfer files from a local system to OCI object storage.
Refer to https://docs.Oracle.com/en-us/iaas/Content/API/SDKDocs/cliinstall.htm for information on setting up.
Here is a quick outline of the steps:
# Check OS platform release
[oracle@opdb ~]$ cat /etc/oracle-release
Oracle Linux Server release 7.9
# Install oci cli
[oracle@opdb ~]$ sudo yum install -y python36-oci-cli
#Check oci cli version
[oracle@opdb ~]$ oci --version
3.6.2
# Setup oci cli config and provide inputs, for private key, you must provide the private key in .pem format as we created earlier in the step.
[oracle@opdb ~]$ oci setup config
Preparing a ZDM response file for migration
zdm requires inputs for some parameters that it will use during migration. You can collate all these parameter file values into a response file, the template for which you can find in the ZDM_HOME directory.
Follow the following sequence of steps to create the response file:
[zdmuser@zdmhost ~]$ cd $ZDM_HOME/rhp/zdm/template/
[zdmuser@zdmhost template]$ cp zdm_logical_template.rsp zdm_logical_template.rsp.orig
[zdmuser@zdmhost template]$ vi zdm_logical_template.rsp
# Set the parameter values as you can see in below example.
MIGRATION_METHOD=ONLINE_LOGICAL
DATA_TRANSFER_MEDIUM=OSS
TARGETDATABASE_OCID=<OCID of target database service in OCI>
# Fill the parameter values under each group
#General inputs (Source and target database details, connection details admin user details etc)
#GoldenGate parameter settings
#Datapump settings
A dry run of ZDM
In this step, you do a dry run of the migration process using ZDM:
# In ZDM service host
[zdmuser@zdmhost ~]$cd $ZDM_HOME/bin
[zdmuser@zdmhost bin]$ ./zdmcli migrate database -rsp /home/zdmuser/zdmhome/rhp/zdm/template/zdm_logical_online.rsp
> -sourcesid orcl
> -sourcenode xxx.xxx.xxx.xxx
> -srcauth zdmauth
> -srcarg1 user:opc
> -srcarg2 identity_file:/home/zdmuser/.ssh/privateKey
> -srcarg3 sudo_location:/bin/sudo
> -eval -skipadvisor
This will create an audit ID for the execution and prompts you for a password for the different database users, such as the system, ggadmin, oggadmin, and the OCI user OCID, and then create a job ID for the execution, as shown in Figure 3.36:

Figure 3.36: Creating an audit ID
You can check the status of the job at intervals by querying the job ID. You should see the COMPLETED status for each step, as shown in Figure 3.37:
./zdmcli query job -jobid <job#>
job# is the job id that was created when you invoked the migration job.
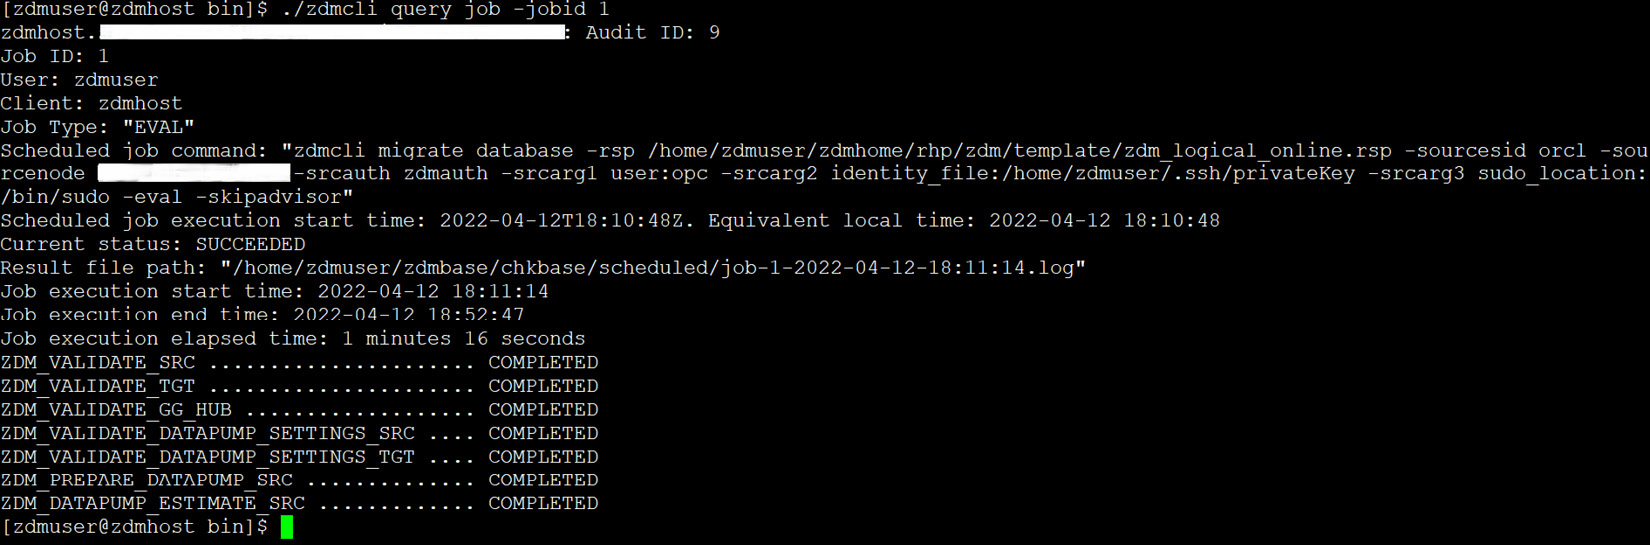
Figure 3.37: zdm_eval_job_status
If any of the steps resulted in a failed status, you can work on to fix the issue and rerun the dry run until you see each step has a COMPLETED status.
Run the migration job
Once you see the status has completed in the dry run, you can proceed to run the actual database migration with ZDM, using the same command without the -eval option:
# In ZDM service host
[zdmuser@zdmhost ~]$cd $ZDM_HOME/bin
[zdmuser@zdmhost bin]$ ./zdmcli migrate database -rsp /home/zdmuser/zdmhome/rhp/zdm/template/zdm_logical_online.rsp
> -sourcesid orcl
> -sourcenode xxx.xxx.xxx.xxx
> -srcauth zdmauth
> -srcarg1 user:opc
> -srcarg2 identity_file:/home/zdmuser/.ssh/privateKey
> -srcarg3 sudo_location:/bin/sudo
> -skipadvisor
Similarly, it will prompt you for inputs and then submit a job, as shown in Figure 3.38:

Figure 3.38: Database_migration_using_zdmcli
This will create your GoldenGate source and target credentials, create GoldenGate extracts, run an initial load, and then run replication into the target autonomous database, allowing you to switch your application connection to the new environment and then clean up the environment.
In the following figure, note that there was an error creating the GoldenGate capture process due to an “insufficient privilege” error. You can log in to the source and run the database commands to grant the appropriate privilege to the ggadmin user. Once that issue is fixed, you can invoke zdmcli once more with the same parameters, and it will again create a new job and start executing it.
When the issue is resolved and the migration job is again invoked with zdmcli, then, as shown in Figure 3.39, it is able to run the capture process.

Figure 3.39: Golden_Gate_extract.jpg
You can go back to the terminal and query job_id, where you can see the series of steps it is executing and the status of the execution at each step. You can see that the step names are quite self-explanatory – for example, ZDM_ADD_HEARTBEAT_SRC, ZDM_PREPARE_GG_HUB, and ZDM_DATAPUMP_EXPORT_SRC, which indicate the creation of a heartbeat table in Oracle GoldenGate, preparing the GoldenGate Hub, and taking expdp from the source database respectively, and it also indicates whether the step was completed successfully or failed. It has different statuses such as COMPLETED, STARTED, and PENDING, as you can see in the following figure:

Figure 3.40: zdmcli_migration_steps
Note here that it will create a bucket to store the source dump files in object storage, as the target is Autonomous Database. In Figure 3.41, you can see the list of Data Pump dump files uploaded automatically by ZDM into OCI object storage:

Figure 3.41: Data_dump_in_ObjectStorageBucket
After completion of initial loading using Data Pump, it will create a target replication process, as shown in Figure 3.42:

Figure 3.42: add_OGG_replicat
In Figure 3.43, you can see that the replication process is created in the target deployment (port 9021 on the Service Manager screen). This process will run continuously until all the replication is done and it is in real-time sync with the source database.

Figure 3.43: add_replicat
Once all the steps have been completed, they will each show a COMPLETED status, as shown in Figure 3.44:
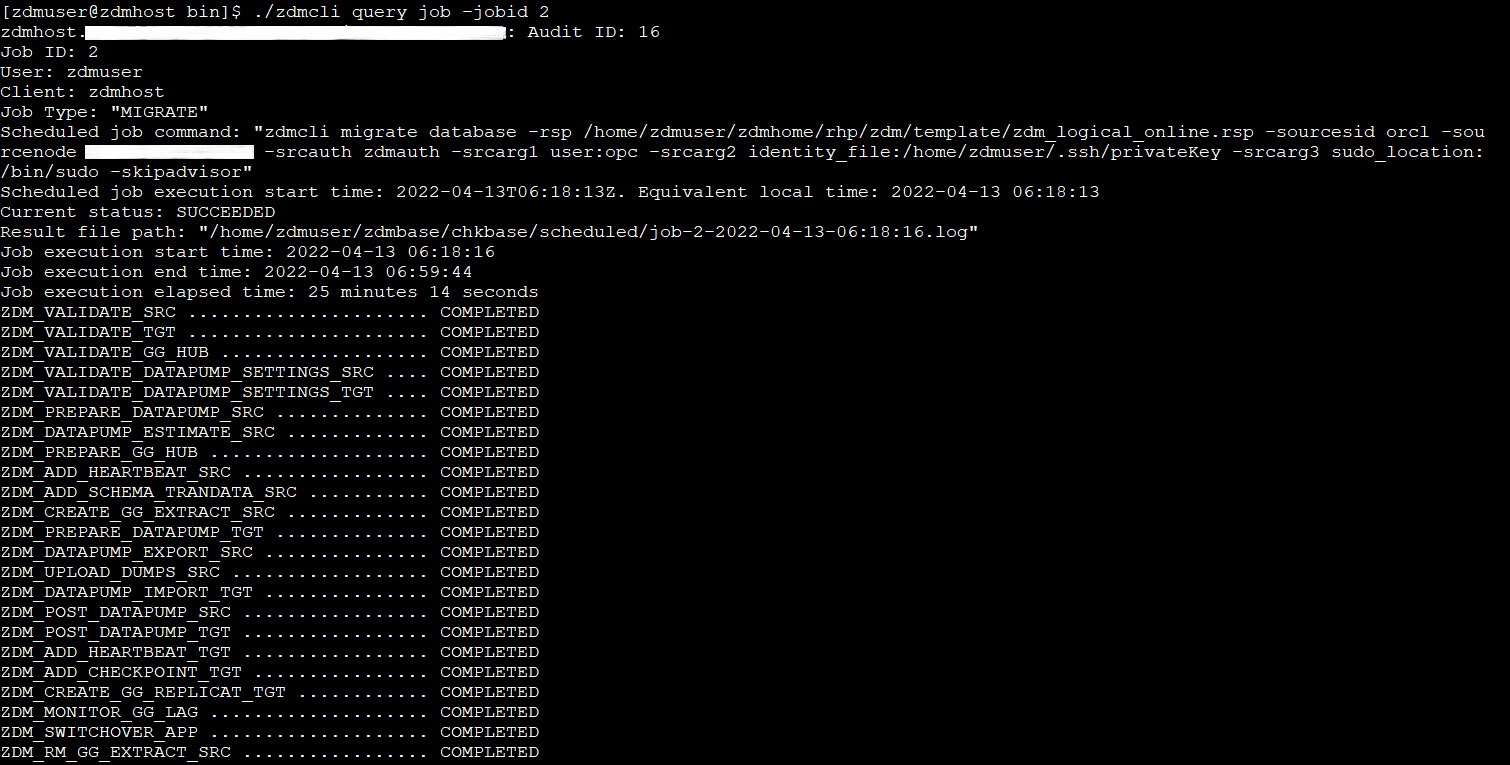
Figure 3.44: All_steps_status
The last step involves cleaning up all the created resources. You can perform a validation of the migration by querying the schema and its objects in the target autonomous database, as shown in Figure 3.45. Later, you can compare it with the source schema.

Figure 3.45: Schema_objects_in_target_db
This results in us successfully migrating our source database into the target autonomous database with automated migration, using ZDM.
Summary
Throughout this chapter, we covered a very key topic of Autonomous Database – that is, migration to Autonomous Database if we need to leverage the rich features available within the service. We discussed some of the regular considerations when migrating a database in general, and what precautions or considerations need to be made for a successful migration. Briefly, we talked about the different migration approaches that are possible while migrating to Autonomous Database and focused on one of the recommended automated processes for migration, zdm. We split the migration into multiple parts; first, we discussed the prerequisites, followed by a detailed discussion of each of the different steps involved in this utility, and finally, we simplified the entire process by clubbing them together as one invocation, using a response file that runs the steps in sequence. A concluding part of the step was to perform a sanity check. This method allowed us to initiate multiple migrations in one go with less manual intervention. The objective of performing the individual steps is to help you understand the task accomplished in each step so that if you invoke via a response file and encounter an error, you then know what steps are involved and can easily troubleshoot and fix the issue.
OCI also provides a fully managed service, DMS, which provides a self-service experience to migrate your on-premises, Oracle Cloud, or Amazon RDS Oracle databases into co-managed or autonomous databases in OCI. Under the hood, it is entirely driven by a ZDM product that automatically handles the ZDM configurations.
In the next chapter, we will discuss how to ease out the preparation of development or a non-production database environment with refreshes of production, using the available cloud tooling.
Questions
- What are the different methods to migrate to Autonomous Database?
- How does zero-downtime ensure as little downtime migration as possible to Autonomous Database?
- Where are dumps stored for import?
- What is the minimum supported database version for migration?
- Are you required to create new tablespaces before initiating Data Pump Import?
Answers
- Data Pump, SQL *Loader, SQL Developer, Oracle GoldenGate, Oracle Data Integrator, and other ETL tools.
- Using logical online migration, which automates the usage of Data Pump combined with Oracle GoldenGate.
- An OCI Object Store bucket.
- 11.2.0.4.
- No, in Autonomous Database, we cannot create new tablespaces. It is restricted; we can only remap tablespaces during import. There are two tablespaces available, one for DATA and another for RECO. Besides that, in the ZDM migration method, we just have to provide the inputs in the response file, where we can also use remap_tablespace and let the ZDM tool take care of the import operation.