4
ADB Disaster Protection with Autonomous Data Guard
From our understanding of the chapters so far, Autonomous Database definitely is a database deployment of choice in the cloud. In this chapter, we explore more how it provides an additional level of database protection from any kind of disaster. We will also learn how to configure our Autonomous Database with a Disaster Recovery (DR) solution to ensure business continuity and understand the Recovery Point Objective (RPO) and Recovery Time Objective (RTO) concepts in the context of Autonomous Database. We’ll also learn about the cloud tool available for automating most of the manual steps that you would otherwise do in a traditional non-cloud or IaaS-based deployment.
In this chapter, we will cover the following topics:
- Overview and associated terminologies
- AuDG
- Status and operations in AuDG
We will conclude this chapter by making a short summary of what we have learned in this chapter, followed by some knowledge checks to assess your understanding.
Overview and associated terminologies
To begin with, Oracle Autonomous Database has all the essential properties that significantly waive much of the data management overhead while being a cost-effective database solution. Needless to say, this is a highly available (HA) database solution in Oracle Cloud Infrastructure (OCI) with an SLA of 99.95% for a shared infrastructure and an SLO of 99.95% for Autonomous Database for a dedicated infrastructure or Exadata Cloud at Customer (C@C). Thus, this makes it an ideal platform for our mission-critical application, as applications can run uninterrupted irrespective of whether there is any database maintenance activity or there is any fault in any component of the underlying infrastructure for the reasons discussed earlier.
Now, the next question that comes to mind is “Although my current Autonomous Database is HA and protected from any kind of failures, is it 100% protected?” This leads us to perform the same level of risk assessment that we would do even for an on-premises database deployment in our data centers – that is, we must have the best redundant infrastructure components, implement the best-known HA solution for our database, and all within the boundary of our data center, checking whether we are still protected from unforeseen disasters such as earthquakes, floods, and fires. The same applies to OCI as well. So, in the event of any natural disaster of this kind, our database systems should be resilient by having a DR environment, far from the primary impact site and a mirror copy of your primary database system (a standby). The answer to meet this critical requirement in Autonomous Database is fulfilled by a new capability called Autonomous Data Guard (AuDG). AuDG is a fully automated DR solution to protect your mission-critical application databases running in Oracle Autonomous Database, safeguarding them from any disaster due to site failures, human error, or data corruption.
Let’s now expand our understanding of the capability in the following sections and learn about what kind of DR solution it offers and the different operational mechanisms.
AuDG
With Oracle Autonomous Database, you have the option to create a mirror copy of your primary Autonomous Database either locally or cross-region using AuDG. This is fully automated, wherein you just have to enable the option against your Autonomous Database instance and as the name sounds, under the hood, a standby copy of your primary Autonomous Database is automatically created with the needed settings for failover or switchover with zero manual intervention. This feature is available with Autonomous Database – for Shared, Dedicated, and Exadata C@C deployment options. Throughout this chapter, we will discuss this feature and gain more insight into its functionality and usage.
This chapter is dedicated to studying the feature functionality more from an Autonomous Database Shared infrastructure service perspective. The AuDG configuration for Dedicated or ExaC@C is slightly different and is not covered as part of this chapter, but if there is a need, you must refer to the OCI public documentation to understand the configuration steps:
https://docs.oracle.com/en/cloud/paas/autonomous-database/dedicated/adbau/index.html#articletitle
The term autonomous is used deliberately for Data Guard and it rightfully suits the definition. By just clicking on the Enable link in the Autonomous Data Guard section of your Autonomous Database Details page, a standby Autonomous Database of your Autonomous Database (the primary) is created without any manual intervention. It allows the same failover and switchover capabilities as you would achieve for an on-premises database.
You can view the details of the standby instances of your primary Autonomous Database by clicking on the Autonomous Data Guard option under the Resources section, where it shows the standby instance name, its role, its state, whether available or stopped, and the region it is created in.
You have two choices to decide how you want to enable AuDG – that is, you can choose to have a local standby in the same region as your primary, a remote standby in a region (subscribed) other than your primary, or you can have both a local and cross-region standby. These types of deployment differ slightly in terms of capabilities and we will discuss this in the following section.
Local standby
In case of a local standby, AuDG creates a standby database in the same region as your primary database and the provisioning location of the standby database depends on the number of Availability Domains (ADs) available for the dedicated OCI region. In multi-AD OCI regions, the standby instance is created in another AD other than the AD where the primary database exists, and for single AD OCI regions, the standby database is created in another fault domain other than the fault domain where the primary database exists. This provides resilience and protection against any kind of data loss in the event that a primary database becomes unavailable. It should be noted that this is an advanced feature, only available with an Autonomous Database that is on 19c release and above – hence if your autonomous instance is on 18c, you need to upgrade to 19c. This is not available for Autonomous Databases provisioned with an Always Free tier subscription in OCI:

Figure 4.1: AuDG – local standby
AuDG continuously monitors the primary Autonomous Database instance and if the primary instance becomes unavailable or goes down, then AuDG automatically converts the standby database to the primary database with the least interruption. Once the failover completes, AuDG creates a new standby database for you automatically, which will be a standby copy of your new primary Autonomous Database. If you wish to do a switchover, you can do so by clicking on the provided link on the Autonomous Database Details page, which we will see later as we progress.
In the case of a local standby database (in the current region), Autonomous Database does not give you access to the standby database.
Since the standby database is a copy of the primary database, all database features active in the primary instance will also be available whenever there is a failover or switchover from the primary to the standby instance. All operations performed by you in the primary – for example, scaling up the OCPU count or enabling auto scaling – are executed on the standby by AuDG. You can perform start and stop operations of the primary database, but you cannot perform any such operation on standby, as you do not get access.
In case of a local standby switchover or failover operation, where the standby takes the role of the primary, all database features active in the primary – for example, the OCPU count, auto scaling, licenses, display names, storage, database names, display names, tags, and license options – remain the same in the standby database post switchover or failover operation. OML Notebooks users and notebooks, apex configuration data and metadata, the access control list as set in the primary, and the private endpoint are exactly copied and made available in the standby database. The same Autonomous Database connection wallet is used after a failover or switchover operation. Thus, the end user applications, client connections, and APIs continue to work as before after a failover or switchover operation without requiring you to make any change to your existing application configuration.
The switchover is a manually triggered step; this can be initiated by clicking on the Switchover link in the Autonomous Data Guard section. The automatic failover operation is triggered based on the RPO and RTO.
Remote standby (cross-region standby)
When AuDG is enabled with cross-region, then it provisions a standby database of your primary Autonomous Database cross-region to protect your primary database from any disaster that entirely affects the cloud region where your primary Autonomous Database service is running.
However, there are certain limitations in terms of the regions where a replica standby database can be created and that entirely depends on the region where your primary Autonomous Database is created. The cross-regions where the standby database for your Autonomous Database can be created are called AuDG paired regions. These paired regions match the replication target regions of the OCI block volume primary region exactly. Hence, you must ensure that you have subscribed to the corresponding paired target region for your primary Autonomous Database region or the target region will not be listed when choosing a cross-region standby for your primary Autonomous Database. You can find the corresponding paired region by following this link:
https://docs.oracle.com/en-us/iaas/Content/Block/Concepts/volumereplication.htm
The paired region is the value in the destination region mapped to the source region where your Autonomous Database is provisioned:

Figure 4.2: AuDG – cross-region standby
In contrast to local standby, where you enable remote standby using AuDG for your primary database, you can access the remote standby Autonomous Database from the OCI console. AuDG will perform all the operations that you perform in the primary Autonomous Database in the cross-region standby Autonomous Database – for example, enabling auto scaling or scaling up OCPUs on the primary. These operations are performed automatically in the cross-region standby Autonomous Database and hence you must ensure you have enough resources in the paired region, as in the primary region, for these operations to succeed.
Certain operations can be performed independently in the cross-region standby via the OCI console – for example, network configuration, creating VCNs for private endpoints, and tagging to define keys, values, and similar operations, which are not replicated between the primary and cross-region standby Autonomous Database.
Failover is handled differently in a cross-region standby. If the primary and local standby Autonomous Databases become unavailable, then you have to manually failover to the remote standby to take the role of the primary; AuDG does not perform an automatic failover to remote standby.
Although you can access the cross-region standby database in the OCI console, you can neither connect to the cross-region standby Autonomous Database nor can it be opened for read-only operations. It can only be connected when it takes up the primary role either due to a manual switchover or manual failover operation.
When you enable AuDG for a cross-region standby of your Autonomous Database, you have to download the wallet again after the standby creation. The wallet file contains connection strings for both the primary and standby Autonomous Database and the same wallet can be used for connecting after the failover or switchover to the remote standby Autonomous Database.
Since the order of connection strings in the wallet file impacts the connection time, you must use the wallet downloaded from the region wherever the database is running in the primary role.
There are differences in the way some of the features or options operate in a cross-region standby when compared to a local standby, which we will discuss here:
- Display name suffixed with _Remote: When you enable AuDG cross-region, then the standby Autonomous Database bears the name of the primary database suffixed with _Remote, as you can see in Figure 4.3:

Figure 4.3 – Cross-region standby display name
Under Resources, when you click on the Autonomous Data Guard link on your Autonomous Database Details page, you can see the details of the standby database. The following are the definitions of the columns that we can see on this page:
- Peer Autonomous Database: This is the name of the Autonomous Database that is a replica.
- Peer Role: This shows the current database role of the peer Autonomous Database.
- State: This is the state of the peer Autonomous Database instance and it can be Available or Stopped.
- Region: This is Peer Autonomous Database’s region and will have the same region value as the replica instance if AuDG was enabled for a local standby – otherwise, it will have a different region value when AuDG is enabled for a cross-region standby.
In Figure 4.3, the name of the primary database is Autonomous Transaction Processing Database (ATPDB) with its role indicated as primary beside the name, and in the Autonomous Data Guard option, its Peer Autonomous Database name is the same as that of the primary database suffixed with _Remote to indicate that it’s a cross-region standby database running in a different region from the primary region. Peer Role shows that it is a standby with an Available state for switchover or failover.
- OML notebooks need re-creation: The OML notebooks created in the primary region are not available in the cross-region post-switchover or failover. Hence, you must recreate the OML notebooks that were present in the primary region.
- Private endpoint configuration in cross-standby: The network configuration is not synchronized from primary to standby in a cross-region AuDG setup after a switchover or failover operation. Hence, you can independently configure and update private endpoints on the remote standby before failover or switchover. Additionally, you must complete the Virtual Cloud Network (VCN) peering and domain forwarding for wallets to work across regions. Autonomous Databases have private endpoints with AuDG enabled where primary and remote databases are in different VCNs.
- APIs and scripts: All APIs and scripts that were configured to manage your primary Autonomous Database must be updated to call APIs on a remote standby database region after a switchover or failover operation and it is recommended to use the wallet of the Autonomous Database wherever it runs with the primary role.
- Client application connections: No change to the application connection string is required either during a failover or switchover operation. The only recommendation is to use the wallet from the region where Autonomous Database is running with the primary role. This is because the order of the connection string in the instance wallet file will impact the database connection time. Since the same wallet file contains the entry for both the primary and standby databases, downloading it locally will mean that the primary database entry precedes the remote standby database entry.
- Change in URLs for Autonomous Database tools: The URLs of all the tools associated with Autonomous Database change after a switchover or failover operation to the cross-standby region. This is not impacted in the case of a local standby – that is, URLs of the different tools remain the same even after switchover or failover in the case of a local standby AuDG configuration. These tools URL changes include Database Actions, APEX, ORDS, the Service Console, OML Notebooks, user management, and Graph Studio.
In subsequent sections, you will learn about some of the associated terminologies that apply to an AuDG configuration, what the different operations that you can perform are, and what the different statuses indicate in the respective environment so that you know what the values indicate and what actions you can perform. Let’s understand them individually.
Associated specifications in AuDG
Before we can go ahead with enabling AuDG, let’s first understand the following terminologies that are associated with AuDG.
Region and roles specification
In a local AuDG configuration, the values of regions and roles for a primary and standby Autonomous Database do not differ, but the values carry a difference with a cross-region AuDG configuration. AuDG will assign the value for the region as either primary or remote based on its role at the time when you enabled the Autonomous Data Guard option. That is, if the database has the primary role, then the region value would be primary, and if the role is standby, then the region would be remote and this value for the database does not change after a switchover or failover:
- Primary: This is the region where the primary database or local standby database is provisioned
- Remote: This is the cross-region where the remote standby is initially created
During a failover or a switchover operation, only the value of the role for the Autonomous Database changes – that is, either primary or standby, but the region value does not change.
For example, if you perform a switchover operation from the primary database to the cross-region database, then the naming convention changes as follows:
- Before switchover: ATPDB has a Primary role and its region is Primary while ATPDB_Remote is its Standby database with a _Remote suffix and the region is Remote:

Figure 4.4 – Cross-region standby configuration – pre-switchover operation
- After switchover: The ATPDB role has changed to Standby as you can see in its name and its region is unchanged. This means that ATPDB_Remote now has the Primary role and its region is also unchanged – that is, it’s the Remote region:

Figure 4.5 – Cross-region standby configuration – post-switchover operation
RPO and RTO are two Data Guard-specific concepts on which you build your DR strategies. Let’s take a look at how both of these are defined in the context of an Autonomous Database.
RTO and RPO in an AuDG configuration
RTO is defined as the maximum amount of time required to restore the connection to the standby database after a manual or automatic failover. This is expressed in minutes and the value is usually representative of how much service downtime can be tolerated by the organization in case the database is not available.
RPO is the maximum duration of potential data loss of the primary that can be tolerated during recovery by an organization without causing any critical business loss.
In the context of AuDG, the RPO and RTO values have been pre-defined for local standby based on the type of failover that takes place:
- Automatic failover: This is an event when user sessions cannot connect to the primary instance service for a few minutes, which results in automatic failover to the standby database that takes over the role of primary, and the auto-failover of user sessions succeeds only when no data loss is guaranteed. In this case, the RTO is set to 2 minutes, and the RPO is set to 0 minutes.
- Manual failover: If for some reason, the automatic failover was unsuccessful, then you may initiate manual failover directly from the link on the Autonomous Database Details page. During a manual failover, the system automatically recovers the maximum amount of data, thus minimizing any potential data loss and it may vary from a few seconds to a few minutes of data loss. In the case of local standby, the RTO is 2 minutes and the RPO is 5 minutes.
This objective values differ with cross-standby. Automatic failover is not feasible in the current capability and with manual failover, the RTO is 1 hour and the RPO is up to 5 minutes.
Whatever the failover scenario may be, a new standby database is automatically provisioned for the new primary database post the failover operation.
Status and operation in AuDG
Whether an Autonomous Database is activated with AuDG or not is determined by the Status field in Autonomous Data Guard section of the Autonomous Database Information page. It would bear either of these two statuses:
- Enabled: This indicates that AuDG is enabled for the Autonomous Database
- Disabled: This indicates that AuDG is not enabled for the Autonomous Database
Figure 4.6 shows the details page of an ATPDB:

Figure 4.6 – ATP details page
If you notice in Figure 4.4, there is a section named Autonomous Data Guard, it has a status of Disabled and an Enable link beside that. If you click on the information symbol, it states the following:
“Autonomous Data Guard provides a standby database instance in a different availability domain or in a standby database instance in different region. With a standby database in the current region, if the primary instance becomes unavailable, Autonomous Database automatically switches the role of the standby database to primary and begins recreating a new standby database. With a cross-region standby database, you can perform a manual failover to the standby database if the current region goes down.”
That is a quick tooltip to inform anyone about the feature and how it performs failover to ensure high availability.
Now, let’s discuss some of the operations associated with AuDG.
Disable operation
This allows you to disable AuDG for your Autonomous Database. There could be various reasons why you would like to disable AuDG. For example, you may wish to disable AuDG on a database instance that no longer serves as a production database or that doesn’t have critical data anymore after a consolidation operation and can only be used for development. In this case, data loss can be tolerated and a regular backup would preserve the changes. There may be a scenario in which to have a cross-region standby and disable the local standby, instead of having both. It may be the organization strategy as per the business needs to disable AuDG in one region and enable it in another region and likewise, other reasons where you may feel the necessity to disable AuDG.
If AuDG is already enabled, then the Disable link appears against the Status field under the Autonomous Data Guard section of the Autonomous Database Details page. Note that disabling a remote standby is only allowed from the primary region. If you have performed a switchover or manual failover to the remote region, the database in the primary region will have a standby role. This will not allow you to disable the remote standby in the primary region. In order to disable the remote standby, first, you must perform a switchover so that the database in the primary region runs with a primary role. The Disable link will appear only if the Autonomous Database in the primary region has a primary role.
Click on the Disable link where you are prompted to select the autonomous standby database and provide the database name and confirm the Disable dialog box. If you have both a local and remote standby, you will have to disable each one of them individually. Disabling AuDG changes Lifecycle State to Updating and in the background, the standby database is being terminated. It also generates a Disable Autonomous Data Guard work request, which would be visible in Resources under Work Requests. If you enable AuDG for your Autonomous Database again, then it will create a fresh standby database for your Autonomous Database.
Enable operation
This allows you to enable AuDG for your Autonomous Database when Lifecycle State shows as Available. Click on the Enable link to configure AuDG for your Autonomous Database service. The Autonomous Database service could be an autonomous data warehouse, ATP, or an autonomous JSON instance. The Enable option will create a standby instance of your primary Autonomous Database. You can choose to either create a local or a cross-region standby database or both. Prior to enabling AuDG, you must ensure that you have ample resources (in terms of compute and storage) to provision a standby database, whether a local one, a remote one, or both. For a cross-region standby, your tenancy must be already subscribed to the paired regions. Otherwise, when enabling the cross-region standby, the remote regions will not be listed. During the process of enabling a cross-region standby, select the compartment where you have got the necessary IAM privileges. The Enable process creates an Enable Autonomous Data Guard work request that can be seen in the Work Requests menu option under Resources.
When you enable AuDG locally or cross-region, the Autonomous Database’s Lifecycle State changes to Updating, and under the Resources area, the AuDG option shows the state of the standby databases as Provisioning. When Lifecycle State is Updating, then you cannot perform a move operation to another compartment or any stop, restart, and restore operation on the primary Autonomous Database. Later, after some time, the Autonomous Database’s Lifecycle State will change to Available while the provisioning of the standby database goes on in the background. Once the provisioning of the standby database completes, then under the Autonomous Data Guard section of your Autonomous Database Overview page, the Role field will have a Primary value and a Switchover link for the standby, which you can click on to switch to the standby. If you enable a cross-region standby, then you will also see a Region field with a Primary value.
During the standby database creation process, your primary Autonomous Database is available for read or write operations and there is entirely no downtime incurred on your primary database, which is a key benefit, as business operations continue to function.
Post the creation of the standby database, you can check some of the attributes of the standby database by clicking Autonomous Data Guard under the Resources section. You can see the name of the standby database, which appears as a link under Peer Autonomous Database, its role under Peer Role, and the state and region of the standby database. In the case that your standby database is a cross-region standby database, you can access the peer Autonomous Database by clicking on the database link under the Peer Autonomous Database column, which opens the Autonomous Database Details page for the remote region.
Figure 4.7 shows the details page of the primary Autonomous Database instance showing a Region value of Primary and Role also as Primary:

Figure 4.7 – ADB primary instance details
This has been configured with a cross-region standby as seen in Figure 4.8:
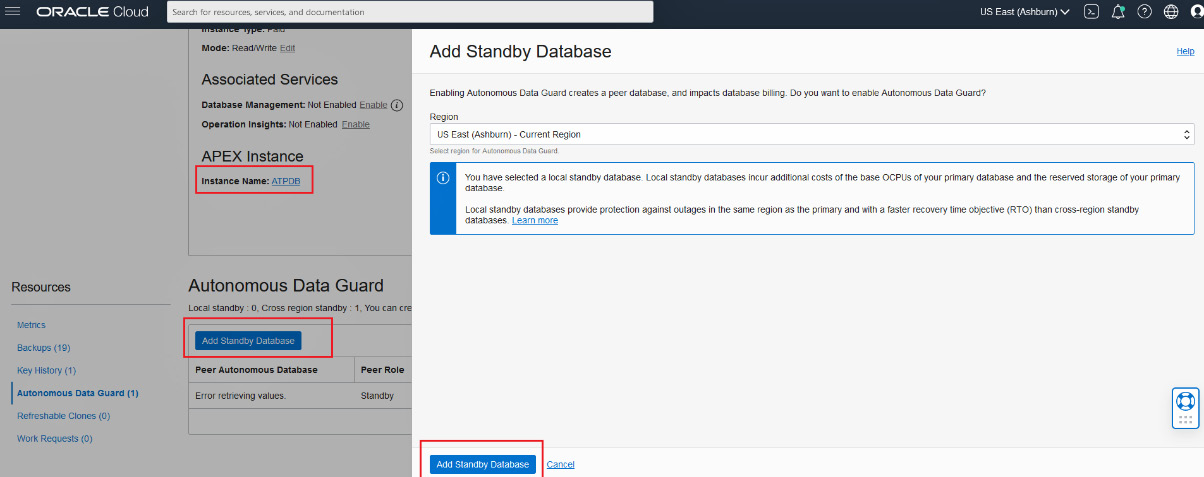
Figure 4.8 – Add Standby Database
When you want to add an additional standby database instance, you can do that from the primary database region and give the Autonomous Database a primary role. Note that you can add one local standby and one remote standby database only – no more than that.
As shown in Figure 4.6, you can add a new standby database by clicking on the Add Standby tab with the Autonomous Data Guard link under Resources on your primary Autonomous Database Details page.
Switchover operation
Once you have enabled AuDG, you will see the Switchover link in the Role field under the Autonomous Data Guard section of your Autonomous Database Details page. Clicking on that link performs a role transition – that is, Primary becomes Standby and Standby becomes Primary without any loss of data.
With a local standby AuDG configuration, the Switchover link appears in the Role field of the primary database when both the primary database and local standby database are available.
In cases where you only have a cross-region AuDG configuration, the Switchover link appears in the Role field of both the primary and remote database when both the primary and the remote standby databases are in an Available state. However, the switchover can be only initiated by clicking the Switchover link in the Role field of your cross-region standby. If you try to initiate a switchover by clicking on the Switchover link in the Role field of the primary database, then it will error out with a message as you can see in Figure 4.9:

Figure 4.9 – Cross-region switchover not allowed from the primary
When Lifecycle State for the primary Autonomous Database (primary region) is either Available or Stopped, and either the local standby or remote standby database is Available, then you can perform a switchover. The switchover operation can be initiated from the Autonomous Database Details page in the OCI console or you can invoke the Autonomous Database APIs. During a switchover operation, if there is any concurrent activity in progress on the Autonomous Database – for example, scaling up or manual backup creation – then you will be prompted to either pause or cancel the operation before it can proceed with the switchover operation.
Things to note that occur during a switchover operation have been outlined here:
- Switchover has to be started from cross-region standby only.
- Post-switchover, the state of the primary Autonomous Database is preserved – that is, if the primary was in a Stopped or Available state, then after the switchover operation is complete, the new primary database will also be in a Stopped or Available state.
- During a switchover operation, most actions on the database in the OCI console are disabled and the Lifecycle State value is Updating.
- The switchover process creates an Autonomous Database work request that can be checked under the Resources section within the Work Requests option.
- Post-switchover or a failover operation, all graphs displayed in the service console and the OCI metrics represent information about the new primary.
- When you have enabled AuDG with both a local standby and a cross-region standby and you have performed a switchover to the remote standby, this means that remote standby has taken the primary role. Here, AuDG does not provide a local standby that would be available. It is only after the Autonomous Database in the primary region gains back the primary role that the local standby is made available. Usually, the switchover to the remote standby is performed when you are performing some kind of testing.
- You cannot cancel a cross-region switchover operation once initiated and the Lifecycle State value shows as Role Change in Progress.
Since we have two different options for enabling standby with AuDG, let’s understand the behavior of the switchover in two different combinations:
- Enabled with no local standby, but with a cross-region standby: When you have enabled AuDG with only a cross-region standby, then you can switch over cross-region so that the primary region Autonomous Database takes up the standby role and the remote region standby database takes up the primary role, but note that the switchover operation must be initiated from the remote region standby, but not from the primary region.
- Enabled with a local standby and cross-region standby: When you have enabled AuDG for both a local and cross-region standby, then you can switch over from a primary to a local standby in the same primary region so that the primary database becomes the local region standby and the standby becomes the local region primary database. AuDG continues to use the same remote standby cross-region.
But if you switch over from the primary database in the primary region to the cross-region standby database, you cannot switch over to the local standby database in the primary region.
A switchover from the remote region database is possible when the remote region standby database has the primary role and the primary region’s primary database has the standby role.
Automatic failover operation
Failover of database instances can happen from the primary database to standby when the primary database becomes unavailable for some reason. In an AuDG with a local standby, the system monitors the condition of the primary and whenever the primary instance becomes unavailable, failovers from the primary to the local standby instance happen automatically based on the RTO and RPO defined, provided the local standby database is available. This means that standby takes over the role of primary. During an automatic failover, if the local standby database is available, then automatic failover would guarantee zero data loss as per the RPO target. After an automatic failover operation, a new local standby is automatically provisioned in the local region after the standby transitions to the primary role.
While the system is provisioning a new standby database after a failover operation to either a local or remote standby, AuDG is not enabled on the primary unless the provision is completed. After the provisioning is completed and the standby is available, AuDG is enabled on both the primary and new standby. Automatic failover is disabled when the Lifecycle State value is either Restore in Progress or Upgrading.
You can view the last failover operation details by hovering on the ![]() icon in the Role field.
icon in the Role field.
In certain scenarios where the primary becomes unreachable or has failed, the AuDG automatic failover conditions are not met, or the RPO target is not met, the OCI console displays a banner stating that the automatic failover did not succeed while mentioning the reasons and provides a link to initiate manual failover.
Manual failover operation
If automatic failover to your local standby did not succeed and the standby database is in an Available state, then you can perform a manual failover to make your local standby a primary database. If a cross-region standby is available, you can perform a manual failover to the remote standby. However, you must note that there is a possibility of data loss during a manual failover.
As in the case of a switchover, let’s examine different scenarios and understand the behavior of a failover operation:
- Enabled with no local standby, but with a cross-region standby: In this configuration, since an automatic failover to a cross-region standby is not feasible, you have to initiate a manual failover to a cross-region standby when you detect that the primary database in the primary region is down. We have already discussed that the RTO is 1 hour and the RPO is up to 5 minutes in the case of a cross-region manual failover. When you initiate a switchover from a cross-region standby database and the operation fails, then AuDG will display a Failover link in the Role field of the cross-region standby that you can click to initiate a manual failover. You can also use APIs to initiate a manual failover.
- Enabled with a local standby only: When AuDG is enabled with a local standby in the primary region and a remote standby in the remote region and the primary database becomes unavailable, then AuDG will automatically failover to the local standby in the primary region with minimal interruption if the standby state is available. If the automatic failover is not successful, then the OCI console displays a banner with the information about why the automatic switchover operation did not succeed and provides a failover link in the Role field of the primary database that you can click to initiate the manual failover to the local standby. The failover link will appear only if the Lifecycle State value of the primary database is Unavailable and the Lifecycle State value of the local standby is Available. You can initiate a manual failover anytime using the APIs. The RTO and RPO value for a local standby would apply as discussed earlier. At the end of the failover to the local standby, AuDG creates a new local standby in the same primary region.
- Enabled with a local standby and cross-region standby only: When the primary database in the primary region is unavailable and both the local and remote standby databases are available, if the automatic failover to the local standby is not successful, then it is recommended that you first attempt a manual failover to the local region standby. There is no change to the cross-region standby and AuDG continues to use the same cross-region standby.
If the local standby is unavailable or a manual failover to the local standby fails, then you can perform a manual switchover to the cross-region remote standby (initiated from the Switchover link in the Role field of the cross-region remote standby) and that will make the remote standby the new primary database cross-region. If that switchover operation fails, then AuDG will create a Failover link in the Role field of the remote standby, which you click to initiate a manual failover to the standby database. The RTO and RPO value for the manual failover to the cross-region remote standby will apply as discussed earlier.
Unlike a failover operation to a local standby, AuDG does not create a new local standby when you manually failover the primary database to the cross-region remote standby database. Thus, the remote region database becomes a primary database but does not have a local standby.
After a manual failover operation, you can view the information about any data loss in a message in the OCI console banner or by hovering over ![]() in the Role field.
in the Role field.
Termination operation
When you terminate an Autonomous Database that is enabled with AuDG then the standby database is automatically terminated. If you have both a local and cross-region standby, then both are terminated.
Add new standby
After you have enabled AuDG and have created your first standby Autonomous Database, you can add a new standby database by clicking on the Add Standby Database tab in the Autonomous Data Guard option under Resources as you can see in Figure 4.10:
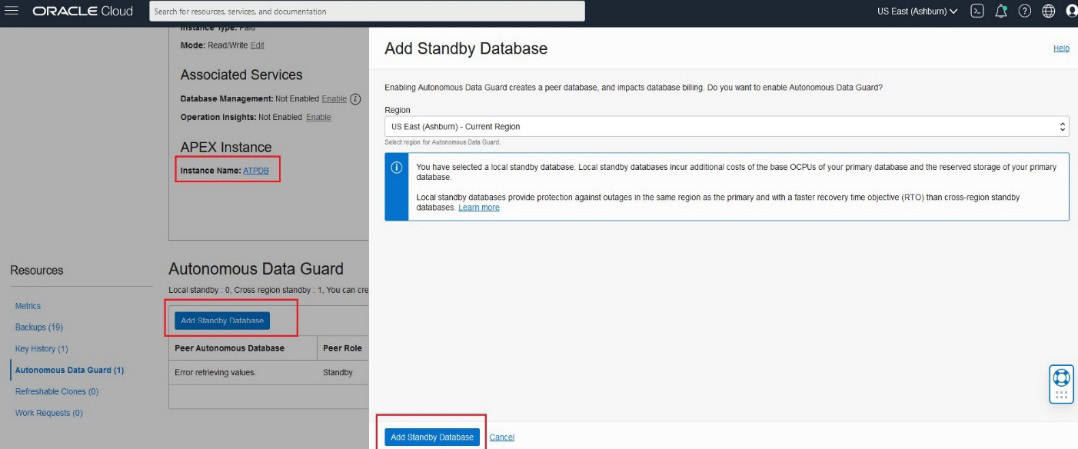
Figure 4.10 – Add Standby Database
Adding the standby is a pretty simple step so next, let’s understand the different states as the creation of the standby is in progress.
Peer Autonomous Database State
The state of the peer Autonomous Database is indicated by the State field in the Autonomous Data Guard option under Resources on the Autonomous Database Details page as shown in Figure 4.11. It may have any of the following values based on the current state:

Figure 4.11 – Peer Autonomous Database state
- The Provisioning state is seen in the following scenarios:
- The first time you perform an enable operation of AuDG, it will bear this status as it begins creating a standby database for your Autonomous Database. The state will change to Available once provisioning completes, which includes synchronization configuration as well.
- After failover to a local standby, you will see this state as well, since it recreates a local standby database.
- If the primary database is being restored from backup, in that case, a local standby database will be recreated – in which case, the state value will display as Provisioning.
- Available indicates that the standby database is available for a switchover or a failover operation
- Role Change in Progress indicates a switchover or failover operation is in progress
Thus, in this section of the chapter, we have come to understand some of the key concepts around AuDG that are essential to developing a good understanding of how DR works in an Autonomous Database service. In the next section, we will take a practical look via some screenshots that will equip us with the right information as to how we would go about configuring and using it.
Implementing AuDG
In this section of the chapter, we will browse through some of the screenshots that will give us a sufficient idea of how to configure AuDG for your Autonomous Database and perform certain operations that we have learned about so far.
Now, let’s jump into the OCI console and start doing some of the operations. To begin with, let’s enable AuDG for your ADB instance.
Enabling AuDG
As we understood earlier, you can enable either a local or a cross-region standby Autonomous Database with an AuDG configuration, but before you can enable AuDG for your Autonomous Database instance, you must ensure that you have enough OCPU and storage resources in your tenancy across the AD and region in which you want to host the standby ADB instance.
To enable AuDG, please follow these steps:
- In order to enable AuDG, the primary instance’s Lifecycle State should be Available, as indicated by 1 in Figure 4.12, on the Autonomous Database Details page. If you check on the section under Autonomous Data Guard, you can see the tooltip for a quick hint. The status shows as Disabled, which means AuDG is not enabled on this Autonomous Database instance as indicated by 2:

Figure 4.12 – Pre-checks for enabling AuDG
- Click on the Enable link to enable AuDG. This opens up a popup asking for confirmation as you can see in Figure 4.13:

Figure 4.13 – Enabling AuDG locally
You can create a local standby by keeping the default region selected, which will be the same region as your Autonomous Database, and clicking on Enable Autonomous Data Guard.
- If you wish to create a remote standby, then you can select another paired region from the dropdown that you have subscribed to as seen in Figure 4.14:

Figure 4.14 – Enabling AuDG cross-region
- When you select the region, you will be asked to select a compartment where you wish to host your remote standby as shown in Figure 4.15. You must ensure that in the subscribed region, you have a sufficient resource quota in terms of OCPU and storage resources and the needed permission to provision an Autonomous Database in the compartment cross-region:

Figure 4.15 – Enabling AuDG cross-region – selecting a compartment
Important note
We will skip the steps to enable a cross-region standby and continue with enabling AuDG locally. The steps to create a cross-region standby can be initiated using the Add Standby process.
- Now, click on Enable Autonomous Data Guard to begin creating a local standby as shown in Figure 4.13. This will change the state of your primary Autonomous Database to UPDATING as you can see in Figure 4.16:
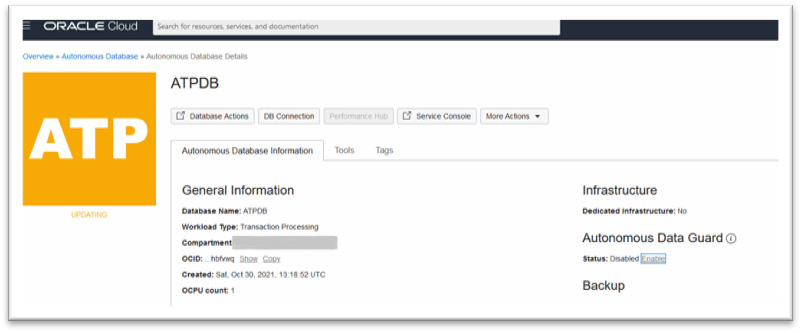
Figure 4.16 – AuDG provisioning
- Provisioning a local standby is pretty fast. The Lifecycle State value of the primary has changed to AVAILABLE as you can see in Figure 4.17. The Autonomous Data Guard section now shows the status of AuDG as Enabled with a link to disable AuDG beside it. The Role field shows the value of the role for this database in this region, which is Primary, and it is ready for a switchover as denoted by the active link for Switchover:
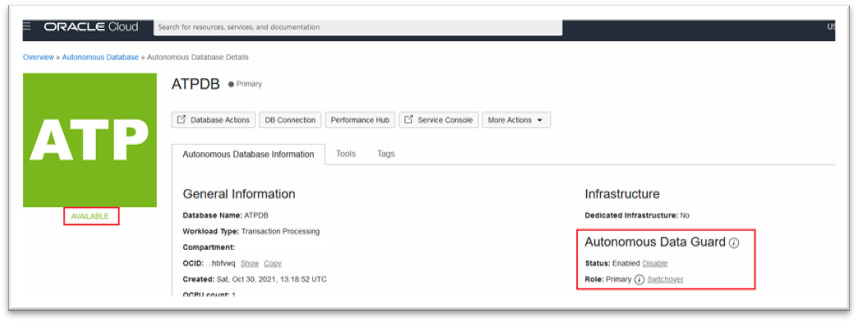
Figure 4.17 – AuDG provisioned
- Now click on Autonomous Data Guard under the Resources section to check the details about the standby database as shown in Figure 4.18:
Figure 4.18 – Local standby peer
The Peer Autonomous Database’s name is the same as that of the primary database and Peer Role shows as Standby with an Available state in the same region as the primary Autonomous Database. Since the standby is Available, much like the primary, you can perform a switchover by clicking on the Switchover link in the primary as shown in Figure 4.18, or by clicking on the three dots in the row and then selecting Switchover. As mentioned earlier, the name in the Peer Autonomous Database field is not a link since AuDG does not allow access to the local standby.
- Enabling AuDG will generate a work request, which you can see by clicking on the Work Requests option under Resources in the left-hand pane as shown in Figure 4.19. The state will change from In Progress to Succeeded:

Figure 4.19 – AuDG provisioning work requests
When the % Complete column has a value of 100%, then it means that provisioning is complete and you will notice the primary database’s Lifecycle State, as well as the peer Autonomous Database state, will be Available. In this way, we can create a local standby database for our Autonomous Database.
Let’s also create a remote standby cross-region for your primary Autonomous Database:
- Click on the Autonomous Data Guard option under the Resources section and click on the Add Standby Database link as shown in Figure 4.20:

Figure 4.20 – Adding a remote standby ADB
- Adding a standby will open up a new window where you can choose a region other than the primary region where the remote database has to be provisioned. In this example, we chose the US West (Phoenix) region to deploy the remote standby database as shown in Figure 4.21:

Figure 4.21 – Adding a remote standby ADB – selecting a region
This will lead to another selection where you need to choose the compartment for deployment in the paired region:

Figure 4.22 – Adding a remote standby ADB – selecting a compartment
- Click Add Standby Database, which begins the provisioning of the remote standby database. During this step, the primary’s Lifecycle State changed to UPDATING, and the state of the peer Autonomous Database changed to Provisioning as you can see in the highlighted box in Figure 4.23:

Figure 4.23 – Remote standby ADB – provisioning
This would also create a work request as it did for a local standby with the operation named Enable Autonomous Data Guard. You can check the Lifecycle State value for the primary and the peer Autonomous Databases. As seen in Figure 4.24, for the primary as well as for the remote standby, it’s Available, which means the provisioning of the remote standby cross-region is complete:

Figure 4.24 – Remote standby ADB – provisioned
- If you note, the name of the peer Autonomous Database cross-region, that is, in the Phoenix region, is ATPDB_Remote, which appears as a hyperlink, but the local standby database, which bears the same name as the primary, is not a hyperlink. Clicking on ATPDB_Remote will open up a new tab providing details of the remote standby ATP database as shown in Figure 4.25, similar to the primary since AuDG allows access to the remote standby ATP database through the OCI console:

Figure 4.25 – Remote standby ATP in the OCI console
Note that in the remote region, since this involves provisioning a replica of the primary, there would be a work request created but with a different operation named Create Autonomous Database as you can see in Figure 4.26:

Figure 4.26 – ADB work requests for the remote standby
When you have enabled AuDG with a cross-region standby, here are a few additional points to keep in mind:
- If the primary database is restored from backup, a new remote region standby instance is created from the restored primary
- Automatic and manual backups can only happen from the database with the primary role
- The restore or clone operation from backup can only happen from the primary and you will have the option to restore when either the primary region or remote region database has the standby role
This completes the steps to be followed when enabling AuDG with a local and cross-region standby. The provisioning step is very simplified using the OCI console – you can provision a standby database for your Autonomous Database with just a few clicks. It is immediately ready for switchover and automatic or manual failover. It frees you of all the manual effort that you would have needed otherwise. In the next section, we will check a few switchover scenarios that you can self-initiate.
Performing a manual switchover operation – local standby
Typically, a database switchover operation is performed to evaluate the preparedness of the secondary database. It will resemble a failover scenario and you will be able to ascertain whether your application is appropriately configured to the automated action, as would be required during a database failover or switchover scenario or for audit or certification reasons. There may be other requirements within your organization to perform a switchover.
In an AuDG configuration, a switchover is initiated just by clicking on the Switchover link in the Role field. You will see the Switchover link when the primary database’s Lifecycle State is AVAILABLE or STOPPED and the Peer State field is Available. Click on Switchover as indicated by the bold arrow in Figure 4.27:

Figure 4.27 – Initiating a switchover
Figure 4.28 shows you the option to choose local or remote:

Figure 4.28 – Choosing a local or remote standby for switchover
If you choose remote, then you are notified that the operation is not supported as you can see in Figure 4.29. In the case of a remote standby, when a primary is available, you must switch over from a remote standby database:

Figure 4.29 – Choosing a remote standby from the primary – not supported
Since we have a local standby, we can now switch the primary over to a local standby while being in the primary by selecting the local standby in the dropdown and providing the name of the standby database as shown in Figure 4.30, and clicking Confirm Switchover to Standby:

Figure 4.30 – Switchover to local standby
Once initiated, the primary database Lifecycle State value changes to UPDATING, and the State field value of the peer Autonomous Database local standby changes to Role Change in Progress, as you can see in Figure 4.31:

Figure 4.31 – Role Change in Progress during local switchover
After the local standby takes the role of primary and the old primary takes over the role of standby, there is fresh provisioning happening for the remote standby cross-region. This can be seen in the State field of the peer Autonomous database as shown in Figure 4.32. If you check Work Requests in the remote Autonomous Database console, as indicated by 2, the operation name is Create Autonomous Database, which means it is freshly provisioning the remote standby database to map with the new primary:
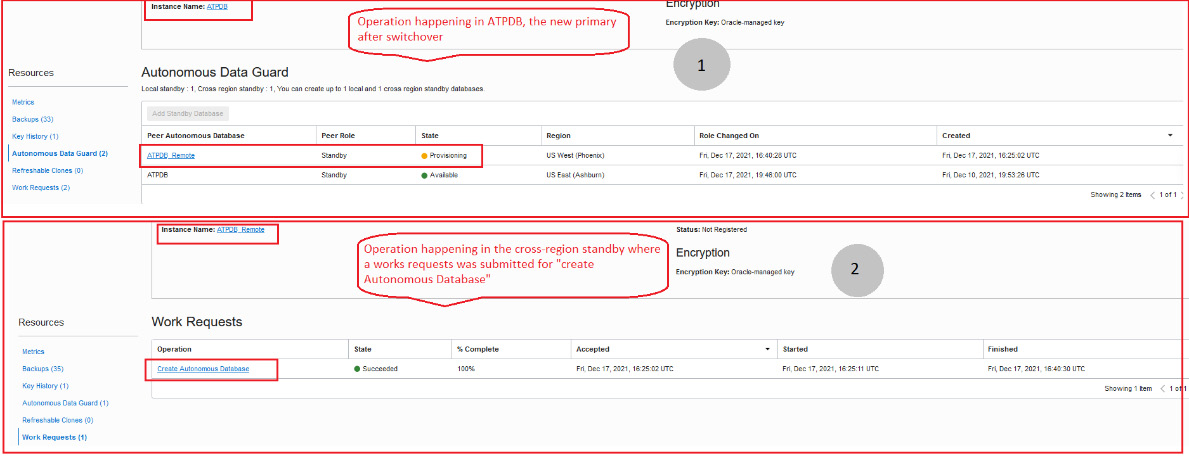
Figure 4.32 – Post-switchover to the local standby
All operations in the primary database, such as stop, restart, move, or restore, are restricted, along with other operations under More Actions on the Autonomous Database Details page, and you can only perform these operations after the switchover operation has been completed.
At the end of the local switchover operation, you can check the region of the Autonomous Database, which is Primary – that’s because, although the role change has happened for the initial primary to stand by, the region of the database does not change. This is depicted in Figure 4.33:

Figure 4.33 – Local switchover completed
As we performed a local switchover, let’s now see how to perform a switchover to a remote standby in the next section. The steps remain pretty much the same, except the underlying operations are a little different than what happens in case of a local switchover.
Performing a manual switchover operation – remote standby
Unlike how we performed a manual switchover from a primary region, the switchover operation in the case of a remote standby must be started cross-region. Click on the remote standby name in the Autonomous Data Guard option while in the primary region as shown in Figure 4.34:

Figure 4.34 – Clicking on the remote ADB
This will open up a new tab for the remote Autonomous Database as you can see in Figure 4.35. The Region value is Remote since this standby has been created cross-region. The Role value is Standby. Click on the Switchover link to initiate the switchover to the primary:

Figure 4.35 – Initiating a remote switchover
This opens up a popup with the preselected region of the remote standby and asks you to confirm the name of the database before starting the switchover operation as shown in Figure 4.36. Fill in the name of the ADB and click on Confirm Switchover to Standby:

Figure 4.36 – Confirming a remote switchover
This would change the Lifecycle State value of the database in the remote region to ROLE CHANGE IN PROGRESS and that of the primary to Updating. Figure 4.38 shows the status as observed cross-region:

Figure 4.37 – Lifecycle state during the switchover to remote
Figure 4.38 shows the given lifestyle state for the primary region before the switchover is complete:

Figure 4.38 – Lifecycle state of the primary region during switchover
After some time, Lifecycle State for ATPDB_Remote is AVAILABLE. Additional information that you must note is that the role has now changed to Primary but the Region value does not change. It is still the Remote region as per the initial configuration. You can view these changes in the console for the cross-region standby as in Figure 4.39:

Figure 4.39 – Primary role in a remote region
ATPDB in the primary region will have a change in status from updating to provisioning and post-completion of provisioning operation in the primary region, observe the new change in the role of the old primary, ATPDB. It has a standby role but the Region value remains unchanged as per the original configuration, which you can check in the Autonomous Data Guard section in Figure 4.40:
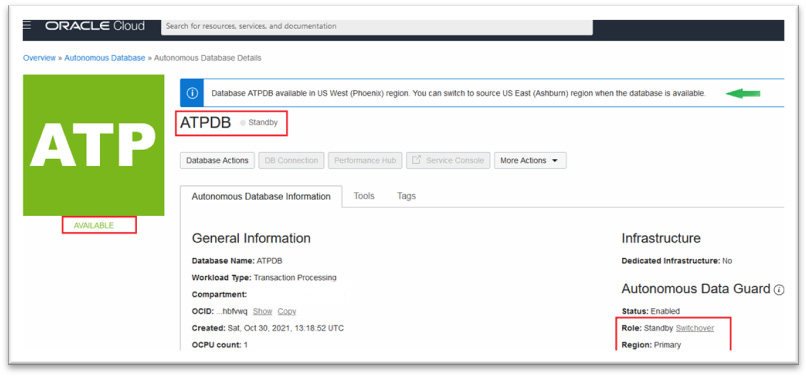
Figure 4.40 – Standby role in the primary region
As you may have noticed, in Figure 4.39 and Figure 4.40, the DB Connection tab is disabled in the primary region (ATPDB – running as standby) and is active in the remote region where ATPDB_Remote is running with a primary role. This will allow you to download the wallet for connecting to the database as you would do in order to connect to Autonomous Database in general.
In the case of a cross-region switchover, when the remote region standby becomes the new primary, it won’t have a local standby in the remote region, as you can see in Figure 4.41 in the Autonomous Data Guard option of ATPDB_Remote, which now has a primary role. It states Local standby : 0 and Cross region standby : 1:

Figure 4.41 – No local standby in the remote primary
When you switch over the primary database from the remote region to the primary region, as part of the switchover operation, it will first perform a switchover from the remote region to the primary region. Then, it provisions a fresh local standby that was present in the initial configuration as you can see in Figure 4.42:

Figure 4.42 – Switchover from a remote to a primary region
As the next step, it also provisions the remote standby database in the same cross-region as was present in the initial configuration. The Unavailable state for ATPDB_Remote as we saw in the previous screenshot changes to PROVISIONING, which you can see in Figure 4.43, and finally, the state will change to Available once the provisioning of remote standby has been completed. This will set the configuration to the initial one that existed before the switchover:

Figure 4.43 – Provisioning a remote standby post-switch back to the primary region
Each of the switchover operations we tried will create work requests as they did during the enabling of AuDG.
Thus, we have seen how to perform a switchover operation for your primary to either the local or cross-region standby with a few simple clicks, entirely overcoming all the manual steps that you need to perform this sequentially, which is more prone to errors unless you are an experienced DBA.
Important note
We have skipped the failover operation practice, as we don’t have sufficient control over the Shared Autonomous Database infrastructure to imitate a manual failover condition, but the steps remain pretty straightforward as has been explained in the previous sections.
Although enabling AuDG is highly recommended for DR, there could be a scenario where one of the Autonomous Databases no longer holds any critical data and data loss can be tolerated in the event of a disaster. In this scenario, you can disable AuDG in the simplest way possible, which we are going to see in the next section.
Disabling AuDG
Disabling AuDG with a cross-region standby can only be initiated from the primary region. When the Autonomous Database is available and bears a primary role in the primary region, then the Disable link will appear active as you can see in Figure 4.44. Click on the Disable link to disable the standby database:

Figure 4.44 – Disabling AuDG
If you have a local and remote standby, then you have to repeat the Disable operation twice, selecting the specific standby database in each iteration, which eventually terminates both the standby databases of the Autonomous Database.
Clicking Disable opens up a popup prompting you to select the standby type and also asking you to enter the name of the Autonomous Database for confirmation as seen in Figure 4.45. Here, I have selected Remote Standby Database - US West (Phoenix) to disable:

Figure 4.45 – Choosing the standby to disable
Click Disable Autonomous Data Guard, which will change the status of the primary database to Updating and will terminate both the local and remote standby database as you can see in Figure 4.46:

Figure 4.46 – Disabling the remote standby
At the end of this remote Disable operation, it will freshly provision the local standby and make both the primary and local standby available for access as you can see in the following screenshot in Figure 4.47:

Figure 4.47 – Disabling the remote standby completed
As with the other operations, Disable Autonomous Data Guard follows a few simple steps to clean up the AuDG deployments for your Autonomous Databases that no longer need the configuration. This may be the case where you have moved the primary data to a new Autonomous Database and wish to keep this database for development with all sensitive data being completely masked.
During the disable operation, there is no downtime incurred and you can continue to use your primary Autonomous Database.
AuDG also provides APIs, SDKs, or a CLI that you can use to perform all the operations, such as enabling or disabling AuDG or performing a manual switchover or failover operation. Hence, you have the flexibility to use the tool of choice.
There are a few things to note here:
- As in other operations, during the disable operation, you won’t be able to perform most of the options under the More Actions tab on the Autonomous Database Details page
- As with other operations, here too, the Autonomous Database generates a work request named Disable Autonomous Data Guard, which you can find under the Resources tab in the left-hand pane as shown in Figure 4.48:

Figure 4.48 – Disabling an AuDG work request
As with every other service in OCI, you can leverage OCI Events Service to generate notifications for AuDG events and alert respective teams on the occurrence of these events. Let’s understand a few details about it in the following section.
Leveraging OCI Events Service for AuDG operations
You can configure OCI Events Service for your AuDG operations to be notified of specific operations such as enabling, disabling, manual failovers, switchovers, and specifying rules in response to these events. Take a look into the OCI Events Service console and create a rule for a specific event type, a snapshot of which is shown in Figure 4.49. Look for the list of event types related to the AuDG operation and set the rule with an appropriate action, which could be an email notification, for example.
I am not going into much detail on OCI Events Service, as it is not the core topic here, but to facilitate your AuDG operation, I wanted to highlight the pre-defined AuDG events available that can definitely simplify your management of an Autonomous Database configured with AuDG:

Figure 4.49 – OCI event types for AuDG
There are few features regarding autonomous data guard configuration that you must note, which I will highlight in the following section.
Points to remember about AuDG
Here are a few general notes to remember before we wind up on the topic of AuDG:
- While the disable operation is running, that is, Lifecycle State for the primary shows as Updating and the peer Autonomous Database State field shows as Terminating, there is no downtime required for the primary – you will still be able to perform your normal database operation on the primary Autonomous Database while the disable operation is in progress.
- You cannot connect to a local standby to offload read-only queries.
- You can access the Autonomous Database Details page for a remote standby database, but you cannot open it in read-only for running read-only queries.
- Wallets are not accessible in the remote standby database. Hence, you cannot rotate a remote standby database wallet. You must switch over from the remote standby in order to enable access to the wallet.
- Only Oracle-managed encryption keys are supported by cross-region standby databases, which means you cannot change from Oracle-managed encryption keys to customer-managed encryption keys if your Autonomous Database has a cross-region standby. If the Autonomous Database already uses customer-managed keys for encryption, you cannot enable a cross-region standby.
- The CPU utilization and OCPU’s allocated graph or any metrics of this kind only apply to the primary and do not apply either to the local or remote standby databases.
- Automatic failover to a local standby is disabled when there is either an upgrade or a restoration operation ongoing.
- When the Lifecycle State value for the primary Autonomous Database is Stopped, then the Lifecycle State value of the standby is also Stopped, but you may still perform a switchover when the primary is Stopped.
- An operation such as scaling up or enabling auto scaling performed on the primary database is automatically executed by AuDG on the standby side for both a local and a remote standby. There is an exception here – in the case of a remote standby, a few additional operations, such as private endpoint configuration, can be done in the remote standby independent of the primary.
- You must reset and verify the access control list on the remote standby database after you disable the private endpoint in the primary.
- Oracle Data Safe cannot be enabled on an Autonomous Database that has the cross-region standby enabled.
- AuDG is not available with the Always Free subscription.
- All AuDG operations can be performed using the AuDG APIs.
- You can only allow TLS connections on the primary if the primary and remote standby are both configured to support the TLS connection.
- AuDG is also now configurable with an Autonomous Database on Dedicated Exadata infrastructure and supports intra-region and cross-region DR capability, but unlike Autonomous Database on Shared infrastructure, AuDG on Dedicated infrastructure is enabled at the container level and the option is checked while provisioning the container database. Hence, when creating the Autonomous Database, you must choose those container databases that were enabled with AuDG during provisioning time.
In the case of an Autonomous Database on Dedicated infrastructure that is enabled with AuDG, you have the option to reinstate the database after a failover. This concludes the section about configuring AuDG in an Autonomous Database environment and also brings us to the end of the chapter on AuDG.
Summary
In this chapter, we got some insights into how Autonomous Database provides another layer of protection and high availability by enabling either a local or cross-region standby using the fully automated feature called AuDG. We came to understand the different concepts related to the AuDG operation and the different status changes it goes through when we perform different operations.
With AuDG, it was also interesting to learn about the different switchover and failover scenarios and how the operation proceeds either automatically or with manual intervention required during a cross-region failover. It was also suggested to use the appropriate wallet while establishing a connection to the primary database in a respective region. Please consider some hands-on practice to grasp the underlying concepts better.
If you have an interest in carrying out operations using the APIs or SDKs, you can refer to the public documentation for the AuDG APIs so that you can automate some of the actions by invoking them remotely. This marks the end of this chapter, so now let’s do a knowledge check of all that you have learned from this chapter.
Questions
- When the primary database in the primary region becomes unresponsive, you can perform a failover from the cross-region standby from the primary directly from the console. State true or false.
- With an AuDG configuration with both a local and remote standby, when you switch over from the primary to a remote standby, an automated backup will be initiated in the remote region database with the primary role. State true or false.
- What are the RTO and RPO of a local standby during automatic failover?
- If you have enabled AuDG with a cross-region standby and you enable auto scaling in the primary region’s primary database, then you have to manually enable auto scaling in the other region’s remote standby database. State true or false.
- You can mask sensitive data in the cross-region remote standby. State true or false.
Answers
- False. You have to perform a switchover first; if it fails, then it’ll provide a Failover link in the console.
- True. Automatic backups will all be initiated from the database with a primary role in an AuDG configuration.
- RTO = 2 mins, RPO = 0 mins.
- False. You only enable it in the primary and AuDG will automatically execute the command in the standby. Only certain configurations can be carried out in the standby.
- False. You cannot enable Oracle Data Safe when you have already configured a cross-region standby.