5
Backup and Restore with Autonomous Database in OCI
Backup is a crucial activity when we deal with any database. It derives the mechanism of how to back up the data either with the same or a different optimized format. If data loss happens due to a disaster or human mistake, then the data can be recovered only through a backup. We have many backup methods for Oracle databases, such as Data Pump, Recovery Manager (RMAN), and so on. In this chapter, we are going to discuss backup strategies in Autonomous Database.
In general, Oracle database backup can be taken either as full database backup having user data along with its database metadata (for example, RMAN backup), or we can extract only the user data (for example, Data Pump) and create a dump file. You may wonder how the backup can be taken for an autonomous database. We’ll cover that in detail in this chapter.
We will be covering the following topics:
- Understanding backup types
- Backup through the OCI portal
- Backup through the command line
- Restoring database backup
By the end of this chapter, we will have an understanding of all available backup methods for an autonomous database.
Technical requirements
This chapter requires an understanding of traditional backup methods, Data Pump, and RMAN. Before trying out the techniques and steps mentioned in this chapter, we need an OCI account with privileges to create an Object Storage Bucket and an autonomous database, whether an Autonomous Transaction Processing (ATP) database or an Autonomous Database (ADB).
Understanding the backup types
In an autonomous environment, all DB tasks are managed automatically; in the same way, the backup will also be taken care of by itself. But we do have a provision to back up the data manually. Let’s discuss both methods.
Working with automated backup in the OCI portal
Automated backup is configured by default when we create an autonomous database. It is a mandatory backup taken daily for autonomous databases. No manual effort is required in this backup method.

Figure 5.1 – Automatic backup list
In general, an Oracle database has various methods to take backups. RMAN is one of the proven methods to take Oracle database backup. This method has the luxury of taking a backup of either the full database or only changes that happened after the last full backup (incremental backup). Also, it has features to validate the backup before Restore. In an autonomous environment, the automated database backup takes RMAN full backups weekly and incremental backups daily into the object storage. The backup will be retained for 60 days. The RMAN backup piece will get deleted automatically once it crosses the retention period. Since the automatic backup is managed by the database itself, we can’t stop or change the timing of the automatic backup. The backup algorithm decides the appropriate time for the backup based on the database workload. Another specialty of this backup method is that an automatic backup will be taken daily even if the database is in a closed status. We can restore the database backup to a point in time using this automated backup. We will discuss the Restore topic later in this chapter.
Learning how to take a manual backup
The previous section talked about automated backup, but at the same time, a manual backup for autonomous databases can be taken. Mostly, a manual backup will be required before or after the execution of sensitive tasks. The manual backup can be taken through the OCI portal or by executing the command-line expdp utility. We will discuss both methods in detail.
Manual backup through the OCI portal
Oracle Autonomous Database provides the option to make database backups manually. This backup is going to be an RMAN full backup and it will be taken directly into object storage. We have two prerequisites to initiating this manual backup. It is a one-time activity:
- Define Cloud credentials in the database using the DBMS_CLOUD package
- Create an object storage bucket
Let’s go through the prerequisite tasks in detail.
Generating Cloud credentials
In Cloud databases, we should create Cloud credentials at the database level to access the Cloud resources. The credentials can be created using the DBMS_CLOUD.CREATE_CREDENTIAL package, available in the database:
BEGIN
DBMS_CLOUD.CREATE_CREDENTIAL(
credential_name => 'Credential_Name',
username => 'Cloud_UserName',
password => '<authorization_token>'
);
END;
/
Here, the variables are as follows:
- Credential_Name: User-friendly name for credentials
- Username: Cloud login username
- Password: Authorization token created using login credentials
You can follow these steps to generate an authentication token:
- Log in to the Oracle Cloud portal. Click on Identity | Users. It will show the user details page as shown. In the bottom left, under Resources, click on the Auth Tokens option. We can see the Auth Tokens page here:

Figure 5.2 – User auth tokens
- Click on the Generate Token button, which will bring up the following page:

Figure 5.3 – Generate Token
- Provide a meaningful description and click on the Generate Token button again. It will generate a token as shown:

Figure 5.4 – User token
- Copy the token information in a text file. Don’t forget to copy the token since it won’t be shown again. This token will be used for the password column in the DBMS_CLOUD.CREATE_CREDENTIAL procedure:
BEGIN
DBMS_CLOUD.CREATE_CREDENTIAL(
credential_name => 'Credential_Name',
username => 'Cloud_UserName',
password => '<authorization_token>'
);
END;
/
- Execute the procedure to generate Cloud credentials at the database level. After creating the credentials, make it as default in the database.
ALTER DATABASE PROPERTY SET DEFAULT_CREDENTIAL = '<Schema Name>.<Credential Name>';
ALTER DATABASE PROPERTY SET DEFAULT_CREDENTIAL = 'ADMIN.OBJSTORE_CRED';
At this stage, we have created a default Cloud credential at the database level. The next prerequisite is creating an object storage bucket.
Creating an object storage bucket
We will continue with the following steps to create an object storage bucket:
- Log in to the Oracle Cloud portal. Under Core Infrastructure, click on Storage and then click on Buckets from Object Storage & Archive Storage as shown:

Figure 5.5 – OCI Object Storage
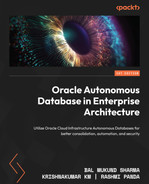
- It will invoke the object storage bucket creation window as shown. Provide a bucket name and for Storage Tier, select Standard. Archive lets you create Archive buckets where archived objects will be stored and the storage cost is cheaper compared to a Standard bucket. Retrieving objects from Archive buckets will take time, hence we choose the Standard bucket to store the database backup. We can also choose the other available options as per our requirements:
- Enable Auto-Tiering – Infrequently accessed backups will be moved from the Standard bucket to the Archive bucket.
- Enable Object Versioning – Objects will get a version number when the object is overwritten or deleted.
- Emit Object Events – Emits certain events based on object state changes. For example, if a new file is placed in object storage, it can send notifications or invoke functions through events.
- Uncommitted Multipart Uploads Cleanup – Deletes uncommitted or failed multipart uploads after 7 days.
Choose the appropriate Encryption method and then click on the Create button:
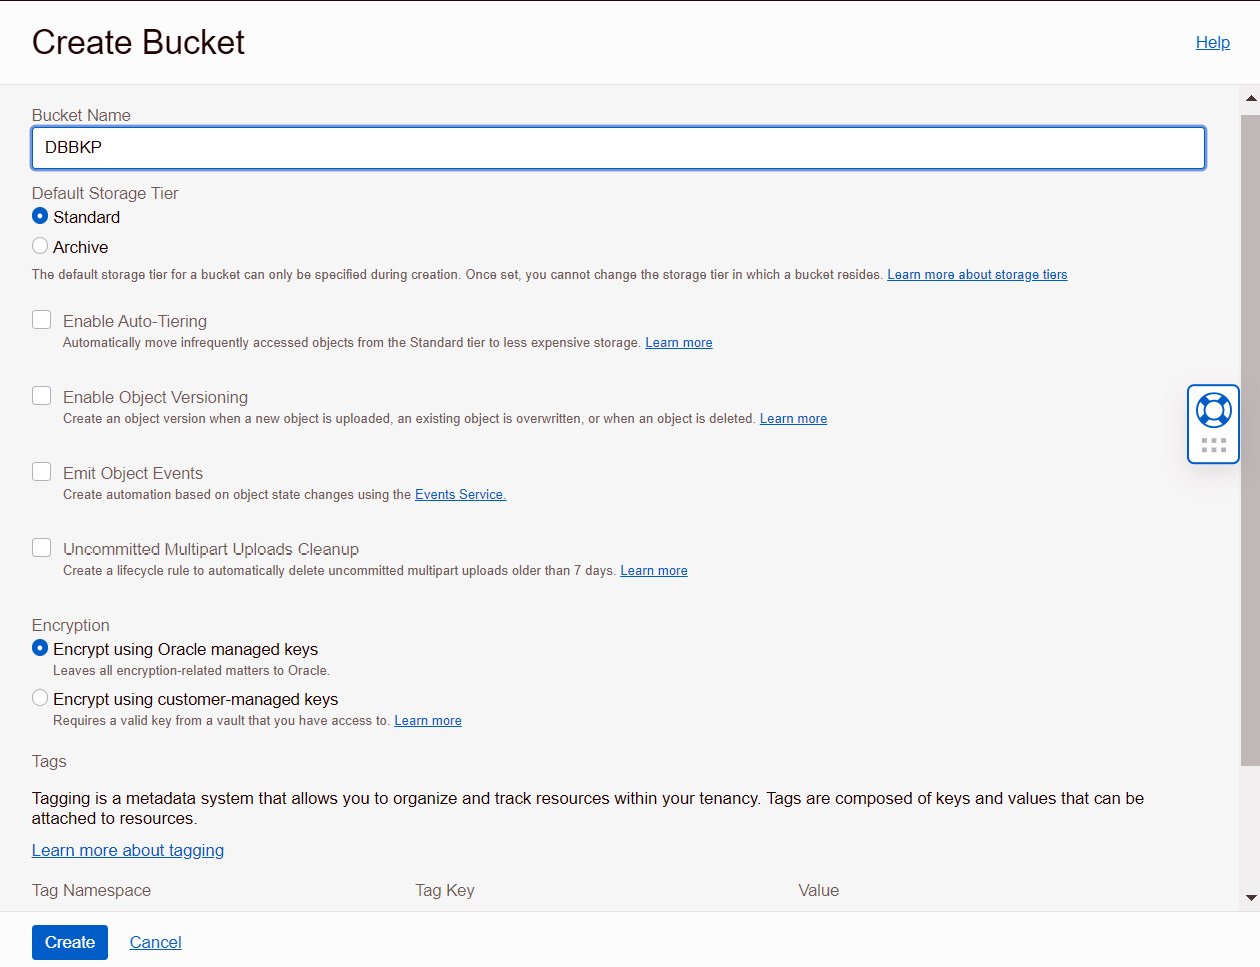
Figure 5.6 – Create Bucket
- We could make a default object storage bucket to store the autonomous database by setting the DEFAULT_BACKUP_BUCKET database property to the bucket name.
The bucket name should have the format of https://swiftobjectstorage.region.oraclecloud.com/v1/object_storage_namespace/bucket_name.
Here is an example:
ALTER DATABASE PROPERTY SET default_backup_bucket='https://swiftobjectstorage.us-phoenix-1.oraclecloud.com/v1/mynamespace/backup_database';
In this example, the object storage namespace is mynamespace and the bucket name is backup_database. The namespace value can be retrieved from the object storage bucket details page.
The database could be either an ATP database or an ADB. These prerequisites should have been created before invoking the manual backup.
Creating a manual backup
At this stage, all the prerequisites are set and ready, and we can execute the manual backup. The steps are as follows:
- Log in to the Oracle Cloud portal and move either ATP or ADB to Autonomous Database. Click on the Backups option available in the Resources section:

Figure 5.7 – On-demand backup
- Click on the Create Manual Backup button. It will present a pop-up window that specifies Display Name for the backup as shown:

Figure 5.8 – Create Manual Backup
- After providing the display name, click on the Create Manual Backup button. The backup process will get initiated and the progress, along with the status, will be shown in the portal:
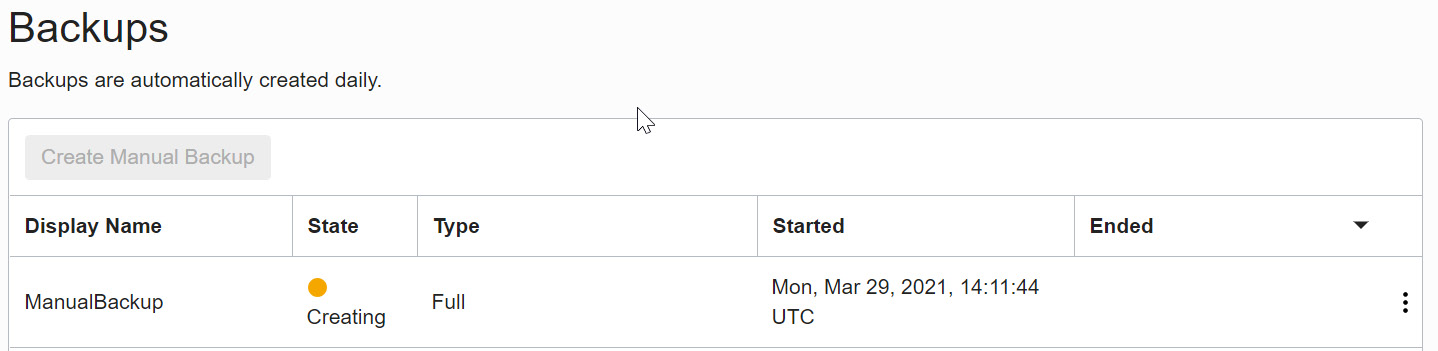
Figure 5.9 – Backup creation in progress
When the manual backup is in progress, some management activities, such as Stop or Restart, will get disabled. Also, the ATP banner changes from a green color to a yellow color, as shown in the following screenshot. Once the backup is complete, the status will change to Available, the color will change back to green, and all the functionalities will become active.

Figure 5.10 – ADB options are disabled
The backup status changes to Active once it is completed. The backup will be stored in object storage, but we will not be able to see or download the backup piece as the backup is managed automatically. The backup piece will be stored in the object storage for 60 days.
If there is a need to rename the autonomous database, there is no need to worry about existing backups. That will continue to work.
Once the backup is complete, we get two options, as shown in the following screenshot. Either the full backup can be restored or a clone database can be created.

Figure 5.11 – Restore backup
We will now move on to restoring backups.
Restoring database backups
There could be situations where unwanted DML or DDL changes happened in the database that cannot be rolled back, or the database may have been corrupted and needs to be repaired. In these case, the backup can be restored. In Autonomous Database, restoring is very simple. It is done through a single click.
The option to restore a database backup is available under the More Actions button on the Autonomous Database Information page, as shown:

Figure 5.12 – Database options
Choosing the Restore option will invoke the Restore window, as shown:

Figure 5.13 – Restore database backup
Point-in-time recovery can be done either at the preferred timestamp in UTC or any specific backup, as shown:

Figure 5.14 – Point-in-time restore
Alternatively, you can select a backup from the list:

Figure 5.15 – Backup list
Choose the appropriate method and click Restore.
You can also restore from the backups listed on the Autonomous Database details page. You can find the list of available automatic and manual backups in the Cloud portal. You can choose the desired backup piece and click on the Restore option, as shown:
Figure 5.16 – Restore a particular backup
It will ask for confirmation before proceeding with the actual restore operation:

Figure 5.17 – Restore confirmation
By clicking on the Restore button, we confirm the restoration. The ATP status changes to RESTORE IN PROGRESS and the basic functionalities will be disabled until the restoration is completed:

Figure 5.18 – Restore in progress
We can monitor the Restore progress through Work requests:

Figure 5.19 – Work requests
Once Restore is completed, the banner changes from yellow to green, the status changes to Available, and all portal options will get enabled.
Manual database backup using Data Pump
Data Pump is a powerful tool to take logical backup and it has been introduced in Oracle Database 10g. It extracts the user data with its metadata and generates a dump file. That dump file can be imported into the target database. In general, it is a server-side utility, which means the dump will get stored in the database server. In an autonomous environment, we won’t get server access, so how we will take a backup? The answer is either to create an autonomous dump set and then move it to object storage, or directly take the dump to object storage. We will discuss both methods here.
Creating a dump set
The step for creating a dump set is similar to the on-premises environment. First, we need to create a logical directory at the database level to store the dump:
SQL>  create directory dump_dir as 'datapump_dir';
Directory created.
SQL> select directory_name , directory_path from dba_directories;
DIRECTORY_NAME
DIRECTORY_PATH
---------------------------
-----------------------------------------------------------------------------------------------
DUMP_DIR
/u03/dbfs/BDF28FA2296E84A6E053C614000ACEA2/data/datapump_dir
The /u03/dbfs/BDF28FA2296E84A6E053C614000ACEA2/data/ folder is the root location in the autonomous environment, and all custom directories will get created here. Remember, we can’t access these folders physically.
The Data Pump expdp command is as follows:
expdp Admin/password@ATPDB_high
directory=dump_dir
dumpfile=exp%U.dmp
parallel=16
encryption_pwd_prompt=yes
filesize=1G
logfile=export.log
Here, encryption_pwd_prompt encrypts the dump using the given password. The same password should be used during import.
$ expdp admin@kkatp_high filesize=1GB dumpfile=exp%U.dmp  parallel=2 encryption_pwd_prompt=yes logfile=export.log directory=dump_dir schemas=test
Export: Release 12.2.0.1.0 - Production on Fri Apr 2 12:19:20 2021
Copyright (c) 1982, 2017, Oracle and/or its affiliates.  All rights reserved.
Password:
Connected to: Oracle Database 19c Enterprise Edition Release 19.0.0.0.0 - Production
Encryption Password:
Starting "ADMIN"."SYS_EXPORT_SCHEMA_01":  admin/********@kkatp_high filesize=1GB dumpfile=exp%U.dmp parallel=2 encryption_pwd_prompt=yes logfile=export.log directory=dump_dir schemas=test
Processing object type SCHEMA_EXPORT/TABLE/TABLE_DATA
Processing object type SCHEMA_EXPORT/TABLE/STATISTICS/TABLE_STATISTICS
. . exported "TEST"."TEST"                               8.568 MB 1000000 rows
Processing object type SCHEMA_EXPORT/STATISTICS/MARKER
Processing object type SCHEMA_EXPORT/USER
Processing object type SCHEMA_EXPORT/DEFAULT_ROLE
Processing object type SCHEMA_EXPORT/TABLESPACE_QUOTA
Processing object type SCHEMA_EXPORT/PASSWORD_HISTORY
Processing object type SCHEMA_EXPORT/PRE_SCHEMA/PROCACT_SCHEMA
Processing object type SCHEMA_EXPORT/TABLE/TABLE
Processing object type SCHEMA_EXPORT/POST_SCHEMA/PROCACT_SCHEMA
Master table "ADMIN"."SYS_EXPORT_SCHEMA_01" successfully loaded/unloaded
******************************************************************************
Dump file set for ADMIN.SYS_EXPORT_SCHEMA_01 is:
  /u03/dbfs/BDF28FA2296E84A6E053C614000ACEA2/data/datapump_dir/exp01.dmp
  /u03/dbfs/BDF28FA2296E84A6E053C614000ACEA2/data/datapump_dir/exp02.dmp
Job "ADMIN"."SYS_EXPORT_SCHEMA_01" successfully completed at Fri Apr 2 12:20:00 2021 elapsed 0 00:00:26
The dump has been stored in /u03/dbfs/BDF28FA2296E84A6E053C614000ACEA2/data. We don’t have access to the database server, but the dump file existence can be verified through a query:
SQL> SELECT * FROM DBMS_CLOUD.LIST_FILES('DATA_PUMP_DIR');
OBJECT_NAME
BYTES
CHECKSUM
CREATED
LAST_MODIFIED
---------- ----------------------------------------------------------------------------------------------------------------
exp01.dmp
45056
02-APR-21 11.36.59.000000 AM +00:00
02-APR-21 11.37.57.000000 AM +00:00
exp02.dmp
9297920
02-APR-21 11.37.25.000000 AM +00:00
02-APR-21 11.37.57.000000 AM +00:00
Now, the dump files need to be moved to object storage. First, we need to create an object storage bucket:

Figure 5.20 – Creating an object storage bucket
Now we need to copy the dump files to object storage. This can be achieved by executing the DBMS_CLOUD.PUT_OBJECT procedure:
 BEGIN
   DBMS_CLOUD.PUT_OBJECT(
   credential_name => 'DEF_CRED_NAME',
   object_uri => 'https://objectstorage.region.oraclecloud.com/n/namespace-string/b/bucketname/o/',
   directory_name => 'DUMP_DIR'
   file_name => 'Dump file');
END;
/
Here, credential_name refers to the Cloud credentials created at the database level. Earlier in this chapter, we discussed the credentials while taking a manual backup of the autonomous database.
Here is an example:
Sql>  Begin
DBMS_CLOUD.CREATE_CREDENTIAL(
    credential_name => 'OBJSTORE_CRED',
    username => '[email protected]',
    password => 'iJW61QSOS-4:dHs5CP6B'
  );
END;
PL/SQL procedure successfully completed.
The Cloud credential has been created in the database with the name OBJSTORE_CRED. Let’s execute the DBMS_CLOUD.PUT_OBJECT procedure to move the dump to object storage.
Let’s first move exp01.dmp using this procedure:
SQL> BEGIN
DBMS_CLOUD.PUT_OBJECT(
credential_name => 'OBJSTORE_CRED',
object_uri => 'https://swiftobjectstorage.us-ashburn-1.oraclecloud.com/v1/mytenancy/DBBKP/exp01.dmp',
directory_name => 'DUMP_DIR',
file_name => 'exp01.dmp');
END;
PL/SQL procedure successfully completed.
Let’s also move exp02.dmp to object storage using this procedure:
SQL> BEGIN
DBMS_CLOUD.PUT_OBJECT(
credential_name => 'OBJSTORE_CRED',
object_uri => 'https://swiftobjectstorage.us-ashburn-1.oraclecloud.com/v1/mytenancy/WalletATP/exp02.dmp',
directory_name => 'DUMP_DIR',
file_name => 'exp02.dmp');
END;
/
PL/SQL procedure successfully completed.
We can verify the uploaded objects in Cloud portal | Object storage:

Figure 5.21 – Database backup list
Now let’s discuss how to take export directly into object storage instead of creating a dump set.
Creating a Data Pump backup directly to object storage
This procedure is very simple. We need to invoke the expdp command along with the object storage URL:
expdp HR/password@ATPDB_high
directory=dump_dir
dumpfile=Credential_name:Object storage URL
parallel=16
encryption_pwd_prompt=yes
filesize=1G
logfile=export.log
If the export utility version is 19.9 or later, then we can specify the credential name as a separate parameter, and the dump file parameter can carry only the object storage URL in this case:
expdp HR/password@ATPDB_high
directory=dump_dir
credential=Credential_name
dumpfile=Object storage URL
parallel=16
encryption_pwd_prompt=yes
filesize=1G
logfile=export.log
The dump file carries values of the default credential and the object storage URL. We derived values for both of them earlier in this chapter while executing the DBMS_CLOUD.PUT_OBJECT procedure; let’s use that.
Here is an example:
$ expdp admin@kkatp_high filesize=1GB dumpfile=OBJSTORE_CRED:https://swiftobjectstorage.us-ashburn-1.oraclecloud.com/v1/mytenancy/bucket-crsk-ash/o/export%T.dmp parallel=2 encryption_pwd_prompt=yes logfile=export.log directory=data_pump_dir schemas=test
Here is an example of the output:
Export: Release 12.2.0.1.0 - Production on Sat Apr 3 11:39:17 2021
Copyright (c) 1982, 2017, Oracle and/or its affiliates.  All rights reserved.
Password:
Connected to: Oracle Database 19c Enterprise Edition Release 19.0.0.0.0 - Production
Encryption Password:
Starting "ADMIN"."SYS_EXPORT_SCHEMA_01":  admin/********@kkatp_high filesize=1GB dumpfile=OBJSTORE_CRED:https://swiftobjectstorage.us-ashburn-1.oraclecloud.com/v1/ mytenancy /bucket-crsk-ash/o/export%T.dmp parallel=2 encryption_pwd_prompt=yes logfile=export.log directory=data_pump_dir schemas=test
Processing object type SCHEMA_EXPORT/TABLE/TABLE_DATA
Processing object type SCHEMA_EXPORT/TABLE/STATISTICS/TABLE_STATISTICS
. . exported "TEST"."TEST"                               8.568 MB 1000000 rows
Processing object type SCHEMA_EXPORT/STATISTICS/MARKER
Processing object type SCHEMA_EXPORT/USER
Processing object type SCHEMA_EXPORT/DEFAULT_ROLE
Processing object type SCHEMA_EXPORT/TABLESPACE_QUOTA
Processing object type SCHEMA_EXPORT/PASSWORD_HISTORY
Processing object type SCHEMA_EXPORT/PRE_SCHEMA/PROCACT_SCHEMA
Processing object type SCHEMA_EXPORT/TABLE/TABLE
Processing object type SCHEMA_EXPORT/POST_SCHEMA/PROCACT_SCHEMA
Master table "ADMIN"."SYS_EXPORT_SCHEMA_01" successfully loaded/unloaded
******************************************************************************
Dump file set for ADMIN.SYS_EXPORT_SCHEMA_01 is:
  https://swiftobjectstorage.us-ashburn-1.oraclecloud.com/v1/ mytenancy /bucket-crsk-ash/o/export20210403.dmp
Job "ADMIN"."SYS_EXPORT_SCHEMA_01" successfully completed at Sat Apr 3 11:39:58 2021 elapsed 0 00:00:31
We can see the export dumps are directly placed in the object storage. We don’t need to manually execute the DBMS_CLOUD.PUT_OBJECT procedure.
Data Pump import backup
Now that the dump files are ready, let’s talk about the import activity. Import command parameters to autonomous databases are similar to export. Along with normal import parameters, we need to specify the dump file stored in object storage with its URL:
$ impdp admin@kkatp_high directory=data_pump_dir dumpfile=OBJSTORE_CRED:https://swiftobjectstorage.us-ashburn-1.oraclecloud.com/v1/mytenancy/bucket-crsk-ash/o/export20210403.dmp REMAP_SCHEMA=TEST:SCOTT
An example of import output is as follows:
sImport: Release 12.2.0.1.0 - Production on Sat Apr 3 11:45:20 2021
Copyright (c) 1982, 2017, Oracle and/or its affiliates.  All rights reserved.
Password:
Connected to: Oracle Database 19c Enterprise Edition Release 19.0.0.0.0 - Production
Master table "ADMIN"."SYS_IMPORT_FULL_01" successfully loaded/unloaded
Starting "ADMIN"."SYS_IMPORT_FULL_01":  admin/********@kkatp_high directory=data_pump_dir dumpfile=OBJSTORE_CRED:https://swiftobjectstorage.us-ashburn-1.oraclecloud.com/v1/ mytenancy /bucket-crsk-ash/o/export20210403.dmp REMAP_SCHEMA=TEST:SCOTT
Processing object type SCHEMA_EXPORT/USER
Processing object type SCHEMA_EXPORT/DEFAULT_ROLE
Processing object type SCHEMA_EXPORT/TABLESPACE_QUOTA
Processing object type SCHEMA_EXPORT/PASSWORD_HISTORY
Processing object type SCHEMA_EXPORT/PRE_SCHEMA/PROCACT_SCHEMA
Processing object type SCHEMA_EXPORT/TABLE/TABLE
Processing object type SCHEMA_EXPORT/TABLE/TABLE_DATA
. . imported "SCOTT"."TEST"                              8.568 MB 1000000 rows
Processing object type SCHEMA_EXPORT/TABLE/STATISTICS/TABLE_STATISTICS
Processing object type SCHEMA_EXPORT/STATISTICS/MARKER
Processing object type SCHEMA_EXPORT/POST_SCHEMA/PROCACT_SCHEMA
Job "ADMIN"."SYS_IMPORT_FULL_01" successfully completed at Sat Apr 3 11:45:40 2021 elapsed 0 00:00:10
Please note that Autonomous Database supports external tables, partitioned external tables, and external partitions of hybrid partitioned tables. But the backup will not include those external objects. It has to be backed up separately through different methods.
Refreshing Autonomous Database schemas
In real-time scenarios, we may have a requirement to refresh user data, such as the Dev database may need to be refreshed periodically from production. This requirement could appear in an autonomous environment as well. Imagine that the Dev and Production databases are autonomous databases and we may need to refresh Dev data from the Production database, or we may need to refresh Autonomous Database schema from an on-premises database, or vice-versa. Let’s discuss how we can achieve this.
In general, we can do a data refresh through the expdp/impdp procedure that we discussed earlier in Manual database backup using Data Pump. We can export the required data from the source database and import it into Autonomous Database.
Another method is through a database link. Create a database link between these databases and pull or push the data according to the need. We are going to discuss how to create database links in Autonomous Database.
Database links between autonomous databases
In general, a database link is used to communicate between different databases. The beauty of this method is that we don’t need to worry about compatibility between the databases. The source and target database could be with different platforms, different versions, and different character sets. The only requirement is SQL connectivity between these databases. We create a link between schemas present in source and target databases. From the source database, we can refer data of schema located in the target database.
Autonomous Database supports creating database links only if the target database is accessible through a public IP or public hostname or using an Oracle Database Gateway.
In Autonomous Database, the database link can be created using the DBMS_CLOUD_ADMIN.CREATE_DATABASE_LINK procedure:
DBMS_CLOUD_ADMIN.CREATE_DATABASE_LINK(
       db_link_name         IN VARCHAR2,
       hostname             IN VARCHAR2,
       port                 IN NUMBER,
       service_name         IN VARCHAR2,
       ssl_server_cert_dn   IN VARCHAR2,
       credential_name      IN VARCHAR2,
       directory_name       IN VARCHAR2 DEFAULT,
       gateway_link         IN BOOLEAN DEFAULT);
Here, the parameters and their definitions are as follows:
- db_link_name: Database link name
- Hostname: Target database hostname
- Port: Port at which the target database listener is active
- Service_name: Target database service name
- ssl_server_cert_dn: The DN value found in the server certificate
- credential_name: Credential to log in to the target autonomous database
This is different from the credential that we created earlier for expdp. For the expdp command, the credential parameter had Cloud portal login credentials. But here, we create credentials for the database, and hence the database schema should be specified.
Here is an example:
BEGIN
DBMS_CLOUD.CREATE_CREDENTIAL(
credential_name => 'DB_Schema_credential',
username => 'ADMIN',
password => 'Welcome123##'
);
END;
The attributes and their descriptions are as follows:
- directory_name: Directory in which the cwallet.sso wallet has been stored. This directory location will be within an autonomous environment. As per our previous example, it is the /u03/dbfs/BDF28FA2296E84A6E053C614000ACEA2/data folder.
- gateway_link: Indicates whether the target is an autonomous database/any other database or Database Gateway.
In a general autonomous database, the authentication happens through the wallet. To use database links with Autonomous Database, the target database must be configured to use TCP/IP with SSL (TCPS) authentication. So, let’s first download the wallet. We can retrieve the hostname, port, and service name values from the wallet. The steps are as follows:
- Log in to the OCI portal, and navigate to Autonomous Database. Choose ATP or ADB according to the workload:

Figure 5.22 – ATP DB connection
- Click on the DB Connection button, as shown. It will invoke the Database Connection page:

Figure 5.23 – Wallet download
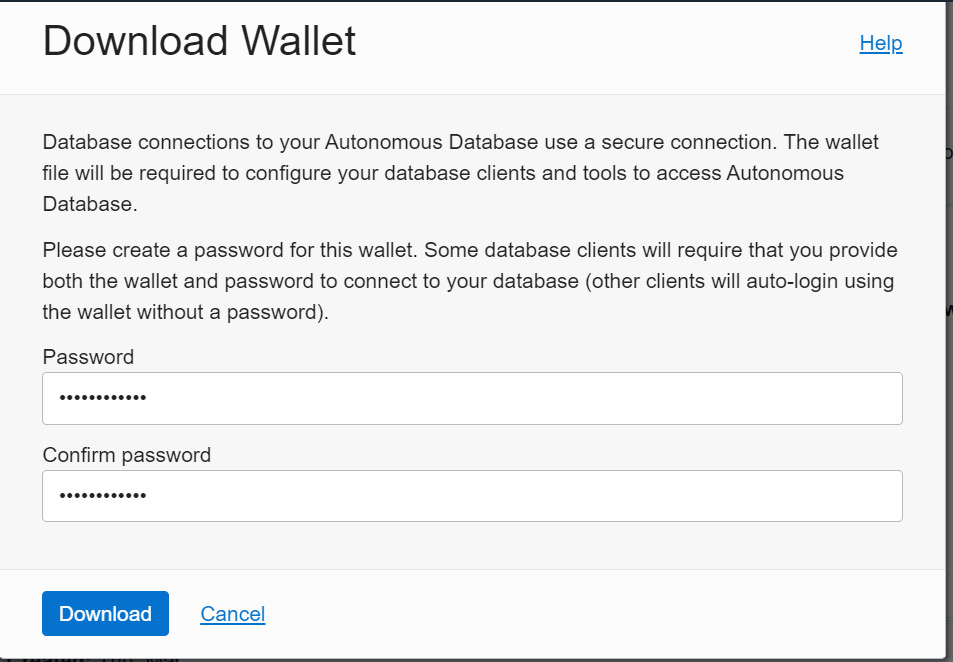
Figure 5.24 – Wallet download credentials
The DB connection will be downloaded as a ZIP file. Extract the ZIP file and you can find the cwallet.so wallet, tnsnames.ora, and other network-related files. The wallet is available now, but it should be on the Autonomous Database server. To transfer the downloaded wallet to the Autonomous Database server, first, we will move it to object storage and then move it to the Autonomous Database server by executing the DBMS_CLOUD.GET_OBJECT procedure. Transferring the wallet to object storage can be done through the Cloud portal or using the OCI command-line utility (CLI).
After copying/moving the wallet to object storage, execute DBMS_CLOUD.GET_OBJECT as shown to copy it to the Autonomous Database server:
BEGIN
DBMS_CLOUD.GET_OBJECT(
credential_name => 'DEF_CRED_NAME',
object_uri => 'https://objectstorage.us-phoenix-1.oraclecloud.com/n/<tenancyName/Namespace>/b/<bucket_name>/o/cwallet.sso',
directory_name => 'DATA_PUMP_DIR');
END;
Here, the attributes and descriptions are as follows:
- Credential name: The Cloud credentials created at the database level
- Object_uri: Object storage URL after uploading the wallet to object storage
- Directory_name: Directory in which the wallet will be transferred, basically the logical directory created at the autonomous database level
BEGIN
   DBMS_CLOUD.GET_OBJECT(
   credential_name => 'OBJSTORE_CRED',
   object_uri => 'https://objectstorage.usphoenix-1.oraclecloud.com/n/mynamespace/b/bucketname/o/cwallet.sso',
   directory_name => 'DUMP_DIR');
END;
/
The https://objectstorage.usphoenix-1.oraclecloud.com/n/mynamespace/b/bucketname/o/cwallet.sso wallet has been copied to the DUMP_DIR logical directory. Now, we have everything to create a database link.
Let’s revisit the database link procedure with collected attributes:

Figure 5.25 – Database link procedure with attributes
Execute this procedure from the source database to create a database link to the target database. Once the link is created between schemas of two different databases, we can write SQL scripts to perform a refresh of a particular table or schema or the whole database itself.
Summary
In this chapter, we discussed the backup/restore concepts of Autonomous Database. We learned how automated backup works with Autonomous Database and then discussed the available manual backup methods. We also discussed how the backup restoration process is automated in Autonomous Database. This chapter also covered the database link mechanism, which plays a crucial role in database refresh activity.
In the next chapter, we will be discussing how high availability can be achieved for Autonomous Database through Oracle Data Guard.
Questions
- Can we do point-in-time recovery in Autonomous Database?
- Is it possible to refresh a particular table between different autonomous databases?
Further reading
- Oracle Database 12c Backup and Recovery Survival Guide, by Francisco Munoz Alvarez and Aman Sharma
Answers
- Yes. We can do point-in-time recovery in Autonomous Database. This option is available in the Autonomous Database portal.
- Yes. We can refresh tables between different autonomous databases through the database link.