An Access database is like a carefully built fort. It takes strictly organized and error-tested information, and locks it up tight. Very few programs guard their data as protectively as database software does. Word processors and spreadsheet programs accept just about any content and let you build your document structure on the fly. Databases aren’t nearly as freewheeling.
Most of the time, databases live in an independent world. But every once in a while, you need to bridge the gap in one of two ways:
You want to take the information from another program and import it—basically, stuff it into your database.
You want to take some of the information in an Access database and export it, so you can work with it in another program.
Access has several different options for transferring information. You can use the lowly clipboard, or sophisticated import and export features. In this chapter, you’ll learn about all your options.
Note
The ever-popular XML standard is yet another option for importing and exporting, which is great for Access power users. You can learn more about Access and XML in Access 2007: The Missing Manual.
If you haven’t thought much about importing and exporting, it’s probably because you don’t need to use these features—yet. Many databases are completely happy living a quiet, solitary life. However, importing and exporting might come in handy for a few reasons. Sooner or later, one of these reasons will apply to you.
Exporting is the easier part of the equation. Exporting’s simpler than importing, because it involves moving information from a stricter storage location (the database) to one with fewer rules (another type of document).
Note
Exporting is a way to transfer a copy of your information to another location. The original copy always remains in Access. There’s no point in changing the exported copy. Instead, if you need changes, make them in the database, and then perform the export operation again.
Here are some of the most common reasons people decide to export information:
You want to email some information to a friend. You don’t want to send the Access database because your friend doesn’t have a copy Access, or you want him to see only some—not all—of the data.
You’re creating a presentation in PowerPoint. The easiest way to dazzle and convince your peers is to show them some impressive information from your database.
You want to analyze the information in Excel. Access is great for storing and managing your data, but it doesn’t give you the tools to help you figure out what it all means. If you want to crunch the numbers with heavy duty formulas and slick charting features, it makes sense to move it to Excel.
Some programs are intelligent enough to pull the information out of an Access database all on their own. One example’s Word, which provides a mail merge feature that lets you take a list of names and addresses from a database, and then use them to create mailing labels, personalized forms, or any other sort of batch paperwork. When using this feature, you don’t need to perform any exporting—instead, you can just point Word to your Access database file. (For more information about Word’s mail merge feature, see Word 2007: The Missing Manual.)
You need importing whenever there’s information outside your database that belongs inside it. Suppose you create a state-of-the-art e-commerce database for your buffalo farm. However, some of your sales associates still fill out forms using an old Excel spreadsheet. Now, you need a way to get the information out of the Excel spreadsheet and into your database.
Tip
Your sales staff has let you down. They really shouldn’t enter data into a document for another program. Instead, they should use a form that’s designed for logging sales, as described in Chapter 33.
Import operations have two key challenges. The first is making sure the data fits the database’s strict requirements. As you learned in Chapter 26, databases are rule-crazy, and they rudely toss out any information that doesn’t fit (for example, text in a date field). The second challenge is dealing with information that doesn’t quite line up—in other words, its representation in the database doesn’t match its representation in the external document. This headache’s more common that you may think.
In your database, you might use status codes (like 4302), while the spreadsheet you want to import uses status names (like High Priority). Or, you may need to break the information you’re importing into more than one linked table, even though it’s stored together in a single document. The customer order spreadsheet for your buffalo farm could include customer information (which corresponds to the Customers table) and order information (for the Orders table). Sadly, you don’t have any easy way to solve these problems. If the external data doesn’t match the representation in the database exactly, you’ll need to change it by hand before or after the import operation.
Anyone who’s spent much time using a Windows computer is familiar with the clipboard—a behind-the-scenes container that temporarily stores information so you can transfer it from one program to another. Using the clipboard, you can copy a snippet of text in a Word document, and then paste it into a field in an Access table, or vice versa. That much is easy. But you probably don’t realize that you can copy an entire table of information.
Tip
Almost all Windows programs respect the same shortcut keys for the clipboard. Use Ctrl+C to copy information, Ctrl+X to cut it (copy and delete it), and Ctrl+V to paste it.
Before you try this trick out, you need to understand two key facts about the clipboard:
The clipboard can store many different types of information. Most of the time, you’re using it to copy plain text. However, depending on the program you’re using, you could also copy shapes, pictures, tables, and more.
Some types of information can convert themselves to other types. If you copy a selection of cells in Excel, then you can paste it as a formatted table in a word processing program like Word or WordPerfect. Of, if you copy a diagram in Visio, then you can paste it as a picture in Paint. In both examples, you copy a specialized type of object (Excel cells or a Visio diagram) to the Windows clipboard. However, this object can downgrade itself when it needs to. You can paste a full-fledged copy of the object in the original program without losing anything, or you can paste and convert it to something simpler in a less powerful program.
This flexibility is the secret to transferring data to and from Access. The following sections explain how it works.
Note
The clipboard approach is simpler than the import and export features in Access. As a result, it’s a faster choice (with fewer steps). Of course, it also gives you fewer choices and doesn’t work with all programs.
Access lets you copy a selection of rows or an entire table to another program, without going through the hassle of the Export wizard. Access copies these rows to the clipboard as an intelligent object that can convert itself into a variety of soft-ware-friendly formats. You can paste them as Excel cells, HTML text (the formatting language of the Web), or RichText (a formatting standard created by Microsoft and supported by all major Word processors). Since HTML and Rich-Text are so widely supported, you’ll almost never have a problem copying your rows into another program when you use this technique.
Here’s how to try it out:
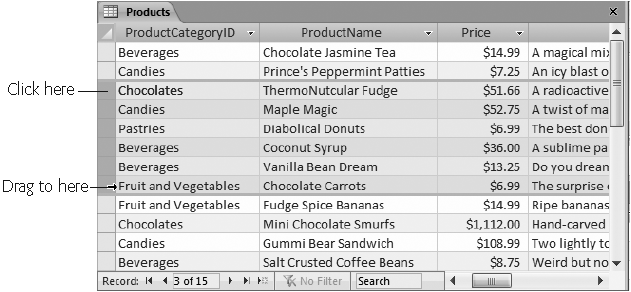
If you want to copy an entire table, then, in the navigation pane, select the table. If you want to copy only a few rows, then select them in the Datasheet view, as shown in Figure 34-1.
You’re not limited to copying tables. You can also copy a query’s results. Just select the query in the navigation pane. You can’t copy reports or forms, however.
When you copy rows or an entire table, Access takes your column hiding settings (Hiding Columns) into account. If you’ve hidden a column so it doesn’t appear in the datasheet (by selecting it, and then choosing Home → Records → More → Hide Columns), Access doesn’t copy it to the clipboard. This technique helps you leave out information you don’t want to copy.
Figure 34-1. When selecting rows in the datasheet, click the gray margin just to the left of the first row you want to select. Then, drag down to select as many rows as you want. If you don’t want to take your hand off the mouse, then you can copy these rows by holding down the Ctrl key, and right-clicking one of them. Then, from the pop-up menu, choose Copy.
Note
You can copy only a contiguous selection of rows, which is a fancy way of saying you can copy only rows that are right next to each other. If you have 10 rows in a table, then you can copy rows three to six, but you can’t copy just the first and last rows. (Of course, you can use several smaller copy operations to get the stragglers.)
Hit Ctrl+C to copy your selection.
This action places the records on the Windows clipboard. You can now paste it inside Access or in another program.
Switch to the program where you want to paste your information.
If you’re just trying this feature out for the first time, then take a whirl with Excel or Word (shown in Figure 34-2).
Hit Ctrl+V to paste your selection (see Figure 34-2).
Access pastes the rows from your selection, complete with column headers. If you’ve applied formatting to the datasheet (Datasheet Customization), then most of that formatting comes along.
Depending on the program where you paste your records, you might see a smart tag icon appear at your newly pasted content’s righthand corner. In Office applications, you can use this smart tag to change options about how the data’s pasted (for example, with or without formatting).

You can copy information from Access into another program easily enough, but you probably don’t expect to be able to do the reverse. After all, a database is a strict, rigorously structured collection of information. If you try to copy a table from a Word processing program, then you’ll lack vital information, like the data types of each column. For that reason, Access doesn’t allow it.
However, Access makes a special exception for everyone’s favorite spreadsheet program, Excel. You can copy a selection of cells in Excel, and then paste them into Access to create a new table. This procedure works because Excel does distinguish between different types of data (although it isn’t nearly as picky as Access). For example, Excel treats numbers, dates, text, and TRUE/FALSE values differently.
Here’s how to use this feature:
In Excel, select the cells you want to copy.
If your spreadsheet includes column titles, then include those headers in the selection. Access can use the titles as field names.
Hit Ctrl+C to copy your selection.
Switch to Access.
Click anywhere in the navigation pane, and then press Ctrl+V.
Access notices that you’re trying to paste a group of Excel cells, and it tries to transform them into a table. First, it asks if the first row in your selection includes column titles.
If you selected the column titles in step 1, then choose Yes. Otherwise, choose No.
If you choose Yes, then Access doesn’t need to create random field names— instead, it can use your headers.
Access creates a new table to deal with the new data. This table’s named after the Excel sheet. If your sheet’s named Sheet1 (as so many are in Excel), you now have a Sheet1 table.
Once Access finishes the paste, it shows a confirmation message to let you know everything’s finished successfully.
Click OK.
Now you can refine your table to make sure the data types and field names are exactly what you want.
Although the clipboard cut-and-paste approach is neat, it doesn’t always work out. If you need to export data to a file and you don’t have the corresponding program installed on your computer (or you just don’t want to bother running it), then you need a different way to transfer your information. Similarly, if you’re downloading data from the Web or fetching information from a program that doesn’t support Windows cut-and-paste, you need the full-fledged Access import feature.
When Microsoft designed Access 2007, they spent a fair bit of time making the import and export features clearer and more straightforward. Nowadays, you can do all the importing and exporting you want from a single ribbon tab, which is named External Data (Figure 34-3).
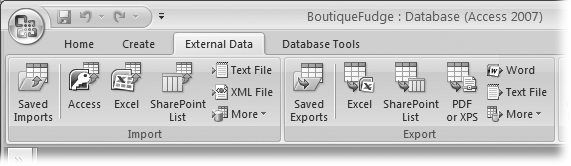
Figure 34-3. The External Data tab’s Import section lets you pipe data into Access using a variety of formats. The Export section does the reverse—it takes your table, and exports it in a bunch of different flavors.
Note
The Import and Export sections have easy-to-access buttons for the most popular file formats. If you don’t see what you want, then click the More button to see an expanded list of choices.
Whether you’re importing or exporting data, the process is essentially the same. You answer a few questions about what file you want to use and how you want to make the conversion, and then Access does your bidding.
Once you finish performing an import or export operation, Access gives you the option of saving all your steps. If you do, you can reuse them later on. This method’s a great way to save time if you need to perform the same export or import process again (like if you need to import some data every day, or export a summary at the end of every month).
Most of the time, you’ll import data that’s in one of these five common formats:
Access. When you use this option, you aren’t performing a conversion. Instead, you’re taking a database object from another Access database file, and copying it into the current database.
Excel. Pulls the data from an Excel spreadsheet.
SharePoint List. Pulls the data from a list that’s hosted on a SharePoint server (which big companies use to help workers collaborate). You don’t need to import SharePoint information in order to work with it. You can also edit SharePoint lists directly in Access. Access 2007: The Missing Manual has much more about getting Access and SharePoint to work together.
Text File. Pulls the data out of a plain text file. Typically, plain text files use some sort of character (like a comma) to separate field values. This universally understood format’s supported by many programs, including just about every piece of spreadsheet software ever written. When using this option, Access takes a look at the text file as it tries to figure out how it’s organized. However, you get the chance to confirm or correct the hunch before you import any data, as described on Importing from a Text File.
XML File. Pulls the data out of a structured XML file. XML is a cross-platform format used to represent any type of information.
Using the More button, you’ll find several other, more exotic import choices:
ODBC Database. Grabs information from just about any database product, provided it has an ODBC driver. This option works particularly well if you need to get data out of a high-end server-side database like Oracle, SQL Server, or MySQL.
HTML Document. Extracts information from a list or a table in an HTML Web page. Since HTML’s a standard that’s notoriously loose (and at times downright sloppy), you should try to avoid this option. You’re likely to have importing problems.
Outlook Folder. Pulls information out of a folder in Outlook or Outlook Express.
dBase File, Paradox File, and Lotus 1-2-3 File. Pulls information out of a file created with one of these Paleolithic programs.
No matter what type of data you want to import, you’ll go through the same basic steps. Here’s an overview:
In the ribbon’s External Data → Import section, click the button that corresponds to the type of file you want to import.
When you choose a format, Access launches the Import wizard (Figure 34-4).
Enter the name of the file you want to import.
If you don’t remember the file path (or you just don’t want to type it in by hand), then click Browse, and then navigate to the right place in the File Open window. Once you find the file, double-click it.
Choose where to place the imported content in your database.
You have three possible choices for placing your data. Depending on the file format you’re using, all these may not be available.
Create a new table. This option creates a fresh new table for the data you’re importing, which saves you the headache of worrying about conflicting records. However, if a table of the same name already exists in the Access database, then this option wipes it out.
Append to an existing table. This option takes the rows you’re importing and adds them to an existing table. In order for this option to work, the structure of the data you’re importing must match the structure of the table you’re using. For example, the field names much match exactly. However, the data you’re importing can leave out fields that aren’t required (Preventing Blank Fields) or have default values (Setting Default Values).
Create a linked table. If you use this approach, then Access doesn’t actually transfer the information into your database. Instead, every time you view the linked table, Access checks the original file to get the most recent information. The neat thing here’s that your linked table always shows the most recent information. With any other option, the imported table’s left untouched if you change the original file. However, linked tables are also risky, because you don’t have any guarantee that the file won’t travel to another location on your hard drive (where Access can’t find it).
Click OK.
A wizard launches that collects the remaining information that Access needs. If you’re importing an Excel file, then Access asks you which worksheet to use. If you’re importing a text file, then Access asks you how the fields are separated.
Answer all questions in the wizard to tell Access what it needs to know about the structure of the data you’re importing.
Once you’re finished with this stage, Access asks you its final question—whether or not you want to save your import steps.
If you want to perform this import again later on, then select “Save import steps”. Then, click Close.

Note
If Access finds any errors while importing your data, then it creates another table with the same name as the table you’re importing to, with _ImportErrors tacked on the end. Access adds one record to that table for each problem. If you try to import a bunch of information into a table named SalesData, and Access can’t convert the values to the data type you want (for example, there’s text in a column that should only hold numbers), you get a table named SalesData_ImportErrors.
The following sections walk you through the specifics for two common data formats that need a few extra steps: Excel workbooks and text files.
In order to import from an Excel file, your data should be organized in a basic table. Ideally, you have column headings that match the fields in your database. You should trim out any data that you don’t want to import (like other cells under the table that aren’t a part of the table). You should also remove values calculated using Excel formulas. (As you learned on 5. Avoid Redundant Information, you shouldn’t store calculated values in a table, because they introduce the risk of inconsistent data.)
Note
Earlier in this chapter, you learned how to take Excel data, and cut and paste your way to an Access table. However, when you perform a full-fledged import, you get the opportunity to change field names, fine-tune data types, and use indexing.
Once you have a cleaned-up table of data in an Excel file, you’re ready to start the import process:
Choose External Data → Import → Excel, choose your Excel file, and then specify how you want to add the imported information to your database. Then, click OK.
You learned how to make these decisions in steps 1 to 3 on Importing Data.
Choose the worksheet that houses your data (Figure 34-5).
Excel files, or workbooks, begin with three worksheets. Most people plop their data on the first one, which is initially named Sheet1. If you’re an Excel expert, then you might have designated a section of a more complex worksheet as a named range. If so, you can pick that named range from the list.
Click Next.
If your Excel data has a row with column headings, then choose First Row Contains Column Headings.
These headings become the starting point for your field names. If you don’t choose First Row Contains Column Headings, then Excel treats the first row as an ordinary record.
Click Next.
If you’re creating a new table for your imported records, then Access asks you to configure the fields you’re creating. If you’re appending the records to an existing table, then skip ahead to step 7.
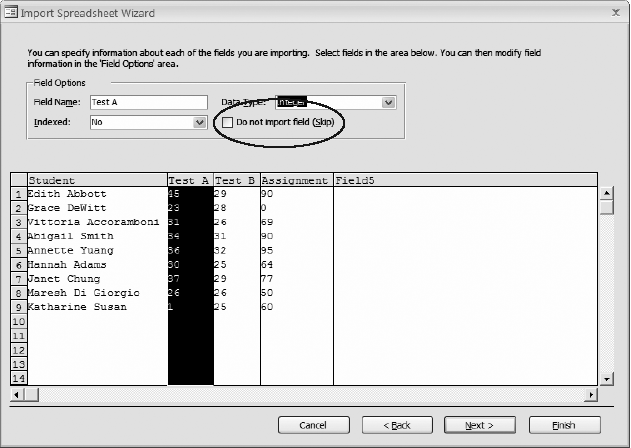
For each field, you can choose a field name, the data type, and whether or not the field should be indexed (Preventing Duplicate Values with Indexes). Then, click Next.
Access makes some intelligent guesses based on the data that’s there, but it’s up to you to fine-tune the details. For example, if you have a column with whole numbers, you may want to change the data type from Double (which supports fractional numbers) to Integer, as shown in Figure 34-6.
Choose whether you want Access to create the primary key.
Choose “Let Access add primary key” if you’d like Access to create an autonumbered ID field (which is generally a good idea). If the data you’re importing already includes a field you want to use as a key, then select “Choose my own primary key”, and then pick the right field.
In the Import to Table text box, type the name of the table you want to create or add your records to.
Click Finish to finalize your choices.
Once the import’s complete, you can choose whether or not to save your import steps for reuse.

You’ll find some potential stumbling blocks when importing data from Excel. Blank values and fields, the commonest problems, occur when the Import wizard assumes there’s data in a part of your worksheet that doesn’t contain any information. (This could happen if there’s a cell with just a space somewhere on your worksheet, or even if you have a cell that used to contain data but has since been deleted.) After you perform your import, you may need to clean up your table to fix problems like these by deleting empty fields and records.
Text files are the lowest common denominator for data exchange. If you’re using a program that creates files Access can’t import, then plain text may be your only avenue.
Once again, you start by choosing your file, and then choosing how you want to add the information to your database. Then, the Import wizard takes you through a few more steps:
Specify the type of text file.
Access can import from two types of text files:
Delimited text files use some sort of separator to indicate where each field ends. For example, Joe,Piscapone,43 is a line of text you may find in a delimited text file—it’s three field values separated by commas.
Fixed-width text files separates a record into separate fields by position. Each field has a certain number of characters allocated to it, and if you don’t use them all up, then Access fills the remaining space (up until the next field) with space characters.
Click Next.
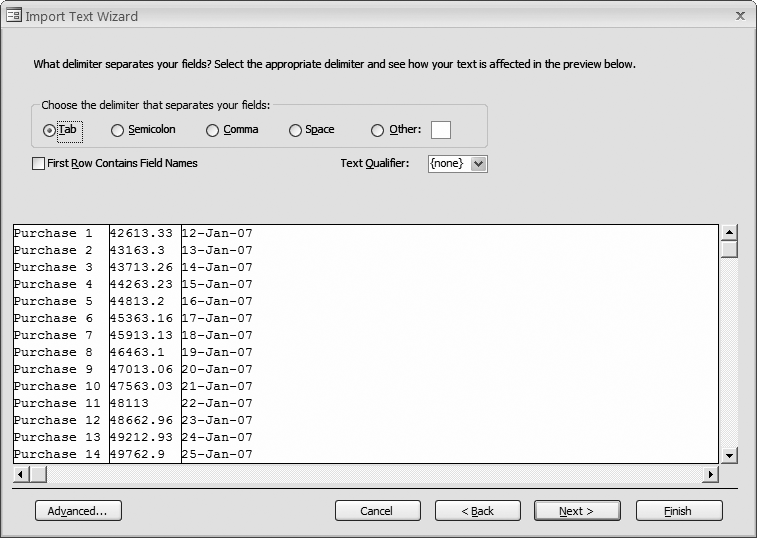
If you’re importing delimited text, Access asks you what character’s the delimiter—in other words, what character separates the fields (Figure 34-7). Commas and tabs are common delimiters.
If you’re importing fixed-width text, Access lets you set the field boundaries by dragging column lines to the right position in the preview window.
The rest of the wizard unfolds in exactly the same way as it does for Excel data.
If you’re creating a new table to hold your imported data, then the next step asks you to configure the fields you want to create by setting their names, data types, and indexing options (Figure 34-6). Once you’ve finished this part, you can choose whether or not you want Access to create an autonumbered ID field, and then use it as the primary key.
Finally, in the last step, you need to enter the name of the table you want to create or add to. You can then click Finish (and, optionally, choose to save your import steps for later reuse).
Just as you can import information from other files and pop it in your database, you can also take the existing information and ship it out to another format. You’ll most often undertake this step to let some other person or program get their hands on your information without needing to go through Access.
When exporting your data, you can use all the same formats that you can use in an import operation, plus a few more. Here’s a rundown of the most popular choices:
Access. Transfers the Access table (or a different type of object) to another Access database file. This feature isn’t as powerful as importing Access objects, because you’re limited to one object at a time. For that reason, people don’t use it as often.
Excel. Puts the data into the cells of an Excel worksheet. Perfect if you want to use Excel’s tools to analyze a sales trend or plot a profit chart.
Word. Puts the data into a Word document, separating each column with tabs and each line with a hard return. This format leaves a lot to be desired, because it’s difficult to rearrange the data after the fact in Word. (A nicer export feature would put the report data into a Word table, which would make it far easier to work with.)
PDF or XPS. Creates a print-ready PDF file with the exact formatting and layout you’d see if you sent the table to your printer. Unlike Excel or Word documents, you can’t edit a PDF file—you’re limited to reviewing the report and printing it out.
Note
The PDF or XPS option appears only if you’ve installed a free add-in for Office. Getting the “Save As PDF” Add-in describes how to get it.
HTML Document. Creates a web-ready HTML Web page that you can post to a Web site or a company intranet. The HTML format that Access generates looks remarkably like your real, printed report.
Text File. Dumps the data into a plain text file, with tabs and spaces used to arrange the data. You lose colors, fonts, borders, and other formatting details. This format isn’t very useful—think of it as a last resort to transfer data to another program if none of the other export options work.
XML File. Saves the data in a text .xml file, without any formatting. This option makes sense if you’re using some sort of automated program that can read the exported XML file and process the data.
To perform an export operation, follow these steps:
In the navigation pane, select the table you want to export.
Unfortunately, you can’t export more than one table at once. However, you can export just a portion of a table. One way to do this partial export is to open the table, and then select the rows you want to export. (Once you start the export process, you see an option that lets you export just the selected rows.) You can also create a query that gets just the rows you want. You can export the query results by selecting the query in the navigation pane instead of the underlying table.
Click the button that corresponds to the type of file you want to export.
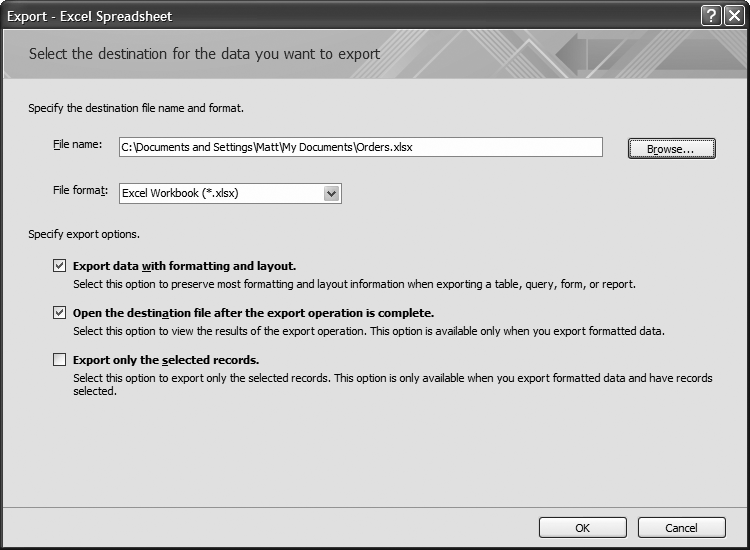
When you choose a format, Access launches the Export wizard (Figure 34-8).
Enter the name of the file you want to create.
Access creates this file during the export operation. In some cases, you may have a choice of file format. For example, if you’re exporting to Excel you can use the newer XML-based spreadsheet format (the .xlsx standard), or the older .xls standard that supports older versions, like Excel 97.
If you want to keep the formatting that’s in your database, then choose “Export data with formatting and layout”.
If you’ve tailored the datasheet with fancy fonts and colors (as described on Datasheet Customization), Access preserves these details in the exported file. Obviously, this option doesn’t work for all formats. For example, simple text files can’t handle any formatting.
If you want to double-check your exported document, then choose “Open the destination file after the export operation is complete”.
It’s always a good idea to make sure you got the data and the formatting you expect. If you use this option, then Access launches the exported file, opening it in the program that owns it (Excel for spreadsheets, Notepad for text files, and so on). Of course, this method works only if you have that application on your computer.
If you’ve selected only a few records in a table, then choose “Export only the selected records”.
This way, Access exports the current selection, not the entire table or query.
Click OK to perform the export.
Access may ask you for additional details, if it needs any more information about how to create the exported file.
Once you’re finished this stage, Access asks you its final question—whether or not you want to save your export steps.