So far, you’ve learned how to create tables that house your data, queries that search it, and reports that prepare it for printing. You’ve also learned about action queries that automate big updates. But your actual database users (whether that’s you or someone else) will spend most of their time on an entirely different job: daily database upkeep.
Database upkeep includes reviewing, editing, and inserting information. Real databases go through this process continuously. In a typical day, the staff at Cacophoné Studios adds new students, the customer service department at Boutique Fudge places new orders, and the Gothic Wedding planners tweak the seating arrangements. Bobbleheads are bought, addresses are changed, purchases are logged, test scores are recorded, and your data grows and evolves.
You can perform your daily upkeep using the datasheet (Chapter 28), but that isn’t the easiest approach. Although the datasheet packs a lot of information into a small space, it’s often awkward to use, and it’s intimidating to Access newcomers. The solution is forms: specialized database objects that make it easier for anyone to review and edit the information in a table.
Note
Remember, if you’re using Access in a business environment, different people probably use your database. You may create it, but others need to be able to use it to perform a variety of tasks—usually data entry and searches. These other folks may not be as Access-savvy as you are.
Forms get their name from paper forms that people use to record information when a computer isn’t handy. Depending on your situation, you may create an Access form that resembles a paper form that your company or organization uses. If you’re working at a bank, you can create an Access form that lays out information in the same basic arrangement as a paper-based customer application form. This arrangement makes it easy to copy information from the paper into your database. However, most of the time the forms you design don’t have a real-world equivalent. You’ll create them from scratch, and use them to make data entry easier.
To understand why forms are an indispensable part of almost all databases, it helps to first consider the datasheet’s shortcomings. Here are some areas where forms beat the datasheet:
Better arrangements. In the datasheet, each field occupies a single column. This arrangement works well for tables with few fields, but leads to endless side-to-side scrolling in larger tables. In a form, you can make sure the data you need is always in sight. You can also use color, lines, and pictures to help separate different chunks of content.
Extra information. You can pack a form with any text you want, which means you can add clues that help newbies understand the data they need to supply. You can also add calculated details—for example, you can calculate and display the total purchases made by a customer without forcing someone to fire up a separate query.
Table relationships. Many tasks involve adding records to more than one related table. If a new customer places an order in the Boutique Fudge database, then you need to create a new record in the Customers and Orders tables, along with one or more records in the OrderDetails table. A form lets you do all this work in one place (rather than forcing you to open two or three datasheets).
Buttons and other widgets. Forms support controls—buttons, links, lists, and other fancy pieces of user interface matter you can add to your form. The person using your database can then click a button to fire off a related task (like opening another form or printing a report).
Properly designed forms are what the geeks call a database’s front end. In a database that uses forms, you can edit data, perform searches, and take care all of your day-to-day tasks without ever touching a datasheet.
As with reports, Access gives you an easy and a more advanced way to construct a form. The easy way creates a ready-made form based on a table or query. Keen eyes will notice that this process unfolds in more or less the same way as when you automatically generate a simple report (Creating a Simple Report).
Here’s how it works:
In the navigation pane, select the table or query you want to use to generate the form.
Try the Products table from the Boutique Fudge database.
Note
If you create a form for a parent table that’s linked to other tables, then you wind up with a slightly different type of form. If you create a form for the Categories table (a parent of the Products table), then you end up with a two-part form that lets you view and modify the category record and the linked product records in each category.
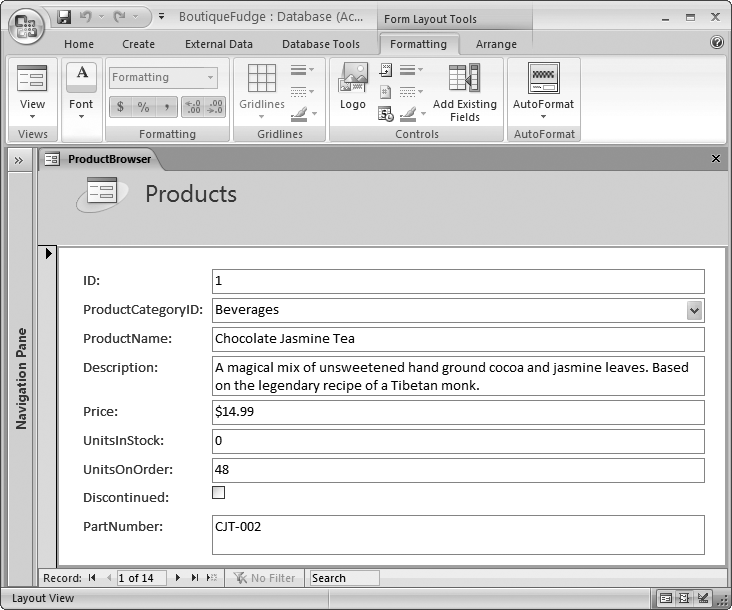
A new tab appears, with your form in Layout view. The simple form shows one record at a time, with each field on a separate line (Figure 33-1). If your table has lots of fields, then Access creates more than one column (Figure 33-2).
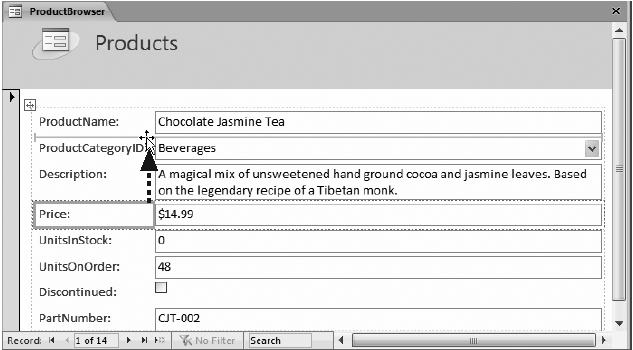
Figure 33-1. This simple form for the Products table already shows a fair bit of intelligence. Access uses text boxes for all the text fields, a drop-down list box for fields that have a lookup (in this case, ProductCategoryID), and a checkbox for any Yes/ No field (like Discontinued). It also makes some boxes (like Description) larger than others, because it notices that the underlying field has a larger maximum allowable length (Text length).
Tip
Good design practices pay off when you begin building forms. If your text fields store a far greater number of characters than they need (as controlled by the Field Size property described on Text length), then your form winds up with huge text boxes that waste valuable space. You need to resize them by hand.
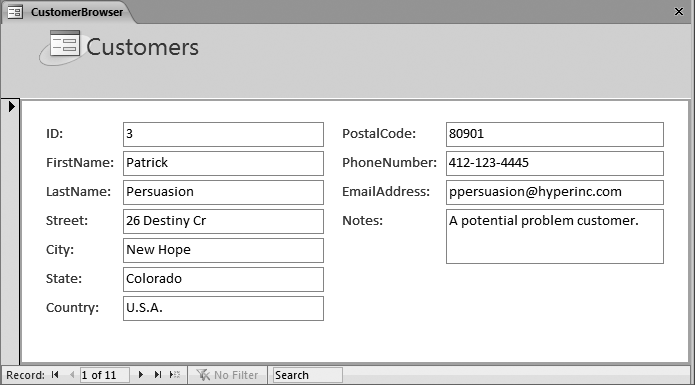
Figure 33-2. In this form for the Customers table, Access can’t fit all the fields using the ordinary one-field-per-line arrangement. Instead, it adds a second column.
When you first create a form, Access arranges the fields from top to bottom in the same order in which they’re defined in the table. It doesn’t make any difference if you’ve rearranged the columns in the datasheet. However, Access leaves any columns you’ve hidden in the datasheet (Hiding Columns) out of the form.
Tip
You can add or remove fields in a form in the same way you do with a report. If the Field List pane isn’t open, then choose Form Layout Tools | Formatting → Controls → Add Existing Fields. Then, drag the field you want from the Field List pane onto the form. To remove a field, click to select it on the form, and then press Delete. However, keep in mind that people often use forms to add records, and if you want to preserve that ability, you need to make sure your form includes all the required fields for the table.
Arrange the fields in the order you want by dragging them around.
Although a simple form doesn’t look like the simple reports you learned about in Chapter 32, you can actually work with it in much the same way. One of the easiest ways to tailor your form is to drag fields from one place to another (Figure 33-3).
Change your columns’ widths.
When you create a new form in Layout view, Access makes all the fields quite wide. Usually, you’ll want to shrink them down to make your form more compact. It’s also hard to read long lines of text, so you can show large amounts of information better in a narrower, taller text box.
To do so, just click to select the appropriate field; a yellow rectangle appears around it. Then, drag one of the edges. Figure 33-4 shows this process in action.
Figure 33-3. To move a field, drag it to a new position. Access reshuffles all the other fields accordingly. In this example, the Price field’s being relocated to the top of the form, just under the ProductName field. Access bumps all the other fields down the page to make room.
Optionally, you can click a field header to edit its text.
This option lets you change ProductCategoryID to just Category.
Optionally, you can tweak the formatting to make the form more attractive, by changing fonts and colors.
You can most quickly change the formatting of your form by selecting the appropriate part (by clicking), and then using the buttons in the ribbon’s Form Layout Tools | Formatting → Font section. You can also use the Form Layout Tools | Formatting → Formatting section to adjust the way Access shows numeric values. You learned about all your formatting options on Formatting numeric fields when you built basic reports.
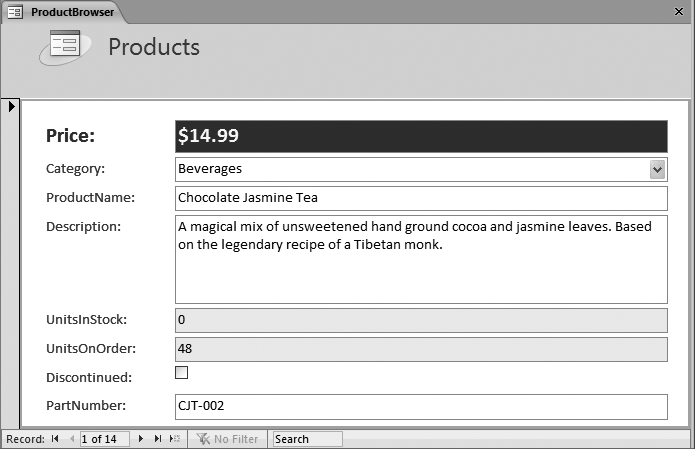
Often, you’ll want to format specific fields differently to make important information stand out. You can also format the title, header section, and form background. Figure 33-5 shows an example of judicious field formatting.
Figure 33-5. You can select the field header (Price, for example) and the box with the field value separately, which means you can give these components different formatting. This form gives a shaded background fill to the Price, UnitsInStock, and UnitsOnOrder fields. It also gives a larger font size to the Price field and Price header, so this information stands out.
Tip
To select more than one part of a form at once, hold down Ctrl while you click. This trick allows you to apply the same formatting to several places at once.
If you’re in a hurry (or just stylistically challenged), then you can use a nifty Access feature called AutoFormat to apply a whole slew of related formatting changes. Just make a choice from the Form Layout Tools | Formatting → Auto-Format section (which has the same AutoFormat choices you used with reports on Formatting a Report).
Save your form.
You can save your form at any time by choosing Office button → Save. Or, if you close the form without saving it, Access prompts you to save it at that time.

Now that you’ve created your first form, it’s time to take it for a test spin. All forms have three different viewing modes:
Layout view. This is the view you’ve been using so far. It lets you see what your form looks like (with live data), rearrange fields, and apply formatting.
Design view. While Layout view provides the simplest way to refine your form, Design view gives you complete power to fine-tune it. In Design view, you don’t see the live data. Instead, you see a blueprint that tells Access how to construct your form.
Form view. Both Layout view and Design view are there to help you create and refine your form. But once you’ve perfected it, it’s time to stop designing your form and start using it to browse your table, review the information it contains, make changes, and add new records.
Note
When you open a form by double-clicking it in the navigation pane, it opens in Form view. If you don’t want this view, then right-click your form in the navigation pane, and then choose Layout View or Design View to start out in a different view.
To try out the form you created, switch it to Form view if you’re not already there. Just right-click the tab title, and choose Form View.
In Form view, you can perform all the same tasks you performed in the datasheet when you worked with a table. With a simple form, the key difference is that you see only one record at a time.
Most people find forms much more intuitive than the datasheet grid. The following sections give a quick overview of how you can use Form view to perform some common tasks.
Rare is the record that never changes. Depending on the type of data you’re storing, most of your work in Form view may consist of hunting down a specific record and making modifications. You may need to ratchet up the price of a product, change the address details of an itinerant customer, or reschedule a class.
Before you can make any of these changes, you need to find the right record. In Form view, you have four ways to get to the record you need. The first three of these methods use the navigation controls that appear at the bottom of the form window.
By navigating. If your table’s relatively small, then the fastest way to get going is to click the arrow buttons to move from one record to the next. Datasheet Navigation has a button-by-button breakdown.
By position. If you know exactly where your record is, then you can type in the number that represents the position (for example, 100 for the one-hundredth record), and then hit Enter. If you don’t get exactly where you want, then you can also use the navigation buttons to move to a nearby record.
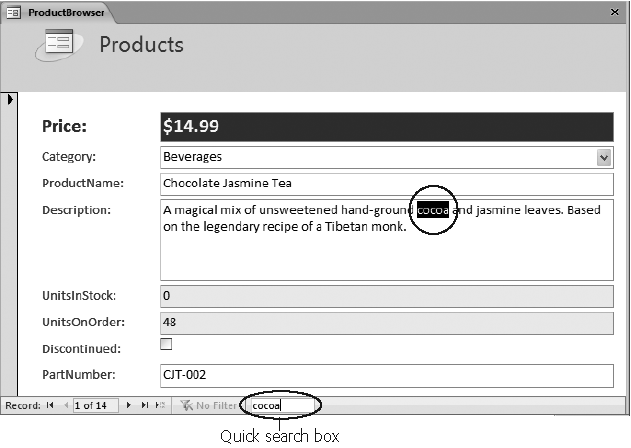
By searching. The quick search feature finds a record with a specific piece of text (or numeric value) in one of its fields. To use quick search, type the text you want to find in the search box, as shown in Figure 33-6. If you want a search that examines a specific field or gives you additional options, then use the Home → Find → Find command.
By filtering. Using filtering, you can narrow down the displayed records to a small set. Filtering’s best-kept secret’s that you can use a feature called filter by form to quickly hunt down a single record. You’ll see how that works on Using the Filter by Form Feature.
Once you’ve found the record you want to change, you can edit it in the same way you would in the datasheet. If you make a change that breaks a rule (like typing the text "Exasperated Bananas" in a date field), then you get the same familiar error messages.
Access commits any change you make as soon as you move to another record or field. To back out of a change, hit Esc before you move on. When you do, the original value reappears in the cell, and Access tosses out your changes. And if you do commit a change by accident, then you can use the Undo button in the Quick Access toolbar (above the ribbon), or hit Ctrl+Z, to reverse it.
As you already know, you add a new record in datasheet view by scrolling to the very bottom of the table, and typing just underneath the last row. In Form view, the concept’s similar—scroll to the very end of your table, just past the last record.
You’ll know you’ve reached the magic ready-to-add-a-record spot when all the fields in your form are blank (Figure 33-7). To save yourself the scrolling trip, use the New Record button at the bottom of the form (marked in Figure 33-7).
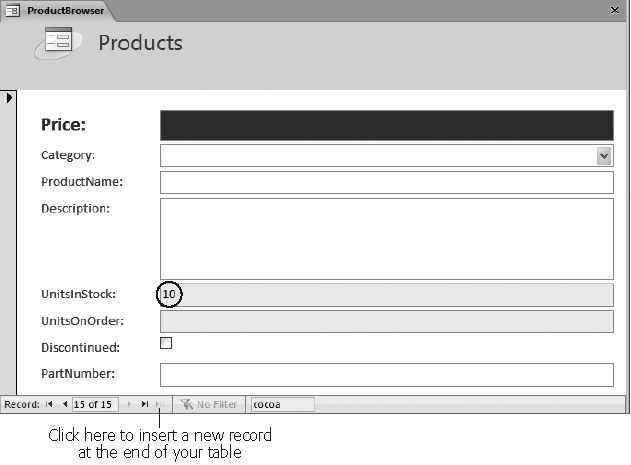
Figure 33-7. When you create a new record, you start off with a clean slate that shows your form’s formatting but no values. If you’ve set any default values for the table (Setting Default Values), then you see them appear instead of the blank values. In the Products table, the UnitsInStock field has a default value of 10.
If you’ve decided that you don’t want to add a new record after all, then hit Esc twice. The first time you press Esc, Access wipes out the value in the current field. The second time, Access removes all the other values you entered. Now that your form’s been restored to its original emptiness, you can safely scroll off to another record.
If you scroll away from your new record while there’s still some data left in it, then Access creates the new record and adds it to the table. You can’t reverse this action. If you want to get rid of a newly created record, then you need to delete it, as described in the next section.
When you find a record that shouldn’t exist, you can wipe it out in seconds. The easiest way to delete the current record is to choose Home → Records → Delete. But you have another option. You can select the whole record by clicking the margin on the form window’s left side. Then you can liquidate it by pressing Delete.
No matter what approach you use, Access asks you for confirmation before it removes a record. You can’t recover deleted records, so tread carefully.
Here’s a little-known secret about forms: You can use them to create a quick printout. To do so, open your form, and then choose Office button → Print. The familiar Print dialog box appears, where you can choose your printer and the number of copies you want.
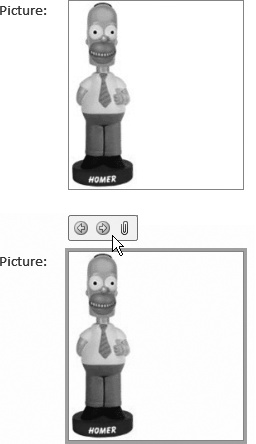
Figure 33-8. Top: Here, the Picture field shows a bobblehead doll’s picture. Access sizes the picture to fit the Attachment control box (without unnaturally stretching or skewing the picture). Bottom: When you select the Picture field, you see a mini-toolbar with additional options appear right above the image. The arrows let you step through all the attached files for this record. The paper clip icon opens the Attachments window, where you can add or remove attachments, or open them in a different program. (The Attachments window is described on Attachment.)
When you print a form, Access prints all the records, one after the other. If you want to print just the current record, then, in the Print dialog box, choose the Selected Records option before you click OK.
You can also use Office button → Print → Print Preview to check out the result before you send it to the printer (Figure 33-9). Click Print Preview → Close Preview → Close Print Preview to return to your form.
Although you might be tempted to use forms as a convenient way to create snazzy printouts, you’ll always get more features and better control if you use reports.
Sorting and filtering are two indispensable features that Access gives you with Form view. Learning how to use them could hardly be easier—in fact, you already learned everything you need to know when you tackled the datasheet in Chapter 28. The creators of Access took great care to ensure that filtering and sorting work the same in forms as they do in the datasheet. You use the same commands, on the same part of the ribbon, to put them into action.
As you’ve probably realized by now, forms show your data in raw, unsorted order. So records appear in the order you created them. (The only exception is if you create a form that gets its data from a query, and that query uses sorting.)
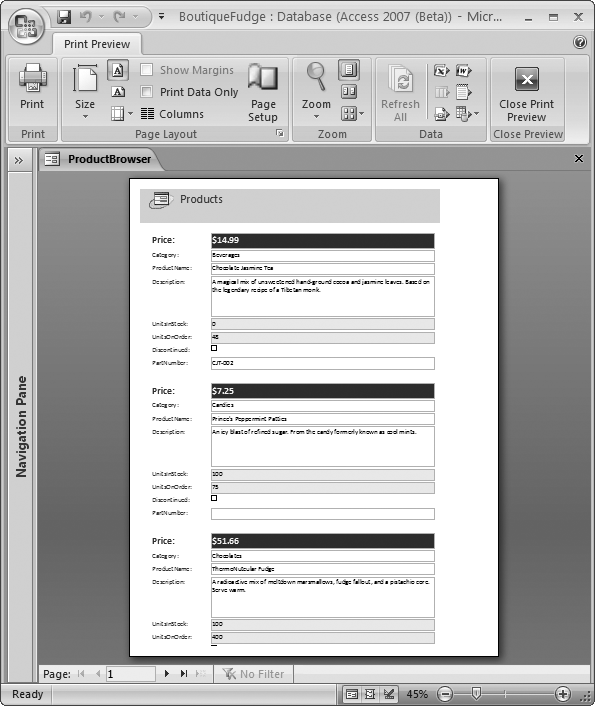
Figure 33-9. This preview shows what you’ll get if you print the CustomerList form. The printout closely matches the form, with the same formatting and layout. When Access first creates the form, it gives it the same width as an ordinary sheet of paper. When you print the form, Access crams as many records—three in this case—as it can fit on each page.
Fortunately, sorting’s easy. In fact, you can sort the records that are shown in a form in exactly the same way you sort records in a datasheet. Choose the field you want to use for sorting, right-click it, and then choose one of the sorting options. In a text-based field, you’ll see the sorting choices “Sort A to Z” (for an alphabetical sort) and “Sort Z to A” (for a reverse-alphabetical sort). You can also use the Ascending and Descending buttons on the ribbon’s Home → Sort & Filter section.
For more information about your sorting options (including how to sort by multiple fields), see Sorting.
Filtering’s a feature that lets you cut down the total number of records so you see only those that interest you. Filtering can pick out active customers, in-stock products, expensive orders, and other groups of records based on specific criteria.
In a form, you have the following filtering choices:
Quick filter shows you a list of all the values for a particular field and lets you choose which ones you want to hide. It’s easy to use, but potentially time-consuming. If you want to hide numeric values that fall into a certain range, then you’ll get the job done much faster with the "filter by condition” approach (as described later). To show the list of quick filter values, move to the field you want to filter, and then click Home → Sort & Filter → Filter. Quick filters has full details about quick filters.
Filter by selection applies a filter based on an existing value. First, find the value in one of the records, right-click it, and then choose a filter option. You can right-click a price value of $25, and then choose “Greater Than or Equal to 25” to hide low-cost items. For more information, see Filter by selection.
Filter by condition lets you define the exact criteria you want to use to filter records. You don’t need to base it on an existing value. To add this sort of filter, right-click the field and then look for a submenu with filtering options. This menu item’s named according to the data, so text fields include a Text Filters option, number fields have a Number Filters option, and so on. You can learn more about this type of filter on Filter by condition.
Advanced filters are filters that you design using a window that looks just like the query designer. The advantage of advanced filters is that you can apply filters on more than one field in a single step. To create a set of advanced filters, choose Home → Sort & Filter → Advanced Filter Options → Advanced Filter/ Sort.
Note
If you insert a new record that doesn’t match the currently active filter conditions, your new record disappears from sight as soon as you add it. To get it back, remove the filter settings using the ribbon: Select the Home tab, click the Advanced button in the Sort & Filter chunk, and then choose Clear All Filters. Or, use the Toggle Filter button to temporarily suspend your filter settings (and click Toggle Filter later to get them back).
One other filtering technique works with forms: filter by form. Essentially, “filter by form” transforms your form into a full-fledged search form. Using this search form, you supply one or more criteria. Then you apply the filter to see the matching record (or records).
Although you can use “filter by form” with the datasheet, it really shines with forms. “Filter by forms” is particularly useful for searching out a single hard-to-find record. (If you want to use filtering to pull out a whole group of records, one of the other filtering options is generally easier.)
Here’s how to use the "filter by form” feature:
Choose Home → Sort & Filter → Advanced Filter Options → Filter By Form.
Access changes your form to search mode. In search mode, your form looks exactly the same, except all the fields are blank.
If you’ve already used the “filter by form” feature and you’re returning to change the filter settings, then you should start by clearing the previous set of filters. To do so, right-click a blank spot on the form surface, and then choose Clear Grid.
Move to the field you want to use for filtering.
A drop-down arrow appears in the field.
Click the drop-down arrow, and then choose the value you want to include in your results.
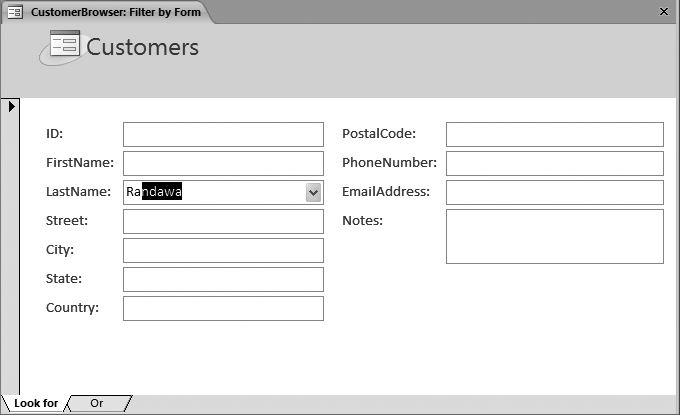
The drop-down list shows all the values from the different records in the table (Figure 33-10). When you choose one, it appears in the field box in quotation marks.
Figure 33-10. Here’s the Customers form in “filter-by-form” mode. Using the dropdown list, you can quickly find a customer by last name. Or you can find a name by typing the first few letters rather than scrolling through the list, as shown here. In this example, typing “Ra” brings up the first alphabetical match: the last name Randawa.
If you want to apply a filter to more than one field, then return to step 2.
Use multiple filter conditions if a single filter condition may result in more matches than you want. If you don’t remember a customer’s last name, you could apply a FirstName filter. But if that customer has a common first name, then you may also want to apply a filter on another field, like City.
If you don’t want to use exact matches, then you can write in more complex filters using an expression. Use <10 to find numeric values under 10, and Like Jon* to find text values like “Jones,” “Jonathon,” and “Jonson.” This trick’s particularly useful with date fields. Building filter expressions has the full scoop on filtering expressions.
If you want to perform more than one filtering operation and combine the results, then click the Or tab and fill out more filter settings (Figure 33-11).
If you fill out your first search form so that it matches the LastName “Gorfinkel,” and the second search form to match the FirstName “Jehosophat,” your results will include all the records that have the last name Gorfinkel and all those that have the first name Jehosophat. However, if you put both those filter conditions on the same search form, your matches include only people named Jehosophat Gorfinkel.
Figure 33-11. The Or tab appears at the bottom of the form. When you click the Or tab, a second copy of your search form appears, where you can fill out additional filter conditions. Each time you click the Or tab, another Or tab appears. You can repeat this process to fill in a dozen search forms at once, but there’s rarely any reason to go to such lengths.
Right-click a blank spot on the form surface, and then choose Apply Filter/ Sort.
Access switches back to your normal form, and then applies the filter settings. At the bottom of the form, between the navigation buttons and the search box, you see the word “Filtered” appear to let you know that you aren’t seeing all the records.
If you decide not to apply the filter settings, just close the search form. Access switches back to your normal form but doesn’t apply any filtering.

One of form filtering’s limitations is that Access remembers only your most recent set of filters. If you’ve perfected a complex filter expression that you want to reuse later, this quality’s a problem. As soon as you apply a different filter, you’ll lose all your hard work.
Fortunately, you have several solutions to this dilemma. One option’s to create a whole new query that performs the filtering, and use that query in a whole new form. This choice is a good one if you want to use your filter criteria to perform a specific task, and you also want to customize the way the form works or the way it displays its data.
On the other hand, if you don’t plan to use your filtering settings very often, but you just want to have them on hand for the next time you need them (or if you need to store dozens of different filter settings, and you don’t want to be stuck with dozens of nearly identical forms), there’s a better option. You can save your filter settings as a query in your database. Then, when you want them back, you can load them up and apply them to your form.
Here’s how to pull this trick off:
Apply your filters.
Use any of the techniques described on Sorting and Filtering in a Form.
Choose Home → Sort & Filter → Advanced → Advanced Filter/Sort.
This action opens a query window. This query uses the same data source (table or query) as your form, and it applies your filtering using the Criteria box under the appropriate field (Creating a Query in Design View ). You don’t need to make any changes in the query window because Access automatically fills in the Criteria box (or boxes) based on the current filter settings.
Choose Home → Sort & Filter → Advanced → Save as Query. Supply a name for this query, and then click OK.
Although you can use this query like a normal query, you probably won’t. So to prevent confusion, use a different type of name, like CustomerBrowser_Filter, that clearly indicates this query’s designed for form filtering.
The next time you want to retrieve your filter settings and reapply them, open your form and follow these steps:
Choose Home → Sort & Filter → Advanced → Advanced Filter/Sort.
This action shows the query window.
Choose Home → Sort & Filter → Advanced → Load From Query.
Access shows all the queries that use the same table and don’t involve joins (you can learn about joins in Access 2007: The Missing Manual).
Pick the filter query you created earlier, and then click OK.
The filter settings for that query appear in the query window.
Right-click anywhere on the blank space in the query window, and then choose Apply Filter/Sort to put your filter settings into effect.
Tip
You can use this trick to apply the same filter expression to different forms, as long as these forms include the fields you want to filter. (You can use the filter settings that you created for the Customer-Browser form to filter another form that shows a list of customers, but not a form that shows products.)
By now, you’ve learned how to create a number of common forms. Access gives you one other way to build a form: using the Form wizard. The Form wizard has an uncanny similarity to the report wizard you used in Chapter 32. It asks you a series of questions and then builds a form to match. However, the questions are fairly rudimentary, and the form it builds is little more than a good starting point for further customization.
Here’s how to put the Form wizard through its paces:
Choose Create → Forms → More Forms → Form Wizard.
The first step of the Form wizard appears.
From the drop-down list, choose the table you want to use.
In the Available Fields list, the wizard shows all the fields that are in your table.
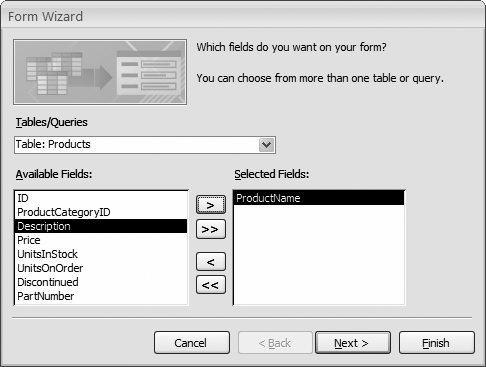
Add the fields you want to include, as shown in Figure 33-12. When you’re finished, click Next.
You can choose fields from more than one table, provided these tables are related.
Choose a layout option for your form.
Your layout options include:
Columnar creates a form with a stacked layout. It’s similar to clicking Create → Forms → Form in the ribbon.
Tabular creates a form with a tabular layout. It’s similar to clicking Create → Forms → Multiple Items in the ribbon.
Datasheet creates a datasheet form. It’s similar to selecting Create → Forms → More Forms → Datasheet in the ribbon.
Justified creates a form that doesn’t use any set layout. Instead, it packs controls closely together, combining several fields on a single line if they’re small enough to fit. A justified form’s the only kind of form you can’t create directly from the ribbon using another command.
Choose one of the preset styles, and then click Next.
The styles determine the formatting that Access applies to your form. Unfortunately, it’s difficult to get a feeling for what the final result will look like unless you actually try each option.
Enter a name for your form.
When the Form wizard finishes, it immediately saves your form using this name.
Choose “Open the form to view or edit information” if you want to start using your form to work with data, or “Modify the form’s design” if you want to adjust it in Design view first. Then, click Finish.
Access saves your form and opens it in Form view or Design view, depending on your choice.