Chapter 24
Going Virtual
In This Chapter
![]() Examining the basics of virtualization
Examining the basics of virtualization
![]() Weighing the benefits of virtualization
Weighing the benefits of virtualization
![]() Installing VMware Player
Installing VMware Player
![]() Creating and using virtual machines
Creating and using virtual machines
Virtualization is one of the hottest trends in networking today. According to some industry pundits, virtualization is the best thing to happen to computers since the invention of the transistor. If you haven’t already begun to virtualize your network, you’re standing on the platform watching as the train is pulling out.
This chapter is a brief introduction to virtualization, with an emphasis on using it to leverage your network server hardware to provide more servers using less hardware. In addition to the general concepts of virtualization, you find out how to experiment with virtualization by using VMware’s free virtualization product, VMware Player.
 Mastering a virtualization environment calls for a book of its own. I recommend two titles: Virtualization For Dummies, by Bernard Golden, and VMware Infrastructure 3 For Dummies, by William Lowe (no relation, honest).
Understanding Virtualization
The basic idea behind virtualization is to use software to simulate the existence of hardware. This powerful idea enables you to run more than one independent computer system on a single physical computer system. Suppose that your organization requires a total of 12 servers to meet its needs. You could run each of these 12 servers on a separate computer, in which case you would have 12 computers in your server room, or you could use virtualization to run these 12 servers on just 2 computers. In effect, each of those computers would simulate six separate computer systems, each running one of your servers.
Each of the simulated computers is a virtual machine (VM). For all intents and purposes, each virtual machine appears to be a complete, self-contained computer system with its own processor (or, more likely, processors), memory, disk drives, CD-ROM/DVD drives, keyboard, mouse, monitor, network interfaces, USB ports, and so on.
Like a real computer, each virtual machine requires an operating system to do productive work. In a typical network server environment, each virtual machine runs its own copy of Windows Server 2012 (or an earlier version). The operating system has no idea that it’s running on a virtual machine rather than on a real machine.
Here are a few terms you need to be familiar with if you expect to discuss virtualization intelligently:
![]() Host: The actual physical computer on which one or more virtual machines run.
Host: The actual physical computer on which one or more virtual machines run.
![]() Bare metal: Another term for the host computer that runs one or more virtual machines.
Bare metal: Another term for the host computer that runs one or more virtual machines.
![]() Guest: Another term for a virtual machine running on a host.
Guest: Another term for a virtual machine running on a host.
![]() Guest operating system: An operating system that runs within a virtual machine. By itself, a guest is just a machine; it requires an operating system to run. The guest operating system is what brings the guest to life.
Guest operating system: An operating system that runs within a virtual machine. By itself, a guest is just a machine; it requires an operating system to run. The guest operating system is what brings the guest to life.
 As far as licensing is concerned, Microsoft treats each virtual machine as a separate computer. Thus, if you run six guests on a single host, and each guest runs Windows Server 2012, you need six licenses of Windows Server 2012.
![]() Hypervisor: The virtualization operating system that creates and runs virtual machines.
Hypervisor: The virtualization operating system that creates and runs virtual machines.
The two basic types of hypervisors are Type 1 and Type 2. A Type 1 hypervisor is a hypervisor that itself runs directly on the bare metal. A Type 2 hypervisor is a hypervisor that runs within an operating system, which in turn runs on the bare metal.
For production use, you should always use Type 1 hypervisors because they’re much more efficient than Type 2 hypervisors. Type 1 hypervisors are considerably more expensive than Type 2 hypervisors, however. As a result, many people use inexpensive or free Type 2 hypervisors to experiment with virtualization before making a commitment to purchase an expensive Type 1 hypervisor.
Looking at the Benefits of Virtualization
You might suspect that virtualization is inefficient because a real computer is inherently faster than a simulated computer. Although it’s true that real computers are faster than simulated computers, virtualization technology has become so advanced that the performance penalty for running on a virtualized machine rather than a real machine is only a few percent.
The small amount of overhead imposed by virtualization is usually more than made up for by the simple fact that even the most heavily used servers spend most of their time twiddling their digital thumbs, waiting for something to do. In fact, many servers spend nearly all their time doing nothing. As computers get faster and faster, they spend even more of their time with nothing to do.
Virtualization is a great way to put all this unused processing power to good use.
Besides this basic efficiency benefit, virtualization has several compelling benefits:
![]() Hardware cost: You typically can save a lot of money by reducing hardware costs when you use virtualization. Suppose that you replace ten servers that cost $4,000 each with one host server. Granted, you’ll probably spend more than $4,000 on that server, because it needs to be maxed out with memory, processor cores, network interfaces, and so on. So you’ll probably end up spending $15,000 or $20,000 for the host server. Also, you’ll end up spending something like $5,000 for the hypervisor software. But that’s still a lot less than the $40,000 you would have spent on ten separate computers at $4,000 each.
Hardware cost: You typically can save a lot of money by reducing hardware costs when you use virtualization. Suppose that you replace ten servers that cost $4,000 each with one host server. Granted, you’ll probably spend more than $4,000 on that server, because it needs to be maxed out with memory, processor cores, network interfaces, and so on. So you’ll probably end up spending $15,000 or $20,000 for the host server. Also, you’ll end up spending something like $5,000 for the hypervisor software. But that’s still a lot less than the $40,000 you would have spent on ten separate computers at $4,000 each.
![]() Energy costs: Many organizations have found that going virtual has reduced their overall electricity consumption for server computers by 80 percent. This savings is a direct result of using less computer hardware to do more work. One host computer running ten virtual servers uses approximately one-tenth the energy that would be used if each of the ten servers ran on separate hardware.
Energy costs: Many organizations have found that going virtual has reduced their overall electricity consumption for server computers by 80 percent. This savings is a direct result of using less computer hardware to do more work. One host computer running ten virtual servers uses approximately one-tenth the energy that would be used if each of the ten servers ran on separate hardware.
![]() Recoverability: One of the biggest benefits of virtualization isn’t the cost savings, but the ability to recover quickly from hardware failures. Suppose that your organization has ten servers, each running on separate hardware. If any one of those servers goes down due to a hardware failure — say, a bad motherboard — that server will remain down until you can fix the computer. On the other hand, if those ten servers are running as virtual machines on two different hosts, and one of the hosts fails, the virtual machines that were running on the failed host can be brought up on the other host in a matter of minutes.
Recoverability: One of the biggest benefits of virtualization isn’t the cost savings, but the ability to recover quickly from hardware failures. Suppose that your organization has ten servers, each running on separate hardware. If any one of those servers goes down due to a hardware failure — say, a bad motherboard — that server will remain down until you can fix the computer. On the other hand, if those ten servers are running as virtual machines on two different hosts, and one of the hosts fails, the virtual machines that were running on the failed host can be brought up on the other host in a matter of minutes.
Granted, the servers will run less efficiently on a single host than they would have on two hosts, but the point is that they’ll all be running after only a short downtime.
In fact, with the most advanced hypervisors available, the transfer from a failing host to another host can be done automatically and instantaneously, so downtime is all but eliminated.
![]() Disaster recovery: Besides the benefit of recoverability when hardware failures occur, an even bigger benefit of virtualization comes into play in a true disaster-recovery situation. Suppose that your organization’s server infrastructure consists of 20 separate servers. In the case of a devastating disaster, such as a fire in the server room that destroys all hardware, how long will it take you to get all 20 of those servers back up and running on new hardware? Quite possibly, the recovery time will be measured in weeks.
Disaster recovery: Besides the benefit of recoverability when hardware failures occur, an even bigger benefit of virtualization comes into play in a true disaster-recovery situation. Suppose that your organization’s server infrastructure consists of 20 separate servers. In the case of a devastating disaster, such as a fire in the server room that destroys all hardware, how long will it take you to get all 20 of those servers back up and running on new hardware? Quite possibly, the recovery time will be measured in weeks.
By contrast, virtual machines are actually nothing more than files that can be backed up onto tape. As a result, in a disaster-recovery situation, all you have to do is rebuild a single host computer and reinstall the hypervisor software. Then you can restore the virtual-machine backups from tape, restart the virtual machines, and get back up and running in a matter of days instead of weeks.
Getting Started with Virtualization
Virtualization is a complex subject, and mastering the ins and outs of working with a full-fledged virtualization system like VMware Infrastructure is a topic that's beyond the scope of this book. You can dip your toes into the shallow end of the virtualization pond, however, by downloading and experimenting with VMware's free virtualization product, called VMware Player. You can download it from www.vmware.com.
Figure 24-1 shows the VMware Player main screen. From this screen, you can create a new virtual machine or run one of the virtual machines you’ve already created. As you can see in the figure, I’ve created several virtual machines, including a few that run various versions of Fedora (a popular Linux distribution) as well as two that run Windows Server 2008.

Figure 24-1: VMware Player lets you experiment with virtualization.
You can run an existing virtual machine by selecting the VM and clicking Play Virtual Machine. This launches the virtual machine, which opens in a new window, as shown in Figure 24-2. When you launch a virtual machine, the VM behaves exactly as a real computer would when you power it up: First, it initializes its virtual hardware devices; then it loads the guest OS that has been installed in the VM. In Figure 24-2, Windows Server 2008 has booted up and is waiting for you to press Ctrl+Alt+Del to log on.

Figure 24-2: A virtual machine running Windows Server 2008 R2.
The prompt to press Ctrl+Alt+Del shown in Figure 24-2 illustrates one of the peculiar details of running a virtual machine within a host operating system (in this case, running Windows Server 2008 R2 within Windows 7 Ultimate). When you press Ctrl+Alt+Del, which OS — the host or the guest — responds? The answer is that the host OS responds to Ctrl+Alt+Del, so the guest OS never sees it.
To get around this limitation, VMware uses the special keyboard shortcut Ctrl+Alt+End to send a Ctrl+Alt+Del to the guest OS. Alternatively, you can use the VM pull-down menu that appears in the menu bar above the virtual-machine menu. This menu lists several actions that can be applied to the virtual machine, including Send Ctrl+Alt+Del.
Another detail you should know about when working with a VM is that when you click in the virtual machine’s window, the VM captures your mouse and keyboard, so your input will be directed to the virtual machine rather than the host computer. If you want to break the bonds of the virtual machine and return to the host computer, press Ctrl and Alt simultaneously.
Creating a Virtual Machine
Creating a new virtual machine in VMware Player is relatively easy. In fact, the most challenging part is getting hold of the installation disc for the operating system you want to install on the VM. Remember that a virtual machine is useless without a guest operating system, so you need to have the installation disc available before you create the virtual machine.
If you just want to experiment with virtualization and don't have extra licenses of a Windows server operating system, you can always download an evaluation copy of Windows Server from Microsoft at www.microsoft.com/en-us/server-cloud/windows-server. The evaluation period is six months, so you'll have plenty of time to experiment.
The downloadable trial version of Windows Server comes in the form of an ISO file, which is an image of a DVD file that you can mount within your virtual machine as though it were a real disk.
When you have your ISO file or installation disc ready to go, you can create a new virtual machine by following these steps:
1. Click Create a New Virtual Machine on the VMware Player home screen (refer to Figure 24-1).
This brings up the New Virtual Machine Wizard, as shown in Figure 24-3.

Figure 24-3: The first page of the New Virtual Machine Wizard.
2. Choose the installation option you want to use.
You have three choices:
• Installer Disc: Select this option and then choose from the drop-down list the drive you’ll install from if you want to install from an actual CD or DVD.
• Install Disc Image File (iso): Select this option, click the Browse button, and browse to the ISO file that contains the installation image.
• I Will Install the Operating System Later: Select this option if you want to create the virtual machine now but install the operating system later.
Note that the remaining steps in this procedure assume that you select a Windows Server 2012 ISO file as the installation option.
3. Click Next.
The screen shown in Figure 24-4 appears. You can enter the product key now or skip this step until later.

Figure 24-4: The New Virtual Machine Wizard asks for your product key.
4. If you have the Windows product key, enter it, and click Next; otherwise, just click Next.
You can always enter the product key later if you don’t have it handy now. Either way, the screen shown in Figure 24-5 appears next.

Figure 24-5: Create a name and specify the VM disk location.
5. Enter a name for the virtual machine.
6. Enter the location of the virtual machine’s disk file.
If you want, you can click the Browse button and browse to the folder where you want to create the file.
7. Click Next.
The wizard asks for the size of the disk to create for the virtual machine, as shown in Figure 24-6.
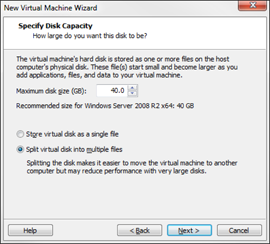
Figure 24-6: Specify the VM disk size.
8. Set the size of the virtual machine’s hard drive.
The default setting is 40GB, but you can change it depending on your needs. Note that you must have sufficient space available on the host computer’s disk drive.
9. Click Next.
The wizard displays a final confirmation page, as shown in Figure 24-7.

Figure 24-7: VMware is ready to create the virtual machine.
10. Click Finish.
The wizard creates the virtual machine and then starts it. Because the machine doesn’t have an operating system installed, it boots from the CD/DVD installation image you specified back in Step 2. In this case, I booted with the Windows Server evaluation software disk image, so the new virtual machine displays the Install Windows screen, as shown in Figure 24-8.
11. Follow the steps to install the OS.
Installing an OS in a virtual machine is exactly the same as installing it on a physical computer, except that the installation screens appear within a virtual-machine window.
When the OS is installed, you’re done! Then you can proceed to use the virtual machine.
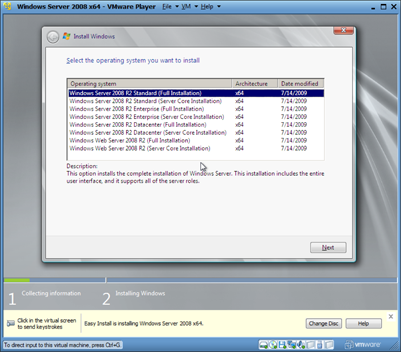
Figure 24-8: Installing Windows Server in a virtual machine.
You can adjust the hardware configuration of a virtual machine by choosing VM⇒Settings while the virtual machine is running. This command brings up the Virtual Machine Settings dialog box, as shown in Figure 24-9. From this dialog box, you can adjust the virtual machine’s hardware configuration, including the amount of RAM available to the VM and the number of processor cores. You can also adjust the disk drive size; add CD, DVD, or floppy drives; and configure network adapters, USB connections, and sound and display settings.

Figure 24-9: Configuring virtual-machine settings.