Detecting Device-Based Attacks
In the previous chapter, we learned about network-based attacks in which the attacker targets communications lines, and how to protect against them. In this chapter, we talk about attacks targeting network devices and how to harden your network devices against these attacks. By the end of this chapter, you will understand the risks to communications devices and learn how to protect against these risks.
In network devices, we focus on devices that are used for packet switching and forwarding, from simple Layer 2 switches, routers, firewalls, and load balancers to other devices that receive and send packets through the network.
This chapter starts with an explanation of the structure of communications devices— the management, control, and forwarding planes—then, we will drill down into each one, learn about the device resources assigned to each one of them, and learn about the risks and how to protect against them.
In this chapter, we will cover the following main topics:
- Network devices' structure and components
- Attacks on the management plane and how to defend against them
- Attacks on the control plane and how to defend against them
- Attacks on the data plane and how to defend against them
- Attacks on system resources
Network devices' structure and components
In this section, we talk about the functional and physical structure of communications devices. We start with the functional structure.
The functional structure of communications devices
As we saw in Chapter 1, Data Centers and the Enterprise Network Architecture and its Components, in the Data, control, and management planes section, a communications device's structure comprises three planes, categorized by the function they perform, as follows:
- A management plane that enables the administrator or the management system to give commands and read information from the device
- A control plane that makes decisions as to where to forward the data
- A forwarding or data plane that is responsible for forwarding the data
As there are three different functions, there are also three different ways to attack a device, as outlined here:
- Attacks on the management plane will be attacks trying to breach passwords, attacks on Simple Network Management Protocol (SNMP) trying to read information from or write information to the device, and so on.
- Attacks on the control plane can be of several types. An attack could be in the form of malicious traffic that intends to overload the device central processing unit (CPU) and therefore slow down the device, or it could be traffic that confuses the control protocols—for example, routing protocols. We will talk about the first type of attack in this chapter and cover the second type in Chapter 12, Attacking Routing Protocols.
- Attacks on the forwarding plane will be attacks that load the device ports to a point where they cannot forward more packets—that is, send and receive information.
Before getting into further details, let's see the structure of a typical communications device so that we can understand its vulnerabilities better.
The physical structure of communications devices
In data networks, a communications device is a hardware/software component that makes decisions and forwards packets according to these decisions. A local-area network (LAN) switch forwards packets according to Layer 2 information (that is, the switch media access control (MAC) forwarding table); a router forwards packets based on a Layer 3 routing table; a firewall forwards packets based on security policy; and so on. Let's look at these components in detail and see how they can be attacked.
LAN switches' architecture
A LAN switch operates in Layers 1 and 2 of the Open Systems Interconnection-Reference Model (OSI-RM). It forwards frames based on Layer 2 information. In the following diagram, we see the general architecture of a LAN switch:
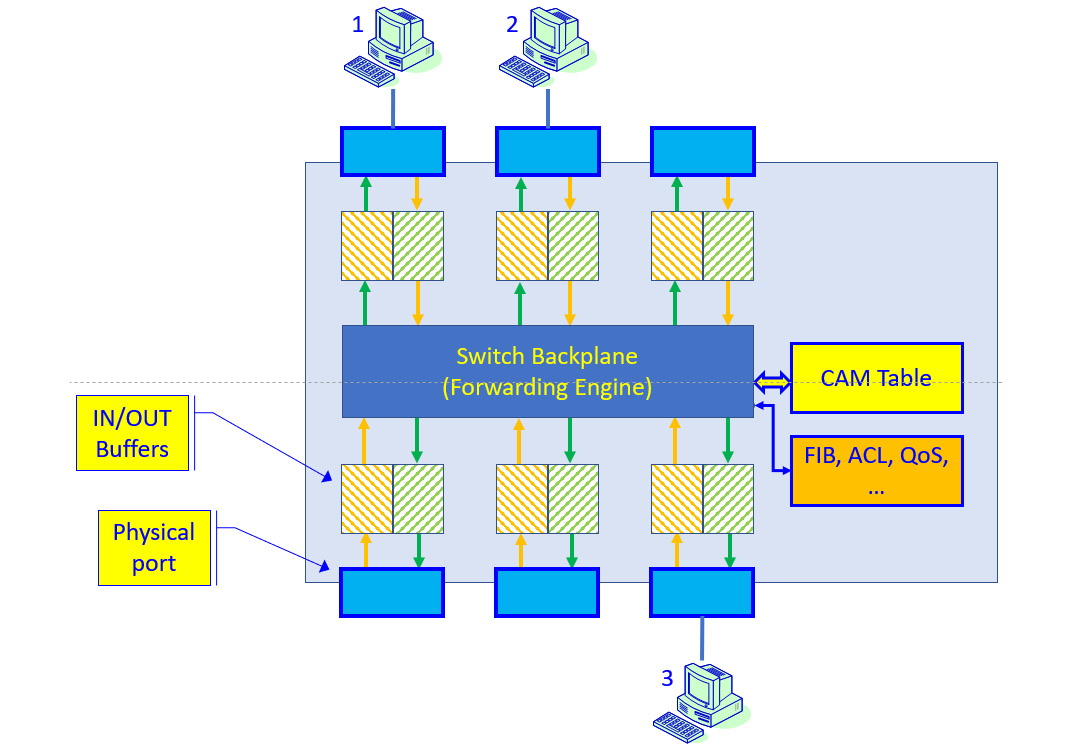
Figure 7.1 – LAN switch architecture
As we see in the preceding diagram, frames are coming into the switch from PCs connected to it. Frames are forwarded through the input buffers, through the backplane, and forwarded through the output buffers to the destination PC.
The content-addressable memory (CAM) table holds the MAC address table and ports they have been learned from. The forwarding information base (FIB), access control list (ACL), and quality of service (QoS) tables store additional information, outlined as follows:
- The FIB holds information regarding which port should be forwarded frames coming into the switch.
- The ACLs enforce restrictions configured by the network administrator—for example, which frames should be dropped and which ones should be forwarded.
- The QoS table holds priority rules—that is, which frames should be forwarded before others.
There are other tables and mechanisms, depending on the vendor and switch size. From an attack and defense point of view, this is the architecture we should consider when we plan our attacks and defenses.
Routers' architecture
A router is a device that makes decisions based on the Layer 3 information of the packets and forwards them. In the following diagram, we see a typical router architecture:

Figure 7.2 – Router architecture
In the router architecture, we have Layer 1, Layer 2, and Layer 3 operations—Layer 1 because packets are received and sent to the wire, Layer 2 because packets are forwarded from port to port, and Layer 3 because decisions are taken based on Internet Protocol (IP) addresses and routing tables. For this reason, along with Layer 3 attacks, Layer 2 attacks can also affect routers.
In the control plane, we have several types of processes that run on a router. The first type, of course, is routing processes—these are the routing protocols that exchange information with other routers on the network. Other processes that control traffic forwarding are—for example—ACLs that forward or block traffic as configured by the network administrator, QoS mechanisms, network address translation (NAT), and many others.
The result of the routing and other control processes running on the router is forwarding and decision tables, according to which packets are forwarded.
Firewalls' and security devices' architecture
Firewalls, load balancers, and other communications devices are devices that work on Layer 2 and above, forward packets, and perform additional operations, as per device type.
Firewalls forward packets according to security policy using the following mechanisms:
- Packet filtering, which decides which packets and sessions to forward and which ones to block
- Stateful inspection, which monitors the sessions' directions and allows sessions to be opened only in specific directions
- Intrusion detection and prevention (IDP), which discovers intrusion patterns and blocks intrusion attempts to the network
- Content filtering, which watches the content of packets in the upper layers and decides whether they should be forwarded or dropped
- Anti-virus, anti-spam, and anti-malware mechanisms, which watch the content of traffic sent to the network and drop it if infected
- Mechanisms such as sandboxes, which before downloading a file run it locally on the sandbox device; Voice over IP (VoIP) gateways, which check for risks inside received voice calls; web application firewalls (WAFs), which check inside the application content; and so on
Important Note
There is a difference between the firewall forwarding mode and the decision a firewall makes as to whether to forward packets or not. As for the forwarding mode, the firewall can be configured to work as a LAN switch (that is, to make forwarding decisions based on Layer 2 MAC addresses)—or to work as a router (that is, to forward packets based on Layer 3 routing tables, which is more common). In both ways, a security policy is implemented on the packets that cross the firewall.
All these mechanisms run as processes on the firewall, preventing intrusions and other risks, but they can also be targeted by attackers.
Now that we have talked about communications devices' functionality and planes, in the next section, we will talk about potential risks and how to protect against them.
Attacks on the management plane and how to defend against them
The management plane is the part of the device responsible for controlling the device—that is, to log in to the device and configure it, to receive SNMP commands, to send SNMP traps and System Logging Protocol (Syslog) messages to a management console, and so on.
For this reason, attacks on the management plane can be categorized as follows.
The first sorts of attacks are brute-force attacks for password discovery, such as the following:
- Brute-force attacks for password discovery—Telnet, Secure Shell (SSH)
- Brute-force attacks against SNMP passwords (community strings)
- Brute-force attacks against HyperText Transfer Protocol (HTTP)/HTTP Secure (HTTPS) passwords
- Brute-force attacks on proprietary-access applications
The next kinds of attacks are attacks on the management plane intended to interfere with the management of the device. In this category, we have the following:
- Attacks on Network Time Protocol (NTP)
- Attacks on File Transfer Protocol (FTP) or Trivial FTP (TFTP)
- Synchronize (SYN) scan (Transmission Control Protocol (TCP) SYN packet that intends to open a TCP connection) and attacks targeting the management plane processes' availability
Let's see how such attacks are performed and how to protect against them.
Brute-force attacks on console, Telnet, and SSH passwords
The first type of attack that we are going to talk about is brute-force attacks, usually based on password-guessing mechanisms.
How to test for vulnerabilities
We talked about brute-force attacks in Chapter 5, Finding Protocol Vulnerabilities, in the Breaking usernames and passwords (brute-force attacks) section.
There are various types of testing tools. For password guessing, we have Linux tools such as nmap, John the Ripper, ncrack, Hydra, and Crunch.
For SNMP discovery, we can use tools such as the OpenNMS platform, SNMP scanners such as Lansweeper, or other open source or commercial tools.
For HTTP/HTTPS password cracking, you can use nmap or many other penetration testing tools, such as skipfish.
How to defend against attacks
There are several simple measures to take against brute-force attacks, outlined as follows:
- RADIUS/TACACS+: The first way is to use Remote Authentication Dial-In User Service (RADIUS) or Terminal Access Controller Access-Control System Plus (TACACS+) services. As you see in the following screenshot, these services use an authentication server to authenticate users:
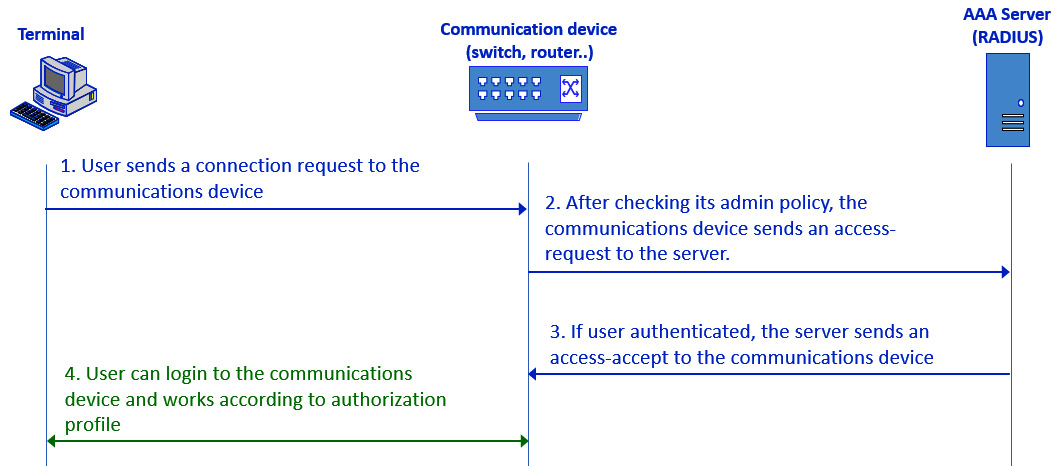
Figure 7.3 – RADIUS authentication
As we see from the preceding screenshot, the capabilities of the terminal will be as configured in the RADIUS server. It can be used to read information from the communications device, to write information, to change the configuration, or any other thing configured on the server—for example, one user can be assigned read-only privileges while another will be assigned full administrator privileges.
Configuring a device with RADIUS or TACACS is a vendor-specific procedure. You can implement this through Cisco (https://www.cisco.com/c/en/us/td/docs/ios-xml/ios/sec_usr_rad/configuration/xe-16/sec-usr-rad-xe-16-book/sec-cfg-radius.html), Juniper Networks (https://www.juniper.net/documentation/en_US/junos/topics/topic-map/radius-authentication-accounting-basics.html), and others.
For RADIUS servers, there are many open source versions, such as FreeRADIUS (https://freeradius.org/), along with commercial implementations such as Identity Service Engine (ISE) from Cisco, and implementations from other vendors.
Important Note
RADIUS is an open standard first standardized by the Internet Engineering Task Force (IETF) in Request for Comments (RFC) 2138 (June 2000). TACACS+ is a Cisco proprietary protocol. RADIUS uses User Datagram Protocol (UDP) port 1812 for authentication and port 1813 for accounting, while TACACS+ uses TCP port 49 for both. Both protocols are used for authentication, authorization, and accounting (AAA)—that is, authenticating users, authorizing them for specific actions, and accounting, which is monitoring their activities, with minor differences between them.
- Limit access from specific stations: A second measure to take against brute-force attacks is to limit access to the communications device from specific stations—for example, the network administrator station. This is to be performed by ACLs on the device. There are different vendors' procedures for how to configure ACLs—for example, https://www.cisco.com/c/en/us/support/docs/security/ios-firewall/23602-confaccesslists.html in Cisco, https://www.juniper.net/documentation/en_US/junose15.1/topics/reference/command-summary/access-list.html in Juniper, https://techhub.hpe.com/eginfolib/networking/docs/switches/K-KA-KB/15-18/5998-8150_access_security_guide/content/c_IPv4_Access_Control_Lists_ACLs.html in Hewlett Packard Enterprise (HPE) (similar to Cisco), and others.
Important Note
Every vendor has its own command reference, and in some cases, you will find different commands from different communications devices from the same vendor. When you understand what to protect and how to protect it, the remainder of your task will be to google it and read the manual. In this chapter, we will use examples mostly from Cisco, which is one of the leaders in communications networks, while in some cases of interest we will use examples from other vendors—Juniper Networks, Extreme Networks, HPE, and others—when relevant. In all cases, the purpose of this chapter is to provide a defense methodology and a what-to-do list. For a how-to-do list, refer to your network equipment manuals.
- Strong and encrypted passwords: The last thing, of course, is to configure strong and encrypted passwords.
In Cisco, you will have to configure enable secret, like this:
enable secret <password>
Or, you can configure username and password, like this:
username <name> secret <password>
Important Note
Don't forget that Console, Telnet, and SSH are three different access methods. You must configure different passwords and security methods for each of them. For each of them, configure secured access or disable them.
Another feature to configure is Login Password Retry Lockout, which limits the number of login attempts so that in the case of brute-force attacks, the communications device will be locked for a while.
Let's go through the next potential vulnerability—SNMP.
Brute-force attacks against SNMP passwords (community strings)
A second way a brute-force attack can succeed is when trying to break the SNMP password—that is, the community string in SNMPv1 and SNMPv2c. In SNMPv3, we have encrypted passwords, so this is more difficult to do.
How SNMP can be compromised
SNMP comes in three versions: SNMPv1, SNMPv2c, and SNMPv3. The first two versions use community strings that are simple clear-text passwords for read-only and read-write permissions. The third version, SNMPv3, can be configured with encrypted username and password mechanisms and is thus more secure.
To verify your devices are protected against SNMP vulnerabilities, study the following information:
- In a small and simple network: When you know with complete confidence all your communications devices, log in to each of them and change the SNMP community strings from the defaults. If none of them is configured, it is for you to decide whether to configure new community strings or not use SNMP.
- In medium-to-large or more complex networks: Run SNMP software and enable discovery with the default community strings—that is, public for Read-Only (RO) and private for Read-Write (WR). Make sure no devices were discovered with SNMP.
Important Note
SNMP is a management-agent protocol in which you have a management application that has three functions: read information from the agent running on a device, write information to a device, and receive messages initiated by the device. Read information is performed by GET, GET_NEXT, and GET_BULK commands; write operations to a device are done by the SEND command; and messages initiated by the agent are called TRAP (SNMPv1/v2c) or INFORM (SNMPv3 only). Having permissions to access a device must be considered carefully—by reading information from a device, we will learn the network topology and functionality, and writing to a device can cause changes to the network.
For SNMP tests, you can use the following tools:
- For Windows: Any SNMP software such as Paessler Router Traffic Grapher (PRTG) from https://www.paessler.com/ or SNMPc from https://www.castlerock.com/; SNMP sweep/scanning tools such as ManageEngine (https://www.manageengine.com/products/oputils/download.html); and others. The best way is to install an SNMP management system—there are many commercial systems, along with open source ones such as Cacti (https://www.cacti.net/download_cacti.php) and Zabbix (https://www.zabbix.com/download) that will give you good results.
- For Linux: Use snmp-check for a single device. You can see an example of this in the following screenshot, where you see that 172.30.122.254 responds to SNMP while 172.30.116.254 did not respond:
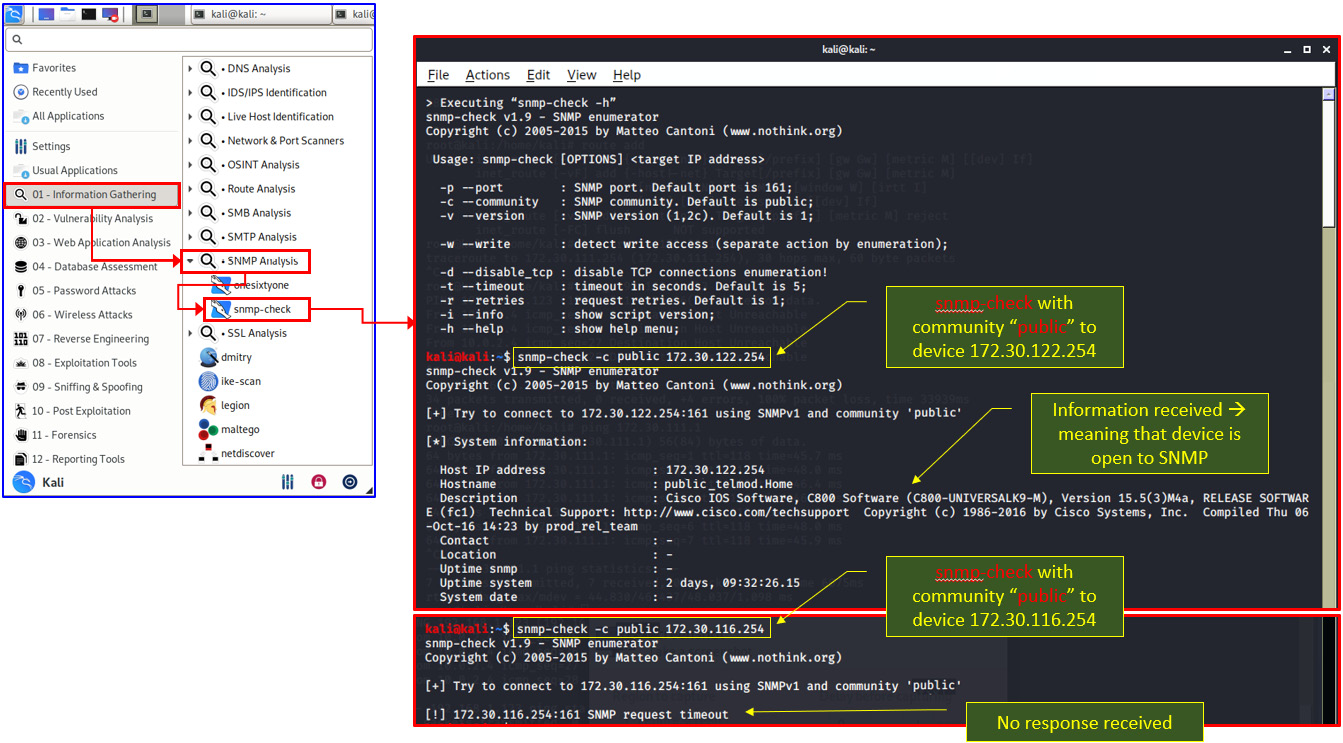
Figure 7.4 – snmp-check with response
Now that we have looked at SNMP vulnerabilities and how they can be attacked, let's see how to protect against these attacks.
How to defend against attacks
To protect against information from the communications device being read, do the following:
- When possible, use SNMPv3. You can find out how to do this at https://www.cisco.com/c/en/us/td/docs/ios-xml/ios/snmp/configuration/xe-16/snmp-xe-16-book/nm-snmp-cfg-snmp-support.html#GUID-59CB0C09-2EE9-40F5-B6DE-B8DDAB55514B for Cisco and https://www.juniper.net/documentation/en_US/junos/topics/task/configuration/snmp-configuring-junos-nm.html on Juniper devices.
- When the complexity of SNMPv3 is not required (for example, in a network with low-availability requirements), change the community strings defaults, and preferably disable the WRITE option.
Important Note
SNMPv1 and SNMPv2c have default community strings—the word public for READ-ONLY and the word private for READ-WRITE. Change these defaults!
- On communications devices, use ACLs to limit access to the device only from the management system. Enable SNMP queries only from the IP address of the management system.
- Finally, create strong community strings (upper- and lowercase letters, numbers, special characters).
As we now have a sound understanding of the first two ways of accessing a communications device, let's look at the last one—that is, HTTP and HTTPS.
Brute-force attacks against HTTP/HTTPS passwords
HTTP (TCP port 80) and HTTPS (TCP port 443) are also common ports on which we access communications devices and should be carefully handled.
How to attack
In some cases, it will be easy to break through the web server. Try the following steps:
- Try device defaults. There are routers, switches, and other communications devices that come with HTTP or HTTPS default usernames and passwords, so try them. You can find these credentials on vendors' websites, and there are cellular applications that list them—WiFi Router Password – Router Master, All Router Admin, and others.
- Use password-cracking tools such as nmap with http-brute scripts, John the Ripper, and Hydra. You can read more about these in Chapter 5, Finding Protocol Vulnerabilities, in the Breaking usernames and passwords (brute-force attacks) section.
- And of course, try the standard password—customer name, Cisco, Telnet, abcd1234—and all passwords that—unfortunately—(for customers) are more common than we used to think.
Now that we have talked about attack tools, let's see how to protect against these types of attacks.
How to protect against attacks
To protect against hacking into communications devices' HTTP/HTTP servers for configuration, proceed as follows:
- If you don't use HTTP or HTTPS and prefer the command-line interface (CLI), disable them.
- If CLI tools are used, use RADIUS or TACACS+ for authentication.
- Configure ACLs that allow access only from the network manager station.
- Use (very) strong passwords.
Now, let's see other potential risks and how to protect against them.
Attacks on other ports and services
After we have checked for vulnerabilities in the standard protocols, that is the standard door to the communications equipment, lets see how other vulnerabilities can be used to attack these devices.
How to test for vulnerabilities
Here, it is simple. Run the NMAP scanner (Zenmap, which—as you see in the upper bar of the following screenshot—is the graphical version of nmap), and check which services are open. You can see how to do this here:
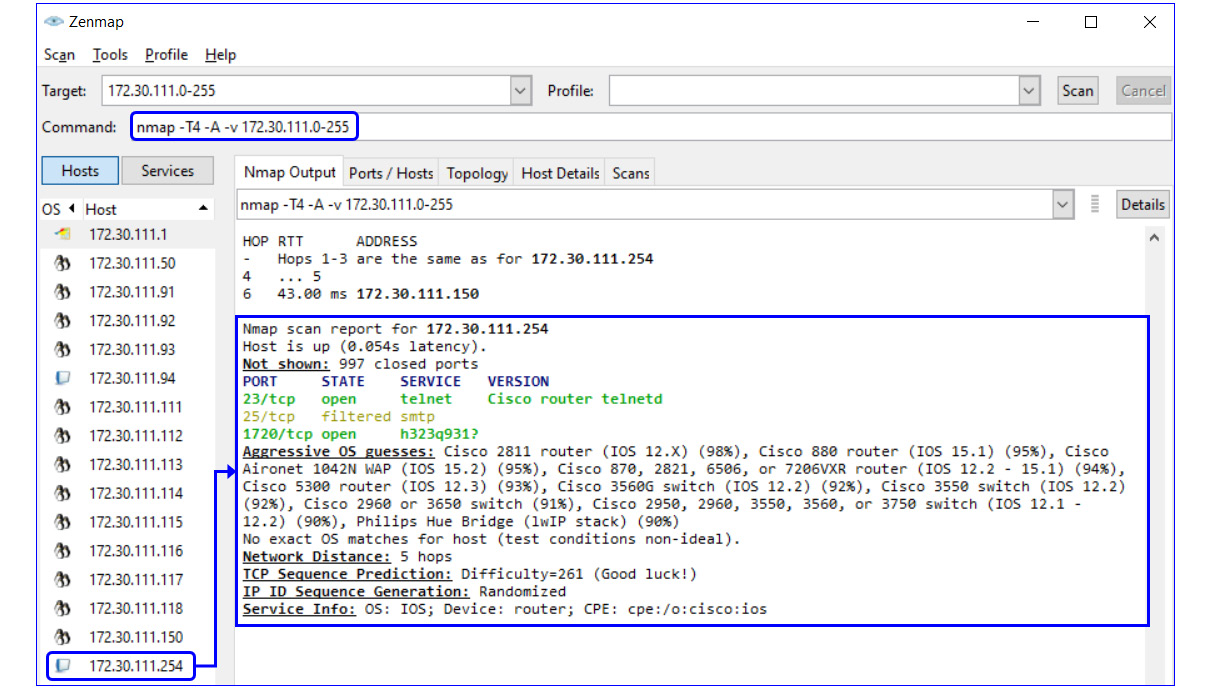
Figure 7.5 – NMAP scan with router vulnerabilities
Now that we have seen how to scan against open services, let's see how to make sure these services are closed and protected.
How to defend against attacks
To defend against attacks on open services is simple—close anything that is not essential to the device's functionality.
Let's take, for example, the router we scanned in the previous example. We have three open ports, as follows:
- Port 23 (Telnet)—It is recommended that you close Telnet and enable access by SSH. To do so in a Cisco router that we tested, simply add the transport input ssh command under line vty 0 4.
- Port 25 (SMTP)—There is no reason to have port 25 opened on a router, switch, or any communications device. To close it, use ACL to block the port— this will be done by configuring the ACL rules for blocking any access to the router.
- Port 1720 (H.323/Q.931)—Since these ports are used for telephony and there is no telephony service running on this router, a quick Google search tells us that this is a fake port answered by the Check Point firewall before the router.
Now that we have talked about protecting against brute-force attacks, let's see how to protect against attacks targeting equipment availability.
SYN-scan and attacks targeting the management plane processes' availability
Vulnerabilities in the management plane responding to SYN messages can happen when a massive TCP-SYN attack is coming from an external device, causing a high usage of CPU or memory in the device under attack. There are measures to take against these types of attacks. Let's see how to test for and how to protect against these vulnerabilities.
How to test for vulnerabilities
Testing for vulnerabilities on the management plane is quite logical, as we can see in the following steps:
- Use Nmap/Zenmap or any other software for port scanning. You can see an example in Figure 7.5, in which ports 23, 25, and 1720 are opened. In this example, we will see that ports 23 and 35 are open.
- On the open ports discovered in the general scan (for example, port 25 in Figure 7.5) run a packet generator (for example, Colasoft Packet Builder) to generate a SYN flood to the communications device.
- To do so, configure Colasoft Packet Builder for TCP SYN packets using the tool, as described in the next steps.
- Open the software, choose Add, and in the opened window, choose TCP Packet to add a TCP packet to the generated traffic, as illustrated in the following screenshot:
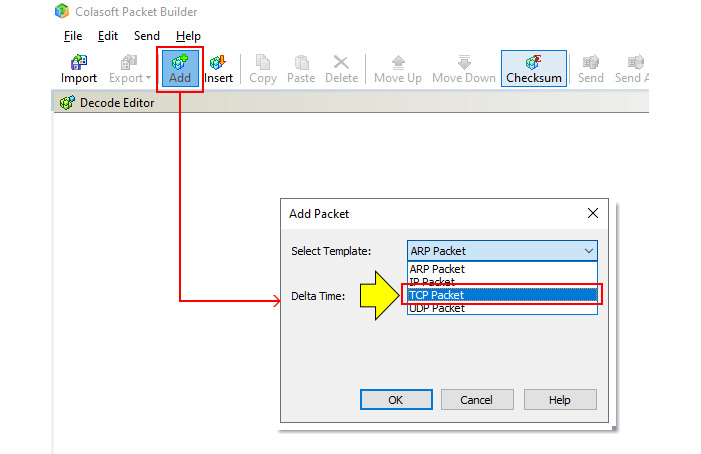
Figure 7.6 – Generating TCP SYN packets
- In the TCP packet structure, configure the parameters, as shown in the following screenshot:
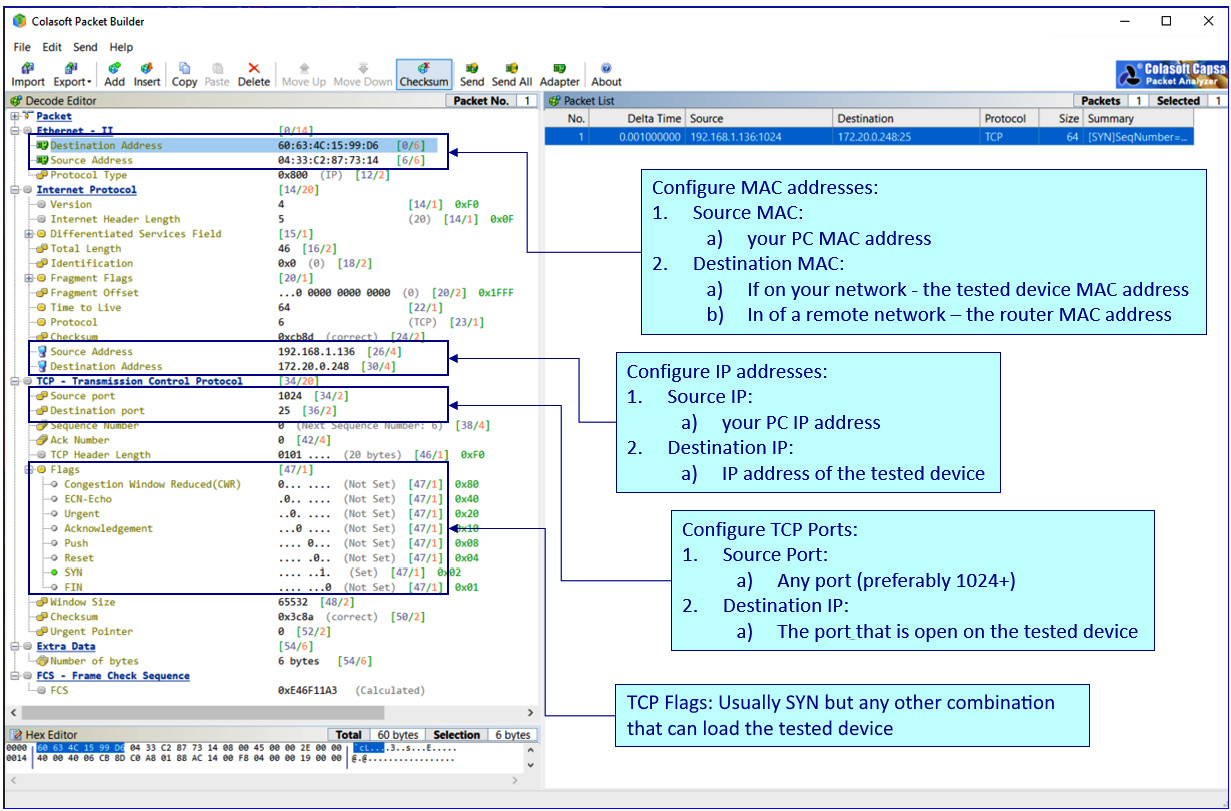
Figure 7.7 – Configuring TCP SYN packets
- Generate packets destined for the tested device. Have a look at the following screenshot to see how to do this:
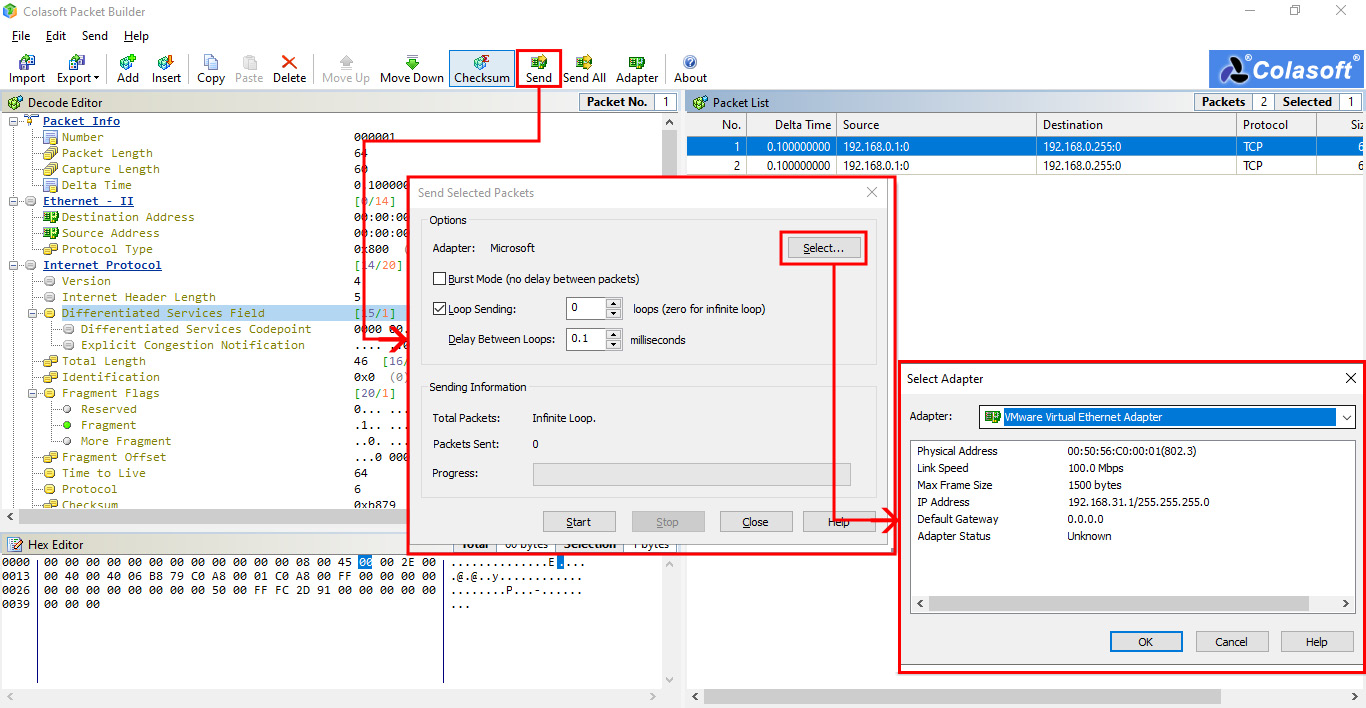
Figure 7.8 – Generating packets
- Click the Send button.
- Choose an interface from which you will generate traffic. You can identify this by its IP address.
- Configure a loop with a short delay between the packets and starting packet generation.
Important Note
There are tools that directly generate SYN packets. With tools such as Colasoft Packet Builder, you can get to the bits and bytes, and configure and make changes to the sent traffic. You can send a SYN flag or any other combination that can load the tested device.
When simple TCP SYN flooding does not affect the tested device, you can try TCP flag combinations, several packets on different ports, and so on—anything that the router might not be configured to protect against.
You can see another example in Figure 7.9 and Figure 7.10, in which we used two steps in the attack, as follows:
- Running nmap with Wireshark for recording the scan
- Running Colasoft Packet Builder and multiplying the attack
In the first step, we used nmap with the following string: nmap -T4 -A -v 172.30.0.241. Let's look at what each of the commands in the string stands for, as follows:
- -T4: mode for an aggressive scan
- -A: mode to enable advanced options
- -v: for verbose—that is, showing scan results
Let's see how it's done, as follows:
- We start the nmap scanning with Wireshark opening in the background to capture the scan results, as illustrated in the following screenshot:

Figure 7.9 – Configuring nmap for device scanning
- Upload a .pcap file and generate the attack. This is done by running the Colasoft Packet Builder Import feature (from the File menu) at high speed.
- Open the file that you captured in Step 1.
- Run the packet generator in a short loop time, as illustrated in the following screenshot:
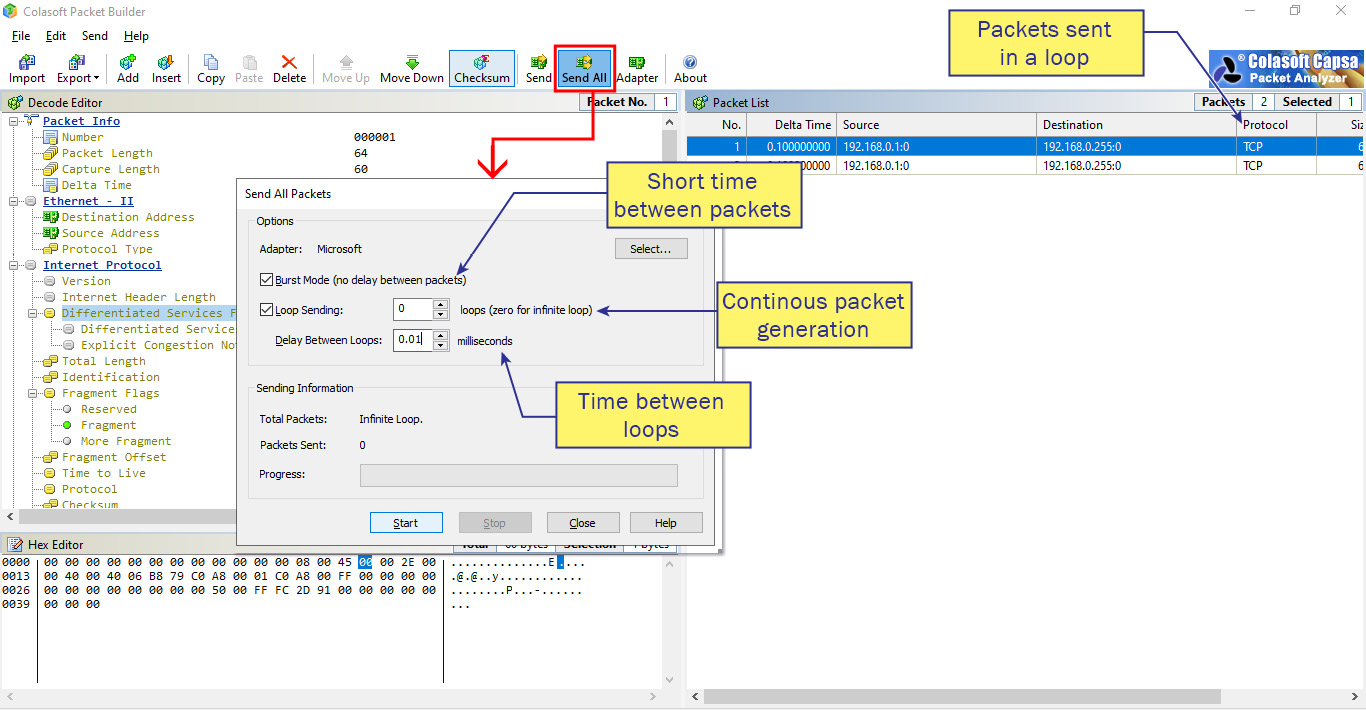
Figure 7.10 – How to run a packet generator
- The results, as we can see in Figure 7.10, can be viewed directly on the switch or in a management system.
You can see in the following screenshot the result of such an attack on a Cisco Catalyst 2960 using the show processes cpu history command:
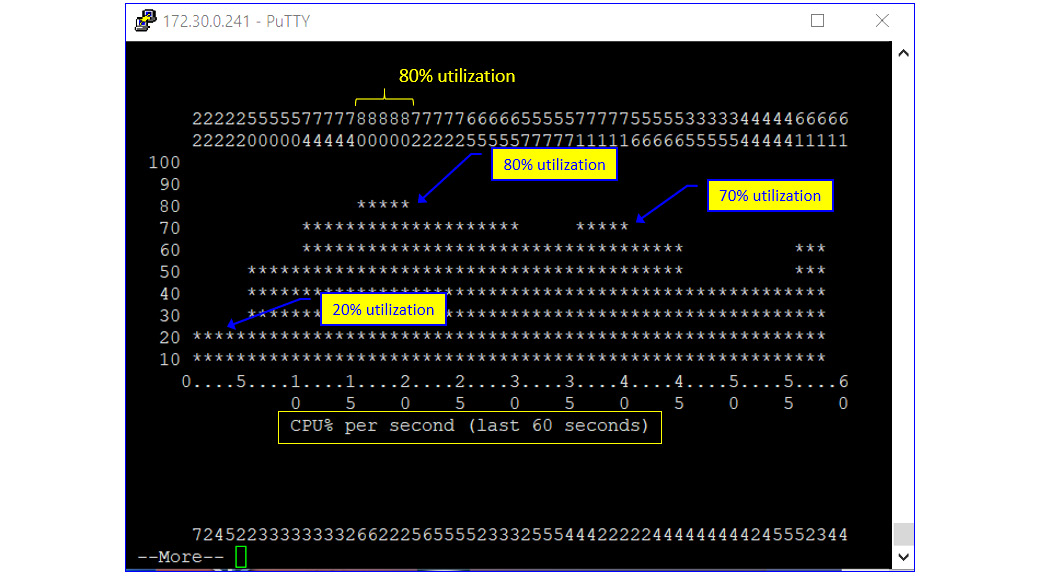
Figure 7.11 – show processes cpu history outcome
Finally, what we will see on the management console (in this example, PRTG) is peaks of load, as illustrated in the following screenshot:
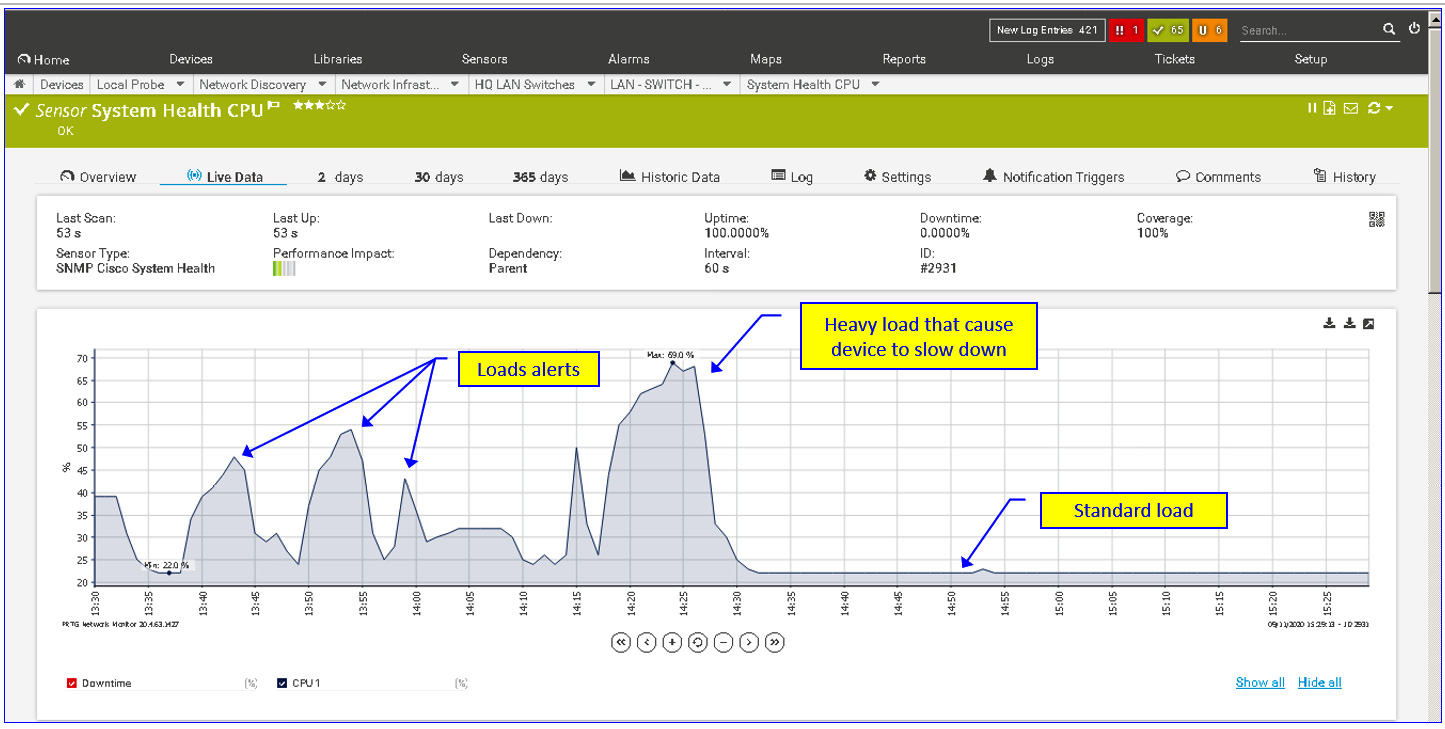
Figure 7.12 – Load indication on SNMP software
The reason we see 80% utilization in the Cisco command line and 70% in PRTG is due to the measurement's method: in the CLI, we have 1-second intervals between samples, while in the PRTG, we have 1-minute intervals.
The important thing is to use a management system that will alert on 70-75% CPU utilization; at these numbers, the device will start to have slow responses. In higher utilization numbers of 90-95%, the device will function very badly, with high delays and a high probability of packet losses.
How to protect against attacks
Several mechanisms can be configured on the router to protect the management plane against TCP SYN flooding, outlined as follows:
- First, configure an ACL that enables access to the management plane (that is, the router addresses) only from allowed addresses—for example, the address of the network administrator.
- Configure thresholds—a threshold on CPU usage (usually over 90%) and a threshold on memory usage (usually 80-90%; check the vendor's recommendations).
- Configure alerts on memory issues such as memory leaks and buffer overflows. We will talk about memory issues in the Memory-based attacks, memory leaks, and buffer overflows section later in this chapter.
- Configure memory reservation for console access. If there's an attack that will utilize all memory resources of the equipment, you will still be able to log in with the console.
The majority of brand devices have proprietary mechanisms for protecting against SYN attacks. In Cisco, you should enable the TCP Intercept option https://www.cisco.com/c/en/us/td/docs/ios-xml/ios/sec_data_dos_atprvn/configuration/15-mt/sec-data-dos-atprvn-15-mt-book/sec-cfg-tcp-intercpt.html; in Juniper, you can enable the SYN-ACK-ACK proxy protection screen option, explained in https://www.juniper.net/documentation/en_US/junos/information-products/pathway-pages/security/security-attack-denial-of-service.pdf; in Extreme Networks, configure dos-protect, explained in https://documentation.extremenetworks.com/exos_commands_16/exos_16_2/exos_commands_all/r_configure-dosprotect-type-l3protect-notifythreshold.shtml?_ga=2.239065216.1810244091.1605352243-1044091113.1601730273.
For every device you configure, read the vendor's recommendation for hardening and securing the device or software.
Attacks on the control plane and how to defend against them
The control plane, as we saw earlier in this chapter, contains the protocols and processes that communicate between network devices in order to move packets from end to end through the network. In this category, we have Layer 2 protocols such as the Spanning Tree Protocol (STP)/Rapid STP (RSTP); Layer 3 routing protocols that learn network topologies such as the Cisco Discovery Protocol (CDP) or the Link Layer Discovery Protocol (LLDP) that advertise equipment information to their neighbors; the Resource Reservation Protocol (RSVP) that establishes a guaranteed end-to-end (E2E) channel with pre-defined QoS; the Internet Control Message Protocol (ICMP) that is used for network reachability testing; and others.
In Chapter 10, Discovering LAN, IP, and TCP/UDP-Based Attacks, and in Chapter 12, Attacking Routing Protocols, we will get into the details of how to protect the network protocols themselves. What we talk about in this section is attacks and how to protect against the device resources.
Control plane-related actions that influence device resources
There are actions performed by the communications device that have an influence merely on the device interfaces—Layer 2 switching, for example. There are actions that influence the entire device resources—that is, the device CPU, memory, and storage. When attacking a device, we focus on the second type: when our targets are processes that, when loading them, will overwhelm device resources to the point that it will slow down and even stop functioning. In this section, we see the most common ones.
Important Note
Many issues can load a communications device to the point of failure. One indicator for an attack on a device is that it's getting slow, and the best way (of course) is to set a threshold that will send a trap to your management system on a resource's high usage. To check what causes the high usage, use device commands such as the show processes command (Cisco), the show system processes extensive command (Juniper), or another vendor's command, and check what is the process that loads the device. It can be a sizing issue when the device is too small and weak for your network, but it can also be an attack on its resources. For attack patterns, refer to Chapter 9, Using Behavior Analysis and Anomaly Detection.
Let's see some of the processes that may consume significant system resources. The principles are outlined here:
- Standard processes such as simple routing protocols should not consume significant resources.
- Non-standard protocols and features—IP options, TCP no-standard flags to router control-plane ports (for example, TCP port 179 for Border Gateway Protocol (BGP)): non-standard flags can be any combination that is not standard or not legal—SYN and PSH, SYN-URG, and so on—and this can cause high consumption of resources.
- Security protocols (tunneling, encryption, authentication)—in some cases, there is no additional hardware module for this, and if it is processed by the device CPU it can consume significant resources.
- Management protocols—high-frequency SNMP polling or NetFlow can cause high consumption of CPU resources.
Let's see more details on these.
Routing and routing processes
Routing processes can load the router CPU. Routing protocols that can normally load a router are usually BGP protocols.
Attacks on routing processes will be discussed in detail in Chapter 12, Attacking Routing Protocols. For device health-check processes, verify there is no load coming from routing.
Encryption – virtual private networks (VPNs) and tunneling
Encryption, when performed on a router of firewall CPU and not on dedicated hardware, can consume significant resources from the device CPU.
When you see high CPU utilization due to an encryption process, verify the following:
- Clients that are connected are clients you know.
- Encryption processes are those you have configured.
Let's now talk about the Address Resolution Protocol (ARP).
IP options and time-to-live
Any packet with IP options, fragmentation, and packets with a Time-To-Live (TTL) field equal to 1 are forwarded to the CPU for processing.
IP options were presented in the IP version 4 (IPv4) standard but never actually used until early 2021, when they were defined again for features such as Identifier-Locator Network Protocol (ILNP) (RFC 6746, November 2012), Label Edge Router Forwarding of IPv4 Option Packets (RFC 6178, March 2011) implemented in Multi-Protocol Label Switching (MPLS), and some other features that are not applicable for enterprise networks. For this reason, using them can load the device's CPU.
Another issue is with the TTL field in the packet. For TTL=1, which is used as a protection mechanism in some routing protocols, this is also something to be handled by the CPU and potentially loading it.
ARP requests
ARP is a protocol that is used to resolve the destination MAC address from its IP. We talked about ARP attacks in Chapter 6, Finding Network-Based Attacks, in the L3- and ARP-based attacks section. These types of attacks can cause network errors, as we talked about in Chapter 6, Finding Network-Based Attacks, but they can also cause load on device resources.
You can use an ARP rate limit to protect against ARP poisoning attacks. Refer to Dynamic ARP Inspection in the vendor's manuals to eliminate this issue.
Let's now talk about IP issues.
Fragmentation
IP fragmentation is a standard mechanism that is used when a large IP packet must be transferred over Ethernet frames that have a maximum payload of 1,500 bytes (1,518 bytes including the header; 1,522 bytes including the header and virtual LAN (VLAN) tag, if this exists). Several problems can be caused by fragmentation, as outlined here:
- The first problem is that when the device receives—for example—a packet that was fragmented into three parts, it must handle three times more packets than are handled by the CPU.
- A second issue is that a worm can be hidden in the fragment and discovered only when assembled.
- A third issue is when there is an attempt to cause a reassembly problem in the receiving device. One of the fields in the IP header is the fragment offset field, which indicates what is the offset of the data contained in a fragmented packet, relative to the beginning of the data from the beginning of the original unfragmented packet. When the sum of the offset and size of one fragmented packet is different from that of the next fragmented packet, the packets overlap and can cause the server receiving the fragments and attempting to reassemble the packet to crash. To prevent IP fragmentation attacks, configure an ACL that denies the acceptance of IP fragments by the router or the routing processes.
To do so, refer to vendors' manuals—for example, the Cisco Security Configuration Guide at https://www.cisco.com/c/en/us/td/docs/ios-xml/ios/sec_data_acl/configuration/15-sy/sec-data-acl-15-sy-book/sec-refine-ip-al.html, or Juniper (https://www.juniper.net/documentation/en_US/junos/topics/example/routing-stateless-firewall-filter-security-handle-fragment-configuring.html). Now that we've seen what can be attacked, let's see how to defend against these attacks.
Attacks on the data plane and how to defend against them
As we saw earlier, the data plane is the part of the networking device that's responsible for the transfer of data through the device, and therefore attacks on the data plane are those targeting processes and services that are responsible for data transfer. Data plane services are services such as ICMP, ARP, and Reverse ARP (RARP), among others. We will go through these services and see how to protect the data plane while using them.
Protection against heavy traffic through an interface
Heavy traffic can cross a networking device interface—that's the purpose of it. The thing is to know when it happens and check if it is legitimate traffic. For this purpose, there are two things we can configure, as follows:
- Traffic threshold
- Storm control
Configuring a threshold: 80-90% of the interface bandwidth should be a reasonable value. For example, for Cisco, refer to https://www.cisco.com/c/en/us/td/docs/wireless/asr_5000/21/Threshold/21-Thresholding-Config/21-Thresholding-Config_chapter_011000.pdf; for Juniper, refer to https://www.juniper.net/documentation/en_US/junos/topics/reference/configuration-statement/interfaces-edit-threshold.html.
Important Note
In many places, we include links to vendors' documents. The links we include are to the most common equipment vendors—Cisco, Juniper Networks, and others—based on popularity only.
Configuring storm control: This command limits the percentage of the total amount of data that is transferred through an interface. Storm control should be limited to 10-15% of interface traffic. For configuring storm control, refer to the vendors' manuals.
Now, let's talk about attacks on equipment resources.
Attacks on system resources
A communications device is a dedicated computer, and this computer has computer resources that can be attacked. In this section, we talk about potential attacks on these resources and how we can protect against them.
Memory-based attacks, memory leaks, and buffer overflows
Memory leaks are static or dynamic memory resource allocations of memory that do not serve any useful purpose. This can be due to a software bug, inefficient software, or attacks that consume memory resources.
Memory-based attacks and causes of memory leaks
Memory leaks can be any of the following:
- An application that continually stores data in memory, without releasing the memory for other applications.
- An inefficient application that locks a large amount of memory without a real need for it, prohibiting other applications from accessing this part of the memory.
- An attack on device resources that consume a large number of memory resources. This can be anything that requires memory resources, and since these resources are used for handling the attacker, they are not serving any useful purpose.
Let's see how to configure alerts for avoiding memory leaks.
Configuring alerts on low values of free memory
Refer to the Cisco manual at https://www.cisco.com/c/en/us/td/docs/ios-xml/ios/bsm/configuration/15-2mt/bsm-mem-thresh-note.html and the Juniper user manual at https://www.juniper.net/documentation/en_US/junos/topics/reference/configuration-statement/high-threshold-edit-system-services-resource-monitor.html on how to do this.
Defending causes of memory-based attacks
Configure a minimum memory reservation at which the networking device will be able to send critical notifications. Refer to the Cisco manual at https://www.cisco.com/c/en/us/support/docs/ip/access-lists/13608-21.html and the Juniper manual at https://www.juniper.net/documentation/en_US/junos/topics/reference/configuration-statement/pic-memory-threshold-edit-services.html for more information on this.
Let's now talk about CPU issues.
CPU overload and vulnerabilities
A device's CPU can be loaded due to legitimate or non-legitimate operations, while non-legitimate operations can be due to denial of service/distributed DoS (DoS/DDoS) attacks or other types of attacks.
To protect against CPU-based attacks on Cisco devices, configure alerts on CPU high consumption. To configure alerts, you should run the following commands:
- snmp-server enable traps cpu <threshold>
- snmp-server host <ip-address> traps <my-community-string> cpu
- process cpu threshold type total rising <high-value> interval <time-high> falling (low-value> interval <low-time>
To do the same for Juniper devices, refer to the Juniper manual at https://www.juniper.net/documentation/en_US/junos/topics/task/configuration/snmp-traps.html.
The principle is to send a trap when the CPU load rises above a specific value configured in the <high-value> parameter, for period of time configured in the <high-time> parameter. Another trap will be sent when it goes down to a low value configured in the <low-value> parameter, for a period of time configured in the <low-time> parameter, which should be configured for the normal operation value, usually around 30%.
Summary
In this chapter, we talked about risks to networking devices, including attacks on the management, control, and data planes—attacks on the management plane that intend to break into devices or prevent us from managing them, attacks on the control plane that target the protocols that a device works with, and attacks on the data plane that forward the information. We also talked about attacks on device resources and how to discover and protect against them.
Now that you have completed this chapter, you will be able to protect your communications devices against various attacks targeting the management, control, and forwarding planes, and set notifications for such attacks when they happen.
In the next chapter, we will talk about eavesdropping, packet analysis, and behavior analysis, and then go on to how to defend against attacks on the network protocols, getting deeper into identifying and protecting our network.
Questions
- Attacks on the control plane are targeting:
- The data that is transferred through the device
- The device control information that is transferred through it
- Communication protocols that are used for transferring information through the device
- The management of the device
- A brute-force attack is an attack that:
- Generates a large amount of traffic in order to crash the target
- Uses password-guessing mechanisms in order to break into a device
- Brutally blocks access to a communications device
- Simultaneously attacks the control and management planes
- You should configure SNMPv3 on your network devices:
- Always—SNMPv3 is the highest security version and therefore should always be configured.
- It depends on the level of security that is required and the risks you are subjected to.
- Only for the protection of the management plane
- Only for the protection of the control plane
- SYN attacks are attacks that are:
- Generated in order to scan a network device for open TCP ports
- Generated in order to load the device resources and slow it down, potentially crashing it
- Generated in order to synchronize DDoS attacks on the organization server
- Generated for breaking device passwords
- What are the values of CPU load that should configure alerts when the device reaches them?
- We should configure 98% as a threshold. A device should be able to be fully functional up to the maximum.
- We should configure 80-90% as a threshold so that we will be alerted before the problem and not after it happens.
- We should configure 95% as a threshold so that it will be as close as possible to a slowness event.
- We should configure 90% as a threshold so that it will be as close as possible to a slowness event.