Finding Network-Based Attacks
In the previous chapters, we learned about network structures, network security protocols, tools, and attack methods. Now we will dive into the finer details, focusing on attack targets and learning how to protect against them.
When we focus on the network, these attack targets can be categorized into two major areas:
- Network connectivity-based attacks: These are attacks on the communications lines that connect between network devices, servers, and hosts.
- Device-based attacks: These are attacks on network devices, that is, LAN switches, routers, firewalls, and more, and the protocols that run on and between them.
In this chapter, you will learn about the first type of attack, that is, network-based attacks, how these attacks are carried out, how to discover them when they happen, and what measures to take in order to prevent them.
In this chapter, we will cover the following main topics:
- Planning a network-based attack
- Active and passive attacks
- Reconnaissance and information gathering
- Network-based Denial of Service (DoS)/Distributed DoS (DDoS) attacks and flooding
- L2-based attacks
- L3- and Address Resolution Protocol (ARP)-based attacks
We will start with how to plan and protect against a network-based attack.
Planning a network-based attack
Before attacking a network, or planning our defenses against these attacks, let's define exactly what the attacker would like to achieve when attacking the communication network.
Important Note
A cyber attack, as defined by the US National Institute of Standards and Technology (NIST), involves "targeting an enterprise's use of cyberspace for the purpose of disrupting, disabling, destroying, or maliciously controlling a computing environment/infrastructure; or destroying the integrity of the data or stealing controlled information."
If we summarize this definition, in general, cyber attacks are used for destroying information, stealing information, or preventing users from accessing IT resources. Network-based attacks can be used for the latter two actions:
- Stealing information: This involves reconnaissance and information gathering, which is used for listening to information that travels through the network and copying or using it for advanced attacks on network resources.
- Preventing users from using IT resources: This causes the network to crash and stop functioning. This can be caused by several methods such as disrupting the operations of ARP, starving Dynamic Host Configuration Protocol (DHCP), confusing routing protocols, and more. Additionally, it can be performed by simply loading the network to the point at which it will stop functioning.
Now, let's consider what we do for these two actions. These are the steps to take when planning network attacks. Some of these results can be achieved by attacks on network devices, which we will discuss in more detail in Chapter 7, Detecting Device-Based Attacks.
In both methods, the first thing to do is to gather information on the network we wish to attack. Then, we will use tools to steal information or prevent users from using IT resources. Let's start with information gathering.
Gathering information from the network
Gathering information from the network can be done in several ways. The first way is, simply, when you connect to the network, run Wireshark, start the capture, and analyze the results.
Important Note
When we connect our laptop to a LAN switch, we will see broadcasts and, possibly, multicasts. Broadcasts are forwarded to all switch ports, so we will view all of the broadcasts. Multicasts are also forwarded to all ports on the LAN switch unless configured otherwise. For instance, if IGMP snooping is configured, multicasts packets will only be forwarded to ports from which clients have sent requests to receive multicast packets.
By understanding these differences between broadcasts and multicasts, we will be able to gather a lot of information, as you will discover in the Reconnaissance and information gathering section.
The second way, when possible, is to use port-mirror on important ports of the network and observe the traffic that passes there.
Important Note
Port-mirror, monitor-port, Switch-Port Analyzer (SPAN), and other similar terms, depending on the vendor, refer to ports that are configured on a LAN switch in order to listen to all traffic going in and out of another port. In general, you configure a monitor-port and a monitored port; you connect your laptop to the monitor-port and all the traffic from the monitored port is mirrored to you so that you can listen to it, analyze it, or save it. Some vendors also support features such as monitoring with filters, monitoring an entire VLAN, and more.
In other methods, we can impersonate someone else, for example, in ARP poisoning, DNS attacks, and more. We will discuss these methods in Chapter 10, Discovering LAN, IP, and TCP/UDP-Based Attacks, and Chapter 15, Enterprise Applications Security – Databases and Filesystems.
Stealing information from the network
Stealing information from the network requires you to perform the following steps:
- Connect to the network physically or virtually.
- Start gathering information with tools such as Wireshark.
- Steal meaningful information.
Important Note
You can connect to the network by physically connecting to a port switch directly or through a physical network socket in the wall. You can also do it by connecting to a wireless network.
To gather information from network devices, we can use several tools. The first method is to use Wireshark to listen to broadcasts:
- ARP broadcasts will give you the network users.
- NetBIOS broadcasts will give you the IP addresses, names, and services provided by the host.
- Routing updates will provide information about networks, routers, and the connectivity between them.
- Other updates – you can view who is sending broadcasts/multicasts and analyze them. You will be surprised by how much information you will gather from there.
To steal meaningful information, you must do one of the following:
- Port-mirror an important port and listen to traffic running on it.
- Install software on the device you want to tamper.
- Use impersonation tools in order to draw the traffic in your direction.
In Chapter 8, Network Traffic Analysis and Eavesdropping, we will discuss this in further detail.
Preventing users from using IT resources
To prevent users from using the network, you will need to perform the following steps:
- Understand the structure of the network you plan to attack. Use Wireshark or scanning tools to gather information and listen to protocol updates.
- Plan an attack methodology: will it be simple DoS/DDoS that loads the network, or will it be to confuse network protocols?
- Decide on an attack method: if you see routing updates and they are not encrypted, attempt to confuse the routers with fake updates. If you see NetBIOS advertisements, check who is sending them, and if you see ARP requests, check what most of the devices are looking for.
To protect against these methods, first, you must understand the attacks. Understanding the types of attacks means you are halfway there. In the later chapters on protocols, we will learn how to do this.
Active and passive attacks
In general, active attacks are when you perform an action, and usually, passive attacks are when you just listen.
Active attacks
In network security, active attacks include the following types of attacks:
Let's discover how they work. We will examine both Linux- and Windows-based examples, just to keep it interesting.
Masquerade and MITM attacks
These types of attacks occur when one entity pretends to be something it is not. For instance, this can be done by faking a MAC address or IP address so that packets that are intended to go to other destinations are forwarded to us instead. Let's take a look at how ARP poisoning occurs:
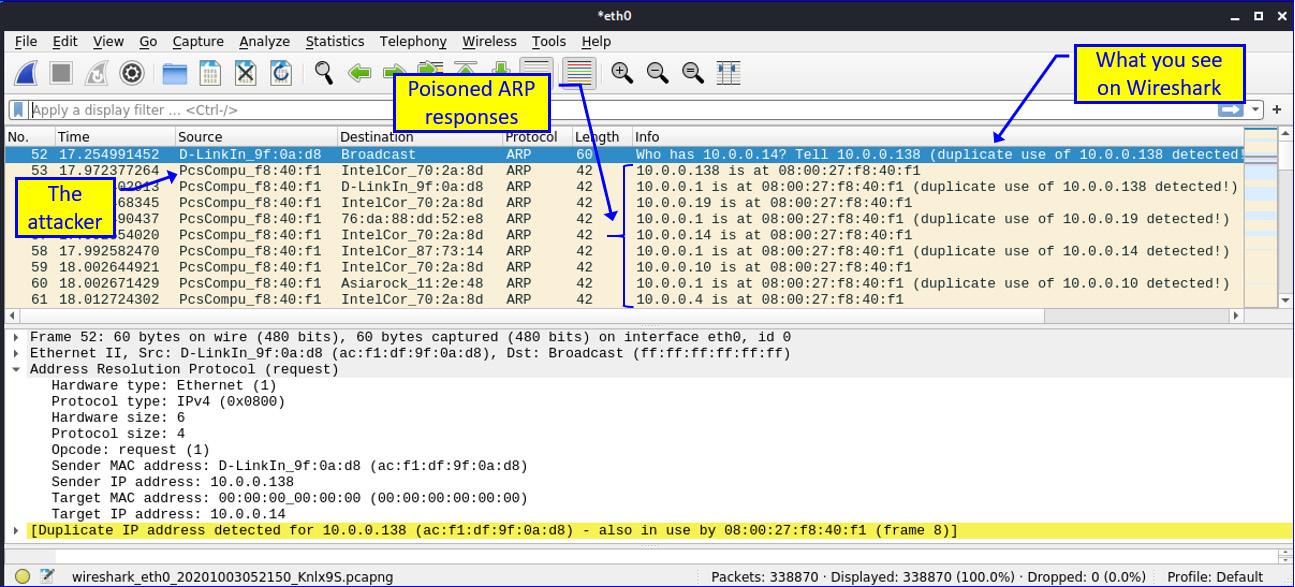
Figure 6.1 – ARP poisoning
In the preceding screenshot, you can observe how the PC with a MAC address of 08:00:27:f8:40:f1 sends fake ARP responses – for instance, 10.0.0.138 is at 08:00:27:f8:40:f1, 10.0.0.19 is at 08:00:27:f8:40:f1, and 10.0.0.1 is at 08:00:27:f8:40:f1. The purpose of this is that the devices receiving these ARP responses will believe the address they are looking for is the attacker's address and, therefore, send data to it.
Modification attacks
A modification attack happens when the attacker tries to interrupt, capture, modify, steal, or delete information in the system via network access or direct access using executable codes. In this section, we will discuss how to do so through the network.
To modify information that has been sent through the network, you need to draw the information in your direction, modify it, and send it to the intended recipient.
To draw the information to you, you can use ARP poisoning and tools such as Ethercap. We will discuss this, in more detail, in Chapter 10, Discovering LAN, IP, and TCP/UDP-Based Attacks. The purpose of these tools in the context of network-based attacks is for the manipulation of routing information, that is for example, to cause the routers to route packets to the attacker instead of the intended destination, as we will learn in Chapter 12, Attacking Routing Protocols; the manipulation of DNS information, as we will learn in Chapter 13, DNS Security; the manipulation of enterprise network applications, as we will learn in Chapter 15, Enterprise Applications Security – Databases and Filesystems; and for tampering to and manipulating voice calls, as we will learn in Chapter 16, IP Telephony and Collaboration Services Security.
DoS attacks
DoS and DDoS attacks occur when we prevent users from accessing network resources, and there are many types of these attacks. In this chapter, we talked about network-based DoS/DDoS attacks, and here are three major types:
- The first type of attack is disturbing the operation of the network devices. We talk about this in Chapter 7, Detecting Device-Based Attacks.
- The second type of attack is an attack on network protocols. We will discuss this in Chapter 10, Discovering LAN, IP, and TCP/UDP-Based Attacks, and Chapter 12, Attacking Routing Protocols.
- The third major type is an attack on communication lines by blocking them; we will discuss this later in this chapter.
Now, after learning what we can actively generate, let's take a look at passive attacks.
Passive attacks
In the context of network security, passive attacks are those that listen and collect information from the network and network resources without interfering with its operation. Listening to network traffic and analyzing it is entirely passive – in this scenario, we only listen. It will become active once we use it to attack the network resources.
Reconnaissance and information gathering
Reconnaissance and information gathering are the acts of learning the network structure and resources in order to prepare to attack them. There are several methods that can be used in order to learn a network structure.
The first and most simple one is to simply listen. Let's explore how we can do it.
Listening to network broadcasts
When you are connected to a port switch, and that could be when you physically connect to a network or you take control of a network device and install a capture tool on it, you will be able to view all of the broadcasts sent and received by this device and others. Let's view some examples of broadcasts that we can learn from.
In Figure 6.1, we can observe some typical Wireshark capture files from which we can learn several things about the network. First, we can see Spanning Tree Protocol (STP) updates, and the interesting thing is that the root bridge has a default priority of 32768.
Important Note
LAN Layer-2 devices, which we also refer to as switch, are called by the STP/RSTP standards of Bridge or Multi-Port Bridge. So, every time I refer to the standards, I will call them bridges, and in all the other places, I will refer to them as we are used to, that is, switches.
In STP, and its successors, Rapid STP (RSTP, which made STP obsolete) and Multiple STP (MST), the root bridge is the bridge that all the traffic passes through. The bridge with the lowest priority is chosen to be the root bridge, and when all bridges priorities are left to be the default, then the root is chosen to be the one with the lowest MAC address.
Important Note
Every Layer-2 switch, or bridge, has its own MAC address. Its MAC address is used in several control protocols, including STP, RSTP, and MST. This MAC address has nothing to do with the MAC addresses that are forwarded by the switch in the switching process.
In this example, inserting a switch with a switch priority of less than 32768 will make our switch the root of the STP network. This has two meanings:
- All traffic will pass through our switch, so we will be able to configure the port-mirror to our laptop and listen to all of the organization traffic.
- Forwarding all organization traffic to pass through our small switch will probably cause a significant reduction in network performance, and if it does not, we can configure it to do so, for example, by configuring rate limits on our port switches so that traffic passing through it will intentionally slow down.
There are several mechanisms that can protect the network from unrecognized switches. To do so, we can configure the Bridge Protocol Data Unit (BPDU) guard to block the reception of BPDU updates, we can configure the root guard on a switch port to disable a port from becoming a root port (a port that is connected to the root bridge), or we can use our Network Access Control (NAC) system to disconnect unauthorized devices. There are also other methods to protect against it. The important thing is to attempt to understand the problem; when you understand it, solving it just involves reading the user manuals. Please refer to the official documentation of Cisco at https://www.cisco.com/c/en/us/td/docs/optical/15000r8_5_1/ethernet/454/guide/454a851_ethconf/454a851_configstprstp.pdf, Juniper Networks at https://www.juniper.net/documentation/en_US/junos/topics/topic-map/spanning-tree-configuring-rstp.html, Extreme Networks at https://gtacknowledge.extremenetworks.com/articles/How_To/How-to-configure-RSTP-in-EXOS, or you can refer to any other vendor that you are working with:
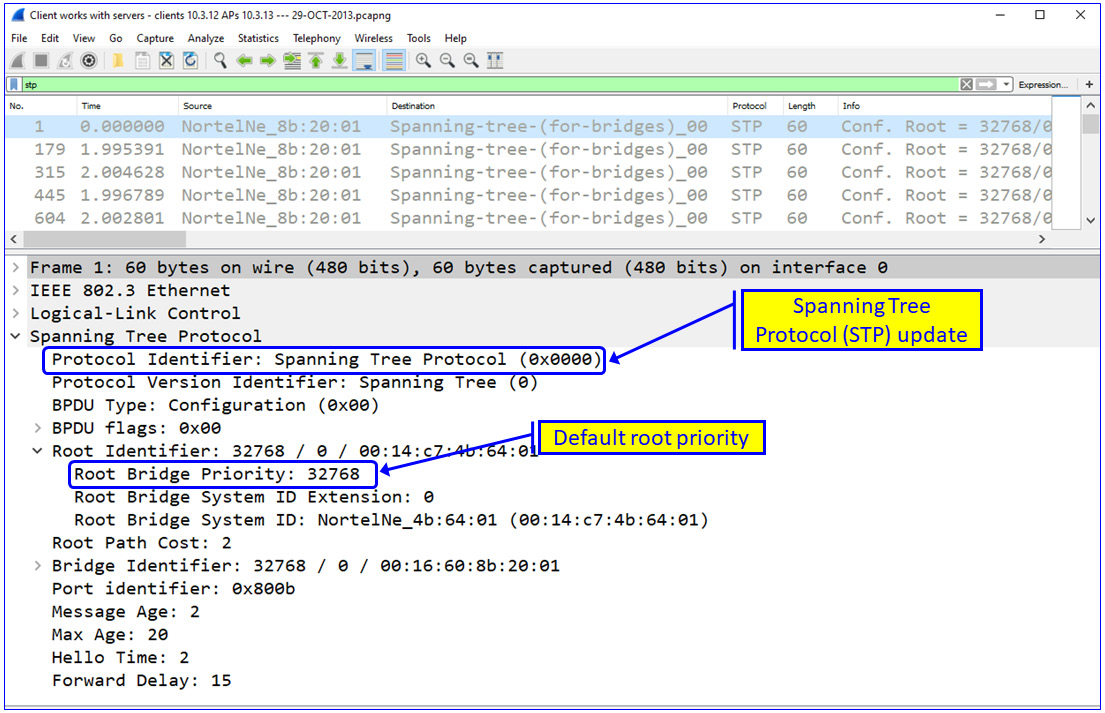
Figure 6.2 – STP priority
From the preceding screenshot, we can observe the Layer-2 structure of the network. Note that the root bridge is the one that ends with the MAC address of 4b:64:01 and a priority of 32,768. Now we have a good knowledge of the STP/RSTP protocols, that will enable us for example to connect a switch with lower priority will make it the root bridge and draw all traffic in our direction.
In the next example, we can observe the NetBIOS broadcast protocols. In the NetBIOS host announcements (that is, the broadcasts on TCP port 139), we can view information on the host that advertises their name and the services they provide. Let's view the example more closely.
In this example, I've configured the NetBIOS display filter: browser.server_type.server == 1.
(To configure displaying a filter, fill in the filter expression in the upper bar in the main Wireshark window.)
Since all Microsoft NetBIOS devices send periodic updates by sending broadcasts to the network, and since by using this filter, we can view from the packet header we receive from the sending device is a server, this is an excellent way in which to list all servers in the network:
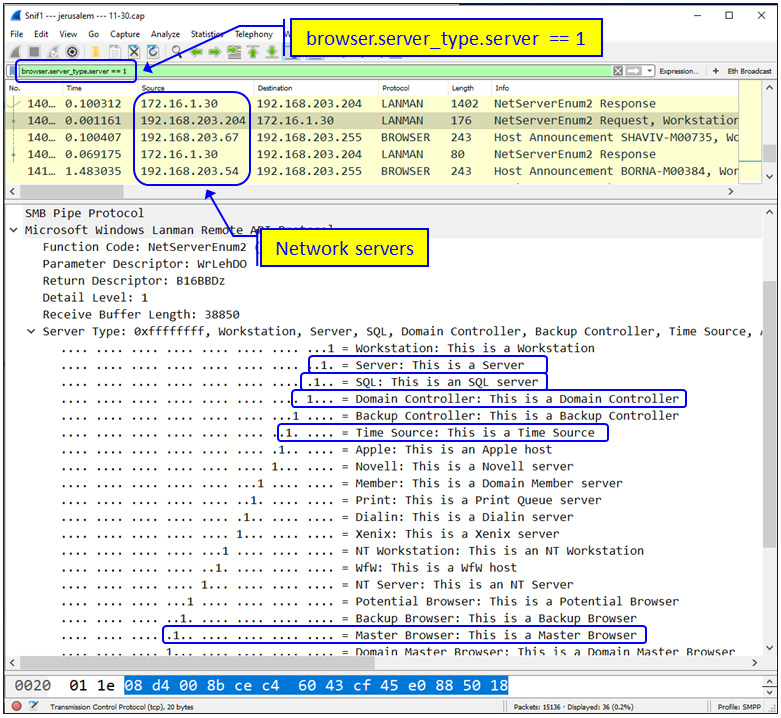
Figure 6.3 – NetBIOS broadcasts and what we can learn from them
From the preceding example, we can see that we have the 172.16.1.30 and 192.168.203.204 servers, along with some others. Additionally, clicking on 192.168.203.204 shows us that this is a domain controller, a SQL server, and a time source. These are important network functions – attacking this server will probably cause significant damage, and listening to what is coming in and going out from it will bring us a lot of information regarding the network and network users.
In this last example, when we listen to multicast packets on the network, we were using the eth.dst [0:3] == 01:00:5e Wireshark display filter. So, we will observe the following packets:
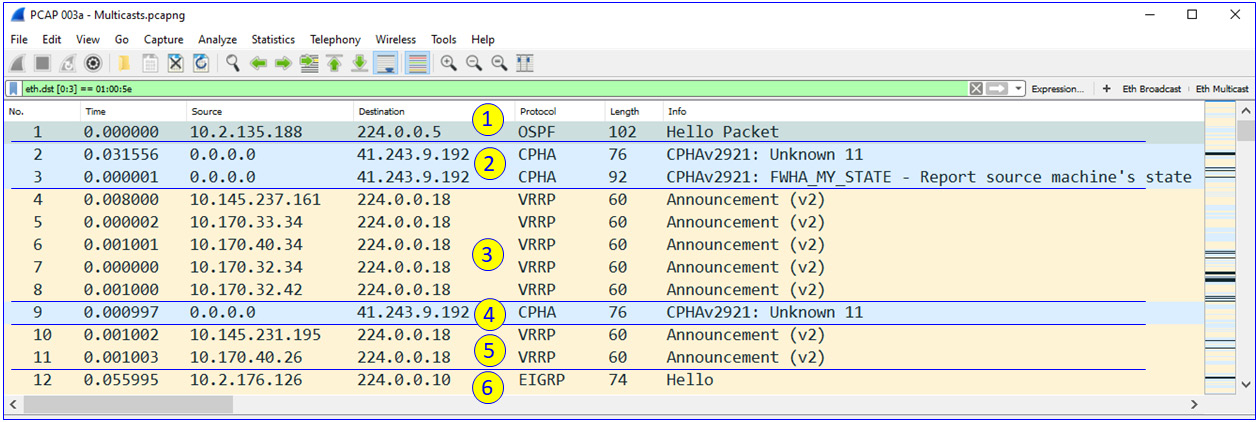
Figure 6.4 – Listening to multicast traffic
Here's what we can understand from these packets:
- In the first packet (1), we see can an Open Shortest Path First (OSPF) Hello packet. This is a router announcing its existence and telling other routers it is here.
- In the next two packets (2), we can see Checkpoint High Availability (CPHA) updates. This is a checkpoint firewall announcing that it is alive to its cluster neighbor.
- The next packets (3) are Virtual Router Redundancy Protocol (VRRP) announcements in which we view the routers that send updates. Similar to the CPHA packets, these are routers announcing their existence and availability.
- In (4) and (5), we see additional CPHA and VRRP packets.
- In the last packet (6), we can also see an Enhanced Interior Gateway Routing Protocol (EIGRP) sending updates to the network.
- Now, from simply listening to the network, we know which protocols run on the network, we know some of the routers, and we know their addresses.
Now, let's take a look at what information we can get from routing updates:
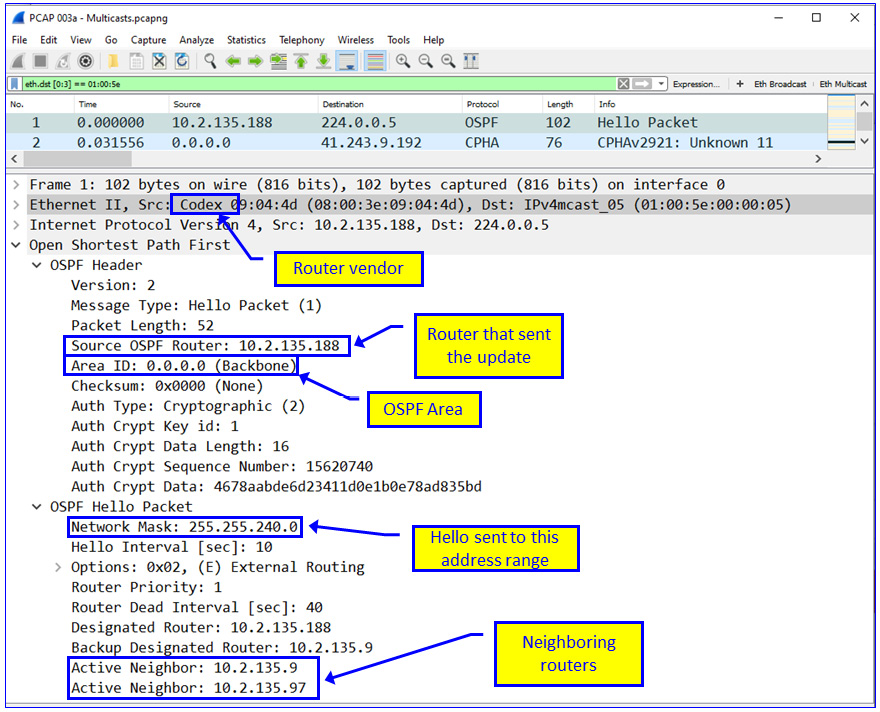
Figure 6.5 – OSPF packet details
As you can see in Figure 6.5, digging into the packet will give us more information. For example, when we look at the OSPF packet, we can view the IP address of the source router. In the source MAC address, we see the vendor (perhaps there are some known bugs/breaches in this vendor's routers); we can see the router area, that is, the OSPF area of 0.0.0.0 (if we send fake updates, we will send them to this area); and we can see that the Hello message has been sent to an address range with a subnet of 255.255.255.240, that is, a subnet of 14 hosts (this is 16 total hosts minus the first and last addresses).
Listening on a single device/port-mirror
Listening on a single device, or using a port-mirror to listen to a single device, will give you all the information you need. Here, you have two Wireshark features that will give you all the information you need. These are the Statistics Conversations and Statistics Protocol Distribution menus, as you can see in the following screenshot.
Figure 6.6 shows a simple example of what we can get from a simple capture on a switch port:
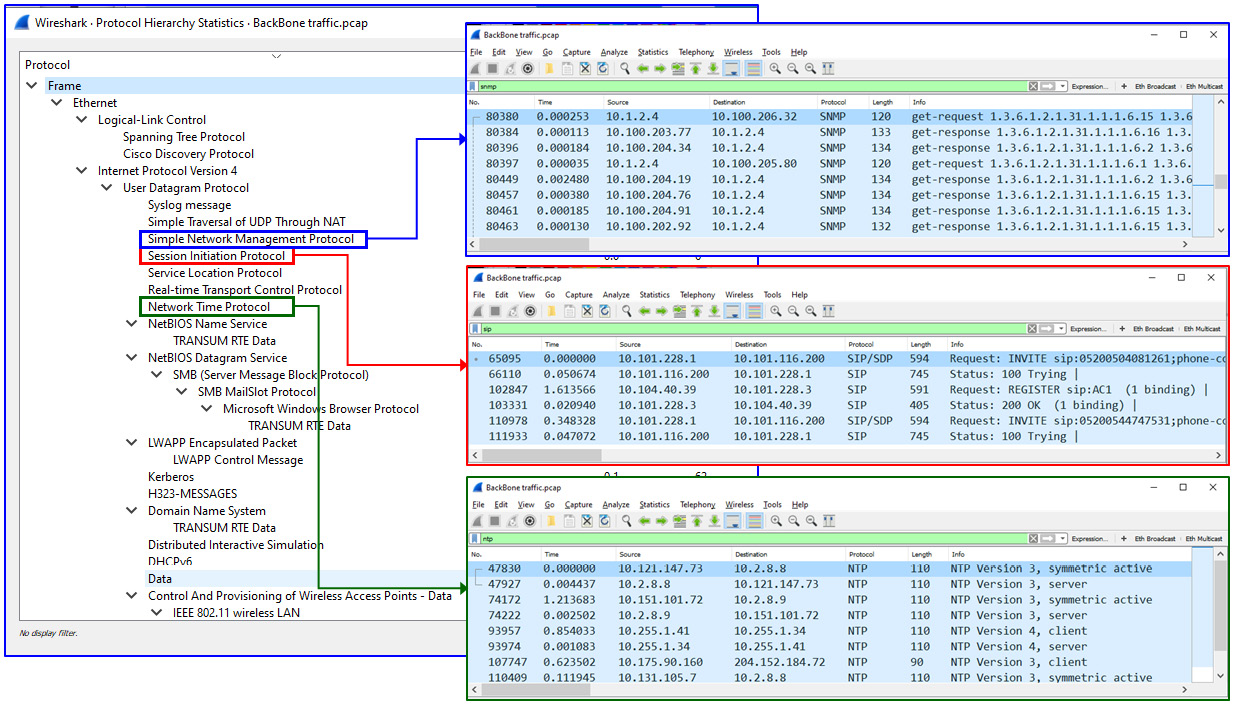
Figure 6.6 – The protocol hierarchy
In this example, we use Statistics Protocol Hierarchy to view all protocols that were discovered. Right-clicking on a specific line in the protocol hierarchy and choosing Apply a filter Selected will show you the packets running this protocol.
The first example, on the right-hand side (as highlighted in blue), shows the SNMP GET commands from 10.1.2.4; from this, we know that 10.1.2.4 is an SNMP management system.
The second example, on the right-hand side (as highlighted in red), shows the SIP session initiated from 10.101.220.1 to 10.101.116.200; from this, we know that 10.101.116.200 is a SIP server.
The third example, on the right-hand side (as highlighted in green), shows (for example) NTP requests from 10.175.90.160 to 204.152.184.72; from this, we know that 204.152.184.72 is a time server.
Now that we have a solid understanding of this, we can start connecting to servers, attacking them, and more.
Now, let's explore one of the major types of network-based attacks: DoS/DDoS attacks and flooding.
Network-based DoS/DDoS attacks and flooding
A common method in which to prevent users from accessing IT resources in general, and network resources specifically, is to use DoS/DDoS mechanisms. The principle here is simple. A network resource can be a network device or a communication line. Loading the resource to the point it is blocked will prevent users from accessing this resource. It's as simple as that. Now the issue is how to load it.
There are two major types of DoS/DDoS attacks that target the network resources:
- Volumetric attacks: These are attacks that overwhelm communication lines to the point they are prevented from carrying user traffic.
- Protocol attacks: These are attacks on network protocols such as ARP and DHCP. When attacking these protocols, we disable the network to stop it from functioning – without ARP devices, we will not know their destination MAC address, and without DHCP, they will not have the IP address.
We will begin with network scanning, which is one of the methods in which to create volumetric attacks.
Scanners can be used on several levels. They can be used to discover network hosts, services on network hosts, usernames on applications, and more. In this section, we will talk about a scanning attack that can be used to flood the network.
To perform network scans, we have many tools and scripts that can be used. For Windows and Linux, we have nmap, which we have discussed already, Linux Scapy, Windows and Linux PacketSender, and more. However, the principle is the same – load the network to the point it can no longer provide connectivity services.
Flooding through scanning attacks
A flood or flooding is a type of DoS/DDoS attack in which the attacker attempts to constantly send traffic to a target network, network interface, communications link, or server to prevent legitimate users from accessing it by consuming its resources. There are various types of flooding attacks – examples include ICMP flooding, TCP or UDP flooding, and HTTP/HTTPs flooding. The first type of flooding we see is in an Internet Control Message Protocol (ICMP) DDoS, when a ping worm blocks the network:
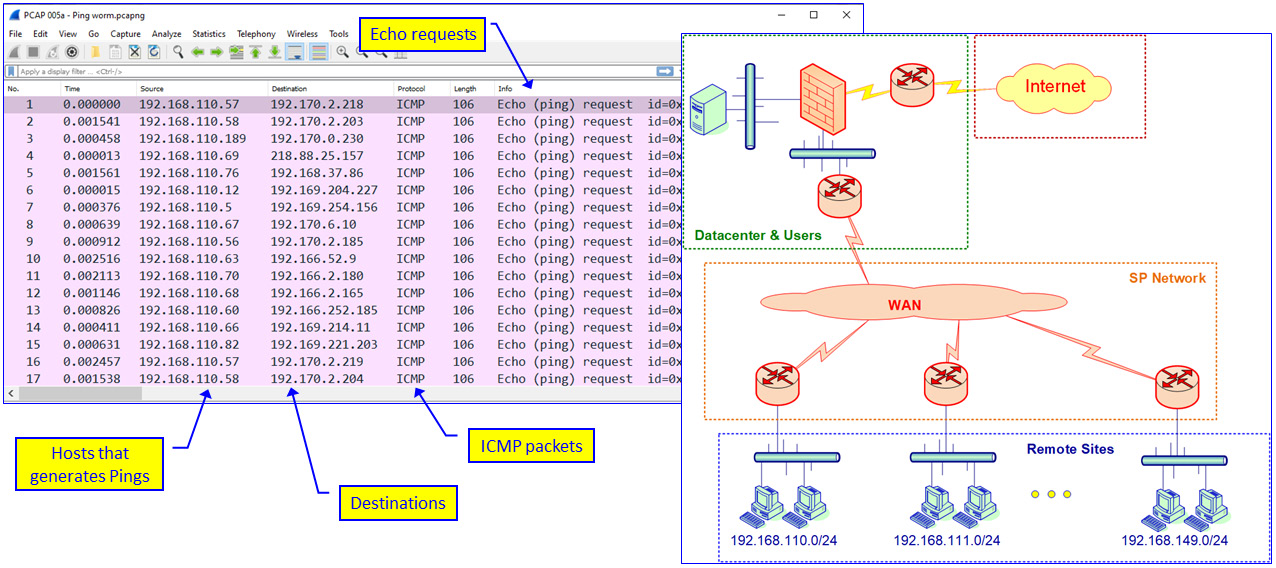
Figure 6.7 – Ping worm – network and Wireshark result
In Wireshark, we can see (on the left-hand side) many ICMP packets sent from addresses on the 192.168.110.0/24 network to various IP destinations. On the right-hand side, we see the network structure: remote offices on networks 192.168.110.0/24, 192.168.111.0/24 up to 192.168.149.0/24, with a total of 50 remote offices.
To identify the problem, we can open the Statistics Conversations window. Let's examine this in the following screenshot:

Figure 6.8 – Ping worm results
On the left-hand side, you can view host 192.168.110.5. It starts the scan from 192.170.3.0 (even though this is not a legitimate address), continues to 192.170.3.1, then 192.170.3.2 until it gets to 192.170.3.255. Then, in the center screenshot, it starts from 192.170.4.0 to 192.179.4.1, and so forth. This is clearly a pattern of scanning.
When this worm catches one of the network's hosts, it pings the next host, then the next one, and so on. For instance, this problem started when someone inserted an external disk into their PC; the worm infected their PC and started to ping. Any PC that responded to the ping request was also infected, and all of the infected PCs generated ICMPs that blocked the communications line.
The funny (or very sad from the customer's point of view) point is that when a PC on the 192.168.110.0/24 network finishes a scan on this network and pings to 192.168.110.255, it continues to 192.168.111.0. The pings are forwarded to the default gateway, and on the way to the next network, the ping blocks the line from 192.168.110.0/0 to the center. The result of this can be observed on the screenshot on the right-hand side – the line to the center that was 0.8 Mbps is now blocked. This is a typical DDoS. In this case, it is a type of amplification attack – the worm spread itself through the network to amplify its behavior.
Random traffic generation flooding
Unlike methods that are used to break into the network, to listen to information, or to cause any other damage to the network, the purpose of random traffic generation is to send traffic that is meant to flood the network to the point it will stop functioning.
In the next example, we can observe that the majority of the traffic consists of IPv6 packets. As you can see, there are many packets – up to 20,000 packets per second – indicating the massive usage of IPv6 or something suspicious:

Figure 6.9 – Massive IPv6 traffic
Looking at the packets (which is always recommended), we can observe the following capture:
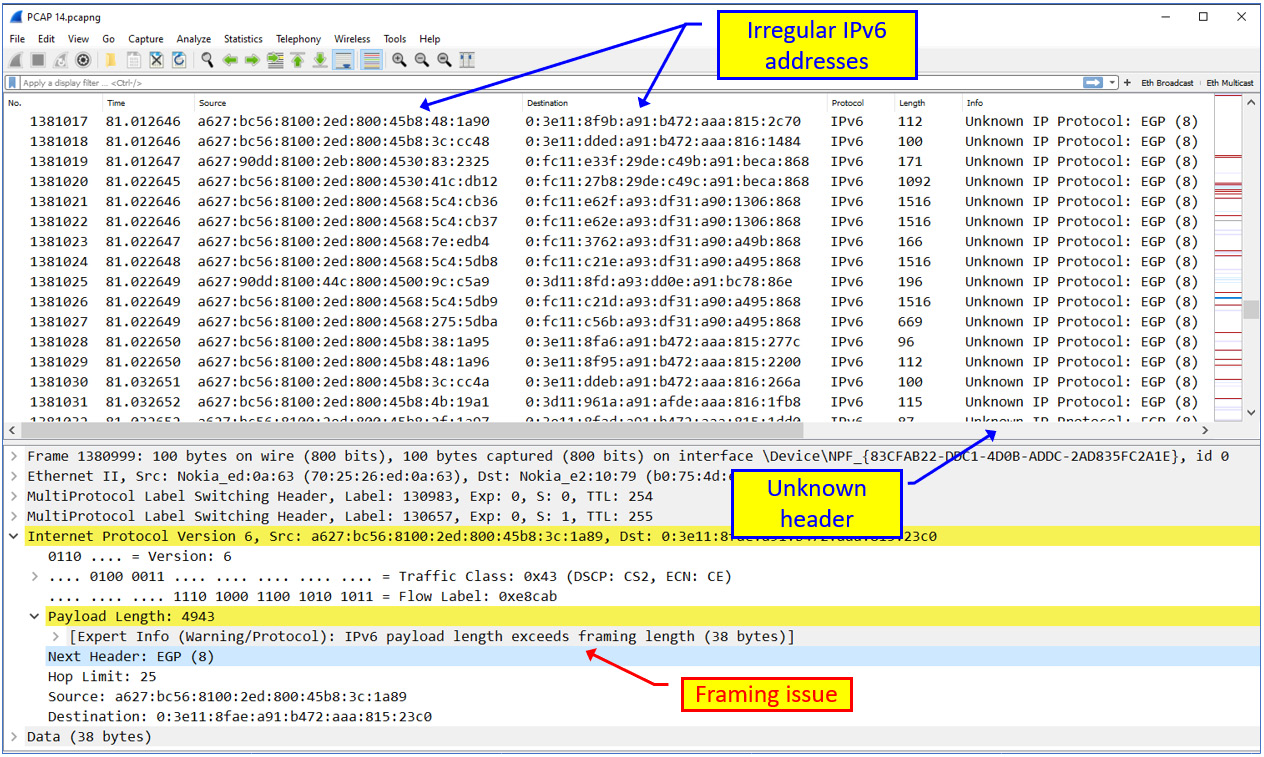
Figure 6.10 – Non-standardized IPv6 packets
Here, we can notice several suspicious things:
- First, the IPv6 addresses are not registered addresses, and they are not addresses that have been standardized by IPv6 standards.
- Second, we can observe an Unknown IP Protocol (EGP), which is used to indicate that the IP protocol type is unknown.
- Third, in the lower part of the screen, there is a framing issue, that is, IPv6 payload length exceeds framing length, which is also an indicator that something is wrong here.
When we open the Conversations window (from the Statistics menu), and click on the IPv6 tab, it becomes even more strange. Let's take a look at the following screenshot:

Figure 6.11 – Non-standardized IPv6 packets – statistics
Here, we can observe the most typical scanning pattern, that is, all of the packets are going in one direction – from the addresses that start with a:627 to the addresses that start with 0:3d1. Additionally, we can see the non-standard IPv6 addresses.
Generating and defending against flooding and DoS/DDoS attacks
In this section, we will examine how DoS/DDoS attacks are generated. We are doing this to better understand how these mechanisms work so that we can protect against them.
How to generate flooding and DoS/DDoS attacks
There are a large number of tools on the internet that can be used for loading the network, including general tools such as nmap (for Linux and Windows), the iPerf/jPerf client-server application (for Linux and Windows), and Colasoft Packet Builder.
How to protect against flooding and DoS/DDoS attacks
As there are many tools and methods in which to generate network-based DoS/DDoS attacks, there are several simple measures to take in order to protect against them:
- First, use your management system to discover the sudden increase in network traffic.
- Configure LAN switch ports to limit the number of broadcasts and multicasts (usually, the storm-control command in common networking operating systems such as Cisco IOS, Juniper JuNOS, and so on).
- Use behavior analysis tools to discover abnormal network conditions. We will discuss this, in more detail, in Chapter 9, Using Behavior Analysis and Anomaly Detection.
- Use the vendor's guides to defend against DoS/DDoS attacks.
Let's go through the network layers and examine how to protect against attacks in each one of them.
L2-based attacks
With Layer 2 attacks, we are referring to attacks that interfere with the normal operation of the OSI Layer-2 network protocols. When in this category, we have LAN switching that includes MAC learning, VLANs, STP/RSTP, MAC security, and other attacks on the Layer-2 functionality of the network. Let's examine some examples and learn how to protect against them.
MAC flooding
LAN switches contain a MAC table that holds all of the MAC addresses that were learned by the switch. In Chapter 2, Network Protocol Structures and Operations, we learned about the way switches operate, and we discovered that a LAN switch learns all of the MAC addresses that are connected to it, and forwards frames to these destination MAC addresses only to the physical ports the devices with these MAC addresses are connected to. Since every switch has a limitation in terms of the number of MAC addresses that it can learn, when the MAC address table is filled, the switch will not be able to add MAC addresses to it, and a frame that will be sent to the switch will be forwarded to all of the ports so that everyone will be able to view it.
How to generate
To generate a MAC flooding attack, we have several tools that we can use in Windows and Kali Linux.
In Windows, you can use tools such as Colasoft Packet Generator, and in Linux, you can use macof, which is part of the dsniff package.
To use macof, perform the following steps:
- Log in to your Kali Linux machine.
- Use the following command to install the dsniff package: sudo apt-get install dsniff.
- To generate the flooding, use the macof -s <Source-IP> -d <Destination-IP> command.
- And, if the source has several interfaces, also indicate the interface name: macof -s <Source-IP> -d <Destination-IP> -i <Source-Int-Name
- For example, to use PC 10.0.0.22 from the eth0 source interface to attack switch 10.0.0.138, use the macof -s 10.0.0.22 -d 10.0.0.138 -i eth0 command.
- The result can be viewed at Wireshark Statistics Conversations.
The results of this attack can be viewed in the following screenshot:
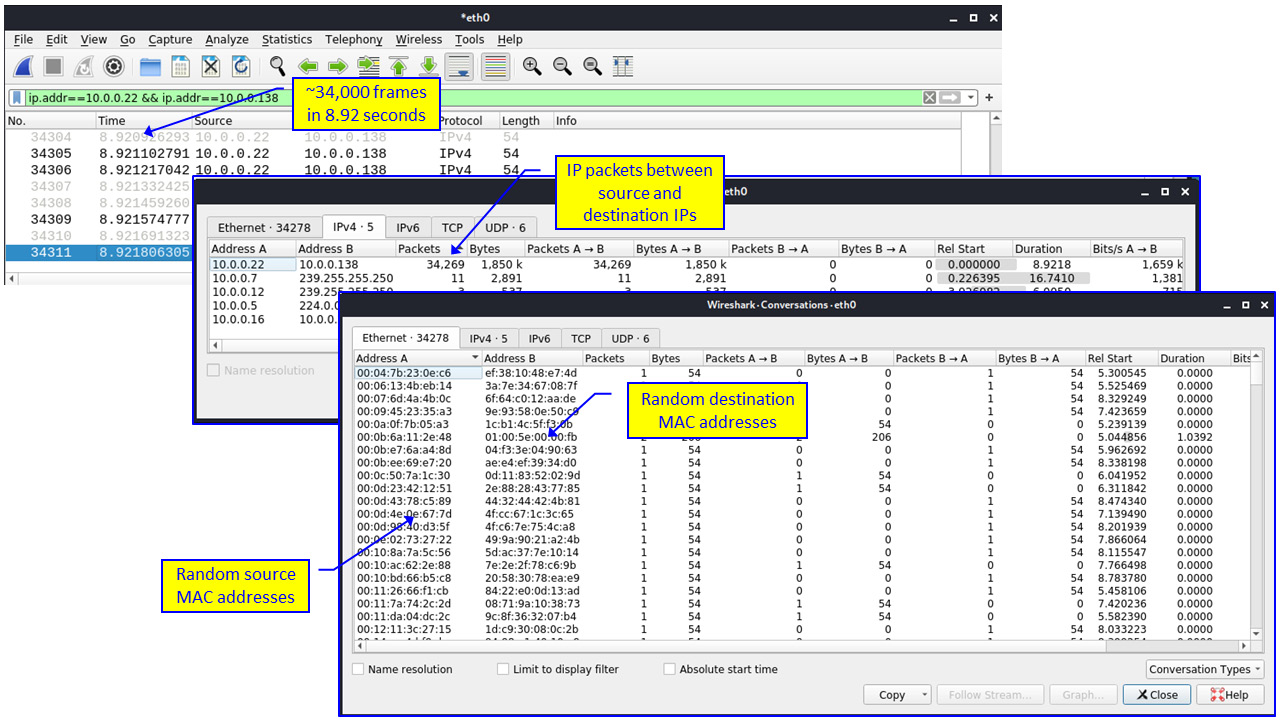
Figure 6.12 – MAC address spoofing
Looking in the upper window of the preceding screenshot, we can see very short times between the packets. In the middle screenshot, there are 34,269 packets between 10.0.0.22 and 10.0.0.138. Additionally, we can see that all packets are from A to B, that is, from A, which is 10.0.0.22, to B, which is 10.0.0.138. In the lower screenshot, we can see random MAC addresses, strengthening our assumption that this is not the usual traffic.
How to protect
To protect against MAC spoofing, you can take several countermeasures:
- First, use the NAC system to prevent any unauthorized access to your network.
- Use a port security feature (which is available on all brand switches) to limit the number of MAC addresses that can be learned on each port.
- Configure the switch to send an alarm to the management system in the case of a sudden increase in interface load or MAC address table size.
In the next section, we will examine spanning tree-based attacks and learn how to defend against them.
STP, RSTP, and MST attacks
As discussed in Chapter 2, Network Protocol Structures and Operations, there are three types of potential attacks in STP:
- Root role attack: This connects to the network with a low-priority switch in order to become the root of the network. This type of attack can be used for two purposes: the first is simply to crash the network, and the second is to become a root so that all traffic will be forward through us, for example, for eavesdropping. The second type of attack is a type of MITM attack.
- Topology Change Notification (TCN) attack: This attack is used to shorten the CAM table aging time from 300 to 15 seconds, causing the switches to delete learned MAC addresses and, therefore, flood the network with every frame that is sent to an unknown MAC address.
- BPDU flooding: In this type of attack, we simply try to overload the switch CPU by sending a large number of BPDUs to the switch, causing them to slow down to the point that it will start to lose traffic. This can be referred to as a type of DDoS attack.
Let's explore how to generate these attacks so that we can better understand how to protect against them.
How to generate
In STP/RSTP attack, you cause the network to forward packets to you, . you can do one of two things.
First, if you are physically connected to the network, configure a switch with the lowest possible bridge priority. If the network is not protected, your switch will become the root and all network traffic will pass through it.
Knowing the STP protocols structure (STP, RSTP, and MST), you can use tools such as Colasoft Packet Builder (for Windows) by uploading an existing STP capture file (there are many of them on the internet; just google STP .pcap, and you will find many of them). In the following screenshot, you can see the Packet Builder window:

Figure 6.13 – Colasoft Packet Builder
Note that you can also use various packet crafting tools in Linux, such as Scapy, packETH, and more.
How to protect
To protect against STP protocols attacks, take the following measures:
- Configure the BPDU Guard feature on switch ports that are not connected to known switches.
- Use the NAC system to protect against unauthorized connections to the network.
In any case, read the vendor's manual on network device hardening.
Let's go one layer higher to the IP and learn and understand how attacks are carried out and how we can protect against them.
L3- and ARP-based attacks
In this section, we will discuss ARP and IP attacks. Let's start with ARP poisoning, which is also known as ARP spoofing.
ARP poisoning
ARP is a protocol that resolves the destination MAC address from the destination IP address. Note that we discussed this in Chapter 2, Network Protocol Structures and Operations.
ARP poisoning (also known as ARP spoofing) is a type of attack that involves sending malicious ARP packets to a default gateway on a LAN in order to change the gateway ARP table.
The attack is used to alter the host-under-attack MAC address in the gateway ARP cache. This is so that instead of sending packets to the host under attack, the gateway will send these packets to the attacker that can copy their content.
Once the default gateway has changed its ARP cache with the faulty MAC entry, all of the traffic sent to the host under attack travels through the attacker's computer, allowing the attacker to inspect or modify it before forwarding it to its real destination.
ARP poisoning can be used as a DoS attack, preventing packets from getting to the host under attack. It can also be used as a MITM attack in which we get information sent to the host under attack and then send the information to it. It can be further used for session hijacking, causing users to open sessions to the attacker instead of the host under attack.
In the following diagram, we can view an example of ARP poisoning:

Figure 6.14 – ARP poisoning
Let's take a look at the preceding example. The first step is when, as in regular operations, Alice wants to communicate with Bob. From address 192.168.1.1, Alice sends an ARP request looking for the MAC address of Bob, that is, the MAC address of 192.168.1.103. This broadcast is flooded to all ports of the switch. We can observe this in packet number 5 of the Wireshark capture file.
Both the attacker (Trudy) and the host under attack (Bob) send responses to the ARP request. Trudy's response is in packet 6 of the capture, and Bob's response is in packet 7.
Now, the question is what will happen when Alice receives these two ARP responses – the first is 192.168.1.103, which has the MAC address of 00:d0:59:12:9b:02, and the second has the MAC address of 00:d0:59:aa:af:80. The question of whether all packets will be sent to the first one that was learned or to both depends on the operation system.
In Wireshark, you will see a notification on a duplicate IP address because Wireshark sees the same IP (192.168.1.103) with two MAC addresses – the real and the fake ones.
Let's examine how to generate ARP poisoning and gain a good understanding of how it's done.
How to generate
You have several tools that can generate false ARP responses.
For Linux, you can use the arpspoof command, under /usr/sbin.
The command's format is as follows:
arpspoof -i <interface-name> -t <device-under-attack> -r <gateway>
For example, consider the following:
arpspoof -i eth0 -t 10.0.0.6 -r 10.0.0.138
Similarly, for Windows, you can use packet builders such as Colasoft.
How to protect
Since ARP poisoning is a LAN-based attack (ARP works on a single LAN or a single VLAN), first, you will need to use a NAC system so that unauthorized users will not be able to access your LAN. However, this is only a partial solution, and it will not help when the attack is coming from the internal network, as in the case of most attacks, in which an internal device is infected and generates attacks on the network it is connected to
For this reason, the second step to take is to configure the router for Rate Limiting of ARP Packets. This is a common feature on any brand router and is referred to as Dynamic ARP Inspection (DAI).
Now, let's take a look at DHCP and how it can be compromised.
DHCP starvation
As you might have gathered from the name, a DHCP starvation attack is where we generate a large number of DHCP requests with fake MAC addresses so that, eventually, there are no more IP addresses available to allocate to legitimate devices; therefore, the network becomes unavailable to users.
A DHCP starvation attack works by broadcasting DHCP requests with spoofed MAC addresses. There are many tools available on the internet that enable you to send out these sorts of frames. This kind of attack can be continued by the attacker installing its own DHCP server and responding to a client request for IP addresses, which will result in data being sent to the attacker and compromising company data.
Since DHCP also allocates DNS addresses, default gateways, and other parameters, the attacker can become the network server, causing all network traffic to be sent to their computer. Let's examine how it's done next.
How to generate
There are several ways in which to bluff the DHCP protocol. If NAC is not configured, you can simply connect a home router to the network. Usually, these routers come with a DHCP server running by default. When you connect it to the network, every device that connects to the network or renews its IP address will get its IP either from the network DHCP server or from the new router, so complete chaos is guaranteed. If the network is NAC protected and you have gained control over one of its devices, you can install a DHCP server on it.
A simple and friendly tool to use for this purpose is Kali Linux's yersinia. You can use this to generate DHCP requests or as a rogue server:
- To install yersinia, use the sudo apt-get install yersinia command.
- The command will be installed under /usr/bin.
- For graphical applications, use yersinia -G.
Next, let's take a look at how we can protect against this attack.
How to protect
To protect against DHSP attacks, take the following measures:
- Use NAC and prevent unauthorized access from the network.
- Configure the DHCP server to respond only to DHCP requests coming from authorized MAC addresses (to be configured in conjunction with the organization NAC).
In this section, we learned about attacks on the network, from Layer-2 to Layer-3 attacks. Additionally, we learned how to generate these attacks and how to protect against them.
Summary
In this chapter, we discussed network-based attacks, that is, attacks that target network resources in order to prevent users from using the network.
We examined two major types of attacks – those that simply load the network to the point that users are not able to use them, and the network protocol-based attacks that target basic network functionality, such as ARP and DHCP, in an attempt to prevent the network from functioning.
In this chapter, you learned how to use traffic-generation tools and tools that are used to generate attacks on Layer-2 and Layer-3 protocols. Additionally, you learned how to protect against them.
In the next chapter, we will learn about attacks on network devices, how to perform them, how to discover them, and how to defend against them.
Questions
- We connect our laptop with Wireshark to the LAN and we don't see any broadcasts. Is there a problem?
- There is no problem. This network is functioning perfectly and there is no way to break into it.
- We are on a specific VLAN, and therefore, we don't see broadcasts.
- This is not possible; broadcasts must exist on every network.
- Traffic is encrypted, and therefore, we don't see the broadcasts.
- What is the best way to defend against DoS/DDoS attacks?
- There are multiple measures. Adapt the measures to the risks.
- Configure bandwidth limits on all ports on the network devices.
- Use NAC systems.
- Use port security and limit access of users to the network.
- The network becomes very slow; users complain that they are getting very slow responses from network servers, and the networking guys say that it's a security breach. What will you check?
- You will connect Wireshark to the network and look for suspicious traffic patterns – for example, unrecognized sources, too much traffic from specific sources, and more.
- You will look at the STP/RTSP/MST topology and try to discover unknown switches and root switches.
- You will ping the servers, use arp -a, and use traces and other tools to look for any strange behavior in the network.
- You will use your head, think, and use the necessary tools to uncover the problem.
- What is a spoofing attack?
- When a malicious device or software impersonates another device in order to bypass its network defenses.
- A type of attack that is used in network scanning tools for breaking into the network.
- A specific network-targeting tool that is used to overwhelm the network with traffic.
- A network reconnaissance tool for discovering the abnormal behavior of network devices and hosts.
- We connect our laptop to the network, run Wireshark, and see a large number of ICMP and ARP requests. Why might this be a problem?
- This is a typical scanning; we must discover and isolate the source and disable it immediately.
- It could be due to scanning, ARP poisoning, DHCP starvation, or another attack, so we must discover and isolate the source and disable it immediately.
- It could be a problem, but it can also be legitimate traffic, for example, network management software that runs a discovery mechanism.
- This is not a problem; there are scans in every network, so it is a part of a normal network operation.