Prologue: Getting to Know the Xbox One
This book explains how to tap into the powerful features of the Xbox One so it can take its rightful place as the centerpiece of your home entertainment system. Despite its name, the Xbox One is actually Microsoft’s third console, after the Xbox, which debuted on November 15, 2001, and the Xbox 360, which debuted on November 22, 2005.
The Xbox One debuted on November 22, 2013. It proved an immediate hit, selling more than 1 million consoles in the first 24 hours of its rollout, spanning just 13 initial countries. The Xbox One represents a fresh start for Microsoft because none of the games or accessories for their previous consoles work with the new system. In fact, the Xbox One interface has more in common with the Windows 8 and Windows Phone operating systems than it does with even the latest version of the Xbox 360.
Understanding the Prerequisites
The Xbox One breaks from the tradition set by previous generations of consoles by only working with one type of display, a minimum 720p high-definition or better television or monitor with an HDMI input. Fortunately, most televisions sold within at least the last 5 to 10 years meet this requirement, and, if for some reason you don’t already have one, you can get large, 1080p-capable displays for little more than what you paid for your console. Likewise, although not strictly a requirement, the Xbox One can take great advantage of a quality sound system either through its HDMI Out or S/PDIF (optical audio) ports.
What About 4K Ultra HD?
Compared with standard high-definition televisions (HDTVs) that have a maximum resolution of 1920×1080, 4K Ultra HD displays have a maximum resolution of 3840×2160, as well as an increased color gamut. For now, both the exorbitant prices of these 4K displays and the lack of content that takes advantage of the increased resolution puts Ultra HD capabilities out of the reach of the average consumer. Impressively, both the Xbox One itself and the high-quality HDMI cable that it comes with support 4K Ultra HD displays, so if you do end up eventually getting such a television, your console will support it. Keep in mind, however, that “support” and having actual content natively in that resolution are two very different things. At this time, no Xbox One games display at 4K resolution, and it’s unlikely that any games will display at 4K resolution in the near future.
Of all the new features in Xbox One, one of the most impressive is its capability to integrate your cable or satellite box with it. Although a cable or satellite receiver box is not required, the HDMI In on your console would be awfully lonely without it. The benefit of connecting such a box to your Xbox One is that not only can you reuse the primary HDMI input on your television (freeing other inputs for other devices), but you can also enhance the use of your cable or satellite service. If your cable or satellite receiver box does not presently connect to your television via HDMI, then you must contact your service provider for a newer model that the Xbox One can take advantage of.
Finally, although an existing wired or wireless network is not strictly a requirement after initial setup is finished, you’re limited to playing only retail game discs unless you go online. Similarly, without an Xbox Live Gold account (see Chapter 3, “Examining Xbox Live”), access to the most interesting Xbox One features, like many of the video and music services, Skype video chat, and online gameplay, are not available.
Unboxing Your Xbox One
Freeing your Xbox One from its box can be an exhilarating, but somewhat tedious process. All Xbox One packages come with, at minimum, the console, Kinect sensor, wireless controller and AA batteries, chat headset, 6.5-foot (2-meter) HDMI cable, power supply and power cord, and various documents, so there are plenty of items to extract. Luckily, no tools are required for removing and setting up your system other than your hands and some patience.
However, before you start trying to hook up the Xbox One to your TV, sound system, or cable or satellite receiver box, it’s wise to familiarize yourself with all of its parts so that you can plan accordingly. For instance, you ultimately want to place your Xbox One console in a location where it’s both stable and there’s enough clearance around the unit to ensure none of its ventilation openings are blocked. You also need to make similar arrangements for the Kinect sensor, along with providing it a clear view of your living space. If a wireless Internet connection is not available, you want to place your console close enough to make a wired connection to your home network; otherwise, you’ll have to make do without many of the connected features that make the Xbox One so great. Nevertheless, even if you choose to eschew online features and just want to play disc-based games, you still need a broadband Internet connection for first-time setup to download an initial update before your shiny new console will even let you play.
Breaking Down the Components
Each of the components included in the Xbox One’s box has a variety of connectors or inputs, as well as a range of other features. Familiarizing yourself with these major features makes setup and use easier.
Xbox One Console
Your Xbox One includes a variety of buttons and ports, located on the front, left, and rear of the console. Inside the console is a 500GB hard drive, which gives you plenty of storage space for game downloads, movie and music purchases, and so on. Of course, eventually, even that much storage space will become cramped, so it’s nice to know that Microsoft plans to add support for external hard drives, attached via one of the Xbox One’s three USB ports, in the future.
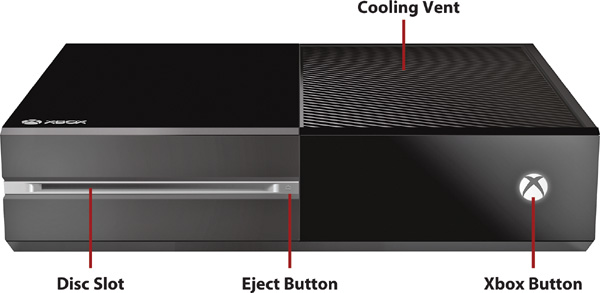
Now, let’s review the features on the front of the Xbox One console:
• Disc slot—This is where you load and unload a Blu-ray, DVD, or audio CD disc. Once a disc is inserted part of the way into the slot, it is automatically pulled into the console and read.
• Eject button—Press this button to eject a disc that is inside the console.
• Xbox button—This is the power button and LED status indicator.
• Cooling vent—This vent allows heat to escape from your console. This vent should never be blocked.
Now take a look at the features on the left side of the Xbox One console:
• USB 3.0 port—Use this port to connect wired accessories, such as the Xbox One Play & Charge Kit (see “Accessorizing Your Xbox One” in Chapter 4, “Personalizing Your Xbox One Experience”).
• Eject hole—If a disc ever gets stuck in your console, you can use this to manually eject it. See “Manually Eject Discs” in Chapter 1, “Setting Up Your Xbox One,” for how to use the eject hole.
• Accessory Pairing button—Press this button when you want to connect additional wireless accessories, such as a wireless controller, to your console.
• Cooling vent—This vent allows heat to escape from your console. This vent should never be blocked. Similarly, the entire right side of the console has a cooling vent.

Keeping Your System Clean
One way to help maintain your Xbox One and its components in top working condition is to keep dust out of and off of them. Although not strictly necessary, before cleaning your console or any of its components, unplug all connections. Only use a dry microfiber cloth to remove dust, as liquids or other materials may damage the finish or internal components.
Finally, take a look at the features on the rear of the Xbox One console:
• Power supply port—The power supply plugs directly into this port.
• HDMI Out—One end of the included HDMI cable plugs into here, while the other end plugs into your television. See “Hook Up Your Xbox One” in Chapter 1 for more information on connecting to your television.
• S/PDIF—This port provides optical audio output, which is typically used to connect to sound systems. An optical audio cable is not included. See “Display & Sound” in Chapter 2, “Navigating Your Xbox One’s Dashboard and Settings,” for more information on connecting to a sound system.
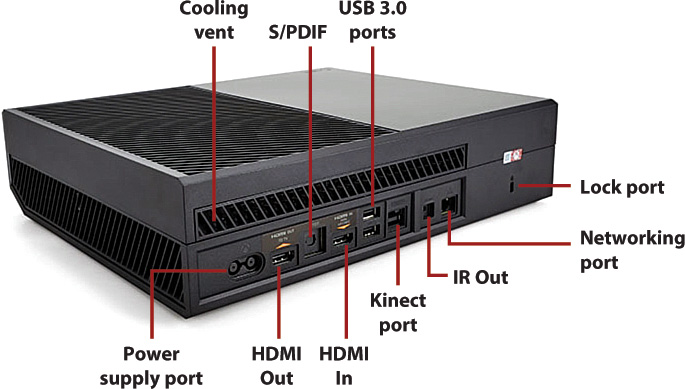
• HDMI In—The HDMI cable from your cable or satellite receiver box optionally plugs in to here. See Chapter 1 for more information on connecting a cable or satellite receiver box.
• USB 3.0 ports—USB stands for universal serial bus. These ports enable you to attach peripheral devices to your console, such as a wired controller or, eventually, a flash or hard drive for additional storage capacity. Your console has three of these ports, one on the side and two in back.
• Kinect port—This is the dedicated Kinect USB port, handling both data and power for this motion and voice control camera device.
• IR Out—This is an infrared (IR) output port for connecting an optional IR blaster. See “Accessorizing Your Xbox One” in Chapter 4 for more information on IR blasters.
• Networking port—This is an Ethernet, or network, port, allowing for a wired connection.
• Lock port—This port enables you to connect a laptop lock to keep your console secured in areas where physical security may be an issue. See “Accessorizing Your Xbox One” in Chapter 4 for more on what to use with the lock port.
• Cooling vent—This vent enables heat to escape from your console. This vent should never be blocked.
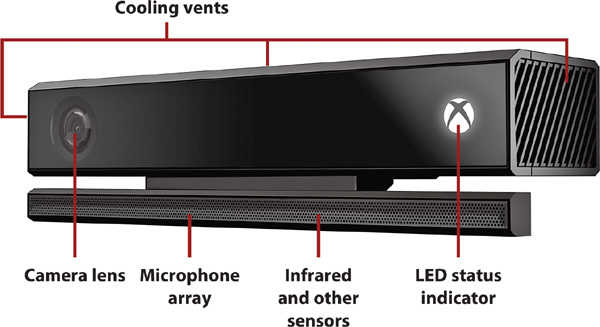
Kinect Sensor
The new Kinect sensor offers several improvements over its predecessor for the Xbox 360, including a wide-angle lens, nearly three times the resolution, and the capability to see in the dark thanks to an active IR sensor. It also can see objects that are closer to the sensor (within 3 feet) and track up to six different bodies (skeletons) at once. Other new features include the capability to detect a player’s heart rate, facial expressions, 25 individual joints (even fingers!) and the precise rotation of those joints, weight put on each limb, and speed of movements, as well as the capability to track gestures performed with the wireless controller. It’s also an IR blaster, so it can control your cable or satellite receiver box, television, and sound system.
Kinect’s microphone remains active at all times, so it’s always ready to receive voice commands from the user when needed, even when the console is in Sleep mode (but not when it is powered off). Although it’s not necessary to keep Kinect active or even plugged in, if you don’t, you’ll clearly be missing out on some interesting functionality.
Wireless Controller
How do you follow up the Xbox 360’s controller when it was already considered one of the greatest ever made? Simple—keep just about everything that was so great about it, improve upon its weaknesses (the D-pad), and then add new features such as faster response time, impulse triggers that deliver precise vibration feedback, and infrared LEDs that can be tracked by Kinect. Best of all, up to eight of these new Xbox One controllers can be paired to one console (with Kinect keeping track of who’s who), making for some crazy local multiplayer sessions for games that support it.
Now, take a look at the features of the Xbox One wireless controller:
Understanding Digital and Analog
You’ll hear a lot about digital and analog when it comes to your controller. Digital uses discrete values and analog uses a continuous range of values. The digital D-pad and buttons register as on or off. For example, with the D-pad, if you move an in-game character left, it simply moves left. The analog sticks and triggers allow for a finer degree of control. For example, with the analog stick, you can control how quickly an in-game character moves left.
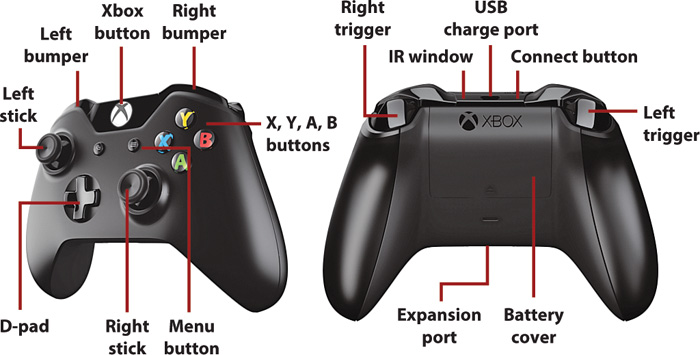
• Left stick—The primary analog control stick, which functions much like a D-pad, but due to its analog nature (detecting minute movements) is not as precise when navigating menus. It also functions as a button when you press down on it, often bringing up secondary functions or in-game menus.
• Left and right bumpers—Digital buttons that often act as quick scroll buttons in menu screens, with the right bumper scrolling right and the left bumper scrolling left.
• Xbox button—A digital button with a wide range of functions. If the console is off (LED status indicator off), hold this button to turn on the console. If the console is already on and the controller is off (LED status indicator off), hold this button to turn on the controller. If both the console and controller are already on, hold this button down to bring up the option to turn off the console or controller. With both the controller and console on, press this button at any time to show the Home screen (see Chapter 2). Finally, when viewing two snapped apps, where you move one to the right side of your screen while you do something else on the main part of your screen, press this button twice in rapid succession to toggle between the two apps.
• X, Y, A, B buttons—Digital buttons that can serve any assigned menu or in-game function. Typical usage for the X button is to cancel or exit a selection. Typical usage for the Y button is to bring up a menu. Typical usage for the A button is to accept selections. Typical usage for the B button is to go back to a previous screen or exit a screen.
• D-pad—A digital control that provides eight-directional input, enabling you to go up, down, left, right, up and left, up and right, down and left, and down and right. Some games do not allow use of the D-pad for movement but map certain in-game functions to it.
• Right stick—The secondary analog stick, often used to look around and adjust the camera angle in games that provide this functionality. It is also sometimes used for moving around in games, though use of the left stick for this function is much more common. The right stick also functions as a button. For example, in games that enable you to adjust the camera angle, pressing the button might return the camera’s vantage point to the center.
• View button—A digital button used to focus in on an activity in a game or app, such as accessing the address bar in Internet Explorer (see Chapter 10, “Surfing with Internet Explorer”). The function of this button varies depending on the app or game, with some completely ignoring its existence.
• Menu button—A digital button to access game- and app-specific menu options, such as Settings or Help, along with commands within the user interface, such as pressing the equivalent of Enter on a keyboard.
• Right and left triggers—Analog buttons that act as up and down quick scroll buttons in menu screens, with the left trigger scrolling down and the right trigger scrolling up. These are also called impulse triggers, which means they can feature rumble effects during gameplay.
• IR window—Infrared LEDs that are hidden behind the smoked plastic cover. These help Kinect see the controller and are used for auto-pairing controllers to the console (see “Assigning a Profile to a Wireless Controller” in Chapter 4).
• USB charge port—A Micro-USB port used to connect a USB cable to the controller for charging the optional Xbox One Play & Charge Kit or third-party equivalent (see “Accessorizing Your Xbox One” in Chapter 4). With a USB to Micro-USB cable plugged between the console and controller, the controller can also act like a wired controller, with no need for batteries.
• Connect button—A button used to sync a controller with a new or different Xbox One console (see “Connecting Additional Controllers” in Chapter 1).
• Battery cover—A cover for the compartment where the included AA batteries go.
• Expansion port—An accessory port, used to attach add-ons like the included Xbox One chat headset.
Chat Headset
The included headset enables you to chat with friends and family in both party chat (see Chapter 6, “Making the Social Connection”) and supported online multiplayer games (see Chapter 5, “Getting Your Game On”). Now take a look at the features of the Xbox One chat headset:
• Earpiece—Enables you to hear friends and family.
• Microphone—Enables your friends and family to hear you. The whole earpiece and microphone assembly rotates to accommodate use on the left or right ear.
• Expansion port connector—Plugs in to the expansion port on the Xbox One wireless controller to establish and secure a connection.
• Mute—Mutes your microphone so that others can no longer hear you.
• Volume up/down—Increases (when you press +) or decreases (when you press –) the volume you hear in the earpiece.

What to Expect from This Book
We wrote this book with few assumptions made about reader skill level or any preliminary understanding of its many topics. If something needs explaining, we explain it. Although you can skip to a chapter of interest, each chapter does build upon what came before it. In this way, if you read the book from its first chapter to its last, you can be assured that you’ll be armed with all you need to know about the Xbox One. With such a foundation, you can more easily understand and make great use of any new Xbox One features Microsoft adds over the years.