4. Personalizing Your Xbox One Experience
In this chapter, you learn about personalizing your Xbox One experience, including how you’re virtually represented and about some must-have accessories for your console.
→ Assigning a Profile to a Wireless Controller
Your Xbox One is thoughtfully equipped to give you a personalized experience. Not only can you create your own user profile, complete with a gamerpic (gamer picture), but you can also create an avatar to represent you, set a gamertag (your gamer name), customize your Home screen, and create your own circle of friends.
In addition, there are many accessories you can consider buying to deck out your console and Kinect to enrich your overall experience. In this chapter, you learn how to personalize and accessorize your Xbox One so that you have all the right enhancements and add-ons.
Understanding Your Profile
Your profile, which establishes your presence on your Xbox One, includes several components, including your gamerpic, gamertag, and avatar. How you set up your profile also determines the color of the tiles on your Home screen when you are logged in, your privacy settings, and whether you appear online or offline on Xbox Live. Any profile you want to have Xbox Live Gold access needs an Xbox Live Gold account. For more on Xbox Live, turn to Chapter 3, “Examining Xbox Live.” Profiles without Xbox Live Gold have no dependence on or interactivity with the Xbox Live Gold service, although they still require an associated Microsoft Account.
If you already have an Xbox Live Gold account because you previously had an Xbox 360, your profile, account information, family settings, and music and video content are automatically transferred to your Xbox One when you sign in to your account. If you do not have an Xbox Live Gold account, but you followed the steps in “Power On for the First Time” from Chapter 1, “Setting Up Your Xbox One,” your Xbox One already gave you a basic profile, including a gamertag and gamerpic that you can modify.
Get into Your Profile
It is easy to customize your existing profile on your Xbox One console. To access your profile, follow these steps:
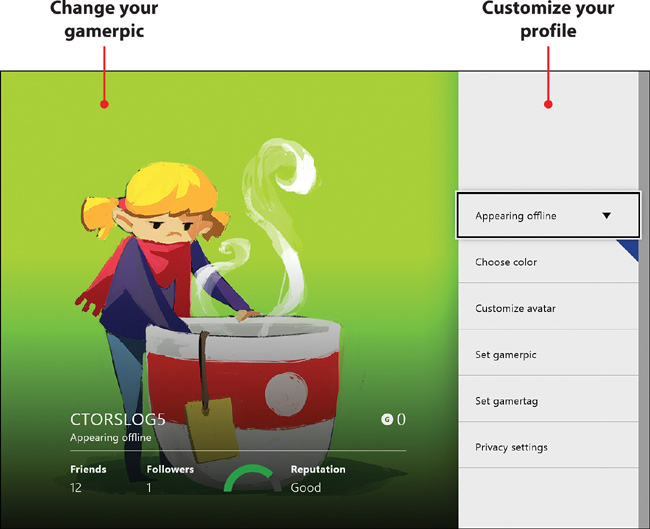
1. From the Home screen, select Sign In.

2. Select the profile you want to customize.
3. When Xbox returns you to the Home screen, select your Social tile.
4. Select My Profile.

5. You are now in your profile and can make the desired modifications, which are reviewed in the next section, “Customizing Your Profile.”

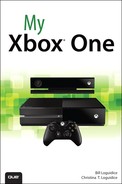
Customizing Your Profile
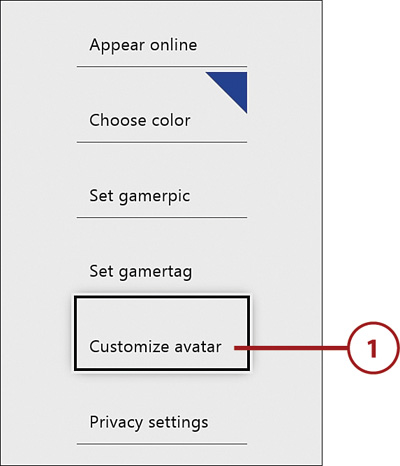
When you’re at the Profile screen, the following customization options are available to you:
• Appear Offline/Appear Online—When you select this option, you toggle between “Appear offline” and “Appear online.” If you don’t want anyone to know that you’re online, select Appear Offline.
• Choose Color—This option enables you to select the color of the tiles on the Home screen. At the time of this writing, there are 21 options to choose from. Simply scroll to the color you like until it is outlined in black and press the A button to select it. If multiple people are using your console, you might want each person to select his or her own color.
• Customize Avatar—Your avatar is a digital representation of you, and you can change how your avatar looks at any time. For more on creating an avatar, turn to the “Building an Avatar” section later in this chapter.
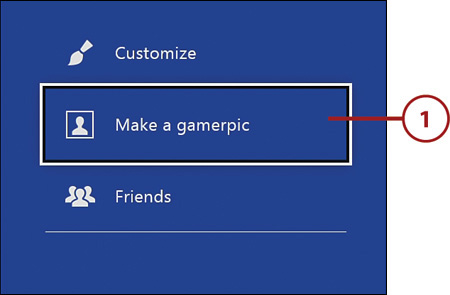
• Set Gamerpic—Xbox One introduces new, full-screen, 1080p gamerpics. Your gamerpic is the image that represents you. When you select this option, you can choose from any of the available gamerpics, and you can change your gamerpic as many times as you want. There are countless images to choose from, from food, to creatures of every kind, to symbols, to abstract art, to numbers. Simply scroll to the image you like until it is outlined in black and press the A button to select it. If you don’t like any of the options, you can make one with your avatar. For more on that, see the “Create a Gamerpic with Your Avatar” section later in this chapter.
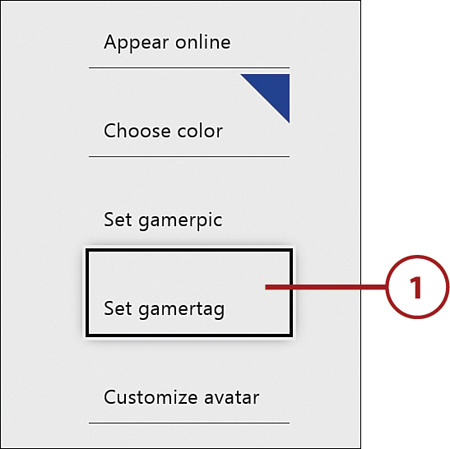
• Set Gamertag—Here, you can change your gamertag, which is the name associated with your Xbox Live account. You have only one chance to change your gamertag for free; thereafter, you need to pay if you want to set a new one. For instructions on how to set a gamertag, see the “Change a Gamertag” section next.
• Privacy Settings—Selecting this option brings you to your Privacy & Online Safety settings. For more on the options here, turn to “Breaking Down the Settings Screen” in Chapter 2, “Navigating Your Xbox One’s Dashboard and Settings.”
Change a Gamertag
Changing your gamertag is easy as pie! Just keep in mind, as previously mentioned, you can do it only once for free, so you must be careful when making your selection. To change your gamertag, follow these steps:
1. Go to the Profile screen and select Set Gamertag. If needed, follow steps 1 to 5 in the “Get into Your Profile” section earlier in this chapter.
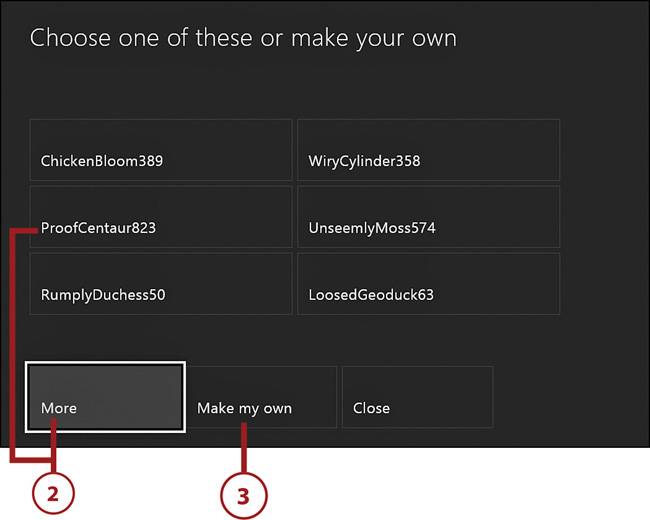
2. Xbox provides six alternative gamertags. To see more autogenerated options, select More; every time you select this option, six new potential gamertags appear onscreen. Select the option you want, and proceed to step 5.
3. If you don’t like any of the suggested gamertags, create a personalized gamertag by selecting Make My Own, and proceed to step 4.
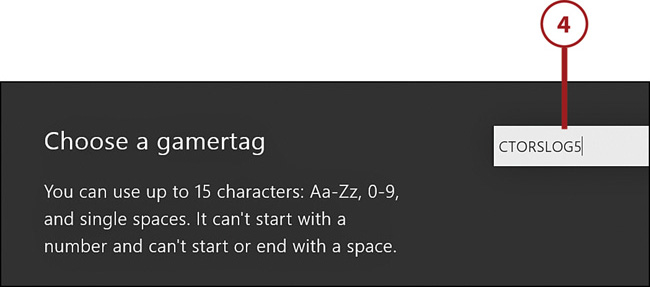
4. Use the onscreen keyboard to input your proposed gamertag, and then select Enter.
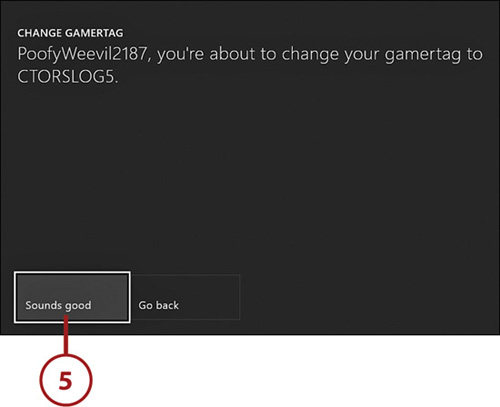
5. At the Change Gamertag screen, select Sounds Good if you’re happy with your gamertag. If not, select Go Back and enter a new gamertag, and then select Sounds Good.
6. You now have your new gamertag. Select Close to go back to the Profile screen.

Building an Avatar
Although avatars are supported on Xbox One, their role has been minimized. Unlike on the Xbox 360, where they are heavily integrated into the interface, they largely remain hidden on the Xbox One outside of the Friends app (see Chapter 6, “Making the Social Connection”) and are mainly used in gamerpics, which is reviewed in “Create a Gamerpic with Your Avatar” later in this chapter.
Still, building your digital representation can be lots of fun and is a bit like a game itself. After all, you can shape and mold your avatar to take on whatever identity you want, and if you change your mind about your avatar’s features, you can make modifications simply by pressing a few buttons, enabling you to test a variety of looks.
Select a Base to Work From
Before you can start customizing your avatar, you must select a base model to work with. Go to your Profile screen, as described earlier in the “Get into Your Profile” section, and follow these steps to get started:
1. On the Profile screen, select Customize Avatar.
2. You now see all the bases from which you can work. Select the left and right arrows to scroll through additional options until you find the one you want.
3. Select the avatar you want to use as your base model. (You can change everything about the avatar you pick.)

Change My Features
Once you have your base avatar selected, as described in the “Select a Base to Work From” section, you can change its appearance by modifying its facial features, body size, and coloring. To make modifications to your avatar, follow these steps:
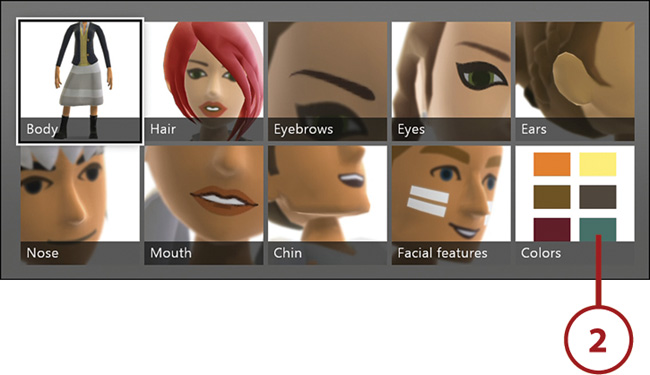
1. Select the My Features tile.
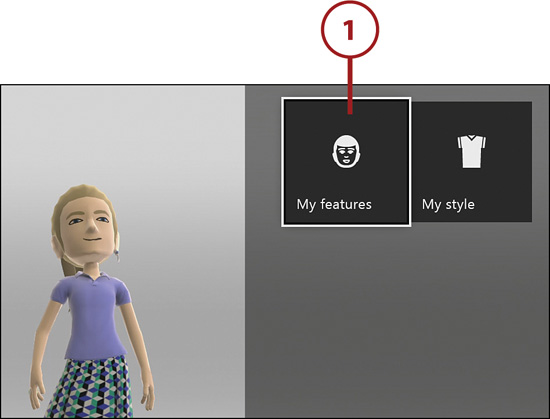
2. Use the left stick or D-pad to move between assorted categories, such as Body, Hair, Eyebrows, Eyes, Ears, Nose, Mouth, Chin, Facial Features, and Colors (where you can change colors of skin, eyes, hair, and so on).
Navigation Guide
Each of these categories uses the same controls for navigation. Use the left stick or D-pad to move between the various options. When you find a feature that you want (such as a particular mouth shape in the Mouth category), highlight it and press the A button to select it. You can use the left and right triggers to rotate your avatar for a better look. If you change your mind at any time, press the B button on your controller or select Cancel at the bottom of the screen.
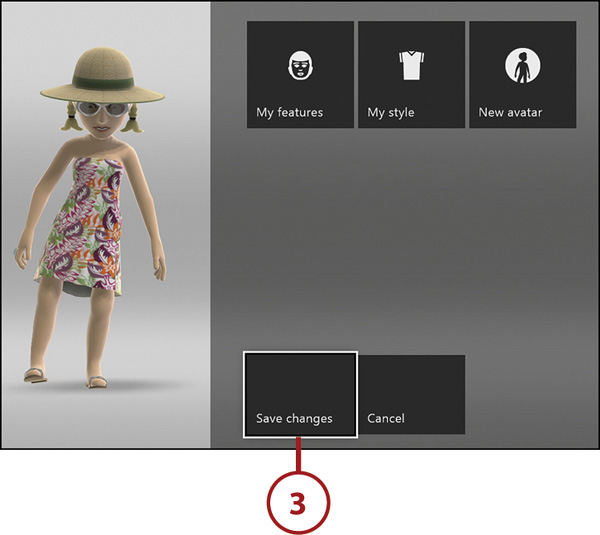
3. Press the B button to return to the Avatar Customization screen, and then select Save Changes. Your avatar is now saved.
Change My Style
To change the style of your avatar, if you’re not already at the Avatar Customization screen, follow steps 1 to 5 in the “Get into Your Profile” section, and then select Customize Avatar. If you want to change your avatar’s clothing, makeup, and accessories, follow these steps:
1. At the Avatar Customization screen, select My Style.

2. Use your left stick or D-pad to move between the 10 categories. Select a category by pressing the A button on your controller. The options include Dress Up, Hats & More, Tops, Bottoms, Shoes, Glasses, Earrings, Wristwear, Rings, and Gloves.

Navigating between each of the My Style categories requires the same controls. Use the left stick or D-pad to move between the various items. Use the left and right triggers to rotate your avatar for a better look. If you change your mind at any time, press the B button on your controller or select Cancel onscreen to go back. Press the A button to make your selection and return to the My Style screen.
3. When you are finished setting your style, press the B button to return to the Avatar Customization screen and select Save Changes.

Not Enough Gear?
You can purchase items for your avatar online. Visit the Avatar Editor at https://live.xbox.com/en-US/AvatarEditor.
Create a Gamerpic with Your Avatar
After you’ve created and saved your avatar, you can show it off in a gamerpic. Follow these steps:
1. If you’ve just finished and saved your avatar, select Make a Gamerpic. Otherwise, go to your profile (follow steps 1 to 5 from the “Get into Your Profile” section) and select Customize Avatar, and then Make a Gamerpic, or go to Set Gamerpic and select the Make One with Your Avatar tile in the lower-left corner.
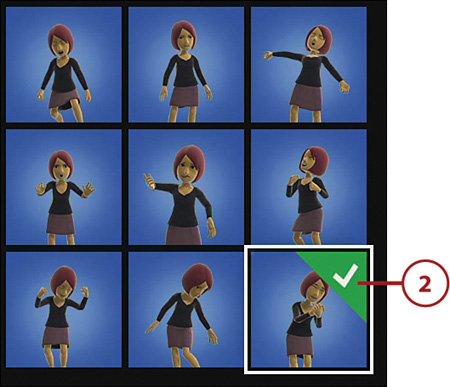
2. Select the pose you want; the selected pose is highlighted with a checkmark. Then use the right stick on your controller to position your avatar left, right, up, and down, depending on what you want to have in frame. When satisfied, press the B button on your controller.
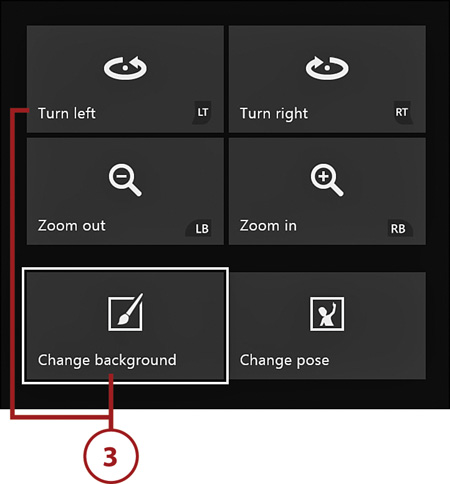
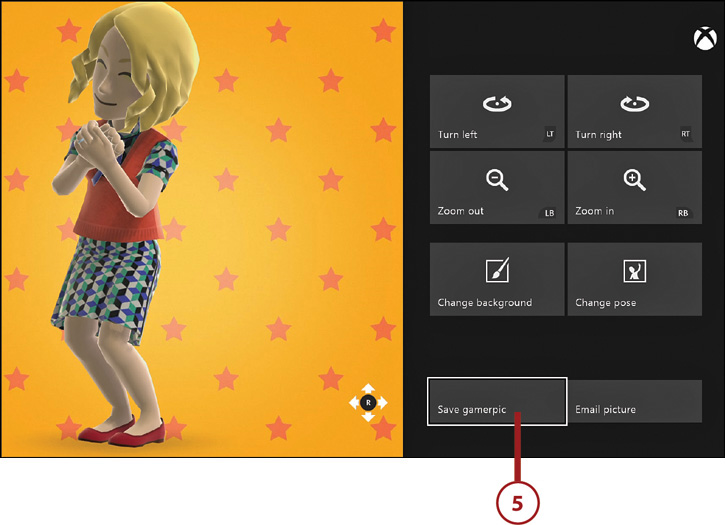
3. Customize the pose by turning your avatar left or right, zooming out and in, and changing the background. If changing the background, select Change Background and see step 4. Otherwise, proceed to step 5.
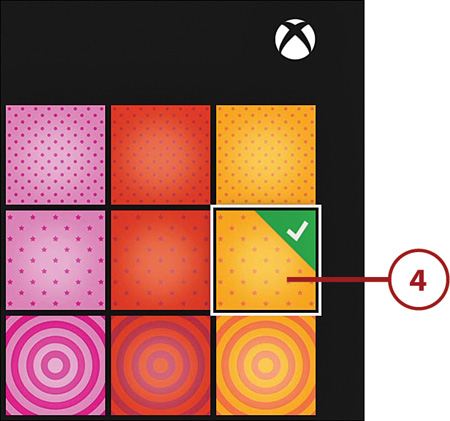
4. Select your desired background.
5. Select Save Gamerpic.
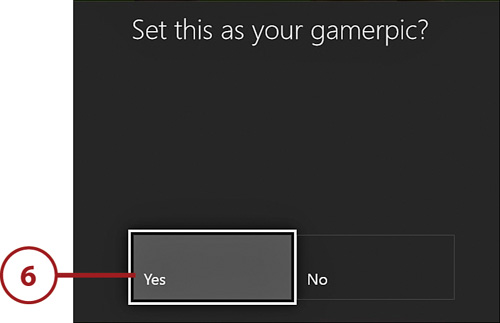
6. At the Set This as Your Gamerpic? screen, select Yes.
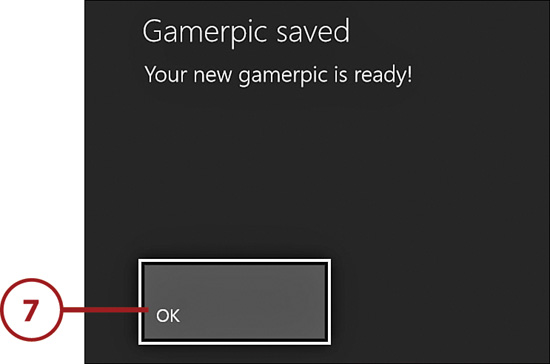
7. Select OK, and then press B on your controller to go back.
Assigning a Profile to a Wireless Controller
You can automatically pair or manually assign your profile to your specific Xbox One wireless controller. Doing so puts your profile in control of the action on your console, which is especially important if multiple people are using your console at the same time. This also helps ensure that everyone has the best experience and correctly assigned achievements.
Automatically Assigning a Profile
Follow these steps to automatically assign a profile to a wireless controller:
1. Press the Xbox button on the controller you want to use.
2. Stand approximately 6 feet away from your Kinect sensor and point your controller toward it so that Kinect can detect your controller’s infrared signal.
3. Kinect should now recognize you and automatically assign you to the controller you’re holding.
Manually Assigning a Profile
If you don’t want to automatically pair your profile with your controller by using Kinect or you have a guest over who wants to use a controller (up to eight controllers can be connected at one time), you can manually sign in using any wireless controller.
To do so, power on the controller you want to use, go to the Dashboard, and sign in to the profile you want to use. The controller you’re using is now assigned to that profile for this particular session. If you sign out again and someone else signs in using that controller, it becomes associated with that profile instead.
Accessorizing Your Xbox One
Even though your Xbox One comes with everything you need to make it work straight out of the box, there are a variety of accessories available that can make your experience even better.
Let’s take a look at some of the more useful and fun accessories for your Xbox One.
Controllers
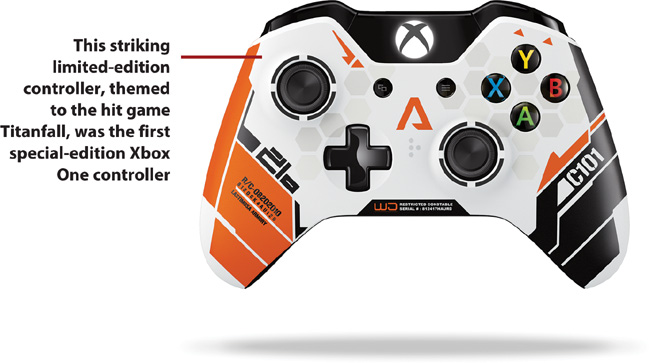
For the best and most versatile in-game control, it’s hard to beat the superb wireless controller that comes with your system. Adding one or more additional Xbox One wireless controllers to your console is the ideal way for other family members and friends to join you on the couch for some great multiplayer gaming. Of course, as with special cosmetic variations of the console itself, special editions of the standard wireless controller can also make a great addition to your controller lineup, so they’re worth keeping an eye out for.
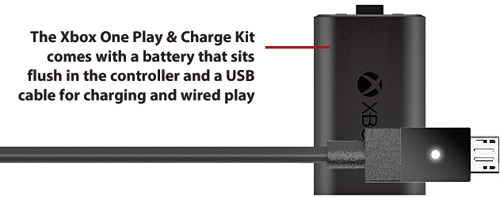
It’s hard to argue with the excellent battery life that two good AA batteries provide in the standard controller, but there are rechargeable, reusable alternatives that give similar performance. Microsoft makes the most popular option, the Xbox One Play & Charge Kit, which consists of a rechargeable battery pack that sits flush with the back of the controller and a USB cable for charging. The Xbox One Play & Charge Kit also comes as a bundle with the standard controller and offers a small savings over buying each item separately.
Other rechargeable options include the Energizer 2X Charging System, Energizer Power & Play Charging System, and the Nyko Charge Base, each of which comes with battery packs for two controllers as well as a stand to dock the controllers for charging.
Perhaps even more exciting, there are also some specialty controllers that are worth checking out, such as arcade sticks and steering wheels. Naturally, neither option is ideal for every game, but for specific genres. For example, the arcade stick is excellent for fighting games and the steering wheel is great for racing games. When playing games in these genres, the specialty controllers make a huge difference.
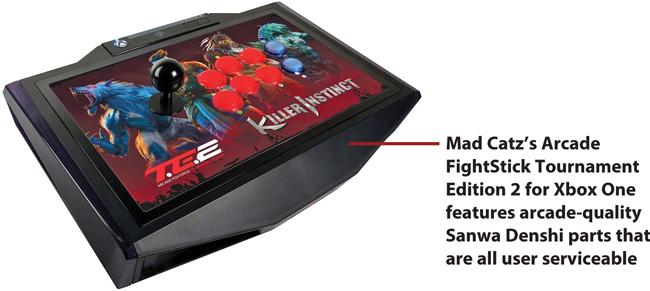
A good arcade stick option is the Mad Catz Arcade FightStick Tournament Edition 2 for Xbox One. Besides the Killer Instinct-themed artwork, you’ll also take notice of the high-quality components and arcade authentic control layout.
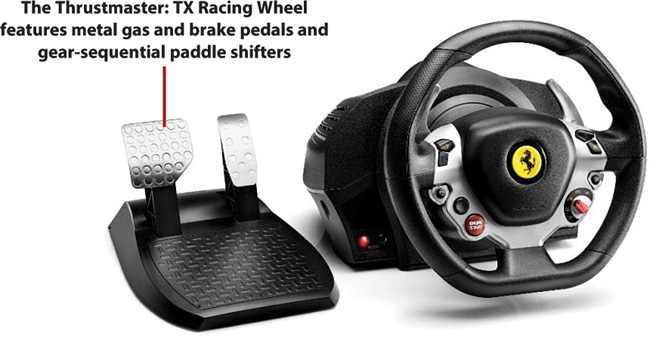
A superior steering wheel control option is the Thrustmaster: TX Racing Wheel, Ferrari 458 Italia Edition. Although the name is a mouthful, you won’t have too much time to think about it as you feel the powerful force feedback effects when tearing around the track in your favorite racing game.
Although every Xbox One game is optimized for use with the standard wireless controller or Kinect, many computer gamers still swear by the extra precision that a mouse and keyboard provide. For this group, IOGEAR offers the KeyMander, which enables you to configure a standard USB mouse and keyboard to control your favorite games.
Keyboards
It’s only Chapter 4 and you’ve probably already become frustrated by how tedious it can be to enter text using the controller. Although SmartGlass, which is covered in Chapter 11, “Looking Through the SmartGlass,” is a rather sophisticated alternative, a good old-fashioned USB keyboard still makes for a nice option.
The USB ports on your console are ideal for plugging in standard USB keyboards, like the one you probably use with your computer. The best part is that you don’t have to do anything extra to make them work after you plug them in. You can even go wireless, using your keyboard’s wireless USB adapter (if it has one) as long as the Xbox One recognizes the particular keyboard make and model. (Most models from Microsoft and Logitech do work with the Xbox One.)
Universal Remotes
Even though Kinect paired with the standard wireless controller that comes with your system does a fine job when it comes to navigating menus and, of course, playing games, it’s not quite as intuitive for controlling music and videos. That’s where a universal remote might come in handy. Using your system’s IR receiver, a compatible remote control will let you easily do things like play, pause, and rewind your media, as well as duplicate many of the functions found on the standard controller, like the Xbox button.
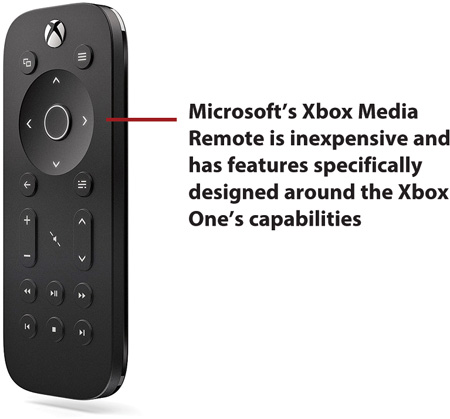
At launch, there was no official solution from Microsoft, but the popular Logitech Harmony line of remotes immediately provided compatible codes. In the spring of 2014, Microsoft finally released its own media remote, which provides quick access to OneGuide, DVD and Blu-ray video, streaming video, apps, TV power, and volume controls.
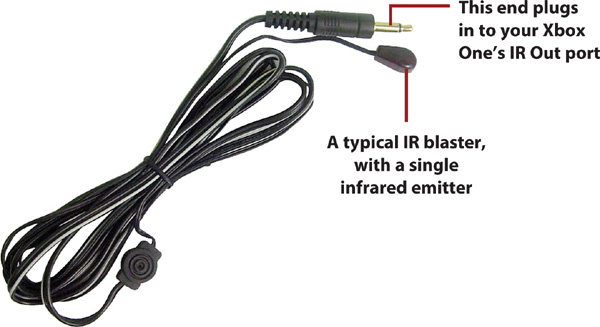
Of course, thanks to Kinect, your Xbox One also acts like an IR blaster, capable of sending its own control commands throughout your room to your television or sound system. This functionality can be further enhanced by connecting a physical IR blaster to the IR Out on the back of your console, which can be used to reach components that otherwise might be blocked from view. IR blasters typically vary only by cable length and number of emitters, and are a great way to reach components that Kinect would otherwise have trouble targeting.
Headphones and Speakers
Your Xbox One supports a nice range of sound output options, including uncompressed stereo and 5.1 (five speakers plus one subwoofer) and 7.1 (seven speakers plus one subwoofer) surround formats. If your TV speakers lack punch, a wide range of headphones and speaker systems—including everything from single soundbars to multispeaker extravaganzas—will help you take better advantage of your Xbox One’s impressive audio capabilities. As a nice bonus, if you hook your cable or satellite receiver box into your Xbox One, you can hear its output through not only the Xbox One’s HDMI Out, but also its S/PDIF optical audio port at the same time. This means that if you have headphones or a headphone receiver plugged in to the Xbox One’s S/PDIF port, you’ll not only hear the Xbox One’s output but also that of your cable or satellite box, all without disturbing the audio that’s output over HDMI.
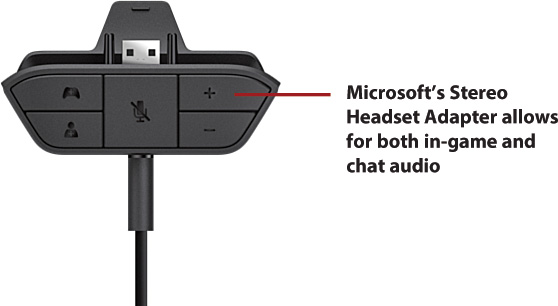
Perhaps the most convenient headset option is Microsoft’s Xbox One Stereo Headset, which comes with the Stereo Headset Adapter. The Stereo Headset Adapter plugs in to the bottom of the standard wireless controller and has touch button controls that let you balance game and chat audio levels, control the master volume, and mute the microphone. The Stereo Headset Adapter is also available for purchase separately and lets you use your own compatible stereo headset, though one with a microphone is required for chat.
Three of the better officially licensed headphone options are the Polk Audio 4Shot and the Turtle Beach Ear Force XO SEVEN and FOUR. The wireless Polk Audio 4Shot comes in a variety of colors, features a retractable boom microphone for chat, and also works with other devices, like tablets, smartphones, and computers. The two Turtle Beach options have a similar feature set as the 4Shot, though they have removable boom microphones and only come in black. Although the FOUR’s audio capabilities are not quite as immersive as the 4Shot or SEVEN, it’s approximately $50 cheaper and still sports a nice range of features and an impressive 15 hours of battery life.

In terms of speaker systems, there are literally dozens of quality options for every budget and desire in a wide range of configurations. Although there is no particular need to go with an officially licensed speaker, the Polk N1 SurroundBar—available in both black and white—is a single, compact unit with full-range Dolby Digital surround support, four different audio modes, and Bluetooth compatibility so that it can be used with other devices. Although nothing beats having seven real speakers and a subwoofer, for those who don’t want to deal with the clutter (or expense), the Polk N1 SurroundBar is a fine alternative.
Networking Enhancements
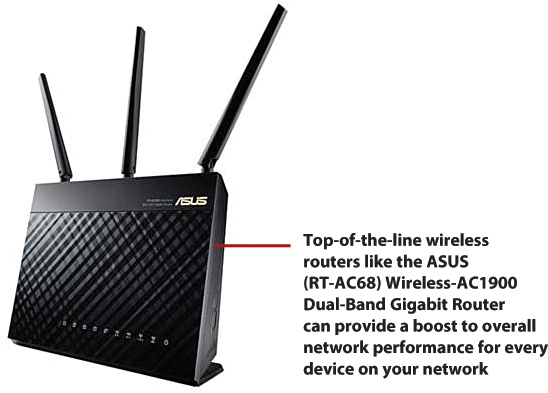
Thanks to the Xbox One’s Gigabit networking port, the ideal scenario for making the fastest network connection is always to run an Ethernet cable directly from your console to an Ethernet jack, router, or cable or DSL modem. Unfortunately, the reality is most homes are not set up to support a wired connection. If you haven’t already, investing in a wireless router that works on the Wireless-N (802.11n) standard and operates on the 5-GHz frequency will give the best wireless performance. Dual-band routers offer more flexibility, operating in the 2.4-GHz band for longer range and to support older devices, as well as the 5-GHz band for less interference. Although the Xbox One does not support the newest wireless standard, 802.11ac, many such routers do have other useful features, such as signal targeting that can help boost overall performance.
If you find that environmental factors cause your wireless connection to be sluggish or inconsistent, and you can’t run Ethernet cable, you should consider investing in a Powerline AV Network Kit. These easy-to-use devices enable you to create a high-speed network connection anywhere in your home via an adaptor that gets plugged in directly to any electrical wall outlet. One adapter gets plugged in to an electrical outlet near your console, and another adapter gets plugged in to an electrical outlet near your router. Most of these setups allow several additional adapters to be added to the mix for other devices that also have a networking port, and some adapters even have multiple input ports. Many quality brands are available, including from Linksys (Powerline), Actiontec (PWR511K01), NETGEAR (Powerline), and D-Link (PowerLine).

Security Locks
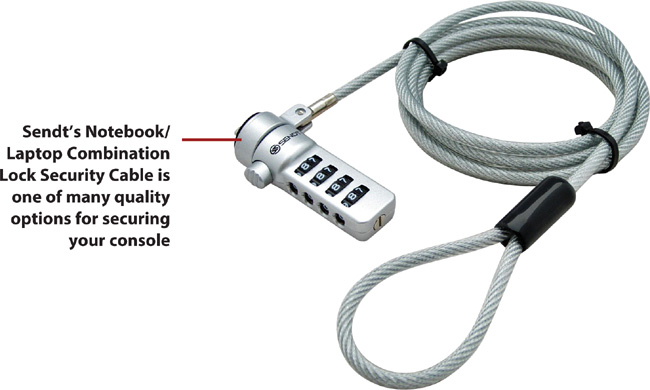
If you’re ever concerned about the security of your Xbox One, say if it’s in a dorm room or some other public location, your console’s lock port has you covered. Known popularly as a laptop (or notebook) security cable, these handy devices are usually nothing more than some type of reinforced cable with either a key or combination lock attached, which snaps into the Xbox One’s lock port. The cable is then secured to some type of heavy, reinforced structure, like a table leg. Kensington, which originally designed this type of antitheft system (Kensington Security Slot and Lock), and Sendt make some of the more popular and best-reviewed devices.
Kinect Accessories
Now that Kinect is such an integral part of the Xbox experience, it’s only natural that it too has room for improvement in less-than-ideal situations. For instance, if you have a projector screen or otherwise have nowhere to safely place your Kinect sensor, you might want to try a tripod with a camera mount. Although a standard tripod will work just fine, Foamy Lizard’s Kinect Floor Stand for Xbox One is purposely built to an ideal 2-foot height.

A more direct solution is the PDP Kinect TV Mount, which enables you to securely mount the Kinect to the top of most flat-panel televisions. Its telescoping arm accommodates most TV widths, plus it even comes with a privacy cover that blocks Kinect’s cameras for times when you want to be absolutely certain of your privacy.
Similarly, if you’d prefer to mount your Kinect securely to a wall, Foamy Lizard and LETECK both make wall mounts, with the latter also supporting a second configuration—television placement—just like PDP’s device. Foamy Lizard also sells a privacy shield by itself.