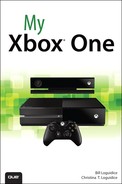
1. Setting Up Your Xbox One
In this chapter, you learn about setting up and starting to use your Xbox One and its related attachments and components.
→ Making a Home for Your Xbox One
→ Setting Up a Cable or Satellite Connection
→ Connecting Additional Controllers
In this chapter, you learn about positioning and setting up your Xbox One console, Kinect, and other components, such as the wireless controller. This setup includes connecting to your home network and cable or satellite receiver box, as well as configuring key settings. Luckily, none of this is particularly difficult, so you’ll be on your way to playing games, watching videos, and having all kinds of other Xbox One fun in no time.
Making a Home for Your Xbox One
If you read this book’s Prologue, “Getting to Know the Xbox One,” you have a good handle on all of your Xbox One’s parts, so now it’s just about time to hook up everything so that you can start enjoying your new system. That process won’t take long, provided you secure a proper place for your console, power supply, and Kinect and don’t have to move heavy furniture or lots of dusty knickknacks out of the way.
Many wall units or entertainment centers that have their component shelves behind glass or wooden doors don’t make good homes for sensitive electronic equipment like the Xbox One. Many times, the only available air holes are circular cutouts in the back of the unit or center for cable routing. If you have a unit or center like this, at minimum, increase the number of air holes, or optimally, place the Xbox One in a more open area.

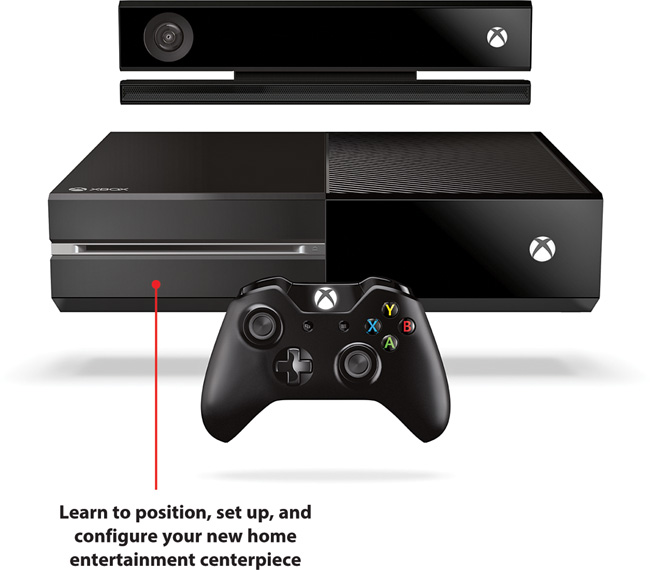
Unlike the Xbox 360, which could be placed vertically, the Xbox One is designed for only horizontal placement on a flat, stable surface so that the console doesn’t wobble. The console’s cooling vents should have sufficient clearance for proper airflow. Similarly, to maximize air ventilation and minimize heat, the Xbox One should not be placed on any objects nor have any objects placed on it.
The included HDMI cable is approximately 6.5 feet long (2 meters), so your console must be well within that distance of your television’s or sound system’s HDMI input. If you plan to connect your cable or satellite receiver box to your Xbox One’s HDMI In, it also must be within range of your console. Under that scenario, where the HDMI connection already exists for your cable or satellite box, you can simply unplug the existing HDMI cable from the back of your box and plug it in to the Xbox One’s HDMI Out. You can then use the Xbox One’s included HDMI cable to go from the cable or satellite receiver box’s HDMI Out into the console’s HDMI In.
Need More Length?
Longer HDMI cables are available from a variety of retail outlets. These cables should work just as well as the high-quality HDMI cable that’s included with your Xbox One as long as it’s of reasonable quality and doesn’t exceed 25 feet in length.
The Xbox One’s external power supply features a built-in fan and has similar ventilation requirements as the console. Ideally, you should plug in the power cord to a grounded, surge-protected power strip or equivalent, but any open outlet will suffice.

The Kinect sensor has a 9-foot (3-meter) cable that plugs in to the Kinect port on the back of the console. Because there is no way to extend the cable’s length, the Kinect must be well within 9 feet of the console. Like the console, the Kinect sensor must be placed horizontally on a level, stable surface with plenty of ventilation. The Kinect sensor also must have an unobstructed view of your play space and floor.
Kinect should be between 2 and 6 feet (0.6–1.8 meters) from the floor. Because of its wide-angle lens, its capability to see your play space generally improves the higher it’s placed. Although the Kinect sensor can be positioned below your television, ideal placement is approximately 6 inches (15 centimeters) above your display (see “Accessorizing Your Xbox One” in Chapter 4, “Personalizing Your Xbox One Experience,” for television-mounting options). Whenever possible, have the Kinect sensor avoid direct sunlight, which might impair its tracking capability. Similarly, try to keep the sensor at least 1 foot away from any speakers, which might impair its capability to hear voice commands.
Hook Up Your Xbox One
Now that you’ve secured positions for your Xbox One, power supply, and Kinect, it’s time to get it all connected. Follow these steps:
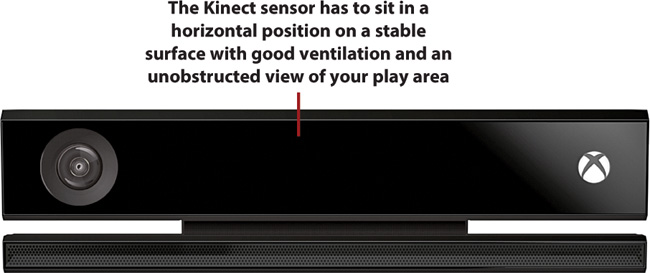
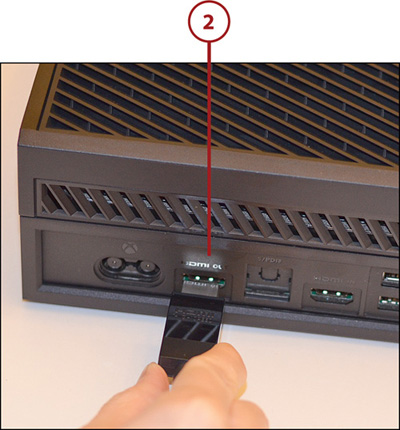
1. Remove the stickers from the front and back of the console.
Sticker Removal
You might find it odd to remove the rear sticker, what with the helpful labels above each port, but this recommendation comes straight from Microsoft.
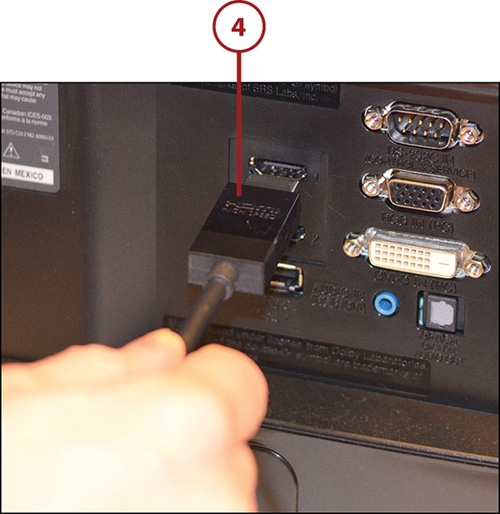
2. Connect the included HDMI cable to the HDMI Out port on your console. Alternatively, if you’re connecting your cable or satellite receiver box to your Xbox One, unplug the HDMI cable from the HDMI Out on the box and plug it in to the HDMI Out port on your console.
If you’ve connected your cable or satellite receiver box, proceed to step 3; otherwise, proceed to step 4.
Before You Connect
Make sure to remove the protective plastic from both ends of the included HDMI cable before you connect it.
3. Connect the included HDMI cable to the HDMI Out of your cable or satellite receiver box to the HDMI In on the console. Proceed to step 5.

4. Plug in the other end of the HDMI cable connected to the console’s HDMI Out to an HDMI input on your television or sound system.
If you have a sound system that only supports S/PDIF, connect an optical audio cable (not included) from the Xbox One’s S/PDIF output to the sound system’s input.
5. If you are connecting your Xbox One directly to a cable modem, network port, or router, connect a networking cable (not included) from an open port on the respective device to the console’s networking port. Otherwise, if you plan on using the Xbox One’s wireless networking option, proceed to step 6.

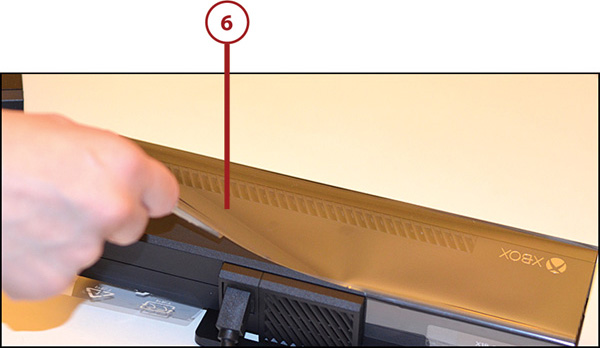
6. Remove the protective plastic from the Kinect sensor and power supply as well as the end cap from the Kinect’s cable.
7. Connect the Kinect’s cable to the console’s Kinect port.

8. Plug in the power supply to the power supply port on the console.
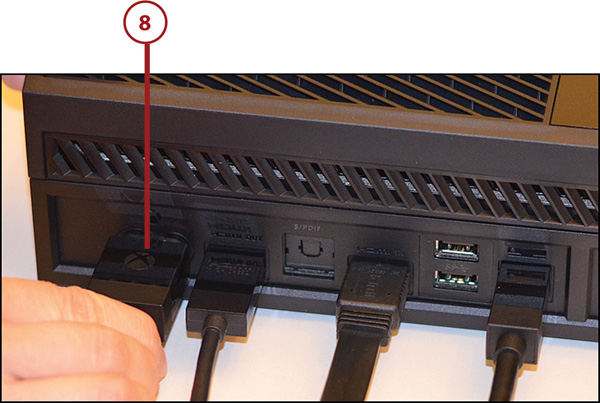
9. Plug in the power cord to the power supply.

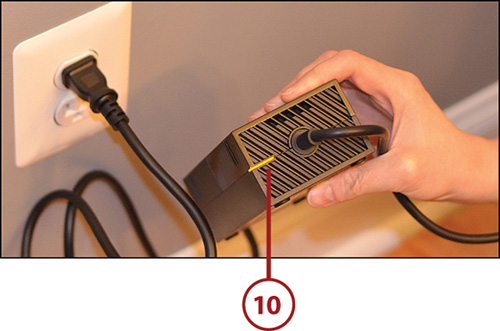
10. Plug in the other end of the power cord to an electrical outlet. The LED on the power supply should be amber, indicating that there’s power but the console is not yet turned on.
Power On for the First Time
Now that all of the necessary connections have been made, it’s time to power on for the first time and begin the onscreen setup. Follow these steps:
1. Turn on your television and sound system (if applicable). Make sure your display is on the same input that the Xbox One is connected to (usually HDMI 1).
If you connected your Xbox One to a sound system over S/PDIF, make sure the sound system is also on the correct source.
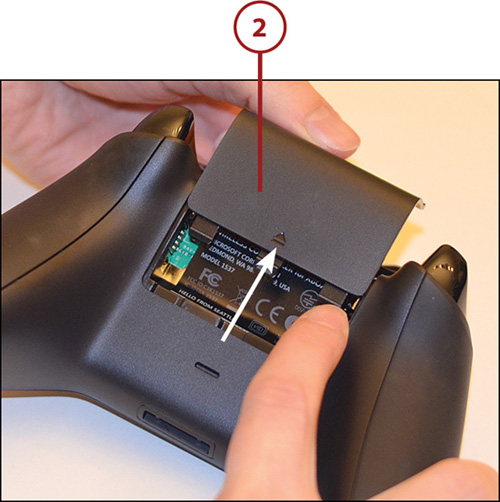
2. Remove the battery cover on the wireless controller, insert the included AA batteries with the correct polarity (+/-) into the battery compartment, and replace the battery cover.
3. Press the Xbox button on the controller. Your console turns on.

4. After a short loading sequence, the controller activation screen appears. Press the A button on your controller.

5. Move the D-pad or left stick up or down if you need to select a language other than English. Press the A button when your chosen language is highlighted to select it.

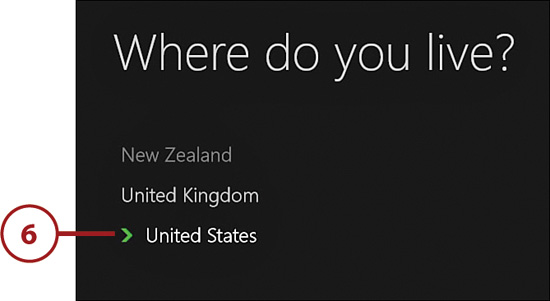
6. Move the D-pad or left stick up or down the list of countries and press the A button when your chosen country is highlighted.
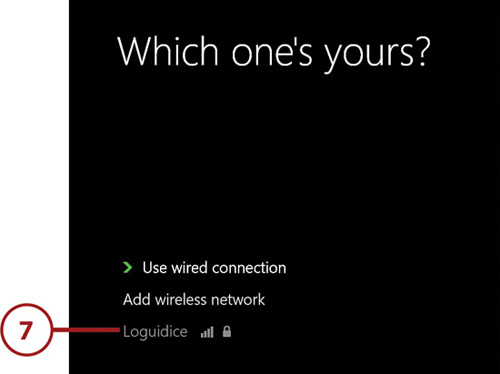
7. Press the A button to continue. If you are using a wired connection, proceed to step 10. If you are using a wireless connection, move the D-pad or left stick up or down to select an available wireless network. If your wireless network is not listed, for instance if its SSID is set to hidden, select Add Wireless Network to manually enter its name. Once your selection is highlighted, press the A button.
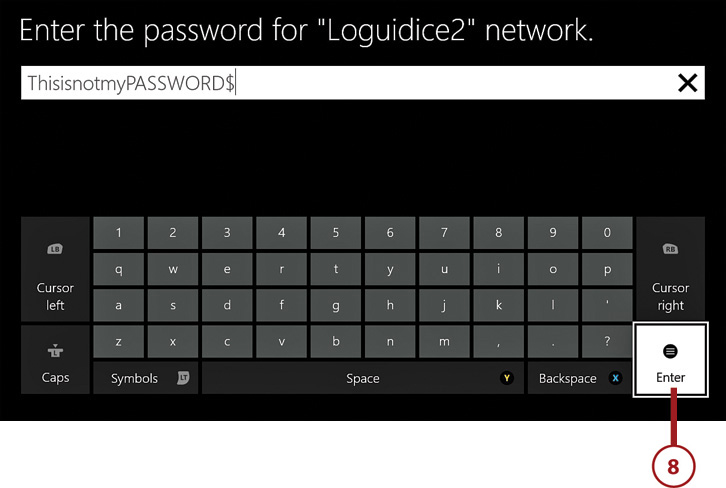
8. Enter your network’s password using the D-pad or left stick, selecting each letter with the A button. Press the left stick like a button to turn on capital letters, and use the left trigger to turn on symbols. Press either one again to go back to regular lowercase text input. When you are finished entering your password, press the Menu button or select Enter on the onscreen keyboard.
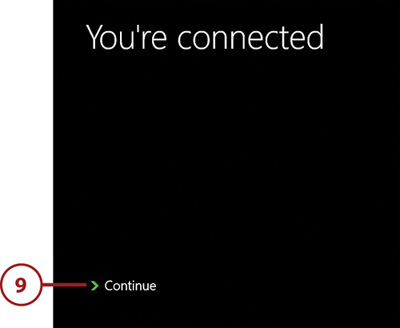
9. If you successfully connected, you’ll see You’re Connected. Press the A button to continue; otherwise, press the B button to go back and try again.
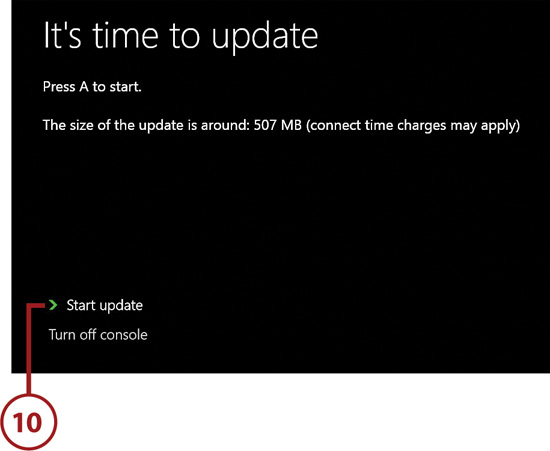
10. Press the A button to start the system update, which ensures your new console has access to all of the latest system features. Your screen might temporarily go black and your console might restart one or more times during the update.
11. After your console restarts and prompts you onscreen, press the Xbox button on your controller.

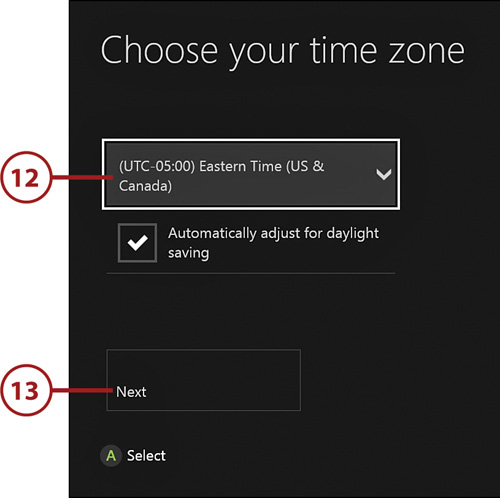
12. Press the A button to select your time zone. Move up and down between the selections with the D-pad or left stick. Press the A button to make your selection.
13. Use the D-pad or left stick down to select Next. Press the A button.
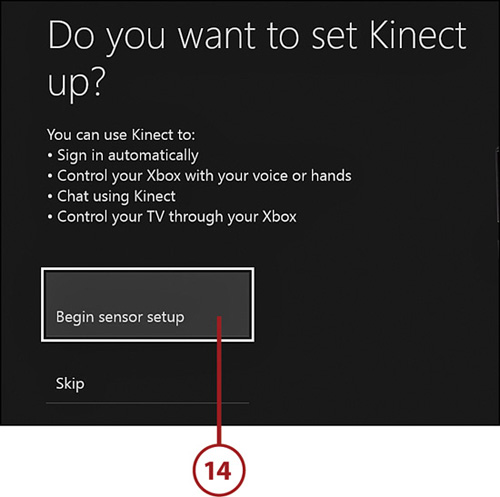
14. To begin Kinect setup, press the A button, then continue to the next step. If you don’t want to set up Kinect, select Skip instead and skip to step 17.
15. Position yourself so that Kinect can see you. Press the A button.

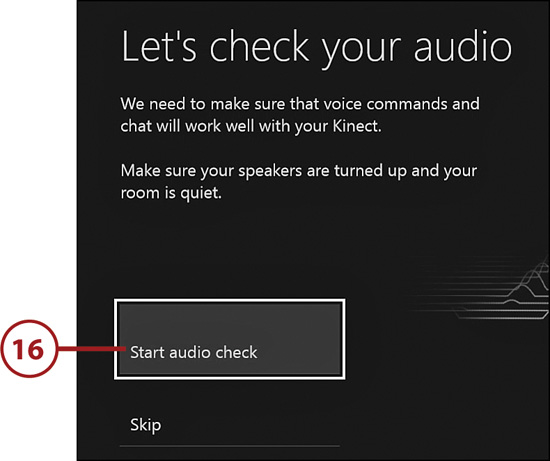
16. Make sure your speakers are turned up to above normal levels. Press the A button to begin the audio check. Try to stay as quiet as possible for each consecutive test. When the audio tests are complete, press the A button twice to proceed to setting up an account.
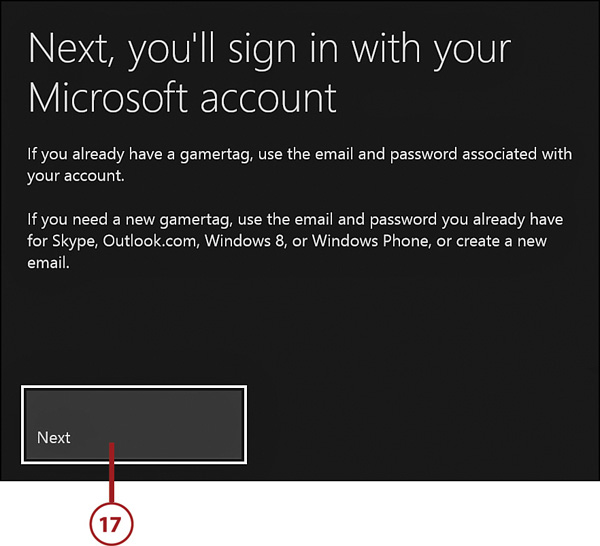
17. Press the A button to continue sign-in with either an existing or new Microsoft account. Valid accounts include Microsoft products and services like Xbox Live, Skype, Outlook.com, Hotmail.com, Live.com, Windows Phone, and Windows 8, though email addresses from other services will also work.
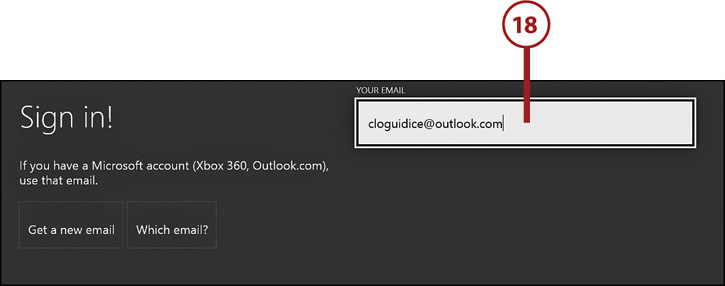
18. Use the onscreen keyboard to enter your credentials from an existing Microsoft account. If you don’t have a Microsoft account, enter your main email address from any other email service, which then becomes associated with a new Microsoft account. Press the Menu button or select Enter on the onscreen keyboard to proceed.
If you’d rather get a new email address to use for your Microsoft account, press the B button on the controller and select Get a New Email to open a new Outlook.com email account.
Follow the remaining onscreen prompts and instructions.
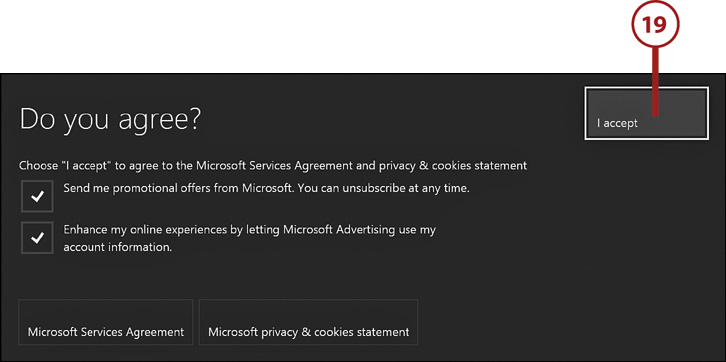
19. Read and accept the Xbox Terms of Use and privacy statement. Decide whether to enable or disable the sending of promotional offers and the sharing of your contact info. When you’re satisfied with the settings, select I Accept. Do the same for the privacy statement that appears next.
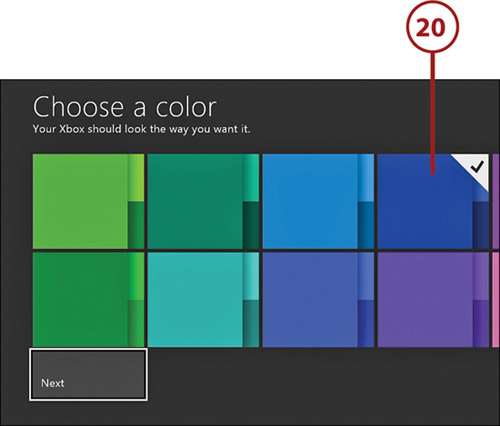
20. Choose a color theme (this can be changed later; see “Customizing Your Profile” in Chapter 4 for more information), then select Next.
21. You see how you appear on this Xbox One console and when connected on Xbox Live. The gamerpic and gamertag can be changed later (see Chapter 4). Select Next.

22. If you’re concerned about the security of your Xbox One at your present location, select Keep Asking for My Password. Otherwise, select Save My Password, which automatically logs you in.
If you do decide you want additional security, you can create a six-digit passkey later on (see “Changing the Console Settings” in Chapter 2).

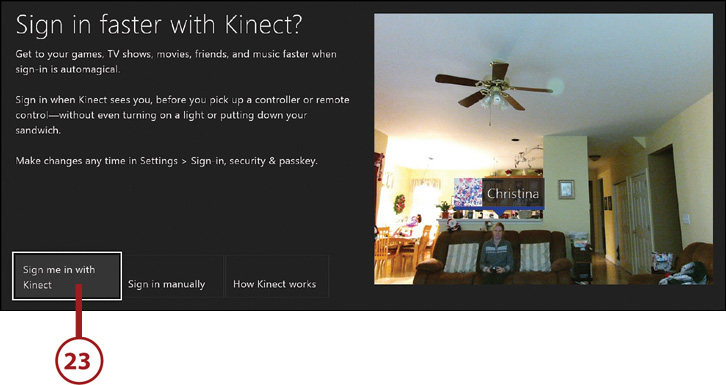
23. Choose to automatically or manually sign in with Kinect. Choosing to sign in automatically with Kinect enables your Xbox One to recognize and log you in when you enter the room. If you choose this option, you are asked to verify that the sensor has identified you.
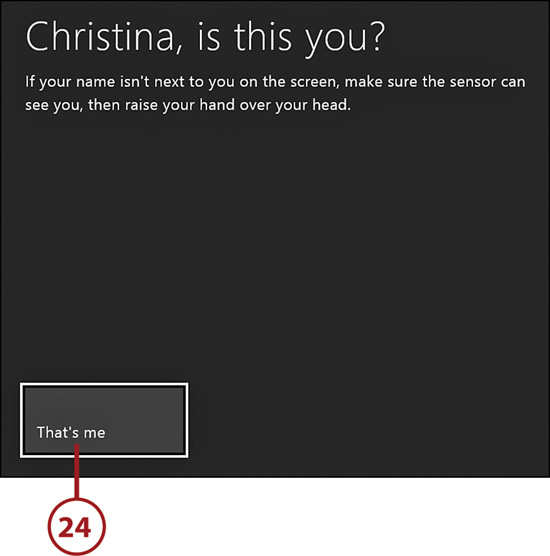
24. Select That’s Me after you’re successfully identified. If you’re not immediately recognized, raise your hand above your head.
25. Press the A button to continue past the Xbox Live Gold preview screen.
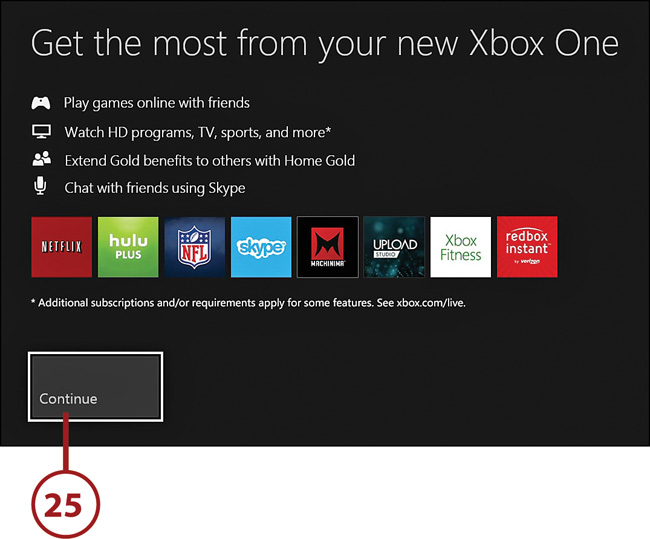
26. Decide which Xbox Live Gold membership term you’d like (see Chapter 3, “Examining Xbox Live,” for more on Xbox Live Gold). Your console most likely came with a promo code for a free trial period (typically 14 days), which can be activated by selecting Use a Code and following the instructions. If you don’t want to activate Xbox Live Gold, select No Thanks, which gives you an Xbox Live Free account and restricts many of the console’s online features.

Already Golden?
If you already have an Xbox Live Gold account associated with an Xbox 360, you can continue to use that account for your Xbox One.
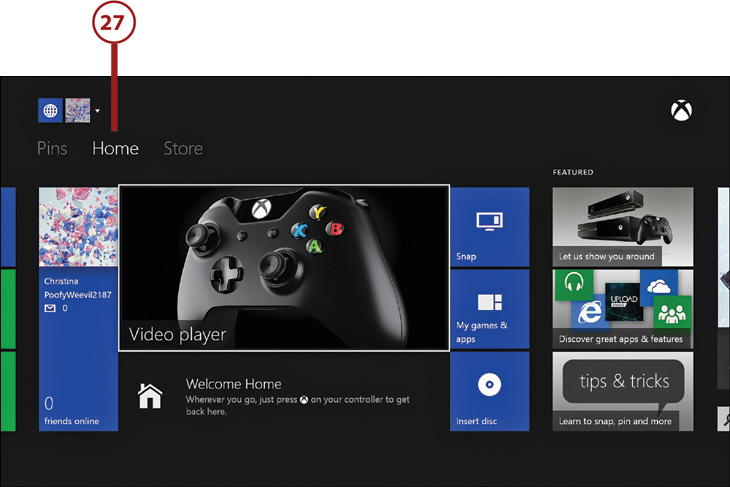
27. A short introductory video plays. When it’s finished, press the Xbox button to go to the Home screen, or simply wait for it to appear. Congratulations, you are now at the Home screen and ready to enjoy your new Xbox One!
Playing Discs
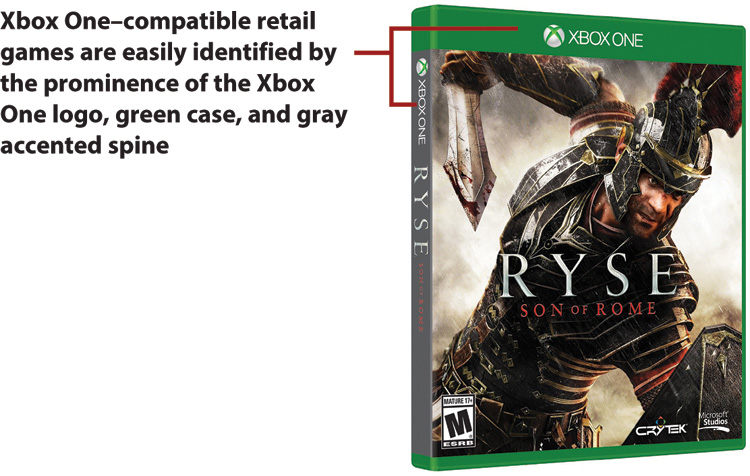
Your Xbox One can play game discs licensed by Microsoft specifically for this platform (see Chapter 5, “Getting Your Game On,” for additional information); region 1 DVDs, which are sold in the United States, Canada, Bermuda, and U.S. territories, and region A/1 Blu-rays, which include most of the Americas, as well as many East Asian and Southeast Asian territories (see “Playing DVDs and Blu-rays” in Chapter 7, “Viewing Videos and Video Content,” for additional information); and any CD music/audio discs (see “Streaming Your Personal Music Library” in Chapter 8, “Tuning In to Music,” for additional information).
Never move your Xbox One with a disc inside, because there is a risk of the disc getting scratched by the console’s optical drive, rendering the disc unusable and possibly damaging the inside of your console.
Insert and Remove Discs
When handling your discs, try not to touch the unlabeled side. A disc should always be grasped by its outer edges or center hole area.
Insert the disc in the disc slot with the label side up until you start to feel a slight resistance. The Xbox One automatically pulls in the disc the rest of the way.

If it’s a game, the disc either begins installing onto the hard drive if this is the first time the game is being used, or begins playing if it was previously installed onto the hard drive. If it’s a video or music disc, the disc either begins installing the appropriate app if this is the first time you’re using a particular format, or, if the app was previously installed, it begins playing.
If you want to eject a disc, press the Eject button on the front of the console.
You can eject a disc at any time, but you might lose unsaved data. Try to quit whatever related activity you’re doing before ejecting a disc.
Although your Xbox is a well-built piece of electronic equipment, you might at some point find yourself with an eject command that doesn’t function properly. This can be especially disconcerting if your favorite game or movie is stuck in there, but don’t fret. It’s possible to reclaim your disc. All you need to accomplish this feat is a straightened paper clip.
Manually Eject Discs
If your disc gets stuck, disconnect your console from the power cord and any other cables, and then follow these steps to reclaim it from your console:
1. Locate the yellow sticker behind the ventilation vents on the left side of the console.

2. Insert the straight end of a paper clip into the eject hole, which is next to the yellow sticker.
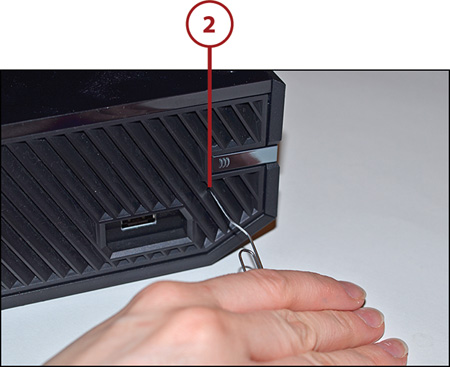
3. When the disc pops out slightly, use your fingers to pull the disc out the rest of the way. At this point, you can reconnect your console.
Check It Out
After you remove the stuck disc, be sure to check whether it’s undamaged, with its label intact and no stickiness present. If the disc is damaged in any way, do not place it back into your Xbox One. Instead, seek a replacement.
Setting Up a Cable or Satellite Connection
When your cable or satellite receiver box is connected to the HDMI input on your Xbox One, there are only three additional prerequisites for getting the most out of your TV-viewing experience. First, as with most Xbox One features, you need an active Xbox Live Gold membership (see Chapter 3). Second, you need an active Internet connection to download channel lineup information for the OneGuide, which is how you control and select TV from your Xbox (see “Working with OneGuide” in Chapter 7). Finally, you need to make sure Kinect is plugged in and active to send infrared (IR) commands to your television and cable or satellite receiver box.
Begin First-Time Setup
To begin first-time TV setup, follow these steps:
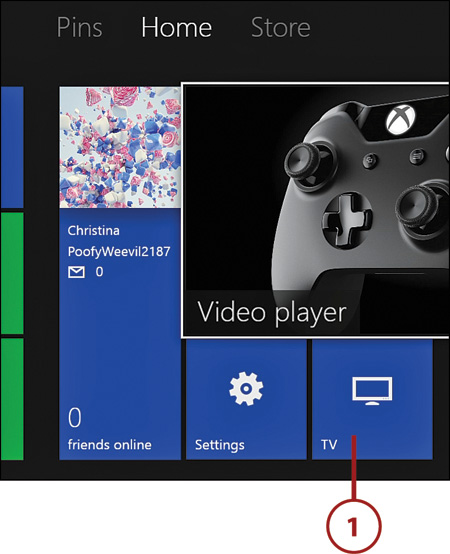
1. Select the TV tile. If it’s not on the Home screen, find it under My Games & Apps.

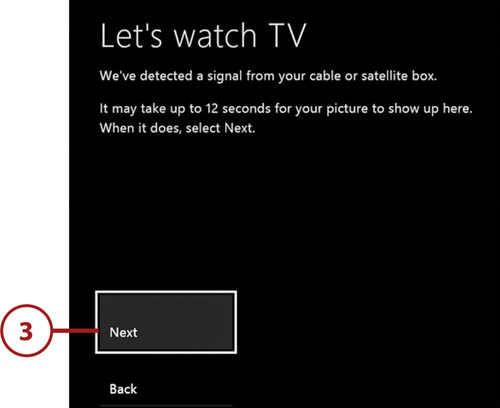
3. When the Xbox One detects a signal from your cable or satellite receiver box, select Next.
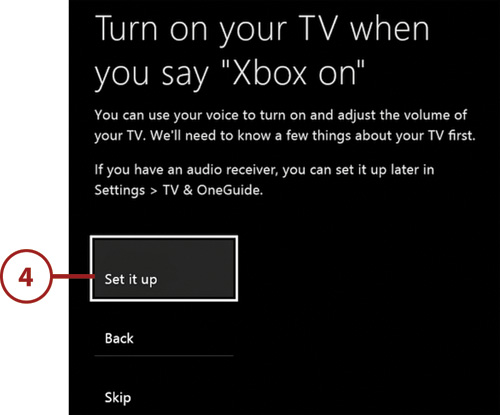
4. Select Set It Up if you want to use your voice to turn on and adjust the volume of your TV, then proceed to the next step. If not, skip to step 13.
5. Select the brand of your television. If you don’t see your brand in the drop-down list, select I Don’t See My Brand and enter the brand manually.
6. Select Next.

7. Select Send Command to send the Mute command to your TV. This should mute your TV.
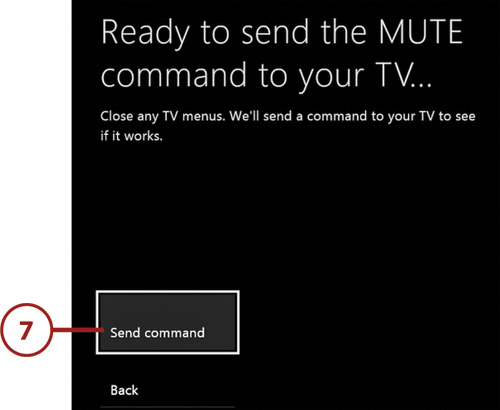
8. If the Mute command worked, select Yes. Otherwise, select No to try again. If you’re not sure, select I’m Not Sure, Try Again, which will send the same command.

9. Select Send Command to test whether the Info/Display command works.
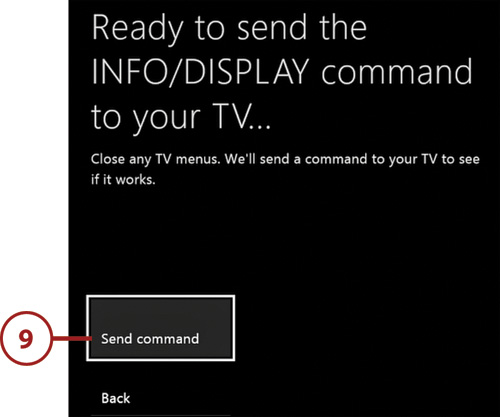
10. If the Info/Display command worked, select Yes; otherwise, select No to try again. If you’re not sure, select I’m Not Sure, Try Again, which will send the same command.

11. Select Send Command to test whether the Menu command works.

12. If the Menu command worked, select Yes; otherwise, select No to try again. If you’re not sure, select I’m Not Sure, Try Again, which will send the same command.

Trouble with IR
For troubleshooting issues about sending IR commands, refer to https://support.xbox.com/en-US/xbox-one/live-tv/troubleshoot-oneguide.
13. Select Set Up OneGuide to access TV listings for your cable or satellite system.

14. Enter your ZIP code.

16. Select Next.
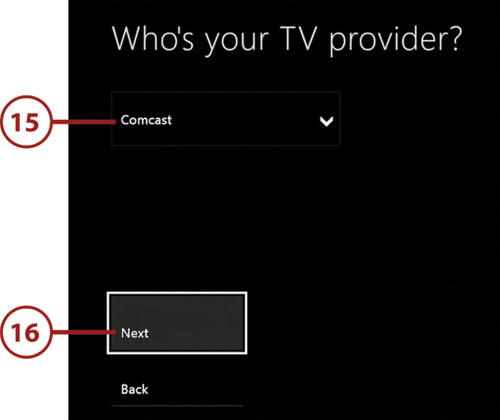
TV Provider Not Listed?
If your TV provider is not listed, it might not yet be compatible with Xbox One. Refer to http://forums.xbox.com/xbox_forums/xbox_support/tv_hardware/default.aspx for more information on possible workarounds or solutions.
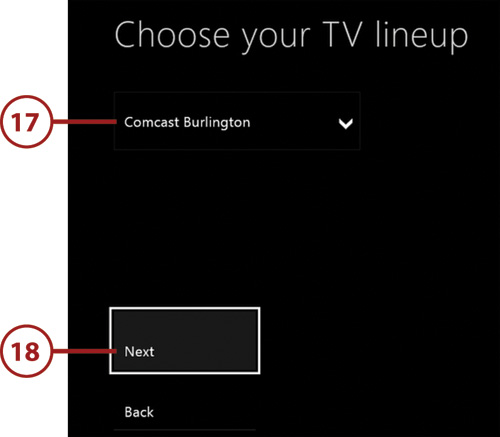
17. Select your TV lineup.
18. Select Next.
19. Enter the brand of your cable or satellite receiver box.

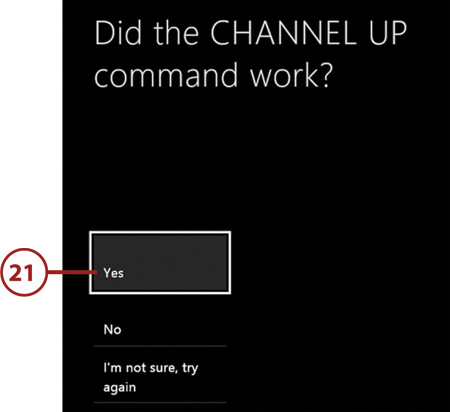
20. Close any menus on your cable or satellite receiver box with your cable or satellite remote. Select Send Command.

21. If the Channel Up command worked, select Yes; otherwise, select No to try again. If you’re not sure, select I’m Not Sure, Try Again, which will send the same command.
22. Select Yes if you want Microsoft to track the TV shows you watch so it can improve its TV program and movie recommendations. If not, select No.


24. Select Watch TV.

25. Your television is now full screen. Press the Xbox button on your controller to return to the Home screen.
Your cable or satellite receiver box is now configured to work with your Xbox One and Kinect. See “Working with OneGuide” in Chapter 7 for how to use the OneGuide. See “Display & Sound” in Chapter 2 if you need to set up control of an audio receiver (sound system).
Connecting Additional Controllers
Unless you’re perfectly content playing solo offline, you’ll want to add additional controllers to your console, or have the ability to connect your friends’ controllers to your console; up to eight controllers can be used, though most games don’t support that many players. There are three different ways to connect an additional controller or controller paired with a different console to your Xbox One: using Kinect (quickest), using the console’s Accessory Pairing button, or using an optional Micro-USB cable or Xbox One Play & Charge Kit.
Use Kinect
To use Kinect to connect a new controller, make sure your console is turned on and that the controller has battery power. Follow these steps:
1. Turn on your controller by pressing and holding the Xbox button until the controller turns on. The Xbox button pulses, indicating it is not yet paired.

2. Press and release the Connect button on the controller. The controller’s Xbox button flashes a few times as it searches for the console.

3. From anywhere in the room, point the front of the controller toward the Kinect. Once connected, the Xbox button lights solid white. Repeat this procedure for any additional controllers you would like to connect.

Use the Accessory Pairing Button
After turning on your Xbox One console and making sure the controller has power, follow these steps to connect another controller using the console’s Accessory Pairing button:
1. Turn on your controller by pressing and holding the Xbox button until the controller turns on. The Xbox button pulses, indicating it is not yet paired.
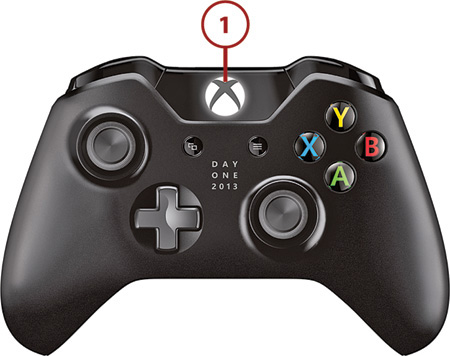
2. Press and release the Accessory Pairing button on the side of the console.

3. Press and release the Connect button on the controller. This must be done within 20 seconds of step 2. The controller’s Xbox button flashes a few times as it searches for the console. When it’s connected, the Xbox button lights solid white. Repeat this procedure for any additional controllers you would like to connect.

Use a Micro-USB Cable
To pair a controller with the Xbox One over USB, simply connect a Micro-USB cable, which is the same type of cable that comes with the Xbox One Play & Charge Kit (see “Accessorizing Your Xbox One” in Chapter 4) and many mobile devices, to both the controller and an available USB port on the console. The controller is now paired with the console.

If no batteries or battery pack are installed in the controller, it will now function as a wired controller. If the controller has working AA batteries installed, or a rechargeable battery pack with a sufficient charge, the controller can now be unplugged from the newly paired console and used normally.
Setting Up Your Headset
The included Xbox One chat headset works great for party chat (see Chapter 6, “Making the Social Connection”) and intense, smack-talking online gaming sessions. It’s also easy to connect. Follow these steps:
1. Insert the expansion port connector on the headset into the bottom of the controller until it slides securely in place.

2. Adjust the height of the earpiece by sliding it up or down until it is comfortable.
3. Swivel the microphone so that the end is close to your mouth.
Understanding Your Warranty
The warranty period on your Xbox One console and Kinect is 1 year, and for other accessories is 90 days. During this time, you can return the console, Kinect, or other accessories to Microsoft for servicing free of charge, provided troubleshooting does not resolve your problem. However, before any service can be performed, you must register your console at https://myservice.xbox.com/. The same Microsoft account used to sign in to Xbox Live is required for registration, as well as your console or Kinect’s serial number.
To send your Xbox One, Kinect, or accessories to Microsoft for servicing after registration, visit http://www.support.xbox.com (U.S. residents only). Alternatively, you can call (800) 4MY-XBOX.
Extending Your Warranty
One way to extend your warranty is by purchasing Microsoft Complete after registration. As of this writing, extending your console’s and Kinect’s warranty to 3 years costs $69.99.
Servicing costs vary, but you can generally get a slightly reduced rate if you submit your request online rather than over the phone. Turnaround time on repairs varies by your state, but generally ranges between 12 and 19 days. When your console, Kinect, or accessories are no longer under warranty, you can still send them to Microsoft for servicing if any problems arise.