
22. Using Files and Folders
In this chapter, you see how to use File Explorer to manage the files and folders on your PC’s hard drive.
![]() Working with Microsoft OneDrive
Working with Microsoft OneDrive
All the data for documents and programs on your computer is stored in electronic files. A file can be a word processing document, a music track, a digital photograph—just about anything, really.
The files on your computer are organized into a series of folders and subfolders. It’s just like the way you organize paper files in a series of file folders in a filing cabinet—only it’s all done electronically.
Using File Explorer
You might, from time to time, need to work with the files on your computer. You might want to copy files from an external USB memory drive, for example, or move a file from one folder to another. You might even want to delete unused files to free up space on your hard drive.
When you need to manage the files on your Windows 10 computer, you use an app called File Explorer. This app lets you view and manage all the files and folders on your PC—and on connected devices.
There are a few ways to open File Explorer:
Click the File Menu icon on the taskbar.
Click the Start button to open the Start menu, click the Windows System folder, and then click File Explorer.
Right-click the Start button to open the Options menu; then click File Explorer.
Press Windows+E.
Navigate Folders and Libraries
All the files on your computer are organized into folders. Some folders have subfolders—that is, folders within folders. There are even sub-subfolders, and sub-sub-subfolders. It’s a matter of nesting folders within folders, in a kind of hierarchy. Naturally, you use File Explorer to navigate the various folders and subfolders on your PC’s hard disk.
![]() In File Explorer’s default view, Quick Access is selected and your most-used folders and documents are displayed. Double-click any item to view the contents.
In File Explorer’s default view, Quick Access is selected and your most-used folders and documents are displayed. Double-click any item to view the contents.
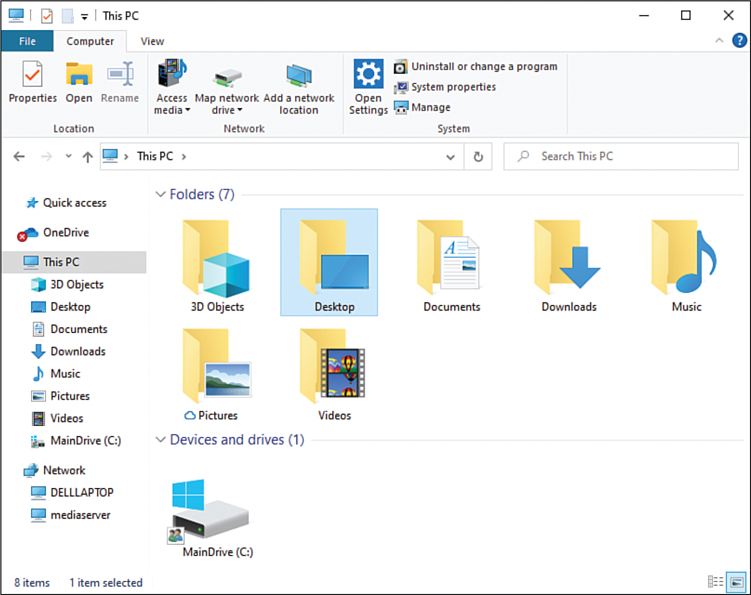
![]() A given folder may contain multiple folders and subfolders. Double-click any item to view its contents.
A given folder may contain multiple folders and subfolders. Double-click any item to view its contents.

![]() To move back to the disk or folder previously selected, click the Back button on the toolbar.
To move back to the disk or folder previously selected, click the Back button on the toolbar.
![]() To move up the hierarchy of folders and subfolders to the next highest item, click the up-arrow button on the toolbar.
To move up the hierarchy of folders and subfolders to the next highest item, click the up-arrow button on the toolbar.

Use the Navigation Pane
Another way to navigate your files and folders is to use the navigation pane on the left side of the File Explorer window. This pane displays both favorite links and hierarchical folder trees for your computer, libraries, and networks.
![]() Click the right arrow icon next to any folder to expand and display all the subfolders it contains.
Click the right arrow icon next to any folder to expand and display all the subfolders it contains.
![]() The right arrow changes to a down arrow. Click this to hide the expanded subfolders.
The right arrow changes to a down arrow. Click this to hide the expanded subfolders.
![]() Click an icon in the navigation pane to open the contents of the selected item.
Click an icon in the navigation pane to open the contents of the selected item.

Change the Folder View
You can choose to view the contents of a folder in a variety of ways. File Explorer lets you display files as Small Icons, Medium Icons, Large Icons, or Extra Large Icons. You also have the option of displaying files as Tiles, Details, or a List. There’s even a Content view that displays information about the file beside it.
![]() From within File Explorer, click the View tab on the ribbon bar.
From within File Explorer, click the View tab on the ribbon bar.

![]() Click Content to display files with content descriptions.
Click Content to display files with content descriptions.

![]() Click Details to display columns of details about each file.
Click Details to display columns of details about each file.

![]() Click List to display files in a simple list.
Click List to display files in a simple list.

![]() Click Tiles to display files as small tiles.
Click Tiles to display files as small tiles.

![]() Click Small Icons, Medium Icons, Large Icons, or Extra Large Icons to display files as icons of various sizes.
Click Small Icons, Medium Icons, Large Icons, or Extra Large Icons to display files as icons of various sizes.

Sort Files and Folders
When viewing files in File Explorer, you can sort your files and folders in a number of ways. To view your files in alphabetic order, choose to sort by Name. To see all similar types of files grouped together, choose to sort by Type. To sort your files by the date and time they were last edited, select Date Modified.
![]() From within File Explorer, click the View tab on the ribbon bar.
From within File Explorer, click the View tab on the ribbon bar.
![]() Click the Sort By button.
Click the Sort By button.
![]() Choose to sort by Name, Date Modified, Type, Size, Date Created, Authors, Categories, Tags, or Title.
Choose to sort by Name, Date Modified, Type, Size, Date Created, Authors, Categories, Tags, or Title.
![]() By default, Windows sorts items in ascending order. To change the sort order, click Descending.
By default, Windows sorts items in ascending order. To change the sort order, click Descending.

Different Sorting Options
Different types of files have different sorting options. For example, if you’re viewing music files, you can sort by Album, Artists, Bit Rate, Composers, Genre, and the like.
Working with Folders
Windows stores files in virtual folders. You can create new folders to hold new files, or rename existing folders if you like.
Create a New Folder
The more files you create, the harder it is to organize and find things on your hard disk. When the number of files you have becomes unmanageable, you need to create more folders—and subfolders—to better manage those files.
![]() From within File Explorer, navigate to the drive or folder where you want to place the new folder.
From within File Explorer, navigate to the drive or folder where you want to place the new folder.
![]() Click the Home tab on the ribbon bar.
Click the Home tab on the ribbon bar.
![]() Click the New Folder button.
Click the New Folder button.

![]() A new, empty folder appears with the filename New Folder highlighted. Type a name for your folder and then press Enter.
A new, empty folder appears with the filename New Folder highlighted. Type a name for your folder and then press Enter.

Rename a Folder or File
When you create a new folder, it helps to give it a name that describes its contents. Sometimes, however, you might need to change a folder’s name. You may also want or need to change the name of an individual file. Fortunately, Windows makes renaming an item relatively easy.
![]() Click the file or folder you want to rename.
Click the file or folder you want to rename.
![]() Click the Home tab on the ribbon bar.
Click the Home tab on the ribbon bar.
![]() Click the Rename button; this highlights the filename.
Click the Rename button; this highlights the filename.

![]() Type a new name for your folder (which overwrites the current name) and then press Enter.
Type a new name for your folder (which overwrites the current name) and then press Enter.

Keyboard Shortcut
You can also rename a folder or file by selecting the item and pressing F2 on your computer keyboard. This highlights the name and readies it for editing.
Managing Files
Tens of thousands of files are stored on a typical personal computer. From time to time, you might need to manage them in various ways. You can copy a file to create a duplicate in another location, or you can move a file from one location to another. You can even delete files from your hard drive, if you like. And you do all this with File Explorer.
Copy a File
Copying a file places a duplicate of the original file into a new location. There are many ways to copy a file in Windows; the easiest is to use the Copy To button on File Explorer’s Home ribbon.
![]() From within File Explorer, navigate to and click the item you want to copy.
From within File Explorer, navigate to and click the item you want to copy.
![]() Click the Home tab on the ribbon bar.
Click the Home tab on the ribbon bar.
![]() Click the Copy To button.
Click the Copy To button.

![]() Choose one of the recommended locations. Or…
Choose one of the recommended locations. Or…
![]() Select Choose Location (at the bottom of the pull-down menu). The Copy Items dialog box displays.
Select Choose Location (at the bottom of the pull-down menu). The Copy Items dialog box displays.

![]() Navigate to the new location for the item.
Navigate to the new location for the item.
![]() Click the Copy button.
Click the Copy button.

Primary Folders
To copy an item directly to one of the primary Windows folders, click either Documents, Music, Pictures, or Videos from the Copy To menu.
Move a File
Moving a file or folder is different from copying it. Moving cuts the item from its previous location and pastes it into a new location. Copying leaves the original item where it was and creates a copy of the item elsewhere.
![]() From within File Explorer, navigate to and click the item you want to move.
From within File Explorer, navigate to and click the item you want to move.
![]() Click the Home tab on the ribbon bar.
Click the Home tab on the ribbon bar.
![]() Click the Move To button.
Click the Move To button.

![]() Choose one of the recommended locations. Or…
Choose one of the recommended locations. Or…
![]() Select Choose Location at the bottom of the pull-down menu. The Move Items dialog box displays.
Select Choose Location at the bottom of the pull-down menu. The Move Items dialog box displays.

![]() Navigate to the new location for the item.
Navigate to the new location for the item.
![]() Click the Move button.
Click the Move button.

Delete a File or Folder
Keeping too many files eats up a lot of hard disk space on your computer—which can be a bad thing. Because you don’t want to waste disk space, you should periodically delete those files (and folders) you no longer need. When you delete a file or folder, you send it to the Windows Recycle Bin, which is kind of a trash can for deleted files.
![]() From within File Explorer, navigate to and click the item you want to delete.
From within File Explorer, navigate to and click the item you want to delete.
![]() Click the Home tab on the ribbon bar.
Click the Home tab on the ribbon bar.
![]() Click the Delete button.
Click the Delete button.

Other Ways to Delete
You can also delete a file or folder by dragging it from the File Explorer window onto the Recycle Bin icon on the desktop, or you can select it and press the Delete key on your computer keyboard.
Restore a Deleted File
Have you ever accidentally deleted the wrong file? If so, you’re in luck. Windows stores the files you delete in the Recycle Bin, which is actually a special folder on your hard disk. For a short period of time, you can “undelete” files from the Recycle Bin back to their original locations—and save yourself from making a bad mistake.
![]() On the Windows desktop, double-click the Recycle Bin icon to open the Recycle Bin folder.
On the Windows desktop, double-click the Recycle Bin icon to open the Recycle Bin folder.

![]() Click the file you want to restore.
Click the file you want to restore.
![]() Click the Manage tab on the ribbon bar.
Click the Manage tab on the ribbon bar.
![]() Click the Restore the Selected Items button.
Click the Restore the Selected Items button.

Empty the Recycle Bin
By default, the deleted files in the Recycle Bin can occupy 4GB plus 5% of your hard disk space. When you’ve deleted enough files to exceed this limit, the oldest files in the Recycle Bin are automatically and permanently deleted from your hard disk. You can also manually empty the Recycle Bin and thus free up some hard disk space.
![]() From the Windows desktop, double-click the Recycle Bin icon to open the Recycle Bin folder.
From the Windows desktop, double-click the Recycle Bin icon to open the Recycle Bin folder.

![]() Click the Manage tab on the ribbon bar.
Click the Manage tab on the ribbon bar.
![]() Click the Empty Recycle Bin button.
Click the Empty Recycle Bin button.

![]() Click Yes in the Delete Multiple Items dialog box to completely erase the files.
Click Yes in the Delete Multiple Items dialog box to completely erase the files.

Working with Microsoft OneDrive
Microsoft offers online storage for all your documents and data via its OneDrive service. When you store your files on OneDrive, you can access them via any computer or mobile device connected to the Internet.
Cloud Storage
Online file storage, such as that offered by OneDrive, Apple’s iCloud, and Google Drive, is called cloud storage. The advantage of cloud storage is that you can access files from any computer or other device at any location—work, home, or away. You’re not limited to using a given file on one particular computer.
Manage OneDrive Files on the Web
Because OneDrive stores your files on the Web, you can manage all your OneDrive files with your web browser, from any Internet-connected computer. Just launch your browser, go to onedrive.live.com, and sign in.
![]() Your OneDrive files are stored in folders. Click a folder to view its contents.
Your OneDrive files are stored in folders. Click a folder to view its contents.

![]() Click a file to view it or, in the case of an Office document, open it in its host application.
Click a file to view it or, in the case of an Office document, open it in its host application.
![]() To copy, move, rename, or delete a file, select the file and then choose the desired option from the toolbar.
To copy, move, rename, or delete a file, select the file and then choose the desired option from the toolbar.

Storage Plans
Microsoft gives you 5GB of storage in your free OneDrive account, which is more than enough to store most users’ documents, digital photos, and the like. If you need more storage, you can purchase 100GB of storage for $1.99 per month. (If you subscribe to Microsoft’s Office 365 Personal plan, you get 1TB of storage for free—and 6TB of storage if you subscribe to Office 365 Home.)
Manage OneDrive Files with the OneDrive App
Microsoft includes a OneDrive app with Windows 10, which you can also use to manage your files.
![]() When you launch the OneDrive app, you see all your OneDrive folders. Click a folder to view its contents.
When you launch the OneDrive app, you see all your OneDrive folders. Click a folder to view its contents.

![]() Click a file to view it or, in the case of an Office document, open it in its host application.
Click a file to view it or, in the case of an Office document, open it in its host application.
![]() To copy, move, rename, delete, or download a file, select the file and then select the action you want to perform from the toolbar.
To copy, move, rename, delete, or download a file, select the file and then select the action you want to perform from the toolbar.

Manage OneDrive Files with File Explorer
You can also use File Explorer to view and manage the files stored online with OneDrive.
![]() On your computer, open File Explorer and click OneDrive in the navigation pane. This displays all your OneDrive files and folders.
On your computer, open File Explorer and click OneDrive in the navigation pane. This displays all your OneDrive files and folders.
![]() Double-click to open a folder or file.
Double-click to open a folder or file.
![]() To manage your files, click any file and then click the appropriate option on File Explorer’s Home ribbon.
To manage your files, click any file and then click the appropriate option on File Explorer’s Home ribbon.

Upload a File to OneDrive
Any file on your hard drive can be uploaded to OneDrive for storage online.
![]() On the OneDrive website or in the OneDrive app, navigate to and open the folder where you want to store the file. (If you don’t select a folder, the file will be uploaded to the main OneDrive directory.)
On the OneDrive website or in the OneDrive app, navigate to and open the folder where you want to store the file. (If you don’t select a folder, the file will be uploaded to the main OneDrive directory.)

![]() Click Upload on the toolbar.
Click Upload on the toolbar.
![]() Click Files to display the Open dialog box.
Click Files to display the Open dialog box.

![]() Navigate to and select the file(s) you want to upload.
Navigate to and select the file(s) you want to upload.
![]() Click the Open button.
Click the Open button.

Download a File to Your PC
You can download files stored on OneDrive to your computer.
![]() On the OneDrive website or in the OneDrive app, select the file(s) you want to download.
On the OneDrive website or in the OneDrive app, select the file(s) you want to download.
![]() Click Download. When prompted to save the file, do so. (Unless you specify otherwise, files downloaded from OneDrive are saved into the Download folder on your computer.)
Click Download. When prompted to save the file, do so. (Unless you specify otherwise, files downloaded from OneDrive are saved into the Download folder on your computer.)

Synchronizing Files On-Demand
Windows 10 lets you work directly with files stored online with OneDrive without first having to download those files to your computer. This lets you access the same files from multiple computers and devices and have all your work show up on all your devices; when you make a change to a file from one computer or device, all other versions of the file automatically reflect that change. (You can also choose to download those files, if you want.)
Enabling Files On-Demand
Files On-Demand should be enabled by default. You can check this by right-clicking the OneDrive icon in the notifications area of the Windows taskbar and then clicking Settings; when the Microsoft OneDrive dialog box opens, select the Settings tab, go to the File On-Demand section, and select Save Space and Download Files as You Use Them.
To use Files On-Demand, open File Explorer, select OneDrive, and double-click to open a given file. The file opens from within its native application, and any changes you make are automatically saved to the master file on OneDrive.
You can view the status of all your OneDrive files from within File Explorer.
![]() From within File Explorer, click OneDrive. You can view the On-Demand status of each file from the Status column in Details view or next to the file name in any other view.
From within File Explorer, click OneDrive. You can view the On-Demand status of each file from the Status column in Details view or next to the file name in any other view.
![]() Online Only files are only available online in OneDrive.
Online Only files are only available online in OneDrive.
![]() Available on This Device files are stored on your computer.
Available on This Device files are stored on your computer.
![]() Always Available on This Device files are stored online but can be edited on your computer or other devices.
Always Available on This Device files are stored online but can be edited on your computer or other devices.

![]() To change the On-Demand status of any file, right-click that file to view the context menu.
To change the On-Demand status of any file, right-click that file to view the context menu.
![]() Select View Online to make a file Always Available.
Select View Online to make a file Always Available.
![]() Select Always Keep on This Device to make a file Locally Available.
Select Always Keep on This Device to make a file Locally Available.
![]() Click Free Up Space to make a file Online Only.
Click Free Up Space to make a file Online Only.
