
19. Storing, Editing, and Sharing Your Pictures and Movies

In this chapter, you find out how to transfer photos from your smartphone or digital camera to your Windows PC, how to edit those photos, and how to share them online with friends and family.
![]() Using Your Smartphone or Digital Camera with Your Windows PC
Using Your Smartphone or Digital Camera with Your Windows PC
![]() Viewing Photos and Videos on Your PC
Viewing Photos and Videos on Your PC
![]() Sharing Your Pictures and Videos
Sharing Your Pictures and Videos
If you’re like me, you take a lot of pictures and videos with your smartphone and digital camera. You can use your Windows 10 computer to store, edit, and share those photos with friends and family—online, over the Internet.
Using Your Smartphone or Digital Camera with Your Windows PC
The first step in managing all your digital photos is to transfer those pictures from your digital camera or smartphone to your computer. There are a number of ways to do this.
Transfer Photos from the Cloud
If you’re like me, you take most of your photos with your smartphone. It’s certainly more convenient to whip out your phone to take a quick picture than it is to lug around a digital camera everywhere you go.
The photos you take with a smartphone can be stored in one of two places by default. Almost all phones store photos on the phone itself, although it’s easy to run out of storage space if you take a lot of pictures. Most phones also offer the option of storing photos in the cloud, where they can be accessed from any device connected to the Internet—including your computer.
If you have an Apple iPhone or iPad, iCloud is the default cloud storage service. When your device is properly configured, all the photos you take are automatically transferred from your phone or tablet to the cloud. To view and download the photos you take, all you have to do is access the iCloud website at www.icloud.com with your Apple account.
If you have an Android phone or tablet, Google Photos is the cloud storage of choice. Google Photos works just like iCloud, automatically backing up all the photos and videos you take with your phone to the cloud. You can then download photos to your computer by going to the Google Photos website at photos.google.com.
Transfer Photos Directly from a Smartphone or Tablet
It’s also easy to transfer photos stored on your smartphone or tablet directly to your PC. All you need is the connection cable supplied with your device.
![]() Connect one end of the supplied cable to your smartphone or tablet.
Connect one end of the supplied cable to your smartphone or tablet.

![]() Connect the other end of the cable to a USB port on your PC.
Connect the other end of the cable to a USB port on your PC.

![]() Click File Explorer on the taskbar or Start menu to open File Explorer.
Click File Explorer on the taskbar or Start menu to open File Explorer.

![]() Click the This PC icon in the navigation pane.
Click the This PC icon in the navigation pane.
![]() Click the icon for your smartphone or tablet.
Click the icon for your smartphone or tablet.

![]() Navigate to the main folder on the devices (typically labeled DCIM or Pictures) and then select the appropriate subfolder to see your photos.
Navigate to the main folder on the devices (typically labeled DCIM or Pictures) and then select the appropriate subfolder to see your photos.

![]() Hold down the Ctrl key and click each photo you want to transfer.
Hold down the Ctrl key and click each photo you want to transfer.

![]() Select the Home tab.
Select the Home tab.
![]() Click the Copy To button.
Click the Copy To button.
![]() Click Pictures. This copies all the selected photos to the Pictures folder on your computer.
Click Pictures. This copies all the selected photos to the Pictures folder on your computer.

Transfer Photos from a Memory Card
If you still use a digital camera to take photos, it’s equally easy to transfer your pictures from your camera to your computer. The easiest way to do this is to use your camera’s memory card.
Connecting Your Camera Directly
You can transfer photos by connecting your digital camera to your computer via USB. This is similar to connecting your smartphone or tablet to your PC; Windows should recognize when your camera is connected and automatically download the pictures in your camera while displaying a dialog box that notifies you of what it’s doing.
![]() Turn off your digital camera and remove the flash memory card.
Turn off your digital camera and remove the flash memory card.

![]() Insert the memory card from your digital camera into the memory card slot on your PC.
Insert the memory card from your digital camera into the memory card slot on your PC.

Copying Automatically
Windows might recognize that your memory card contains digital photos and start to download those photos automatically—no manual interaction necessary. Alternatively, you might get prompts from any other photo app you have installed to download your photos to that app.
![]() Click File Explorer on the taskbar or Start menu to open File Explorer.
Click File Explorer on the taskbar or Start menu to open File Explorer.

![]() Click This PC in the navigation pane.
Click This PC in the navigation pane.
![]() Click the icon for your memory card.
Click the icon for your memory card.

![]() Navigate to the main folder on the memory card (typically labeled DCIM or Pictures) and then select the appropriate subfolder to see your photos.
Navigate to the main folder on the memory card (typically labeled DCIM or Pictures) and then select the appropriate subfolder to see your photos.

![]() Hold down the Ctrl key and click each photo you want to transfer.
Hold down the Ctrl key and click each photo you want to transfer.

![]() Select the Home tab.
Select the Home tab.
![]() Click Copy To.
Click Copy To.
![]() Select Pictures.
Select Pictures.

Viewing Photos and Videos on Your PC
Windows includes a built-in Photos app for viewing and editing photos stored on your PC. There’s also a Videos app for viewing home movies you shoot with your camcorder or mobile device.
View Your Photos
The Photos app is the hub for all your photo viewing and editing in Windows. It lets you navigate to and view all the photos stored on your PC. You launch the Photos app from the Start menu.
![]() Within the Photos app, the Collection view is selected by default and photos are grouped by date taken. (To instead display pictures stored in specific folders on your computer’s hard drive, click More, Folders.)
Within the Photos app, the Collection view is selected by default and photos are grouped by date taken. (To instead display pictures stored in specific folders on your computer’s hard drive, click More, Folders.)
![]() Change the size of the photos displayed by clicking either View Large, View Medium, or View Small.
Change the size of the photos displayed by clicking either View Large, View Medium, or View Small.
![]() Display a single photo within the Photos app by clicking it.
Display a single photo within the Photos app by clicking it.

![]() Move to the next picture by clicking the right arrow on the screen or pressing the right-arrow key on your keyboard. To return to the previous picture, click the left arrow on the screen or press the left-arrow key on your keyboard.
Move to the next picture by clicking the right arrow on the screen or pressing the right-arrow key on your keyboard. To return to the previous picture, click the left arrow on the screen or press the left-arrow key on your keyboard.
![]() Zoom into or out of the picture by clicking Zoom and then dragging the slider right (to zoom in) or left (to zoom out).
Zoom into or out of the picture by clicking Zoom and then dragging the slider right (to zoom in) or left (to zoom out).
![]() Click Delete (or press the Del key on your keyboard) to delete the current picture.
Click Delete (or press the Del key on your keyboard) to delete the current picture.
![]() Click Rotate to rotate the picture 90 degrees clockwise.
Click Rotate to rotate the picture 90 degrees clockwise.

![]() Click See More (three-dot icon) and then select Slideshow to view a slideshow of the pictures in this folder, starting with the current picture.
Click See More (three-dot icon) and then select Slideshow to view a slideshow of the pictures in this folder, starting with the current picture.
![]() Click the back arrow to return to the previous screen.
Click the back arrow to return to the previous screen.

Create and View Photo Albums
The Photos app enables you to organize your photos in virtual photo albums. Let’s look first at how to create and view a photo album.
![]() From within the Photos app, click Albums to display the Albums view.
From within the Photos app, click Albums to display the Albums view.
![]() All of your previously created albums are displayed here. Click an album to view the photos within.
All of your previously created albums are displayed here. Click an album to view the photos within.
![]() Click the New Album tile to create a new album.
Click the New Album tile to create a new album.

![]() Click to select the photos you want to include.
Click to select the photos you want to include.
![]() Click Create.
Click Create.

![]() Name this album by highlighting the “Album” title and typing a new title.
Name this album by highlighting the “Album” title and typing a new title.
![]() Click Done.
Click Done.

OneDrive
By default, your photo albums are stored locally on your current PC. If you want your albums to be available to other devices via Microsoft’s OneDrive cloud storage service, open an album and click the Save to OneDrive button.
View Your Videos
To watch the videos you take with your phone, tablet, or camcorder, you use a different app—the Movies & TV app. Launch this app from the Windows Start menu.
![]() From within the Movies & TV app, click the Personal tab.
From within the Movies & TV app, click the Personal tab.
![]() Navigate to and click the video you want to watch. (Click any folder to view the videos within.)
Navigate to and click the video you want to watch. (Click any folder to view the videos within.)

![]() Playback starts automatically. Mouse over the video to display the playback controls.
Playback starts automatically. Mouse over the video to display the playback controls.
![]() Click the Pause button to pause playback; click the button again to resume playback.
Click the Pause button to pause playback; click the button again to resume playback.
![]() Click and drag the scrub (slider) control to move to a specific point within the video.
Click and drag the scrub (slider) control to move to a specific point within the video.
![]() Click the Fullscreen button to display the video full screen.
Click the Fullscreen button to display the video full screen.

Touching Up Your Photos
Not all your pictures turn out perfect. Maybe you need to crop a picture to highlight the important area. Maybe you need to brighten a dark picture or darken a bright one. Or maybe you need to adjust the tint or color saturation.
Fortunately, the Windows Photos app lets you do this sort of basic photo editing. A better-looking photo is only a click or a tap away!
Enter Editing View
All of the Photo app’s editing functions are accessed via a special editing view. Here’s how you enter editing view.
![]() From within the Photos app, navigate to and display the photo you want to edit.
From within the Photos app, navigate to and display the photo you want to edit.
![]() Click the Edit & Create button.
Click the Edit & Create button.
![]() Click Edit. This displays your photo in editing view, ready to edit.
Click Edit. This displays your photo in editing view, ready to edit.

Rotate a Photo
Is your picture sidewise? To turn a portrait into a landscape, or vice versa, use the Photos app’s Rotate tool.
![]() Enter editing view and click Crop & Rotate.
Enter editing view and click Crop & Rotate.
![]() Click Rotate to rotate the picture 90 degrees clockwise. Continue clicking to further rotate the picture.
Click Rotate to rotate the picture 90 degrees clockwise. Continue clicking to further rotate the picture.
![]() To rotate in less than 90-degree increments, click and drag the Straightening control until the picture is in the desired position.
To rotate in less than 90-degree increments, click and drag the Straightening control until the picture is in the desired position.

Crop a Photo
Sometimes you don’t get close enough to the subject for the best effect. When you want to zoom in closer, use the Photos app’s Crop control to crop out the edges you don’t want.
![]() Enter editing view and click Crop & Rotate.
Enter editing view and click Crop & Rotate.
![]() If you want to crop to a specific aspect ratio, click Aspect Ratio and make a selection—Custom, Original, Square, 3:2, 4:3, 7:5, or 10:8.
If you want to crop to a specific aspect ratio, click Aspect Ratio and make a selection—Custom, Original, Square, 3:2, 4:3, 7:5, or 10:8.
![]() Use your mouse to drag the corners of the white border until the picture appears as you like.
Use your mouse to drag the corners of the white border until the picture appears as you like.

Apply a Filter
The Photos app includes several built-in filters you can apply to your pictures. Use filters to quickly and easily apply interesting effects to a photo.
![]() Enter editing view and click to display the Filters tab.
Enter editing view and click to display the Filters tab.
![]() Click the filter you want to apply from the Choose a Filter section.
Click the filter you want to apply from the Choose a Filter section.
![]() Drag the slider to increase (right) or decrease (left) the intensity of the filter.
Drag the slider to increase (right) or decrease (left) the intensity of the filter.

Remove Red Eye
Red eye is caused when a camera’s flash causes the subject’s eyes to appear a devilish red. The Photos app lets you remove the red eye effect by changing the red color to black in the edited photo.
![]() Enter editing view and click to select the Adjustments tab.
Enter editing view and click to select the Adjustments tab.
![]() Scroll down and click Red Eye. The cursor changes to display a translucent blue circle.
Scroll down and click Red Eye. The cursor changes to display a translucent blue circle.

![]() Click the eye(s) you want to fix to remove the red eye effect.
Click the eye(s) you want to fix to remove the red eye effect.

Retouch a Photo
Does someone in your photo have a blemish or a loose hair? Is there a rough or scratched area in the photo you want to get rid of? Or does that cute baby in the picture have a bit of drool dripping down his chin? Use the Photos app’s Retouch control to smooth out or remove blemishes from your photos.
![]() Enter editing view and click to select the Adjustments tab.
Enter editing view and click to select the Adjustments tab.
![]() Scroll down and click Spot Fix. The cursor changes to include a translucent blue circle.
Scroll down and click Spot Fix. The cursor changes to include a translucent blue circle.

![]() Click the area you want to repair. The area is now repaired.
Click the area you want to repair. The area is now repaired.

Adjust Brightness and Contrast
When a photo is too dark or too light, use the Photos app’s Light controls. The Contrast control increases or decreases the difference between the photo’s darkest and lightest areas. The Exposure control increases or decreases the picture’s exposure to make the overall picture lighter or darker. Use the Highlights control to bring out or hide detail in too-bright highlights; use the Shadows control to do the same in too-dark shadows.
![]() Enter editing view and click to select the Adjustments tab.
Enter editing view and click to select the Adjustments tab.
![]() In the Light section, click and drag the white line to the left to make the picture darker or to the right to make the picture lighter.
In the Light section, click and drag the white line to the left to make the picture darker or to the right to make the picture lighter.

![]() To display additional brightness and contrast controls, click Light.
To display additional brightness and contrast controls, click Light.

![]() Click and drag the control for the item you want to adjust—Contrast, Exposure, Highlights, or Shadows.
Click and drag the control for the item you want to adjust—Contrast, Exposure, Highlights, or Shadows.

Adjust Color and Tint
The Photos app lets you adjust various color-related settings.
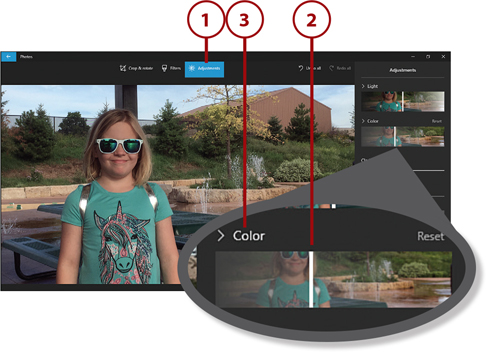
![]() Enter editing view and click to select the Adjustments tab.
Enter editing view and click to select the Adjustments tab.
![]() In the Color section, click and drag the white line to the left to decrease the color saturation for the picture or to the right to increase the color saturation.
In the Color section, click and drag the white line to the left to decrease the color saturation for the picture or to the right to increase the color saturation.
![]() To display additional color-related controls, click Color.
To display additional color-related controls, click Color.
![]() Click and drag the Tint control to change the tinting of the picture.
Click and drag the Tint control to change the tinting of the picture.
![]() Click and drag the Warmth control to the left to make the picture cooler (more blue) or to the right to make a warmer (more red) picture.
Click and drag the Warmth control to the left to make the picture cooler (more blue) or to the right to make a warmer (more red) picture.

Apply Other Effects
You can also use the Photos app to change the picture’s focus or apply a vignette effect.
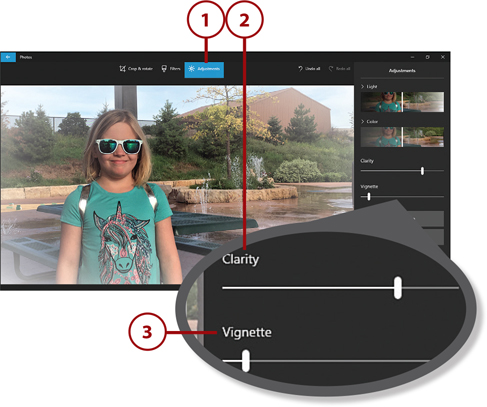
![]() Enter editing view and click to select the Adjustments tab.
Enter editing view and click to select the Adjustments tab.
![]() Click and drag the Clarity control to the left to make the picture more blurry or to the right to make it sharper.
Click and drag the Clarity control to the left to make the picture more blurry or to the right to make it sharper.
![]() Click and drag the Vignette control to the left to apply a white vignette around the picture or to the right to apply a black vignette.
Click and drag the Vignette control to the left to apply a white vignette around the picture or to the right to apply a black vignette.
Save Your Work
You can opt to save your changes to the original picture or as a copy of that picture—which leaves the original unchanged.
![]() From the editing view, click Save to save your changes to the original picture. Or…
From the editing view, click Save to save your changes to the original picture. Or…
![]() Click Save a Copy to save your changes to a new file, leaving the original file unchanged.
Click Save a Copy to save your changes to a new file, leaving the original file unchanged.

Cancel Changes
If, when you’re editing a photo, you decide you don’t want to keep the changes you’ve made, click the Cancel button.
Sharing Your Pictures and Videos
It’s fun to look at all the digital pictures and videos you’ve stored on your PC, but it’s even more fun to share those items with family and friends. Fortunately, the Internet makes it easy to share your favorite photos and videos online, so everyone can ooh and aah over your cute children or grandchildren.
Sharing a Photo from the Photos App
If you’re working from within the Photos app, Windows makes it easy to share a photo a number of different ways.
![]() Open the photo you want to share and then click Share.
Open the photo you want to share and then click Share.

![]() Your favorite and most recent contacts are listed at the top of the Share panel. Click a person’s icon to share with that person and then select how you want to share. Or…
Your favorite and most recent contacts are listed at the top of the Share panel. Click a person’s icon to share with that person and then select how you want to share. Or…
![]() Select the app you want to use to share. Depending on what you have installed on your computer, you can share via the Mail app, Facebook, Skype, Twitter, and more. Follow the normal procedure for that app to select a recipient, add a text message, and send the photo.
Select the app you want to use to share. Depending on what you have installed on your computer, you can share via the Mail app, Facebook, Skype, Twitter, and more. Follow the normal procedure for that app to select a recipient, add a text message, and send the photo.

Attach a Photo or Video in the Mail App
If you’re working within the Mail app, you can use that app to send one or more photos and videos via email. You do this by attaching a picture or video file to an email message and then sending that item along with the message to your intended recipients. A friend or family member who opens your email can click to view the photo or video.
All email programs and services let you attach photo and video files to your messages. Here’s how it’s done in the Mail app:
![]() Launch the Mail app and then click + New Mail to open a new email message.
Launch the Mail app and then click + New Mail to open a new email message.

![]() Enter the recipient and subject information as normal.
Enter the recipient and subject information as normal.
![]() Enter any accompanying text into the message area.
Enter any accompanying text into the message area.
![]() Click the Insert tab.
Click the Insert tab.
![]() Click Files to open the Open window.
Click Files to open the Open window.

![]() Navigate to and select the photo(s) or video(s) you want to share.
Navigate to and select the photo(s) or video(s) you want to share.
![]() Click Open.
Click Open.

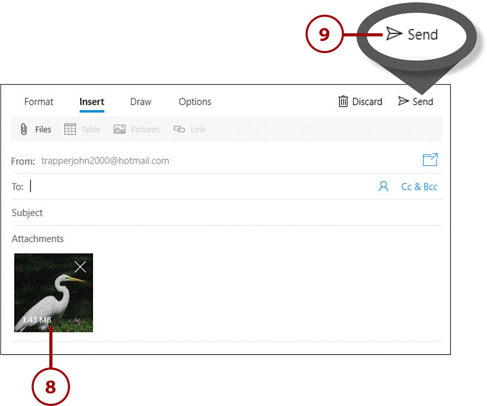
![]() A thumbnail for the photo appears in your message.
A thumbnail for the photo appears in your message.
![]() Click Send to send the message to its recipients.
Click Send to send the message to its recipients.
Other Email Programs
Other email programs and services, such as Gmail and Yahoo! Mail, also let you attach photos and videos in a similar fashion.