
7. Making Windows Easier to Use

In this chapter, you discover how to use the accessibility functions built in to Windows and other ways to make Windows easier to use if you have vision or mobility issues.
![]() Employing Ease of Access Functions
Employing Ease of Access Functions
![]() Using Alternative Input Devices
Using Alternative Input Devices
If you have 20/20 vision, perfect hearing, and the Samson-like grip of a circus strongman, good for you. For the rest of us, however, the default display settings of most computers, particularly laptop models with smaller screens and cramped keyboards, can affect our ability to use our PCs.
Fortunately, Microsoft offers some Ease of Access features that can make Windows—and your new PC—a little easier to use. Let’s take a look.
Employing Ease of Access Functions
The Ease of Access features in Windows 10 are designed to improve accessibility—that is, to make your computer easier and more comfortable to use, especially if you have vision, hearing, or dexterity issues. Microsoft offers several useful Ease of Access functions, including the capability to enlarge text on the screen, change the contrast to make text more readable, and read the screen to aid those with vision problems.
Access Ease of Access Features
The easiest way to get to the Ease of Access settings is through the Settings window.
![]() Click the Start button to display the Start menu.
Click the Start button to display the Start menu.
![]() Click Settings to open the Settings window. (Alternatively, click the Notifications icon on the taskbar and then click All Settings.)
Click Settings to open the Settings window. (Alternatively, click the Notifications icon on the taskbar and then click All Settings.)

![]() Click Ease of Access to display the Ease of Access screen.
Click Ease of Access to display the Ease of Access screen.

Enlarge the Screen
If you’re having trouble reading what’s onscreen because the text is too small, you can turn on the Magnifier tool. The Magnifier does just what the name implies—it magnifies an area of the screen to make it larger, for easier reading.
![]() From the Ease of Access screen, click to select the Magnifier tab.
From the Ease of Access screen, click to select the Magnifier tab.

![]() Click “on” the Magnifier control—that is, move the Magnifier slider to the On position.
Click “on” the Magnifier control—that is, move the Magnifier slider to the On position.

Keyboard Shortcut
You can also enable Magnifier by pressing the Windows key and the plus (+) key on the numeric keyboard.
Invert Colors
To display the magnified screen with inverted colors (white text against a black background), scroll down the Magnifier tab and select the Invert Colors option.
![]() The screen enlarges to 200% of its original size. Navigate around the screen by moving your mouse to the edge of it. (For example, to move the screen to the right, move your mouse to the right edge of the screen.)
The screen enlarges to 200% of its original size. Navigate around the screen by moving your mouse to the edge of it. (For example, to move the screen to the right, move your mouse to the right edge of the screen.)
![]() Use the Magnifier dialog box to adjust Magnifier settings.
Use the Magnifier dialog box to adjust Magnifier settings.
![]() Click the + (plus) button to enlarge the screen further.
Click the + (plus) button to enlarge the screen further.
![]() Click the – (minus) button to reduce the size of the screen. (Alternatively, press Windows + – [the minus key] on your keyboard.)
Click the – (minus) button to reduce the size of the screen. (Alternatively, press Windows + – [the minus key] on your keyboard.)
![]() Click the X to turn off the Magnifier. (Alternatively, press Windows + Esc on your keyboard.)
Click the X to turn off the Magnifier. (Alternatively, press Windows + Esc on your keyboard.)

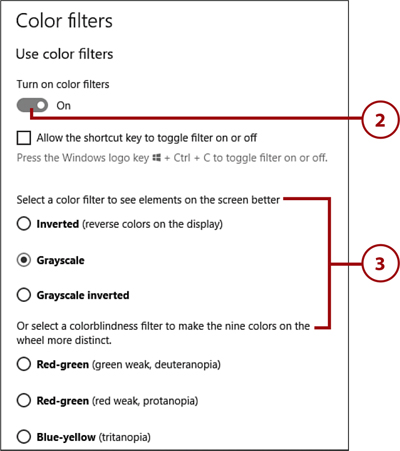
See Colors in Grayscale
If you experience color blindness, it may be easier to see elements of the Windows desktop in grayscale or other color shades rather than their original colors.
![]() From the Ease of Access screen, click to select the Color Filters tab.
From the Ease of Access screen, click to select the Color Filters tab.

![]() Click “on” the Turn On Color Filters switch.
Click “on” the Turn On Color Filters switch.
![]() Select a filter from the Choose a Filter list—Inverted, Grayscale, Grayscale Inverted, Red-green (green weak, deuteranopia), Red-green (red weak, protanopia), or Blue-yellow (tritanopia).
Select a filter from the Choose a Filter list—Inverted, Grayscale, Grayscale Inverted, Red-green (green weak, deuteranopia), Red-green (red weak, protanopia), or Blue-yellow (tritanopia).
Improve Onscreen Contrast
Some people find it easier to view onscreen text if there’s more contrast between the text and the background. To that end, Windows 10 lets you switch to a high-contrast mode that displays lighter text on a dark background instead of the normal black-on-white theme.
![]() From the Ease of Access screen, click to select the High Contrast tab.
From the Ease of Access screen, click to select the High Contrast tab.

![]() Click “on” the Turn On High Contrast switch.
Click “on” the Turn On High Contrast switch.
![]() Select a theme from the Choose a Theme list and then click the Apply button.
Select a theme from the Choose a Theme list and then click the Apply button.

Make the Mouse Pointer Easier to See
Another issue that many users have is seeing the mouse pointer onscreen. The default mouse pointer in Windows can be a little small and difficult to locate on a busy desktop; you can change the size and color of the pointer to make it easier to see. You can choose from Regular, Large, and Extra Large size settings, as well as from White, Black, and Inverting color settings.
![]() From the Ease of Access screen, click to select the Mouse Pointer tab.
From the Ease of Access screen, click to select the Mouse Pointer tab.

![]() In the Change Pointer Size section, select a larger pointer size.
In the Change Pointer Size section, select a larger pointer size.
![]() In the Change Pointer Color section, select a different pointer color—ideally, one that’s easier to see onscreen.
In the Change Pointer Color section, select a different pointer color—ideally, one that’s easier to see onscreen.

Make the Text Cursor Easier to See
If you have trouble seeing the mouse pointer, you may also have trouble seeing the text cursor when you’re editing documents onscreen. Windows 10 lets you display colored text cursor indicators above and below the normal text color—and change the thickness of the cursor itself.
![]() From the Ease of Access screen, click to select the Text Cursor tab.
From the Ease of Access screen, click to select the Text Cursor tab.

![]() Click “on” the Turn On Text Cursor Indicator switch to turn on color shapes above and below the normal text cursor.
Click “on” the Turn On Text Cursor Indicator switch to turn on color shapes above and below the normal text cursor.
![]() In the Change Text Cursor Indicator Size section, select a larger size for the text cursor indicator.
In the Change Text Cursor Indicator Size section, select a larger size for the text cursor indicator.
![]() In the Change Text Cursor Indicator Colors section, select a different color for the text cursor indicator.
In the Change Text Cursor Indicator Colors section, select a different color for the text cursor indicator.

![]() Scroll to the Change the Text Cursor Appearance section and adjust the Change Text Cursor Thickness control to make the cursor thinner or thicker.
Scroll to the Change the Text Cursor Appearance section and adjust the Change Text Cursor Thickness control to make the cursor thinner or thicker.

Read Text Aloud with Narrator
If your eyesight is really bad, even making the onscreen text and cursor super large won’t help. To that end, Windows offers the Narrator utility, which speaks to you through your PC’s speakers. When you press a key, Narrator tells you the name of that key. When you mouse over an item onscreen, Narrator tells you what it is. Narrator helps you operate your PC without having to see what’s onscreen.
![]() From the Ease of Access screen, click to select the Narrator tab.
From the Ease of Access screen, click to select the Narrator tab.

![]() Click “on” the Turn on Narrator control. If you want to use Narrator full time, click “on” the Start Narrator After Sign-In for Me control as well.
Click “on” the Turn on Narrator control. If you want to use Narrator full time, click “on” the Start Narrator After Sign-In for Me control as well.

Keyboard Shortcut
You can also enable Narrator by pressing Windows+Ctrl+Enter on your keyboard.
![]() Pull down the Choose a Voice list and select from either David, Zira, or Mark.
Pull down the Choose a Voice list and select from either David, Zira, or Mark.
![]() Use the Change Voice Speed, Change Voice Pitch, and Change Voice Volume controls to adjust how the voice sounds to you.
Use the Change Voice Speed, Change Voice Pitch, and Change Voice Volume controls to adjust how the voice sounds to you.

Narrator Home
Click Open Narrator Home at the top of the Narrator page to explore more Narrator options in the Narrator Home app.
Use the On-Screen Keyboard
If you find that pressing the keys on your computer keyboard with your fingers is becoming too difficult, especially on a laptop PC with smaller keys, you might want to use the Windows On-Screen Keyboard. This is a virtual keyboard, displayed on your computer screen, that you can operate with your mouse instead of your fingers (or with your fingers, if you have a tablet PC without a traditional keyboard).
![]() From the Ease of Access screen in the Settings window, click Keyboard in the navigation sidebar.
From the Ease of Access screen in the Settings window, click Keyboard in the navigation sidebar.

![]() Click “on” the Use the On-Screen Keyboard control. The On-Screen Keyboard displays.
Click “on” the Use the On-Screen Keyboard control. The On-Screen Keyboard displays.

![]() To “press” a key, click it with your mouse—or, on a touchscreen display, tap it with your finger.
To “press” a key, click it with your mouse—or, on a touchscreen display, tap it with your finger.
![]() To close the On-Screen Keyboard, click the X in the top-right corner.
To close the On-Screen Keyboard, click the X in the top-right corner.

Using Alternative Input Devices
Some of us might lose fine mobility in our hands and fingers, whether due to arthritis or some other condition. This might make it difficult to use the small touchpad on most laptop PCs or to type on normal-sized keyboard keys.
The solution for this problem is to attach different input devices. You can easily connect an external mouse to a laptop PC that then replaces the built-in touchpad, or attach a keyboard with larger keys for easier use.
Replace the Touchpad
Touchpads are convenient pointing devices for laptop PC users, but they can be difficult to use, especially if you have difficulty moving or holding your hand and fingers steady. The solution is to attach an external pointing device to a USB port on your laptop PC; when you do this, you use the (hopefully easier-to-use) external device instead of the built-in touchpad. There are two primary types of devices to choose from.
The first one is a simple external mouse that connects wirelessly to your computer via either USB cable or wirelessly via Bluetooth. Many people find that using a mouse is easier than trying to tap precise movements on a laptop’s touchpad. If you’re using a wireless mouse, connect the mouse’s USB receiver into any open USB port on your computer, turn on the external mouse, and start using it. In most instances, no additional setup is required.
In lieu of a touchpad or mouse, some users prefer an even larger trackball controller. This type of controller is typically used by people who play computer games, but it’s also a terrific option for those with mobility issues. Use the large roller ball on top to move the cursor around the screen.
Attach a Different Keyboard
Some laptop PC keyboards are a little smaller than the keyboard on a typical desktop PC, and use flatter keys that don’t respond much to your touch. You can remedy this situation by attaching a full-size external keyboard, either via USB cable or wirelessly via Bluetooth. Most external keyboards are easier to use and more ergonomic than the smaller keyboards found on most laptop computers.
Even the keys on a standard-sized keyboard might not be big enough if you have mobility issues. Several companies make keyboards with enlarged keys that are both easier to see and easier to use. Look for these online.