8. Managing Media with Content Manager
In this chapter, you learn about Content Manager, which you use to manage, copy, back up, and restore media or applications on your Vita and between it and a computer or PlayStation 3.
• Working with a PlayStation 3
• Transferring Content to and from a PlayStation 3
Although your PlayStation Vita is a state-of-the-art multimedia platform, it would be nothing more than high-tech wasted potential if you couldn’t easily get content to and from it. As such, Content Manager is one of the Vita’s key built-in apps, helping to manage, copy, back up, and restore media or applications on a memory card. Transfers take place between your Vita and a computer or PlayStation 3 over a USB connection. This same connection can also enable your Internet-connected computer or PlayStation 3 to perform a Vita system update.
Using LiveArea Screen for Content Manager
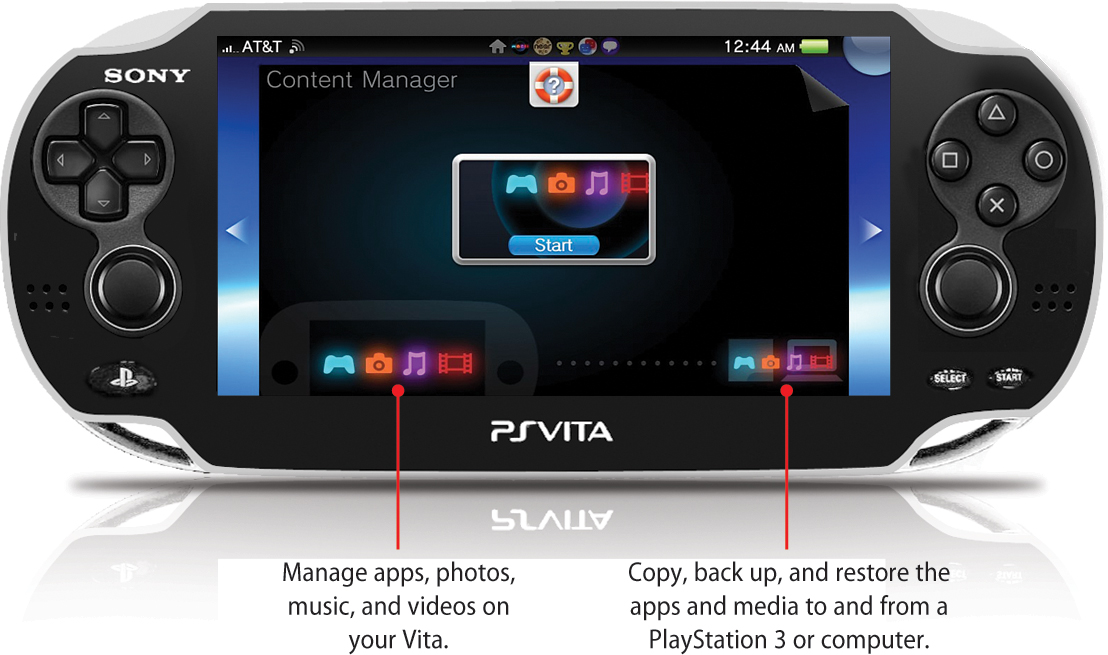
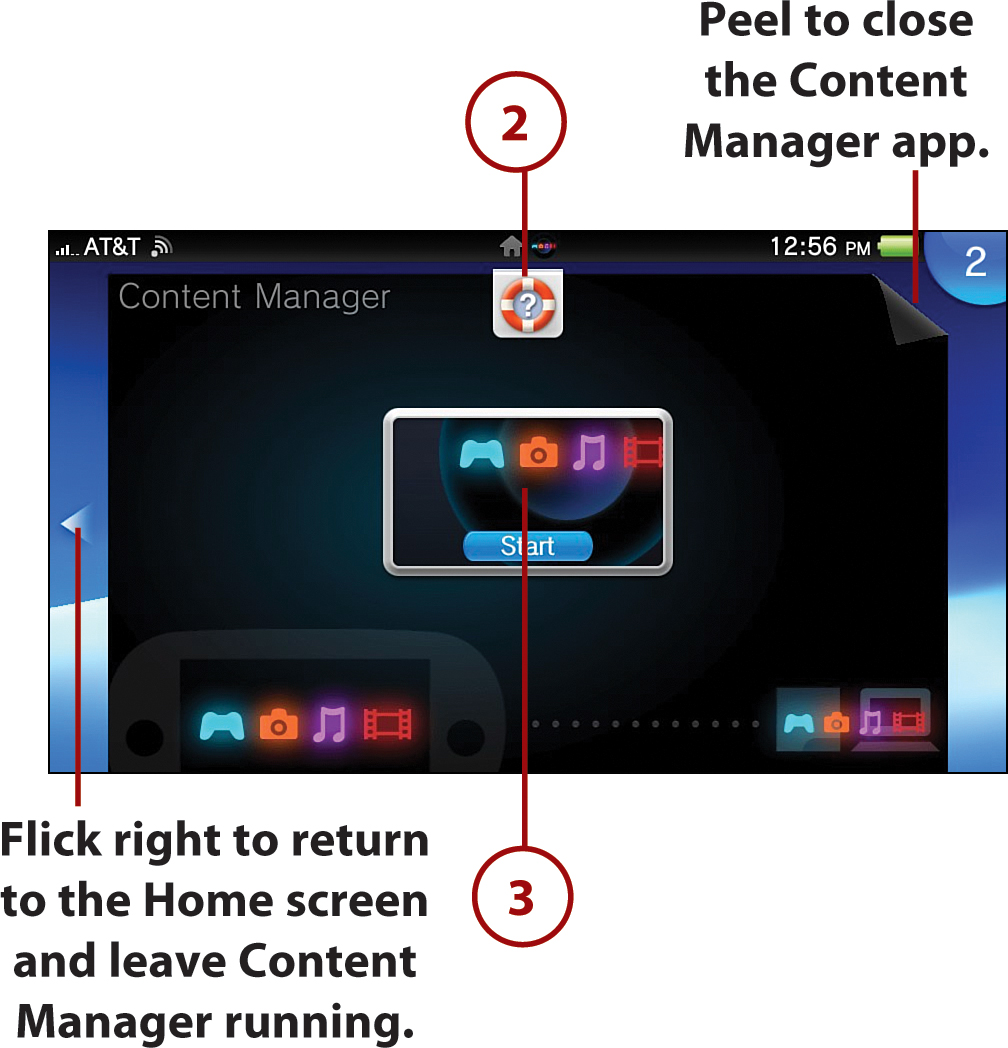
The LiveArea screen for the Content Manager app is similar to other LiveArea screens, including providing access to the user’s guide and the app itself. To navigate the LiveArea, do the following:
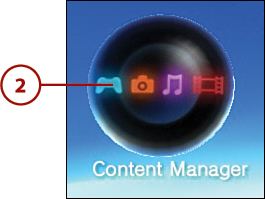
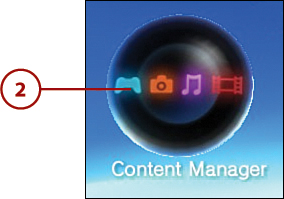
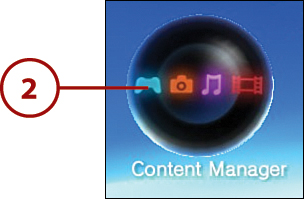
1. Tap the Content Manager icon on the Home screen.

2. Tap the action icon to access the PlayStation Vita User’s Guide, which displays the Content Manager–specific section of the online manual.
3. Tap the Gate to enter the Content Manager app.
Working with a Computer
Just like there’s a Content Manager app on the Vita, similar software is available for both Windows and Macintosh computers called Content Manager Assistant. Content Manager Assistant is required for all copy, backup, and restore operations involving media or applications with a computer. All such transfers are initiated from the Vita, which acts as the master controller for the whole operation.
Installing Content Manager Assistant for Windows
If your computer meets the minimum requirements (see the previous Go Further sidebar, “Minimum Requirements for Content Manager Assistant”), follow these steps to download and install Content Manager Assistant for Windows:
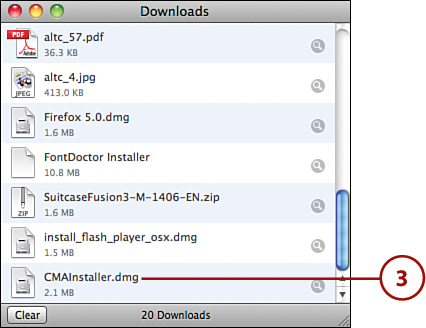
1. From your computer go to http://cma.dl.playstation.net/cma/.
2. Click Download Latest Version.

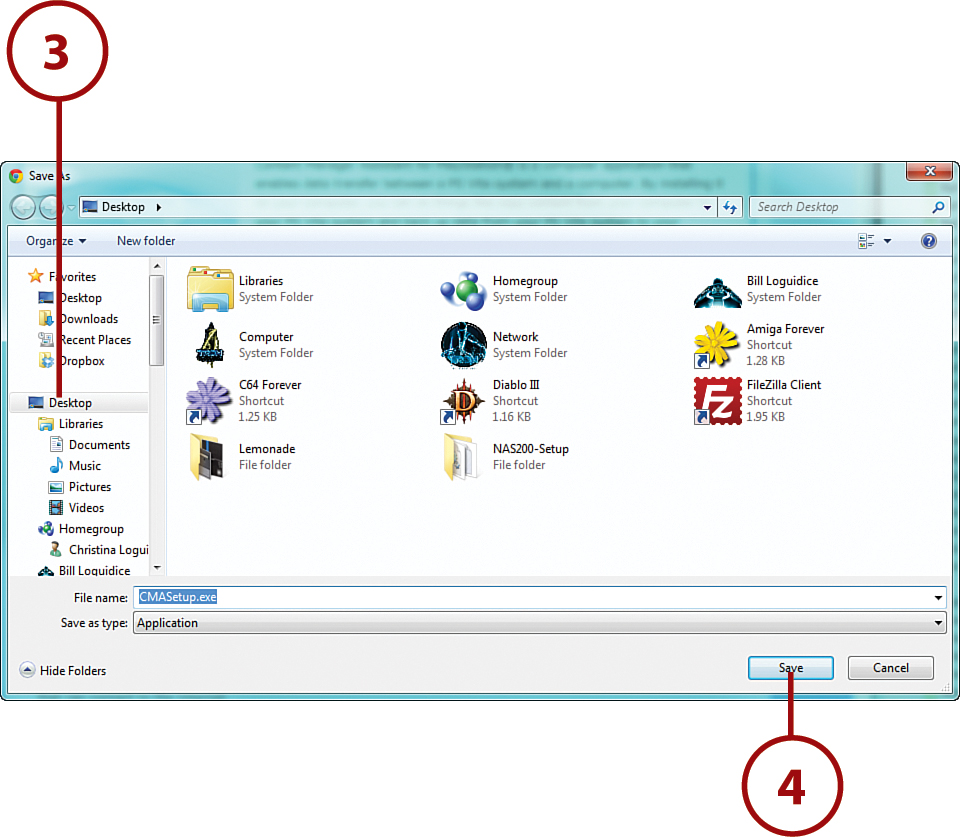
3. Choose a convenient folder to download the file to.
4. Save the file. When the download is complete, go to the folder and run the program. Follow the onscreen instructions to finish the installation.
Content Manager Assistant Is There for Your PC
By default, Content Manager Assistant is set to start automatically when your computer starts. When the application is running, its icon appears in the notification area of the taskbar.

Installing Content Manager Assistant for Macintosh
If your Mac meets the minimum requirements (see the Go Further sidebar, “Minimum Requirements for Content Manager Assistant”) follow these steps to download and install Content Manager Assistant for Macintosh:
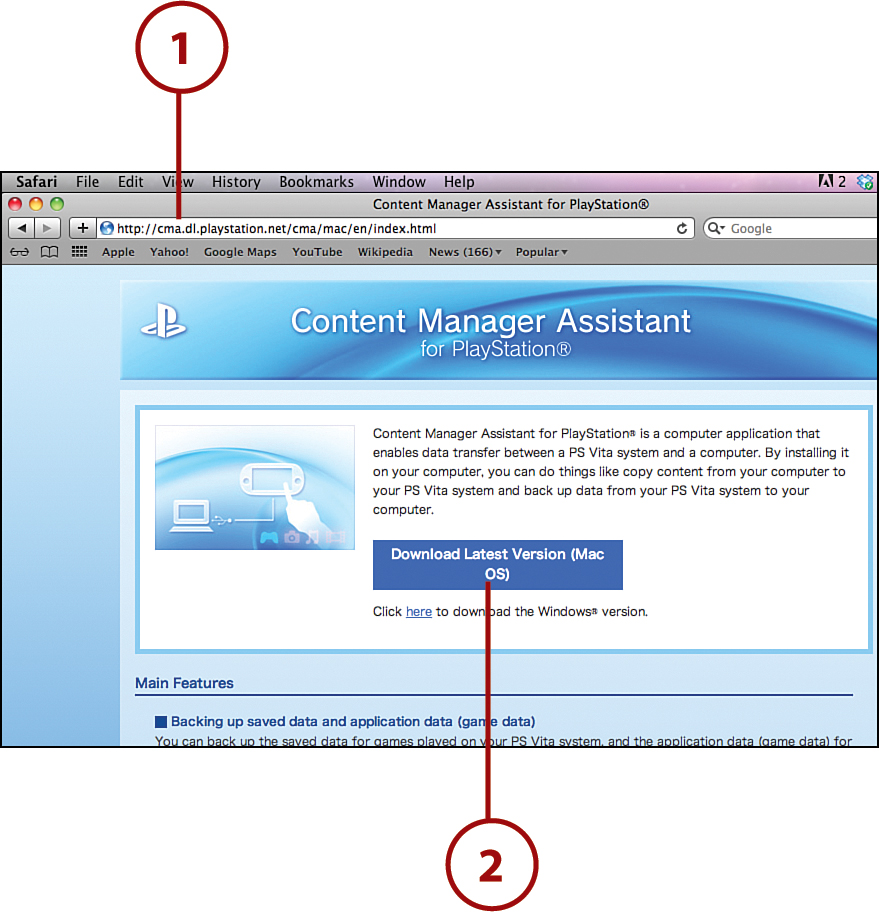
1. Go to http://cma.dl.playstation.net/cma/.
2. Click Download Latest Version.
3. Double-click the disk image to open it after the download finishes.
4. Double-click the installer package to install the program. Then follow the onscreen instructions to perform the remainder of the installation.

Content Manager Assistant Is There for Your Macintosh
By default, the Content Manager Assistant is set to start automatically when your computer starts. When the application is running, its icon appears on the menu bar as a menu extra.

Copying and Deleting Content
You can display lists of applications, video, audio, or image files stored on your computer and copy the content to your Vita, and vice versa. To copy content to or from the Vita, ensure that Content Manager Assistant is installed and running on your computer, and then do the following:
1. Connect your Vita to your computer using the USB cable.
2. On your Vita, tap the Content Manager icon, then tap Start.
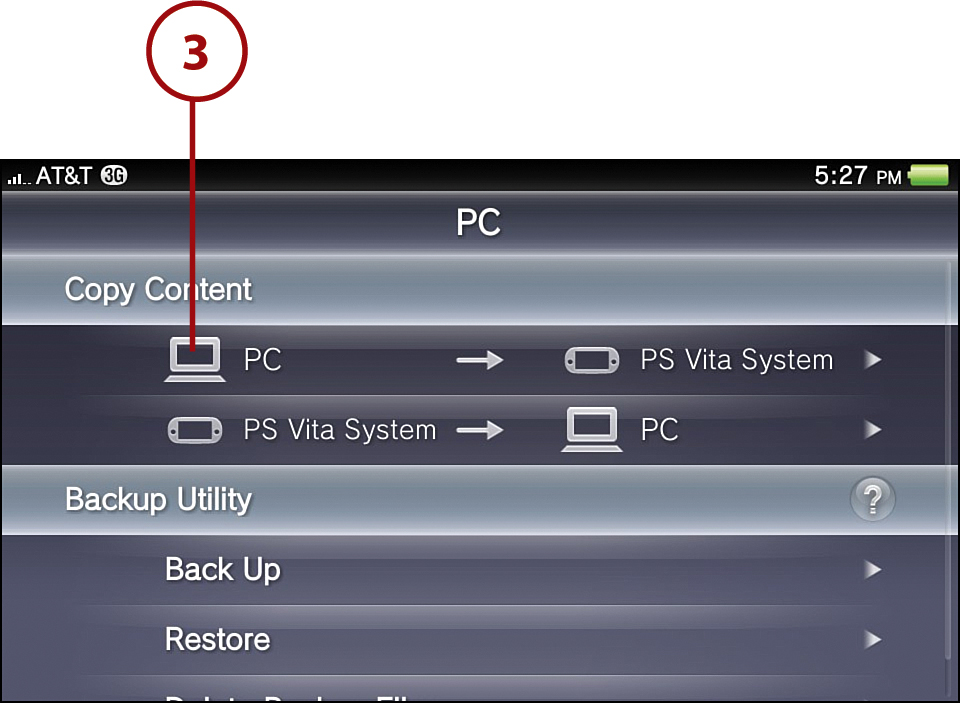
3. Tap either PC to PS Vita System, or PS Vita System to PC.
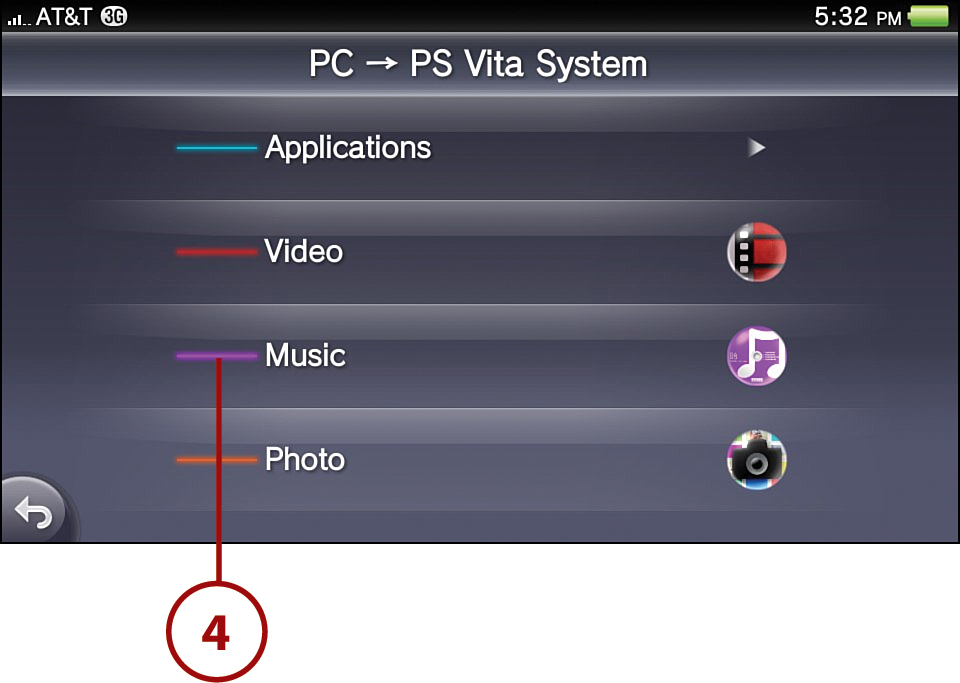
4. Tap Applications, Video, Music, or Photo to select the kind of content to copy. Video, Music, or Photo opens its respective app to complete the action.
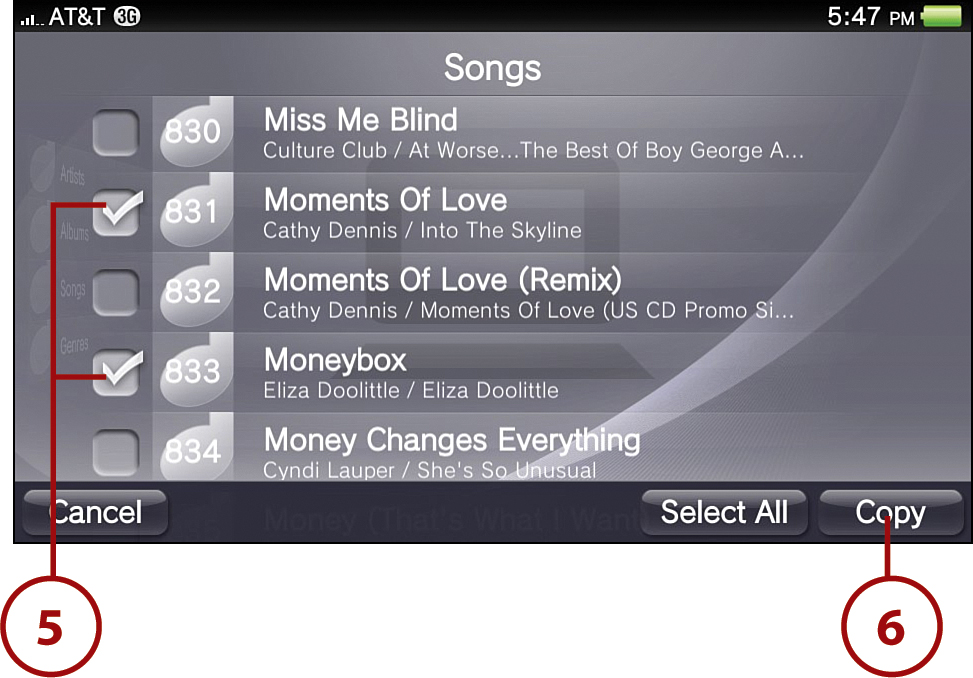
5. Select the checkboxes of the content you want to copy, or tap Select All. For long lists, you might have to scroll up or down to find the desired content.
Additional Applications Options
Applications provides an additional option to delete the desired content.
6. Tap Copy.
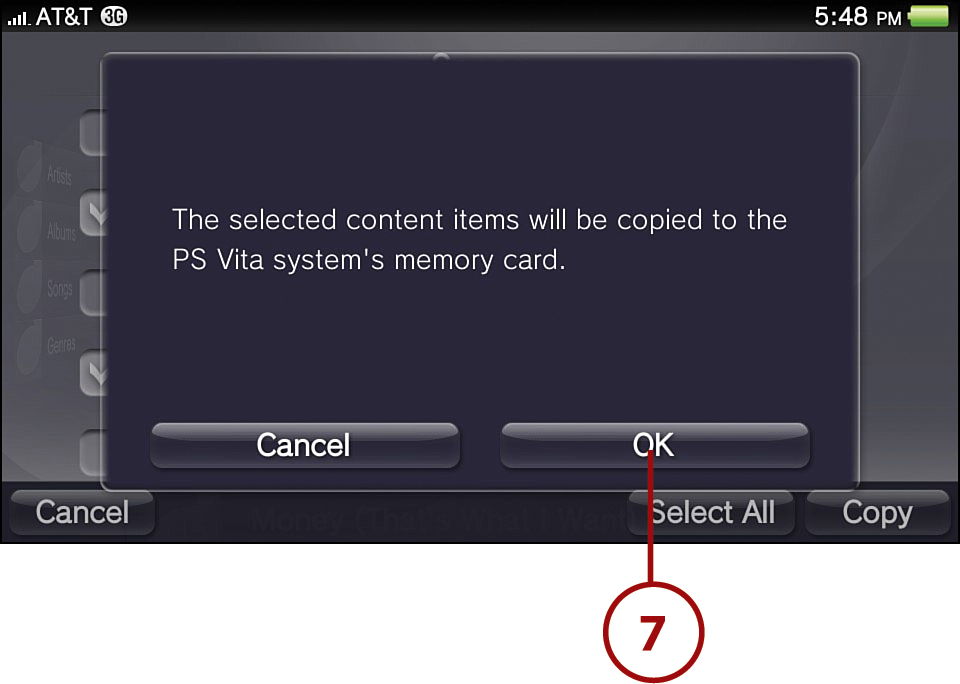
7. Tap OK on the confirmation screen. The selected file or files is copied to the matching destination folder.
8. Tap the Options icon to copy additional files; otherwise, skip to step 9.
9. Tap the Back arrow to go back.

You can also copy video, audio, or images via a similar process within the Vita’s respective Videos, Music, or Photos apps. In each application, tap PC in the list of categories, tap Options, and then tap Copy.
Backing Up and Restoring Content
You can back up to your computer all the saved data for games that come on PlayStation Vita cards, and the application data for games purchased from the PlayStation Store. You can also back up all the system files saved on the memory card or in system memory to your computer. You can then restore these files to your Vita if necessary; for instance, in case of data loss or when upgrading to a larger capacity memory card. Each backup file is linked to a specific PlayStation Network account and can only be restored to a Vita that is linked to that same account.
To back up or restore content to or from the Vita, ensure that Content Manager Assistant is installed and running.
1. Connect your Vita to your computer using the USB cable.
2. On your Vita, tap the Content Manager icon, and then tap Start.
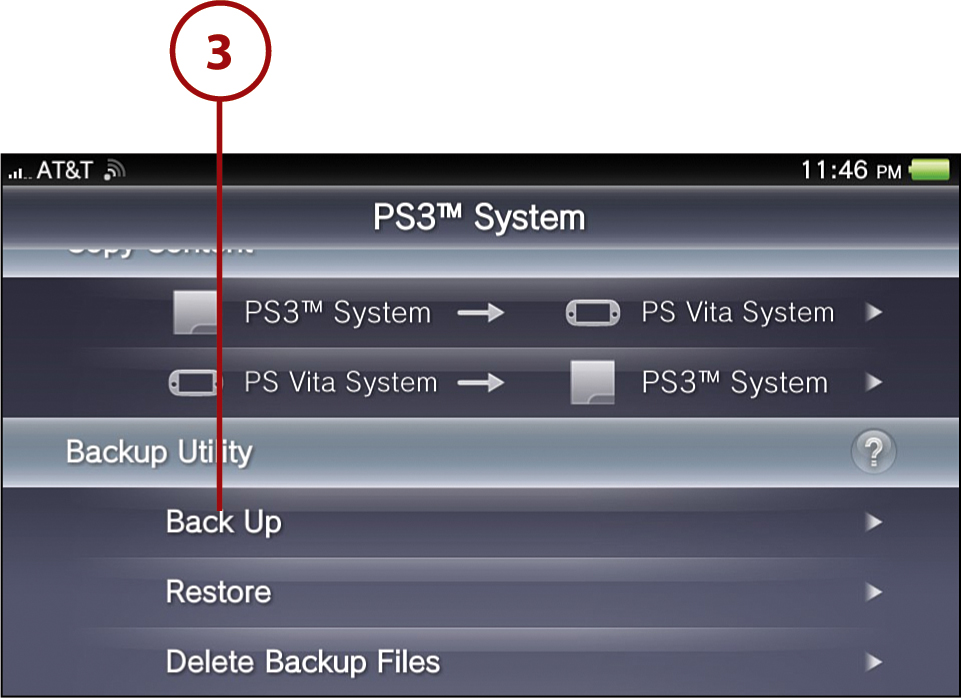
3. Tap Back Up or Restore.

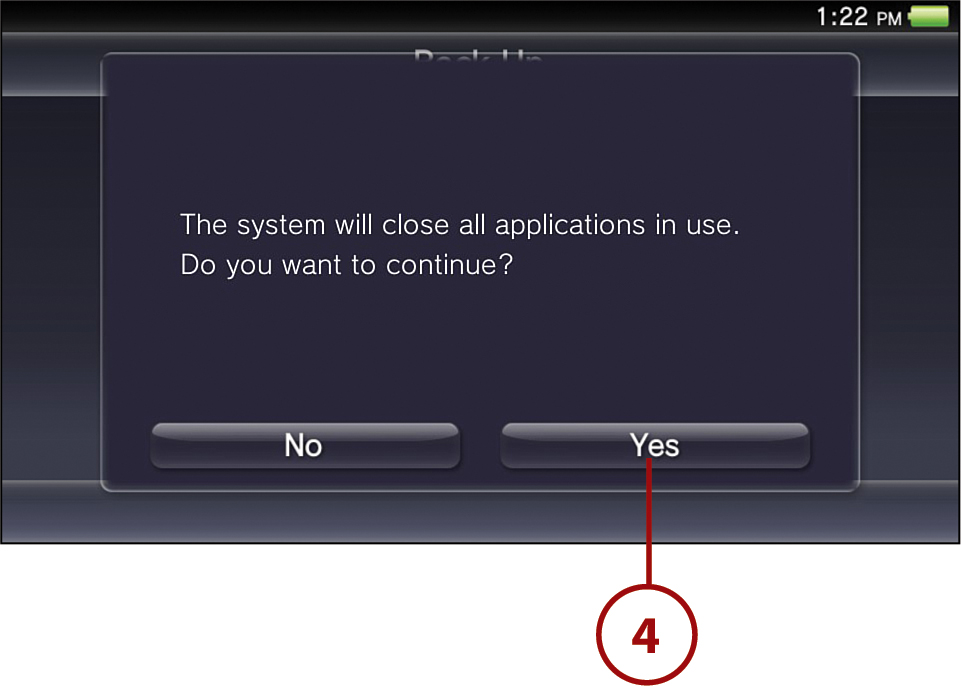
4. Tap Yes to confirm closing all other Vita applications in use, and then follow the remaining onscreen instructions.

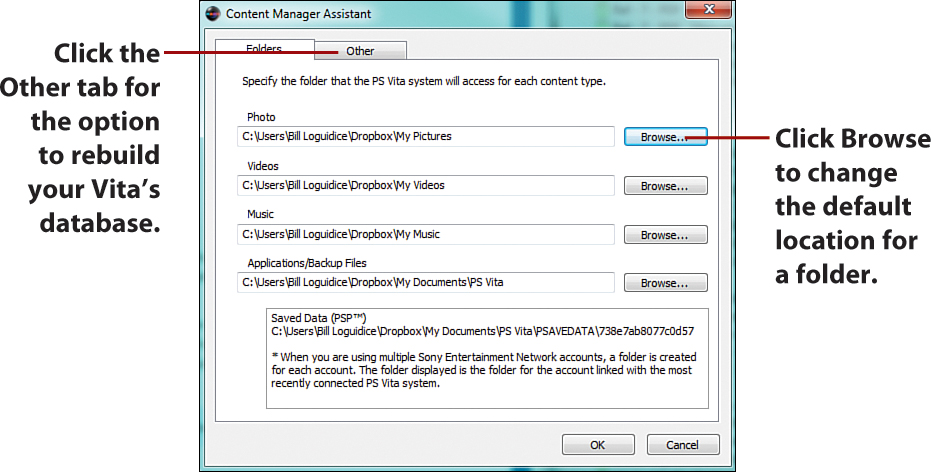
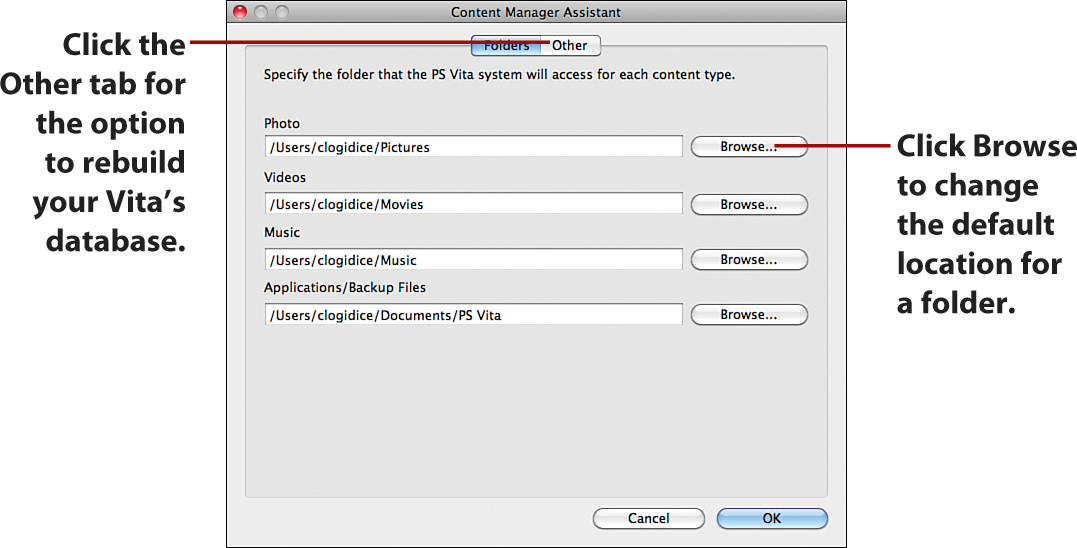
There is a limit of 10 backup files for all accounts. To delete outdated backups, repeat steps 1 and 2. For step 3, tap Delete Backup Files. You can also perform this function from your computer by going to the folder set for the Applications/Backup Files content type in Content Manager Assistant and then deleting the unwanted backup files.
Working with a PlayStation 3
Unlike on the Vita or a computer, Sony’s PlayStation 3 does not require special software to copy, back up, or restore Vita-compatible media or applications. As long as the system software on both the Vita and PlayStation 3 is updated to the latest available version and the PlayStation Network account matches, any communication between the two Sony systems should proceed smoothly.
Copying and Deleting Content
You can display lists of applications, video, audio, or image files stored on your computer and copy the content to your Vita, and vice versa. To copy content to or from the Vita, first ensure that your PlayStation 3 is powered on and logged into the same PlayStation Network account as your Vita.
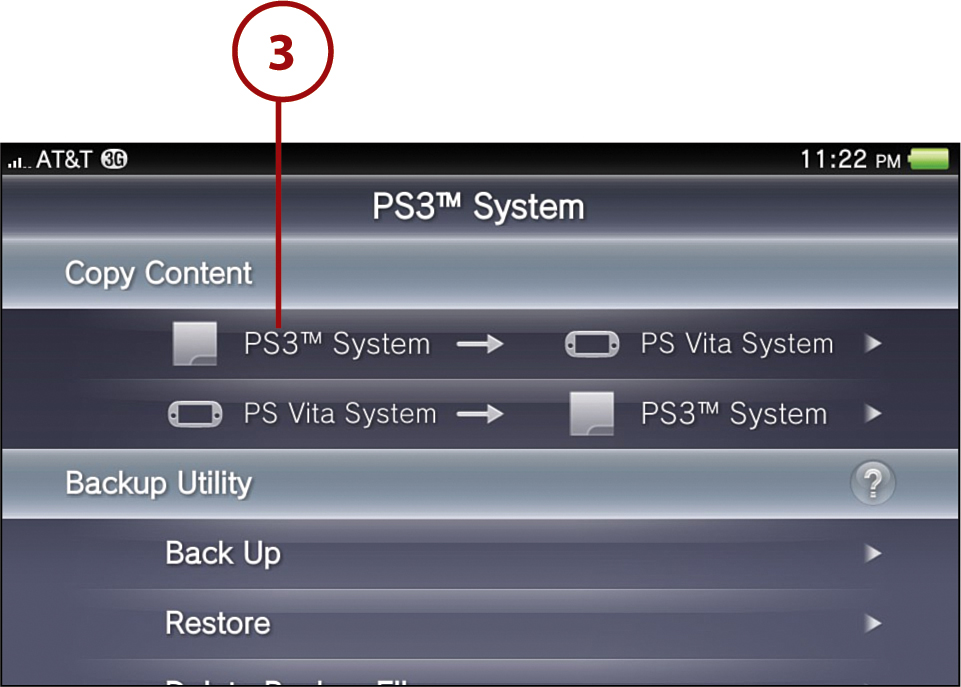
1. Connect your Vita to your PlayStation 3 using the USB cable.
2. On your Vita, tap the Content Manager icon, and then tap Start.
3. Tap either PS3 System to PS Vita System, or PS Vita System to PS3 System.
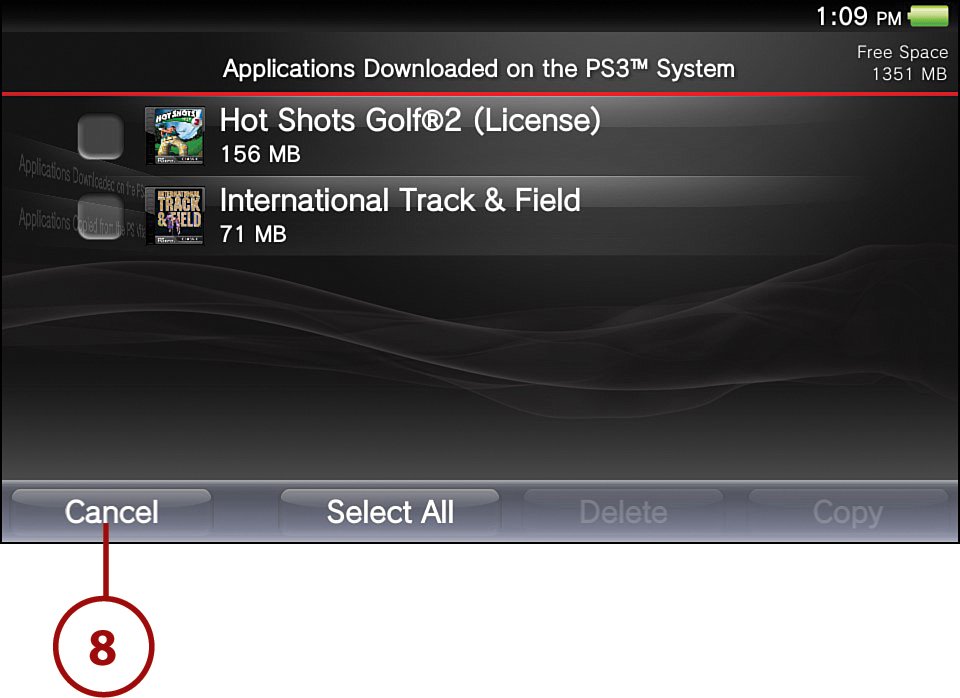
4. Tap Applications, Video, Music, or Photo to select the kind of content to copy.
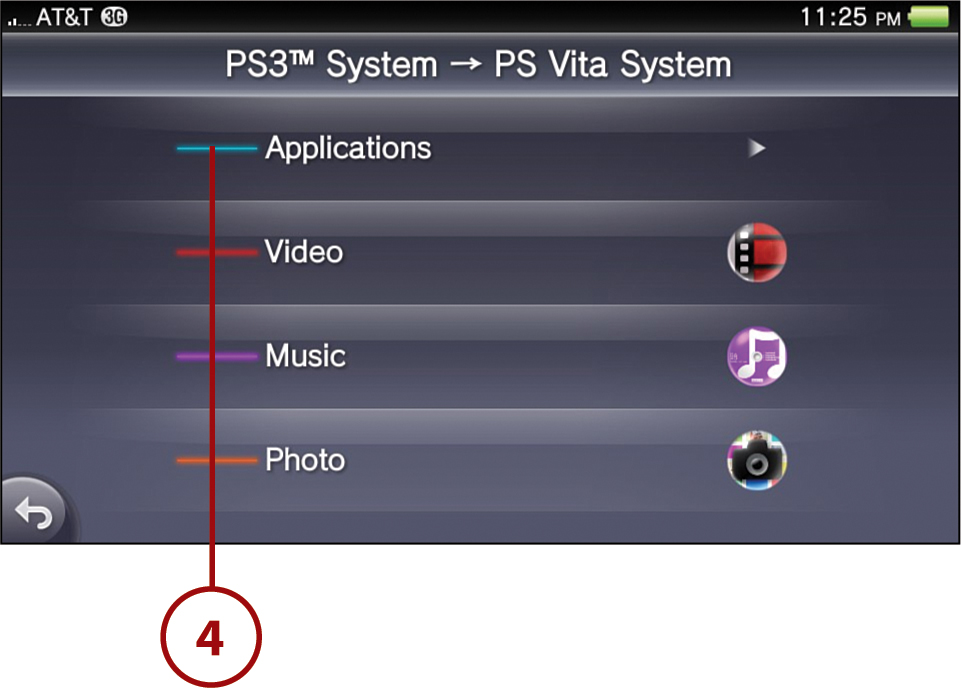
5. Select the checkboxes of the content you want to copy, or tap Select All. For long lists, you might have to scroll up or down to find the desired content.
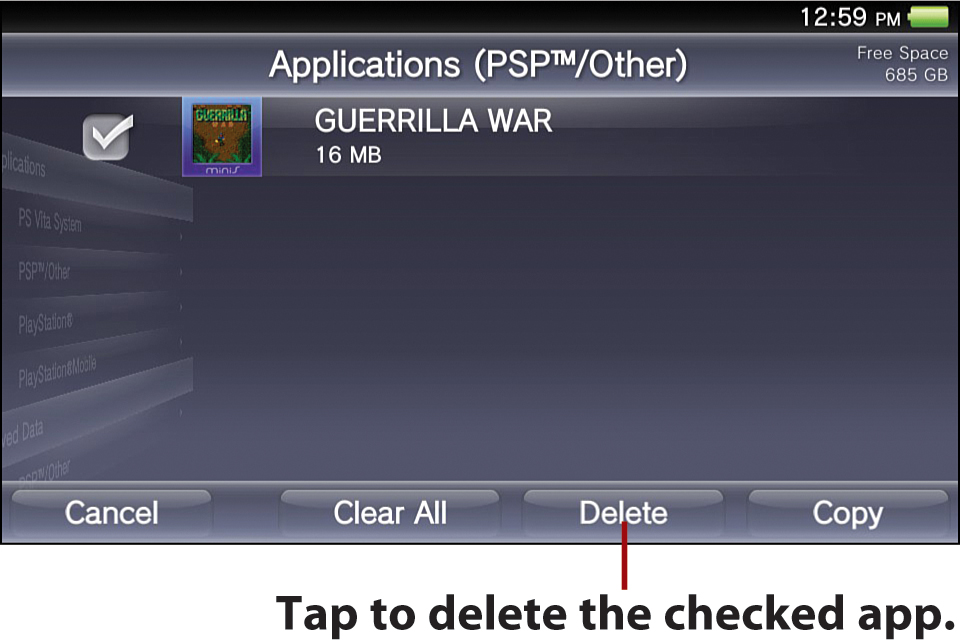
Applications, which consists of Applications (PS Vita), Applications (PSP/Other), and Saved Data (PSP/Other), offers an additional option to Delete the desired content.
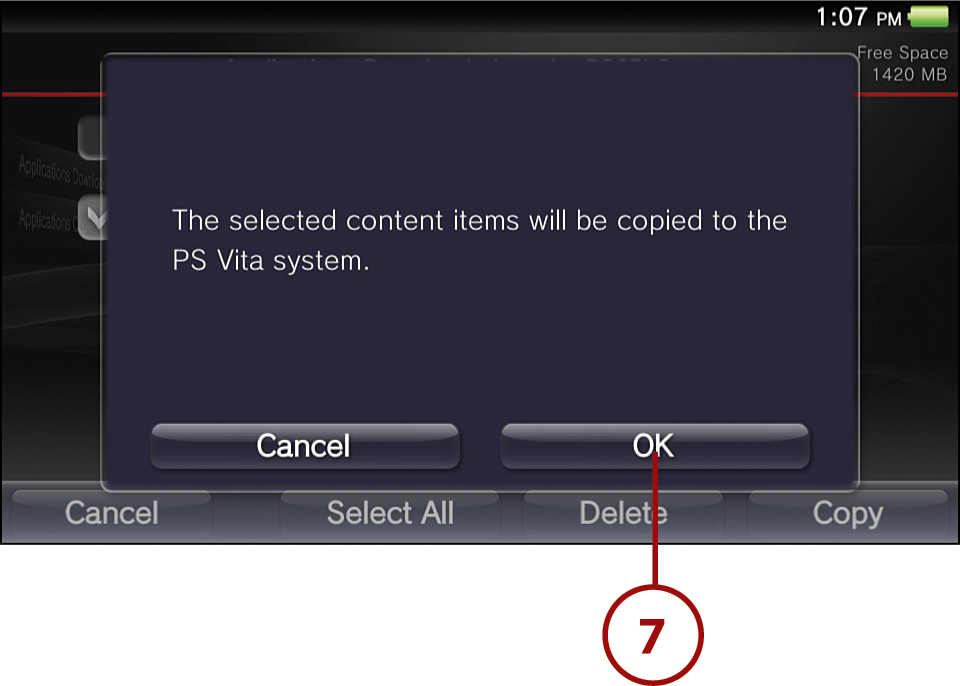
6. Tap Copy.

7. Tap OK on the confirmation screen. The selected file or files is copied to the matching destination folder.
8. When finished, select additional files to copy or delete, or tap Cancel to go back to the previous screen. Keep tapping the Back arrow to go back to the previous screens and select another action, or press the PS button and then peel to close the Content Manager app.
Other Copy Options and Restrictions
You can also copy video, audio, or images using a similar process within the Vita’s respective Videos, Music, or Photos apps. In each application, tap PS3 System in the list of categories, tap Options, and then tap Copy. For the video content that is downloaded from the PlayStation Store to the PlayStation 3 system, only standard definition (SD) video content can be copied to the Vita.
Backing Up and Restoring Content
Just like with a computer, you can use your PlayStation 3’s hard drive to back up files from your Vita.
1. Connect your Vita to your PlayStation 3 using the USB cable.
2. On your Vita, tap the Content Manager icon, then tap Start.
3. Tap Back Up or Restore.
4. Tap Yes to confirm closing all other Vita applications in use. Follow the remaining onscreen instructions.
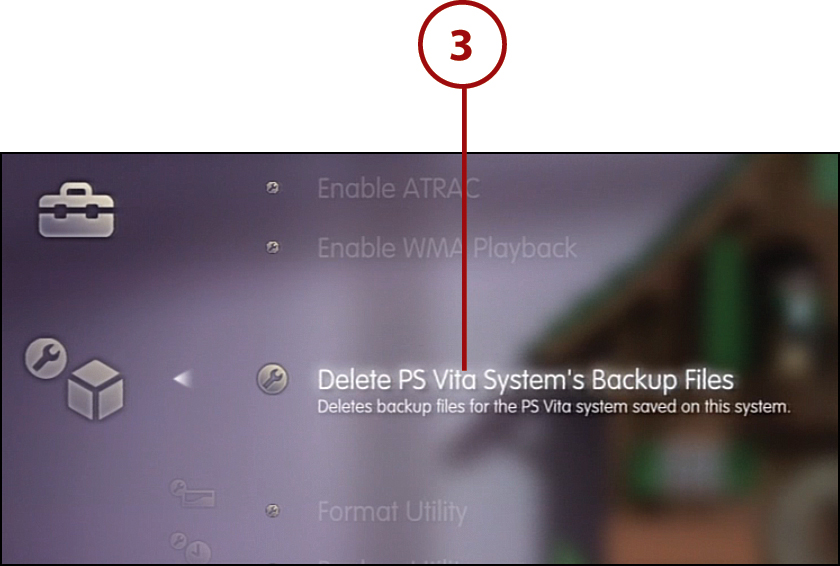
Deleting Outdated Backups
As with a computer, there is a limit of 10 backup files for all accounts. To delete outdated backups, repeat steps 1 and 2 from “Backing Up and Restoring Content” and then for step 3, tap Delete Backup Files. Alternatively, you can perform this function from your PlayStation 3 by doing the following:
1. Select Settings.
2. Select System Settings.

3. Select Delete PS Vita System’s Backup Files. Follow the remaining onscreen instructions.