
7. Surfing with the Internet Browser

In this chapter, you learn about the Vita’s Browser app. You can use it to browse the Web, bookmark web pages, fill in forms, and search the Internet.
• Using the LiveArea Screen for the Browser
• Working with Bookmarks and Browsing History
The PlayStation Vita is a great portable Internet navigator. Its high-resolution widescreen is ideal for both accommodating and seeing more web page content than is possible using other types of portable devices. In addition, the Vita’s touchscreen makes interacting with web content both quick and intuitive. Finally, the Browser app uses the popular WebKit layout engine to render and manage web pages, so it should retain a high degree of compatibility as Sony continues to issue updates.
Using the LiveArea Screen for the Browser
To access the web browser, make sure you are connected to the Internet and then tap the Browser icon on the Home screen.

After you’ve selected the Browser, the following options are available in the LiveArea screen:
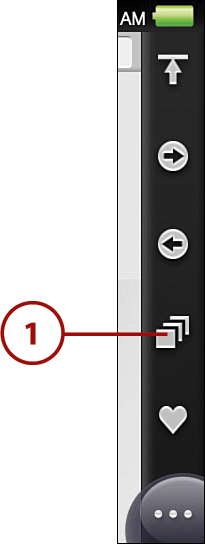
• Window list—Lists up to eight previously opened, but not closed, web pages. Tap an item in the list to go back to a particular web page.

• Action icon—Tap to display the Browser app–specific section of the online PlayStation Vita User’s Guide.
• Gate—Tap to start the Browser app.
• Banner—Tap to go to the highlighted web page. Banners are displayed automatically and you cannot modify them.
If you multitask and start the Browser app while you’re using a game or the Videos app, display of some content on web pages might be limited.
Surfing the Web
When you start the Browser app, either the last website you visited opens, or, if you’ve closed all previously opened pages, you see a blank page. The Browser app displays the following:
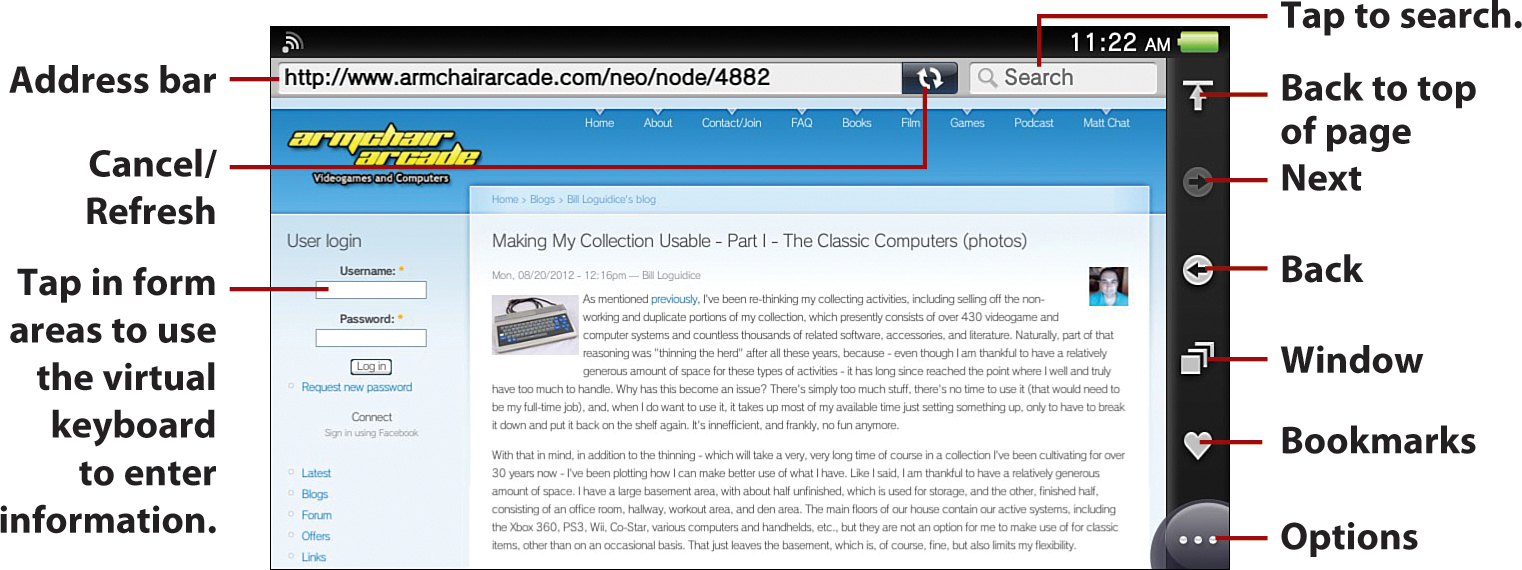
• Address bar—Tap in the address bar to open the virtual keyboard and enter the address of the web page you want to go to.
• SSL (not shown)—You will see a closed padlock to the left of the Address Bar when the web page supports Secure Socket Layer (SSL) information security encryption. An open padlock means the site does not support the security protocol and any information transmitted over the website might not be secure.
• Web filtering (not shown)—The shield icon displays to the left of the Address bar when a web filtering service that blocks harmful content is in use. See “Browser Settings” later in this chapter for more information on enabling this feature.
• Cancel/Refresh—Tap Cancel to cancel a web page in the process of loading or tap Reload to reload a web page that’s already been loaded.
• Back to Top of Page—Tap to quickly return to the top of the web page.
• Next—Tap Next to go to the next web page.
• Back—Tap Back to go to the previous web page.
• Window—Tap Window to display a visual listing of open browser windows or to open a new window.
• Search—Tap Search to do a Google search.
• Bookmarks—Tap the Bookmarks icon to see your browsing history and saved bookmarks. Tap an entry in the list to open that web page.
• Options—Tap Options to display the options for Add Bookmark and Settings, each of which is described later in this chapter.
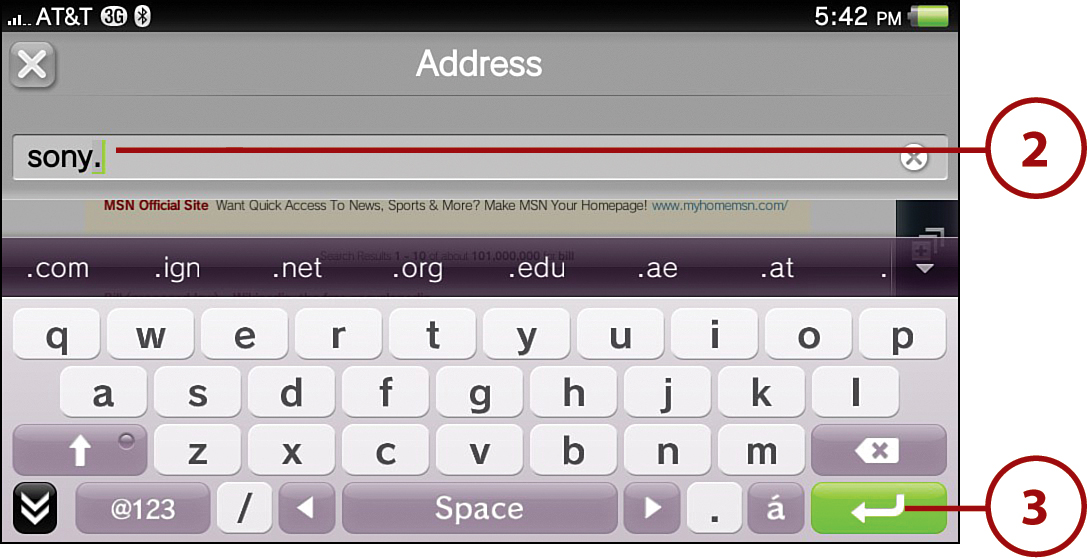
Entering Web Addresses
Entering a web address, known as a universal resource locator, or URL, works the same as it does in most other web browsers. Like these other web browsers, you are usually not required to type “http://” or “www” before the domain name, saving time. To enter a URL in the Browser app, do the following:
1. Tap the address bar. If the address bar is not visible, flick the screen down.
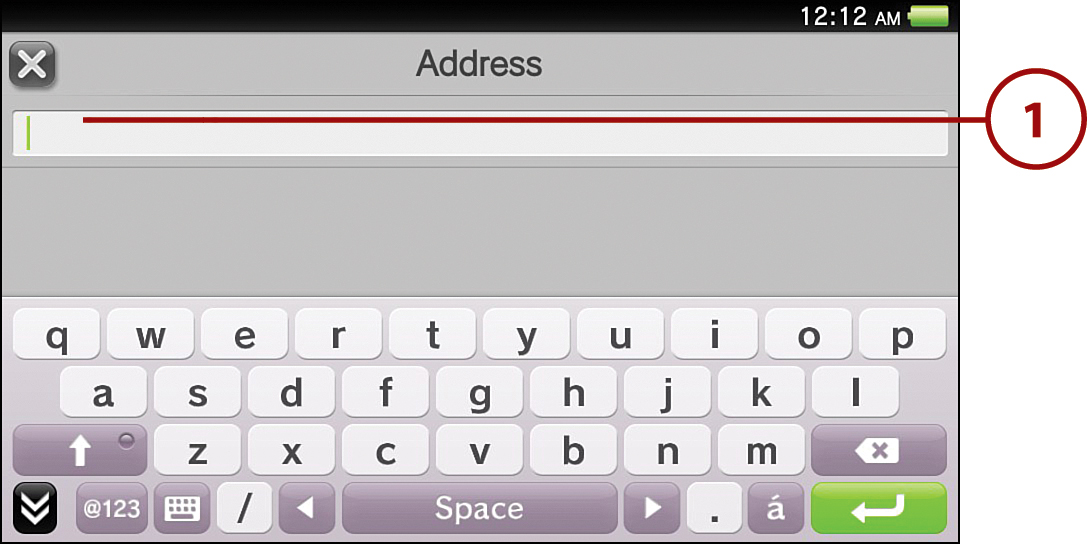
2. Input the address with the virtual keyboard.
3. Tap Enter. The web page opens.
Working with Pages
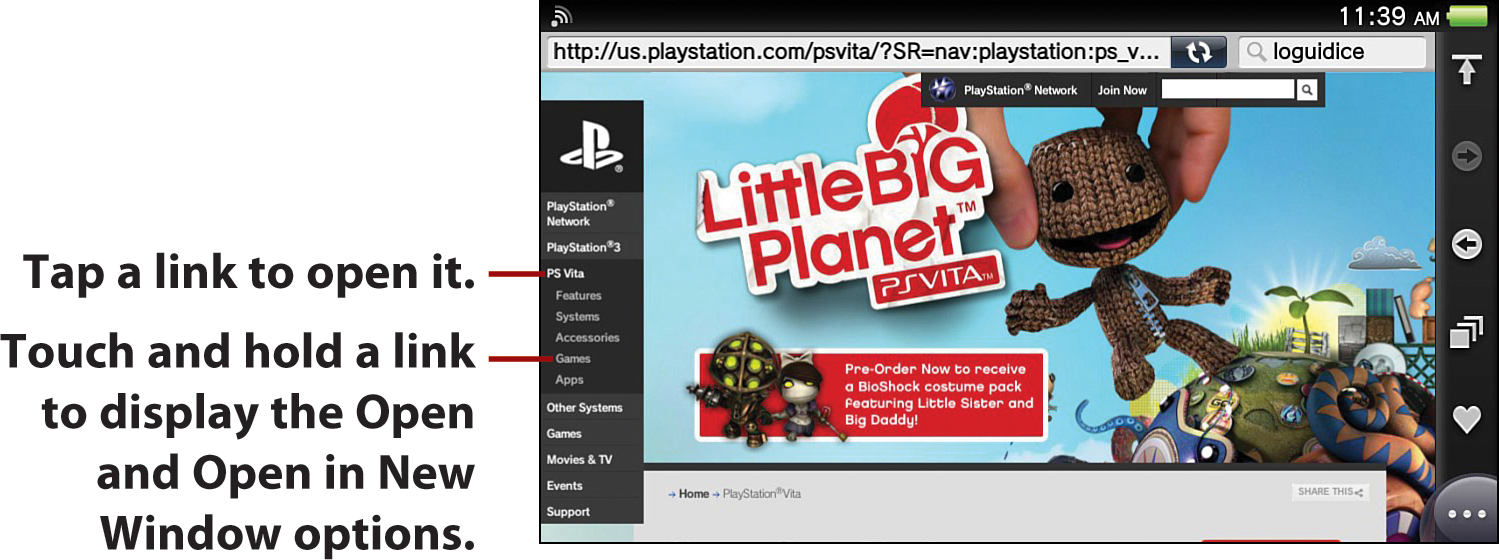
After a web page appears, tap a link on the page to open it. Touch and hold a link to display the menu options for Open and Open in New Window.
Zooming In and Out of Web Pages
To automatically zoom in or out of part of a web page, double-tap the area, taking care to avoid any links because they’ll open if you accidentally tap them. You can also manually zoom in on a specific part of a web page by pinching out on the area. To manually zoom out, pinch in.
Opening Multiple Browser Windows
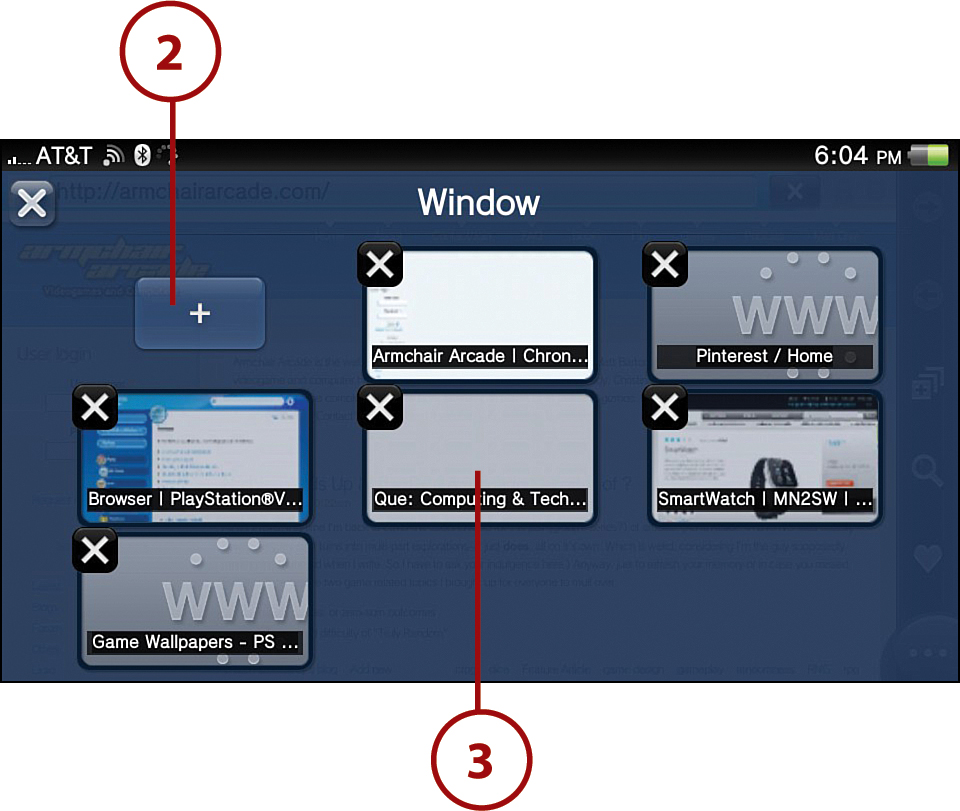
You can open up to eight browser windows. To open the Window display and work with the browser windows, do the following:
1. Tap Window on the Browser menu.
2. Tap Add to open a new window.
3. To switch to a different open browser window, tap the browser window you want to switch to.
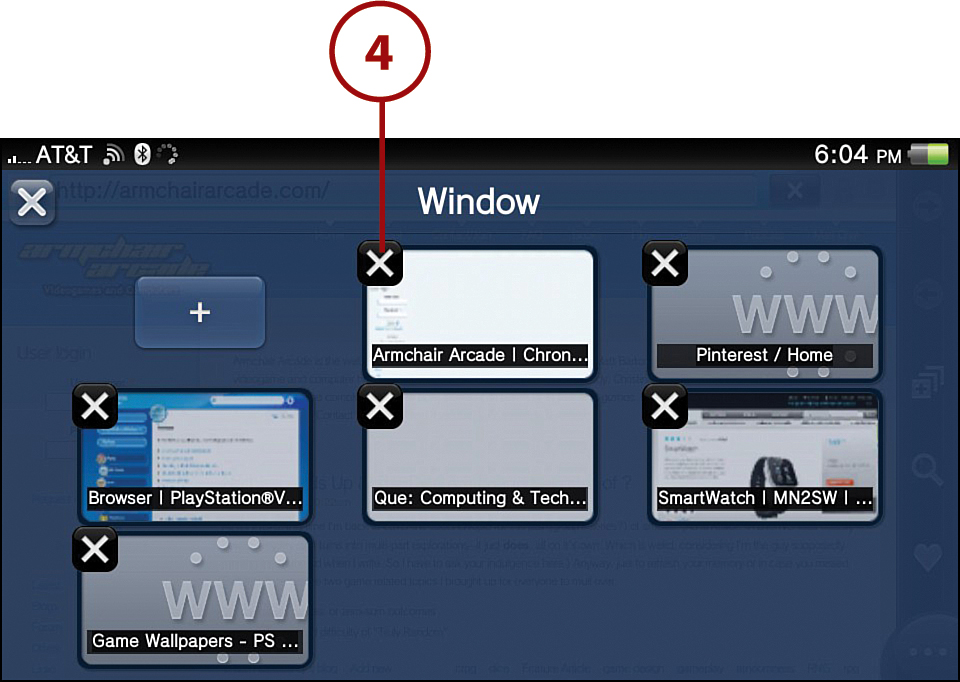
4. Tap X to close a browser window.
When a browser window is closed, it also disappears from the Window list on the LiveArea screen.
When all the browser windows have been closed, a new window is opened and the Bookmarks dialog appears.

Saving Images
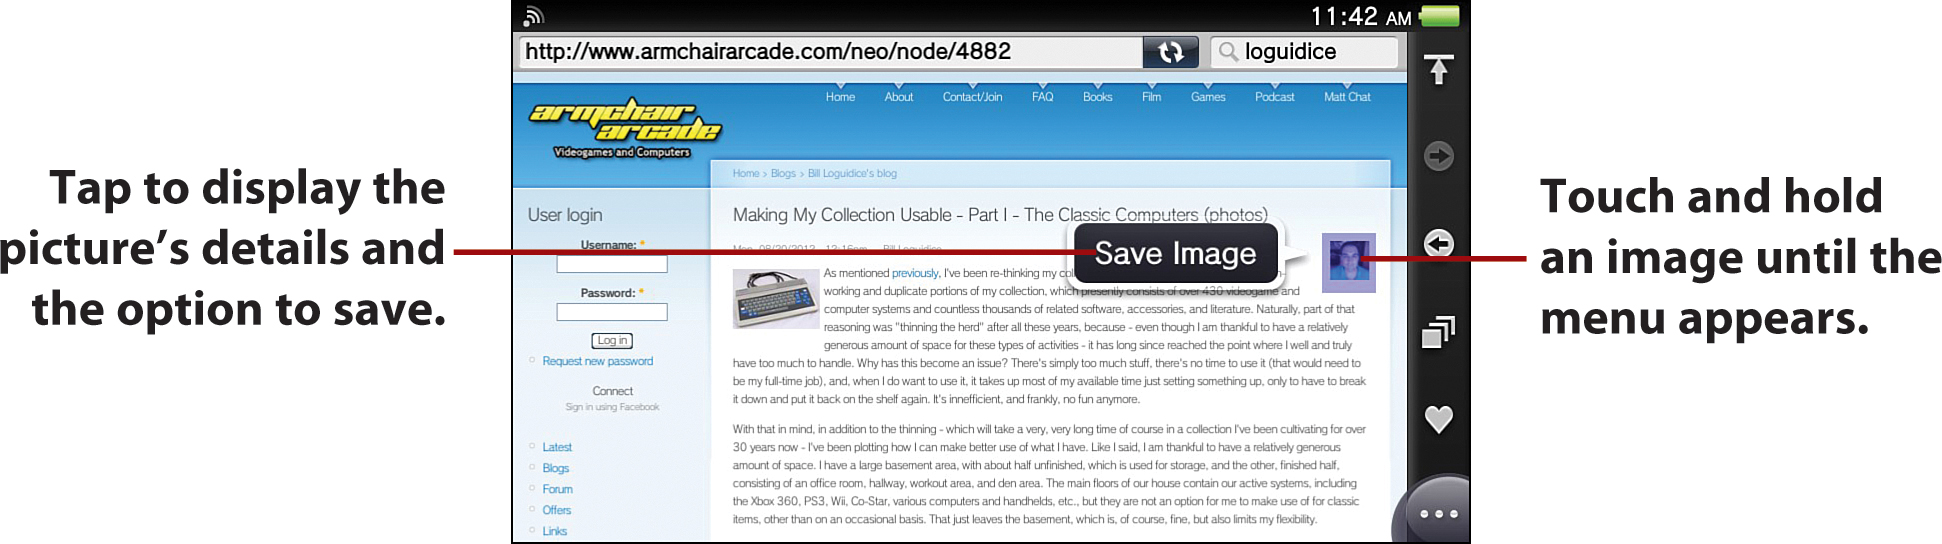
You can save images from a web page to your Vita’s memory card. These saved images can then be viewed on your Vita, used as a wallpaper or lock screen image, or transferred to a PlayStation 3 or computer. When you see an image you want to save, touch and hold the image until the menu appears. Tap Save Image, which displays the picture’s details, and then tap Save.
See Chapter 10, “Snapping Pictures and Videos with the Cameras,” for more on working with photos and other images.
Uploading Files
You can upload files saved on your Vita’s memory card to web pages that have a compatible upload feature. Depending upon the website, different save areas on your memory card will be accessed. For instance, on a site where you can upload wallpapers, tapping Choose File might open your Vita’s Photos listing.
See Chapter 8, “Managing Media with Content Manager,” for additional details on transferring files to your memory card.
Working with Bookmarks and Browsing History
Just like any good web browser, your Vita’s Browser app lets you create a list of Internet shortcuts, known as Bookmarks, that provide categorized links back to your favorite websites. In addition to being able to manually set a bookmark, the Browser app also automatically keeps track of up to six days’ worth of your browsing activities. This enables you to go back to a recent site you’ve visited without having to remember the exact address or other details.
Adding Bookmarks
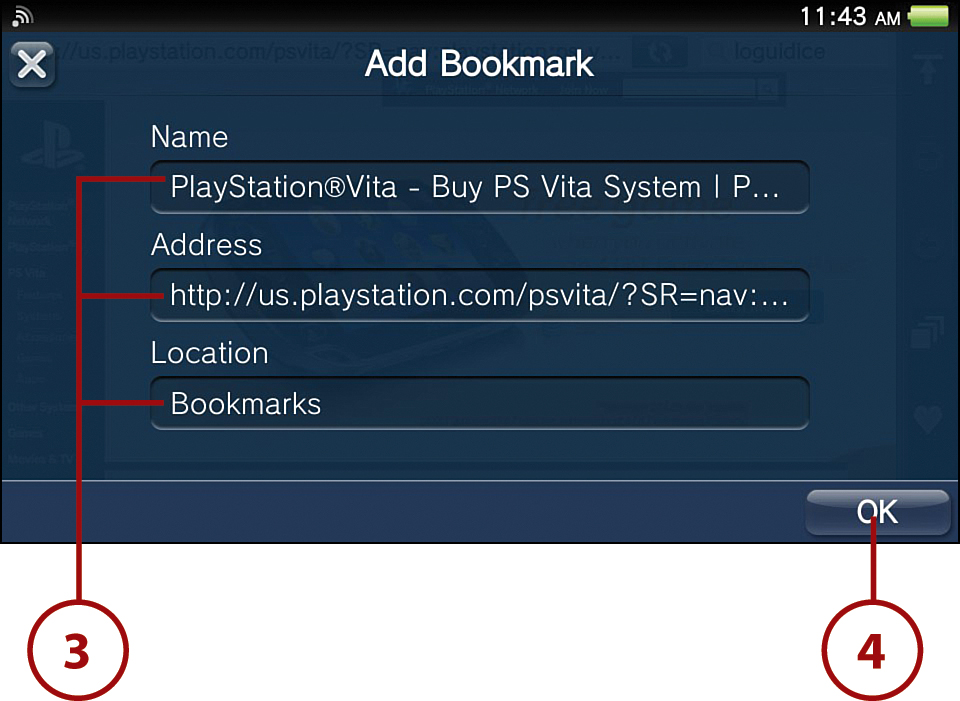
Use the following steps to add a bookmark for the page you’re currently on.
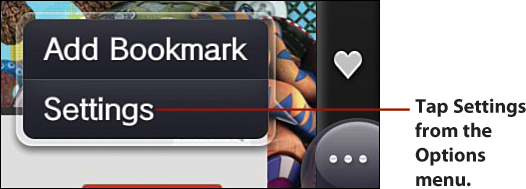
1. Tap the Options icon to display the menu.
2. Tap Add Bookmark.

3. Tap to edit any of the fields, if needed.
• Name—This should represent a name that’s meaningful to you for the bookmark.
• Address—This should rarely, if ever, need editing, as doing so could break the link. One good reason for editing this address would be a desire to save the bookmark at the site’s home page, rather than a specific location on the site.
• Location—If you prefer to group your bookmarks, tap to save to a specific subfolder, rather than to the default main Bookmarks folder.
4. Tap OK to save the bookmark when you’re satisfied with the bookmark’s settings.
Opening a Bookmark
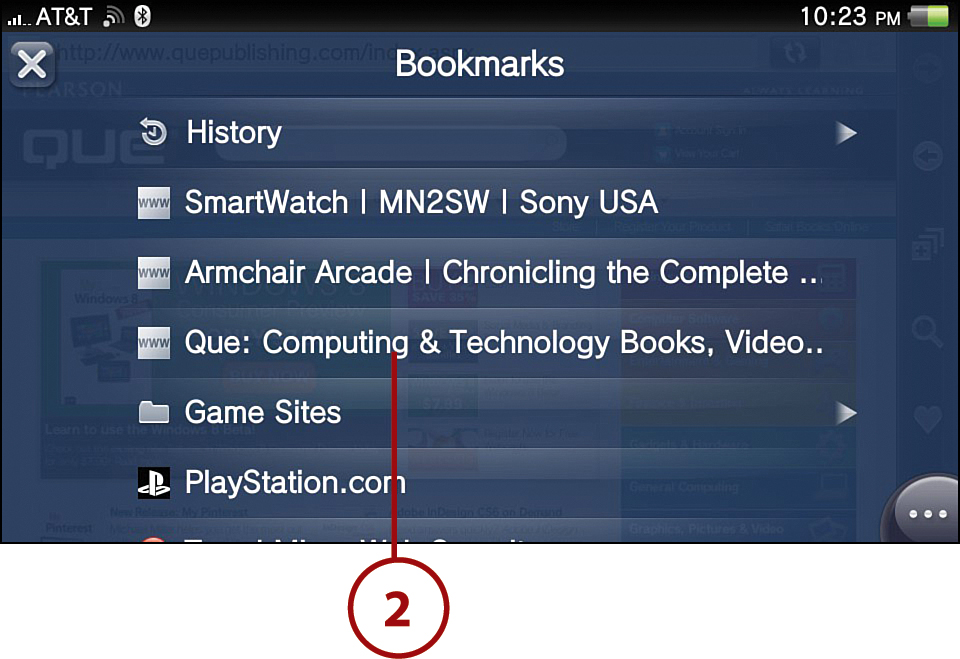
To use a bookmark that you’ve previously saved, do the following:
1. Tap the Bookmarks icon on any web page to display the menu.
2. Tap any of the saved bookmarks to open its associated web page.
Organizing Bookmarks
You can organize bookmarks by tapping Options within the Bookmarks listing. Use the following options to organize your bookmarks:

• Create Folder—Tap Create Folder to create a new folder under Bookmarks. You can create subfolders under other folders by tapping the folder to open it and then repeating the process.
• Edit—Use Edit to rename a bookmark or folder.
• Sort—Tap Sort to change the order of bookmarks. Drag the Move slider for the bookmark you want to move to the desired location and then tap OK.
• Delete—Tap Delete to delete a bookmark or folder.
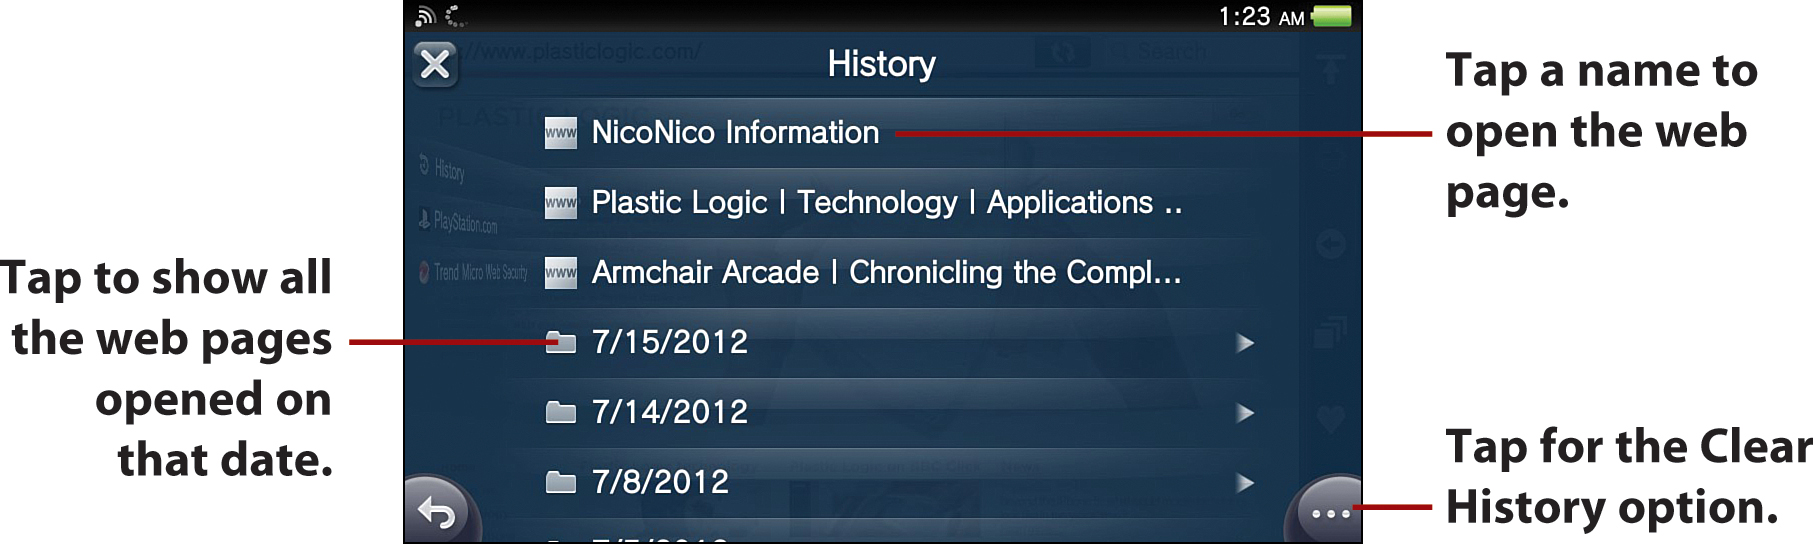
Viewing Your Browsing History
Any opened web pages are automatically saved in your browsing history. On any web page, tap the Bookmarks icon, then tap History. Tap the web page you want to open. Browsing history can be cleared from the Options menu on the History page.
Browser Settings
Within the Browser app you can configure several browser settings related to tracking and security, including the blocking of potentially objectionable websites. You can also enable support for the rear touch pad, which allows for additional scrolling and zooming control. To access Settings from any web page, tap the Options bubble and then tap Settings.
The options within Settings are as follows:
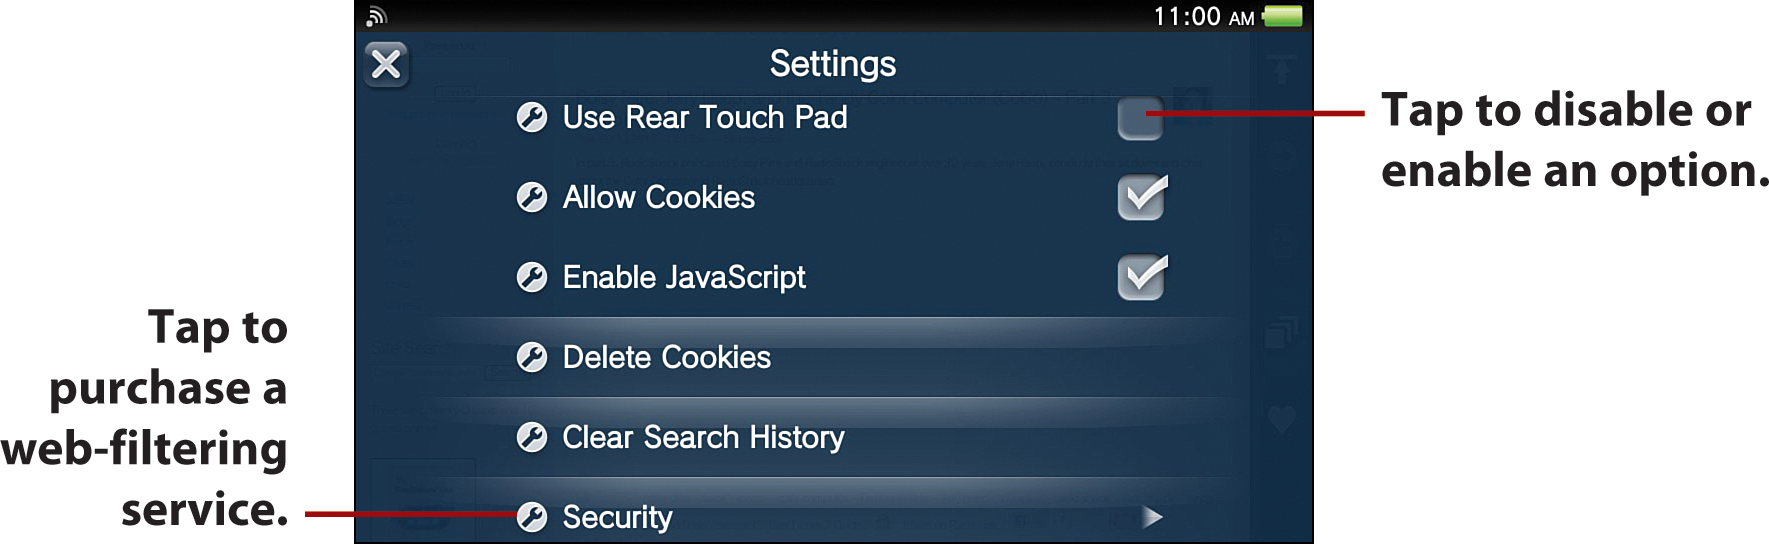
• Use Rear Touch Pad—Tap to enable rear touch pad control. Flick or drag to scroll up and down, and double tap to zoom out on a web page. This is a great way to control select Browser functions while keeping your view of the front touchscreen clear.
• Allow Cookies—Cookies are small pieces of data sent from a website and stored locally in your Browser app. When you visit the same website in the future, these stored cookies serve as a means of notifying the website of your previous activities. Tap Allow Cookies to remove the check mark if you don’t want cookies stored. Bear in mind that if you don’t allow cookies, some websites might not function correctly.
• Enable JavaScript—JavaScript is a programming language whose code is often used to enable important interactive functions on a website, such as data entry forms. JavaScript’s interactivity can sometimes represent a security risk, so a common browser feature is the option to disable its functionality. Tap Enable JavaScript to remove the check mark if you don’t want JavaScript enabled. Keep in mind that disabling JavaScript might significantly impair the functionality of some websites.
• Delete Cookies—Tap Delete Cookies to delete stored cookies. Although this sounds like Cookie Monster’s worst nightmare, it just means the next time you visit a previously opened website, it will be as if it was your first time there.
• Clear Search History—Tap Clear Search History, then confirm, to clear your stored list of searches from using the Browser’s Search function.
• Security—Tap Security to show a list of the web-filtering services available for your Vita. You can use a web-filtering service to check the type and safety of websites, and automatically prevent those that are deemed dangerous or harmful from being displayed. Enabling one of these services can be of particular aid to parents or guardians when letting minors surf the Web. As of this writing, the only service option is Trend Micro Web Security, which is a pay service, but it offers a free 90-day trial period.