
4. Getting Oriented with Near and Maps
In this chapter, you learn about the Vita’s Near and Maps apps, both of which make use of your Vita’s ability to capture location data.
• Accessing Near and Enabling Location Data
• Touring Near’s LiveArea and Application Screens
• Finding Your Way with the Map Apps
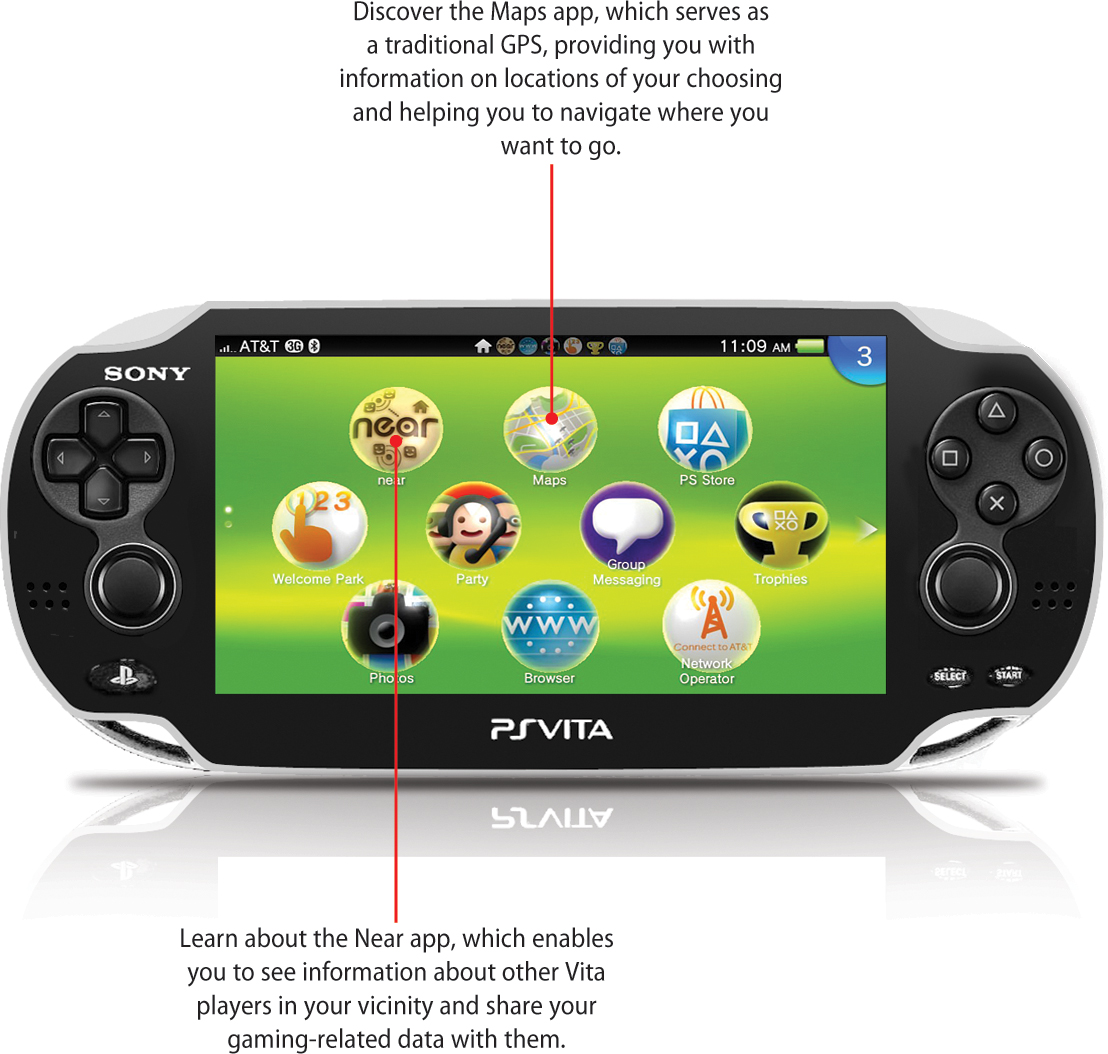
Your Vita comes equipped with the ability to use location data when interacting with certain applications and games. The Vita does this by either approximating its position via Wi-Fi, or, on 3G/Wi-Fi models, more precisely positioning with its GPS (global positioning system) receiver. Two preinstalled applications on your Vita are grounded in location-based technology: Near and Maps. Near is a Vita gaming socialization app that enables you to locate friends and other players with Vitas in your vicinity to see what they are playing, share game information, and access game goods. The Maps app is your portal to Google Maps. It enables you to find your current location, view other locations, and get directions.
Because Near and Maps rely on obtaining location data, the PlayStation Vita 3G/Wi-Fi model enables a more comprehensive “always on” experience with these applications than the PlayStation Vita Wi-Fi model. For example, if you take your 3G-enabled Vita on the road, it should be able to pick up data from more locales along the way than the Wi-Fi model, which can only obtain data when it can establish a connection over Wi-Fi. Turn to “Understanding the Vita Models” in Chapter 1, “Getting Started,” for an overview of the differences between Vita models.
Accessing Near and Enabling Location Data
When you access Near for the first time, you need to set it up by agreeing to various terms of service and enabling location data.
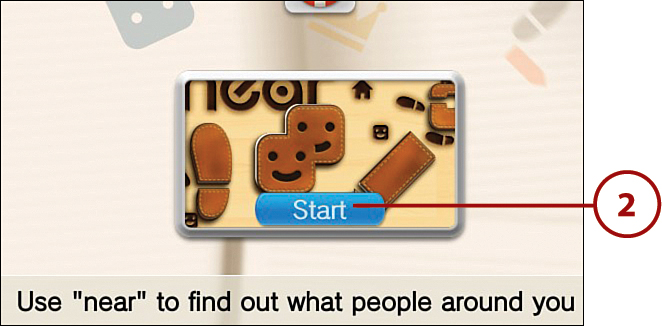
1. Go to the Home screen and select the Near icon.

2. Tap the Gate at the LiveArea screen.
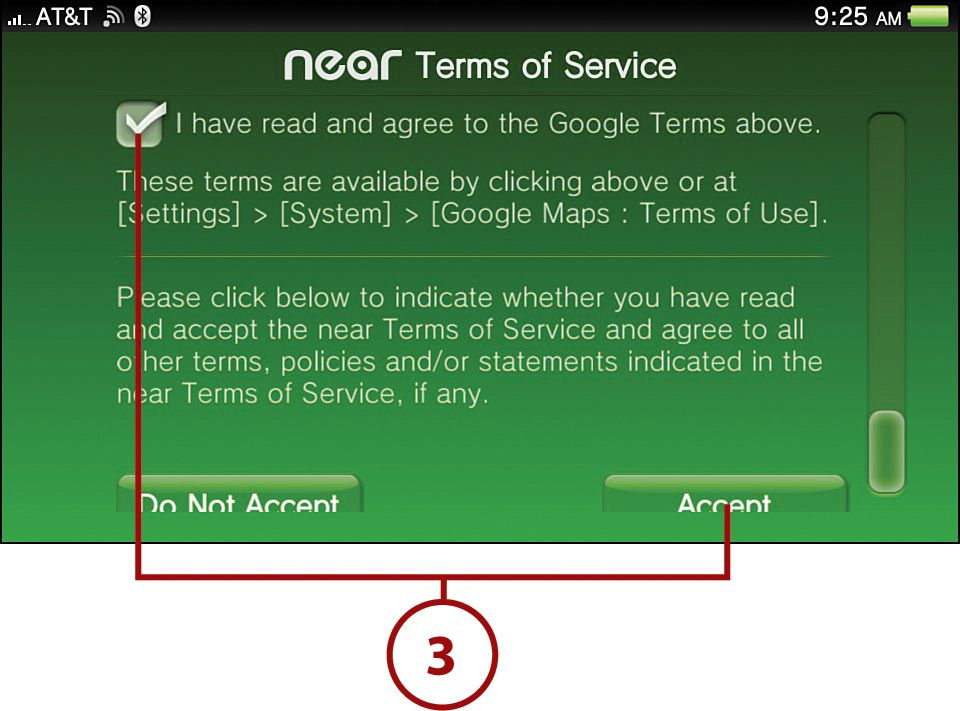
3. Accept the Google Terms of Service by scrolling down and tapping the I Have Read and Agree to the Google Terms Above box to place a check mark, and then tapping the Accept button.
4. You are now on Near’s main interface screen. After tapping OK to a series of informational prompts about Near, tap the round Near icon at the top right of the screen; this is known as the Update button.

5. The first time you tap the Update button, a series of prompts will help you establish location data and enable information sharing. When you see the Location Data Obtained! notice, tap OK to proceed.
6. The Sharing Settings screen appears. This is where you grant Near permission to share your information. You also see which information would be shared if you enable this feature. You can always edit these settings after enabling sharing, as outlined in “Near Settings” later in this chapter. Tap the Share Online ID checkbox if you want to proceed, and then scroll down to the bottom of the screen. Keep in mind that you do not need to share your online ID to use Near.

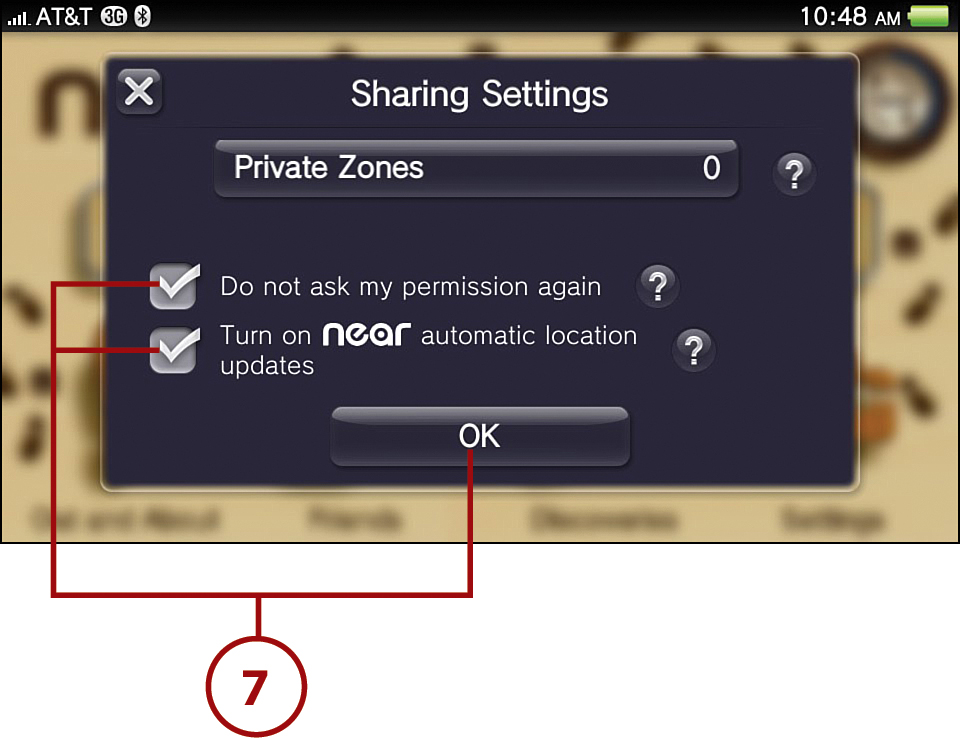
7. Tap the Do Not Ask My Permission Again checkbox if you prefer not be asked for permission each time Near shares your data; you need to check mark this selection to enable automatic updates. If you check mark this first option then the Turn on Near Automatic Location Updates checkbox becomes enabled; tap it if you want Near to automatically update your location data if it notices you haven’t manually done so in a while. Tap OK after you have finished making your selections.
If you are wondering what privacy zones are, turn to “Sharing Settings” later in this chapter to find out.
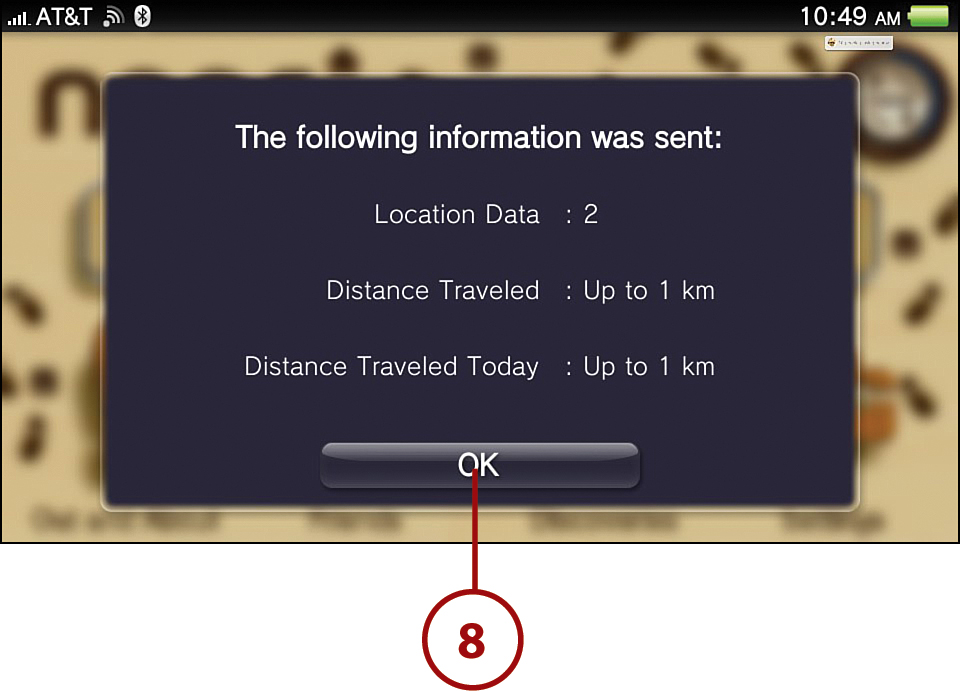
8. Some stats appear that show you the data that has been shared with other Vita users via Near, including your Location Data, Distance Traveled, and Distance Traveled Today. Tap OK when you are ready to go back to Near’s main interface screen.
Touring Near’s LiveArea and Application Screens
To access Near, you go through the Gate on the LiveArea screen. Thereafter, you encounter Near’s Application screen, which is the screen from which you access the application’s core features, including Out and About, Friends, and Discoveries. All of these have their own screens, which are outlined in their respective sections in this chapter.
Near LiveArea Screen
After you set up Near by enabling location data and information sharing, its LiveArea screen includes information beyond the Gate and Action icon that you encountered the first time you accessed Near. The options available and the information displayed on this enhanced LiveArea screen are as follows:
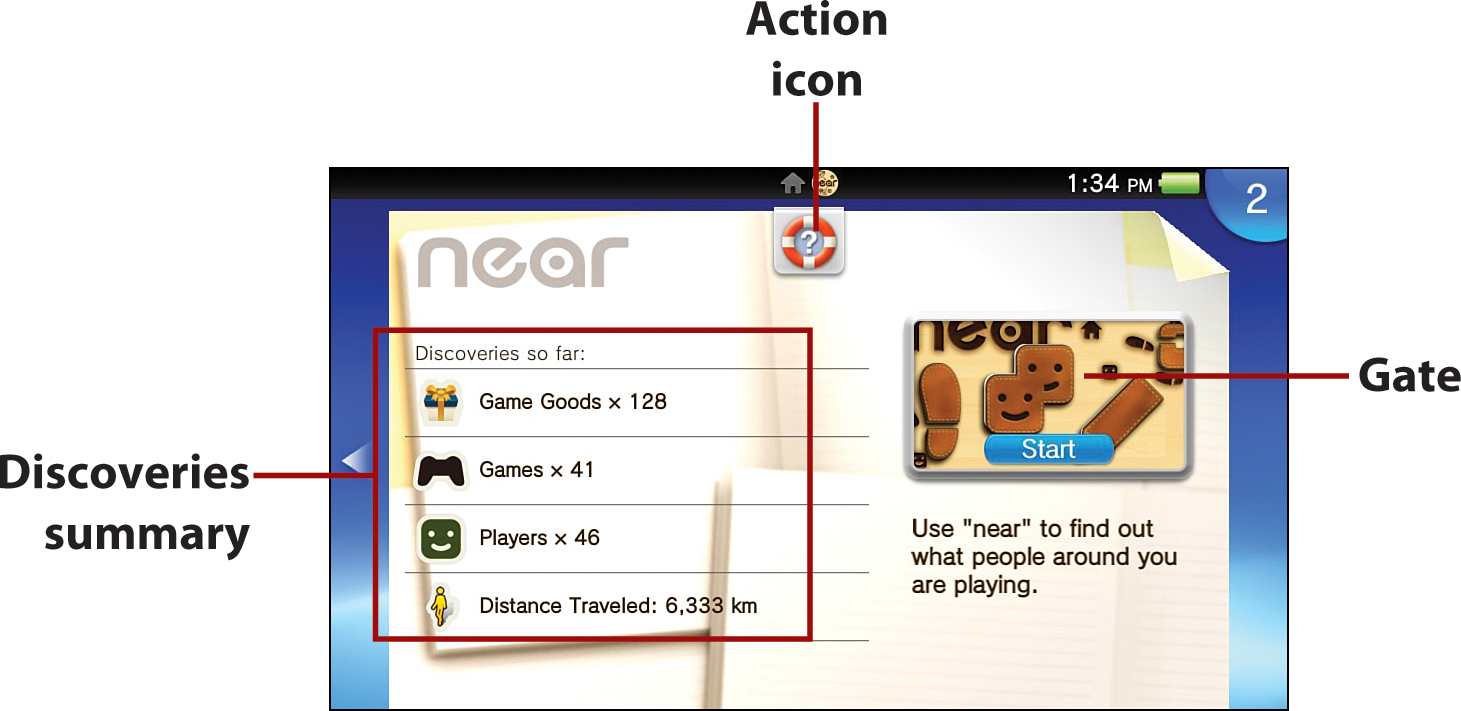
• Action icon—Tapping the Action icon opens the Near section of the PlayStation Vita User’s Guide using the Browser.
• Gate—Tapping the Gate brings you to Near’s main interface screen, also known as the Application screen.
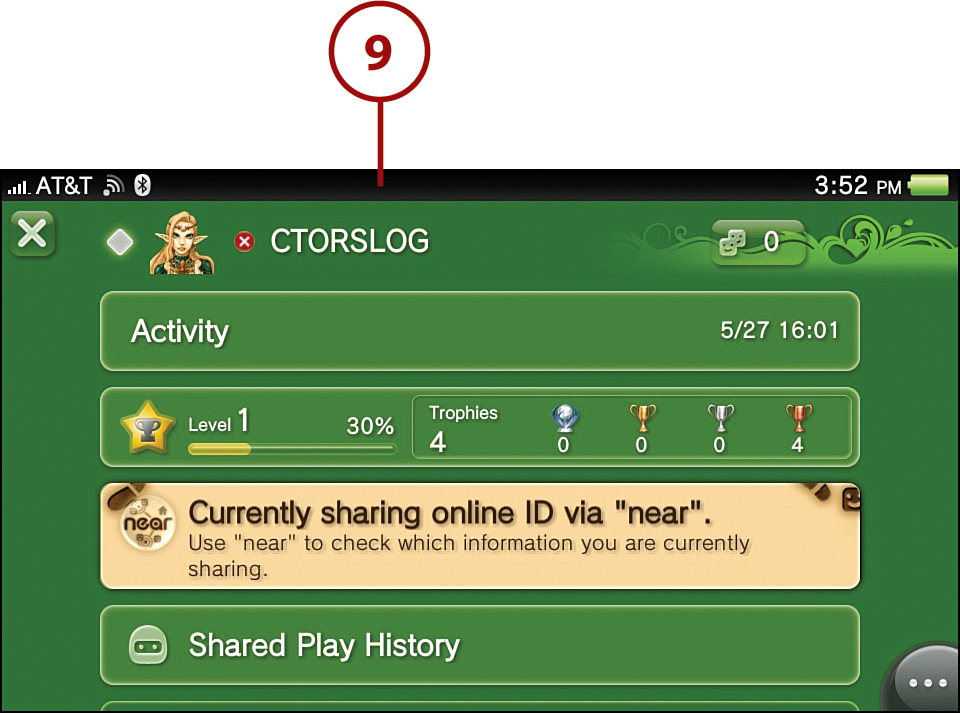
• Discoveries so far—This is purely an informational area, so nothing can be tapped. Here you see outlined the number of game goods and games that you’ve discovered in Near, the number of players you’ve encountered, and the distance you’ve traveled with your Vita in tow. This same information is displayed when you tap Discoveries from the Near Application screen.
Near Application Screen
After you pass through the Gate on Near’s LiveArea screen, you arrive at Near’s Application screen. This is where you access all of Near’s features, including the following:
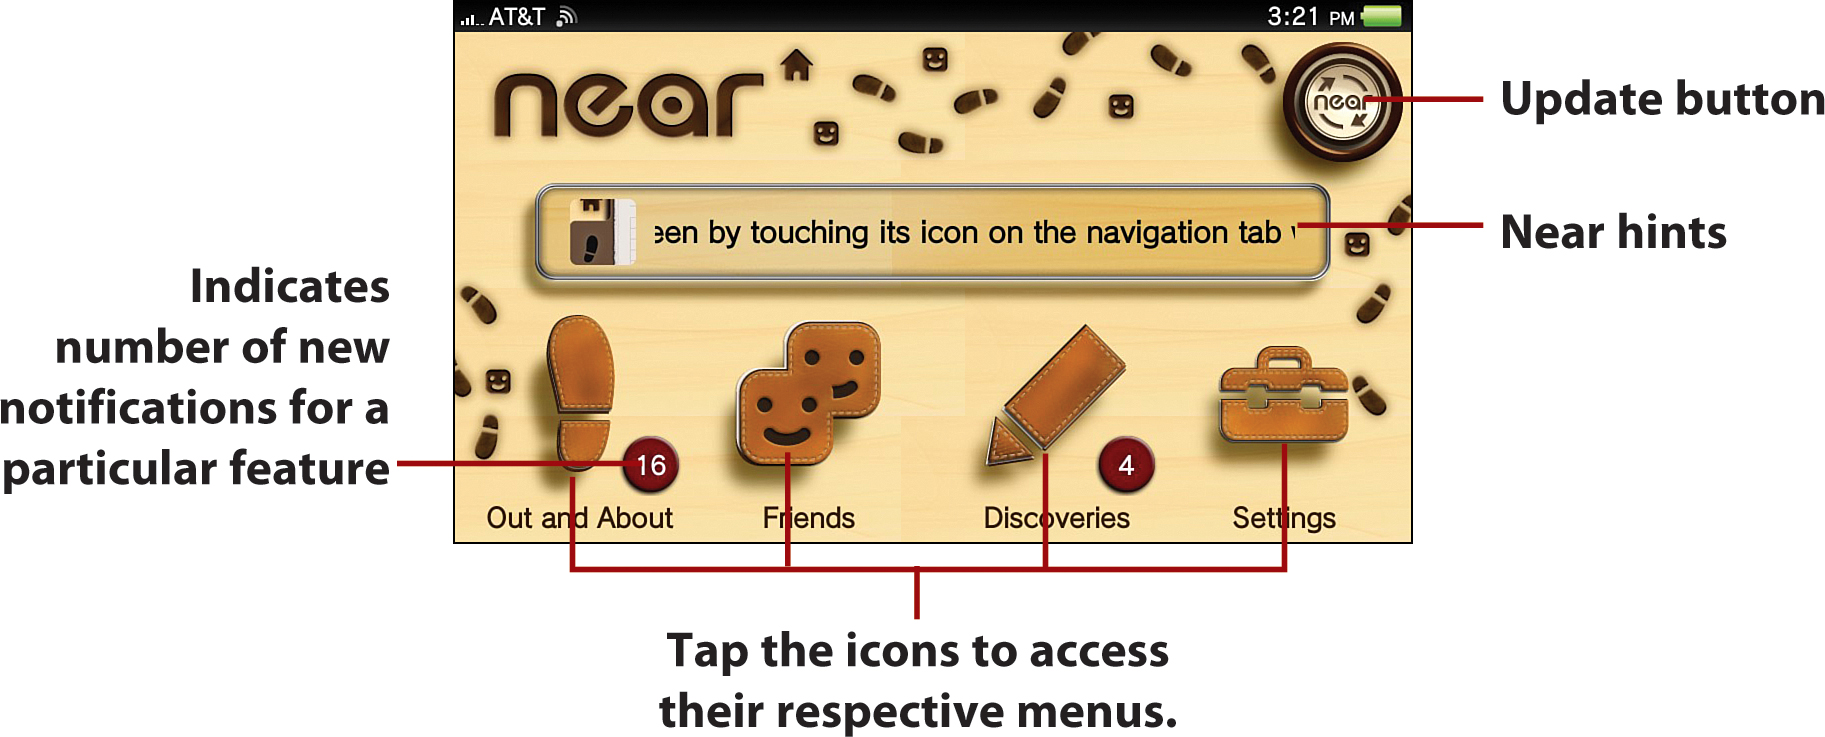
• Update button—Tapping the Update button pulls up the most recent location data.
• Near hints—Tap the Near Hints field to see tips and information on Near’s features. When you are signed in to the PlayStation Network, you can tap this field to receive different hints.
• Out and About—When you tap the Out and About icon, you are brought to the Out and About History screen. This screen displays information regarding your vicinity. In addition, when you take your PS Vita with you on excursions, whether to the next town or across the country, it collects and displays information about events along the way, such as games that are popular in certain geographic areas and users encountered along the way, particularly persons you regularly encounter. All events appear in chronological order. On the Application screen, a number that appears in a red circle next to the Out and About icon indicates the number of new events Near registered. For more on Out and About, see “Getting Out and About” later in this chapter.
• Friends—When you tap the Friends icon, your see a listing of your PlayStation Network friends, including information on their activities and game rankings. A number appearing in a red circle next to the Friends icon indicates the number of updates Near has received about your friends. To learn more about what Friends offers, turn to “Checking on Friends” later in this chapter.
• Discoveries—When you tap the Discoveries icon, it outlines discoveries you’ve made, such as the number of players you’ve encountered, items you’ve discovered, and distances you’ve traveled. You can also download items that have been gifted to you by other gamers. For more on discoveries, see “Viewing Discoveries” later in this chapter.
• Settings—Tapping the Settings icon enables you to set the range in which your personal information is shared with other Vita users via Near. You can also set the parameters regarding how your Vita handles location data and view the Privacy Policy and the Near and PlayStation Network Terms of Service. For more on Near’s settings, see “Near Settings.”
Near Settings
Your settings in the Near app are essential to ensuring you get the most out of this app without compromising your privacy. When you select Settings from the Near Application screen, a Settings page appears. This page has eight options: Location Data, Sharing Settings, Unit of Distance, Game Good Settings, Delete All “near” Data, Near Terms of Service, PSN Terms of Service, and Privacy Policy.
Location Data
When you select Location Data, you see the following three statements onscreen:

• Allow This PS Vita System to Use Your Location Data—The word “On” appearing next to this statement means your Vita is enabled to Use Location Data under the Location Data screen of the main Settings app, which is discussed in Chapter 3, “Settings and Networking on Your Vita.” If you do not enable Vita to use location data, you cannot use the Near app, and when you try to access various features in Near, you are asked whether you want to enable this feature.
• Allow “Near” to Use Your Location Data—This option also needs to be check marked for you to use Near. If it is not, Near cannot locate where you are or compile and share information with you about other Vita users in your community.
• Obtain Location Automatically at Regular Intervals—When this option is check marked, Near automatically obtains your location data at regular intervals, even when Near is not running, but your Vita does need to be turned on. The collected data are uploaded the next time an update is done, either manually (when you tap the Update button) or automatically (if you have enabled the Turn on Near Automatic Location Updates option under Sharing Settings). This is the only option under Location Data that does not need to be check marked for you to use Near.
Sharing Settings
When you select Sharing Settings from the Near Settings menu, five options are available:
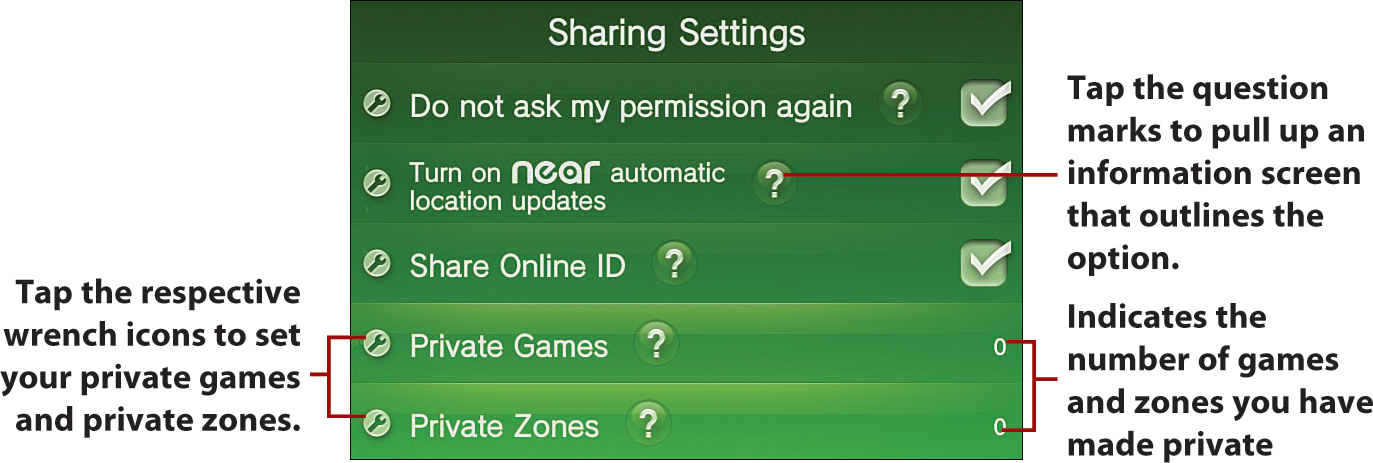
• Do Not Ask My Permission Again—When this option is check marked, you don’t have to give Near approval every time it wants to share your data.
• Turn on Near Automatic Location Updates—If you want Near to automatically update your location data after you haven’t done so for a while, make sure this option is check marked.
• Share Online ID—When this option is check marked, your location data and the games you’ve played are shared with other players and you are enabled to find other Vita gamers in your vicinity and exchange game items with them. If you only want to share some information, you can designate which information not to share under the Private Games and Private Zones options. If you opt to turn off this setting, your location data and information on the games you’ve played are sent to the server, but your online ID isn’t shared.
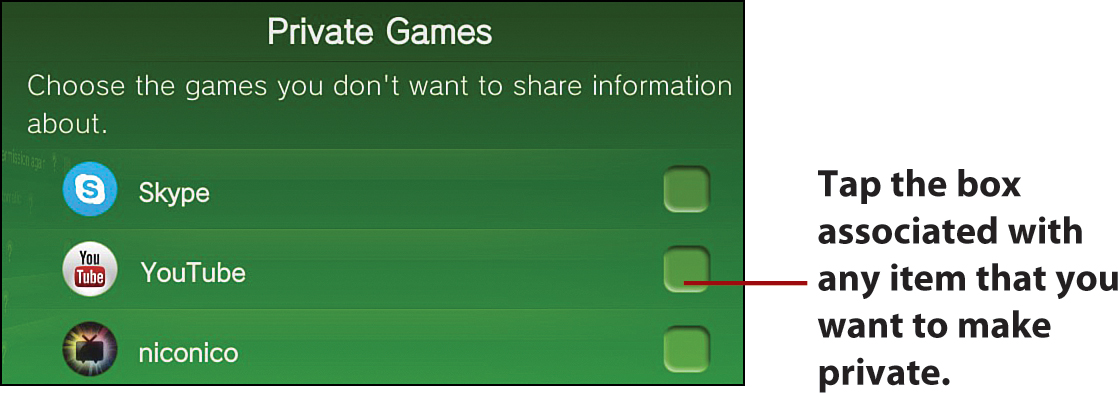
• Private Games—When you select this option, you can prevent other players from seeing game- and application-related information for the items you specify. The specifications you set here only apply to the Near app and don’t affect the Share Activities setting of your Vita. To set private games, simply tap on Private Games, which yields a screen that shows all the games and other applications you have installed on your Vita. Turn off the items you don’t want to share information on by tapping the box associated with that item.
• Private Zones—This setting enables you to choose locations where other players cannot see your Near information. You can set up to five private zones, and when you play your Vita in these zones, you are treated as an anonymous player. To set private zones, see “Establishing Private Zones” later in this chapter.
Depending on the age of the account holder and how the options under Sharing Settings are set, certain features in the Near application are disabled, as outlined in Table 4.1.
Table 4.1. Age and Setting-Related Restrictions on Using Near Features

Establishing Private Zones
To establish private zones, do the following:
1. Select Settings from the Near Application screen.

2. Tap Sharing Settings.

3. Tap directly on Private Zones.

4. Place your finger on the map and drag the map around until the circle appears in the zone you want to make private.
5. Tap the number from the menu that you want to assign to the zone.
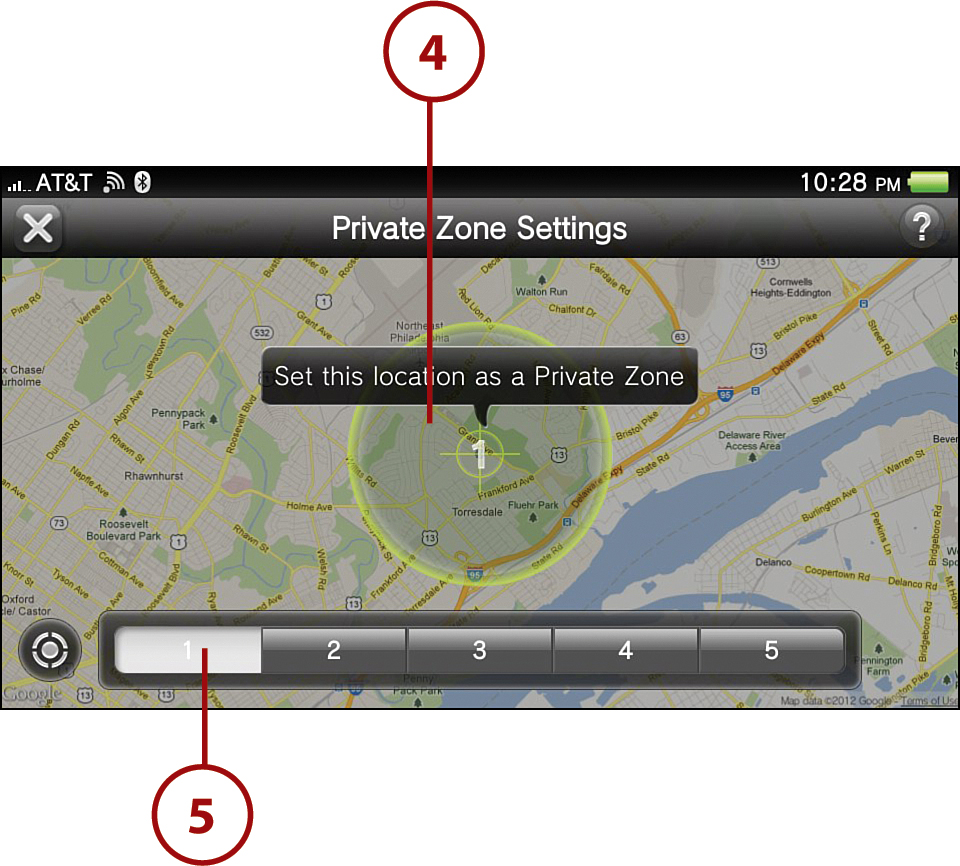
6. Tap the circle again. A solid green circle now appears around the zone on both the map and number menu, indicating it is private.
7. To set another private zone, simply move the map again and repeat steps 4 to 6.
8. After you have set all the zones you want (up to five are possible), tap the X at the top left of the screen to exit.

No Longer Want to Play Incognito?
If you decide you would rather flaunt your gaming identity, you can easily eliminate the private zones. Simply go back to the Private Zone Settings screen (the map screen). Tap the number for the zone you want to delete from the number menu. This brings you to that zone on the map. Tap the circle for that zone on the map. That’s it! The green circle now disappears for that zone, both on the map and from the number menu, indicating you are no longer an anonymous player in that zone.
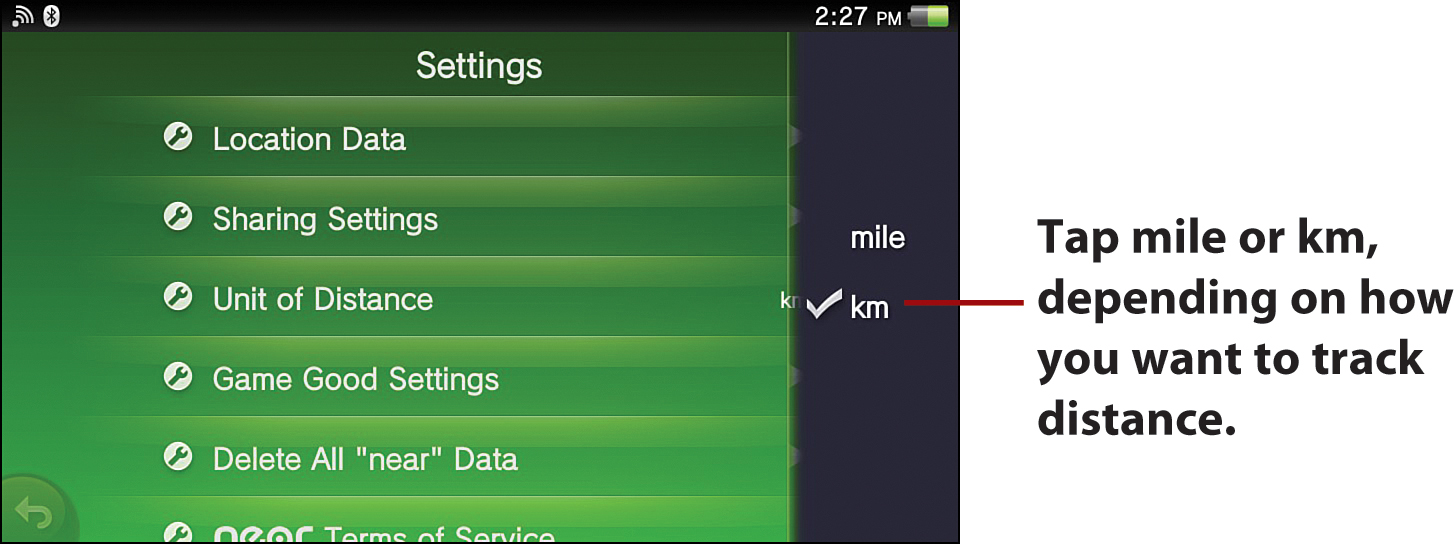
Unit of Distance
Unit of Distance lets you establish how distance traveled is indicated by Near. When you tap this setting, you have the option to select mile or km (kilometer). Tap your preferred unit of measure, and the text next to Unit of Distance shows your selection.
Game Good Settings
Game Good Settings enables you to adjust the settings for automatically downloading game goods and discovering game goods for games and applications that you’ve played or used. If you select Game Good Automatic Download Settings, you can select the titles for which you would like to automatically download game goods, whereas if you tap to check off next to Discover Only Game Goods for Games You Have Played, your Vita will no longer pick up any goods for titles other than those you’ve got installed.

Delete All “Near” Data
Selecting this option enables you to delete all your Near data, including the game goods you’ve discovered, data on people you’ve encountered, and all chart data. If you want to give Near a fresh start, then select Delete All from the Delete All “Near” Data screen, but if you want to keep the information your Vita has collected, select Cancel.
Terms of Service and Privacy Policy
Select Near Terms of Service, PSN Terms of Service and User Agreement, or Privacy Policy if you enjoy reading fine print or legalese or have legitimate questions or concerns about Sony’s policies and procedures regarding the PlayStation Network, Vita, or Near. We are not going to provide you with an overview of each of these items, as that would be dreadfully boring, much like reading through an instruction manual, with My PlayStation Vita being the exception, of course (wink, wink).
Getting Out and About
When you take your Vita with you on excursions, the Near application captures event data, which is displayed in Near’s Out and About area. This is the most comprehensive area of Near, featuring several screens that break down the captured data for you in various ways.
Out-and-About History Screen
Tapping Out and About from the Near Application screen opens the Out and About History screen, which provides the following information:
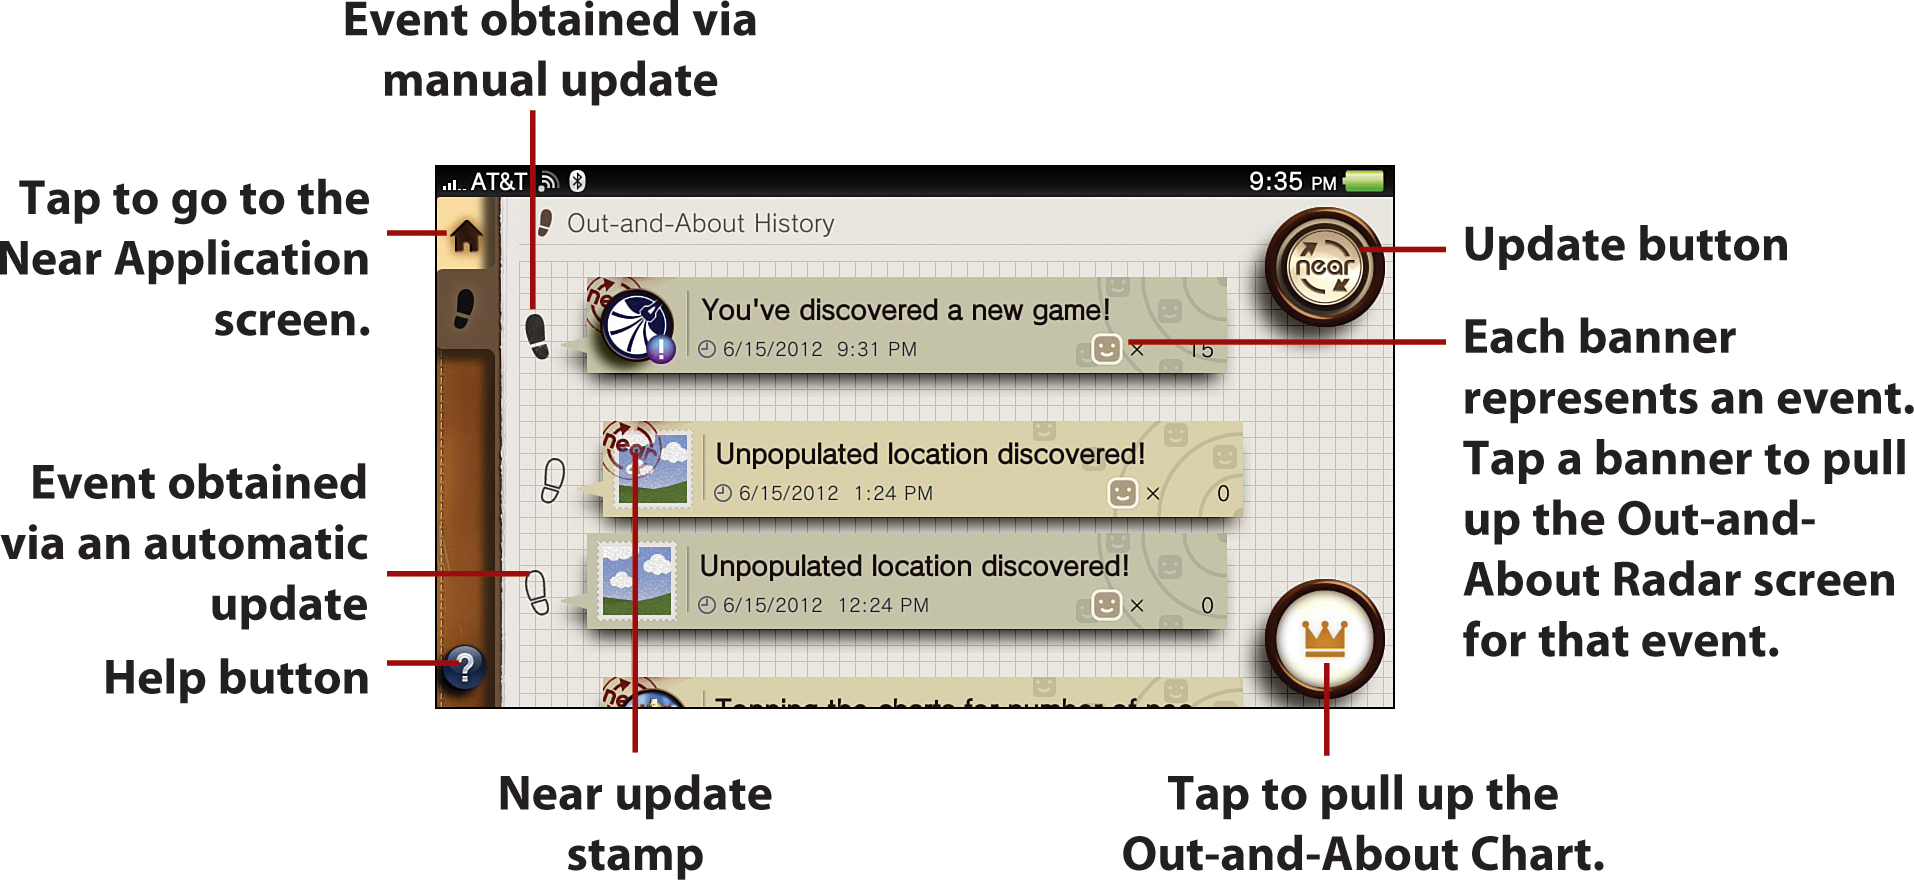
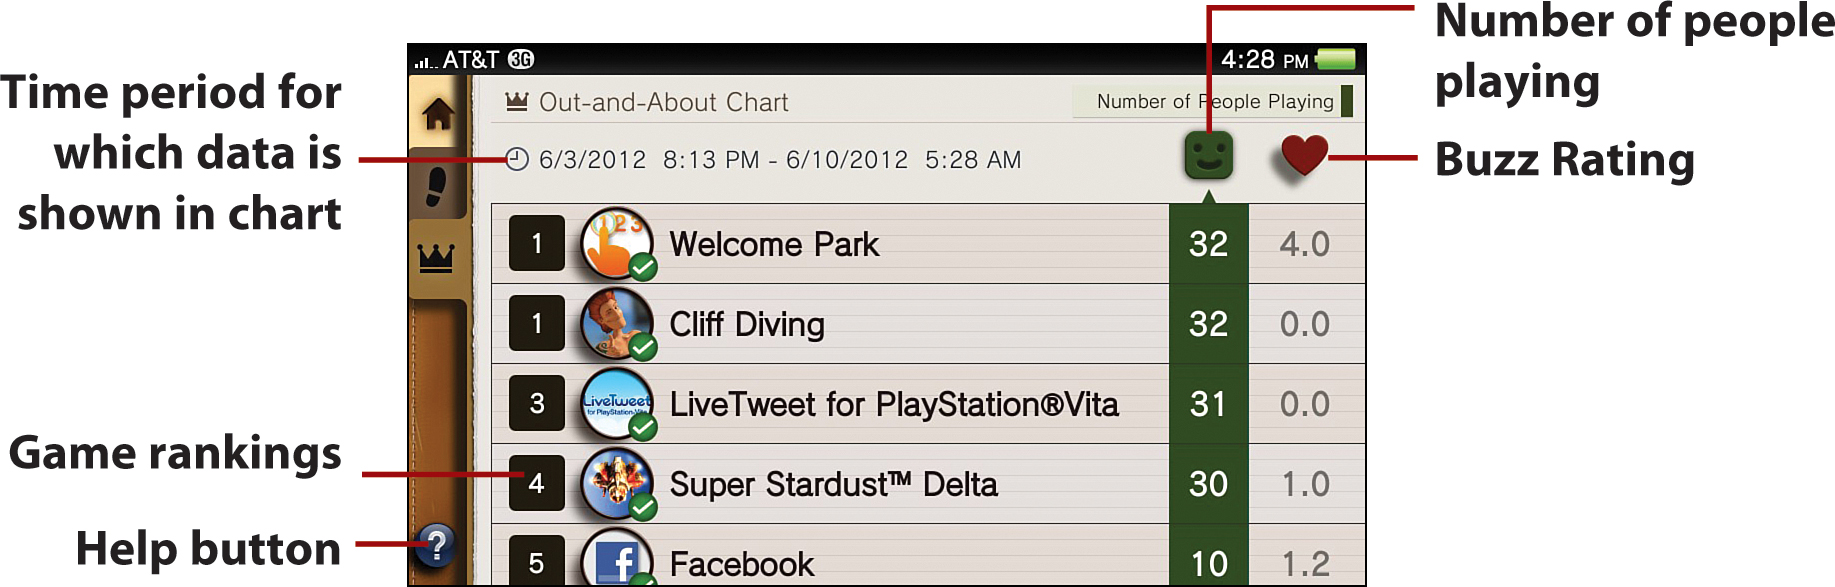
• Event list—The Event list shows the event data that Near captures and displays in chronological order. Each item includes an icon, descriptive text, and positional information. In addition, a Near update stamp or mini-icon (exclamation mark, up arrow, heart) might appear next to an icon in the list. The update stamp gets placed on any event that was picked up when you tapped the Near Update button. The exclamation mark indicates a new discovery, whether a game (if it appears next to a game icon) or game good (if it appears next to a present icon) picked up by Near for the first time. The up arrow appears next to a game icon when Near observes a dramatic increase in the number of individuals playing that game in the vicinity. The heart icon appears next to games with a high Buzz Rating; the Buzz Rating is automatically calculated using the frequency of play and the time played, and it is meant to serve as an indicator of how excited gamers are about that game.
• Update button—Tap the Update button to obtain the most current information about your locale.
• Out-and-About Chart—Tap the Out-and-About Chart icon to view the aggregate ranking for games played by individuals in the vicinity of all the locations in your Out-and-About History. The Out-and-About Chart is discussed later in this chapter.
• Position information—When an event in the event list is obtained via manually acquired location data, it is displayed with a solid footprint next to it. If it is acquired automatically, it is displayed with a sheer footprint.
• Help button—Tap the Help button to receive an overview of the screen and its features.
Because changes that add to or improve the features of your Vita are constantly being made via regular software updates, if a particular icon or feature in Near is unclear and is not outlined in this chapter, be sure to tap the Help button for enlightenment. The Help button appears on all key screens in Near and provides screen-specific information, ensuring you do not have to weed through extraneous information to find what you need.
Out-and-About Radar Screen
To access the Out-and-About Radar screen, tap any event listed in the Out-and-About History screen. The Out-and-About Radar screen provides more detailed information on friends and other players associated with the event you tapped. Key features of this screen are as follows:

• Location data—This is the location information for the event you selected. When you tap it, a mini map generated from Google maps appears pinpointing that location.
• Event icon and listing—This is the icon and descriptor text associated with the event you selected. If the icon is for a game or an application such as Facebook, when you tap it, the Player’s Voice screen appears (see “Players’ Voice Screen” later in this chapter for more on this topic). The face icon in this listing indicates the total number of Vita users encountered in the vicinity of the event.
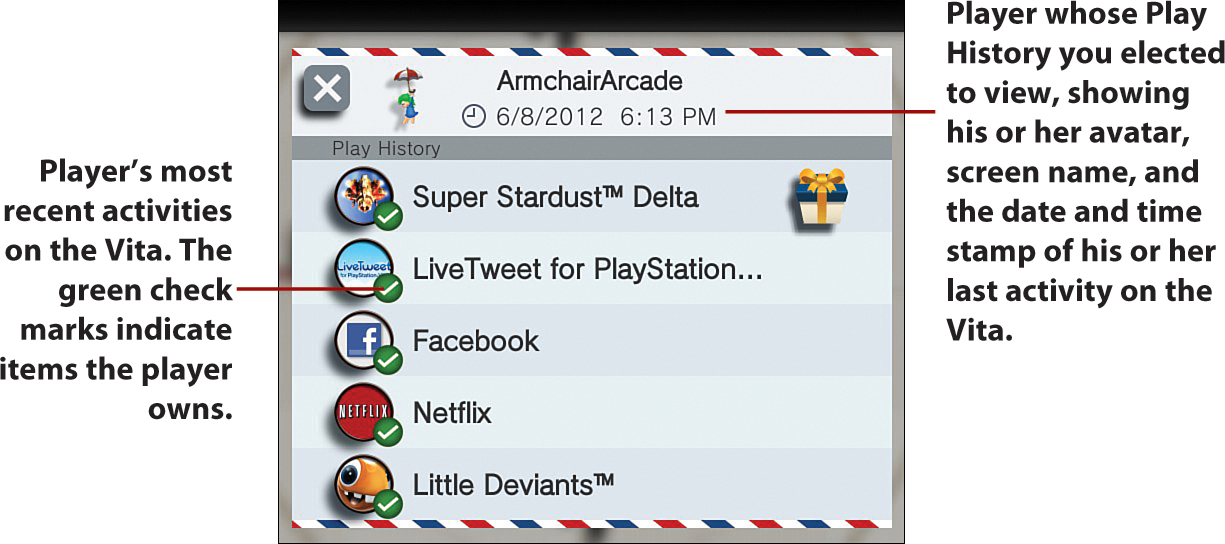
• People encountered—The Out-and-About Radar screen displays the avatars of up to 10 friends and other Vita players closest to you who have enabled their locations and online IDs to be displayed. If your Vita identifies more than 10 players, a gray emoticon icon appears that displays information on another group of 10 players when tapped. When you select an avatar, you see the player’s Play History, which lists up to five titles/game goods that he or she has uploaded. If you tap his or her avatar again, you see the user’s Profile, from which you can send the player a friend request. See “Sending Friend Requests” later in this chapter for more on this.
• Your avatar—Your avatar appears boxed out at the bull’s-eye of the map. If you have not selected an avatar, a gray emoticon appears in the box. To select an avatar, see “Updating Your Avatar and Profile” later in this chapter.
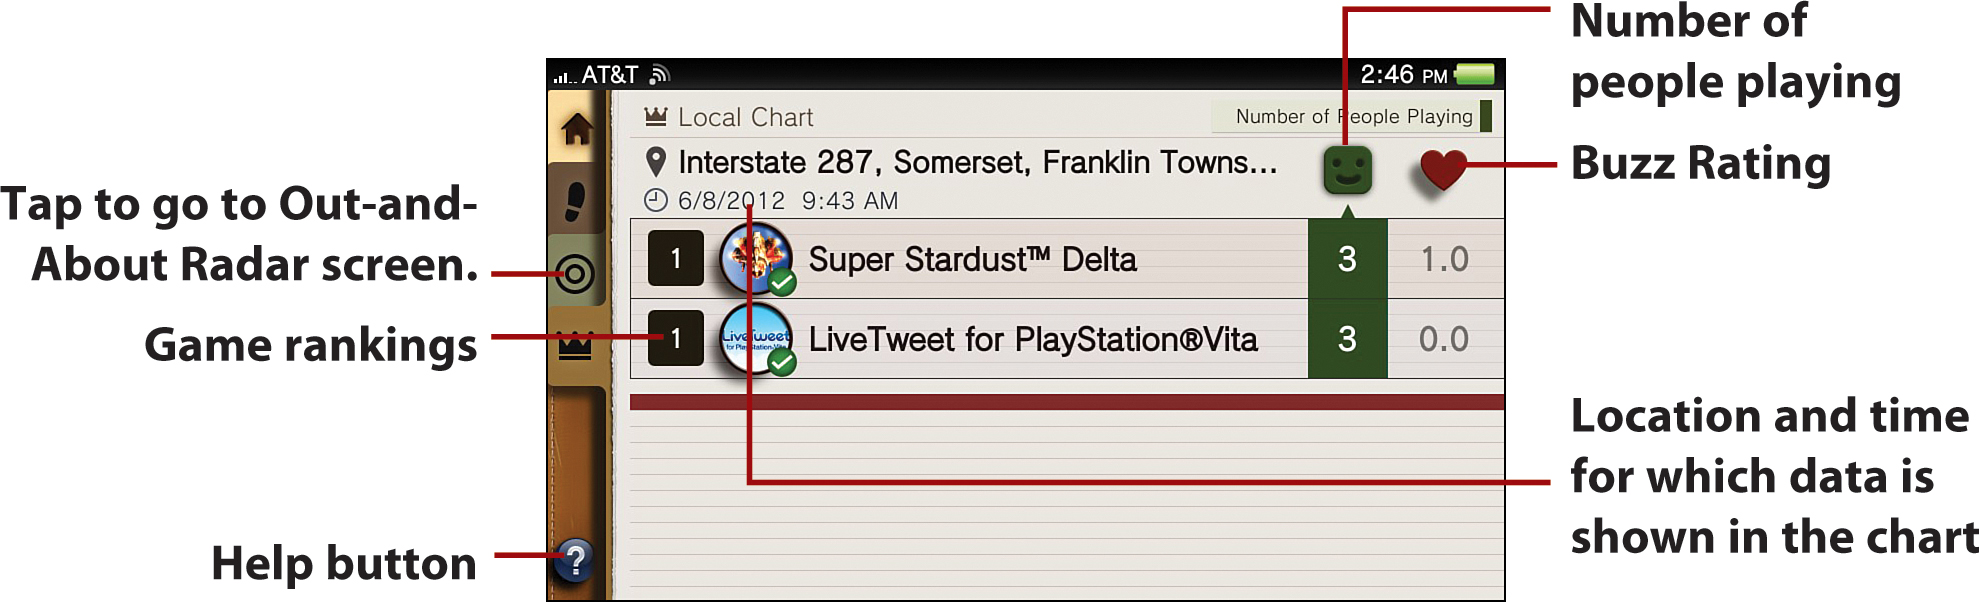
• Local Chart—Tap the Local Chart icon to see a ranking of games that were played by individuals in the event’s vicinity.
• Help button—Tapping the Help button provides insights on the Out-and-About Radar screen and its features.
Out-and-About and Local Charts
The Out-and-About Chart and Local Chart present different sets of data in the same manner. You access the Out-and-About Chart, which shows aggregate game rankings for all the vicinities that your Vita has captured data on, by tapping the crown icon from the Out-and-About History screen. The Local Chart shows game rankings in a particular vicinity; to access it you tap the crown icon from the Out-and-About Radar screen.
Players’ Voice Screen
The Players’ Voice screen has three screens, all of which present the same information regarding a particular game, but show the information based on the following player groups: People Encountered, Friends, and People You’ve Played With. The objective of the Players’ Voice screen is to show you how others perceive the game. From this screen, you can also rate the game yourself, launch the PlayStation Store (this brings you directly to the game) and the Browser (pulls up Google search results on that particular game), and select Launch Game (brings you to the game’s LiveArea screen).
The key areas are as follows:
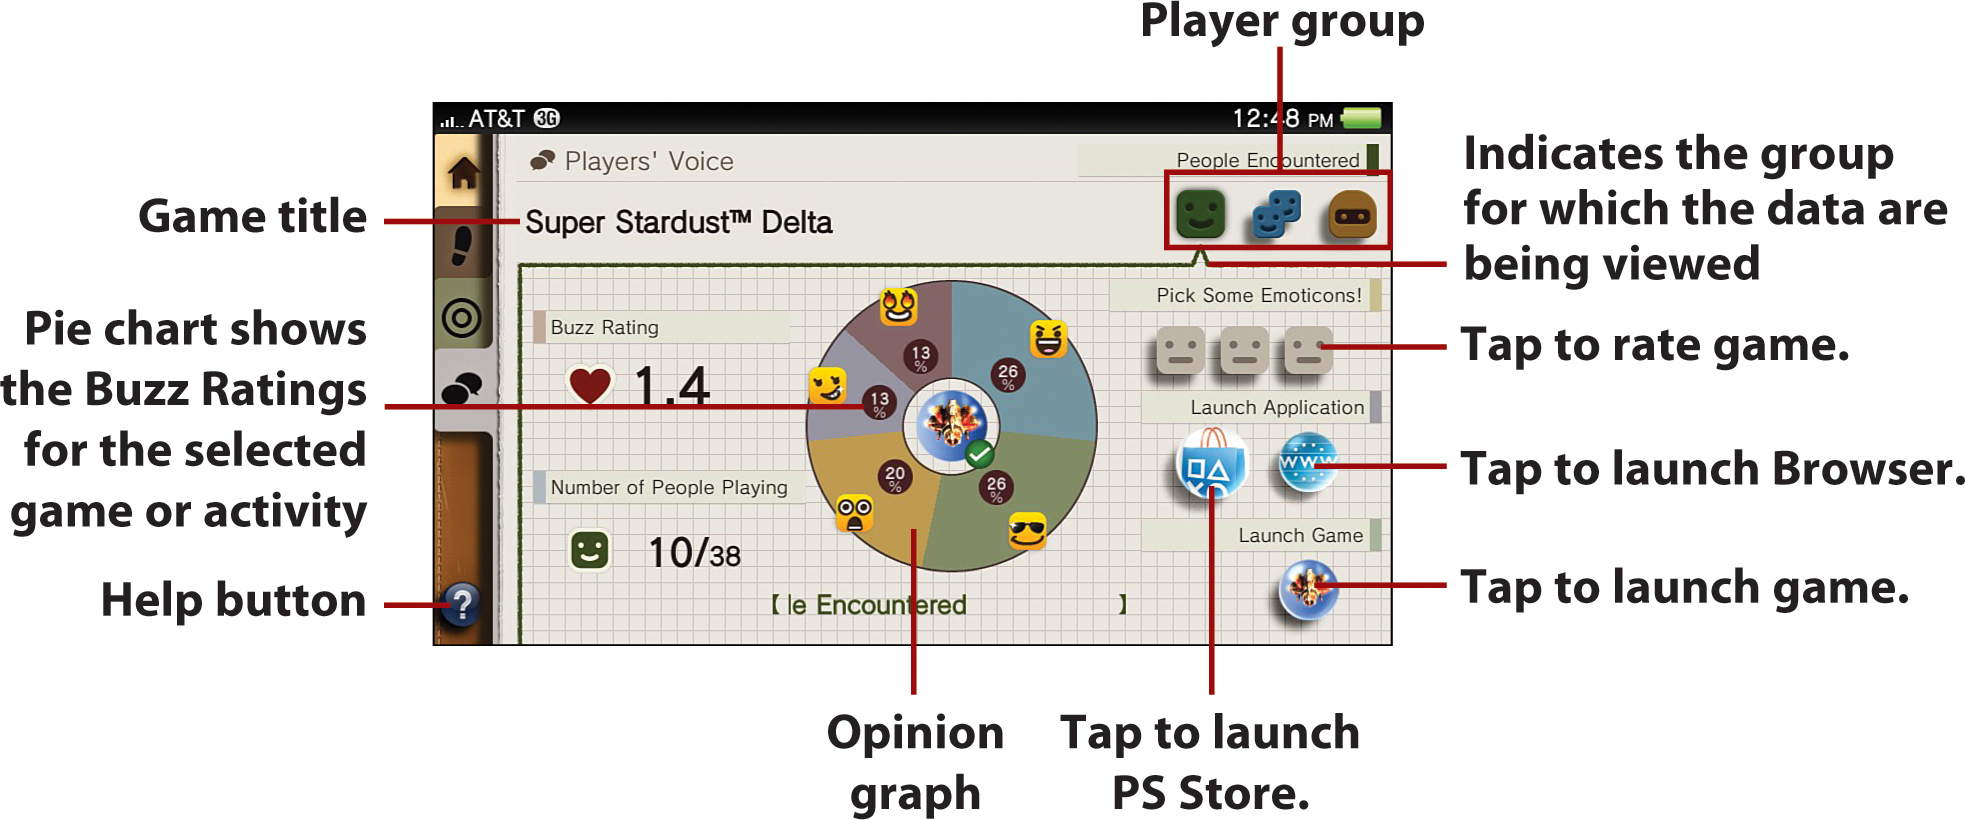
• Player group—Tapping the icons in the Player groups area enables you to view the data for three different player groups. The green icon yields data for people you’ve encountered; the blue icon shows data for people you are friends with; and the brown icon outlines data for the individuals you’ve played games with.
• Pick Some Emoticons!—Tapping the emoticons under Pick Some Emoticons! enables you to associate one of nine emoticons with a game. If you think a game stinks, don’t bother, as all nine are positive impressions, with the following options available: Funny, Engrossing, Captivating, Moving, Rewarding, Amazing, Exhilarating, Cool, and Heartwarming.
• Launch Application—Taping the shopping bag icon takes you to the PlayStation Store, where you can find out more about a particular game and purchase it. Tapping the Browser icon displays Internet search results for the game.
• Launch Game—Tapping the game icon under Launch Game enables you to access the LiveArea screen for the game, provided you own it.
• Opinion graph—The opinion graph is a pie chart that shows which emoticons a particular user group has associated with the game being viewed.
• Buzz Rating/Number of People Playing—The Buzz Rating is an automatically generated rating that is calculated using the average rating by individuals who have played the game and the number of people who have played the game.
Checking on Friends
Selecting Friends from the Near Application screen enables you to view your friend’s activities, comment on their activities, and access a friend chart for your friends. The Friends’ Activities screen shows the following:
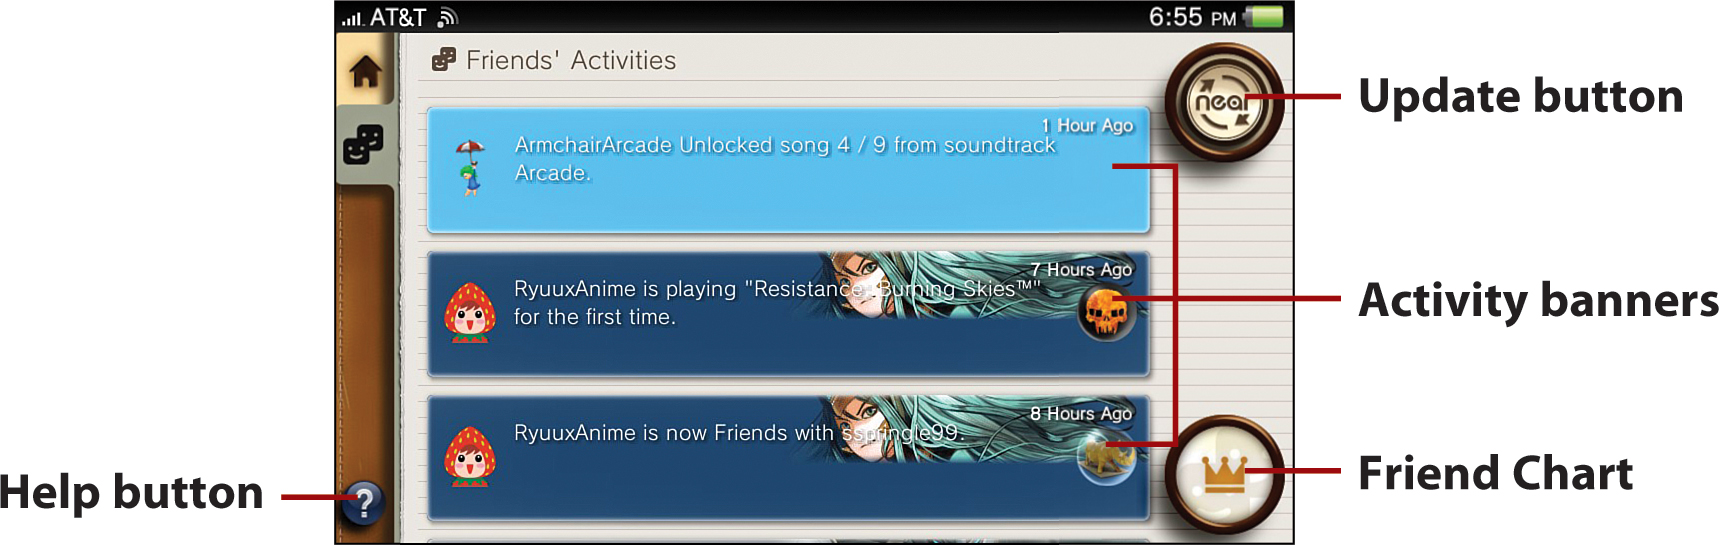
• Activity banners—When you tap an activity banner, you can see more detailed information on that activity and can comment on it. When you comment on an activity, a Comments bubble appears next to that particular activity in the Activities screen.
• Update button—Tap the Update button to see the most recent listing of your friends’ activities and receive game goods that your friends have sent you.
• Friend Chart—Select the Friend Chart icon to view the ranking of games played by your friends. The data is presented in the same format as in the Out-and-About Chart and Local Chart, both of which are outlined earlier in this chapter under “Out and About and Local Charts.”
• Help button—Tap the Help button to obtain more information on the Friends’ Activities screen.
As of the time of this writing, no way exists to bestow game goods upon others via Near. Instead, games that are compatible with Near prompt you when game goods are available for giving. If you consent, Near automatically distributes the goods.
Viewing Discoveries
Tapping Discoveries from the Near Application screen brings you to the Discoveries screen, where you see information such as the number of people you have encountered via Near and game goods that are available to you. The options available and items displayed are as follows:
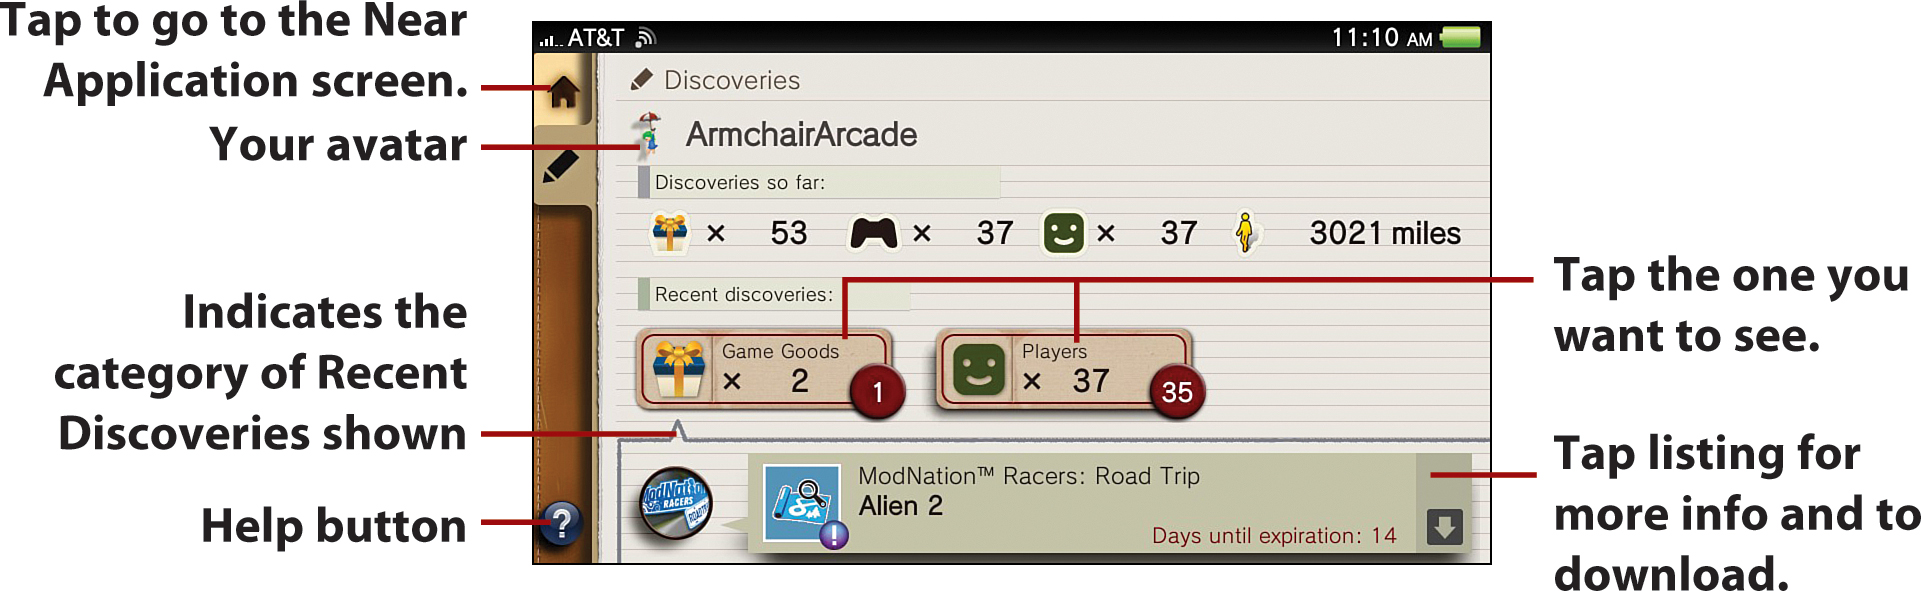
• Your avatar—Tapping your avatar opens a list of up to five recently played games and/or uploaded game goods. If you see a shadowy gray emoticon here, you have not yet selected an avatar. For instructions on how to do so, see “Updating Your Avatar and Profile” later in this chapter.

• Discoveries so far—This area provides number-oriented information on the items you’ve collected, game titles found, people encountered (this includes friends, players you have gamed with, and players encountered in general), and distance traveled. This is the same information that is displayed on the Near LiveArea screen.
• Game Goods—Selecting the Game Goods item displays a list of recently discovered game goods at the bottom of the screen. You can tap a banner to view a screen that provides detailed information about the game good and enables it to be downloaded. Keep in mind that each game good has an expiration date.

• Players—Tapping Players yields a display of the online IDs of up to 100 players you’ve encountered. When you tap an online ID, you pull up a player’s profile screen from which you can send a friend request. More information on friend requests appears later in this chapter.
• Help button—Select Help if you require more information regarding the screen.
Working with Profiles
To view others’ profiles on Near, you need to make your online ID public. See “Sharing Settings” earlier in this chapter for more on this topic. Others’ profiles contain the same elements as your own profile. If you are not friends with an individual, you have the option of sending him or her a friend request. The options available on the profile screen are as follows:
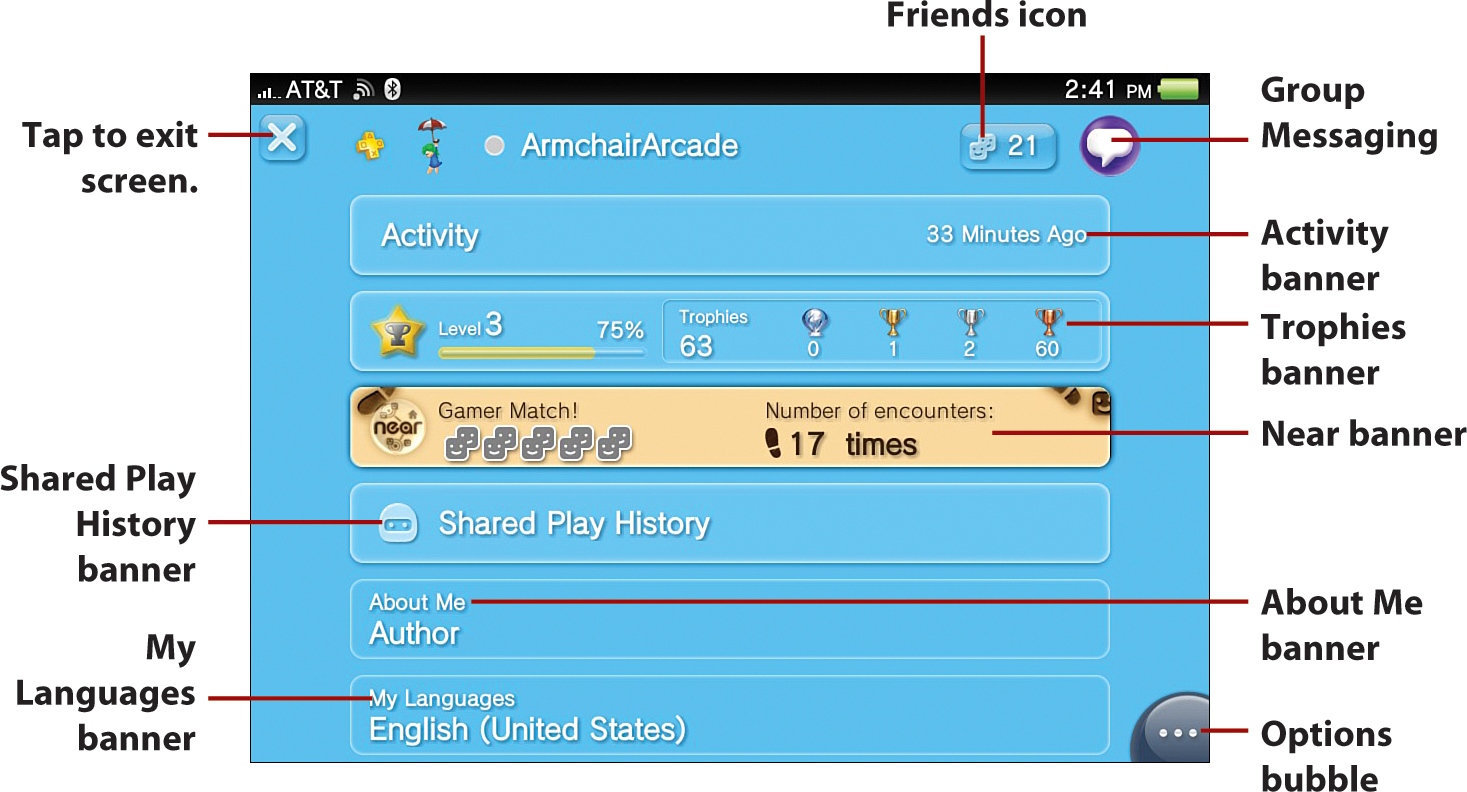
• Friends icon—Tap the Friends icon to pull up a list of the player’s friends, or your friends if you are viewing your own profile. If a player has elected not to share this information, a padlock icon appears here.
• Group Messaging—Tap to start the Group Messaging app to start chatting with the player. This does not appear when you are viewing your own profile.
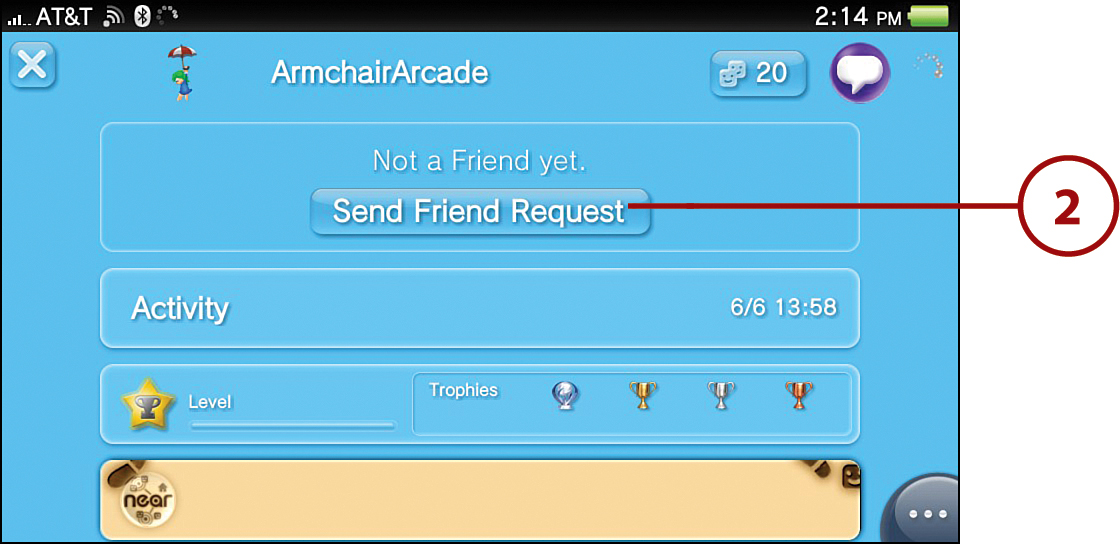
• Friend Request banner—Tap Send Friend Request to send a friend request to the player. This option is not shown in the previous image.
• Activity banner—Tap the Activity banner to pull up a list of the player’s activities or your own activities if you are viewing your own profile. Players may elect to keep this information private. If so, a padlock next to which “(Not Public)” appears on the right side of this banner.
• Trophies banner—Tap to go to the Trophies app and compare your stats with that of the player whose profile you are viewing.
• Near banner—Tap the Near banner to see a synopsis of Near data for the player you are viewing, including total number of encounters with that individual, his or her play history, the location in which you last encountered him or her, and any game match data that are available. If you are viewing your own profile, tapping this banner pulls up your most recent Play History.
• Shared Play History banner—Tap this banner to see any available shared play history.
• About Me banner—The About Me banner includes any information another player elected to share, or any information you elected to share if you are viewing your own profile. For more information on personalizing this banner, see “Updating Your Avatar and Profile” later in this chapter.
• My Languages banner—The My Languages banner outlines any languages the player has indicated. Up to three languages can be listed here. To add languages to your own profile, see “Updating Your Avatar and Profile” later in this chapter.
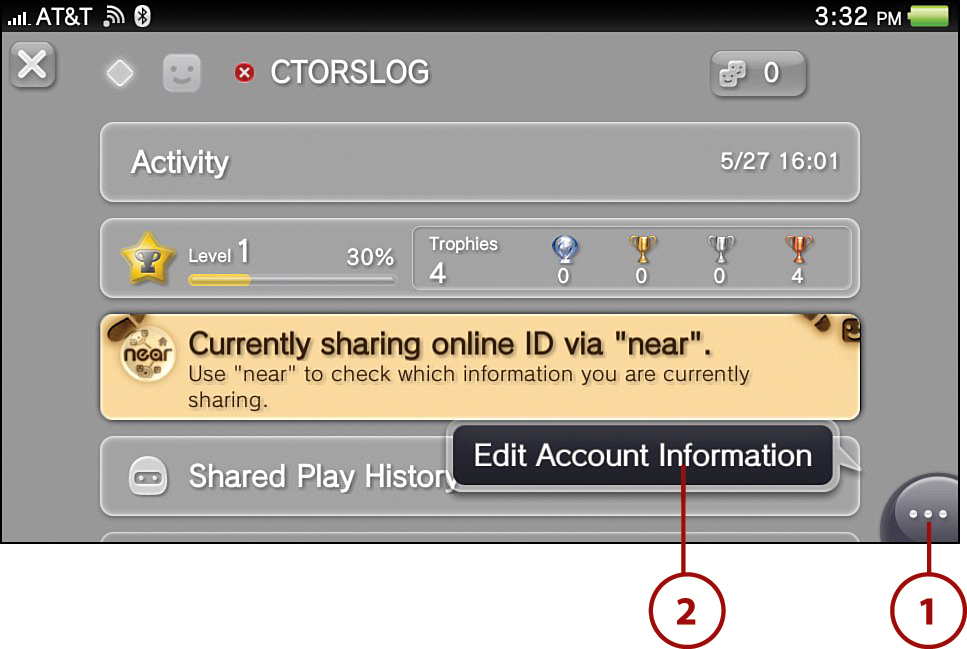
• Options bubble—When viewing another’s profile, tapping the Options bubble yields contextual options, such as Remove as Friend, Block, and Cancel Friend Request. When viewing your own profile, you have the option to Edit Account Information.
Sending Friend Requests
Sending Friend Requests in Near is easy, requiring just a few taps. To send Friend Requests in Near, follow these steps:
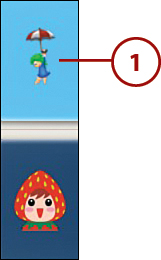
1. Whenever you see a player’s avatar (examples shown) or online ID, tap it until you get to his or her profile.
2. At the player’s profile screen, tap the Send Friend Request button.
Before you send a friend request, you might consider sending the person a Group Message first. This is because you cannot personalize any friend requests in Vita and it may take a while for the person to even see your request. Turn to “Group Messaging with Friends” in Chapter 6, “Exploring Social Apps,” to learn how to send a message to your prospective friend.
Updating Your Avatar and Profile
Unless you fancy the default gray emoticon avatar, chances are you’ll want to change your avatar to one that better represents you. You might also want to update your profile screen to more accurately depict your aesthetic sensibilities and provide other gamers with a little information about you. To change your avatar and update your profile, follow these steps:
1. Go to your profile screen and tap the Options bubble.
2. Tap Edit Account Information.
3. Enter your password and then tap OK. The Account Information screen displays.

4. Tap the avatar icon to see the available avatars. Scroll through them and tap the one you want to use. If you don’t like any of the options and simply want to get back, tap the back arrow at the bottom left of the screen.
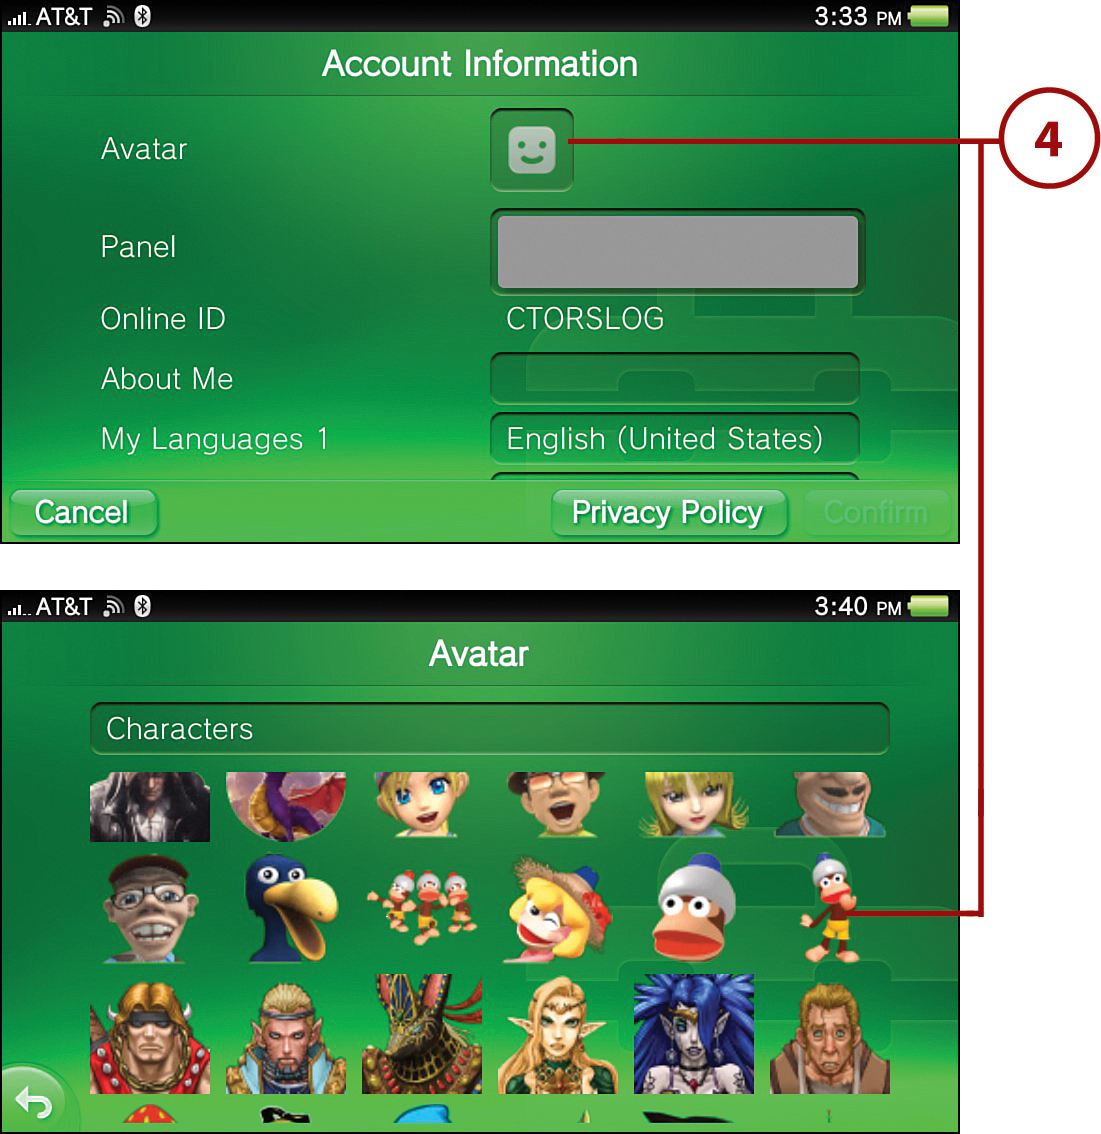
You can browse for a particular avatar type by tapping the All bar, which yields the following categories: All (this is the default), Action/Adventure, Characters, Creatures, Family, Fighting, Items/Miscellaneous, Kanji, Military/Combat, Puzzle, Racing, Retro, RPG, Sports, and Vehicles. If none of these are desirable, you can also consider purchasing an avatar from the PlayStation Store, where many more are available. For more on this, turn to Chapter 5, “Shopping in the PlayStation Store.”
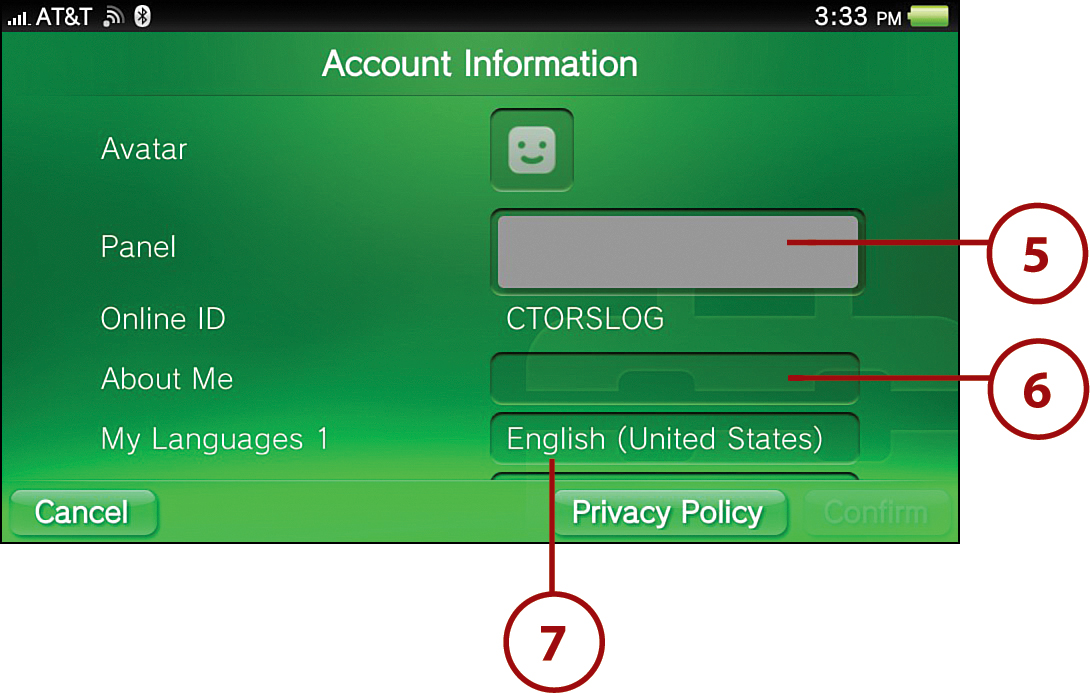
5. Tap the Panel field, scroll through the options, and tap the panel design you want to use. If you don’t like any, tap the back arrow.
6. Tap the About Me field to add information about yourself using the onscreen keyboard.
7. Tap the My Languages 1, My Languages 2, and My Languages 3 fields to add your language(s); you’ll have to scroll down to see the latter two fields.
8. Tap Confirm, which is enabled after you make a change, to your updates.
9. Your profile screen is now updated.
Finding Your Way with the Maps App
The Maps app is your portal to Google Maps, enabling you to find your current location, search for other locations, and get directions. You can also bookmark and flag locations. Let’s examine how to work with Maps so that you can get the geographic information you need.
Accessing Maps for the First Time
The first time you access Maps, you must take a few steps before you can start using the application.
1. Tap the Maps icon from the Home screen.
2. Tap the Maps gate.

3. Read through the Google Maps: Terms of Use, tap the I Have Read and Agree to the Google Terms Above box, and tap Accept.

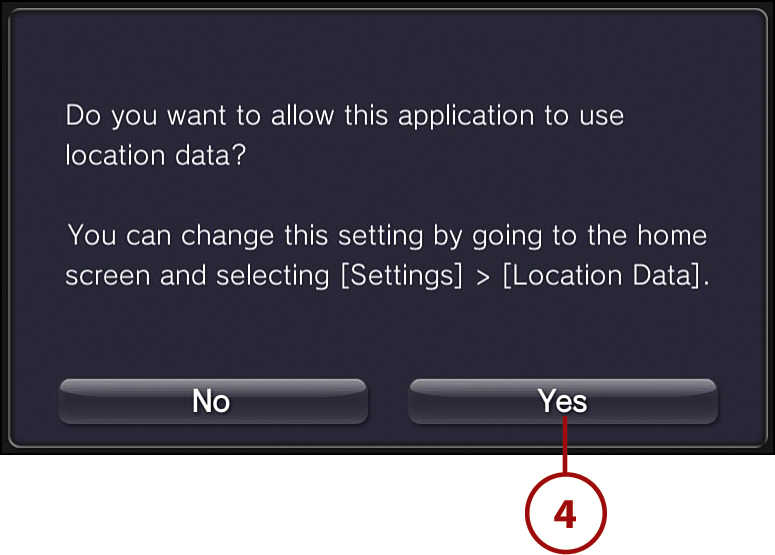
4. Tap Yes to enable Maps to use location data.
5. You are now in Maps. See the “Maps Application Screen” section to learn about the elements on this screen.
Maps LiveArea Screen
When you access the Maps LiveArea screen for the first time, you see the Action icon and the Gate. After you use Maps and start searching for locations, information for up to six different searches is displayed here as well, enabling you to pull up those locations in Maps using a mere tap. If only travel itself could be that easy!
Familiarizing Yourself with Vita Gates
Gates on LiveArea screens say Start when you first launch an application. When you return to a Gate on subsequent visits, it instead says Continue. In addition, the window gives you a preview of the last screen you were on in the application.
Maps Application Screen
The Maps Application screen is the main screen in the Maps app. You conduct searches from this screen, and it serves as the springboard for all of Maps’ key features and functions. Read more about how to use each of these features in the following tasks.

Searching for a Location
You can search for a location by entering an actual address or a keyword (such as the name of a landmark) that relates to the location you want to search for. To conduct a location search, follow these steps:
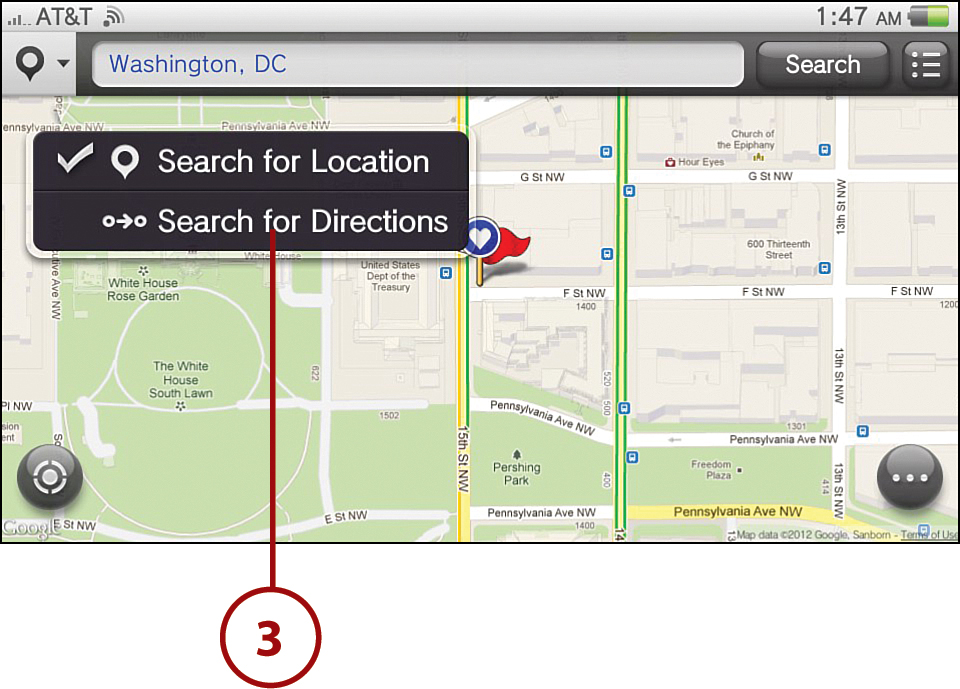
1. Tap the pushpin icon with the dropdown arrow at the top left of the screen and select Search for Location.

2. Use the virtual keyboard to enter the keyword or address related to your search into the Keyword or Address bar at the top of the screen and then tap Search.
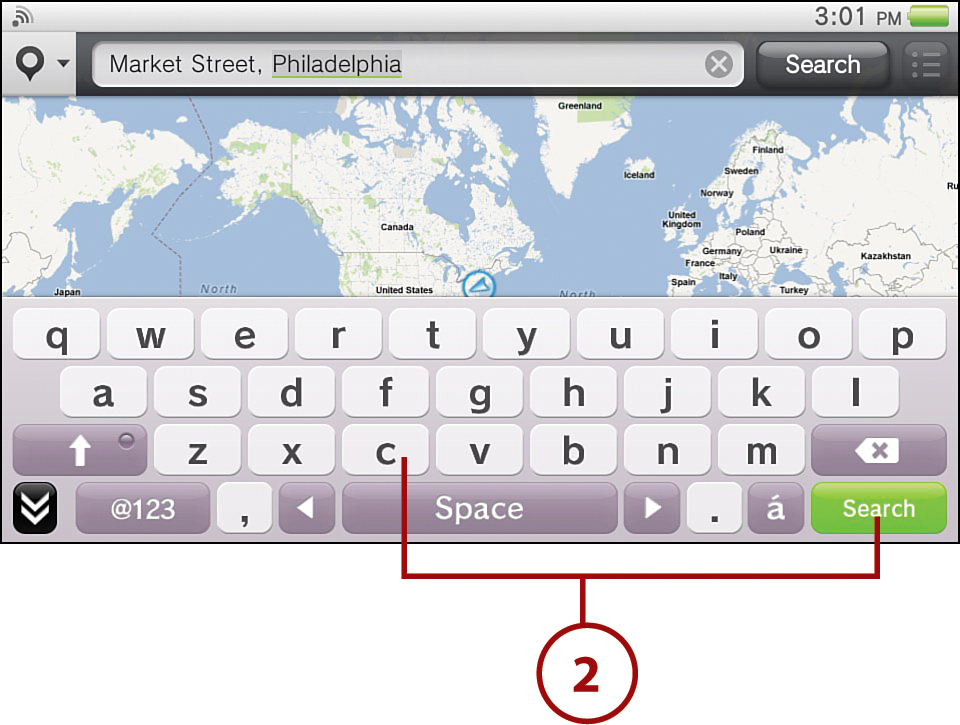
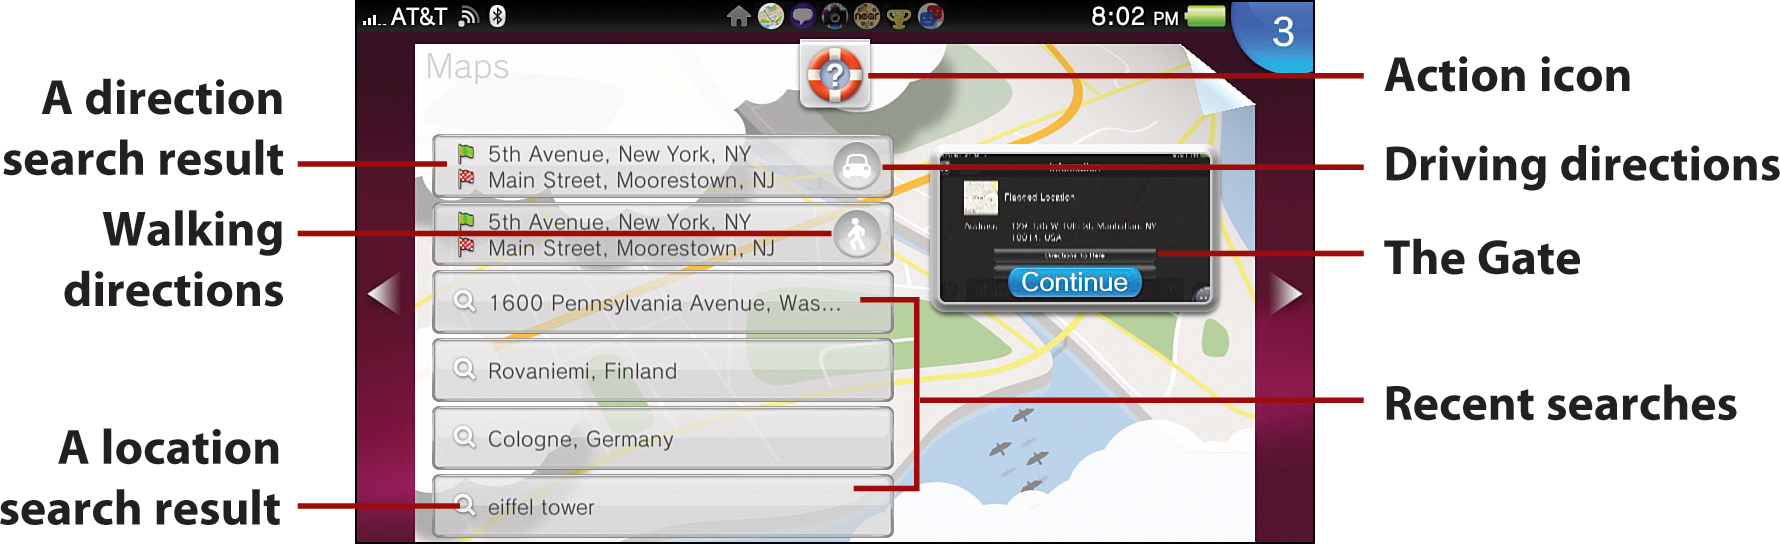
3. The search result that matches your search criteria is shown as a red flag or flags (these are location flags) on the map, depending on how specific your search was.

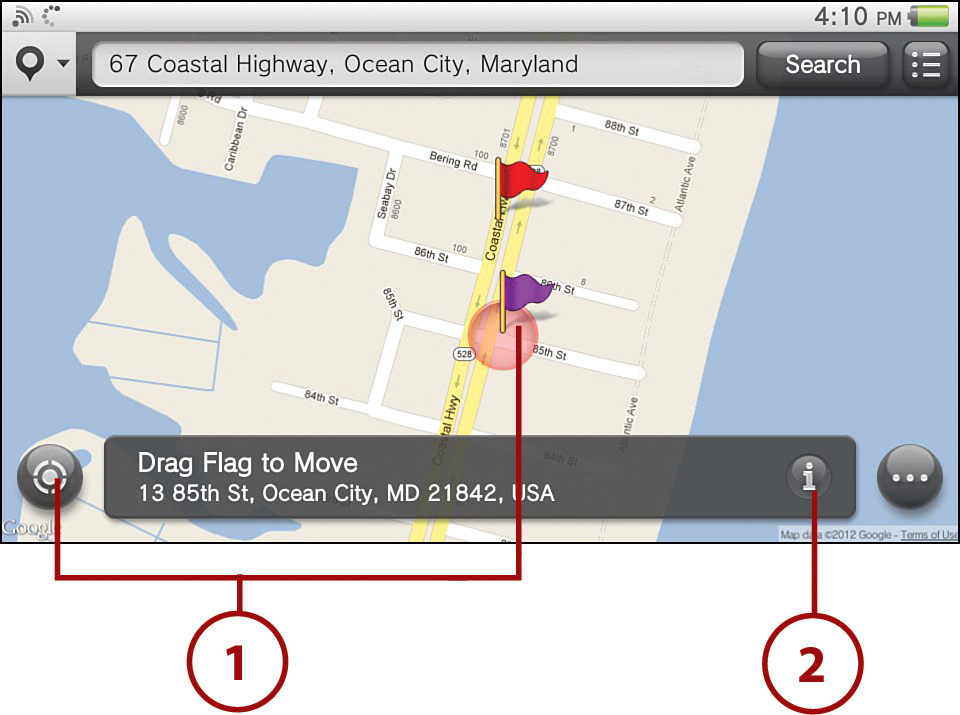
Getting Details on Flagged Locations
When you see location flags on the map, you can get more details on these locations. Tap the screen, then tap the Show List icon (has three stacked circles followed by horizontal lines, making this icon look like a caricature of a bulleted list), and then tap a search result to view a map of that location.
Accessing the Information Screen for a Search Result
You can obtain additional information on a location and perform several other functions, such as messaging a location’s data to a friend via Group Messaging, using the location’s Information screen. To access the Information screen for a location, do the following:
1. When a map with a location flag is visible, tap the flag.
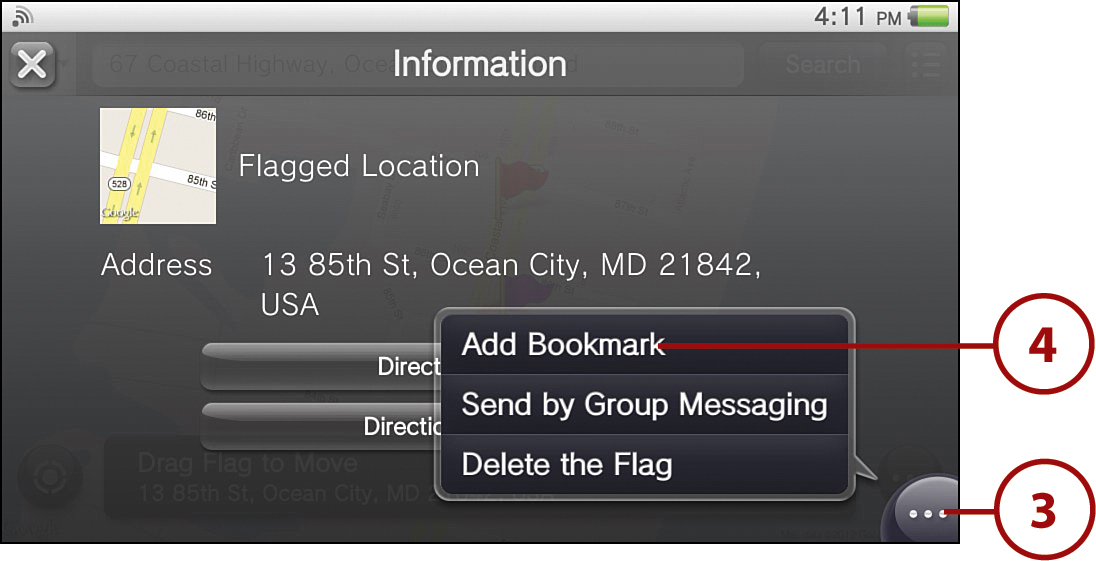
2. A bar appears indicating the location. Tap the information box to yield additional information on that location.

3. Tap Directions To Here or Directions From Here to obtain directions. Tap the Options bubble from this screen to see three additional options:
• Add Bookmark enables you to bookmark the location.
• Send by Group Messaging displays the Group Messaging app, from which you can send the information to an individual on the PlayStation Network by entering his or her Online ID.
• Delete the Flag removes the flag from your map.

Obtaining Directions
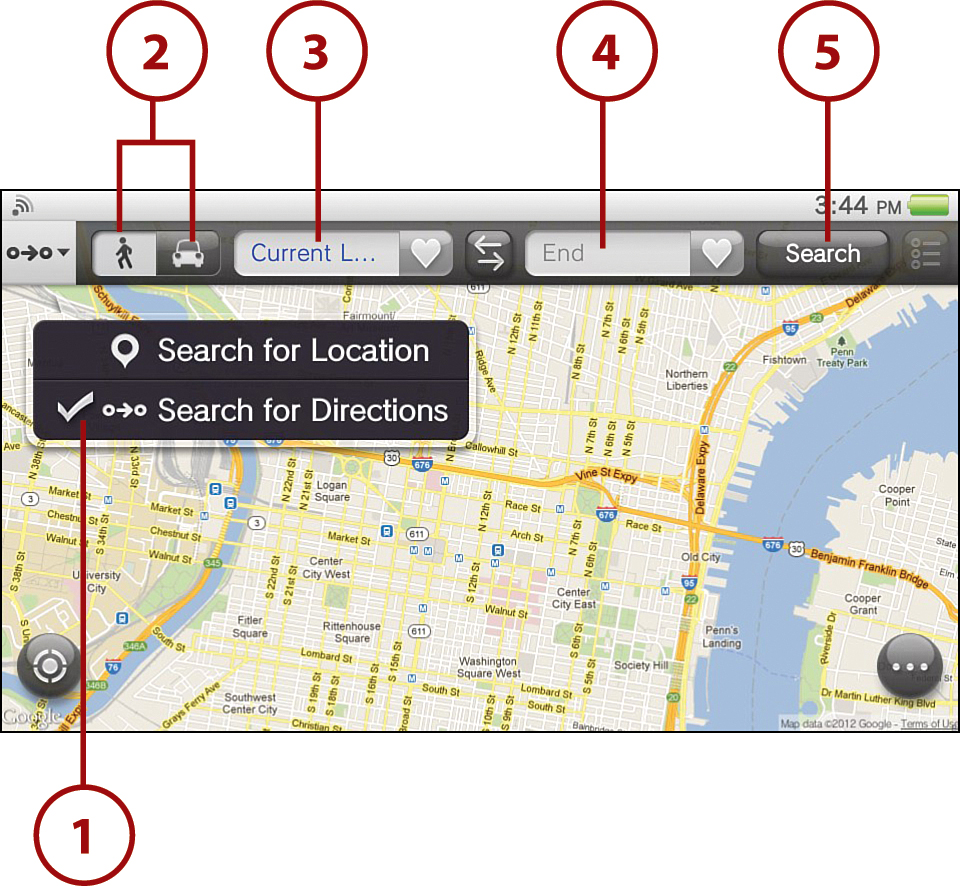
In addition to finding locations, you can use the Map app to obtain directions. To get directions, you can use either keywords or an actual address for your locations.
1. Tap the pushpin icon with the dropdown arrow at the top left of the screen and select Search for Directions.
2. Select your means of transportation by tapping the Walking or Driving icon.
Once you have directions, you can switch between the Walking and Driving directions. Doing so performs the search again and outlines on the map the most direct route via your means of transportation. You can also reverse your directions, switching your starting and ending points, by tapping the stacked arrow icon and then tapping Search.
3. Tap the first field and use the onscreen keyboard to enter keywords or an address in the search box for your starting point.
4. Tap the second field and enter your ending point destination.
5. Tap Search.
6. You now see your route plotted out on a map.
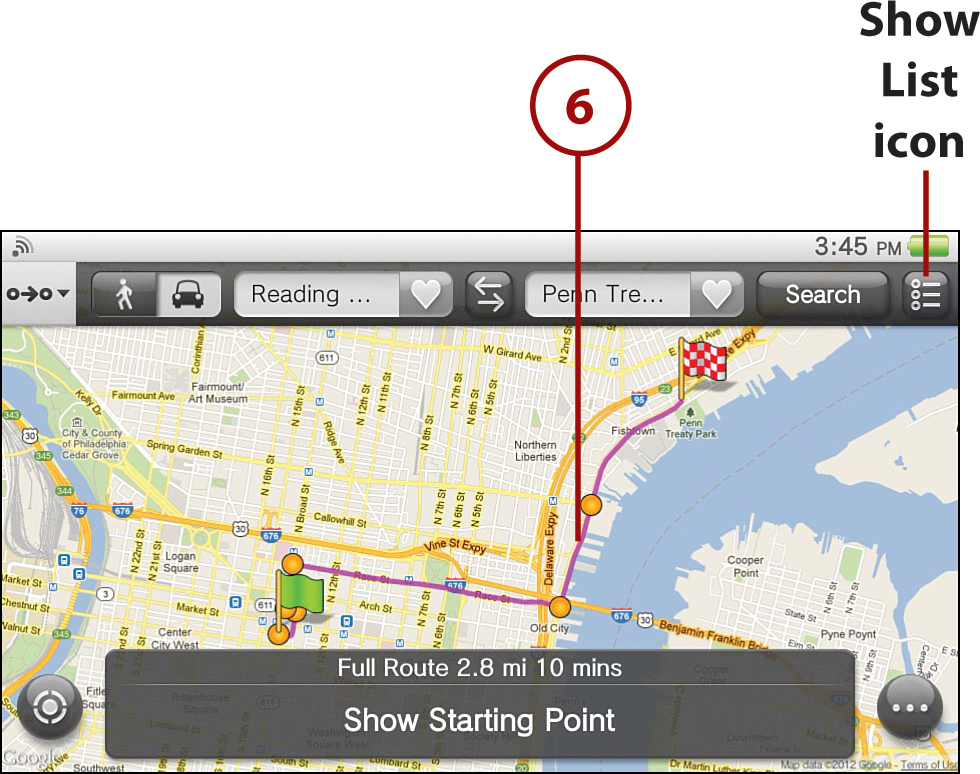
If you want to see directions for specific points on the route, tap any of the direction points (orange circles) on the map. If you want to see all text directions, tap the Show List icon on the top right of the screen. You can also scroll through the directions in the informational bar.
Tapping the heart icon next to the starting point and ending point search field enables you to add bookmarked locations into these fields.
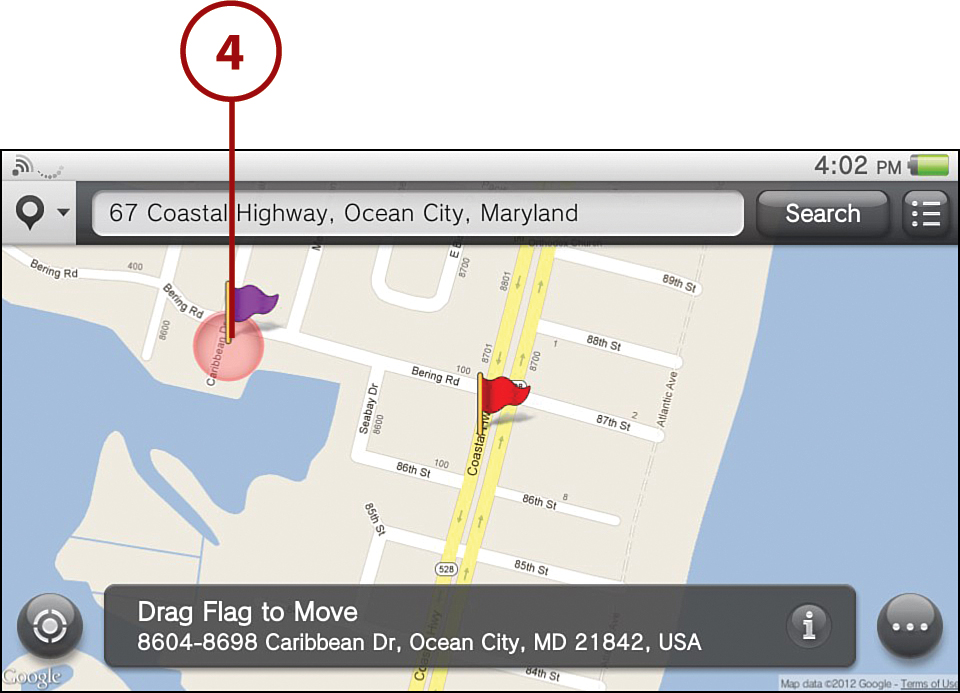
Placing a User Flag
If you want to flag a location, such as a favorite restaurant or landmark along a route, you can place a User flag. When you tap the flag, the Information screen displays; see “Accessing the Information Screen for a Search Result” for more on this screen.
1. Select or enter a location where you want to place a User flag and then tap the Options button.
2. From the Options menu, select Place a Flag.
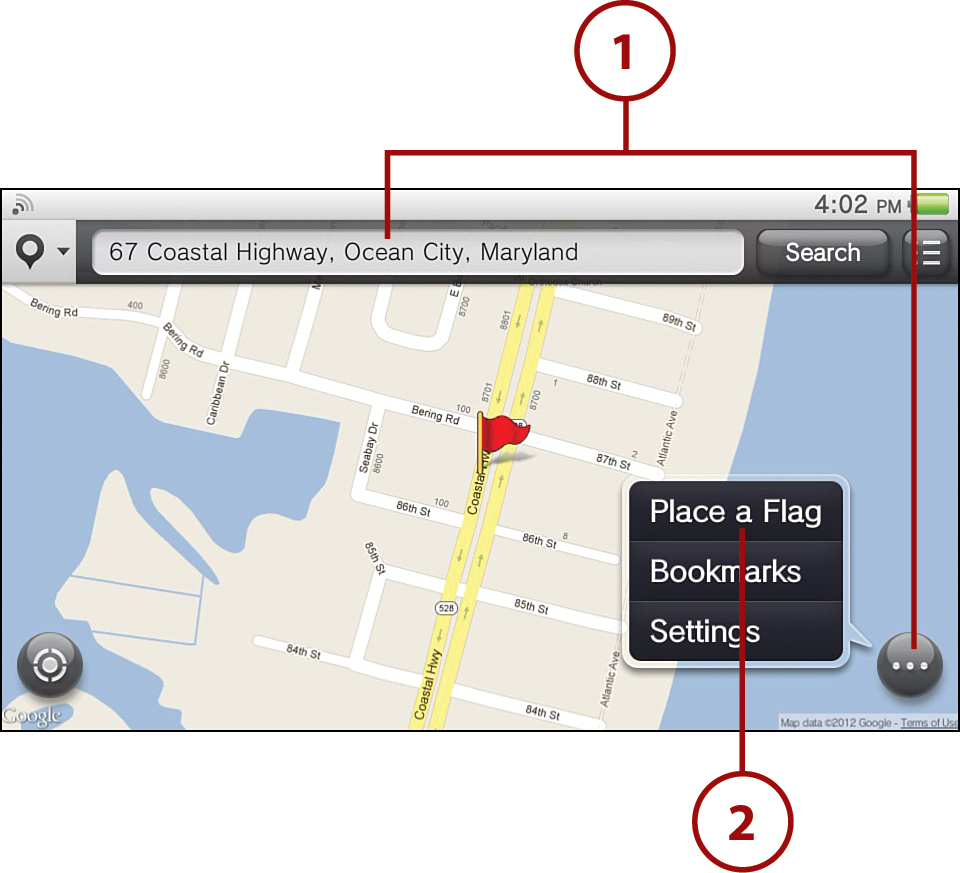
3. A purple flag, which is the User flag, now appears in the center of the map.
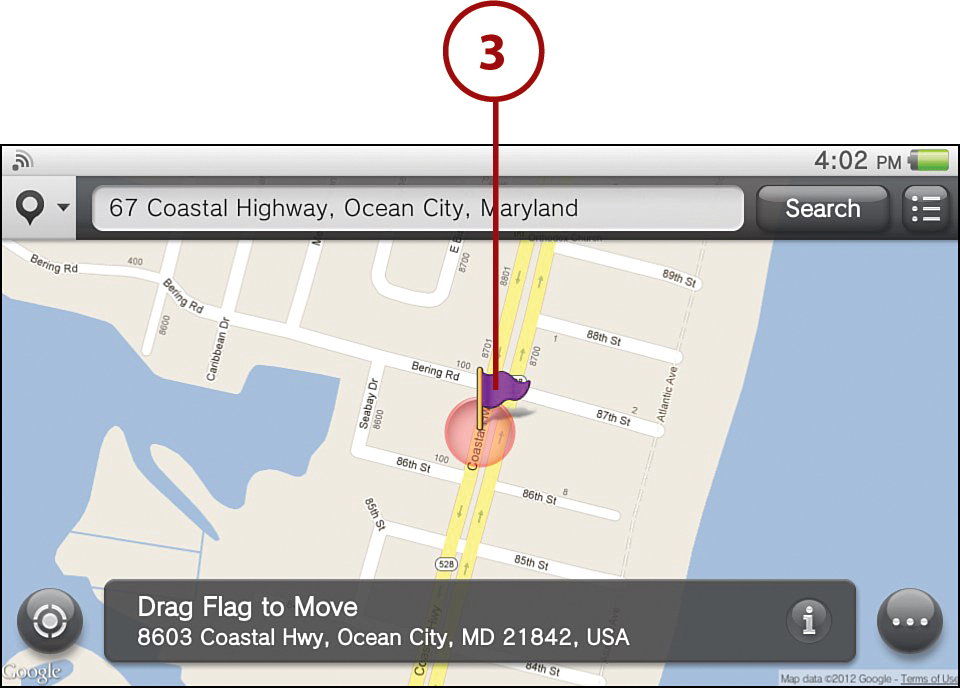
4. To move the flag to the desired location, place your finger on the flag until it becomes unanchored and then drag your finger to the location where you want to deposit it. You can reposition the flag anytime by repeating this step.
Deleting a User Flag
Follow these steps to delete a User flag:
1. Tap the User flag you want to delete.
2. Tap the Options button and select Delete the Flag.

Another Way to Delete User Flags
You can also delete a User flag by tapping the flag you want to delete, tapping the information box, selecting the Options bubble, and then selecting Delete the Flag.
Bookmarking a Location
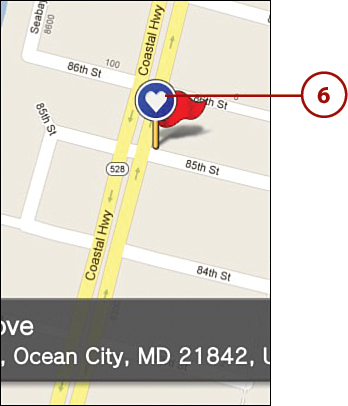
Bookmarked locations are designated by a blue heart sign. You can bookmark your current location and any flagged locations on a map. To bookmark a location, follow these steps:
1. Tap the Current Location icon if you want to bookmark your current location, or tap the flag that you want to bookmark.
2. Tap the information box.
3. Tap the Options bubble on the Information screen.
4. Tap Add Bookmark.
5. Use the virtual keyboard to name your bookmark and then tap Enter.
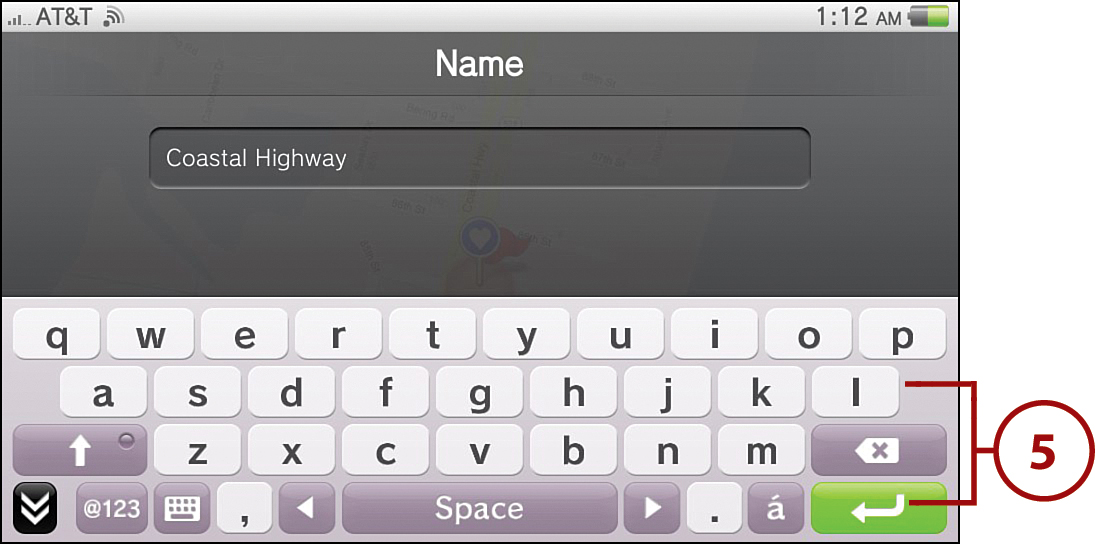
6. Your location is now bookmarked.
Hiding a Bookmarked Location
You can hide bookmarked locations from your map. Keep in mind that you cannot hide individual bookmarks; it is an all or none endeavor.
1. Open the location on the map for which you want to hide a bookmark.
2. Tap the Options button.
3. Select Settings.

4. At the Settings screen, tap the Display Bookmarked Locations checkbox to remove the check mark.
5. Tap the X at the top left of the screen to get back to the map.

Viewing a Bookmarked Location
To see a bookmarked location on the map, follow these steps:
1. When a map is displayed, tap the Options button.
2. Select Bookmarks.
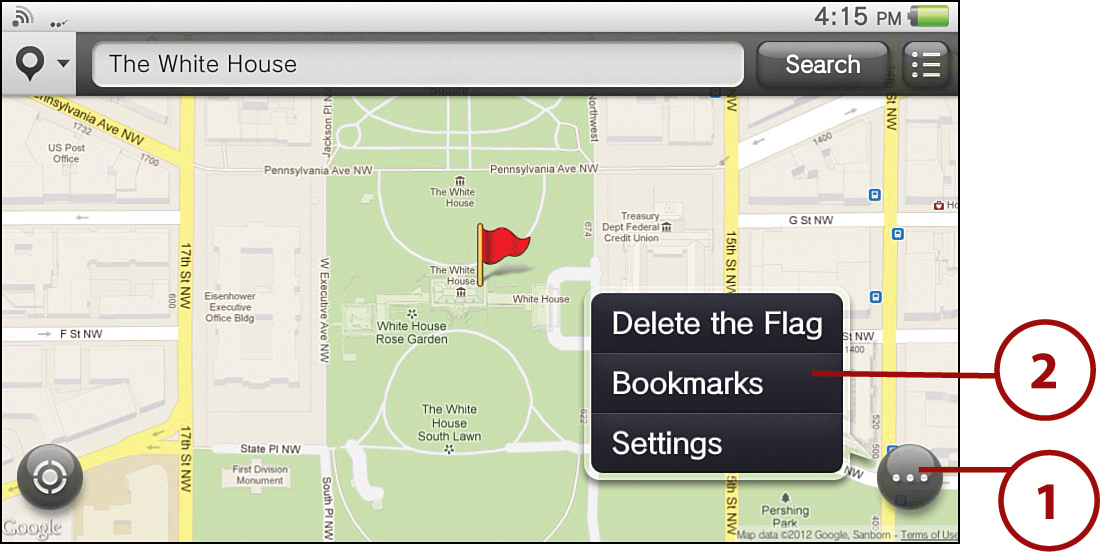
3. Tap the bookmark for the location that you want to see on the map.
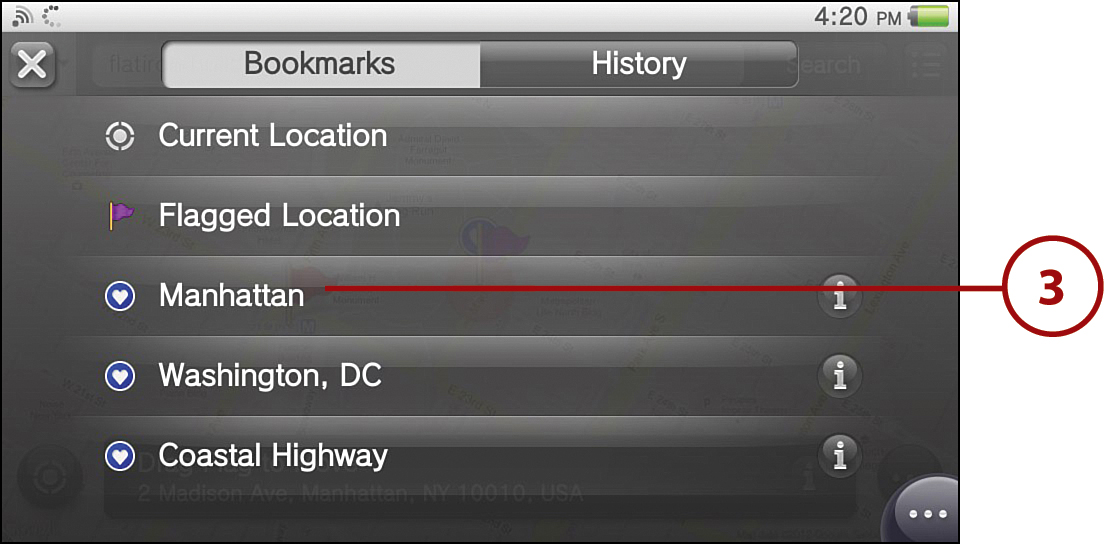
4. You now see the bookmarked location.

Viewing Search History for Locations and Directions
When you conduct a search for a location or for directions, the results are saved to your History in Maps. You can tap a location or directions from the History screen to access them again without having to start a search from scratch.
1. When a map is displayed, tap the Options button. If you want to search for a previous location, go to step 2. If you want to search for a previous set of directions, go to step 3.
2. Tap Bookmarks. Proceed to step 4.

3. Tap Search for Directions and then tap the heart icon at the top of the screen.
4. At the Bookmark and History screen, tap History and select the entry you want to see again.

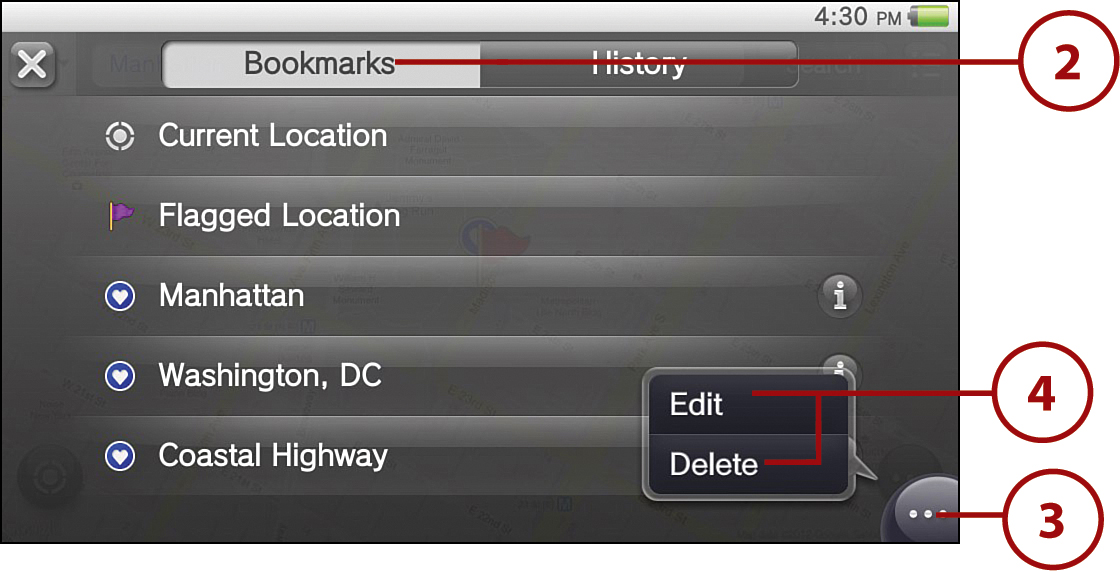
Editing Bookmarks and Search Histories
You can edit or delete the names of location and direction bookmarks and delete any location and direction history.
1. Follow steps 1 to 4 from “Viewing Search History for Locations and Directions” to get to the Bookmark and History screen that you want.
2. Select Bookmarks or History, depending on what you want to edit or delete; you can only delete (not edit) entries on the History screen
3. Tap the Options bubble.
4. Select Edit or Delete. Follow steps 5 and 6 for editing and steps 7 and 8 for deleting.
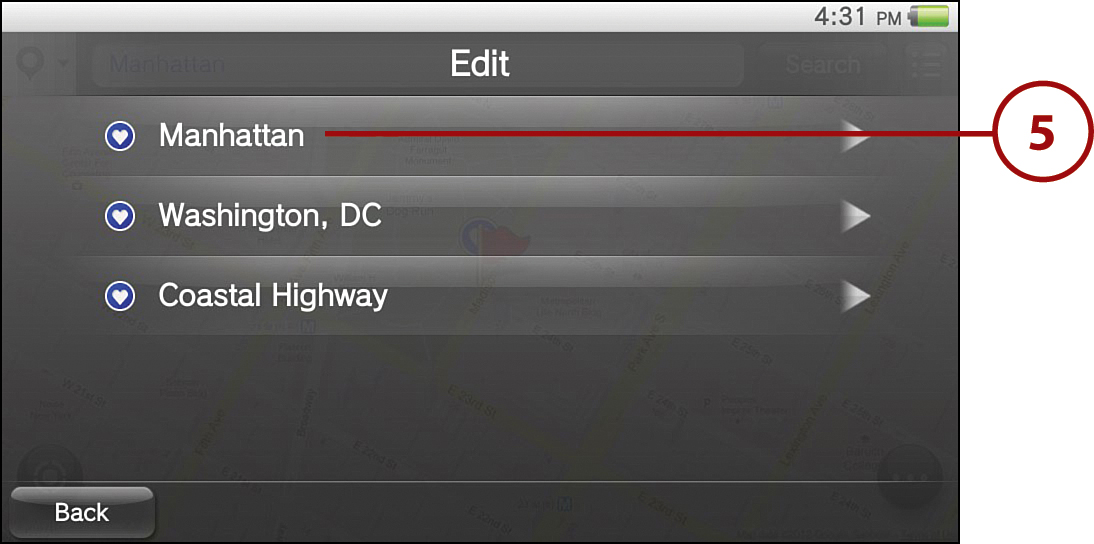
5. From the Bookmarks editing page, tap the entry you want to rename.
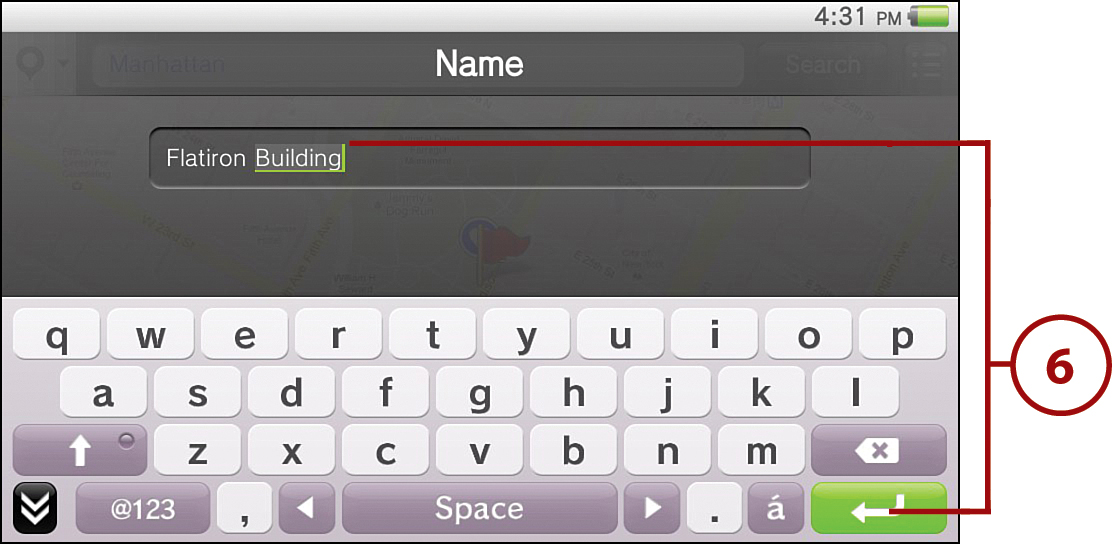
6. Use the virtual keyboard to type the new name for your bookmark and then tap Enter. The new name now appears for that bookmark under the Bookmarks and History screen.
7. To delete an item, tap its checkbox so that a check mark appears next to it and then tap Delete.

8. Tap OK to confirm the deletion. The entry has now been removed from the list.

Working with Maps Settings
To access the Settings menu, tap the Option button from any map screen and then select Settings. The options under the Settings are as follows:
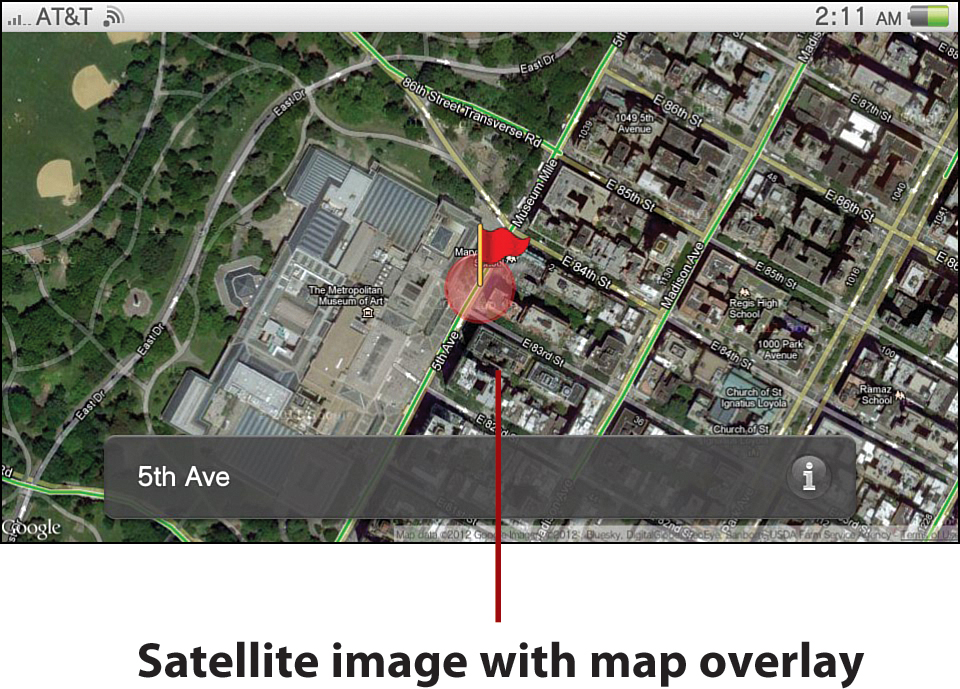
• Map Type—When you select Map Type, you have three options: Map (this is the default), which shows an illustrated map; Satellite, which shows a satellite image of the location; and Map + Satellite, which shows the satellite image of the location with a map overlay. Simply tap the option that you want and then select the X at the top left of the screen to exit the Settings page.
• Traffic Information—If you select this option, traffic information is displayed on the map for areas where it is available.
• Display Bookmarked Locations—If you select this option, your bookmarks appear. If you remove the check mark, your bookmarks won’t be visible on the map.
• Unit of Distance—When you tap this option, you can select showing distances in km (kilometers) or miles.