Chapter 2. Making, Receiving, and Managing Calls

In this chapter, you explore Pre’s cell phone functionality. Topics include the following:
→ Configuring Pre settings
→ Making calls
→ Receiving calls
→ Managing calls
→ Getting information about your cell account
With so many powerful ways of communicating—email, text, and instant messaging, Facebook—it’s easy to forget Pre is also a phone. Pre’s standout phone features include easy-to-use touchscreen buttons or keyboard buttons for dialing and searching contacts, a loud and clear speaker phone, and the capability to conduct conference calls by merging two calls into a three-way conversation.
What’s more, Pre’s phone functions are tightly integrated with Pre’s other features. For instance, making a reservation at a restaurant, you find with Google Maps it’s merely a matter of tapping the restaurant’s phone number on the Google Maps display. Or find and call a phone number for a friend or associate that you’re trying to reach thanks to Pre’s Synergy feature that automatically finds and adds Facebook profile phone numbers to your contact cards.
With Pre you can make, receive, and juggle phone calls faster and easier in a number of ways, as you see in the following pages.
Configuring Phone Settings
Before diving into making and receiving calls with Pre, spend a few minutes configuring your Pre’s phone preferences settings to work the way that suits you best. To begin, tap Phone to open the Phone app card.

Face Time: Auto-Off Screen
Pre’s built-in proximity detector senses when you’re holding Pre to your ear during a phone call and automatically shuts off the touchscreen, so your cheek doesn’t accidentally tap a button or hang up on the call. The touchscreen turns on again when you draw Pre away from your face.
Step-by-Step: Setting Phone Ringtone and System Sounds
The Sounds and Ringtones preferences card is where you choose and adjust the volume of the ringtone Pre plays when you receive a call, whether Pre vibrates when you receive a call, and whether you want to hear system sounds such as new items notifications, event reminders, and the ding-dong sound Pre plays when you attach it to the charger.
- Tap the app menu and choose Sounds & Ringtones. The Sounds & Ringtones card appears.

- Tap Vibrate ON or OFF button beneath Ringer Switch Off to toggle whether Pre vibrates when you have the ringer switch set to Off. If you want to know when you’ve got a call when the ringer is turned off (say, you’re in a movie theater or meeting) then you should leave this option enabled.
- If you want to change your default ringtone, tap Ringtone (or tap the name of the current ringtone) under Ringer Switch On. The Ringtone screen appears. The Pre comes with plenty of different tones by default, but you can add plenty of custom ringtones later, if you prefer.

- Scroll up and down the list to see Pre’s ringtones. A check mark indicates the currently selected ringtone.
- Tap the Play button to the right of a ringtone name to hear the ringtone. A progress bar appears as the ringtone plays.
- Tap a ringtone name to choose the ringtone. You can also choose to use a custom ringtone if you don’t like the default selection.
- Tap the Add Ringtone button to view any audio and music files you copied to your Pre. A list of audio files appears. Scroll up and down the list to see Pre’s audio files, or begin typing the name of an artist, song, ringtone, or audio filename to search for audio tracks that match your search criteria. Once you find the one you want to use, tap it to add it to the main list of ringtones.
Ringtone selected from audio files manually added to the Pre

Ringtones of Your Own
Drag and drop your own custom ringtones, music tracks, and other audio files to Pre in USB drive mode, as explained in this chapter and Chapter 9, “Shooting, Storing, and Viewing Photos.”
- Scroll down to see the selected audio file.
- Tap the Play button to the right of the audio filename to hear its preview.
- Tap the file to select it as Pre’s ringtone.
- Swipe left in the gesture area to go back to the Sound & Ringtones card.

- Drag the Ringtone Volume slider left or right to adjust the ringtone volume level. When you let go of the slider, the ringtone plays so that you can gauge the ringtone volume level. You can also press Pre’s physical volume buttons up or down to adjust Pre’s ringtone volume.
- Tap System Sounds ON or OFF to toggle whether your Pre plays system sound effects for certain actions, such as when you close a minimized app card by throwing it off the top of Pre’s screen.
- Drag the Volume slider left or right to adjust the System Sounds volume level. When you let go of the slider, the charger plugged-in system sound plays, so you can gauge the system sounds volume level.

Deleting Ringtones
Swipe left or right on a ringtone (or audio file) name to delete it from the Ringtone list. When the Delete/Cancel buttons appears, tap Delete to remove the ringtone from the Ringtone list.
If the ringtone you want to delete from the list is the currently selected ringtone, you must choose another ringtone before you can delete the ringtone you want to remove from the ringtone list. Deleting a ringtone or audio file from the Ringtone list only removes it from the list and does not delete the file from your Pre.
- Tap Vibrate ON or OFF to toggle whether Pre vibrates when you receive a call or when Pre plays a system sound. Note that if you enable this option your phone will also vibrate when the ringer is set to on.

Adjusting Other Phone Preferences
The Phone Preferences allow you to tweak how your Palm Pre works as a phone. Some of the options in this preferences screen allow your Palm Pre to assist you when you travel, or set up dialing shortcuts.
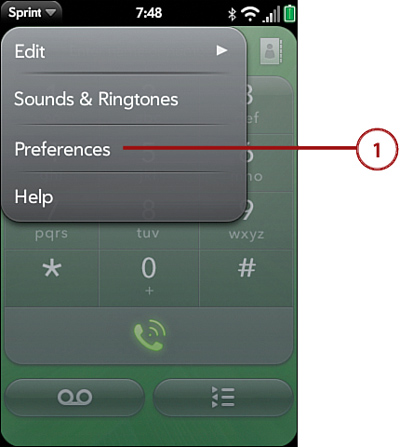
- Tap the app menu and choose Preferences to open the Phone preferences card; then scroll up and down to change any of the options on the card. Note that the first item listed is your Palm Pre’s phone number, should you forget what it is. (It happens to all of us!)
- Tap Show Contact Matches ON or OFF to toggle whether Pre displays only numbers or numbers and letters when you use the keyboard with the Phone card. With the option OFF, Pre recognizes only numbers typed on the keyboard. With the option ON, Pre recognizes numbers and letters, and displays contact matches as you type letters, initials, or numbers.

- Tap the pop-up menu to choose whether Pre plays Short (default) or Long tones when you press the numbers on the dialpad or number keys on the keyboard. Long tones are sometimes required when accessing certain phone services that prompt you to choose from a list of numbered options.
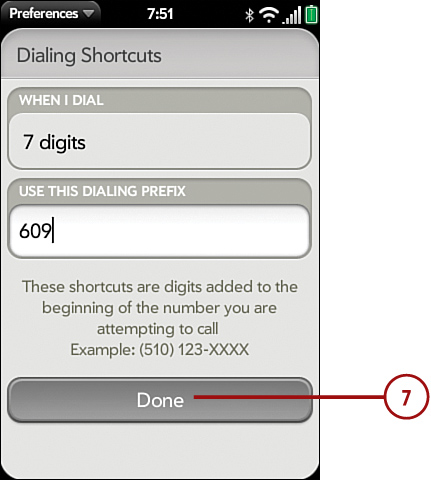
- Tap Dialing Shortcuts to adjust set up shortcuts for when you enter specific numbers. This feature allows you to tell your Palm Pre to watch for a certain number length, and when it sees it, your Pre automatically adds extra numbers before it dials the number. For example, my Palm Pre has a different area code than my home town’s area code of 609, but I don’t want to have to dial the correct area code when calling my friends. I want to just dial the 7 digit part of their numbers and have my Palm Pre take care of the area code.

- Tap When I Dial to choose how many shortcut digits (4 to 7) you want Pre to watch for. We choose 7 digits.
- Tap Use This Dialing Prefix, and type the numbers you want to automatically fill in, 609 in this example.

- Tap Done to return to the Phone Preferences screen.
- Scroll down to get a look at the remaining options on this page.
- Tap Voice Network and tap your carrier’s network or Automatic to toggle whether Pre uses only your carrier’s Network or uses your carrier’s Network and other networks for voice calls when roaming out of range of your carrier’s coverage.
- When Automatic is selected, tap Data Roaming and tap Enabled or Disabled to toggle whether Pre uses Data Services when roaming out of range of your carrier’s Network coverage. This may be useful to cut down on pricey data roaming fees while travelling.

- In the Accessibility section, tap On/Off to toggle Pre’s TTY/TDD (text telephone) feature ON if you connect Pre to a TTY/TDD device used to assist users with hearing, speech, or language disabilities or difficulties. When a TTY/TDD device is plugged into Pre’s headphone jack, all audio (speaker, earpiece) is disabled. When turned ON, a TTY/TDD icon appears in the status area at the top of the screen.

- In the Network Settings section, tap to have Pre check for and update the carrier network settings if updated settings are available. This is only for Palm Pre’s running on CDMA carrier networks like the U.S.-based Sprint and Verizon networks.
- In the Preferred Roaming List section, tap when roaming outside your home network coverage zone to have Pre find the strongest alternative carrier signals. This is only for Palm Pre’s running on CDMA carrier networks like the U.S.-based Sprint and Verizon networks.
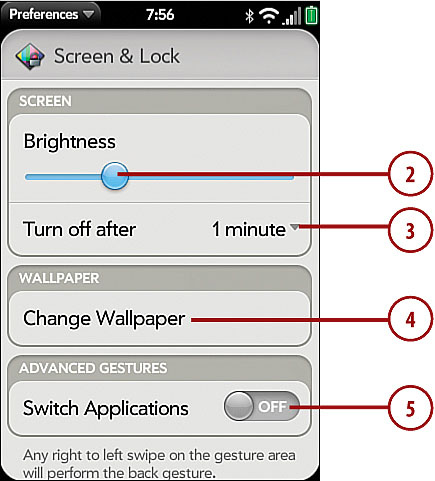
Adjusting Screen Settings
The Screen & Lock preferences card is where you adjust screen brightness and how long before the screen automatically shuts off to save battery power. It’s also where you can change Pre’s background wallpaper, turn on an app switching gesture option, set a password for unlocking your Pre, and choose whether you want to see notifications on the screen when Pre is locked.
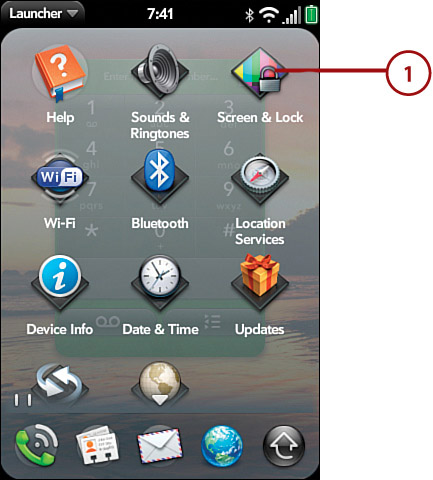
- Open the launcher and tap Screen & Lock to open the Screen & Lock preferences card.
- In the Screen section, drag the slider left or right to decrease or increase the screen’s brightness to the level that’s most comfortable to your eyes. Dimming brightness to the lowest but stillreadable level draws less power and can extend Pre’s battery life when it isn’t connected to a power source.
- Tap Turn Off After; then choose a time span from 30 seconds up to 3 minutes that your Pre’s screen stays on before it turns itself off to conserve battery life.
- In the Wallpaper section, tap Change Wallpaper; then tap All Images or Wallpapers (or any other picture group collections you may have stored on your Pre) to browse and choose a new wallpaper background.
- In the Advanced Gestures section, tap Switch Applications ON to allow you to switch between running app cards by dragging your finger left or right across the width of the gesture area.
- Scroll down the screen to see the remaining options.
- In the Secure Unlock section, tap the pop-up menu and choose Simple PIN or Password. Then type a PIN or password, and type it a second time to confirm it; press Done to close the PIN or password entry card. With Secure Unlock turned on, your Pre will prompt you for a PIN or password to unlock it.

- In the Notifications section, tap Show When Locked ON if you want Pre to display notifications, text message content, and other new incoming information when your Pre’s screen is locked. When the option is OFF, your Pre alerts you with a sound and/or vibrate if you turned on those options in the Phone > Sounds & Ringtones settings card.

Making Calls
Although it might go without saying, we’ll say it here anyway: The main function of your Palm Pre is, in fact, as a cellular phone. There are actually a number of ways to make calls with your Pre and we’ll cover a few of them here. Once a call (or multiple calls) is in progress, however, you pretty much can manage them all in the same way.
Step-by-Step: Dialing with the Dial Pad
The most obvious (and old-fashioned) way to make a call is to dial a phone number with your Pre’s touchscreen dial pad. To access the dial pad simply tap Phone from the Launcher.
- Tap in the phone number on the dial pad. Note that digits can be entered for you automatically if you’ve configured Dialing Shortcuts as described earlier in this chapter, in the section “Adjusting Other Phone Preferences.”

- Tap Call to initiate the call.
- Your Pre dials the number and the call card appears. If the number you dialed matches one of your contacts, the contact’s info displays. Use the call screen to manage your call, as described in the section “Managing Calls” later in this chapter.
- To end the call, tap the Hang Up button.

Finding and Calling Contacts
You can quickly dial phone numbers stored in your contact cards from the Phone app, Launcher page, or card view, as the following sections explains. To learn how to work with your Contacts in more detail, see Chapter 3, “Managing Contacts.”
Turn On Show Contact Matches
To follow the steps in this section please set Phone > Preferences > Show Contact Matches ON.
Step-by-Step: Dialing Contacts with Phone
- Tap Phone; then tap the Contacts icon or just begin typing a contact’s name.
- Contact matches appear as you type. Synergy gathers and displays every phone number for each contact from every type of account source you set up on your Pre, including Gmail, Facebook, and Microsoft Exchange.
- Tap the number of the contact you want to call; your Pre dials the number, and the call card appears as described earlier, in the section “Dialing with the Dial Pad.”

Dialing Contacts from Launcher or Card View
- Tap Launcher or drag up from the gesture area to open card view and begin typing a contact’s name or initials. Contact names appear as you type; contacts for whom you’ve created Launcher favorites appear above the list of contact matches.
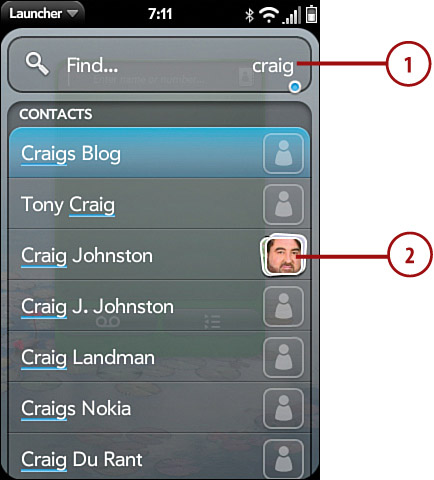
- Tap a contact name to display the contact’s card details; then tap the number you want to call. Pre opens the Phone app, dials the number, and then the call card appears as described earlier, in the section “Dialing with the Dial Pad.”
Dialing with the Contacts App
- Tap Contacts to open the Contacts application. Drag up and down or just begin typing a contact’s name or initials. Contact matches appear as you type.
- Tap a contact to display his contact card; then drag up or down to view the contact’s phone numbers. Tap a number to select and call it. Pre then opens the Phone app, dials the number, and the call card appears as described earlier, in the section “Dialing with the Dial Pad.”

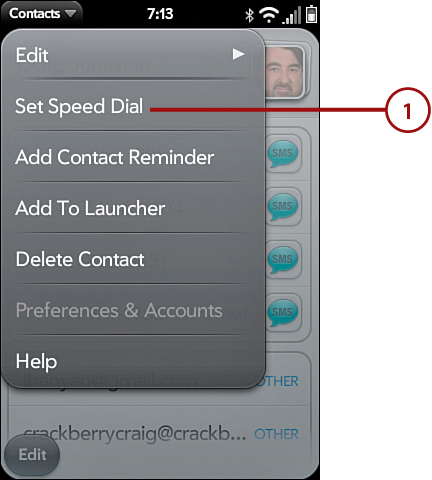
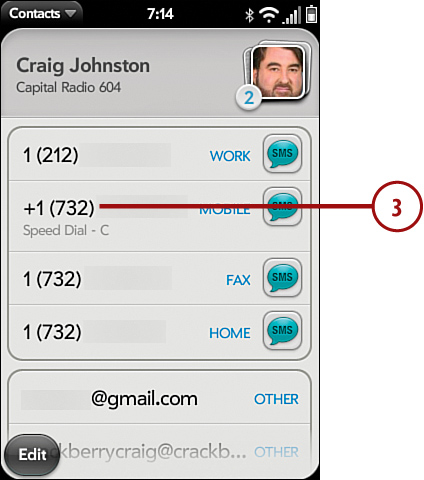
Assigning and Dialing with Speed Dial Keys
You can assign a contact’s phone number to a keyboard key and then press and hold that key to call the contact from the Launcher, Phone, or card view display. To assign a contact’s phone number to a keyboard key:
- Tap Contacts; then find and tap on the contact card for the person you want to assign to a speed dial key. Tap app menu > Set Speed Dial.
- Drag up and down the list of speed dial keys, and tap the one you want to assign to the contact.
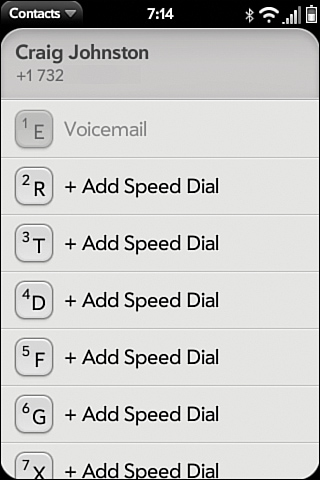
- If a contact has more than one phone number, choose the number you want to assign to the speed dial key. Pre returns to the contact card display.
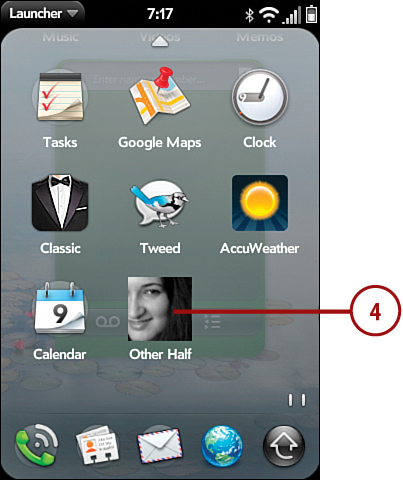
Saving and Dialing with Launcher Favorites
You can save a contact card as a Launcher Favorite and then tap that icon in Launcher to open the contact’s contact card. To save a contact’s phone number as a Launcher Favorite you need to go to the Contacts application, select the contact you want to save as a Launcher favorite, and then use the following steps:
- Tap the Contacts app menu and select Add To Launcher.

- Pre displays the contact’s picture (if she has one) and first and last name. Tap the first or last name fields to change or remove the text in either or both (for instance, you can change your wife’s name to Other Half).
- Tap Add To Launcher.

- The contact’s Launcher Favorite appears at the bottom of the first Launcher page. Now when you tap that contact from the Launcher you can directly tell your Pre to dial that contact.
Customizing Launcher Pages
To learn how to add, move, and remove apps, Launcher and Web Favorites, see Chapter 10, “Working with Palm Pre Applications.”
Dialing with Call Log
Like most any cellular phone, Pre keeps track of calls you make, receive, or miss in the Call Log. In addition to reviewing records of calls made, received, or missed, you can use this log to directly contact someone. For instance, if you check the log to see a missed call there’s no need to ferret out the caller’s contact card (assuming you have one for that individual) when you can simply dial them from the missed calls log.
- Tap the Call Log button to display the call log.

- Tap All Calls or Missed Calls to display the log list you want to view.
- Drag up or down to see all the logged calls on either list.
- Tap a contact name or phone number to dial that number. Pre dials the number and then the call card appears as described earlier, in the section “Dialing with the Dial Pad.”

Returning Missed Calls
A notification banner and buttons to Call Back or Dismiss the notification appears briefly when you don’t answer a call (but not for calls you ignore; see “Handling Incoming Calls”). Tap Call Back or Dismiss to do either.
Dialing from Messages and Web Pages
Pre recognizes phone numbers across most apps, including Email, Web, Messaging, and Google Maps. When Pre recognizes a phone number in one of these apps it formats that number as a link—tap a phone number in email, text or instant messages, or on web pages, and your Pre launches the Phone app and dials the phone number.

Copy and Paste Phone Numbers
You can paste phone numbers copied from other apps into the dial pad phone number field; then press Call to dial the number.
Handling Incoming Calls
Your Palm Pre wouldn’t be a Smartphone if it didn’t offer you multiple ways to achieve the same action. You can answer calls a few different ways with your Palm Pre depending on the circumstance of the call.
• Drag to unlock and answer if your Palm Pre is locked
• Tap to answer if you are working in an application
• Press the headset button to answer if you are listening to music
• Slide open the keyboard to answer if the keyboard is closed
Auto-Mute
Music or audio you’re listening to or video you’re watching automatically pauses when you receive a call. When you end (or ignore) a call, the music or video resumes right where it left off.
When receiving a call you also silence the ringer or send a call directly to voicemail. To silence an incoming call, you can
• Press the power button.
• Press the volume button.
• Slide the ringer switch to the off position (Red).

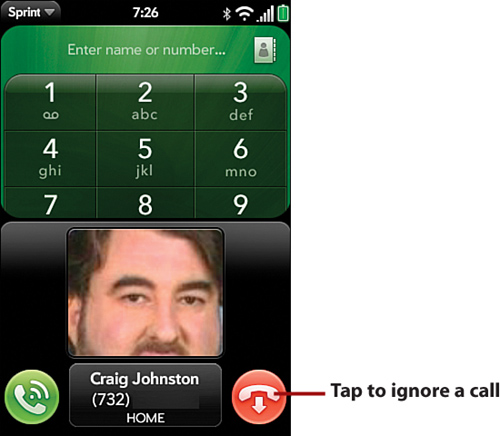
Alternatively, you can ignore an incoming phone call and thereby send it to voicemail; tap the red End Call button.
Managing Calls
There are several ways to manage an active call (or calls) with your Pre. If you are on a call, and another call comes in, you need to be able to handle that situation. Maybe you want to add the incoming call to the call you are on, or ignore the call and send it to voicemail. Another option could be setting up a three-way phone conference with yourself and two other people. The following sections explore each of these scenarios.
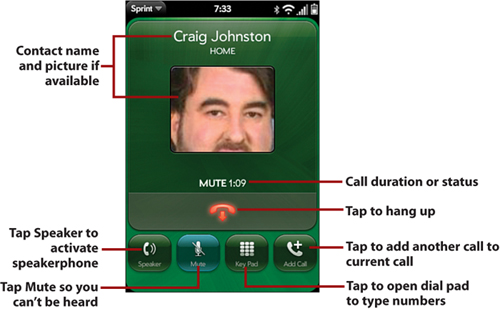
Entering Numbers During a Call
Sometimes it’s necessary to enter numbers into your phone while in the middle of a call, such as when accessing your voicemail or responding to customer service prompts. To do this with your Pre, place or answer your call and then tap the Key Pad button called out in the previous figure. Enter any necessary numbers and, when you’re done, tap Key Pad again to hide the dial pad.
Step-by-Step: Making and Managing a Second Call
Pre makes it easy to conduct calls with more than one person at the same time.
- Place or answer a call as described in the “Making Calls” section; then tap Add Call. The dial pad appears.

- Type a phone number or call a contact using one of the methods you’ve learned so far.
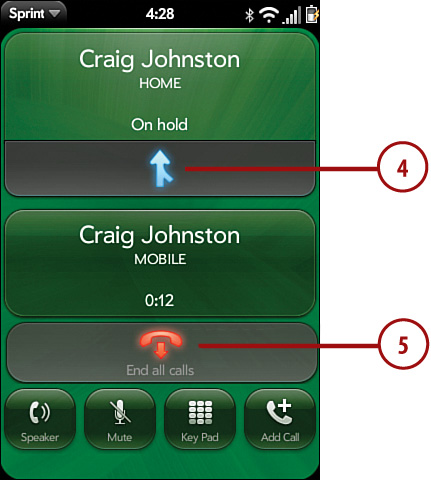
- Tap the Call button. Your Pre puts the first call on hold as it dials the second phone number. Once both calls are connected your Pre’s display lists each call, noting which of them is the call currently on hold.

- Tap the Merge button to merge the two calls into a single three-way conference call.
- To end a call with one caller, ask the caller to hang up; your other caller becomes the active call. To end both calls during a conference call, tap the End Call button.
Sending Messages
While you are talking to someone on the phone, and you already have a contact record for them, tap on their picture to reveal their contact card. When you see the contact card, you can send an SMS by tapping on the SMS bubble next to his phone number, or an email by tapping on his email address.

To learn more about using email with your Pre, refer to Chapter 6, “Email.” To learn more about text messaging with your Pre, refer to Chapter 7, “SMS, MMS, and Instant Messaging.”
Saving Caller Info
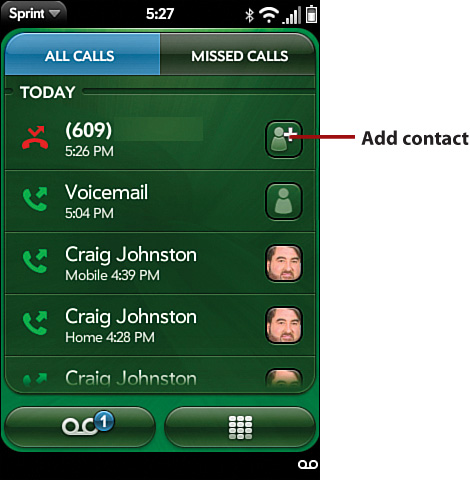
When someone calls you, you can save her number to Contacts. If you are still on the phone with her, tap the Add to Contacts icon next to her number. Choose whether you want to add the number as a new contact or to an existing contact.

If you have already missed the call, go to your call list and tap the Add Contact button next to the missed call.
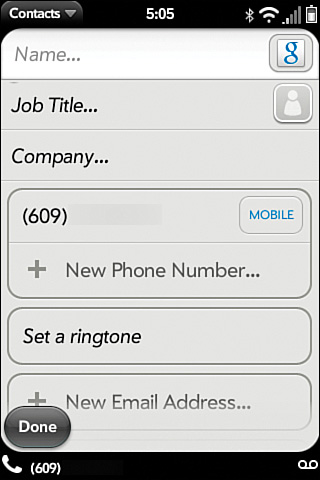
Now complete the new contact card by adding the person’s name and any other details. More detail on adding contacts to your Pre can be found in Chapter 3, “Managing Contacts.”
Using Apps While on a Call
While you are on the phone with someone, you can use any of the applications on your Palm Pre without disconnecting the caller. Press the Home button to switch to other applications, or tap the Launcher to choose which application to start.
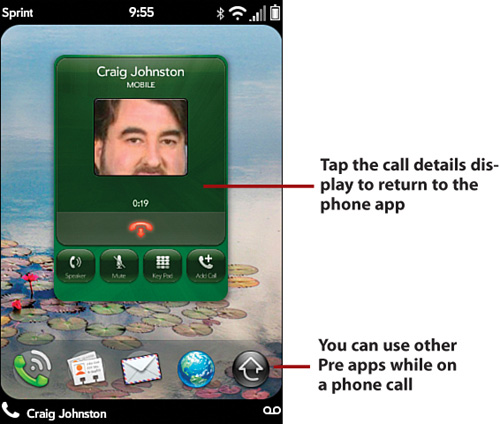
Your current call details display in the notification area at the bottom of the screen at all times enabling you to tap on the call to jump right back to the phone application.
Using a Wired or Bluetooth Hands-Free Headset
If you have previously paired a Bluetooth headset with your Palm Pre or you have plugged in a wired headset, you can use it on a phone call.

While on a call, the speaker button displays a Headset icon. If you press this button you hear the caller in your headset, and your voice will be picked up by the microphone that is located where the left and right side cables meet. The microphone also has a button on it which enables you to answer an incoming call, respond to a call waiting, and hang up on a caller. Press the button once for each of these functions.

If you want to stop using your headset and use either the Palm Pre as the handset or the speakerphone, tap the Headset button again or disconnect your headset.
Managing Your Phone Account
To view or change your calling plan, check your usage, make payments, or purchase accessories for your Pre, visit your carrier’s web site with your computer’s web browser for the easiest-to-use experience. If you are on the road however, you can achieve some of these tasks on your Palm Pre.

From your Pre, you can type in the following codes; then press the Call button to
• *2 Retrieve your calling plan info
• *3 Make a payment
• *4 Check your account balance and usage
On CDMA versions of the Palm Pre (Sprint and Verizon in the U.S.) these special codes do not retrieve information to your screen as they do with GSM carriers like T-Mobile, AT&T, Vodacom, O2, and so on, but simply connect you to Sprint or Verizon customer support.