Chapter 1. Transferring Your Data, Docs, and Media to Pre
Add an account instantly begins downloading your contacts and calendars to Pre

In this chapter, you learn how to transfer your contacts, calendars, tasks, memos, documents, music, pictures, videos, and other data to your Pre. Topics include the following:
→ Dragging and dropping media and documents to Pre
→ Considering Pre’s on-again/off-again relationship with iTunes
→ Understanding Synergy
→ Transferring data using Palm Data Transfer Assistant
→ Keeping data in sync via online accounts
Thanks to preloaded apps such as the web, YouTube, and Calculator, Pre is interesting and fun to play with right out of the box. But the real fun (and getting real work done) begins after you copy your favorite media files such as music tracks, videos, and pictures, and your important business and personal contacts, documents, spreadsheets, and other useful data.
The good news is getting your stuff onto Pre isn’t complicated, thanks to Pre’s capability to automatically download your Gmail or Exchange contacts, calendars, email inboxes, Facebook friends, and AIM and Google Talk instant messaging buddies over-the-air (aka the cloud).
In this chapter, you also learn how you can execute a one-time transfer of your existing Palm Desktop, Outlook for Windows, or Mac Address Book and iCal contacts and calendar items to your Pre (and how to then keep them in sync over the air), and how a nifty feature called Synergy enables your Pre to tap into multiple sources of your data and display it all in a single, unified view, while keeping data from each source separate. You also learn how to connect your Pre to your Mac or Windows computer so you can easily copy documents and media files to your Pre.
Copying Pictures, Audio, Video, and Documents to Pre
Copying music tracks, pictures, videos, ringtones, and documents is as easy as connecting Pre and your PC or Mac with a USB cable and then dragging and dropping what you want onto Pre the same way you would to a hard drive or USB memory drive. That’s because Pre’s USB Drive feature makes Pre behave as though it actually were a USB memory drive.

Pre apps can use a variety of common file types, including image, video, audio, text, .RTF, .PDF, and Microsoft Office (Word, Excel, PowerPoint) files. Windows computer users can also use Windows Media Player to transfer music to and from Pre.
Step-by-Step: Using Your Palm Pre As a Thumb Drive
To copy files from your computer to Pre (and vice versa), you connect Pre to your computer with a USB cable, put Pre in USB drive mode, and then simply drag and drop files to Pre, which appears on your computer as a removable drive.
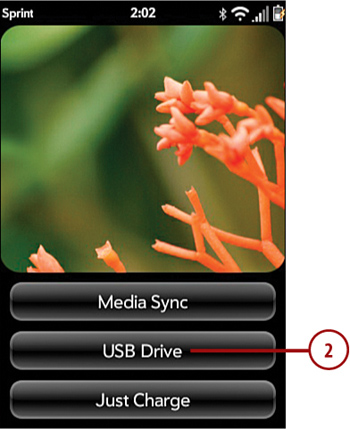
- Connect Pre to your computer with the USB cable included with your Pre. The USB connection options appear on Pre’s screen. Tap USB Drive on Pre.

- A USB drive icon fills Pre’s screen and a few moments later Pre is available as a removable drive icon on your Mac’s Desktop or in Windows Explorer, depending on which platform you use.

Windows users may see a pop-up message reporting Windows has found new hardware and is installing any necessary drivers to enable your PC to connect with Pre. When Windows finishes the process, a second pop-up message lets you know support for Pre has been installed and is ready to use. If the New Hardware Wizard dialog appears, click Cancel and proceed to the next step.
- On your computer, do one of the following:
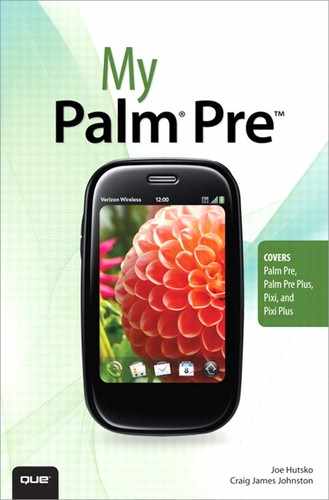
• Windows: If the AutoPlay dialog appears asking what you would like to do with the drive you just connected (that’s what Windows thinks Pre is), as shown here, scroll down the list of options and click Open folder to view files.
• Windows: If the AutoPlay dialog does not appear, press Windows Key+E to open Windows Explorer, and then double click the Removable Drive icon that represents your Pre.
• Mac: Click the Finder icon in the Dock, and then click the external drive icon (in the left column under Devices) that represents your Pre.
Pre’s contents appear as files and folders in a Windows Explorer or Mac Finder window, depending on which platform you use.

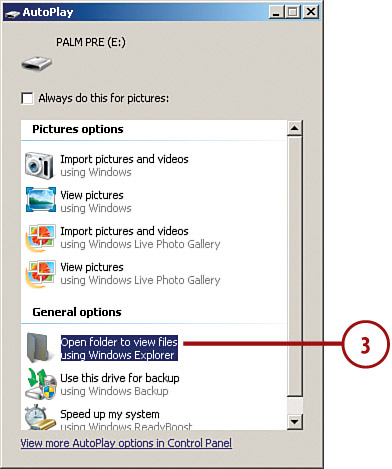
- Drag and drop files from your computer to the Pre. You can drag your files anywhere you want on Pre, and Pre’s apps automatically recognize those files it can use or play. So the Music app finds and plays podcasts and music tracks; Doc View finds and opens Word and Excel documents; Photo finds and opens pictures; and so on. Some common file types Pre apps can use include image, video, audio, text, .RTF, .PDF, and Microsoft Office (Word, Excel, PowerPoint) files.
Organizing Files with Folders
Pre contains a few preconfigured folders, including DCIM (where Pre stores camera snapshots you shoot), ringtones, and wallpapers. You may see other folders Pre apps create as needed, such as downloads and screen captures (which is where Pre automatically saves the image file created when you capture the contents of Pre’s screen by pressing Orange+Sym+P or Gray+Sym+P for the Palm Pre Plus). To make it easier to organize and keep track of files you copy to your Pre, create new folders on your Pre with descriptive names such as Videos, Vacation Pics, Homework, Research, Music, E-books, Work Documents, Podcasts—or any name you want.
- When you finish copying files to Pre:
• Windows: Right-click the drive icon that represents your Pre, and choose Eject from the pop-up menu.
• Mac: Click on the drive icon that represents your Pre to select it; then press Apple+E (or drag the drive to the Trash).
The drive disappears from your computer’s screen.
- Pre’s screen changes from the USB drive icon to whatever it displayed before you connected Pre to your computer. A USB notification icon appears in the lower-right corner.
Disconnect the USB cable from your computer and Pre, or leave it connected if you want to charge your Pre’s battery. At this point you can open any files you copied to your Pre by using the Pre apps that recognizes each particular file type. You can open many file formats for photos, videos, and music; Microsoft Office files; and PDF files.

Copying Amazon Music Purchases from Pre to Your Computer
You can copy music you purchase from Amazon using Palm Music Assistant, which lets you copy music from your phone directly to your desktop music player. Go to palm.com/music-assistant.
Understanding Pre’s Always-in-Sync Approach
When it comes to transferring and staying in sync with contacts, calendars, and tasks, Pre has its head in the cloud, so to speak. The cloud (also known as cloud computing) refers to an increasingly growing number of programs and services for transferring, storing, and keeping data in sync between smart devices and computers over-the-air via the Internet and wireless mobile phone data connections. Apple’s MobileMe service is an example of a cloud application and service. But unlike MobileMe, which requires a $99 yearly subscription, Pre gives you cloud services at no extra cost.
Automatically filling up Pre’s Contacts, Calendar, Tasks, and Email apps with your important data over the cloud is a cinch if you have a Gmail, Facebook, or Microsoft Exchange ActiveSync account (or combination of all three). Simply add the details of one or more of those accounts in Pre’s Email, Contacts, or Calendar app and your information flows over the air and into your Pre in each relevant app.
This approach is a dramatic contrast to other Palm smartphones models such as Treo or Centro, which depend primarily on connecting to your PC to keep your contacts, calendar, and other media in sync between the big computer and the little one posing as a smartphone.
Both Mark/Space and Chapura, companies that for years have offered programs to transfer files and information and keep everything in sync between smartphone and PC, offer Pre versions of their programs but with a twist. Unlike most other versions of their products, which mainly rely on a USB cable to make the connection, Mark/Space Missing Sync for Palm Pre (www.markspace.com) and Chapura Pocket Mirror (www.chapura.com) each make the data sync connection via Wi-Fi.
In the following sections I explain the Synergy Pre feature that combines data from multiple sources into unified views across Pre’s apps and then shows you how to get your basic contacts, calendar events, tasks, email, and instant messaging accounts onto your Pre.
Understanding Synergy
Using the Synergy feature, Pre taps into multiple sources of your data and displays it all in a single, unified view, while still keeping data from each source separate. That means appointments in your Exchange calendar at work and your personal Google calendar both appear in Pre’s Calendar app in a single, unified view.
Events from multiple calendars appear in a single view

Multiple types of messages, including instant messages SMS, and MMS messages, are automatically organized by the person who sends them and are displayed in Pre’s Messaging app as a single, unified conversation.
Ditto for email. Pre displays all your email in a unified inbox view. Optionally, Pre rounds up all flagged email messages in another unified inbox view and tapping on individual inboxes enables you to view only messages for that specific email account.
Details about every person you communicate with displays in a single view, regardless of where the details originate. For instance, say you have your friend Nick’s email address and phone number in Microsoft Exchange ActiveSync, his IM name on AOL Instant Messenger (AIM), and his birthday on your personal Google calendar.
Synergy automatically links together any information it finds in common among the various sources and displays everything in a unified view on Nick’s contact card in the Contacts app.
Multiple contact sources merge in single view for each contact

What’s more, if Nick uses Facebook, any information in his profile—such as his profile photo, anniversary, street address, and any other email addresses or phone numbers—automatically appear on Nick’s contact card. You can also create new links between contact sources for any links Pre doesn’t automatically discover and connect together on your behalf. And If you find you have too much or repetitive information for a contact, you can unlink sources from the contact.
Adding Contacts, Calendars, and Tasks to Pre
You can add your personal data to your Pre in two ways:
• Automatically: Add one or more online accounts and Pre automatically populates the Contacts, Calendar, Tasks, and Email apps with data and stays in sync between your online account and Pre.
• Manually: Use Palm Data Transfer Assistant to transfer data from Microsoft Outlook for Windows, or from Address Book and iCal for Macs.
You can choose one or both methods to transfer data to Pre. For instance, you may have contacts and calendar events you want to manually transfer from your Mac to your Pre using the Palm Data Transfer Assistant. At the same time you might also have a Facebook account and a Google Calendar account that you want to automatically add so that information for those appears on your Pre as well.
Keeping Data in Sync and Importing from Hotmail, Yahoo, and Other Accounts
Information you manually import to your Pre can stay in sync with an online source you optionally select, such as a Google Gmail account or an Exchange ActiveSync account, at the time of the import. You can also choose to import your data to your Pre’s local profile, which is automatically backed up every day but is not kept in sync with an online source. To manually import contact, calendar, and task data from other sources, such as Hotmail or Yahoo, turn to the chapters dedicated to those topics.
Data on your Pre that links to an online account stays in sync whenever you make changes to the data, whereas data on your Pre that’s not linked to an online source backs up every day to your online Palm profile.
For instance, your Pre has a Memo app for jotting notes; however, Google does not offer a way to link and sync Pre Memos to online notes. So, notes you create with Memo back up to your Palm profile.
The following table describes where your data resides and whether it stays in sync with online sources or backs up to your online Pre profile.
Table 1.1. Where Pre Data Resides

For the complete lowdown on adding, changing, managing, and deleting Contact, Calendar, Email, and Messenger accounts and data, refer to the chapters dedicated to each of those topics.
Adding Data Using Online Accounts
Adding a Google Gmail account in one Pre app automatically adds the account in other Pre apps. So, add a Google Gmail account to Contacts, and Pre automatically adds the account to Messaging and Calendar, which in turn populates Tasks with any task items you may have associated with your Google Calendar.
Step-by-Step: Adding a Google Gmail Account
For these steps, I show you how to add a Gmail account to Pre’s Contacts application; however you can choose to add your account in Calendar, Email, or Messaging, and the screens and steps are mostly the same. Ditto for adding an Exchange or Facebook account rather than (or in addition to) a Gmail account.
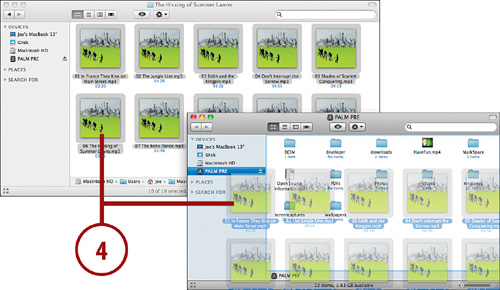
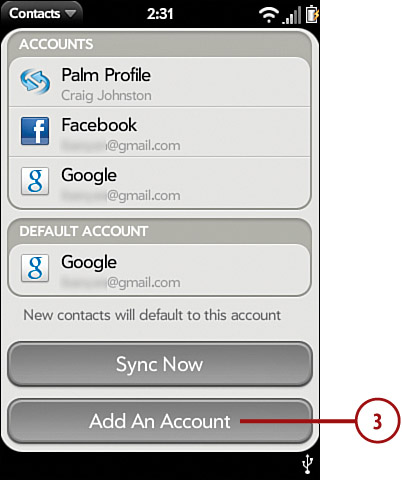
- Open Contacts and tap Application Menu.
- Tap Preferences & Accounts.
- Tap Add An Account.
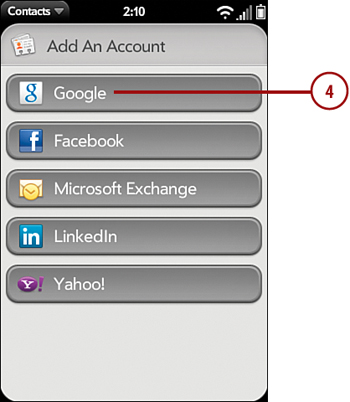
- Tap the type of account you want to add. (I chose Google for this example.) The list of accounts you see on this screen can grow after an update to your Palm Pre. For example, when the Palm Pre first came out, the only accounts listed here were Google, Facebook, and Microsoft Exchange. Since then, Palm has added LinkedIn and Yahoo.
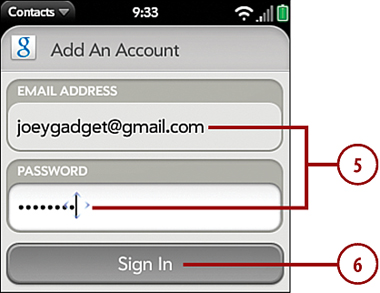
- Type your email address and your account password.
- Tap Sign In.
A syncing account notification appears as Pre downloads your contacts, followed by a sync complete message when Pre finishes downloading your contacts.
Transferring Your Data Using Palm Data Transfer Assistant
If you use Outlook 2003 or later (Windows), or your Pre is replacing a Palm smartphone that you kept in sync using Palm Desktop software, you can use Palm Data Transfer Assistant for Windows to do a one-way transfer of your Outlook or Palm Desktop data to Pre. From either of these programs you can transfer contacts, calendar events, tasks, and notes/memos to Pre.
If you transfer data from Palm Desktop, you must have version 6.2 or later installed. (You can download the latest version of Palm Desktop at www.palm.com/support.)
For Mac Address Book contacts and iCal events and tasks, you can use Palm Data Transfer Assistant for Mac to do a one-way transfer of that data to Pre. If your Pre is replacing a Palm smartphone that you kept in sync using Palm Desktop software, you can export your Palm Address Book and Palm Calendar as data files and import them into Mac Address Book and iCal; then perform a one-way transfer to your Pre using Palm Data Transfer Assistant.
Keep in mind that your one-way data transfer is not the same as synchronizing your data. The one-way process is used to initially copy your data from your computer to your Pre, but after you perform the one-way transfer, Pre does not stay in sync with your computer. You can keep Pre data in sync with a Google Gmail account or a corporate Microsoft Exchange ActiveSync account.
If you want to keep Pre in sync with data on your computer rather than have it automatically sync over the air, you can purchase a third-party program such as Mark/Space Missing Sync for Pre (Windows and Mac; www.markspace.com) or Pocket Mirror (Windows; www.chapura.com).
Bringing Over Web Bookmarks/Favorites
Unfortunately you can’t drag and drop your web browser’s bookmarks the way you can drag and drop music, video, or document files to your Pre. That doesn’t mean you’re out of luck when it comes to keeping your computer and Pre Web bookmarks in sync. To learn more about how to add, manage, remove, and sync bookmarks, check out Chapter 5, “Connecting to the Internet, Wi-Fi, and Bluetooth Devices.”
Using the Palm Data Transfer Assistant involves the following steps:
- Download the Data Transfer Assistant from palm.com/support and install it on your computer.
- Connect Pre to your computer with the USB cable; then run the Data Transfer Assistant on your computer.
- On Pre, choose whether you want to import your data to an online account or to your Pre Profile.
Choosing an online account imports and syncs your transferred data to one of your online accounts, such as Google Gmail or Microsoft Exchange ActiveSync. Choosing your Pre Profile imports your transferred data to your Pre, which is automatically backed up on a daily basis so you always have a backup of your data. Keep in mind that changes you make to your data occur only on your Pre, and your data is not kept in sync with, or accessible from, an online account or Web-based service.
Tip
If you want to keep your Pre in sync with Google Gmail but you don’t have a Gmail account, go to www.gmail.com and create a new Gmail account before proceeding to the next section.
Backing Up and Preparing Your Data Before You Transfer to Pre
Back up your Windows Palm Desktop or Outlook data, or your Mac Address Book and iCal data, before you transfer that data to your Pre.
• If you’re using Palm Desktop for Windows, perform HotSync to make sure your data is up to date between your PC and the Palm smartphone you’re replacing with Pre.
• If Pre is replacing another brand of phone that you kept in sync with Microsoft Outlook, such as a Windows Mobile phone, perform a sync to make sure your data is up to date between your PC and the phone you’re replacing.
• If you use Microsoft Outlook but don’t sync with a mobile phone, back up your Outlook data to your PC’s internal hard drive or an external backup drive.
• If you use Palm Desktop for Mac, perform a HotSync to make sure your data is up to date between your Mac and the Palm smartphone you’re replacing with your Pre. After performing HotSync, you must export your Palm Desktop data to data files before you can import those data files into Address Book and iCal, as explained in the following sections, “Exporting Palm Desktop for Mac Data,” and “Importing Palm Desktop for Mac Data into iCal and Address Book.”
• If you’re using Address Book and iCal on your Mac but you do not sync either or both with a phone, back up your contacts, calendar events, and to-do items to your Mac’s internal hard drive or an external backup drive.
Step-by-Step: Backing Up Microsoft Outlook Data
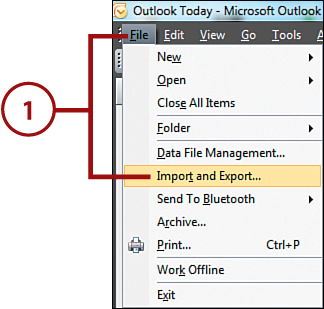
- With Outlook running, choose File, Import and Export. The Import Export Wizard appears.
- Click Export to a file.
- Click Next to continue to the Export to a File dialog.
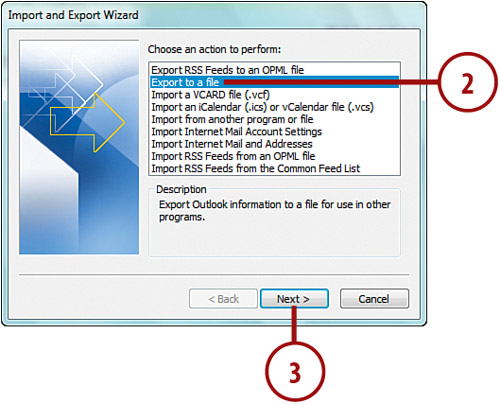
- Click Personal Folder File (.pst).
- Click Next to continue to the Export Personal Folders dialog.

- Click Personal Folders (if it isn’t already selected).
- Click the check box to Include subfolders.
- Click Next to continue to the Save File dialog.

- If you want to change the default folder where Outlook saves your data backup file, click Browse and choose where you want Outlook to save your backup file.
- Click Finish. The Data File Security dialog appears.

- If you want to protect your data backup file with a password, type your password into the Password and Verify Password fields.
- Click OK. Outlook exports and saves your data backup file in the default folder (or a folder you specified in Step 7).
When this process is complete, you can close Outlook and proceed to the section, “Running Palm Data Transfer Assistant” later in this chapter.

Exporting Palm Desktop for Mac Data
Exporting your Palm Desktop Calendar and Address data is a two-step process. You export and save your calendar events to one backup file; then you export and save your addresses to a second backup file.
- From the Palm Desktop choose File, Export to open the Export dialog.
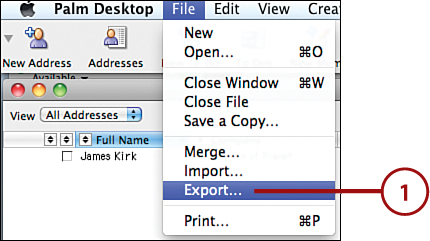
- Type a descriptive name for your calendar backup file in the Save As field; then click the Where pop-up and choose Desktop if it isn’t already selected.
- Click the Module pop-up menu, and choose Date Book.
- Click the Items pop-up menu, and choose All Datebook Items if it isn’t already selected.
- Click the Format pop-up menu, and choose vCal if it isn’t already selected.
- Click Export. Palm Desktop exports and saves your calendar backup file to the Desktop.

- Return to the same Export dialog as described in step 1 and type a descriptive name for your contacts backup file in the Save As field.
- Click the Module pop-up menu and choose Addresses.
- Click the Items pop-up menu and choose All Addresses.
- Click the Format pop-up menu and choose vCard.
- Click Export. Palm Desktop exports and saves your addresses backup file to the Desktop.

Importing Palm Desktop Data into iCal and Address Book
Importing your Palm Desktop Calendar and Address data backup files into iCal and Address Book is a two-step process. You import your calendar backup file into iCal first; then you import your addresses backup file into Address Book.
- From iCal, choose File, Import, Import to open the Import dialog.
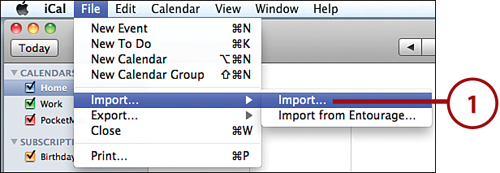
- Click the pop-up menu, and choose Desktop if it isn’t already selected.
- Click the calendar backup file you created in step 6 in the previous section.
- Click Import; iCal imports your calendar events and displays them in the main iCal window.

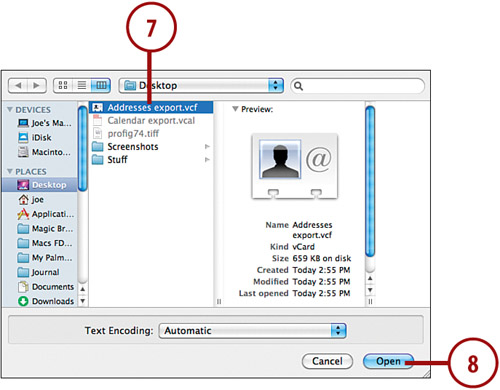
- Run Address Book and then click File, Import.

- Click the pop-up menu, and choose Desktop if it isn’t already selected.
- Click the addresses backup file you created in step 11 in the previous section.
- Click Open. Address Book imports your addresses and displays them in the main Address Book window.
Running Palm Data Transfer Assistant
- After downloading and installing Data Transfer Assistant for Mac or Windows (www.palm.com/support), run the Palm Data Transfer Assistant. (If you see a license agreement and have no objection to it, accept it.) When the Data Transfer Assistant Welcome screen appears, click Next. The USB connection instructions screen appears.
- Connect Pre to your computer with the USB cable included with your Pre. When the USB connection options buttons appear on Pre’s screen, tap USB Drive. A USB drive icon fills Pre’s screen and a few moments later Pre appears as a drive icon on your Mac’s Desktop or in Windows Explorer, depending on which version you run.
• Windows users may see a pop-up message reporting Windows has found new hardware and is installing any necessary drivers to enable your PC to connect with Pre.
• If the Data Transfer Assistant for Windows finds both Palm Desktop and Outlook on your PC, select the one you want to transfer data from. If Data Transfer Assistant finds more than one Palm Desktop profile, select the profile with the data you want to transfer to Pre.
- Click Next on the Data Transfer Assistant window. The Data Transfer Assistant displays a progress indicator as it transfers your data from your computer to Pre.

- A completion message appears when the data transfer is complete. Click Done.
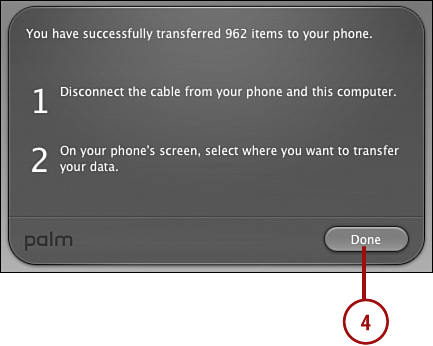
- Quit the Data Transfer Assistant. Your computer automatically unmounts Pre, and Pre displays a Data Transfer Assistant card prompting you to choose where you want Pre to store your imported data. Tap the option you want—Google Or Exchange Account, or My Palm Profile.
Tap through any additional prompts that may appear to confirm your choice. (If you choose Google Or Exchange Account, type in your email address and email account password; then press Done.) When complete, the Desktop Transfer Assistant card closes, and Pre works in the background to import your data into Pre’s Contacts, Calendar, Tasks, and (if your data came from Outlook) Memos apps.
