Prologue: Getting Started with Pre
Your whole world in your hand.
Welcome to your new Palm Pre. The good news is your Pre is easy enough to use that getting started with your Pre is no big deal. Because you probably activated your Pre when you purchased it, the minute you left the store you most likely began doing some of the cool things your Pre can do. By now you’ve probably made and received calls, text and email messages, browsed the web, listened to some music or Internet radio, and maybe even downloaded a few free programs using the Apps Catalog. But the fact that you’re holding this book in your hands suggests you want to go beyond the basics to maximize the very personal relationship you’ve begun with your Pre. In this prologue, you get a crash course on how to operate your Pre’s buttons, switches, and keyboard, and how to use your fingertips to control your Pre’s touchscreen interface. I’ll also give you a strategy on how you can get the most out of this book.
Touring Your Pre
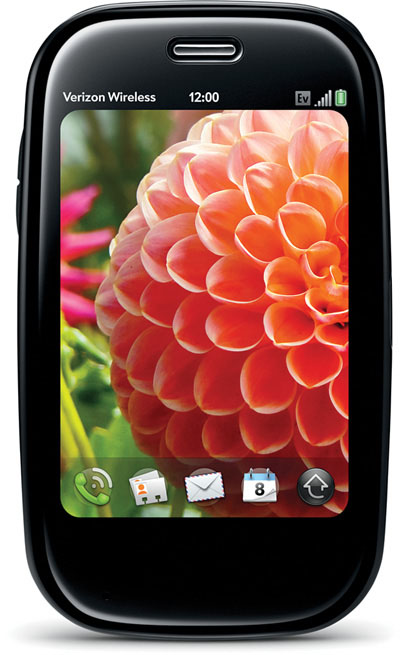
Palm’s Pre designers say they fashioned the Pre to resemble a smooth stone, and that’s nearly what it looks and feels like in your hand when it’s powered off. With only barely visible controls and features on the outside, you learn in no time that, to do most things with your Pre, your fingers do most of the walking on its touchscreen. When you need to type in words and numbers, slide open the Pre’s hidden keyboard to enter alphanumeric information, and then slide it closed when you finish typing. By learning about a handful of fingertip gestures you can use to interact with your Pre’s screen, and about a few special keys you can press when you use the keyboard, operating your Pre becomes second nature almost immediately after you begin to use it.
Prepping Pre for Lift-Off
If you bought your Pre at a your carrier’s store, it’s probably activated, and you’re ready to follow along with the rest of this chapter. If your Pre was shipped to you and you’re using a new phone number, your Pre automatically activates after you create your Palm profile. If your Pre was shipped to you and you’re switching numbers from a previous phone, you must activate your Pre online by visiting your carrier’s website with your desktop computer’s web browser. To use your Pre, you must create a Palm profile using a valid email address. Your Palm profile is your gateway to automatic updates and data backups, and what you use to access Palm’s web-based reset and erase feature if your Pre is stolen or you run into a problem that requires you to completely reset your Pre. Your Palm profile and the email you use to create it are not the same as setting up the Pre’s email application to send and receive email on your Pre (see Chapter 6, “Email”).
Reviewing Your Pre’s External Controls and Features
Get acquainted with your Pre’s external buttons, switches, ports, and keyboard. There are two versions of the Palm Pre. The original Palm Pre, and the Palm Pre Plus. The original Palm Pre has a center button in the gesture area. This button has been removed on the Palm Pre Plus. Instead, the Palm Pre Plus detects a tap in the gesture area as a press of the center button. This also helps to keep the Palm Pre’s design lines cleaner.
Palm Pre Plus Front
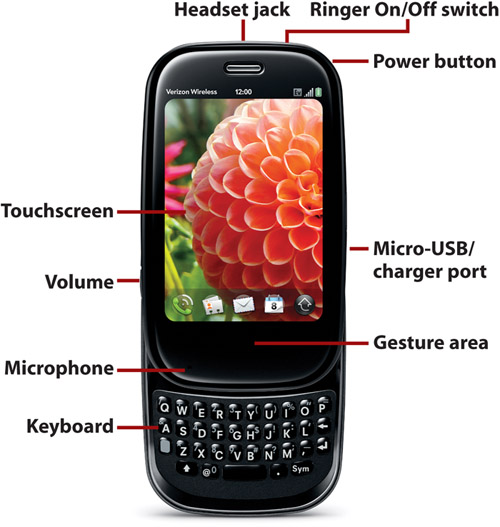
Original Palm Pre Front

• Power button: Press to wake up or put your Pre to sleep. Press and hold to turn your Pre on; if your Pre is already on, press and hold to display options to turn Pre off or select Airplane Mode, which turns off all of Pre’s wireless features but lets you continue to use your Pre to listen to music, watch a video, or make changes to your contacts. When receiving a call press once to mute the ringer (and vibration feature if it’s turned on), or press twice to reject the call and send the caller directly to your voicemail.
• Ringer On/Off switch: Switch right to silence your Pre’s ringer and notification sounds, such as new email alerts or schedule alarms. When you turn off sounds by switching the ringer switch to the right, a red dot appears to the left of the switch, and a muted speaker icon appears momentarily on the screen to indicate your Pre’s sounds are muted. When muted, your Pre vibrates when you receive a call or an alert—but only if you turned on the vibrate feature on the Sounds & Ringtones settings card.
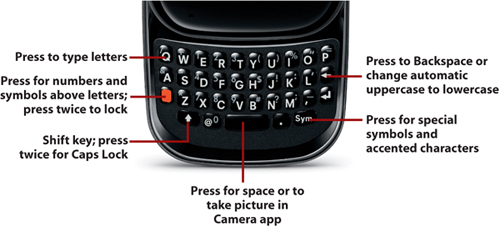
• Keyboard: Type letters and symbols with a single press of each key. Press (or press and hold) the Orange key and then another key to type numbers or symbols shown in the upper half of the keys; press the Orange key twice to lock it. Press (or press and hold) the Shift key to type uppercase letters; press Shift twice to turn on Caps Lock. Press the Symbol (Sym) key to display a list of special symbols. Press the Orange key or Shift key twice to lock either.
• Volume: Press the upper and lower rocker buttons to increase or decrease the volume. Your Pre changes the volume based on what you’re currently doing with it. Adjusting the volume when you’re not having a phone conversation or listening to audio or watching a video increases or decreases your Pre’s ringtone output level. Changing the volume when you’re having a phone conversation increases or decreases the earpiece, headset, or speakerphone output level, depending on which you use during your call. Pressing volume up or down while listening to music or watching videos changes the volume level for those activities.
• Earpiece: The earpiece provides sound output during phone conversations (when you don’t have a headset plugged in or a Bluetooth wireless headset connection).
• Microphone: The microphone picks up your side of phone conversations or listens for voice commands that can control certain apps (when you don’t have a headset plugged in or a Bluetooth wireless headset connection).
• Touchscreen: View and interact with programs and information on the touchscreen display using fingertip gestures. A built-in sensor detects when Pre’s orientation changes between vertical and horizontal, and rotates what’s on the display accordingly.
• Gesture area: Swipe left anywhere in this zone to perform the Back gesture, which takes you back one level in an app, or saves information you typed or a setting or option you selected or changed, and then returns you to the previous level of an app’s screen. You don’t need to swipe left across the entire Gesture area to do the Back gesture; a small inch-long swipe will do. Optionally, you can turn on the Switch Applications option in the Screen and Lock preferences to switch between running apps by swiping left or right across the entire length of the Gesture area.
• Center button: Press to minimize open application and display Card view and Quick Launch. The Center button briefly lights up when you perform certain gestures in the Gesture area. The Center button exists on the original Palm Pre; however, the Center button functionality is duplicated on the Palm Pre Plus by tapping in the gesture area.
• Gesture LEDs: On the original Palm Pre, two LED lights embedded beneath the Gesture area light up to confirm certain gestures in the Gesture area. On the Palm Pre Plus, a thin LED line lights up to confirm gestures.
Palm Pre Plus Back
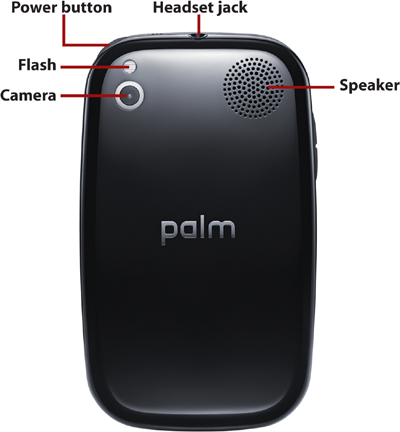
• Headset jack: Plug headsets or stereo headphones into this jack.
• Speaker: Incoming call ringtones, speakerphone phone conversations, music, audio, alert sounds, alarms and other audio emit from the speaker (when you don’t have a headset plugged in or a Bluetooth wireless headset connection).
• Camera lens and flash: The Pre’s camera lens is used by the Pre’s camera app and other programs to capture images. The LED flash above the camera lens can provide flash illumination when capturing images in dimly lit or dark environments.
• Back Cover: The original Palm Pre has an option to replace the back cover with one that works with the Touchstone charging unit. The Touchstone uses induction to wirelessly charge the Palm Pre when it is placed on the unit. The Palm Pre Plus ships with the Touchstone back cover instead of the regular back cover. This will likely further encourage the use of this wireless charging method.
Going the Extra Battery Mile
Pre’s capability to juggle many applications at once is a standout feature that separates it from most other smart phones, which typically run only one app (and certain background services such as push notifications) at a time. The not so great thing is all that processing power required to do all that app juggling—or multitasking—decreases Pre’s battery life. One way to squeeze more waking hours out of your Pre is to invest in an extended life battery, such as the Innocell 1350 Extended Life Battery ($45; www.seidioonline.com), which provides a 20% capacity boost over Pre’s standard battery.
Identifying Status Icons
Besides the time, battery level, and your carrier network’s name and signal strength, Pre displays a number of other status icons and indicators at the top of the touchscreen. These include
![]()
Phone is on but phone carrier network is unavailable.
![]()
Pre is attempting to find carrier network signal.
![]()
Airplane mode is on; all wireless connections—carrier network, Wi-Fi, and Bluetooth—are off.
![]()
Battery charge level.
![]()
Battery is charging.
![]()
Phone carrier signal strength; more bars mean a stronger signal.
![]()
Phone voice and data roaming on and active.
![]()
TTY is on.
![]()
Data connection speed is 1x.
![]()
Data connection speed is EvDO.
![]()
Wi-Fi is on; bars indicate signal strength.
![]()
Wi-Fi is on and attempting to find nearby Wi-Fi network.
![]()
Bluetooth is on.
![]()
Bluetooth is connected to a Bluetooth headset or other device and standing by.
![]()
Bluetooth is connected and actively in use.
![]()
Pre is searching characters you type in Universal Search (card view or Launcher view) or in application card view (such as Memos).
Getting in Touch with Pre’s Touchscreen Gestures
Although your Pre has a tiny keyboard for entering alphanumeric information, most of the time you control Pre by letting your fingertips do the walking on Pre’s touchscreen to perform a number of touch-sensitive actions known as gestures.

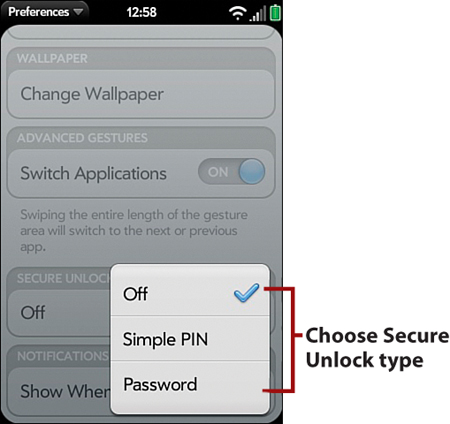
When you press the Power button to wake Pre from sleep, the screen activates and displays the time and the Screen Lock icon. Sliding open the keyboard to wake Pre lets you bypass having to drag the screen lock to unlock Pre.
Optionally, you can lock your Pre with a simple numeric PIN code or lengthier alphanumeric password that you must tap in to unlock your Pre.

To turn on the Secure Unlock feature, tap Launcher > Screen & Lock and scroll down.
Most of the time you should just put Pre to sleep when you aren’t using it, rather than power it off. Pre wakes when you tap the Power button or slide open the keyboard. When asleep, Pre uses less power than when the screen is on. Powering Pre completely off and then turning it on again can often fix random problems such as slow-as-molasses performance or other inexplicable behaviors. Powering off Pre clears its working memory space but does not erase any of your personal data or applications you downloaded.
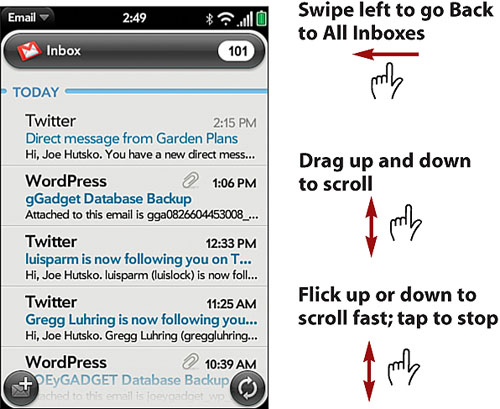
Fingertip gestures include dragging the Lock icon to unlock Pre, tapping buttons or icons, flicking up or down to scroll through lists or web pages, dragging over text you want to select, dragging and dropping items to rearrange where they appear, and pinching or pushing two fingertips together or apart to zoom in or out of a picture or block of text.

Most types of gestures are self-evident based on what’s actively displayed on Pre’s touchscreen. A few gestures are not so obvious because they require a little fancy finger work, or because you do them in the dedicated but unlabeled space known as the Gesture area. The Gesture area is the horizontal space between your Pre’s center button and the bottom edge of the touchscreen.
The series of figures that follow are intended to serve a dual-purpose role: to help you get in touch with every gesture you can do on your Pre’s touchscreen, while simultaneously introducing you to many of Pre’s fundamental concepts and features.

Doing things with Pre begins by launching an application from Quick Launch or Launcher. When no apps are running, Quick Launch is always one hand at the bottom of Pre’s touchscreen. You can replace or mix and match Pre’s four default Quick Launch apps (Phone, Contacts, Email, Calendar) with whichever apps or other icons you prefer, such as the four apps you use the most.

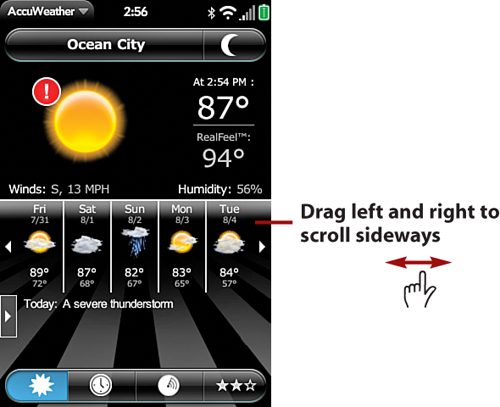
Most of the time you interact with programs maximized on the screen to utilize all of Pre’s touchscreen display.

In certain apps, you can delete items—such as emails, text messages, or tasks—by flicking them off the left or right edge of the screen. In Pre lingo, this action is referred to as throwing.
Press Center button to display Card view (tap the gesture area on the Palm Pre Plus)
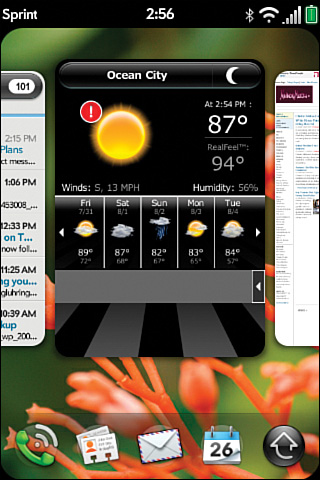
When you want to run another app, open Card view to minimize the active app and display Quick Launch; then tap a Quick Launch app icon or Launcher.

To bypass Card view and open another app instantly (or open Launcher), tap and hold in the Gesture area and drag up to the touchscreen to reveal the floating Quick Launch wave; then slide left or right to move to the desired app (or Launcher) and let go.

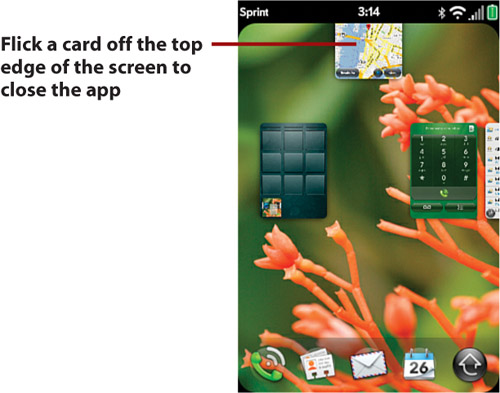
Throw an app card off the screen to close the app by flicking its minimized app card up and off the screen.

The top of Pre’s touchscreen displays information such as the time, battery level, network, and Wi-Fi connection status and signal strength, and a menu in each corner.
The Application menu contains the Edit submenu (Cut, Copy and Paste) and other items such as Preferences or Settings, commands, and Help.
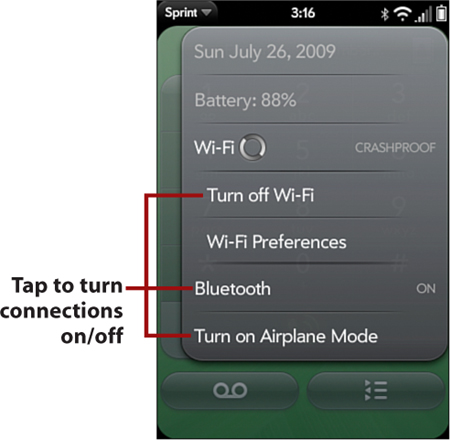
The Connections menu offers a quick and easy way to turn Bluetooth and Wi-Fi on or off, choose a Wi-Fi network or Bluetooth device, or turn Airplane Mode on or off. Choose Airplane Mode to turn off Pre’s phone network, Wi-Fi and Bluetooth features all at once.
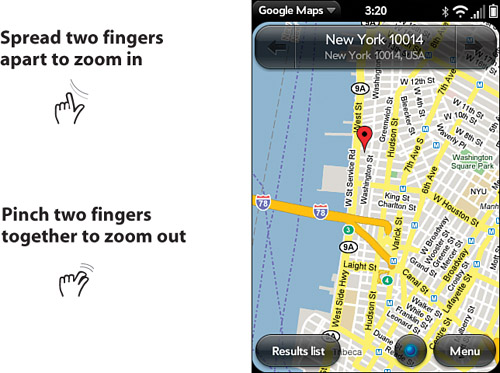
In certain apps you can zoom in or out of what’s displayed on Pre’s screen, such as a picture on a web page you’re viewing with the Web app, or a street intersection you’ve pinpointed using Google Maps.

Sometimes you want to zoom in or out a fixed amount to narrow in on, for instance, one of several columns displayed on a web page.


Rotating your Pre can change the screen’s orientation between vertical (tall but narrow), and horizontal (wide but shorter), which is particularly handy for reading web pages or documents containing small, difficult to read text.

Pre alerts you with notification banners at the bottom of the screen whenever new items or information arrives on your Pre, such as voicemail messages, email and text messages, or upcoming appointments.

If you ignore a notification for more than a few seconds, the notification banner disappears, and a Notification icon appears in the lower-right corner, alongside any other notifications you ignored or haven’t gotten around to because you were in a meeting or otherwise occupied. Tap the Notification icon area in the bottom-right corner to redisplay the notification (or notifications).
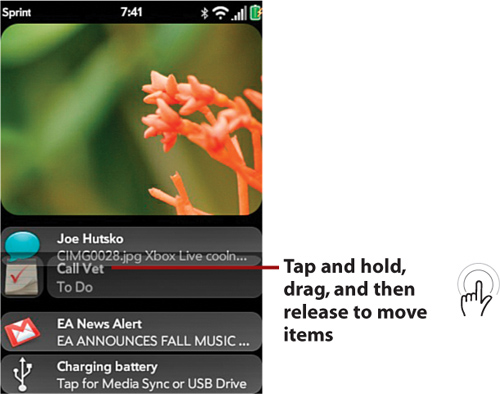
You can use drag and drop to move or reorder items such as notification banners, emails, tasks, Web bookmarks, and memos. You can also reorder app (and other) icons on Quick Launch and Launcher pages by dragging and dropping them wherever you want, as I describe in Chapter 11, “Customizing Your Palm Pre Applications.”
Launcher Lock-Down
The Launcher icon is the only icon you can’t remove from Quick Launch because it’s what you tap to display Launcher pages that contain all the other apps that aren’t displayed in Quick Launch.
Mastering Pre’s Keyboard
Slide out Pre’s keyboard whenever you need to enter, change, or search for information.
Type letters as you normally would. Press Shift when you need to capitalize a letter, or hold it down when you need to capitalize more than one letter.
Pre automatically capitalizes the first letter you type in a new sentence in messages or memos, and in certain other text fields. Press Backspace immediately after the auto-cap letter appears to instantly change it to lowercase.


The cursor appears in fields and other areas where you can enter or work with text, numbers, and symbols using Pre’s keyboard. Tap a text field or within text to set cursor location.

To move the cursor in a text field, hold the Orange key (it’s gray on the Pre Plus), and then drag your fingertip on the touchscreen in any direction.

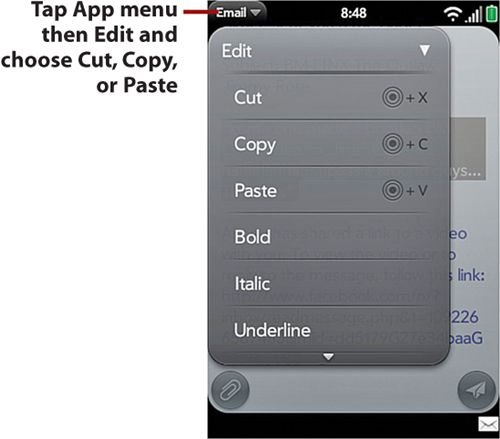
Cut, Copy and Paste Shortcut
Tap and hold on the Gesture area; then press X to cut selected text, C to copy selected text, or V to paste selected text at current cursor location.
As I write this, you can cut or copy text only in editable fields, such as in an email you’re composing, but you can’t copy displayed text, such as a quote from a website news story you’re reading using the Web app. One trick for copying text from emails you receive is to hit the Reply button to create a new Reply message; then scroll down to the text you want to copy from the sender’s original message, select the text, and then tap Mail’s application menu and choose Copy. Now you can paste the text wherever you want. Hopefully by the time you read this, Palm (or a third-party developer) will offer an update or add-on that enables you to copy text from any source.
Tapping into Universal Search
Pre’s Universal Search feature makes it easy to find things you’re looking for, including a contact’s phone number or email address, an app, or a review of the new Mexican restaurant around the block.
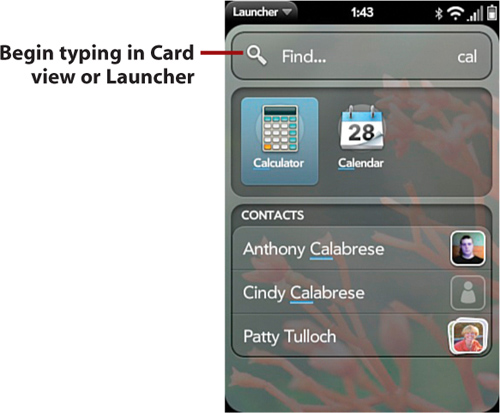
To search, open Card view or Launcher and begin typing a name, first and last initials, a word, or a phrase, and Pre displays suggested matches from your contacts or apps collection. As you type, Pre first attempts to find apps or names in Contacts that may match what you’re looking for—until you reach a letter or letters that do not match any of your contacts. For example, type “Hillary,” and Pre displays all three of your friends and associates named Hillary, including “Hillary Smith,” “Hillary Bell,” and “Hillary Hartman.” Tap the Hillary whose information you want to see to open her contact card. From there you can call or send an email or text message.

Your three Hillary contacts disappear as suggested matches if you continue to type one or more letters because Pre knows you have no contacts other than the three it suggested, and Pre displays other sources you can tap to search, including Google and Google Maps, Wikipedia, and Twitter. (I’ll show you other ways you can search Pre throughout this book.)

Begin typing when viewing the main app card for some apps—such as Contacts, Doc View, and Memos, to name three—and Pre searches only that app’s content for items that match your search word or phrase. Type “bis” in Memos, for instance, and Pre hides memos that don’t contain those letters and shows only memos that do, including a shopping list with dog biscuits on the menu and a memo with a link to Bisquick recipes.
Using this Book
This book has been designed to help you transform the Pre, your Pre, by helping you learn about and use its features quickly, efficiently, and confidently. If you flipped through the book before you purchased it, you probably noticed the book contains lots of pictures that help to illustrate how to do things with your Pre. The things you learn to do in My Palm Pre are organized as tasks, and the actions you take to learn each task are presented in concise, easy-to-digest steps.
As you know, using your Pre is a touchy-feely experience, with your fingertips calling most of the shots to do most things.
When you need to tap something on the screen, such as a button or item, or type information, you see a callout with the step number pointing to where you need to tap or type. When you need to drag, swipe, or flick your finger on the screen, such as to scroll a web page up or down, or throw an app off the screen to close it, you see the following icon:

Arrows indicate the directions you can swipe, flick, or drag your finger.
The pinch and unpinch gestures you use to zoom in or out on some screens are indicated by the following icons:
![]()
When you need to tap twice, such as to zoom in or out a fixed amount, you see the following icon:
![]()
When you need to rotate Pre to reorient the screen, you see this icon:

Because Pre connects to both Windows and Mac computers, this book is designed for readers using either, or both, platforms. Where necessary, task sections may contain specific information and steps devoted to each type of computer, such as which apps you can use to store pictures and music. Feel free to ignore sections and steps that don’t match the your computer.
A Note About Notes
Notes like this one offer additional details or optional information that isn’t necessarily part of a series of steps but can be useful or helpful.