Chapter 9. Shooting, Storing, and Viewing Photos

In this chapter, you learn how to take photos with your Palm Pre’s camera, view the photos, and share them with friends via email, MMS, or Facebook. Topics include the following:
→ Using the Palm Pre’s camera
→ Viewing photos
→ Moving photos on and off your Palm Pre
→ Sharing photos
Your Palm Pre has a 3.2 Megapixel camera with a Light Emitting Diode (LED) flash. This is a good camera for a phone and produces decent-looking photos. Other than taking photos on your Palm Pre, you can synchronize photos to it from your computer. When photos are stored on your Palm Pre you can share them with others on your Smartphone, or via email, MMS, or on social networking sites like Facebook.
Shooting Your World
What would a phone be these days without a camera? Not many phones sell without them, but not all have great cameras. The camera on your Palm Pre is lacking some features compared to a dedicated digital camera, but you can still take good pictures. Your Palm Pre has a flash that will help with low-light, close up pictures. The interface is simple and allows you to tap to take a photo and control how the flash works.
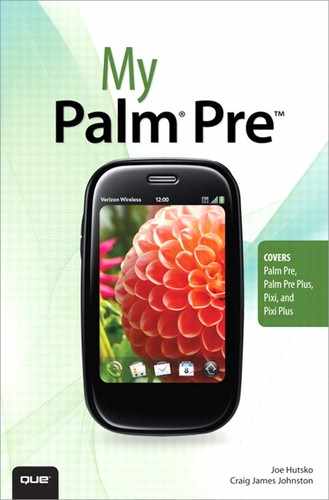
Step-by-Step: Taking Pictures
It seems like a simple task, and it is on your Palm Pre. There are no options to configure with the exception of the control you have over the flash, so it is all about point and shoot.
- From the Launcher, tap Camera.
- Tap the Flash button to control how the flash is used. The button cycles through three choices: Auto (your Palm Pre decides when to activate the flash); Off (flash does not activate); and On (flash always activates).
- Tap the green Camera button to snap a picture.
- Tap to see the Photo roll, which is all the pictures you have taken with the camera.

Viewing and Sharing Your Photos
You can do many things with the photos on your Palm Pre including sharing them with others via email, MMS, or Facebook. You can also use the photos as contact pictures or your Palm Pre’s wallpaper. The Photo application groups the photos by album. These photo albums are sometimes just a date, and sometimes an actual photo album depending on which program was used to move them to your Palm Pre.
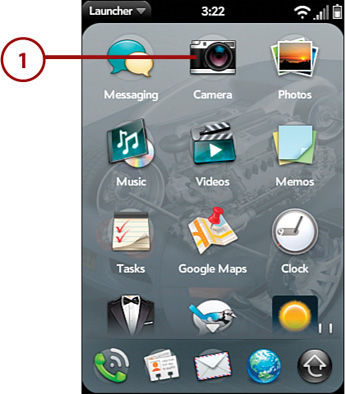
Step-by-Step: Viewing Photos
Let’s start with simply viewing your photos. Your Palm Pre stores photos and other pictures in photo albums, making them easier to find. Let’s take a look.
- From the Launcher, tap the Photos icon.

- When you open Photos, you see photos listed in photo albums.
• All images is what the name suggests—every image on your Palm Pre.
• Photo roll contains only photos that you have taken with your Palm Pre’s camera.
• Photo albums of pictures you have synchronized via iTunes will also display. Photo albums synchronized from doubleTwist are labeled with the date they were synchronized.
• Downloads are photos and other images that you might have received as email attachments or received via MMS.
• Screen captures are images captured when you take a screen shot or screen capture by pressing the ALT, Sym, and P keys together.
When you tap on a photo album, you see those photos in a grid layout.

- Tap a photo to view it full screen.
- Tap the Trash Can button to delete a photo.
- If the photo appears to be landscape, rotate your Palm Pre onto its side and the photo rotates with it.
- To zoom in and out on a photo, use your thumb and forefinger to unpinch and release.
- To move through the photos, swipe left or right across the screen.

Sharing and Using Photos
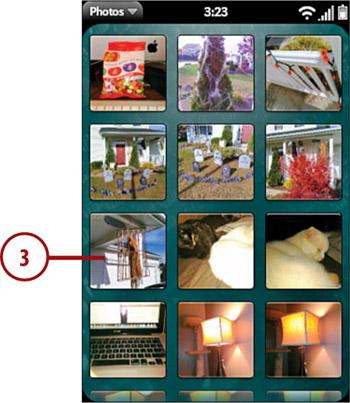
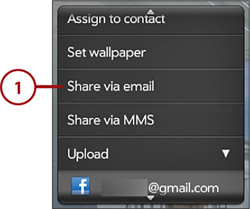
It’s one thing to admire your great artistic talents, but why not share your photos with people? You might also decide that one of your photos deserves to be your Palm Pre’s wallpaper. While viewing a photo, tap the arrow in the top-left corner of the photo to show the menu. From this menu you can access a variety of ways to share your photo.

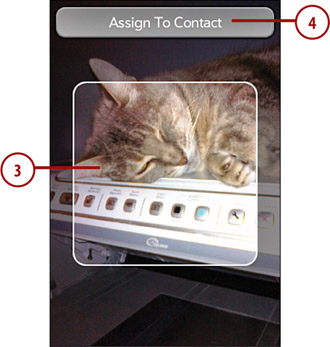
Assigning a Photo to a Contact
While viewing a photo, you can set it as the contact image for someone in your contacts.
- Open the photo menu and tap Assign to contact.
- Find the contact you want to assign the photo to and tap it.
- Using your fingers, move the photo around and zoom in and out using the pinch gesture to position the photo inside the square. Only the part of the photo in the square will become the contact’s photo.
- Tap Assign To Contact.
Setting a Photo as your Palm Pre’s Wallpaper
Your Palm Pre comes with a cool wallpaper already, but why not use one of your photos as the wallpaper? Here’s how.
- Tap Set Wallpaper.

- Using your fingers, move the photo around and zoom in and out using the pinch gesture to make sure the part of the photo you want as the wallpaper is visible.
- Tap Set Wallpaper.

Send a Photo to Someone
If you decide that your photo is so good that you need to share it, send it to some of your friends by email or MMS. Here’s how.
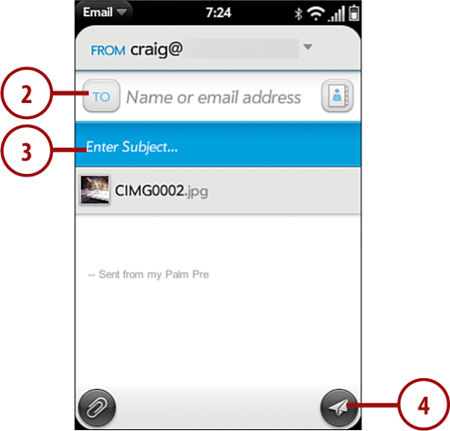
- To send the photo by email, tap Share Via Email. A new email will be composed automatically with the photo attached.
- Address the email by entering an email address or selecting one from your contact list.
- Type a subject and body message to let the recipient know what you’re sending them.
- Tap Send. We covered email in much greater detail in Chapter 6.
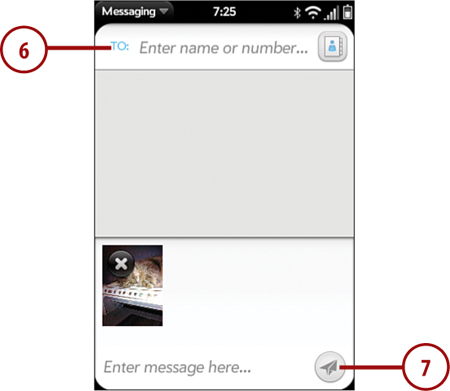
- To send the photo by MMS (Multimedia Message Service), tap Share Via MMS. A new MMS will be composed automatically with the photo attached.

- Address the MMS by selecting recipients from your Contacts that have cell phone numbers.
- Tap Send. MMS is covered in much greater detail in Chapter 8.
Upload a Photo to Facebook or Photobucket
While viewing your photo, you can upload it directly to Facebook or Photobucket. If you have not yet added a Facebook or Photobucket account, follow the steps later in this chapter in the section called “Configuring the Photos Application.”
- Tap Upload.
- Tap on your Facebook or Photobucket account. Your photo is uploaded.

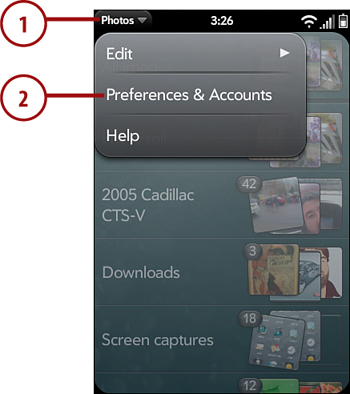
Step-by-Step: Configuring the Photos Application
If you want to upload photos to Facebook or Photobucket, you need to set these accounts up.
- From the main Photos screen, tap the application menu in the top-left part of the screen.
- Tap Preferences & Accounts.
- If you already added your Facebook account using one of the other applications such as the address book, you can see it here.
- To add another Facebook account or a Photobucket account, tap Add an Account.
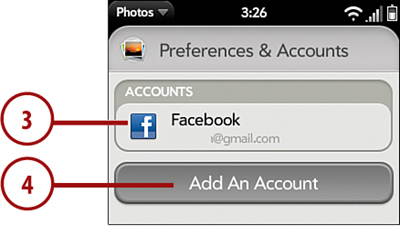
- Tap on either Facebook or Photobucket. For this example, we’ll add a Photobucket account.

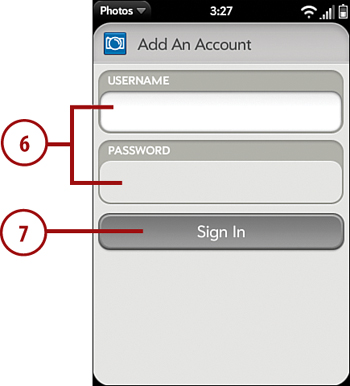
- Enter your account username and password. It might go without saying, but we’ll say it anyway: Make sure that before you reach this point, you have set up a Facebook or Photobucket account to which your Palm Pre can connect.
- Tap Sign In.
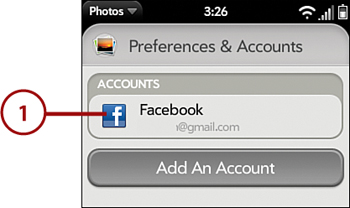
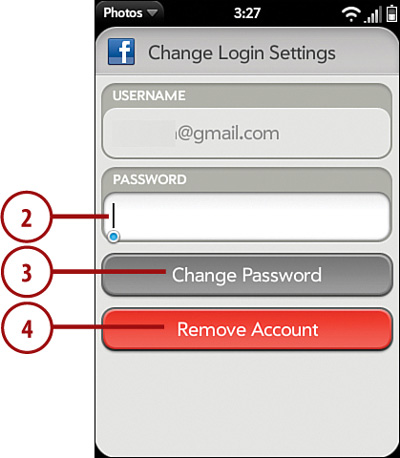
Removing an Account or Changing its Password
If you want to remove your Facebook or Photobucket account, or if you have changed your password for those accounts and need to change it on your Palm Pre, follow these steps.
- To remove an account or change its password, return to the Preferences & Accounts page described in the previous section and tap the account.
- To change you password, enter the new password.
- Tap Change Password.
- Tap Remove Account to delete it.
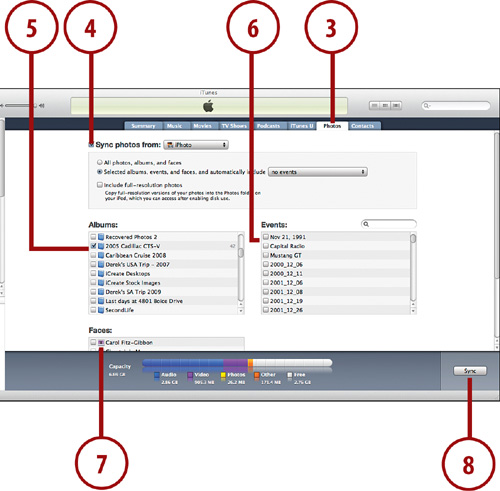
Synchronizing Photos Using iTunes
Because your Palm Pre pretends to be an Apple iPod, you can use iTunes to synchronize photos to it. Normally these photos are already in photo albums, and you can select which ones to copy over to your Palm Pre.
- Connect your Palm Pre to your computer and tap Media Sync when prompted. On your computer, iTunes loads. If it doesn’t launch, start it up manually.
- Select your Pre within iTunes.
- Click the Photos tab.
- Check the box next to Sync Photos.
- Check the box next to any photo album you want to be copied to your Palm Pre.
- Check the box next to any photo event you want to be copied to your Palm Pre.
- If you use iPhoto on a Mac, check the box next to any face you want to be copied to your Palm Pre.
- Click Sync to start the synchronization.
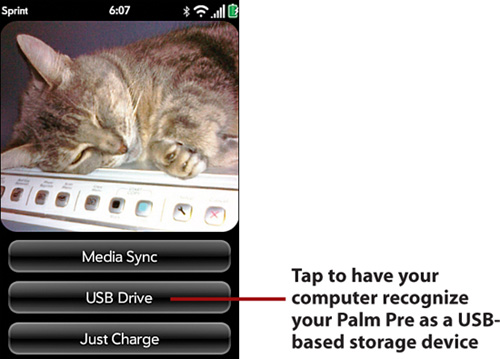
Getting Photos Off Your Palm Pre
So far, we have shown you how to get photos onto your Palm Pre. But what if you want to get those prized memories onto your desktop computer? There are three ways that this can be done. All the steps in the following sections start with you plugging your Palm Pre into your desktop computer using the USB cable and tapping the USB Drive option that appears on your Pre after it has established a connection with your computer.
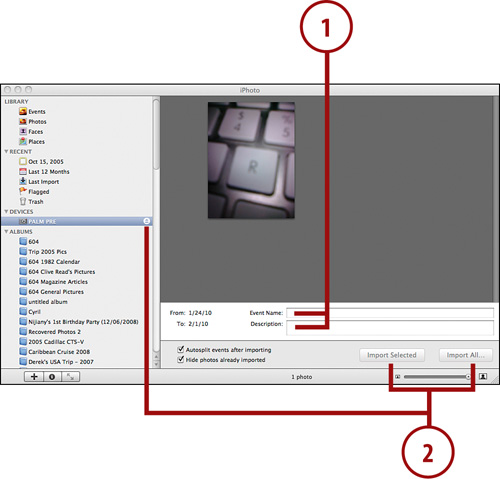
Step-by-Step: iPhoto in Mac OSX
If you plug your Palm Pre into your Mac, iPhoto will see it as a digital camera. If iPhoto doesn’t open automatically, launch it and follow these steps.
- Type an Event Name and Description.
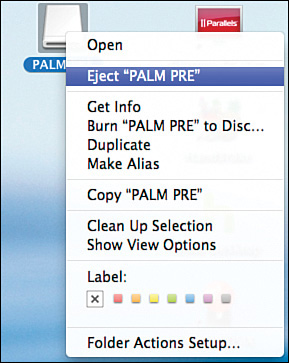
- Click Import All or Import Selected depending on whether you want to import all photos or only selected photos. If you only want to import selected photos, make sure you select them first. When you are done, make sure you eject the Palm Pre to prevent damage to its memory.
Disk Mode in Mac OSX and Windows
You can manually import your photos from your Palm Pre to your OSX or Windows-based computer.
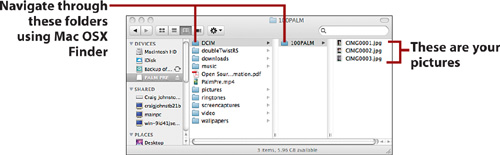
If you are on a Mac, click on your Palm Pre in your Finder, or double click the drive on your desktop. If you are using Windows, you should see your Palm Pre in Explorer or My Computer.
Browse to the DCIM folder on your Plam Pre, then to the folder called 100PALM. This is where you will find all the photos you have taken with your Palm Pre’s camera. Drag or copy and paste the photos you want to another folder on your computer.

Mac OSX
Windows

Once you are done, make sure you eject the Palm Pre to prevent damage to its memory.
Let Windows Import Your Photos
When you plug in your Palm Pre, Windows normally pops up with an AutoPlay Wizard. If you click Import Pictures, Windows will walk you through a step-by-step process of selecting and importing your photos to your My Pictures folder.
