Chapter 10. Working with Palm Pre Applications
In this chapter, you learn how to enhance the usefulness of your Palm Pre with applications. You learn how to find new Palm Pre applications and install them. Topics include the following:
→ Using the Palm App Catalog
→ Finding applications
→ Installing applications
→ Keeping applications up to date
Your Palm Pre is a great Smartphone just the way it is. It comes pre-installed with some useful applications such as the web browser, email client, YouTube client, Google Maps, and many more; however, you can expand what your Palm Pre can do for you by installing new applications. Because your Palm Pre is essentially a small computer, it can do almost anything an application wants it to do. For example, you can install games, keep up with friends on Twitter, look for a company using the Yellow Pages, or check your stock portfolio.
Using the Palm App Catalog
The Palm App Catalog is your gateway to all Palm Pre applications. The Palm App Catalog is right on your Palm Pre, and it enables you to search for and install Palm Pre applications. After you install an application, the Palm App Catalog alerts you to any updates and enables the application to update automatically.
Step-by-Step: Setting Up an App Catalog Account
The first step to enhancing your Palm Pre’s functionality is to find new applications that you want to install; however, before we do that, you need to set up an account so that you can purchase new applications.
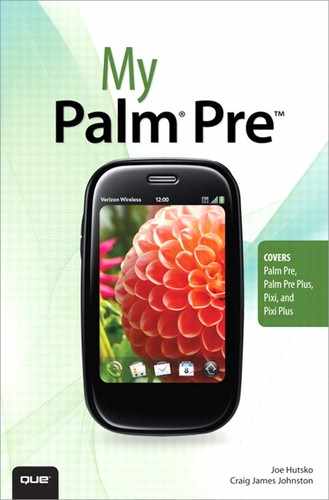
- From the Launcher, tap App Catalog.

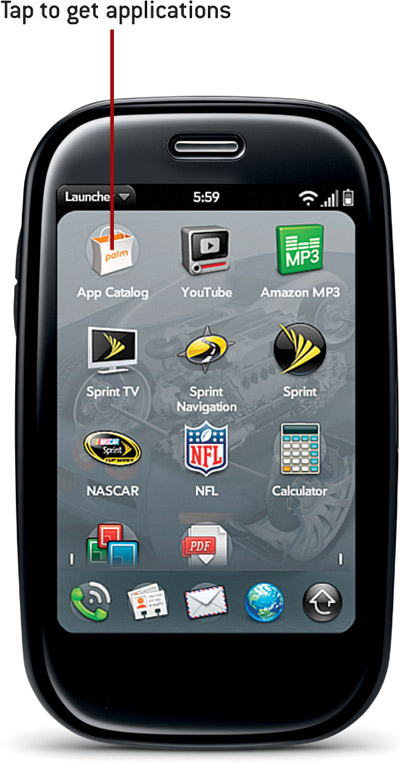
- Tap the application menu on the top-left part of the screen, then tap Preferences & Accounts.
- Tap Add Account.
- Enter your Palm Profile Password.
- Tap Continue.

- Tap MasterCard or Visa. (Unfortunately, there are no other credit card payment options.)
- Enter your credit card information.
- Scroll down the screen to continue entering your billing information.
- Enter the billing information associated with your credit card.

- Tap Submit.

- Your Pre asks you to verify your email address. Tap OK to continue. When the Preferences & Accounts page appears, you see your new account listed.

- Tap Password Is Required, and change it to Every Purchase or leave it set to Once Every 4 Hours. This controls when you are prompted to enter your Palm Profile password when making purchases.
- Swipe back to get to the main App Catalog screen.

Finding Applications
Now that you have your account set up, you can find some cool applications to purchase. If you’re worried about the costs of applications adding up, you’ll be comforted to know that not all applications cost money. Many of the most useful applications listed on the App catalog are free!
- From the App Catalog main screen, scroll left and right to see the featured applications.
- Tap Explore to see all application categories.
- Tap Recent to see all applications recently added to the App Catalog.
- Tap Popular to see all popular applications purchased or downloaded the most.
- Tap the Applications icon to see applications that you have previously downloaded or purchased. We will cover this button in more detail later.

- Tap to see a cloud view of the categories. The larger the name, the more applications are in each category.

- When you tap Explore, you see the different categories listed on the screen. Tap a category to reveal applications in that category.

Purchasing Applications
Now that you know how to find applications, let’s download and purchase some. Remember that you must set up your credit card before attempting to purchase applications. If you have not done so, please follow the instructions earlier in this chapter in the section, “Setting Up an App Catalog Account.”
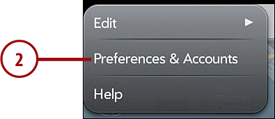
- When you locate and tap an application, more information about that application displays.
- Tap Reviews to read reviews other Palm users have written about the application.
- Tap Share to share information about the application with people via email or SMS. After you select one of these options, a link to the application is automatically pasted into the body of the email or text message. To learn more about sending an email or text message, see Chapter 6, “Email,” and, Chapter 7, “SMS, MMS, and Instant Messaging.”
- Tap to purchase an application. The button will read Download For and will include the price. If the application is free, the button will read Download For Free, and when you tap it the application will download immediately.
- If you are required to purchase the application, you need to confirm the selection. Tap Purchase to continue.

- When the application finishes downloading and installing, the Download For button changes to read Tap to Launch. Tap it to launch the application.

Keeping Applications Up to Date
Many times developers need to update their applications to add features or fix problems. Luckily you don’t have to worry about constantly checking for updates to applications you’ve downloaded because the Palm App Catalog keeps track of those updates for you.
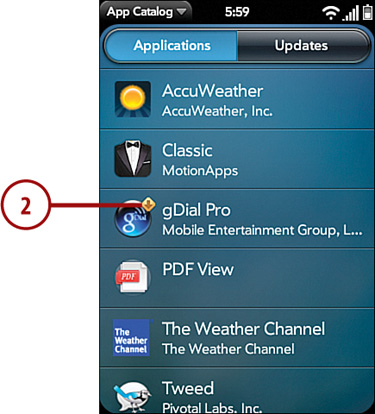
- Tap the Applications icon to see a list of your previously purchased applications.

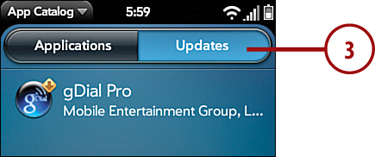
- A yellow down arrow next to an application icon indicates any application that has an available update. Either tap an application that has an update, or tap Updates to see all applications that have updates.
- When you tap the Updates page, you can then tap a listed application to see details about the available update.
- Tap to update the application.

Deleting Applications
Every now and then you want to remove applications you might no longer use. The process is not complicated.
- With the App Catalog application open, tap the Applications icon to reveal your installed applications. Then tap the application you want to delete.

- On the application details screen, tap the application menu in the top-left part of the screen.
- Tap Delete Application.

- Tap Delete.

Organizing Your Applications in Launcher
After you get to the point where you’ve downloaded multiple applications, you might want to move them around in the Launcher so that you have your most used applications on one screen. Let’s cover how to work with your applications in the Launcher and move applications to and from the Quick Launcher.
Let’s start with rearranging applications in the Launcher.
- To rearrange the applications in the Launcher, instead of tapping an application, tap and hold your finger on it for one second.
- You will then be able to drag the application to a new location on the screen.
- To drag the application to another screen, drag it to the edge of the screen. The screen will flip to the adjacent screen and your application will remain under your finger. Release the application in its new position.
You can also, if you choose to do so, rearrange or place new applications on the Quick Launcher; the row of four applications at the bottom of your screen.
- To rearrange an application in the Quick Launcher, tap on the application you want to move, and keep holding your finger on it.
- Slide the application left and right to move it to its new position.
Step-by-Step: Changing the Quick Launcher Applications
The Quick Launcher can only have four applications in it (plus the Launcher icon of course). So, before you move a new one to the Quick Launcher, you must first move one out.
- Tap the Launcher icon to see the full Launcher.
- Drag one of the applications from the Quick Launcher to the full Launcher and drop it.
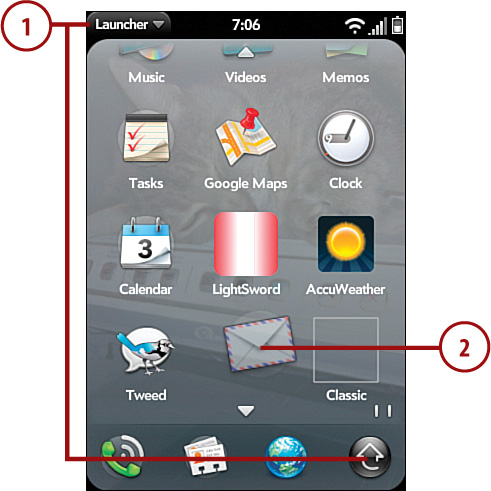
- Drag the application you want in the Quick Launcher from the full Launcher and drop it.
