
The Customer Portal solution, developed by Microsoft and Adxstudio, provides businesses with the ability to deliver portal capabilities to their customers while tracking and managing these interactions in Microsoft Dynamics CRM. It supports all CRM deployment models: Online, On Premise, and SPLA. The portal site can be created on any Windows Server 2003/2008 + IIS7 or even Windows Azure platform.
The Customer Portal solution comes with Windows Live authentication, but the framework supports any ASP.NET membership provider.
Note
In this book, we use the free version that is delivered by Adxstudio and Microsoft; Adxstudio also has a commercial version called "Adxstudio Portal" which provides more enterprise features.
Adxstudio Portal includes the following list of tools: Web Content Management, Event Management, Social, Research, Membership, E-Service, and E-Commerce. For additional product information, see http://www.adxstudio.com/adxstudio-xrm.
Our goal is to deploy the Crew Portal to Windows Azure, and make it communicate with Microsoft Dynamics CRM 2011 Online. So we will test and customize the portal in the local development workspace, then move it to Windows Azure. Either way, we need to do some preparation work first.
The Crew Portal website needs a URL in order for crew members to access the website. Because we will deploy the portal on the Windows Azure platform, we need to register the URL prefix on Windows Azure (all Hosted Service URLs end with "cloudapp.net"); and because we use Windows Live ID to authenticate users, the web application URL must be registered on Windows Live, and the domain (Crew Portal URL) must be verified by Windows Live as well.
Microsoft Dynamics CRM 2011 supports integration with the AppFabric Service Bus feature of the Windows Azure platform. For more information about CRM/Azure integration, please visit: http://msdn.microsoft.com/en-us/library/gg309276.aspx.
Note
Windows Azure isn't a free platform; you can see the pricing information here: http://www.microsoft.com/windowsazure/pricing/. However, when developing applications on Windows Azure, you could find some offers at http://www.microsoft.com/windowsazure/offers/.
- Go to the Windows Azure portal at http://windows.azure.com/.
- Go to the Hosted Services, Storage Accounts & CDN tab, click the New Hosted Service button on the ribbon, enter the Service Name and URL of the Crew Portal, choose your region, and then select Do not deploy:

So, in this stage, we registered the URL of the Crew Portal, which is: http://acm.cloudapp.net.
- Go to https://live.azure.com/.
- Click on the Add an application link, specify the Application name and Domain as acm.cloudapp.net and the Application type as Web Application, and then click the I accept button.
- Click on Essentials, and then specify the URLs that are relevant to the portal website. Make sure that the Return URL specifies the path /LiveID.axd.

- Click the Save button, and then click on Verify Now.
- Click the Download button and then keep the verification file for later use.
- Create a new Windows Azure Project: ACM Azure in Visual Studio 2010.
- Select the ASP.NET Web Role in the solution.
- Right-click on the WebRole1 project, click Add | Existing Item, and then select the verification file.
- Build the solution and publish ACM Azure to a service package.

- Go back to the Hosted Services "ACM" that we just created on Windows Azure, click the New Production Deployment button on the ribbon, navigate to the service package files that were created in Step 4, and then click OK.

- After a while, the solution is uploaded to Windows Azure:

- Go back to Windows Live to verify the domain.
- Complete the Text and Logo settings, and then publish the application.

We may set up the DNS zone (cloudapp.net) on the development workspace to make Windows Live authentication work on the development workspace as well.
Go to the development workspace and run DNS Manager (dnsmgmt.msc):
- Right-click on Forward Lookup Zones, in order to set up a New Zone:
- Primary Zone; Store the zone in Active Directory
- To all DNS servers running on domain controllers in this domain
- Zone name: cloudapp.net
- Allow only secure dynamic updates
- Right-click on the Zone cloudapp.net, and then create a New Host to point to this development workspace.
- Run the the following command:
ipconfig /flushdns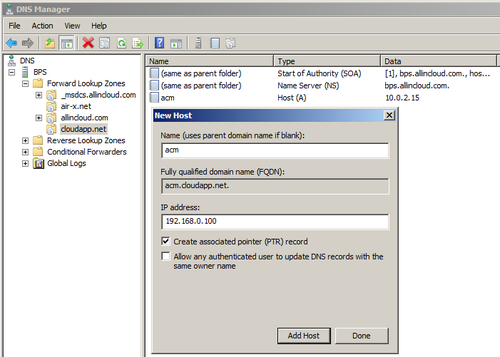
We need to create an IIS website on the development workspace in order to deploy the Customer Portal solution.
Go to IIS Manager (InetMgr.exe), and delete the Default website (port 80) if it's not used by any application. Right-click on Sites, select Add Web Site, and call the new site Crew Portal:

- Import and publish the portal solution (
MicrosoftXrmCustomerPortal.zip) into Microsoft Dynamics CRM on the development workspace. - Go to ACM Settings | Processes, update the portal sign-up invitation e-mail messages, and change the URL to
http://acm.cloudapp.net/.
The only two processes that will be used in the ACM system are:
- Use
WebsiteCopy.exeto upload the initial website content into Microsoft Dynamics CRM.
After performing the last step, the Crew Portal website content should be created in CRM. You can browse it by selecting ACM Content Management | Websites, as shown in the following screenshot:

Open the solution file CustomerPortal.sln.
- Update the
connectionStringinweb.config:<connectionStrings> <add name="Xrm" connectionString="Url=http://crm-server-name:port/crm-organization-name; Domain=user-domain; UserName=user-name; Password=user-password"/> <add name="Live" connectionString="Application Id=0000000000000000; Secret=aaaaaaa"/> </connectionStrings>
- Update the portal to Crew Portal in
web.config:<microsoft.xrm.portal> <portals> <add name="Crew Portal"/> </portals> </microsoft.xrm.portal> - Rebuild the solution and publish the CustomerPortal project to the IIS website that we just created.
- The Customer Portal has been published on the development workspace server, so that you can access it via the URL:
http://acm.cloudapp.net.
Now that everything is ready, let's go ahead and test the portal site:
- Go to ACM | Crew Members, and create the portal administrator account:
- First Name: Portal
- Last Name: Admin
- E-mail:
<[email protected]>(the e-mail is optional in the development workspace)
- Click the Create Invitation Code button on the Web Authentication tab of the ribbon, to generate an Invitation Code. You also need to give the Password Question and Password Answer in order for the validation to work.
- Click the Members link in the navigation pane, add the existing web role to Portal Admin: Customer Portal Administrators, and then save the record.
At this stage, the system will trigger the workflow "MSA-Customer Portal: Setup basic portal privileges" to assign the "Contact Access" privilege to Portal Admin.
You also need to manually run the workflow on Portal Admin: "MSA-Customer Portal: Customer portal sign-up invitation". This will send an invitation e-mail to Portal Admin.
Because we haven't set up the Email Router or Outlook, the e-mail won't be sent out. The workaround for development purposes is to open an Internet Browser from the developer server, and browse the following URL to complete the registration process (replace the InvitationCode with Portal Admin's one):
http://acm.cloudapp.net/login?InvitationCode= 882FDC25E527472D8B2BC0EC1A45C212
You can sign into the portal using any Windows Live ID during this registration verification process. Then, this Live ID will be your portal logon ID. See the next screenshot:

The default portal website is now ready. The next task is to re-brand the website, as well as add custom functions to allow crew members to:
- Update their personal information, which is in the portal already
- Browse the compensation records, to understand how their compensation is composed
The portal site is very well designed, and you can perform many customizations for the portal site by clicking the blue Edit button when logging in with Portal Administrator privileges.
It's fairly easy to rebrand the website through the portal with the Portal Administrator privilege. You can also fundamentally change the look and feel by editing the Masterpage/CSS/PageLayouts in Visual Studio.
Following is an example of how to replace the logo with a custom picture:
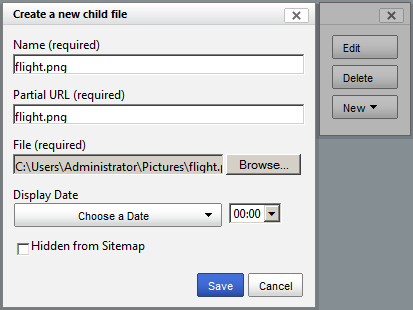
- You can create a new page or add a new file to the portal site. Just click the floating editor, and then click the New button. Specify the information shown in the following screenshot:
- The file will then be uploaded into the CRM system. You can find it by navigating to ACM Content Management | Web Files. If you create a new page, the page will be stored in the CRM system too, in the Web Pages entity.

- You may then use the picture when editing the page:

So the portal will look like:

Although this solution provides a flexible non-coding customization experience, for some customizations you do need to look into the code behind in Visual Studio, and make changes accordingly.
In our case, we want to add the MiddleName column to the profile page. So open the solution in Visual Studio 2010, navigate to the CustomerPortal | Pages | eService folder in Solution Explorer, and open the file Profile.aspx.
Add the MiddleName section between FirstName and LastName:
<div class="row">
<crm:Snippetrunat="server" SnippetName="Profile/MiddleName" DefaultText="Middle Name:" />
<asp:TextBox ID="MiddleName" runat="server" />
</div>
Then open the file Profile.aspx.cs, and add the MiddleName statements in the following classes:
protectedvoidPopulateContactForm(Contact contact)
{
  ...
  FirstName.Text = contact.FirstName;
  MiddleName.Text = contact.MiddleName;
  LastName.Text = contact.LastName;
  ...

  if (!ContactPermission.Adx_Write.GetValueOrDefault())
  {
    FirstName.Enabled = false;
    MiddleName.Enabled = false;
    LastName.Enabled = false;

    ...
  }
  ...
}

publicContactSetContactDetails(Contact contact)
{
  ...
  contact.FirstName = FirstName.Text;
  contact.MiddleName = MiddleName.Text;
  contact.LastName = LastName.Text;
  ...
}
Next, rebuild the solution and publish it to the development workspace IIS path: http://acm.cloudapp.net. You will see that MiddleName now appears on the Profile page.

Next, we also want to change the text of the label "Zip/Postal Code:" to "Postal Code:" You can do this through Visual Studio – that's for sure. However, for such label changes, you can also do it through CRM. Go to ACM Content Management | Content Snippets, open the record Profile/ContactZip, change its value to Postal Code, and save it. This will rewrite the default value in Visual Studio, so you may see that the text has also changed on the Profile page.
The crew members can see and update their information online, and the information will be updated in to the ACM system via the portal. Now we want to create a page for the crew members to see their compensation per flight.
To create a compensation page, open the Customer Portal solution in Visual Studio 2010, right-click on CustomerPortal and select Pages, select Add | New Item, then select Web Form using Master Page, change the name to Compensation.aspx, and then click Add.
In Compensation.aspx, change the code to:
<%@ Page Language="C#" MasterPageFile="~/MasterPages/Default.master" AutoEventWireup="true" CodeBehind="Compensation.aspx.cs" Inherits="Site.Pages.Compensation" %>
<asp:ContentContentPlaceHolderID="Breadcrumbs" runat="server" />
<asp:ContentContentPlaceHolderID="Content" runat="server">
  <asp:GridView ID="CompensationGridView" AutoGenerateColumns="false" runat="server">
    <Columns>
      <asp:TemplateFieldHeaderText="Subject">
        <ItemTemplate>
          <asp:Label ID="Label1" Text='<%# Eval("subject")%>' runat="server" />
        </ItemTemplate>
      </asp:TemplateField>
      <asp:TemplateFieldHeaderText="Crew Name">
        <ItemTemplate>
          <asp:Label ID="Label2" Text='<%# Eval("acm_CrewMember.Name") %>' runat="server" />
        </ItemTemplate>
      </asp:TemplateField>
      <asp:TemplateFieldHeaderText="Flight Name">
        <ItemTemplate>
          <asp:Label ID="Label3" Text='<%# Eval("acm_Flight.Name") %>' runat="server" />
        </ItemTemplate>
      </asp:TemplateField>
      <asp:TemplateFieldHeaderText="Compensation">
        <ItemTemplate>
          <asp:Label ID="Label4" Text='<%# Eval("acm_Compensation") %>' runat="server" />
        </ItemTemplate>
      </asp:TemplateField>
    </Columns>
  </asp:GridView>
</asp:Content>
<asp:ContentContentPlaceHolderID="ContentBottom" runat="server" />
In the file Compensation.aspx.cs, change the code to:
using System;
usingSystem.Collections.Generic;
usingSystem.Linq;
usingSystem.Web;
usingSystem.Web.UI;
usingSystem.Web.UI.WebControls;
usingXrm;

namespaceSite.Pages
{
  public partial class Compensation : System.Web.UI.Page
  {
    protected void Page_Load(object sender, EventArgs e)
    {
      //Get the current logon user
      varcurrentUser = Microsoft.Xrm.Portal.PortalContext.Current.User;

      if (currentUser != null)
      {
        varxrm = new XrmServiceContext("Xrm");
        //Get user's compensation information
        varmyCompensations = xrm.acm_compensationSet.Where(c =>c.acm_CrewMember.Id.Equals(currentUser.Id));
        if (myCompensations != null)
        {
          CompensationGridView.DataSource = myCompensations;
          CompensationGridView.DataBind();
        }
      }
    }
  }
}
The Compensation.aspx page also make sure the current signed-in crew member can only see his/her compensation records.
Rebuild the solution, and publish it to the development workspace IIS path: http://acm.cloudapp.net.
The ASPX page is created and published; now we need to create a compensation page on the portal. Sign into the portal using the Portal Admin account. On the floating toolbar, click New | Child page, and create a compensation page, as shown in the following screenshot:

On the primary navigation toolbar, click Add, and then create a Compensation link:

Now that the compensation link has been added, you can click and see compensation information related to the currently-signed-in user. This is just a demo of the page; you can add whatever you want to see, from CRM onto the Crew Portal.

Now we have the solution, we need to export it and then import it into CRM Online.
To deploy the Crew Portal website to Windows Azure, you may follow the document Customer Portal Deployment Guide_Azure (in the Documentation folder). Because we have registered the web application on Windows Live and Azure, you don't need to repeat those steps—just modify the Visual Studio solution, and add the Windows Azure role and deploy it to the Azure platform.
The major change is to update the connectionString in the file web.config:
<connectionStrings>
  <add name="Xrm" connectionString="Url=https://crmurl.crm.dynamics.com; [email protected]; Password=wlidpassword; Device ID=your-device-id; Device Password=your-device-password"/>
  <add name="Live" connectionString="Application Id=0000000000000000; Secret=aaaaaaa"/>
</connectionStrings>