
To set up Hyper-V on your Windows Server 2008 Workstation, please follow these steps:
- Install the Hyper-V server role on the workstation:
- Start | Run…, type in "ServerManager.msc" and press Enter.
- Right-click Roles and then select Add Roles.
- Select Hyper-V and then click Next and then Install.
- Create two Virtual Network connections that allow a remote desktop connection from the workstation to the VM:
- Open Hyper-V manager, select the Virtual Network Manager… on the Action menu, add two Virtual Networks as per the following table, and then click OK.
Name
Connection Type
External—Virtual Network
External (with your network connection)
Internal—Virtual Network
Internal only
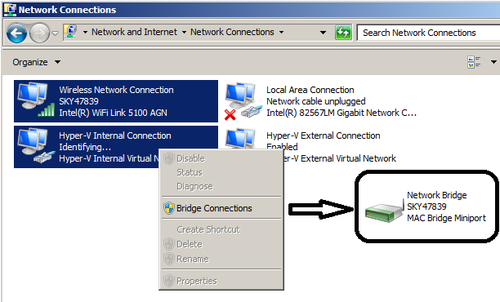
- Hyper-V will create two new network connections. Go to Control Panel | Network and Internet | Network Connections, and rename the connections to:
- Hyper-V External Connection
- Hyper-V Internal Connection
- Open Hyper-V manager, select the Virtual Network Manager… on the Action menu, add two Virtual Networks as per the following table, and then click OK.
- Set up the Internet access via a wireless network:
- Out of the box, Hyper-V doesn't support Internet access via the wireless network. We need to create a wireless network connection in order for VM to access the Internet.
- Go to Control Panel | Network and Internet | Network Connections, and select both Hyper-V Internal Connection and your Wireless Network Connection, right-click and select Bridge Connections. This will create a Network Bridge between the workstation and VM, which allows Internet access via the workstation's wireless connection.
..................Content has been hidden....................
You can't read the all page of ebook, please click here login for view all page.