Chapter 8. Finding Information from External Systems
In this chapter, you will:
Discover how organizations can search external data using SharePoint
Learn how SharePoint Search and Business Connectivity Services work together
Learn how to create content sources to crawl external systems
Establish how to customize the search results pages
Information workers today often spend more time than they should unsuccessfully searching for business data. When they don’t find the data they’re looking for, they spend more time recreating or duplicating it. Duplicate data or content leads to inconsistencies and mistakes being made within an organization, and ultimately costs the organization a lot of money. According to a Butler Group survey (“Enterprise Search and Retrieval: Unlocking the Organization’s Potential,” October 2006), around 10 percent of a company’s salary costs are wasted due to time spent searching for content. To put that into perspective, if you take an organization employing 500 information workers who each earn $30,000 per year, around $1,500,000 is spent on searching for data. If you can save just 1 percent of that time in your organization, you will save $150,000 per year.
Note
See Also You can read more about the Butler Group survey here: www.networkworld.com/news/2006/102006-search-cuts-productivity.html.
Millions of people use Internet search engines such as Bing and Google every day to find information. The search procedure is simple and intuitive, and through an engine’s clever indexing and crawling, you can find relevant information within seconds from billions of webpages.
Microsoft SharePoint provides the ability to search information in a similar way to Internet search engines, providing search results from your SharePoint content and any other data that is relevant to your organization. Instead of your organization’s users spending hours trying to find information, you can increase their search efficiency by cleverly configuring the SharePoint search functionality to find information quickly and provide a better return on your SharePoint investment. Depending on the SharePoint license you have, such as SharePoint Foundation, SharePoint Server 2010 Standard, or SharePoint Server 2010 Enterprise, you can search for content from documents, lists, other intranet sites, Internet sites, shared folders, and external data sources.
Within an external data source such as a customer relationship management (CRM) system, it is not unusual to find duplicate data, such as duplicate contact or company information. The cause of the duplication is usually that someone didn’t find the information during a search and then inserted a new record, not realizing that the same information was already in the system. If it was easy to find the required record in the first place, the instances of duplication would be greatly reduced. Therefore, investing some time into configuring Standard search to search Business Connectivity Services (BCS) external data can be beneficial to the organization, reducing duplication of information and increasing users’ efficiency (thus decreasing salary overhead).
Microsoft SharePoint Foundation 2010 provides a simple site search that allows you to search SharePoint content such as documents and list items. Microsoft SharePoint Server 2010 provides a choice of search: Standard or Enterprise. You can also opt to install Microsoft FAST Search Server 2010 for SharePoint, which provides even more search capabilities. Standard search includes the SharePoint Server Search Connector Framework, which enables you to search external content, such as external sources that you can connect to using BCS. These search options enable users to search for all relevant business data, be it SharePoint content or data outside of SharePoint.
When an overwhelming number of search results is returned, Standard search allows you to reduce the number of items returned to show more relevant results through search scopes, recently authored content, best bets, and relevancy tuning.
Enterprise search in SharePoint also provides contextual search (searches based on the profile of the user), similar results, thumbnails and previews, and much more. Many small to medium-sized organizations tend not to be able to justify the additional cost of the Enterprise edition of SharePoint Server or FAST Search Server, but for large organizations, it is often a good financial investment.
In this chapter, you will examine the benefits of configuring SharePoint to search external data. You will also learn how to configure SharePoint to crawl external data to help provide a central search location for all data and content of use to your organization.
How SharePoint Search and BCS Work Together
SharePoint Server provides a search center that is internal to your organization but is comparable to an Internet search site. You’ll find a simple page with a single search box like you find on the Bing or Google site. The Enterprise Search Center provides two tabs by default: an All Sites tab and a People tab. The All Sites tab provides search across all content sources, including SharePoint lists, documents, external data, and people, while the People search tab returns results from the people search scope only, allowing you to search across user profiles without having to decipher people from other results. For example, say that within your organization you have a requirement for an employee to have .NET development skills. If a SharePoint user has listed .NET development as a skill within their user profile, you can easily find that information through a people search and not make the costly error of hiring a new employee or consultant unnecessarily. Using the People tab within the search center narrows the results to just people instead of returning other content that contains “.NET development” keywords. You can create additional tabs to limit the results for other search scopes, including creating tabs for a specific external data source, such as a CRM database.
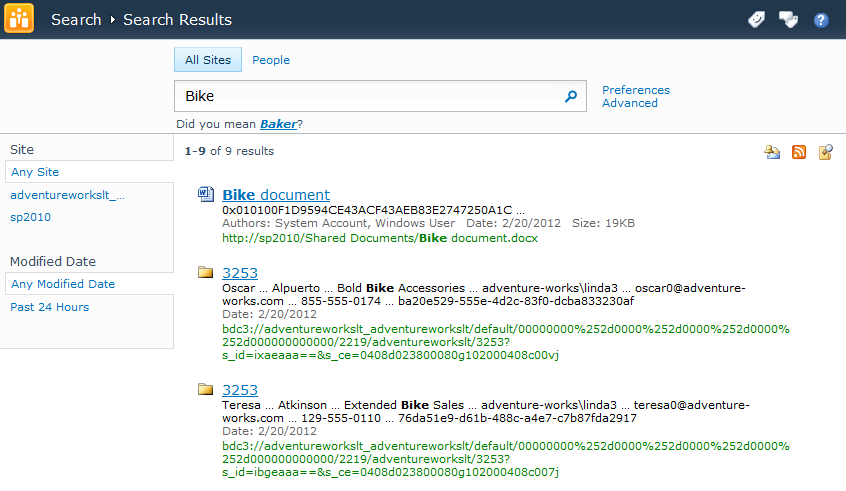
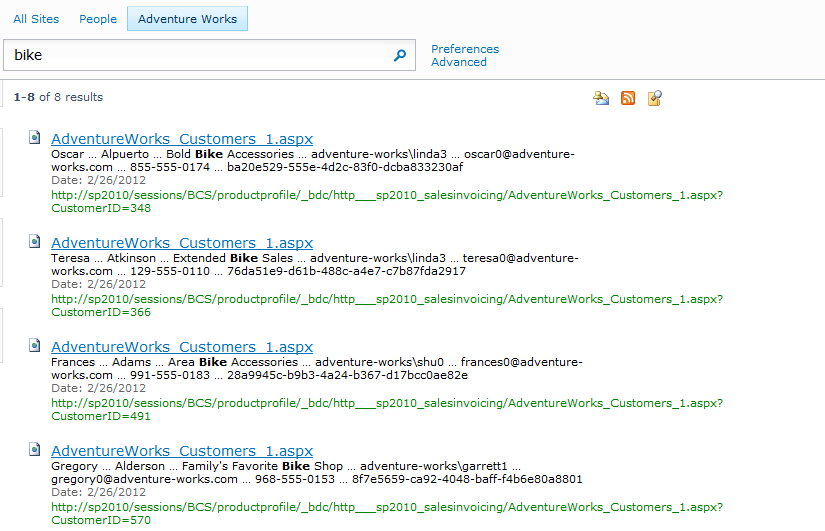
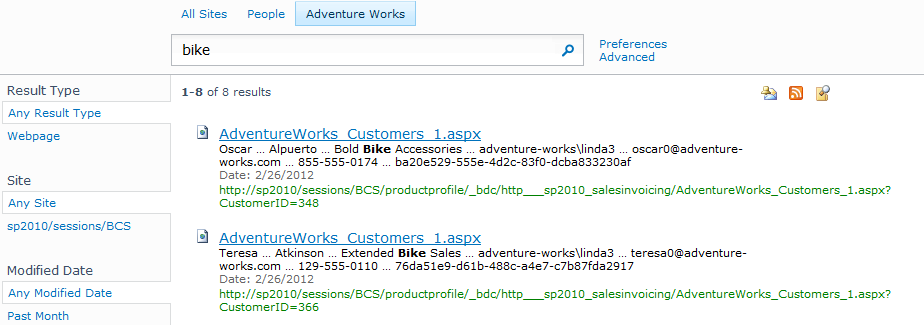
Figure 8-1 illustrates search results using the All Sites tab, which returned results from a mixture of content sources, including All Sites and an external data content source. Notice that the search returned a Microsoft Word document containing the word bike as well as results from the Adventure Works database.
Note
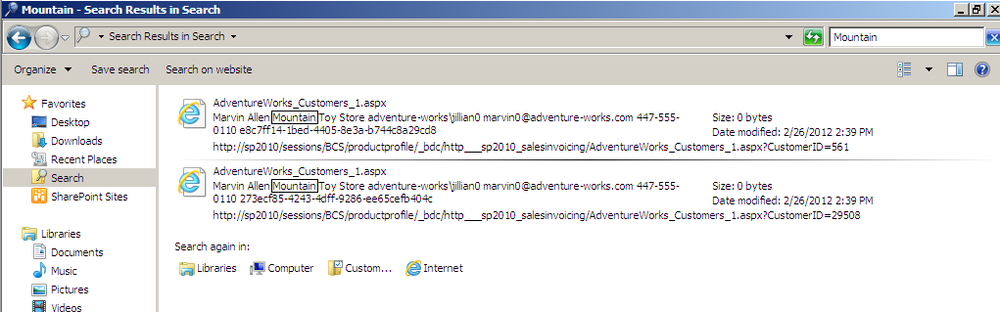
The BCS results display a folder icon with a four-digit number as the link. This number will be replaced with a URL once you create the profile page for the external content type (ECT).
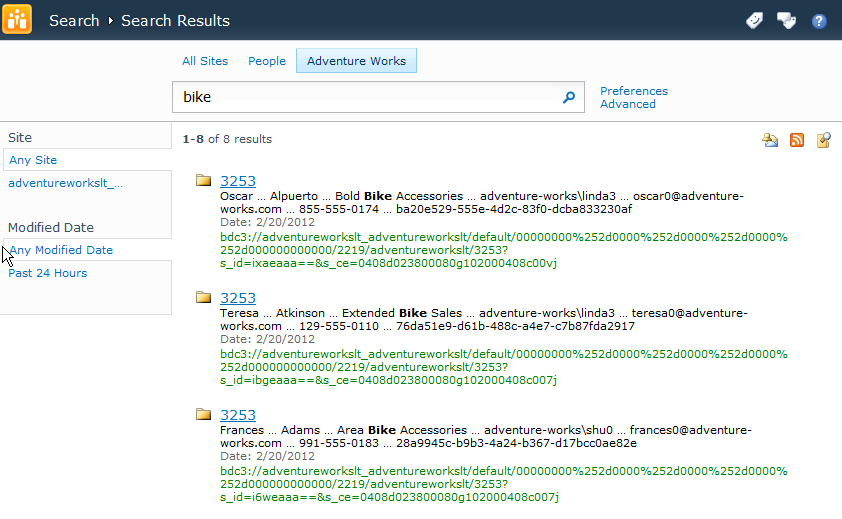
You can customize the search center to show additional tabs beyond All Sites and People. Creating a search page and a custom tab specific to an external data source allows users to limit the results returned in the same way that the People tab works. Notice in Figure 8-2 that the Word document containing the keyword bike is no longer returned, but data from the Adventure Works database containing the word bike is returned. To achieve search results from an external data source, you create a content source and a search scope prior to creating a search results page. Then you customize the search results Web Parts on the search results page. You will learn how to do so in this chapter.
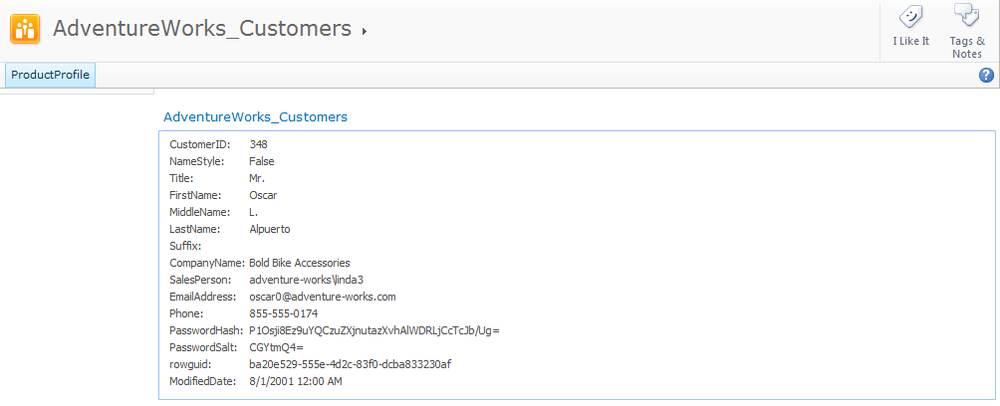
When you click the hyperlink for a search result, such as a document or list item, you are taken to that content. For example, the document will open or you will view the list item. With a BCS search result, you will be taken to a profile page showing a page with a Business Data Item Web Part. If you haven’t created a profile page for that particular ECT, you receive an error message. You can create a profile page in Microsoft SharePoint Designer 2010 after creating your ECT or in the SharePoint 2010 Central Administration website under the Business Data Connectivity (BDC) service application settings. The process for creating the profile page is discussed in detail in Chapter 3, and Chapter 4. Figure 8-3 shows an example of a BCS profile page.
The profile page is made up of two Web Parts: the Business Data Item Web Part and the Business Data Item Builder Web Part. The Business Data Item Builder Web Part is visible only when modifying the profile page. These Web Parts are discussed in Chapter 6. Once you have created a profile page for your ECT, notice that the search results look a lot cleaner without the folder icon and four-digit code, as shown in Figure 8-4.
Creating Content Sources to Crawl External Systems
To successfully configure SharePoint to search your external content, follow the steps outlined in this section. Some of these steps are required, while others are recommended to provide a good end-user experience and to refine the search results:
Create the External Content Type with a Read List operation (required)
Create a profile page for the ECT (required to avoid an error when the search result is clicked)
Create a line-of-business (LoB) data content source (required)
Run a full crawl on your content source (required)
Create a search scope (optional; allows you to refine the search results)
Configure crawl settings and managed properties (optional; allows additional metadata to be filtered)
Customize the search center (optional; provides a more refined search)
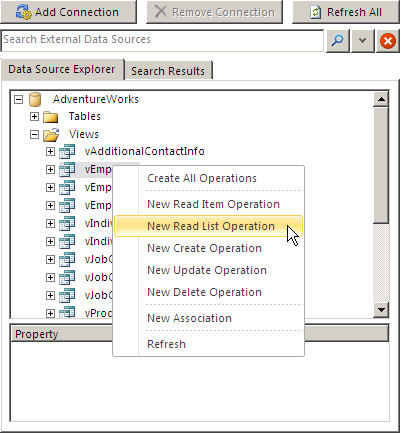
If you configured a LoB data crawl in the Enterprise edition of Microsoft Office SharePoint Server 2007 Business Data Catalog, you will probably remember having to create an IDEnumerator method for the content crawling to work successfully. The IDEnumerator method simply returned the Unique Identifier column for an entity, which was the previous name for an ECT. The IDEnumerator method was used for enumerating each row of data for the crawl. The IDEnumerator method is no longer required, but it is still supported if you are upgrading from BDC to BCS. The Read List operation is a multipurpose method that is used for the content source crawl. The SharePoint crawl uses the operation to create an index, allowing it to enumerate each row from the data source. Figure 8-5 shows the Read List operation being created within SharePoint Designer. Chapter 4 discusses using SharePoint Designer to create the ECT and the Read List operation.
Once you have created the ECT with the required Read List operation, you can configure the content source within the SharePoint 2010 Central Administration website, or you can use Windows PowerShell commands. The content source tells SharePoint where to go to crawl content. A content source can be created to crawl SharePoint sites, websites, file shares, Microsoft Exchange public folders, LoB data (BCS), and custom repositories. A default content source, All Sites, will already exist for SharePoint sites. Creating a content source to crawl websites can be useful to allow information workers to search your company website as well as perhaps some of your largest customers’ and competitors’ websites. Those websites and other sites linked to from those pages will also be crawled, so crawl external sites with caution, as you could end up crawling more content than you planned. Business information also exists within file shares and Exchange public folders, so creating a content source for those resources can be beneficial.
This chapter focuses on using LoB data content sources. A LoB data content source enables you to search the content even if the content lives in external data sources. You can configure the content source to allow crawling of an external data source such as Adventure Works and any ECT within that external data source or all external data sources. You may want to target individual external data sources, allowing different priorities and crawl schedules to be created depending upon the importance of the data that will be searched. To create a content source, follow these steps:
Open the SharePoint 2010 Central Administration website by either navigating to the URL or clicking the Start button, selecting All Programs from the Start menu, choosing Microsoft SharePoint 2010 Products, and then selecting SharePoint 2010 Central Administration.
Click General Application Settings on the Quick Launch toolbar.
On the General Application Setting page, under Search, click Farm Search Administration to display the Farm Search Administration page.
Under Search Service Applications, click your Search Service Application to display the Search Administration page.
Under Crawling, click Content Sources on the Quick Launch toolbar. The Manage Content Sources page displays, where you can see a list of your content sources.
Click New Content Source to display the Add Content Source page.
Note
You may not have permission to use the SharePoint 2010 Central Administration website. If this is the case, request help from a SharePoint farm administrator.
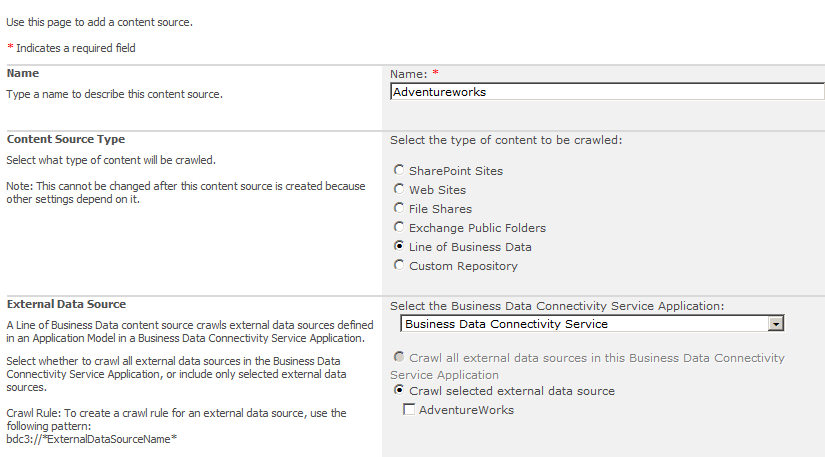
Figure 8-6 shows the Add Content Source page, where a content source is being created for the Adventure Works external data source.
Toward the bottom of the Add Content Source page is a Crawl Schedules section, where you can create a schedule, such as daily or weekly, for external data to be crawled. You may specify the time for a full crawl as well as an incremental crawl. When you have multiple content sources, you can control the priority of each content source, ensuring the highest-priority content source is always crawled first.
After you have configured the content source, click OK to return to the Manage Content Sources page. From here, you can start a full crawl using the drop-down list, as shown in Figure 8-7. A full crawl of your external data must be completed successfully before you see any search results through the search center.
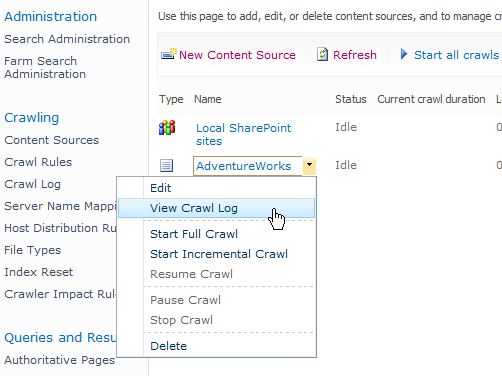
You will need to refresh the Manage Content Sources page periodically during the crawl to see when it has finished. If the crawl takes a while to finish and doesn’t fail immediately, you should consider it successful, since if it fails you will be alerted quickly. You can investigate any problems by choosing View Crawl Log from the drop-down list on the content source. Figure 8-8 shows the Crawl Log – Content Source page with the number of items returned for each content source.
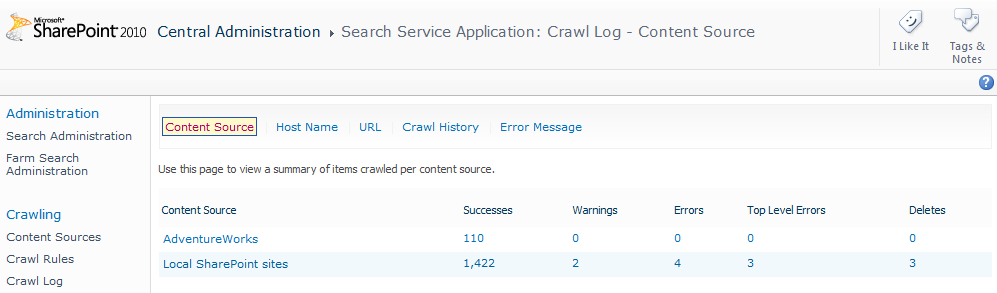
From the Crawl Log – Content Source page, you can drill further into the crawl log for a specific content source by clicking the Content Source hyperlink to display the Crawl Log – Crawl History page. This page shows each crawl and its status, along with any error messages, which you can then use to troubleshoot errors. Figure 8-9 shows an example of crawl logs for a specific content source.
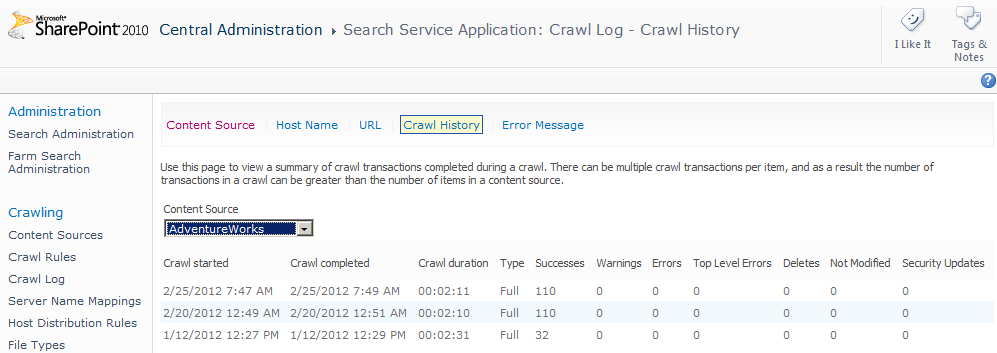
If the crawl completed successfully without errors, you should test the search using the All Sites tab within your search center. Typically, if the crawl is unsuccessful, it fails due to the permissions granted to the ECT, which you can investigate in the BDC service pages. There are two types of error that may be seen in the crawl logs: an Error and a Top Level Error. An Error can be raised if one record from the ECT fails to be crawled, but a Top Level Error implies the whole content source/start address could not be crawled.
Creating a Search Scope and Scope Rules
Once you have created the content source, you are able to return search results from your ECT. However, before you can create a custom search results page that allows you to show more relevant results, you need to create a search scope. You can create search scopes using the SharePoint 2010 Central Administration website on the Search Administration page for your search service application.
To create a new search scope:
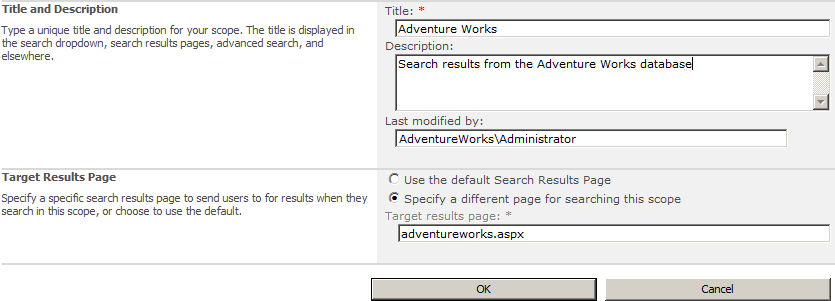
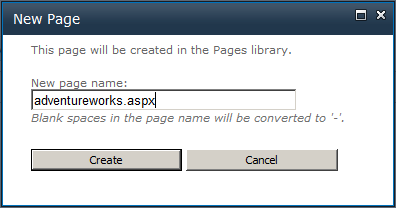
In the Target Results Page section, you are asked to provide a name for the results page. You should have in mind the name of the search results page that you want to create. For example, if you are going to create a custom search results page for all items returned from Adventure Works, you could name the search results page adventureworks.aspx, or if you are returning just products from Adventure Works, you could name the page adventureworks_products_results.aspx. Creating the search scope will not create the page for you. You need to create the results page within the search center, so it is important to make a note of the URL. Figure 8-10 shows the settings when creating a custom search scope.
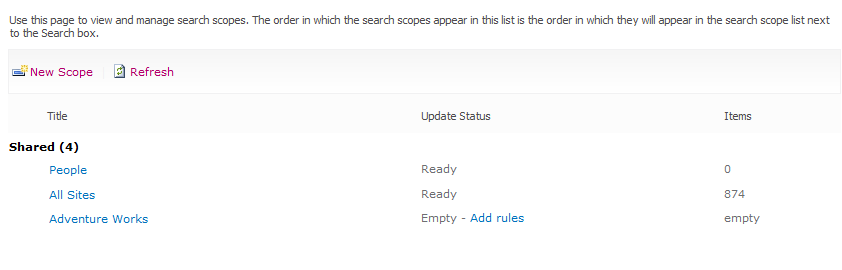
When you click OK, you return to the View Scopes page, where you see the two default search scopes along with your newly created search scope. The newly created search scope currently does not have any rules associated with it, as denoted by the Add Rules hyperlink (see Figure 8-11). You must add a rule to specify the content source used for this search scope.
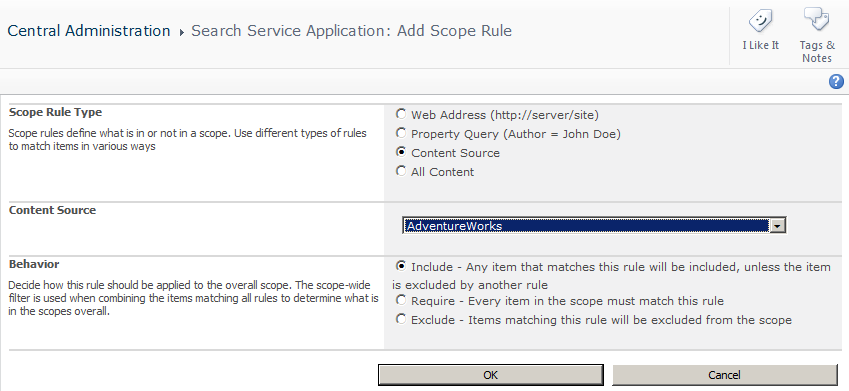
Click Add Rule to display the Add Scope Rule page, where you can define rules to display the search results specific to your ECT that will appear on your custom search page. You can create different types of scopes for different reasons. For example, it is possible to create a scope returning SharePoint list items created with a specific content type or with a specific column value. You can then use this scope with the Core Search Results Web Part to provide a great way to “roll up” SharePoint list content from across multiple site collections. In this case, you will use the scope to map your ECT content source with a custom Core Search Results Web Part on your custom search page.
On the Add Scope Rule page, in the Scope Rule Type section, select Content Source. Then in the Content Source section, select your content source, such as Adventure Works, from the Content Source drop-down list. Figure 8-12 shows the configured scope rule mapping the content source to the search scope.
Configuring Crawled and Managed Properties
Managed properties provide a method of refining a search. SharePoint search provides many out-of-the-box managed properties. These managed properties allow you to refine a search on SharePoint content or people. You can reduce the number of search results by specifying managed properties such as Author: Brett, for example, which would limit the results to those documents authored by Brett (and possibly reduce 50 results down to just a few). Managed properties also allow you to refine searches. For example, say you perform a search using a specific keyword, such as giant. Performing a search on this keyword may return all kinds of content that contains the word giant. Because giant is a common word as well as the brand name for a bicycle, performing a search on the brand name for a bicycle part is likely to also bring back other non-Giant products. Specifying the managed property Product Brand Name: Giant would provide very refined results.
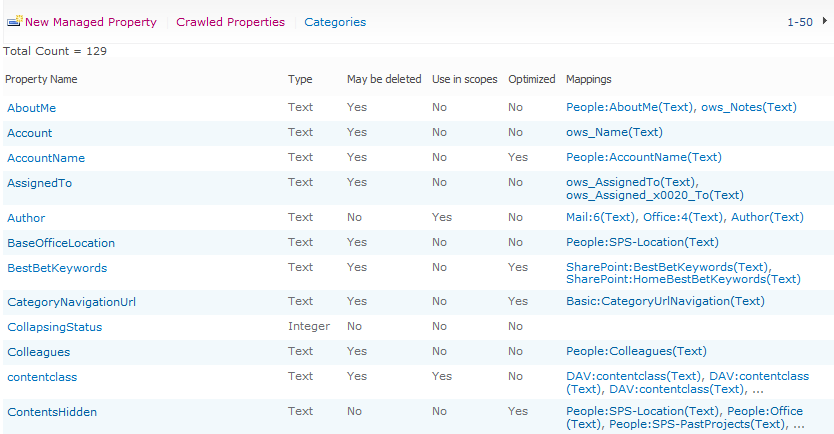
Crawled properties are columns and metadata properties that SharePoint has crawled that can be mapped to managed properties, allowing them to be used within an advanced search. From the Search Administration page for your search service application, under Queries and Results, click Metadata Properties on the Quick Launch toolbar to display the Metadata Property Mapping page, as shown in Figure 8-13.
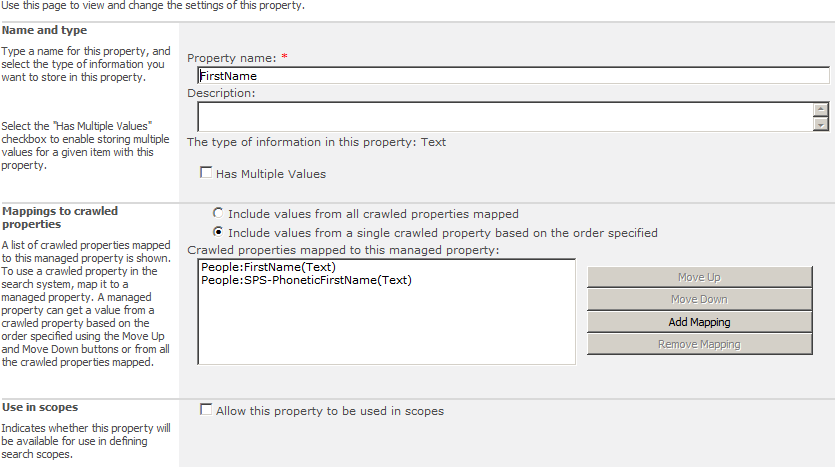
FirstName is a good example of a managed property. When you click FirstName to display the Edit Managed Property page, you can see that it is mapped to two crawled properties, People:FirstName and People: SPS_PhoneticFirstName, as shown in Figure 8-14.
Within a SharePoint search, you are able to perform a People search by specifying FirstName: Scott. Doing so prevents the search from returning people whose first name is not Scott. Clicking Search Options on a people search page also displays some managed properties through the People search box, as shown in Figure 8-15.

You can create a similar configuration for BCS crawled properties. The AdventureWorks_Customer ECT that you created in Chapter 4 contains columns such as Customer Name, Address, City, State, and Zip. These columns are crawled properties that you can map to a custom managed property. You can map multiple columns to a managed property—for example, you can map Contact Last Name and Employee Last Name to the LastName managed property. Mapping in this way allows you to refine your search using an advanced search based upon the LastName. Configuring the Advanced Search box, including exposing managed properties, is covered toward the end of this chapter.
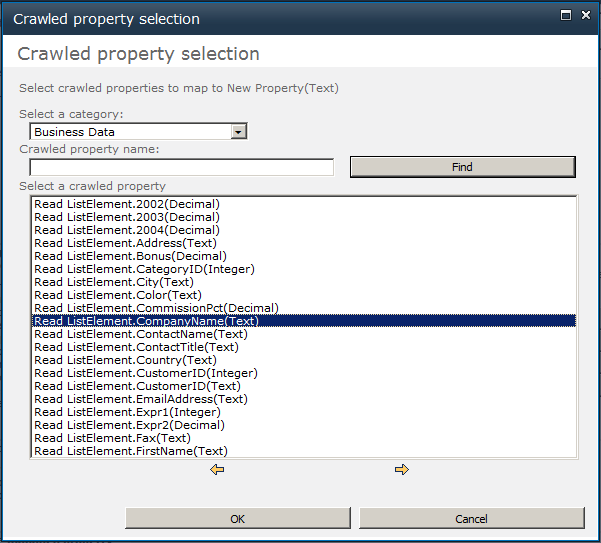
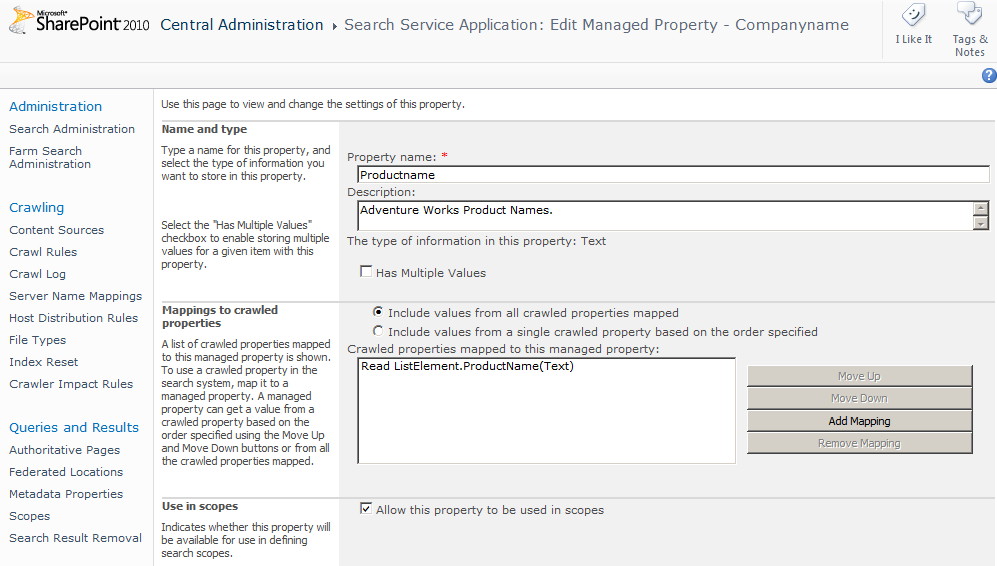
To create a custom managed property, on the Metadata Property Mappings page, click New Managed Property to display the New Managed Property page. In the Name and Type section, provide a managed property name and description, along with the type of data, such as Text. In the Mappings to Crawled Properties section, click Add Mapping to display the Crawled Property Selection modal dialog box, where you can choose from a large number of crawled properties. All of the crawled properties are categorized, so using the Select a Category drop-down list, you can select Business Data, as shown in Figure 8-16. Note that the crawled properties will include Read Item as well as Read List properties.
Click OK once you have selected the crawled property. On the New Managed Property page, in the Use in Scopes section, you may also select the Allow This Property to Be Used in Scopes box to make this managed property available to search scopes. This means that you can create search pages with a scope that will provide users with the ability to show very refined searches that perhaps allow only product names to be searched. Figure 8-17 displays the configured Productname managed property.
Now that you have created a managed property, you can use the property within your searches—for example, Productname: Road Frame HL. You can also create an Advanced Search page that allows the managed property to be selected.
In the next section of this chapter, you will learn how to create the search pages and the Advanced Search pages. You will also examine how to configure the search Web Parts.
Customizing the Search Center
At the start of this chapter, you explored the desired results of customizing the search center, including creating custom search results pages and tabs, and allowing refined results to be shown from the ECT. In this section, you will look at the Web Parts that make up those search pages, learn how to configure them, and learn how to create the pages themselves.
To begin, you will create a new search results page that already contains the Web Parts you are going to configure. You create the search results page as you do any other Web Part page. After you navigate to the search center, click Site Actions, and then click New Page. You are prompted to specify the name of your page, as shown in Figure 8-18. Remember from earlier in this chapter that the name you provide must match the name defined on the Create Scope page.
When you click Create, a new page is created that will be stored within the Pages Library of the search center. You can navigate to the Pages Library by clicking Site Actions and then View All Site Content. You may need to access the Pages Library to check in and check out your page when customizing it, but you can also do this by using the Page ribbon tab. To display the Page ribbon tab, click Site Actions and then click Edit Page. You may also need to navigate to the Pages Library when you want to modify a search page, a search results page, or an advanced search page.
Note
When you first navigate to the search center, a default page, default.aspx, displays. This page has no search results and contains two tabs, All Sites and People. When you click the People tab, another page, people.aspx, displays that contains no results. When you type a keyword in the search text box and press Enter, a page displays that contains the results of the search. This is known as a search results page. For an All Sites search, the results page is results.aspx. This is not the same page displayed when you navigate to the search center. For a People search, the results page is peopleresults.aspx. A third set of pages can be used when you click the Advanced Options link. Out of the box in SharePoint, only one Advanced Search page is provided, advanced.aspx, which is configured to be used when the Advanced link is clicked on any search or search results page.
Creating Search Tabs
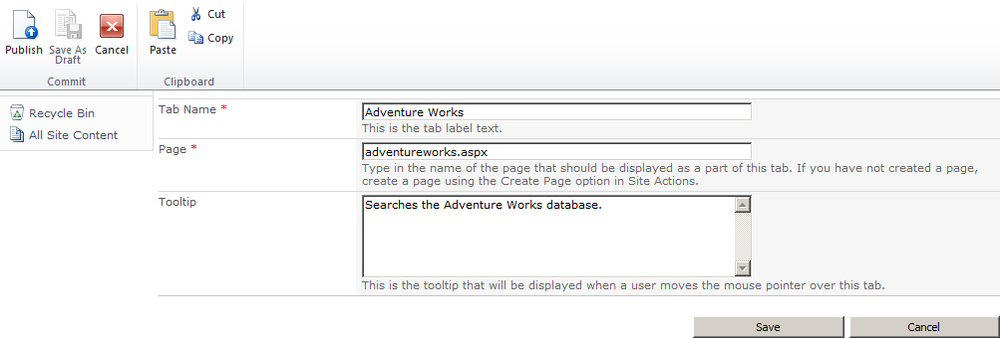
Before you configure the Web Parts, it is a good idea to create the custom tab. You will now have three results pages within your search center: All Sites, People, and Adventure Works. You will need to create the Adventure Works tab on all three results pages to provide navigation. First, navigate back to the results page in the search center so that you have the All Sites tab selected. Click Site Actions and then click Edit Page to edit the results.aspx page. Click Add New Tab to create a new tab within the search center. You will need to specify a tab name, such as Adventure Works, as well as the search page to be opened upon clicking the tab. The search page will be the same URL as the page that you created in the previous section, and it will be specified within your search scope. To make the tab display on the People page and your Adventure Works page, repeat the process of adding the tab for each page. Figure 8-19 shows the creation of the Adventure Works tab.
After you have created the tab on each search results page, make sure that you save your changes and check the page in so that other users may modify it.
Note
To add tabs on search result pages, add list items in the Tabs in Search Results list in the search center. Using this list is an alternative method of creating, modifying, or deleting tabs. Search pages have their own set of tabs, which are stored in the Tabs in Search Pages list. The tabs are rendered on the pages by the ListBoundTabStrip SharePoint control.
Introducing the Search Web Parts
You will include a number of search Web Parts on your search page:
Search Box
Search Summary
Refinement Panel
Related Queries
People Matches
Search Statistics
Search Action Links
Search Core Results
Search Best Bets
Top Federated Results
Search Paging
You are initially concerned with just two of the Web Parts that are on the search results page by default: the Search Box Web Part and the Search Core Results Web Part.
Search Box Web Part
The Search Box Web Part provides users with the text box in which to enter search keywords. It also provides Preferences and Advanced links to the right of the search text box, which you need to configure. Figure 8-20 shows the Search Box Web Part when the search page is in Edit mode.

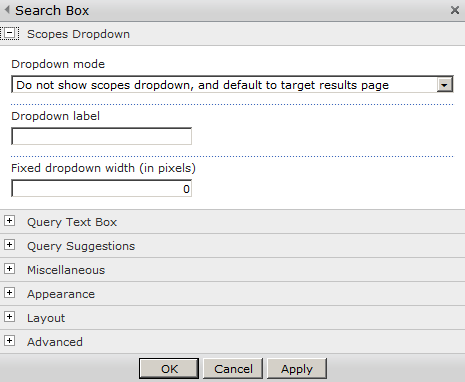
The tool pane of the Search Box Web Part contains some good refinement options as well as some properties that you should set. The Scopes Dropdown section, shown in Figure 8-21, provides three properties: Dropdown Mode, Dropdown Label, and the Fixed Dropdown Width. If you have multiple scopes, setting the Dropdown Mode to provide a choice of scopes allows users to specify which scope they would like to search. There are no required properties that should be changed in the Scopes Dropdown category.
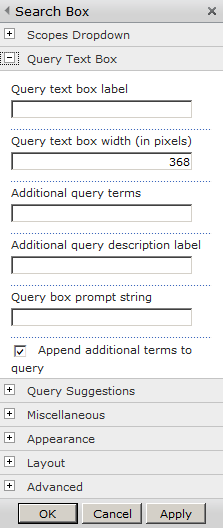
The Query Text Box section allows further refinements, such as Query Text Box Label and Query Text Box Width, as shown in Figure 8-22. The Query Text Box label allows you to add text as a prefix to the search text box. The Additional Query Terms property enables you to append text to the search, which can be used to filter the search automatically to perhaps a specific year or even a division within the organization. If you do append text to the search, then you should enter text in the Additional Query Description Label text box. This description appears immediately below the search box and lets users know what you have configured.
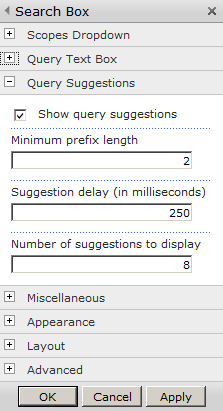
The Query Suggestions section, shown in Figure 8-23, provides search suggestions as you type your query. You can choose to turn this feature on or off, and you can also set properties such as the Minimum Prefix Length, Suggestion Delay, and Number of Suggestions to Display.
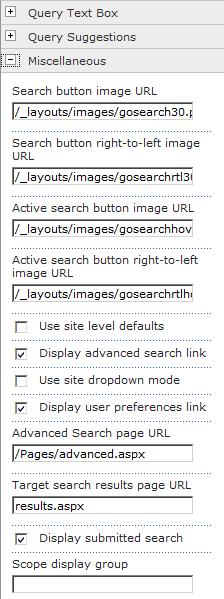
The Miscellaneous section of the Search Box Web Part, shown in Figure 8-24, contains the most useful properties, some of which you should set if you are creating a custom search results page. Many of the properties are self-explanatory, such as Search Button Image URL, should you wish to display an image for the Search button.
A useful property is the ability to turn off the Advanced Search link. If you do not want to build an Advanced Search page, turning off this setting will avoid confusion when users click the Advanced Search link and receive an error message because the page does not exist. If you do want to build an Advanced Search page, you may set the URL to an Advanced Search page within the Pages Library in the search center.
The default URL for the Target Search Results Page URL is results.aspx. This property displays the results.aspx page, which is the same page the All Sites tab uses. So when users perform a search, even though the Web Part is configured to use the correct scope, the results are displayed on the incorrect page. Change this page to AdventureWorks.aspx for this example or to your custom search results page.
Search Core Results Web Part
The Search Core Results Web Part is where the results of your search are actually displayed. This Web Part displays a title that is the hyperlink to the ECT profile page, an icon showing the type of result, a summary description with highlighted keywords, and the full URL to the item.
As previously explained, the profile page consists of two Web Parts: the Business Data Item Builder Web Part and the Business Data Item Web Part. The Business Data Item Builder Web Part uses the URL of the search result and takes the parameter (in this case, the customer ID) and stores it temporarily within the hidden Web Part. The Business Data Item Builder Web Part contains a Web Part connection to the Business Data Item, allowing the Business Data Item to display a specific row of data.
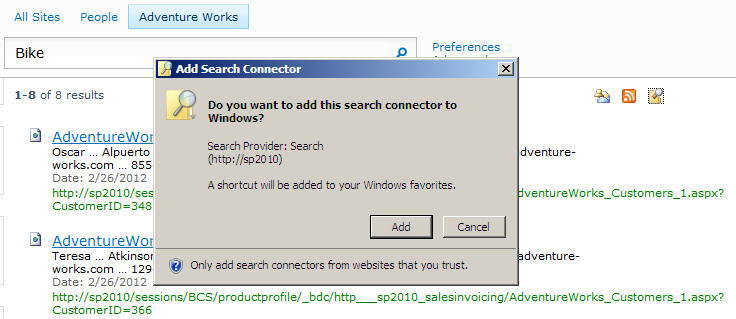
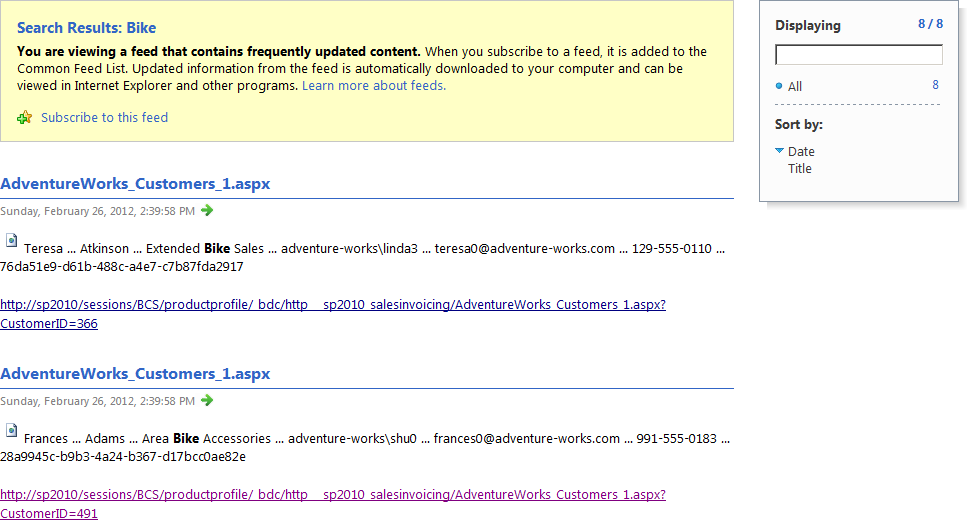
Along with the results, you will see text showing the number of items returned in the top-left corner, providing you with an estimate of how many results to page through or refine. In the top-right corner is a link to the RSS feed for the search results, an alert notification icon, and an icon allowing you to search the same location again using Windows Explorer. Configuring an alert of the search results will send an email notification when the search results change. For instance, if you were searching products for a red-framed mountain bike, and suddenly a new red-framed mountain bike was added to your product catalog, the next time your external content was crawled, you would receive an email notifying you of the addition. The alert functionality does not work within claims-based authenticated web applications. The RSS feed is also a suitable way to keep track of the results changing through an RSS viewer, such as the one built into Microsoft Outlook. The icon at the far right allows you to perform the search again through Windows Explorer. When you click the icon for the first time, you are prompted to download and install a Search.odx file. Figure 8-25 shows the dialog box prompting you to add this search connector to Windows.
Once the control has been added, through your Favorites within Windows Explorer, you are able to search the search scope again without having to open your browser and navigate to the SharePoint search center. Double-clicking one of the search results opens the browser window and displays the profile page for the row that was double-clicked. Figure 8-26 displays the results of a BCS search on the keyword mountain using Windows Explorer.
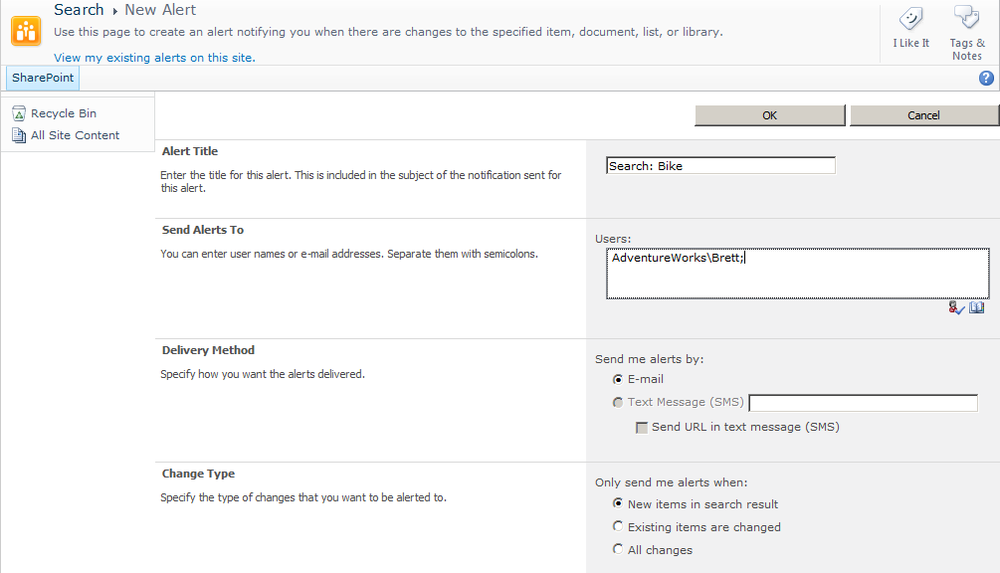
If you click the Alert Me option, you are taken to a page where you can configure the alert for new additions or changes to the search results. Note that you can configure the alert for other users besides yourself either by email or by SMS. Figure 8-27 shows the New Alert configuration page.
Clicking the RSS Feed icon immediately displays an RSS feed view of the search results. Using the RSS feed is a useful way to redisplay the results within another part of SharePoint or in an external application such as Microsoft Outlook. The Data View Web Part (DVWP) within SharePoint Designer allows you to display and reconfigure the RSS results, providing a Web Part of BCS search results that can be displayed on another SharePoint webpage. Figure 8-28 shows the RSS view of a BCS search.
You can configure the Search Core Results Web Part to show the results from a specific search scope. You may also customize it to improve the display of the search results using Extensible Stylesheet Language Transformations (XSLT).
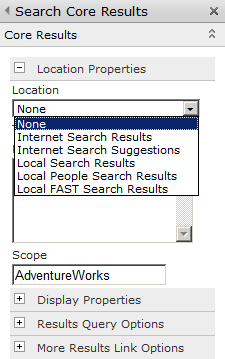
One of the first properties you should set to enable the Web Part to display the correct results is the Search Scope property. Set this property to the name of the search scope you configured in the SharePoint 2010 Central Administration website. The Search Scope property resides in the Location Properties section of the Search Core Results Web Part property pane, as shown in Figure 8-29. The location choices include Internet Search Results, Internet Search Suggestions, Local Search Results, Local People Search Results, and Local FAST Search Results, which are federated connectors defined within the service application.
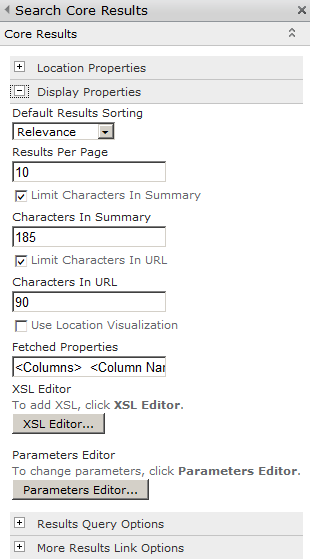
The Display Properties section provides property settings that will affect the sorting of the results, the number of items returned on a search results page, the number of characters to show within the summary description of the search results, and the number of characters within the URL. You can also make modifications to the Fetched Properties, allowing other managed metadata properties to be displayed. An XSL editor allows properties such as sorting, conditional formatting, and branding of the search results. Branding the search results is especially useful within an Internet-facing SharePoint site, where you want the results to match that of the company brand within the website. Click the XSL Editor button to display a dialog box showing the XSLT within the browser. The XSLT from the SharePoint XSLT editor is unclear, without any structured formatting. Use SharePoint Designer or Visual Studio to more easily make modifications to the XSLT prior to copying and pasting the modified XSLT back into the XSL editor. Figure 8-30 shows the Display Properties within the Search Core Results Web Part.
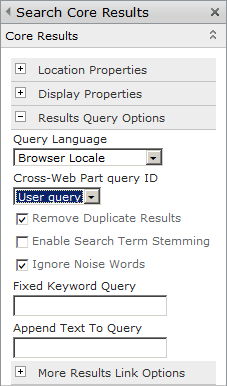
The Results Query Options section provides the locale settings and Cross-Web Part Query ID. Sometimes it is possible to have multiple Search Box Web Parts and Search Core Results Web Parts on the same page. Setting the query ID allows each query to be mapped to the correct Search Core Results Web Part.
You can check options to set the removal of Duplicate Results, Enable Search Stemming, or Ignore Noise Words within the search.
Occasionally, you will find the Search Core Results Web Part providing a slightly different function than is intended. You can use the Search Core Results Web Part as an alternative to the Content Query Web Part, to enable you to aggregate content anywhere within the farm. You can provide a permanent search term in the Fixed Keyword Query and Append Text to Query boxes for this purpose. Figure 8-31 displays the Results Query Options of the Search Core Results Web Part.
In the More Results Link Options section, select the Show More Results Link to provide a link to show more results than the maximum per page. You can also type your own word for the more results link in the More Results Link Text Label text box.

The Search Core Results Web Part is an Ajax Web Part, just like many other Web Parts available within SharePoint 2010. You will find that the Ajax options allow you to specify in seconds how often the Web Part should refresh its results without performing a page postback.
Note
See Also You can find more information about the Ajax options in Chapter 6.
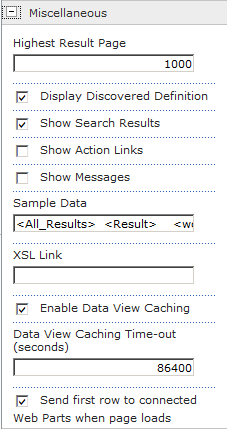
The Miscellaneous section, shown in Figure 8-33, contains a number of properties, including Highest Result Page, Display Discovered Definition (which displays the keyword you search for), Show Search Results, Show Action Links, and Show Messages. Beyond those properties, notice that you can specify whether to show sample data, which helps you customize the look and feel of the Web Part’s XSLT.
Note
You can modify the search results page only within the browser and not with SharePoint Designer because it is a publishing page based on a page layout. Pages in the search center use the following four page layouts: Advanced Search, People Search Results, Search Box, and Search Results. When you create a new page in the search center, by default it will use the Search Results page layout. SharePoint Designer can modify only wiki pages, Web Part pages, HTML pages, and plain ASPX pages. Attempting to modify a publishing page with SharePoint Designer will cause SharePoint Designer to prompt you to modify the Search Results page layout. A search site created from the Basic Search Center site template does not contain publishing pages, nor does it contain tabs. Pages in a Basic Search Center site are Web Part pages and can be modified using SharePoint Designer.
Amending the Search XSLT
You may amend the XLST of the Search Core Results Web Part for several reasons:
You want to display custom Cascading Style Sheets (CSS) classes to allow modifications to the formatting of the results to be applied.
You want to make changes to the results layout by modifying the XSLT templates to include a managed property that you have defined.
You want to conditionally change a search result based on a specific keyword.
Before you begin to modify the XSLT within the Search Core Results Web Part, it is recommended that you copy the default XSLT and paste and save it into a Notepad file so you can reset the XSLT to the default should you need to. Changing the XSLT is not straightforward, and it is possible to break the results page, so having a backup will at least allow you to reset it to begin working again.
To amend the XSLT, copy the existing XSLT and paste it into a XSLT editor such as Microsoft Visual Studio or XML Notepad 2007. An XSLT editor will provide you with search, tree views, edit and redo operations, IntelliSense, and scheme validation, which the Search Core Results Web Part XSL Editor pane cannot do.
To modify the contents, edit the Search Core Results Web Part, expand the Display Properties category, and click XSL Editor to display the XSLT, as shown in Figure 8-34.
Highlight the entire XSLT and copy it into your editor. Figure 8-35 shows the XSLT in Visual Studio. Notice that you can collapse the XSLT to provide better navigation using the shortcut key combination Ctrl+M+L.
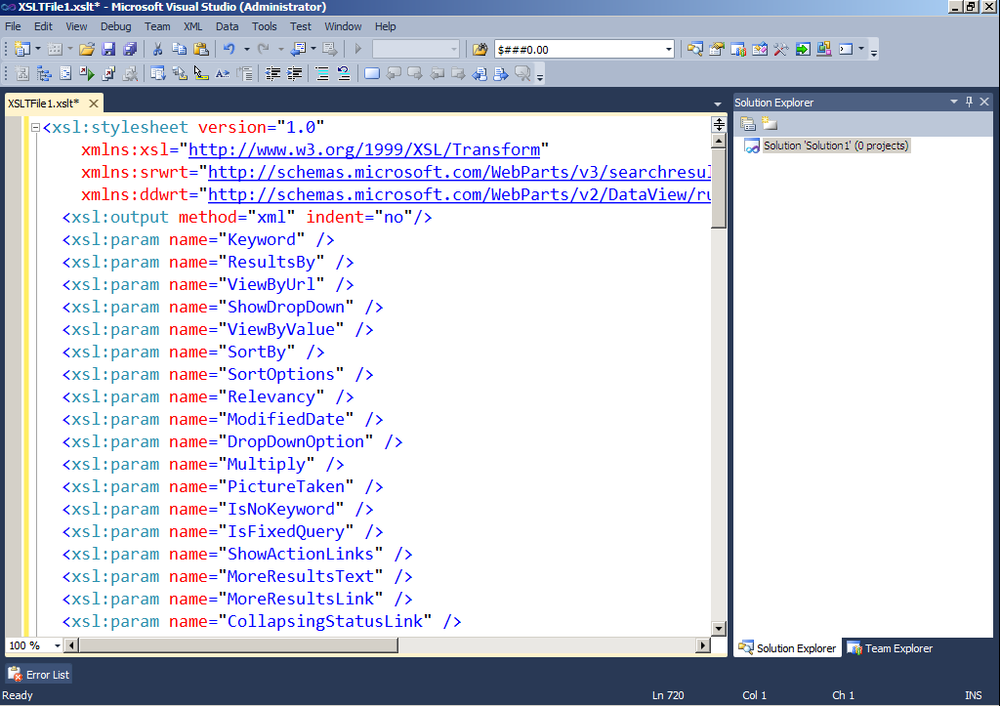
The first part of the XSLT defines parameters, which are values that will be used within the XSLT. Then you will find the XSL templates, which you can liken to subroutines that are units of XSL. You pass control to the XSL templates by using the xsl:call-template tag.
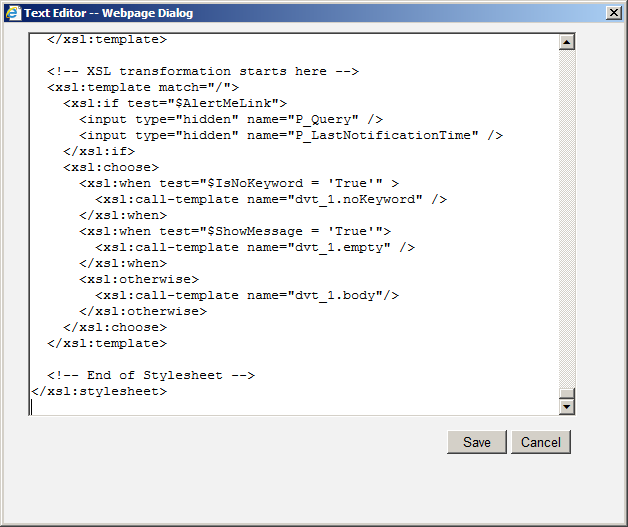
Most of the templates provide transformations of the XSLT; however, the root template determines which template is chosen based upon conditions. If a keyword isn’t provided within your search (so effectively, you are doing an empty search), you will see a message indicating that nothing was found, as shown in Figure 8-36.

When a keyword is provided, the XSLT acts accordingly and continues to run. The contents of the root element are as follows:
<xsl:template match="/">
  <xsl:variable name="Rows" select="/All_Results/Result" />
  <xsl:variable name="RowCount" select="count($Rows)" />
  <xsl:variable name="IsEmpty" select="$RowCount = 0" />
  <xsl:if test="$AlertMeLink">
    <input type="hidden" name="P_Query" />
    <input type="hidden" name="P_LastNotificationTime" />
  </xsl:if>
  <xsl:choose>
    <xsl:when test="$IsNoKeyword = 'True'" >
      <xsl:call-template name="dvt_1.noKeyword" />
    </xsl:when>
    <xsl:when test="$IsEmpty">
      <xsl:call-template name="dvt_1.empty" />
    </xsl:when>
    <xsl:otherwise>
      <xsl:call-template name="dvt_1.body"/>
    </xsl:otherwise>
  </xsl:choose>
</xsl:template>
Displaying a collapsed view of the XSLT within Visual Studio is useful, as you can easily see where each of the templates starts and finishes. If no keyword was entered, the dvt_1.nokeyword template is applied and returns the message shown in Figure 8-37.

If a successful search was executed but no results are returned, the dvt_1.empty template is given control. It returns a message indicating that no results matching your search were found, as shown in Figure 8-38.

If search results are returned, one of the first templates to be called is dvt_1.body, which displays a summary such as “1-8 of 8 Results.” Then the Result template is called, which displays an icon, title, description, and metadata, as shown in Figure 8-39.
Within the Results template, three more templates are called:
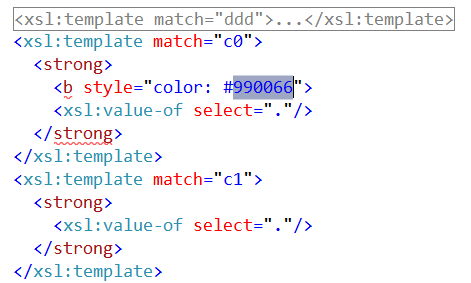
HitHighlighting This template is responsible for applying highlighting to keywords. Within the HitHighlighting template, you can make changes to the first, second, third, and so on highlighted keyword. C0 is the first, C1 is the second, C2 is the third, and so on. You can change the style for each keyword. Figure 8-40 shows the template C0 modified to change the highlighting color.
DisplaySize This template determines the size of the results.
DisplayString This template determines the string for the results, such as the Author and Last Modified date.
Once you complete your modifications to the XSLT, make sure that you copy and paste the results back into the XSLT editor of the Search Core Results Web Part.
Creating Advanced Search Properties
If users perform a search and find that they receive too many search results, they can refine the results using an advanced search. If you created a custom search page, the Search Box Web Part on the custom search page contains a link to the Advanced Search page. However, the link to the Advanced Search page is likely to be broken, unless you already provided the name of a page within the Search Box Web Part property Advanced Search Page URL.
To provide a custom Advanced Search page, first create a page within the search center, and then on your custom search page, map the Advanced link in the Search Box Web Part to the URL of your custom Advanced Search page. Return to your custom Advanced Search page, where you can either change the page layout to Advanced Search using the Page Layout command on the Page ribbon tab or add an Advanced Search Box Web Part.
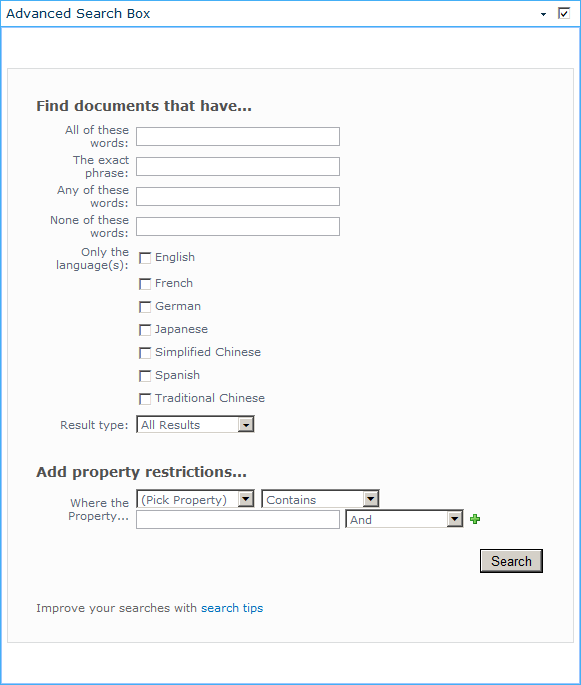
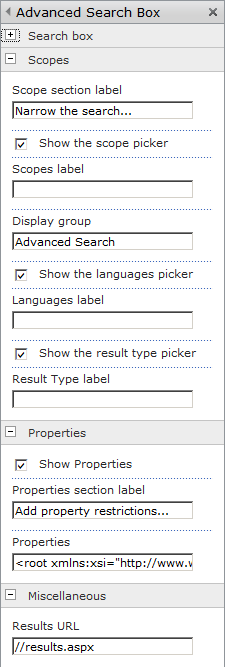
The Advanced Search Box Web Part provides refinements by property, and these properties are categorized by the type of document, language, and other managed properties. Just as with the Search Box Web Part, you set the scope and the URL of the page to display the results. Figure 8-41 shows the Advanced Search Box Web Part added to the custom Advanced Search page.
You can set the search scope can in the Scopes section of the Advanced Search Box toolbar. The Properties section contains the Properties text box, as shown in Figure 8-42. If you click in the Properties text box, and then click the ellipses to the right of the box, a Text Editor dialog box opens where you will see the properties. Back up the properties by copying the properties in the dialog box and saving them to a .txt file. Once you have performed a backup, highlight the full contents, and then copy and paste the contents into your XML editor.
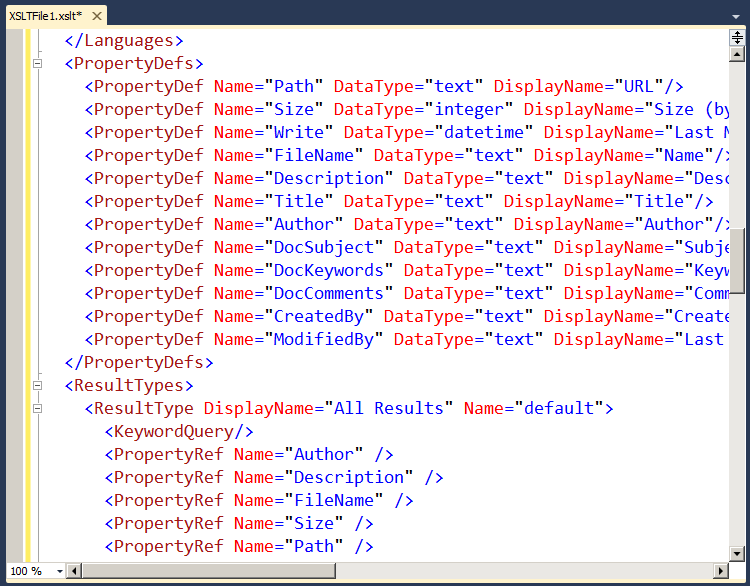
With the XML now within an XML editor, notice that each property consists of a PropertyDef tag and a PropertyRef tag. The PropertyDef tag registers the managed property and the PropertyRef tag as a child of the ResultType tag, which is used for the visualization. Figure 8-43 displays the XML within Visual Studio .NET and shows the default PropertyDefs and PropertyRefs prior to adding a custom managed property.
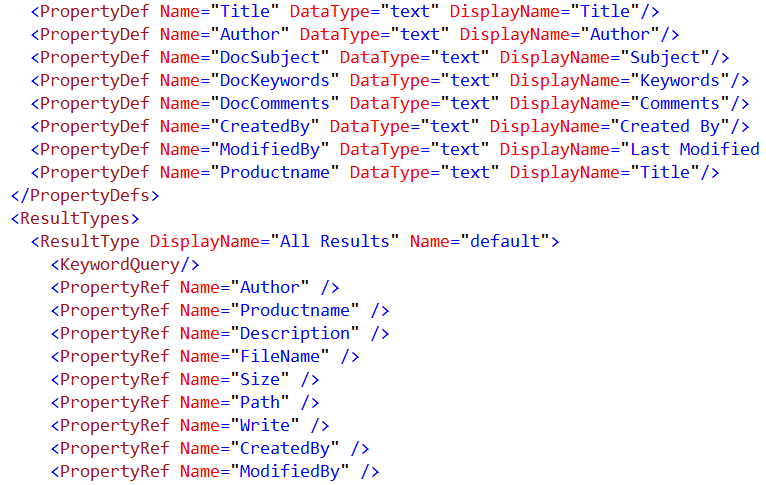
The managed property that you created earlier in this chapter is called Productname. To add Productname to the Advanced Search, create a PropertyDef element setting the DataType to “text” and the DisplayName to “Product Name”. Then add a PropertyRef element to the All Results ResultType, so the property is available in the drop-down list on the Advanced Search page. Figure 8-44 displays the completed XML.
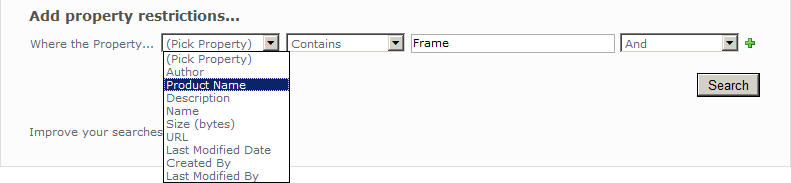
After you copy and paste the XML back into the Properties field of the Advanced Search Box Web Part, you can select and provide a value for your managed property. Figure 8-45 shows the completed Advanced Search Box Web Part.
This chapter mainly covered SharePoint Server Search 2010, which provides you with the ability to connect to external data via BCS. FAST search provides many other performance and feature improvements, such as Deeper Refinements and Thumbnail Previews. The Indexer offers other external database connectors, such as the Lotus Notes database connector and database connector. FAST also provides a JDBC connector, allowing other structured external databases to be crawled directly.
Note
See Also You can find more information about FAST Search Server 2010 connectors on the TechNet website at http://technet.microsoft.com/en-us/library/ee781286.aspx.
Summary
In this chapter, you explored how correctly configuring the default search in Microsoft SharePoint can save organizations valuable time and money. You learned how to index search results and provide refined search capabilities through content sources and search scopes. You also examined how to build a custom search page, configure search tabs, and set the Search Web Part properties to return results in a more refined manner. Finally, you modified the XSLT of the Search Core Results Web Part and the XML of the Advanced Search Web Part to display a configured managed metadata property.