Chapter 3. Creating and Maintaining Business Data Connectivity Service Applications
In this chapter, you will:
Understand the service application architecture and its effects on the deployment of Business Connectivity Services
Understand Business Connectivity Services security options
Create and configure a Business Data Connectivity service application
Configure the Secure Store Service
Use Windows PowerShell to administer a Business Data Connectivity service application
Modify the throttling settings of Business Connectivity Services
Administer Business Connectivity Services in a tenant environment
In SharePoint 2010, Business Connectivity Services (BCS) is managed using the Business Data Connectivity (BDC) service application, which can be shared between one or more web applications or between farms. As explained in Chapter 2, the BDC service connects the presentation layer with the external system. It uses different types of connectors depending on the interfaces supported by the external systems, together with information defined in an XML file, known as the BDC model, to read and write data to and from the external system.
The BDC shared service is built upon the Microsoft SharePoint 2010 shared service architecture, and it is available in SharePoint Foundation 2010, both the Standard and Enterprise editions of SharePoint Server 2010, and SharePoint Online. Different sets of administrators can manage the shared service architecture independently using the SharePoint 2010 Central Administration website or Windows PowerShell.
In this chapter, you will learn how SharePoint uses service applications and its effect on the deployment of BCS. You will then learn how to create and manage BDC service applications, how to configure the security options, and how to administer BCS in a tenant environment.
What Are Service Applications?
SharePoint 2010 contains a number of shared service applications, each of which functions independently of each other, allowing you to install SharePoint in a service-oriented approach. These services include the following:
Access Services
Application Discovery and Load Balancer Service Application
Application Registry Service
Business Data Connectivity Service
Excel Services
Managed Metadata Service (MMS)
PerformancePoint Service (PPS)
Search Service Application (SSA)
Secure Store Service (SSS)
Security Token Service (STS)
State Service
Subscription Settings Service Application
Usage and Health Data Collection Service
User Profile Service (UPS)
Visio Graphics Service
Web Analytics Service (WAS)
Word Automation Services
Note
In SharePoint 2010, InfoPath Form Services (IFS) is not implemented as a service application. It is a farmwide component, and you cannot share it across farms or partition it, nor can you create multiple InfoPath Form Services in one farm.
Microsoft Office SharePoint Server 2007 provided some of these services, but you could not install them independently of each other. In that version, the services were grouped into Shared Service Providers (SSPs), and you were severely limited when you tried to scale or deploy complex solutions.
Not all service applications are available in all versions of SharePoint 2010. Business Connectivity Services (BCS) and the Usage and Health Data Collection Service are the only service applications available in SharePoint Foundation 2010. Other service applications are provided by other Microsoft products, including Microsoft Office Web Apps (OWA), which enable users to access and do light editing and sharing of documents created with Microsoft Word, Excel, PowerPoint, and OneNote.
Note
You will need the Application Registry Service only if you upgraded from Microsoft SharePoint Server 2007 Enterprise Edition and used Business Data Catalog.
BCS and the Service Application Architecture
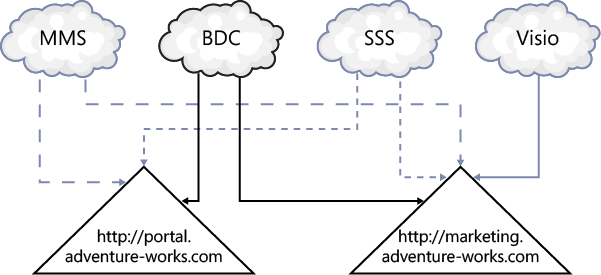
You can associate service applications with one or more web applications. For example, a Business Data Connectivity (BDC) service application can contain multiple BDC models, each defining connection and security details of several external systems. If you associate the BDC service application with the two web applications http://portal.adventure-works.com and http://marketing.adventure-works.com, as shown in Figure 3-1, all site collections within both web applications can access those definitions and present the data from those external systems, as long as the authentication and authorization requirements are met.
You can associate other service applications, such as the MMS service application, with the two web applications, making available terms from the term store and content types defined in the MMS service application.
Using Multiple Service Applications
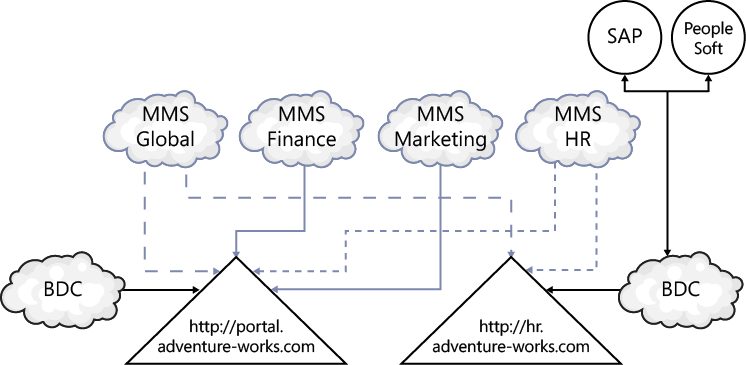
You can have multiple occurrences of a service application. For example, you can create multiple BDC service applications: one that contains the definitions for external systems associated with the human resources department (for example, definitions for your organization’s SAP or PeopleSoft system) and another that contains definitions to external systems that you want to present only on pages in your organization’s portal web application. Similarly, you can have multiple MMS service applications: one global MMS service application for terms and content types applicable to all departments and divisions within your organization that you want to control centrally and another for each division within an organization (human resources, marketing, finance, etc.). You can configure each divisional MMS service application with its own term stores and content types, with the management of the term stores and content types delegated to the appropriate people within each division.
Also, some service applications allow multiple instances to be associated with one web application; the MMS service application is an example. All the MMS service applications could be associated with a web application—for example, http://portal.adventure-works.com. A divisional web application, such as http://hr.adventure-works.com, is associated with two MMS service applications: one containing organization wide terms and content types and one containing HR-related terms and content types, as shown in Figure 3-2. When two MMS service applications are associated with a web application, one has to be defined as the default.
Each BDC service application can have its own BCS administrators, who could be the business owners of the external systems and therefore familiar with the data held in the external system, the business processes that it supports, and security considerations. Each business team can control access to the business data without exposing the connection details of external system. As a result, each BDC service application can be administered in isolation and contain its own definition of external systems, external content types, and security settings.
Web applications can be associated with one or more BDC service applications. However, only the BDC service application that is specified as the default will be used. The second BDC service could be consumed through custom code.
Sharing Service Applications Across Farms
You can share service applications across SharePoint farms. The BDC service application is one of the service applications you can share across server farms, so you can manage it centrally and it can be consumed by web applications created on other farms. Table 3-1 lists the other service applications that can and cannot be shared across farms.
Can be shared | Cannot be shared |
|
|
Note
To make a BDC service application available to be consumed by other SharePoint farms, you need to publish the BDC service application. You can find information about how to publish a BDC service application later in this chapter.
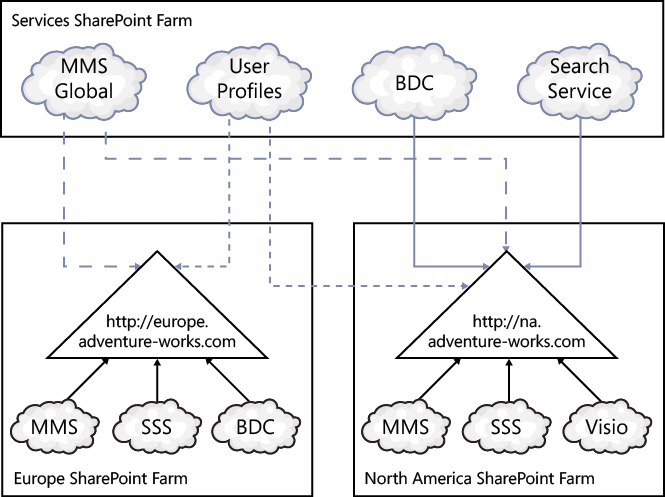
For example, in a large international organization, one farm could be hosting the BDC service application that contains all BDC models for all enterprise line-of-business (LoB) applications, plus a MMS service application that contains organization-wide terms and content types. Each country could host its own SharePoint farm, and web applications in those farms would use the central BDC and MMS service applications and service applications that have been created locally, as shown in Figure 3-3. Very large organizations could create a SharePoint farm with the sole purpose of hosting service applications that other farms consume—that is, the farm would host no web applications.
If you are considering such a configuration for your organization, you must ensure that the connectivity between the sites does not adversely impact the user experience. You will need to consider the retrieval of both the BDC model from the central BDC service application and the data from the external system. Once the BDC model is retrieved from the central BDC service application, it will be cached locally. The information in the BDC model will then be used by the local farms to retrieve data from the external systems—this too will be cached. There could be a long delay the first time a user requests a page that uses a Web Part that displays data from an external system. Subsequent requests will use the cached data and will be faster, but if the external data is rarely accessed, then users will always experience a delay.
Partitioning Service Applications
You can partition some service applications, and each partition can be used by one or more site collections when those site collections are hosted in a web application configured for multiple tenants. Each tenant, sometimes referred to as a customer, is identified by a computer-generated number known as a subscription ID. Subscription IDs can be created only when the Subscription Settings service is started.
Note
Multitenancy is the term commonly used to describe the isolation of websites in a hosting environment. It is the configuration used in Microsoft Office 365 SharePoint Online P and E plans.
Each tenant can have multiple site collections as well as a tenant administration site collection. Site collections belonging to the same tenant are known as member sites. The subscription ID is used to identify all the member sites belonging to the same tenant.
The BDC service application is one of the service applications that can be partitioned, where each partition can contain its own external system definitions. Each partition is associated with a subscription ID, which identifies those site collections that can use the partition’s external system definitions. Figure 3-4 shows four tenants, each associated with its own subscription ID.
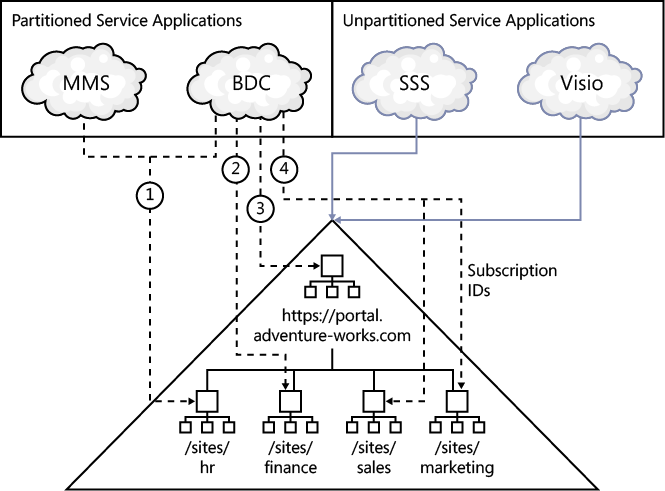
The BDC models uploaded into the first partition of the BDC service application can only be used by the member site /sites/hr.
In Figure 3-4, note that the SSS application is depicted as unpartitioned. SSS can be used in a tenant environment. You create the SSS service application in the same way as in a nontenant environment, and you manage it using the Tenant Administration page. However, in a hosting environment such as Office 365, where each tenant may belong to a separate organization, it is not prudent to use SSS where credentials from one organization are saved in the same encrypted database as credentials from other organizations—therefore, companies who provide hosting solutions may not allow the use of SSS.
Note
See Also You can find information about how to administer a tenant environment later in this chapter.
In Figure 3-4, each site collection is created below a managed path, sites, under the root-level site collection http://portal.adventure-works.com. To view the pages in the HR site collection, for example, users would use the URL http://portal.adventure-works.com/sites/hr. This is not the only way to deploy a multitenant web application.
SharePoint allows multiple root-level site collections, known as host header site collections. Each host header site collection can have its own top-level domain name that is independent of the web application where the site collections are stored. In SharePoint 2010, you can use host header site collections with managed paths and both HTTP and HTTPS protocols. Also, it is possible to configure site collections in multitenant web applications so that a mixture of host header site collections and web protocols coexist. The site collection structure could remain as shown in Figure 3-4, and then you could configure it so users refer to the HR site collection as https://hr.adventure-works.com, while the finance site’s URL is http://portal.adventure-works.com/sites/finance.
Note
See Also You can find a poster summarizing the hosting environments and illustrating common hosting architectures on the Microsoft download site at www.microsoft.com/download/en/details.aspx?displaylang=en&id=3326.
BCS and the Service Application Infrastructure
You can host service applications across one or more servers. SharePoint provides its own round-robin load-balancing mechanism to evenly distribute user requests across the servers running the service application code. In the case of the BDC service, the service application code then connects to the external systems to obtain the external data.
The service application infrastructure consists of the following:
Service instances
Service applications
Service application proxies
Service application groups
Web applications
Service Instance
On each server, the process that runs service application code is known as the service instance or service. A SharePoint service instance is similar to a Windows service: each maps to an executable that performs specific functions, does not require user intervention, and runs for a long time.
Windows services include the Background Intelligent Transfer Service (BITS), DNS Client, Print Spooler, and Task Scheduler. A server administrator can start and stop Windows services using the Services Microsoft Management Console (MMC; services.msc) snap-in, which you can start from Administrator Tools on the Start menu or through the Services tab in Windows Task Manager. SharePoint service instances are not Windows services, however, and to manage them, you use the SharePoint 2010 Central Administration website or Windows PowerShell.
Before creating a service application, you must start the appropriate service on at least one SharePoint server in the farm. That is, to create a BDC service application, you must start a BDC service on at least one SharePoint server.
Note
Not only service application executables run in service instances. Other functionalities also need to run as service instances, such as the Microsoft SharePoint Foundation Subscription Settings Service, which provides the functionality to create and manage the subscription IDs that allow you to deploy a multitenancy environment.
By starting the BDC service on a number of servers, you are distributing BDC service applications across those servers, providing redundancy and the ability to scale your solution to support more users. For example, you could start the BDC service on two SharePoint servers, and if one of these SharePoint servers was lost, this issue would be detected by the built-in load balancer in each SharePoint web server. All subsequent requests from the web servers for external data would be directed to the SharePoint servers that are running the BDC service.
Note
You can find the number of servers you need to run BCS service instances only by completing performance and capacity monitoring activities in your environment.
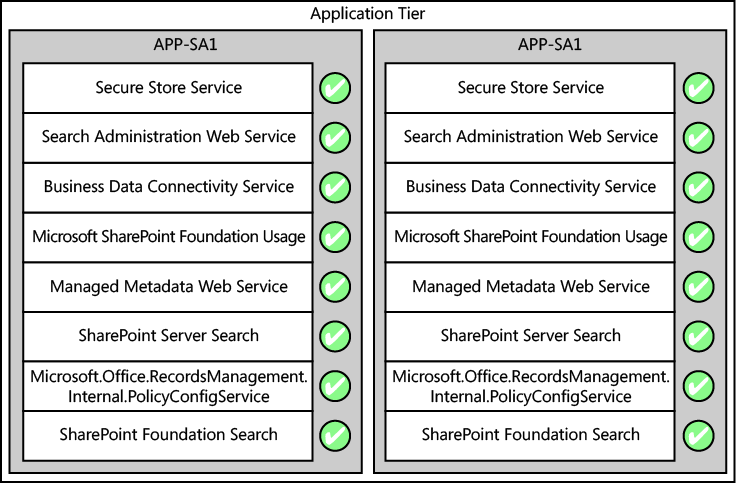
You can run only one BDC service per server, with such servers fulfilling the application tier role. If you create two BDC service applications, they both run in the same BDC service and have their own Windows Communication Foundation endpoint. As detailed in Chapter 2, a SharePoint server can fulfill both web and application tier roles. In large deployments, some SharePoint servers will be running only service application services. For example, the two application servers in Figure 3-5 are hosting a subset of service application services, including the BDC service, and the remaining services are hosted on the web servers.
Note
See Also You can find more information to help you plan your service architecture at http://technet.microsoft.com/en-us/library/cc560988.aspx for SharePoint Server 2010 and http://technet.microsoft.com/en-us/library/ff627854.aspx for SharePoint Foundation 2010.
Service Application Proxy
Most service applications require a service application proxy, also known as a service connection. A service application proxy connects the service application to a service application consumer, the web application.
Service Application Groups
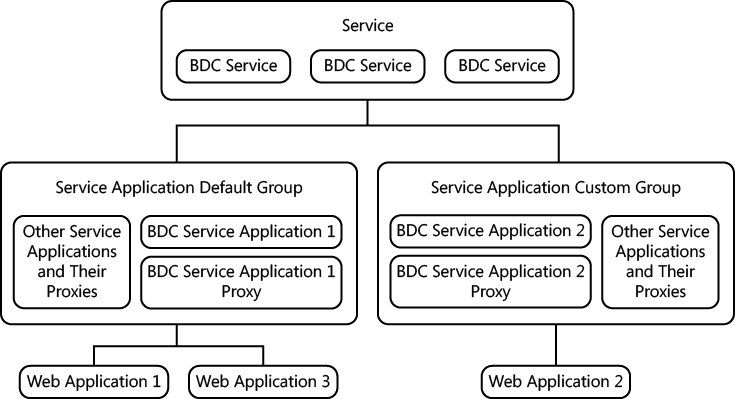
Service applications are grouped together into service application groups. When you install SharePoint, there is one service application group: default. A service application can belong to more than one group. When you create a web application, you can select the default service application group or create a service application group, named custom, that is a specific collection of service applications for the web application you are creating, as shown in Figure 3-6.
All service applications are automatically added to the default group. If you are a member of the Farm Administrators group, you can add and remove service applications from service application groups at any time by using the link to the service application groups on the Service Application Associations page. To navigate to this page in the SharePoint 2010 Central Administration website, click Configure Service Application Associations under Service Applications on the Application Management page.
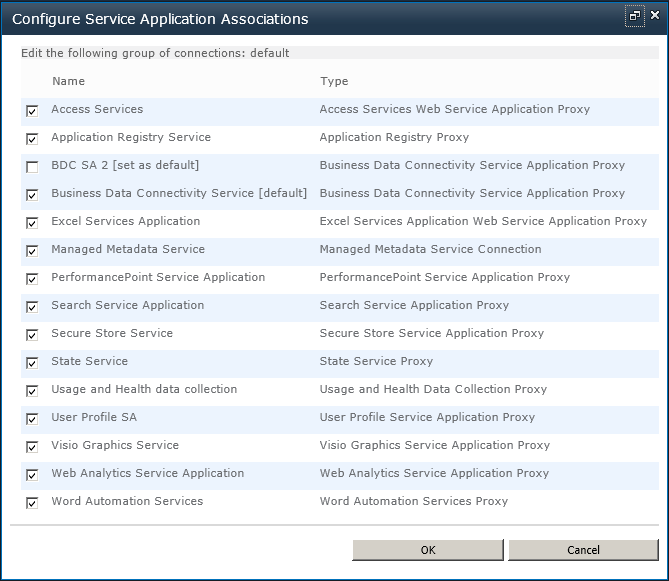
When you click a service application group name, a modal window showing the Configure Service Application Association page appears, as shown in Figure 3-7. All service applications are displayed on this page. Select the ones that you want in your service application group.
You can add more than one BDC service application to a service application group, but only the BDC service application configured as the default will be used. You are unable to create any new external content types (ECTs) or use any existing ECTs stored in the metadata store of the BDC service application other than the default.
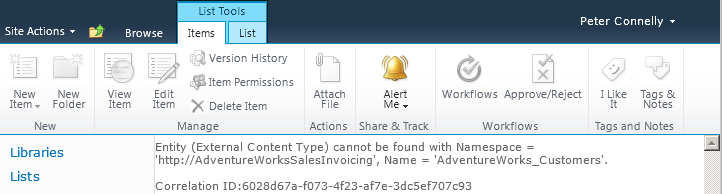
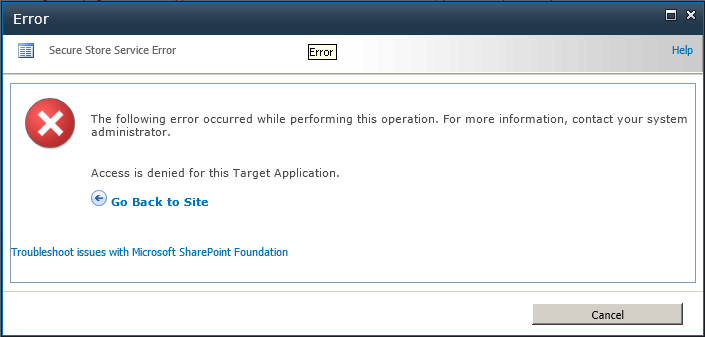
If you set a different BDC service application as the default, then any external lists you created from ECTs saved in the previous BDC service application will not display any data, and an error message similar to “Entity (External Content Type) cannot be found with Namespace = ‘http://Adventure-WorksSalesInvoicing’, Name = ‘AdventureWorks_Customers’.” will display, together with a correlation ID, as shown in Figure 3-8. Select only one BDC service application in a service application proxy group.
Note
See Also See the section Troubleshooting Connection Problems later in this chapter for information about correlation IDs and how they can help during troubleshooting.
BCS Security Options
Chapter 2 introduced you to some security considerations when implementing Business Connectivity Services (BCS) in your organization and differentiated between authentication and authorization. In this section, you will take a closer look at both these processes, including the authentication modes and methods as well as the permission settings on Business Data Connectivity (BDC) objects stored in the BDC metadata store.
Authentication
Authentication is the process of verifying that a user is who they claim to be. Authorization is the process of finding out whether the user, once authenticated, is permitted to access the data. Access control is managing access to the business data exposed using BCS.
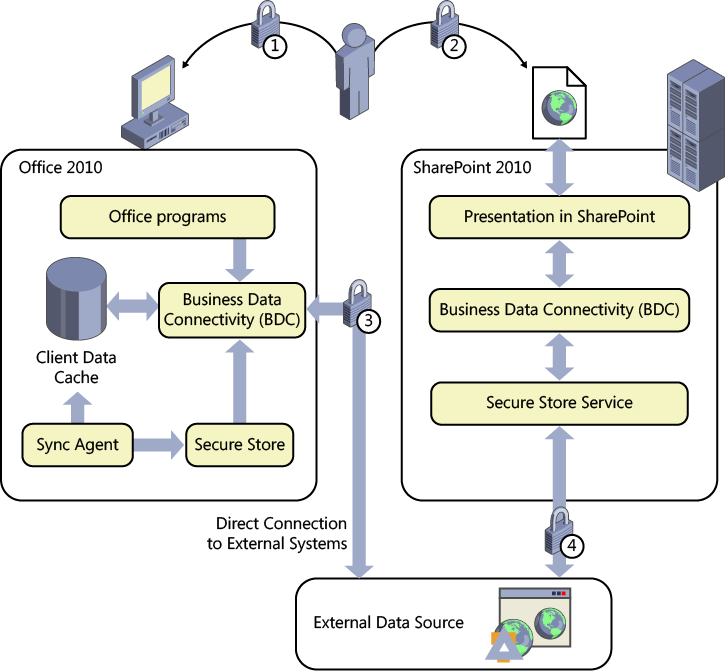
There are two authentication scenarios to consider with BCS. The first is SharePoint’s use of BCS, exposing information on webpages, and the second is the use of BCS in Office client applications. Figure 3-9 shows the three major components: the Office client, SharePoint 2010, and external data sources.
Each lock in Figure 3-9 identifies a form of authentication, as follows:
Lock 1 Logging on to your computer using Windows credentials.
Lock 2 Authentication by Internet Information Services (IIS) on a SharePoint web server. When your SharePoint site is classified in the browser’s intranet zone, you may be prompted for credentials; otherwise, the Windows credentials you used to log on to your computer are used to authenticate you. This experience could vary widely depending on the configuration of Internet Explorer. When the SharePoint site is configured for forms-based authentication (FBA), IIS will prompt for your credentials.
Lock 3 Authentication required when an Office application such as Outlook 2010 is configured to display contact information from a customer relationship management (CRM) or enterprise resource planning (ERP) system.
Lock 4 Authentication when SharePoint displays data on a webpage.
Locks 3 and 4 represent the additional security requirements that an external data source may impose.
Authentication Modes
The two authentication modes in BCS are as follows:
Trusted Subsystem The SharePoint web tier controls authentication and authorization, and retrieves data from the external systems using a fixed identity—that is, the SharePoint servers are a trusted subsystem. In the trusted subsystem model, an account is used to access the external system on behalf of all authenticated users or a set of users, so administrators do not have to specify on the external system the access rights for each user. The account can be the BDC service application pool ID or the credentials associated with a group target application ID retrieved from the Secure Store Service (SSS) database. If the external system is configured to use identify federation authentication, the user’s identity is passed to the Secure Token Service (STS) to obtain the user’s token or claim.
Impersonation and Delegation This mode uses the authorization of the external system, which delegates authentication to the SharePoint web tier. The BDC service application’s pool ID impersonates the user and connects to the external system on the user’s behalf using Kerberos, the credentials associated with an individual target application ID retrieved from the SSS database, or the user’s name passed as a parameter.
Table 3-2 details the benefits of these two modes.
Trusted Subsystem | Impersonation and Delegation | |
Connection pooling | Yes | No |
Could reduce licensing costs on the external system if it uses a product charged on a per-user basis | Yes | No |
Less complex to use | Yes | No |
Provides a single model for authorization | Yes | No |
Supports scenarios in which there is no per-user authorization at the back-end | Yes | No |
Allows per-user auditing at the back end | No | Yes |
Authentication Methods
When you create the BDC model or external content type (ECT), you define the authentication method that the BDC runtime uses with the external system:
User’s Identity (also known as PassThrough) SharePoint sends the user’s credentials to the external system, and the user is allowed or disallowed access based on those credentials. If you use Windows authentication and have a single-server SharePoint farm, and the external system is installed on that server, then using the user’s identity works well. This method will not work in a multiple-server farm installation due to the double-hop issue (explained in Chapter 2), unless you configure Kerberos on your servers or configure your SharePoint web applications to use SSL. When using SSL, authentication of the user is completed at the server and not at the user’s computer; therefore, there is only one hop from the computer that authenticates the user to the external system.
The other disadvantage of using the user’s identity for authentication is that if the external system is an SQL database, a new SQL connection pool is created for each user who is using the ECT to access the external content, which can cause performance issues. You can disable connection pooling, which can also affect performance.
Impersonate Windows Identity A specific Windows user name is used to authenticate with the external system. This could be the same for all users—it could be a group ID, or there could be some mapping mechanism, so the user requesting the content from SharePoint is matched to a different Windows identity passed on to the external system. Using this and the next authentication method requires some mechanism to do the mapping. If you are using SharePoint Server 2010, you can use an SSS application, or if you are using SharePoint Foundation or SharePoint Online, you can write your own equivalent system.
Impersonate Custom Identity This method is similar to the previous authentication method, but this method does not involve Windows identities. The identities could be SQL user names or claims-based identities.
BDC Identity (also known as RevertToSelf) SharePoint reverts to the web application’s application pool identity to authenticate with the external system. This user name has a high level of privileges on a SharePoint installation. Any user who can create or edit a BDC Identity model can make themselves an administrator of site collection. Microsoft does not recommend the use of this authentication mode, and it is disabled by default, but you can enable it using code or Windows PowerShell. When a user tries to import or change the authentication mode to RevertToSelf, an error message displays, as shown in Figure 3-10 (in SharePoint Designer).
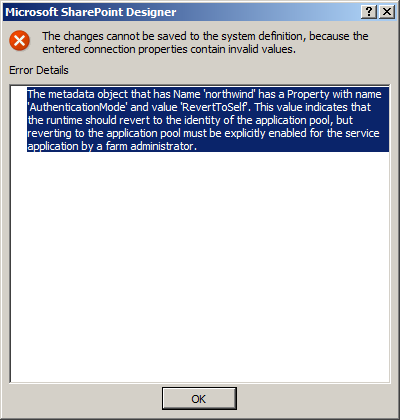
Table 3-3 shows the relationship between the authentication modes and methods.
Client Authentication Considerations
When you configure a BCS solution for client applications, both the PassThrough and RevertToSelf authentication modes use the credentials the user entered when logging on to the computer to directly connect to the external system.
When the BCS solution uses SSS, client applications still connect directly to the external system but do not use the credentials stored in the SSS database, as passing credentials from the server for the client to use is seen as a major security risk. The first time a user tries to connect to the external system, the BCS code on the client will prompt for credentials for the external system. These credentials are saved in the Credential Manager, which is an application incorporated into the Windows client operating system. When the user subsequently accesses the external system, the credentials are retrieved from the Credential Manager.
Note
To manage credentials stored on the client, navigate to the Control Panel, click User Accounts and Family Safety, and then click Manage Windows Credentials under Credential Manager.
On the server, when pages display data from external systems and SSS is configured to use the individual target application type, it is common practice to prompt users for their credentials for the external system. When BCS solutions involve both server-side and client-side presentation of data, users are prompted twice for the same credentials: once for the credentials to be stored in the SSS database and once for the credentials to be stored in the Credential Manager.
Warning
Important If SSS is configured to use the group target application type, however, the credentials that a group of users will use to authenticate with the external system is usually stored in SSS by an administrator. Users are still prompted when the client application connects to the external system, but in this scenario, users do not generally know the group credentials. This approach can cause problems and calls to the help desk, so organizations tend not to use the group target application type when the BCS solution involves client applications.
Note
See Also You can find more information on using SSS later in this chapter in Configuring the Secure Store Service..
Authorization
Once a user is authenticated, the requesting server can authorize the user to perform actions based on the permissions granted to the user (authorization). The user’s request to access external data is routed through a number of components:
Of particular interest in this section are the BDC metadata store and the BDC objects that it contains.
BDC Metadata Store Permissions
Farm administrators, SharePoint Windows PowerShell users and, depending on how the farm administrator has configured service applications, some application pool accounts, have full permissions to a BDC service application and thus to the metadata store. This level of access allows farm administrators to maintain or repair the BDC service application if necessary and enables them to deploy solutions packages that use BCS.
No other users have access to the metadata store, so once you have created the BDC service application, the next task is to set the permissions on the metadata store, as shown in Table 3-4.
BDC Objects
The metadata store includes all the BDC models, external systems, ECTs, methods, and method instances defined for that BDC service application. These objects exist in a hierarchy that determines which objects can propagate their permissions to other objects.
The permission options are Edit, Execute, Selectable In Clients, and Set Permissions. For information about how you can use these permissions on each BDC object, see the TechNet article at http://technet.microsoft.com/en-us/library/ee661734.aspx#Section4 and the Microsoft Business Connectivity Services Team Blog at http://blogs.msdn.com/bcs/archive/2009/11/24/permissions-in-business-connectivity-services.aspx.
Although farm administrators have full permissions on the metadata store, this level of permissions is not propagated to all objects in the store. For example, farm administrators do not have Execute permissions on any metadata store objects. Such accounts can create a BDC model with its associated external system definition and ECT, and they can even create an external list from those ECTs, but they cannot execute any of the operations on the external content. When the external list displays in the browser, an authentication error appears.
Creating BDC Service Applications
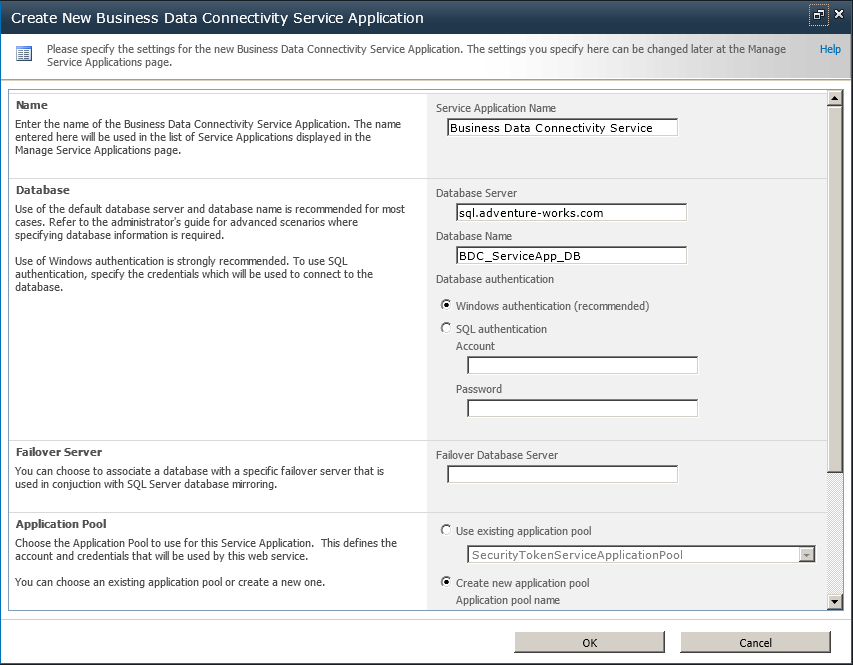
You can use the SharePoint 2010 configuration wizard, the SharePoint 2010 Central Administration website, or Windows PowerShell to create a Business Data Connectivity (BDC) service application. Using the SharePoint 2010 Central Administration website or Windows PowerShell, you can specify the SQL Server database name or use a preconfigured database name. When you use the configuration wizard, it automatically generates a BDC database name, which does not adhere to the naming standard that your database administrator uses.
To create a BDC service application using the SharePoint 2010 Central Administration website, follow these steps:
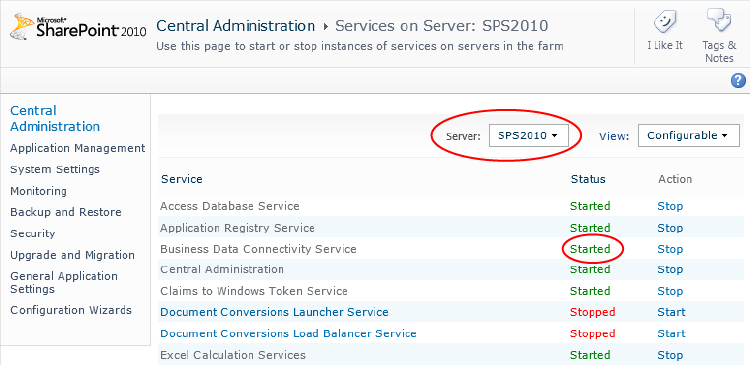
Under System Settings, click Manage Services on Server and ensure that the server where you want to start the BDC service is selected in the Server drop-down list. In the Action column, click Start for the Business Data Connectivity Service if it is not already started, as shown in Figure 3-11.
In the left navigation pane, click Application Management, and under Service Applications, click Manage Service Application.
On the Service Applications ribbon tab, in the Create group, click New, and then click Business Data Connectivity Service.
On the Create New Business Data Connectivity Service Application page, type the name of the service application, the database server, the database name, the authentication method, and the user name and password if appropriate. You can also specify a failover server if you are using SQL Server database mirroring, as well as create or use an existing application pool, as shown in Figure 3-12.
Note
Application pools created for service applications can be used only by other service applications. They cannot be used as application pools for web applications.
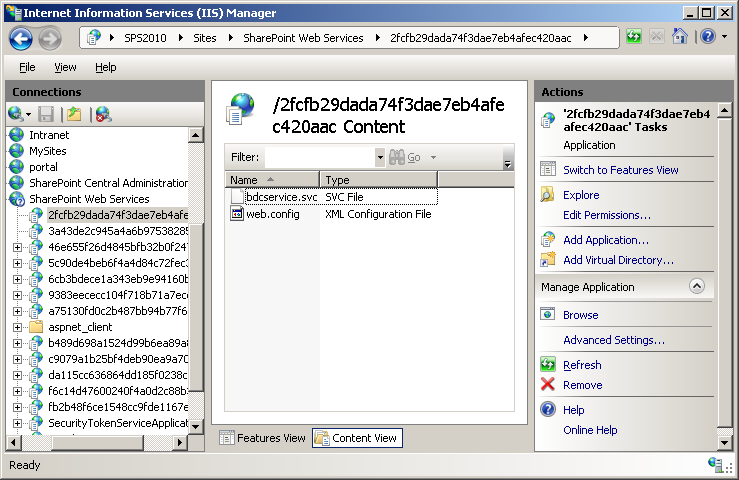
When you start a BDC service and create its associated service application, an IIS virtual application is created within the SharePoint Web Services IIS website. The SharePoint Web Services exposes a Windows Communication Foundation (WCF) web service, also known as the service application endpoint, as shown in Figure 3-13. The endpoint is used by SharePoint itself, and it can be used by your organization to develop new solutions. Such an endpoint is created by SharePoint on each server where the BDC service is started.
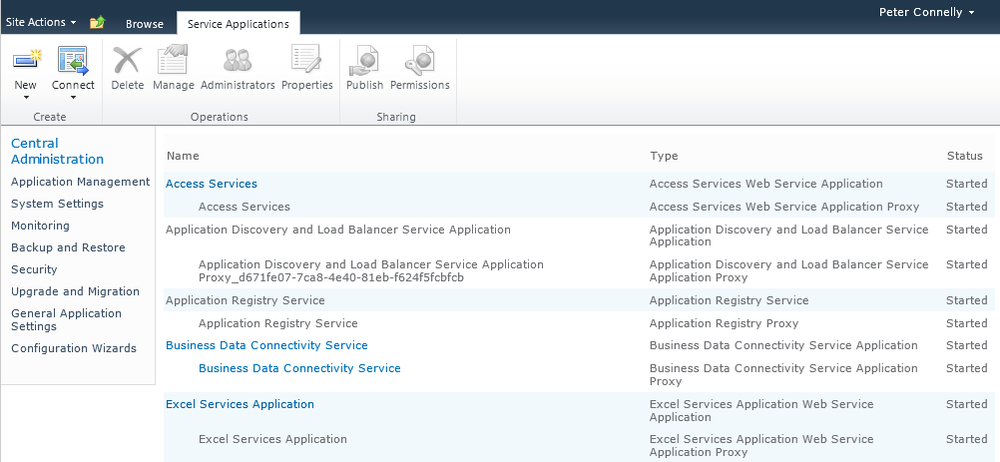
Once you create the BDC service application, on the Service Applications page in the Central Administration website, below the BDC service application, you will see a BDC service application proxy, as shown in Figure 3-14.
Configuring Business Data Connectivity Service Applications
Once you create the Business Data Connectivity (BDC) service application, you will need to complete the following administrator tasks:
Create BDC service application administrators.
Import the BDC model that contains the metadata information.
Configure profile page creation (SharePoint Server 2010).
Configure Secure Store Service (SSS) if you plan for any of the BDC models imported into the metadata store to use this authentication mechanism.
Deploy any custom business data solutions, such as dashboards.
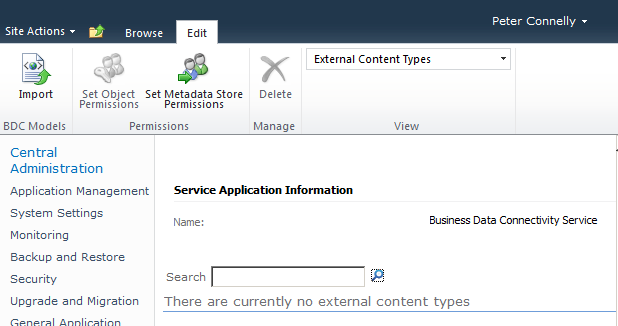
Use the Service Application Information page, shown in Figure 3-15, to view, add, modify, and delete BDC models, external systems, and external content type (ECTs), as well as configure permissions. On SharePoint Server 2010, there is an additional group on the ribbon to manage ECT profile pages. The Service Application Information page displays information from the metadata store in three different views: BDC Models, External Content Types, and External Systems.
Creating a BDC Service Application Administrator
Once you create a BDC service application, you can delegate the administration of that service application to users. Such users will have access to the SharePoint 2010 Central Administration website; however, the webpages will be modified to display only the links (security trimmed) to allow them to manage only the service application.
Note
Only members of the Farm Administrators group are able to add or remove users as service application administrators. By default, the Farm Administrators group can manage all service applications.
To create or remove BDC service application administrators, follow these steps:
Navigate to the SharePoint 2010 Central Administration website, and click Manage Service Applications under Application Management.
On the Service Applications page, select the row of the BDC service application for which you want to create administrators.
On the Service Application ribbon tab, in the Operations group, click Administrators to display the Administrators for Business Connectivity Service page.
Enter the users who will manage the BDC service application in the first text box. You can use the People icon to validate each name you enter, or you can use the Address Book icon to search for a user.
Click Add. The username appears in the second text box.
In the third box, select Full Control, as shown in Figure 3-16.
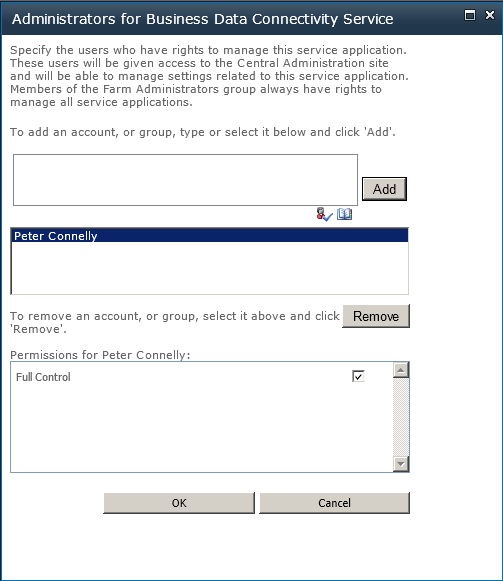
To remove a user as a BDC service application administrator, repeat steps 1 through 3 above. Then in the second text box, select the user you want to remove and click Remove.
Importing and Exporting BDC Models and Resource Files
ECTs are metadata objects defined in the BDC model XML file, which has the extension .xml or .bdcm. The BDC model is usually created by a business analyst, a developer, or a database administrator (DBA). Together, they have the knowledge of the external system or database, as well as how the business uses the data.
You can include resource information in the BDC model or in a separate resource XML file, which usually has an extension .bdcr. The creation of the base metadata information and the resource information is an important activity. You can create the base metadata information using the ECT Designer in SharePoint Designer 2010, Visual Studio 2010, an XML editor, Notepad, or a third-party tool. You can create or configure resource information after the BDC model data is imported.
Note
You can only use SharePoint Designer 2010 to create a model XML file for SQL Server databases, web and Windows Communication Foundation (WCF) services, and .NET connectivity assemblies. For other types of external systems, edit the model XML file in Visual Studio 2010, an XML editor, or a third-party tool. For more information on creating BDC models with SharePoint Designer, see Chapter 4.
One purpose of the model is to describe how the BDC runtime will obtain the data from the external system—that is, it describes the interface. Another purpose of the model is to provide meaningful text in the browser to help users determine the data they require from the external system. The model describes what can be done with the browser and the relationships among the different types of data. For example, using BCS, you can create, read, update, and delete (CRUD) external data in SharePoint and Office client applications, if the external system supports the operations and is modeled appropriately in the BDC model.
Note
Not all Office client applications can write to the external system, even though the external system supports the operations and they are correctly modeled in the BCS. For example, in Word 2010, BCS exposes read-only data in content controls that map to external data columns in a SharePoint document library, and you can import a BDS model into Access 2010 to create read-only tables. For more information, see Chapter 7.
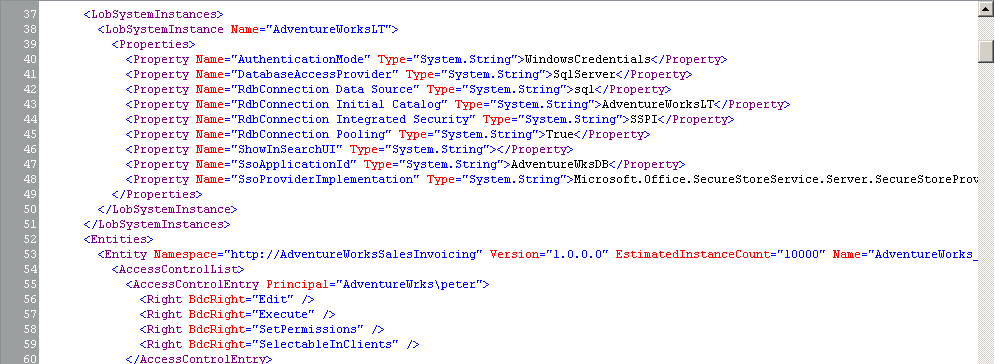
The BDC model contains a hierarchy of XML elements, each containing text or other elements that specify the external system settings and structure. The model must conform to the standards for well-formed XML, so all element names are case sensitive. The model must also conform to the schema described in the file Bdcmetadata.xsd. When you have a separate resource file, the schema definition file is BDCMetadataResource.xsd. Both files are stored in the TEMPLATEXML SharePoint installation root folder, which by default is C:Program FilesCommon FilesMicrosoft SharedWeb Server Extensions14. A snippet of a BDC model is displayed below:
<LobSystemInstances>
        <LobSystemInstance Name="AdventureWorksLT">
          <Properties>
            <Property Name="AuthenticationMode" Type="System.String">PassThrough</Property>
            <Property Name="DatabaseAccessProvider" Type="System.String">SqlServer</Property>
            <Property Name="RdbConnection Data Source" Type="System.String">sql</Property>
            <Property Name="RdbConnection Initial Catalog"
Type="System.String">adventureworkslt</Property>
            <Property Name="RdbConnection Integrated Security"
Type="System.String">SSPI</Property>
            <Property Name="RdbConnection Pooling" Type="System.String">True</Property>
            <Property Name="ShowInSearchUI" Type="System.String"></Property>
          </Properties>
        </LobSystemInstance>
      </LobSystemInstances>
      <Entities>
        <Entity Namespace="http://AdventureWorksSalesInvoicing" Version="1.4.0.0"
EstimatedInstanceCount="10000"
                       Name="AdventureWorks_Customers" DefaultDisplayName="AdventureWorks
Customers">
          <Properties>
            <Property Name="OutlookItemType" Type="System.String">Contact</Property>
          </Properties>
          <AccessControlList>
            <AccessControlEntry Principal="contosopeter">
              <Right BdcRight="Edit" />
              <Right BdcRight="Execute" />
              <Right BdcRight="SetPermissions" />
              <Right BdcRight="SelectableInClients" />
            </AccessControlEntry>
Note
See Also See Appendix A, for more information on the BDC metadata object definitions.
Importing a BDC Model
If you create a BDC model using SharePoint Designer or a third-party tool, or you need to transfer a BDC model from a development environment to a production environment, you can import the model file using the SharePoint 2010 Central Administration website as follows:
Navigate to the SharePoint 2010 Central Administration website, and under Application Management, click Manage Service Applications.
On the Service Applications page, click the name of the Business Data Connectivity service application where you want to import the BDC model. The BCS Application Information page appears, where you can manage permissions, export the BDC model, or delete the BDC model.
Click Import on the Edit ribbon tab to display the Import BDC Model page.
In the BDC Model section, click the Browse button to navigate to where the BDC model is located.
If you are importing a resource file, select the resources defined in your model file in the Advanced Settings section, as shown in Figure 3-17.
Click Import.
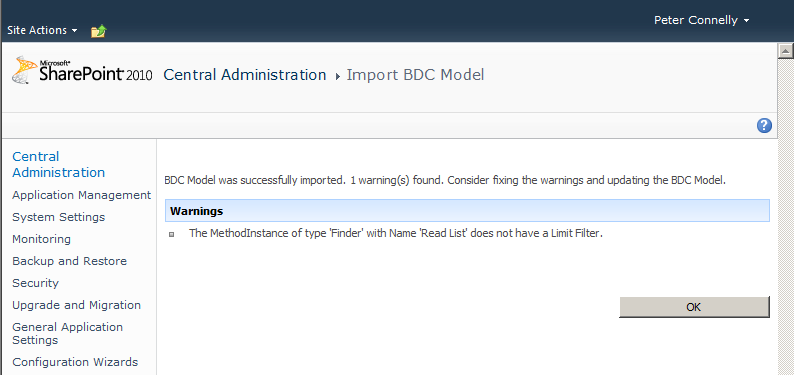
The import process parses the file and validates it. If errors are found during the import process, additional information is displayed. You can find additional information in the Windows event logs and the SharePoint 2010 log file located at %ProgramFiles%Common FilesMicrosoft Sharedweb server extensions14LOGS, where the relevant messages will appear in the Business Data category. You might have to pass this information back to the user who created the BDC model.
A successful import will result in the message “Application definition was successfully imported.” The import process can identify any deficits in the BDC model, in which case you will see the message “Application definition was successfully imported” together with any warnings issued, similar to the page shown in Figure 3-18.

During the import process, SharePoint 2010 separates the external system details from the ECT information. You can then configure the appropriate access rights to users according to the business requirements using the Set BDC Metadata Store Permission command in the ribbon.
Exporting a BDC Model
To export a BDC model, follow these steps:
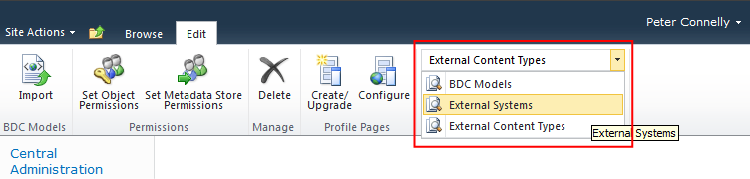
On the Service Application Information page, on the Edit ribbon tab, in the View group, select BDC Models from the drop-down list, as shown in Figure 3-19.
Click the BDC model you want to export, and then select Export BDC Model from the drop-down list, as shown in Figure 3-20. When BDC models are displayed, on the Edit ribbon tab three commands are visible in the BDC Model group: Import, Delete, and Export.
Note
You can also use the drop-down list to delete the BDC model, set permissions on the BDC model, or view the ECTs defined in the BDC model. When you delete a BDC model, all ECTs and external data sources that are defined in the BDC model and that are not also contained in another model are deleted along with the BDC model.
On the Export BDC Model page, in the File Type section, select the type of BDC model file to export (Model or Resource), and then in the Advanced Settings section, select the resources and environmental settings to export.
Click Export.
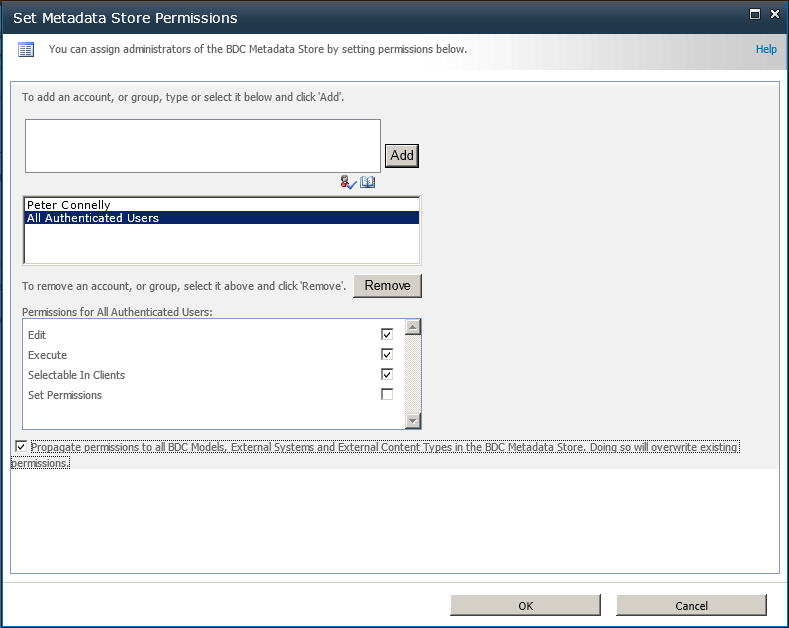
Setting BDC Metadata Store Permissions
The BDC model and resource files are stored in the BDC metadata store. Users must have Edit permissions on the BDC metadata store to create, import, export, or remove files from the BDC metadata store. This level of permissions is usually assigned to BDC service application administrators.
As described in the BCS Security Options section earlier in this chapter, you can set permissions on the following objects:
Metadata store
Model
External system
ECT
Setting permissions on the BDC metadata store should be one of your first tasks after you create a BDC service application. To do so, follow these steps:
Navigate to the SharePoint 2010 Central Administration website, and under Application Management, click Manage Service Applications. On the Service Applications page, click the name of the Business Data Connectivity Service for which you want to manage permissions to display the Service Application Information page.
On the Edit ribbon tab, in the Permissions group, click Set Metadata Store Permissions to display the Set Metadata Store Permissions page, as shown in Figure 3-21.
Enter the appropriate users or groups and assign the appropriate permissions. Permissions set at this level can be copied to any model, external system, or ECT stored in the metadata store for this BDC service application.
Click OK.
Note
To create a BDC metadata store administrator, select Edit, Execute, Selectable In Clients, and Set Permissions, and then select the check box Propagate Permissions to All BDC Models, External Systems, and External Content Types in the BDC Metadata Store. This overwrites any existing permission settings.

Follow these steps to set permissions on one or more models, external systems, or ECTs:
On the Service Application Information page, on the Edit ribbon tab, in the View group, select BDC Models, External Systems, or External Content Types from the drop-down list. The page displays only objects of the type you have chosen.
Select the objects you want to modify, and then click Set Object Permissions, on the Edit tab, in the Permissions group.
On the Set Object Permissions page, enter the appropriate users or groups and assign the appropriate permissions.
Permissions set at this level can be copied to any child objects. For example, if you are setting the permissions for external systems, then permissions can be propagated to all ECTs that belong to the external systems. Be aware, however, that doing so will overwrite existing permissions.
When you import or create a BDC model—especially if you have chosen to copy all permissions to descendants at the metadata store level—you should set the permissions appropriate to the business requirements. This is also true when you create an ECT using SharePoint Designer. Ask the metadata store administrator to set permissions on your newly created ECT. Failure to do so could result in data from the external source not displaying whenever the ECT is used. The lack of data from the external system on a page could also include you when you visit the page. Using SharePoint Designer, you connect directly to the data source using a specific authentication method. Using the ECT to display data will always go through the metadata store, so you need access to the ECT and you need to meet the authentication criteria defined to view/modify/delete external data.
Once you have created the BDC model or ECT and set permissions on that object, you can create a profile page for the ECT.
Configuring Profile Page Creation
You use the profile page to display a single row of data from an external system defined by an ECT. For example, where you have created an ECT to display the customer table from your CRM system, the profile page for the customers’ ECT would display the details for one customer. You do not create a profile page for each customer; instead, when you pass a customer ID to the profile page, it pulls the customer details from the CRM system and displays information about the customer, such as the customer’s name, address, country, telephone number, and any other properties or fields that are defined in the BDC model.
In SharePoint Foundation and SharePoint Online, you must build these profile pages yourself and place controls or Web Parts to display the data. In SharePoint Server 2010, you can create profile pages with one click of a button using the SharePoint 2010 Central Administration website or SharePoint Designer.
Note
See Also You can find information about creating profile pages using SharePoint Designer in Chapter 5.
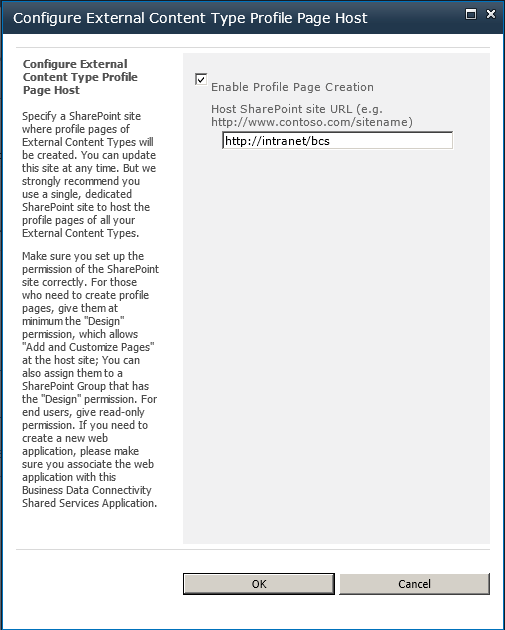
The website that hosts the ECT profile pages can be different for each BCS service application in a SharePoint farm. You first create a site that will host the profile pages and set the permissions so that any user who will create profile pages must have the Add and Customize Pages permission right on that site. All users who have access to the data from the external system can also access the profile pages created in this site. Read-only permission is usually sufficient for such users.
Warning
Important If you create a new web application to host the profile site, ensure that the web application is associated with all BCS service applications that will create profiles on that web application.
After you have set permissions on the BDC metadata store, follow these steps to configure profile page creation:
Navigate to the Service Application Information for the BDC service application that you need to configure.
On the Edit ribbon tab, in the Profile Pages group, click Configure to display the Configure External Content Type Profile Page Host dialog box, as shown in Figure 3-22.
Select Enable Profile Page Creation and type the URL of the site where the profile page will be hosted.
Creating a Profile Page
Once you import a BDC model, you should consider creating a profile page for each ECT that it contains. If you are using the Enterprise edition of SharePoint Service 2010, it is easy to create a profile page using either SharePoint Designer or the SharePoint 2010 Central Administration website. For more information on creating a profile page, see Chapter 5.
Configuring the Secure Store Service
When using Business Connectivity Services (BCS), you will often create solutions where the current SharePoint user is known differently or has a different user name in the external system. If you are using SharePoint Server 2010, then you can use the Secure Store Service (SSS) with BCS to authenticate users with external systems. You can also use SSS to overcome the double-hop issue, which was explained in Chapter 2.
SSS is a service application, just as BCS is. It provides a database to store user credentials and a mechanism to map SharePoint user credentials with credentials used by the external system. Even though user credentials stored in the database are encrypted, Microsoft recommends that the SSS database be deployed to a different SQL Server instance than the instance where the rest of your SharePoint databases are deployed.
In addition, Microsoft recommends that you use Secure Sockets Layer (SSL) when connecting end-user devices and SharePoint web servers, and that you also use SSL or Internet Protocol Security (IP-sec) between servers running SharePoint and external systems to ensure the security of sensitive data. The encryption of data is particularly important if the credentials are passed as clear text between the SharePoint servers and the external system.
Note
The BCS component within Microsoft Office clients uses the Windows Credential Store as a Secure Store provider.
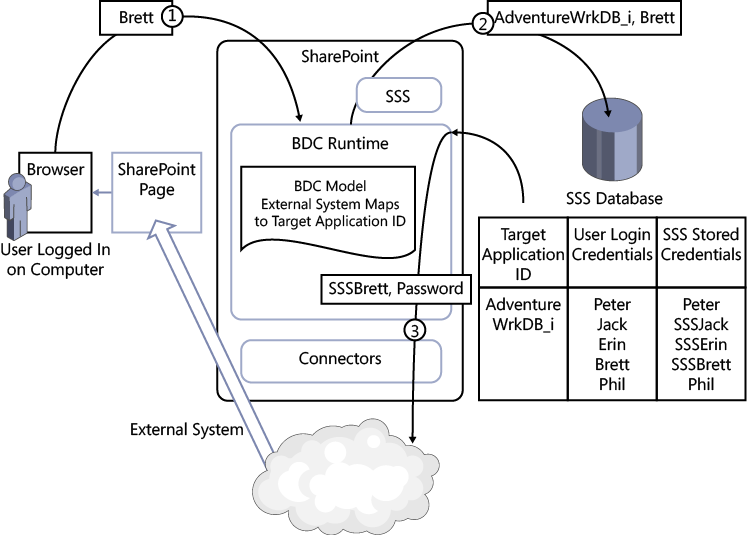
In SSS terminology, each external system that you want to authenticate is known as a target application and is represented by a target application ID. When a user requests content from an external system, the Business Data Connectivity (BDC) runtime reviews the BDC model. If the external system uses a target application ID, then the ID the user used to log on to SharePoint (step 1 in Figure 3-23) is passed to the SSS application (step 2 in Figure 3-23), which uses the information in the SSS database to match the logged-on user name with credentials that can be used with the external system. The matched credentials are then used to authenticate the external system (step 3 in Figure 3-23), and the external system also uses these credentials to identify the user’s access rights in the external system. The returned data is then incorporated into the SharePoint page and rendered in the user’s browser.
SSS uses two types of authentication with external systems:
Although user and group credentials are usually stored in the form of a user name and password, some external systems require additional information, such as a database name. SSS allows you to create the necessary fields to pass to the external system.
Creating a Secure Store Service
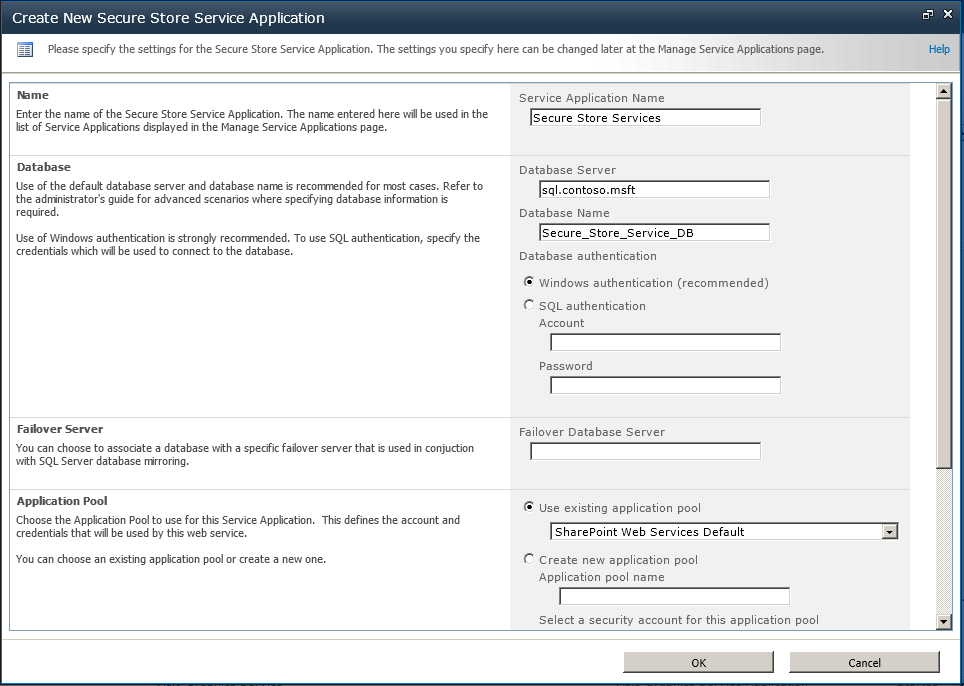
Creating an SSS service application is very similar to creating a BDC service application. Follow these steps on the SharePoint 2010 Central Administration website:
Under System Settings, click Manage Services on Server, and then on the Services on Server: <server name> page, click Start to the right of Secure Store Service. Repeat this step for each server where you want SSS to run.
On the Application Management page, under Service Applications, click Manage Service Applications and create a new SSS, providing a name for the service application and a database name, and selecting an application pool or creating a new one, as shown in Figure 3-24.
You can also use the Create New Secure Store Service Application page to enable auditing and specify the number of days the audit logs will be saved in the SSS database, after which they will be purged. The audit log is saved in the SSS database, so if at any time you need to set the database to read-only, you must first disable auditing. Otherwise, the following error message displays when an attempt is made to use the credentials within the SSS database: “Cannot complete this action as the Secure Store Shared Service is not responding. Please contact your administrator.”
Click OK to create the SSS application and the service proxy.
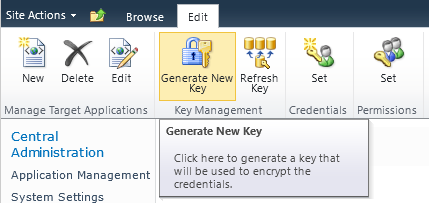
From the Manage Service Applications page, click the SSS service application you created in the preceding step, and then on the Edit ribbon tab, in the Key Management group, click Generate New Key, as shown in Figure 3-25.
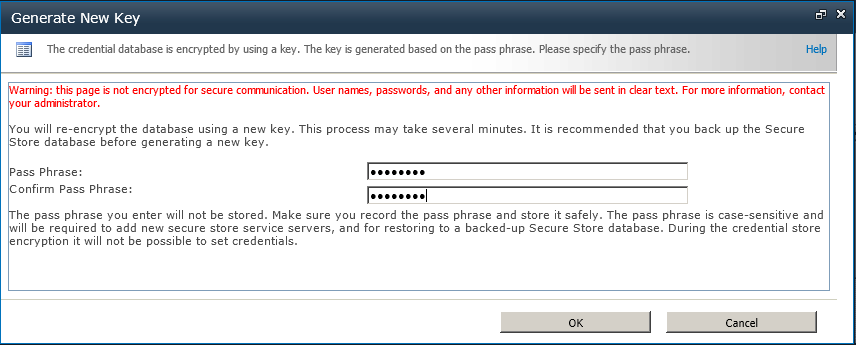
On the Generate New Key page, type a pass phrase, as shown in Figure 3-26. This pass phrase must be at least eight characters in length, and it must contain at least three of the following four types of characters: uppercase, lowercase, number, or any of the special characters “ ! “ # $ % & ‘ ( ) * + , - / : ; < = > ? @ [ ] ^ _ ` { | } ~ .
Click OK.
Using the Secure Store Service
To use SSS, first create a target application that represents the external system. Once you create this application, you can associate it with a BDC model or an ECT, or use it with other service applications that access external content, such as Excel Services or Visio Services.
Creating a Target Application ID
Create a target application as follows:
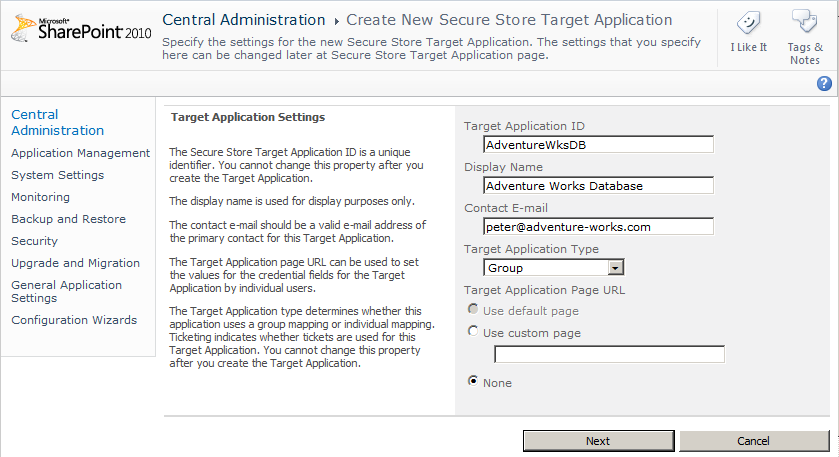
Display the Secure Store Service Application page by clicking the SSS service application on the Manage Service Applications page, and then on the Edit ribbon tab, in the Manage Target Applications group, click New.
Three pages are used to create a new secure store target application. On the first page:
In the Target Application ID text box, type a name that represents the external system, such as AdventureWksDB. You cannot modify this name once it is created. This name will be passed as a parameter in URLs, and it is referenced in the BDC model, so do not include spaces or characters that are not allowed in URLs, such as $ & + , / : ; = ? @ “ < > # % { } | ~ ^ [ ] ‘.
In the Display Name text box, type a name that will be used for display purposes, such as Adventure Works Database.
In the Contact E-mail text box, type an email address. Usually this is the email address of the business owner or the business analyst of the external system.
In the Target Application Type drop-down list, select Individual if each user has an account in the external system, or select Group if the external system uses one account for all users. By using a naming convention for the target application ID, you can quickly identify the application type when looking at the BDC model. For example, AdventureWorksDB_i would indicate that the target application ID is to be used where every user has their own external system credentials.
Leave None selected for the Target Application Page URL, as shown in Figure 3-27, so credentials that will be used to access the external system will be entered by the SSS administrator. Select Use Custom Page if you are going to create a webpage for users to enter the credentials for the external system. When you select Use Default Page, SharePoint generates a webpage that can be used to enter credentials. When you select a Target Application Type of Group, you can only select Use Custom Page or None.
Click Next.
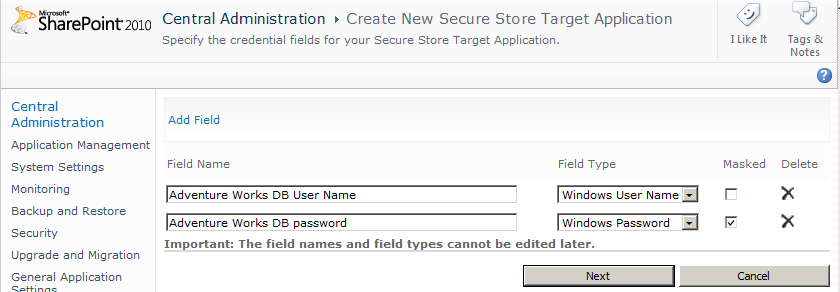
On the second page, you specify the number of fields required by the external system, as shown in Figure 3-28. All the fields created on this page are required when a user or the target application ID administrator creates the credentials.
Note
Select the field type that matches the authentication method used by the external system. For example, if the external system is a database hosted by SQL Server, SQL Server supports two types of authentication: Windows and SQL authentication. By default when SQL Server is installed, only Windows authentication can be used. If your SQL Server is configured to use SQL authentication, and you want to use an SQL user ID as your user credentials, then select the field types User Name and Password in place of Windows User Name and Windows Password.
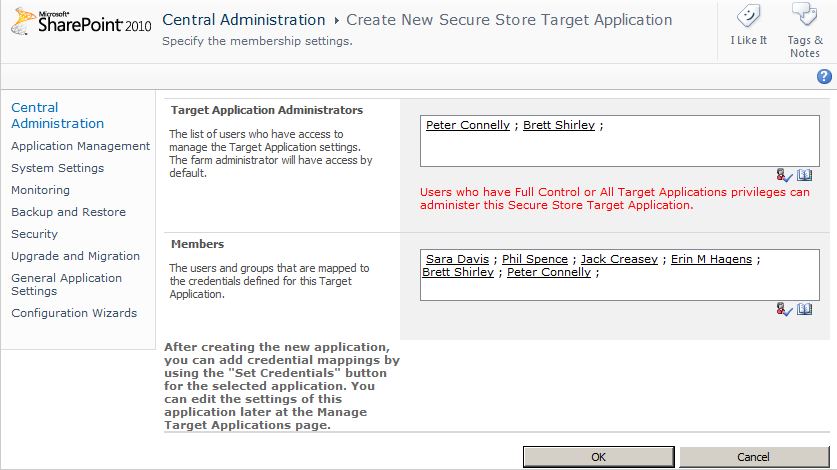
To navigate to the third page, click Next, and then in the Target Application Administrators text box, enter the users who administer the SSS setting for the external system. If you select Group as the Target Application Type, then a Members text box displays where you can enter those users or groups, as shown in Figure 3-29. These users will be able to map to the group credential that provides access to the external system.
To create the target application ID, click OK.
You can modify the target application ID, its display name, contact email, administrators, and members once these have been created, but you cannot amend the following fields:
Target Application ID
Target Application Type
The number of credential fields, their field names, or their field type (however, you can change the field property that controls whether to mask the text typed when entering the credentials).
Setting Field Credentials
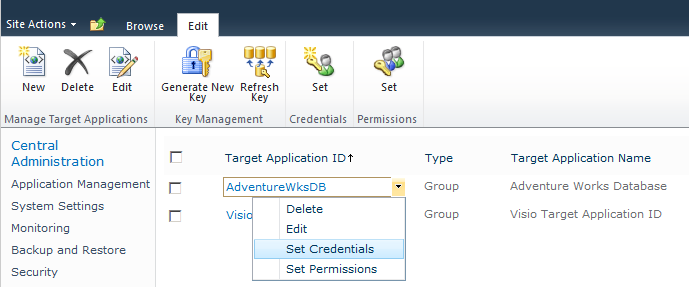
To set the credentials used by the external system, you can use the default or custom page, if that was selected for the target application ID. Alternatively, on the Secure Store Service Application page, select the target application ID, and then on the Edit ribbon tab, in the Credentials group, click Set. You can also use the drop-down list associated with the target application ID to set the credentials, as shown in Figure 3-30.
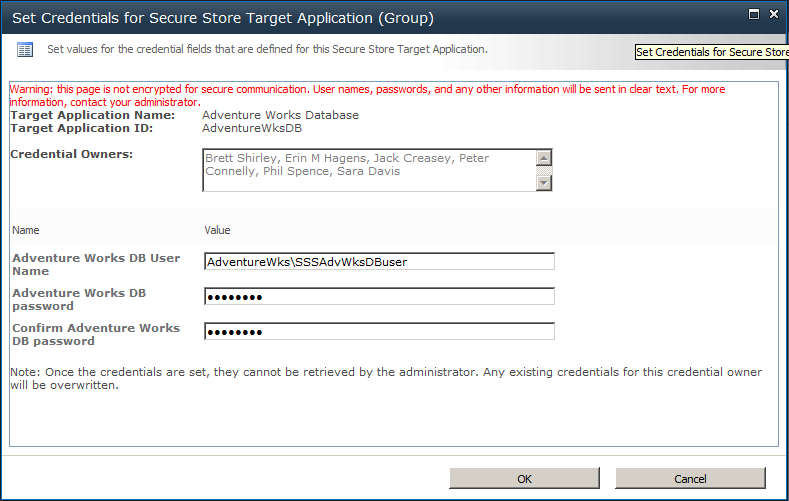
On the Set Credentials for Secure Store Application page, enter the user name for the external system, the password and confirmation of the password, and values for any other field you defined when you created the target application ID, as shown in Figure 3-31.
If the user name field is a Windows user name, then the name you type must be a valid AD user name of the format <domain name><user name>, such as AdventureWrksSSSBrett. The credential owners will not be able to directly access the information you enter on this page; the BDC service application and the SSS application will use the user name and password on behalf of the credential owners. And, of course, the external system owner will use the user name to allow access to the content stored in the external system.
Notice the warning at the top of the page (shown in red text in the interface). User names, passwords, and any other information that you enter on this page are passed as clear text.
Once you click OK, the values you typed in the fields are stored in the SSS database. If you select Individual as the Target Application Type, you are asked to supply the credential owner. Normally, the target application administrator does not manually add every individual user as a credential owner using this page, but instead provides the link to the default or custom webpage and allows users to specify the external system credential information that they have been provided with.
Whether you choose Individual or Group as the Target Application Type, if your organization implements an account policy that forces you to change the password for the credentials stored in the SSS database on a regular basis, then you will need to display the Set Credentials page and enter the new password.
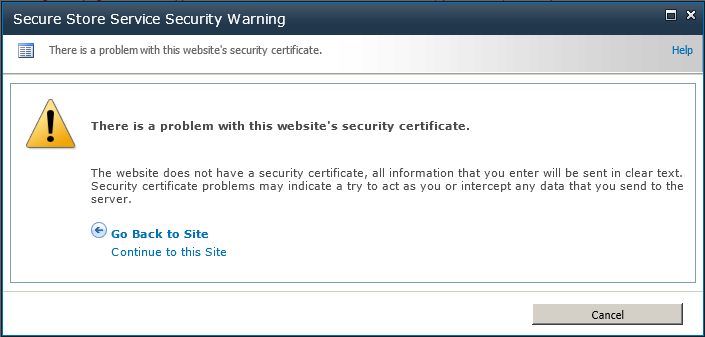
The URL page for the default page is http://<website>/_layouts/SecureStoreSetCredentials.aspx?TargetAppID=<TargetAppID>, where <website> is the name of any website within a web application associated with the SSS service application and <TargetAppID> is the target application ID, such as AdventureWksDB. When a user clicks the link to the default page, a modal window may display stating that there is a problem with the website’s security certificate, as shown in Figure 3-32. Again, this is a warning that the information entered will be sent in clear text.
Click Continue to This Site to display SSS Set Credentials page.
If you try to display the default page for a group target application ID, a modal window displays an SSS error that access is denied for the target application, as shown in Figure 3-33.
Note
The default page is an application page, so there is only one instance of that page per SharePoint farm installation. Application pages cannot be modified using SharePoint Designer. If you do not like the default page, you can create a custom page. You can create a custom page using SharePoint Designer, store it in a content database or package it as a solution, and deploy it to each server in the farm. You can also have a custom page for each target application ID.
When the BDC model or ECT uses an individual target application ID to display the contents of the external system, such as when a user displays an external list created from the ECT and credentials have not been provided, then no data will be retrieved. A webpage displays with a Click Here to Authenticate link, which when clicked displays either the default or custom page depending on the configuration of the target application ID, allowing the user to enter the appropriate credentials.
Troubleshooting Connection Problems
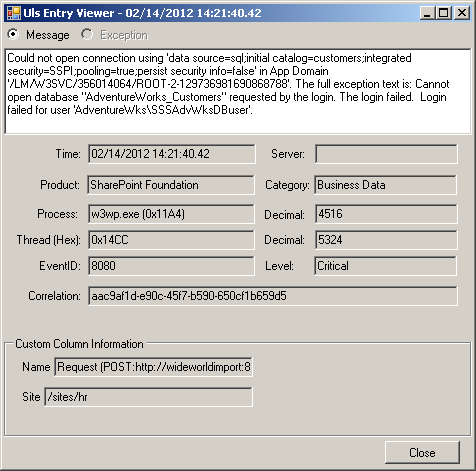
When the credentials provided do not have access to the external system, an error message similar to the following displays and a correlation ID is provided: “The query against the database caused an error.” This is a generic error message. The correlation ID is a hyphenated number, known as a globally unique identifier (GUID), and it will look similar to the following: aac9af1d-e90c-45f7-b590-650cf1b659d5. The GUID will help you identify the cause of the problem, and you can use it in the ULS logs to find further information about the error. The ULS logs are stored on servers in the log folder within the 14 hive. Microsoft provides the ULSViewer tool, which displays the entries in a user-friendly format and can be downloaded from http://archive.mdsn.microsoft.com/ULSViewer. The ULS log entry generated when the credentials stored in the SSS database do not have access to the external system is shown in Figure 3-34.
Configuring an ECT to Use Secure Store Service Credentials
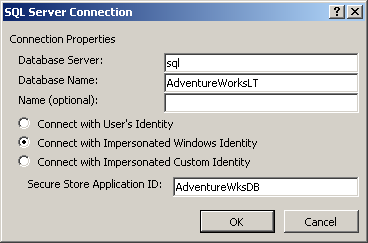
Before you can create an ECT using SharePoint Designer, you first define a connection to the external system, where you provide the connection properties and the credentials that should be used. For example, for a SQL Server connection, you use the SQL Server Connection dialog box to provide the database server and database name. You then select the type of credentials you will use to connect to the SQL Server. Two impersonated identity options map to credentials stored in the SSS database:
Once you select the identity type, in the Secure Store Application ID text box, type the name of the target application ID, as shown in Figure 3-35.
Note
Throughout this book, you will use the Microsoft Adventure Works LT database when creating a SQL Server ECT. You can download this database from http://msftdbprodsamples.codeplex.com. See Chapter 4 for information about how to create ECTs for SQL Server databases.
After you create the ECT, you can modify the connection properties by clicking Edit Connection Properties on the External Content Type ribbon tab, in the Connection Properties group. The Connection Properties dialog box displays, as shown in Figure 3-36, where you can also configure a secondary Secure Store application ID.
You use the secondary Secure Store application ID when the ECT uses a web service or a .NET assembly connector, and the ECT operations are defined to use the optional filters, user name, and password. When the ECT is used to access the external system, values from the SSS database for the fields User Name and Password are passed as input values to the external system. The ability to pass the user name and password as input values can be very useful when connecting to an external system such as a web service, where custom HTTP headers and SOAP headers can pass user name and password information.
Note
See Also You can find information about custom HTTP and SOAP headers at http://msdn.microsoft.com/en-us/library/bb802855.aspx and how to use SSS with .NET connectors at http://msdn.microsoft.com/en-us/library/ff798272.aspx. For details about how to build .NET assembly connectors, see Chapter 12.
Using Windows PowerShell to Administer BCS
SharePoint Foundation 2010 contains over 240 SharePoint-related Windows PowerShell cmdlets, and SharePoint Server 2010 contains over 530. Help is built in within Windows PowerShell. For example, for more information about the cmdlets relevant to Business Connectivity Services (BCS), start the SharePoint 2010 Management Shell as an administrator, and use a command similar to the following to list all Business Data Connectivity (BDC)-related cmdlets:
Get-Help *SPBusiness*
The preceding command generates the following output:
Name                              Category  Synopsis
----                              --------  --------
New-SPBusinessDataCatalogServi... Cmdlet    Creates a new Business Data Conn...
Set-SPBusinessDataCatalogServi... Cmdlet    Sets global properties for a Bus...
New-SPBusinessDataCatalogServi... Cmdlet    Creates a new Business Data Conn...
Get-SPBusinessDataCatalogThrot... Cmdlet    Returns the throttling configura...
Set-SPBusinessDataCatalogThrot... Cmdlet    Sets the throttling configuratio...
Get-SPBusinessDataCatalogMetad... Cmdlet    Returns a Business Data Connecti...
Set-SPBusinessDataCatalogMetad... Cmdlet    Sets the value of a property or ...
Grant-SPBusinessDataCatalogMet... Cmdlet    Grants a right to a principal fo...
Revoke-SPBusinessDataCatalogMe... Cmdlet    Revokes a right to a principal i...
Import-SPBusinessDataCatalogModel Cmdlet    Imports a Business Data Connecti...
Import-SPBusinessDataCatalogDo... Cmdlet    Imports a .NET Connectivity asse...
Export-SPBusinessDataCatalogModel Cmdlet    Exports a Business Data Connecti...
Remove-SPBusinessDataCatalogModel Cmdlet    Deletes a Business Data Connecti...
Remove-SPSiteSubscriptionBusin... Cmdlet    Removes the Business Data Connec...
Export-SPSiteSubscriptionBusin... Cmdlet    Exports all data from the Busine...
Import-SPSiteSubscriptionBusin... Cmdlet    Import-SPSiteSubscriptionBusines...
Clear-SPSiteSubscriptionBusine... Cmdlet    Deletes all data from the Busine...
Copy-SPBusinessDataCatalogAclT... Cmdlet    Copies a set of permissions of a...
Enable-SPBusinessDataCatalogEn... Cmdlet    Activates an External Content ty...
Disable-SPBusinessDataCatalogE... Cmdlet    Deactivates an External Content ...
You can then type the following to find more information about a specific cmdlet:
Get-help Get-SPBusinessDataCatalogMetadataObject
Learning the cmdlets and the logic you need to create a robust set of commands comes with experience and testing. Many administrative tasks will require only one line of code. For example, use the following command when you want to list all BDC service applications and the names of their databases:
Get-SPServiceApplication | where {$_.typename -like "*business*"} | select Name, DatabaseOther administrative tasks require a couple lines of Windows PowerShell. For example, when you want to enable the RevertToSelf authentication method, you first obtain a reference to the BDC service application that you want to manage, and then you complete the administrative task on that service application.
Other tasks require a number of lines of code. Do not expect to correctly create a Windows Power-Shell sequence of commands on your first attempt. It is often helpful to draw a diagram detailing the logic for the set of commands.
In most cases, when you try to complete BCS-related administrative tasks using Windows Power-Shell, you will need to use the SharePoint BDC cmdlets displayed previously, plus other SharePoint cmdlets. You may find that you sometimes have to reference the SharePoint namespace, similar to when a developer creates a program to do such tasks. In such instances, you may have to refer to the SharePoint 2010 software developer kit (SDK) or engage the help of a developer.
Note
See Also For more information about Windows PowerShell and SharePoint 2010, see Microsoft SharePoint Server 2010 Administrator’s Companion, by Bill English, Brian Alderman, and Mark Ferrarz (Microsoft Press, 2010), Chapter 5 and http://technet.microsoft.com/en-us/library/ee661742.aspx.
Enabling the RevertToSelf Authentication Method
By default, the authentication method RevertToSelf is disabled. Microsoft recommends using the RevertToSelf authentication method only in a production environment, when all the following conditions are true:
You are using SharePoint Foundation 2010.
You do not have resources to create a custom SSS.
You trust all of the people who use SharePoint Designer as completely as if they were SharePoint administrators.
The application pool account is locked down such that the attack surface exposed to a malicious user of SharePoint Designer is limited.
Use Windows PowerShell as shown in the following example to enable RevertToSelf, where the variable BDCName is the name of your BDC service application:
$BDCName = "Business Data Connectivity Service";
$bcs = Get-SPServiceApplication | where {$_.displayname -eq $BDCName};
$bcs.RevertToSelfAllowed = $True;
Although the BDC server runtime would use the application pool ID to retrieve data from the external system no matter which user wants to display the external content, remember that you can use permission settings on the BDC service application to restrict access to the external content.
Importing a BDC Model
You can use the SharePoint 2010 Central Administration website to import a BDC model, as shown in the following code:
$catalog = Get-SPBusinessDataCatalogMetadataObject -BdcObjectType catalog '
   -ServiceContext http://intranet
Import-SPBusinessDataCatalogModel -Identity $catalog -Path c:adventurewksCust.bdcm;
If the preceding set of commands is successful and there were no warnings or errors, you will see no output. You should check that the model successfully loaded and that you can use the ECTs that the model may contain. To display all BDC models in the BDC metadata store, type on one line the following command, using the URL of your own web application:
Get-SPBusinessDataCatalogMetadataObject -BdcObjectType Model '
   -ServiceContext http://intranet -Name "*" | select Name
To display all the external systems in the BDC metadata store, and to display the type of external system together with its entities (ECTs), use this command:
Get-SPBusinessDataCatalogMetadataObject -BdcObjectType LoBSystem '
  -ServiceContext http://intranet -Name "*" | select Name, SystemType, Entities
The output will look similar to the following:
Name                                       SystemType Entities
----                                       ---------- --------
SharePointDesigner-adve...                   Database {SharePointDesigner-ad...
AdventureWorksLT                             Database {AdventureWorks_Custom...
SharePointDesigner-adve...                   Database {SharePointDesigner-ad...
adventureworksdw                             Database {AdventureWksDW_Employ...
Modifying External System Throttling
External system throttling is enabled by default to prevent denial of service (DoS) attacks. You are most likely to see the effect of this feature if you created no limit filter on the BDC model and the retrieval of data from the external system is taking too long. Each BDC service application can have a number of throttle configurations, and each configuration can be tuned to a throttle type and/or scope, where the five throttle types are as follows:
Items The number of external content type (ECT) instances returned, such as the number of customers or employees
Size The amount of data retrieved by the BDC runtime in bytes
Connections The number of open connections to a database, web service, or .NET assembly
Timeout The time until an open connection is terminated, in milliseconds
The five throttle scopes refer to the external system connection type and include the following:
Not all combinations of throttle types and scopes are defined when you first create a BDC service application. The rules are as follows:
Global Scope, Throttle Type Connections
Database Scope, Throttle Type Items, and Timeout
WebService Scope, Throttle Type Size
WCF Scope, Throttle Type Size, and Timeout
You can retrieve and amend the throttling rules by using the Business Data Windows PowerShell cmdlets, as shown in the following examples, where the variable BDCName is the name of your BDC service application.
$bdcproxy = Get-SPServiceApplicationProxy | where {$_.displayname -eq $BDCname};To display the throttling configuration for a BDC service application, type the following command on one line:
Get-SPBusinessDataCatalogThrottleConfig -ServiceApplication $bdcproxy `
   -Scope Global -ThrottleType Connections;
The output from the command is as follows:
Scope        : Global
ThrottleType : Connections
Enforced     : True
Default      : 200
Max          : 500
The output displays five properties. The three properties that you can amend are:
To disable a throttling rule, type the following command:
Get-SPBusinessDataCatalogThrottleConfig -ServiceApplication $bdcproxy `
   -Scope Global -ThrottleType Connections | Set-SPBusinessDataCatalogThrottleConfig `
   -Enforced:$False;
To modify a throttle rule, type this command:
$dbrule = Get-SPBusinessDataCatalogThrottleConfig -ServiceApplication $bdcproxy `
   -Scope Database -ThrottleType Items;
$dbrule | Set-SPBusinessDataCatalogThrottleConfig -Maximum 2000000 -Default 5000;
Administrating BCS in a Tenant Environment
You can create a tenant environment that can host multiple tenants in SharePoint Foundation and is available for you to create if you are using SharePoint Server, Standard or Enterprise edition, and SharePoint Online. There are four components to a SharePoint 2010 multitenant installation:
Services These applications are partitioned and nonpartitioned.
Feature packs A subscriber can use only those site or web-scoped features defined in the feature pack.
Multitenant admin site Each tenant has its own tenant administration site that allows the owners of the tenant to create sites, create site collections, manage user profiles, and so on. You create this site from the Tenant Farm Administrator site template.
Multitenant member sites All site collections that form part of one tenancy are associated together by a subscription, and so a tenant is also known as a subscriber. The subscription key, also known as the subscription ID, is a GUID used to map features, services, and sites to a tenant, and also to partition service data.
The SharePoint 2010 Central Administration web application does not expose all the tasks needed to create a multitenant environment. You use Windows PowerShell to create the multitenant service application, admin site, subscription ID, feature packs, and association of site collections to a specific subscription. SharePoint provides a number of Windows PowerShell cmdlets to manage site subscriptions. To find more information about these cmdlets, type the following:
Get-Help *spsitesub*
This code outputs:
Name                              Category  Synopsis
----                              --------  --------
New-SPSiteSubscription            Cmdlet    Creates a new site subscription.
Get-SPSiteSubscription            Cmdlet    Returns the site subscription fo...
Remove-SPSiteSubscription         Cmdlet    Removes data stored in a subscri...
Get-SPSiteSubscriptionConfig      Cmdlet    Returns the configuration proper...
Set-SPSiteSubscriptionConfig      Cmdlet    Sets the configuration propertie...
Remove-SPSiteSubscriptionSettings Cmdlet    Removes the settings service dat...
Export-SPSiteSubscriptionSettings Cmdlet    Creates a backup file of site su...
Import-SPSiteSubscriptionSettings Cmdlet    Restores a backup of subscriptio...
New-SPSiteSubscriptionFeaturePack Cmdlet    Creates a new SharePoint Feature...
Get-SPSiteSubscriptionFeaturePack Cmdlet    Retrieves available SharePoint F...
Remove-SPSiteSubscriptionFeatu... Cmdlet    Removes a SharePoint Feature set...
Add-SPSiteSubscriptionFeatureP... Cmdlet    Adds a feature to a SharePoint F...
Remove-SPSiteSubscriptionFeatu... Cmdlet    Removes a feature definition fro...
Remove-SPSiteSubscriptionBusin... Cmdlet    Removes the Business Data Connec...
Export-SPSiteSubscriptionBusin... Cmdlet    Exports all data from the Busine...
Import-SPSiteSubscriptionBusin... Cmdlet    Import-SPSiteSubscriptionBusines...
Clear-SPSiteSubscriptionBusine... Cmdlet    Deletes all data from the Busine...
Set-SPSiteSubscriptionEdiscove... Cmdlet    Sets properties for the eDiscove...
Get-SPSiteSubscriptionEdiscove... Cmdlet    Displays the eDiscovery hub for ...
Get-SPSiteSubscriptionEdiscove... Cmdlet    Displays the search scope for th...
Get-SPSiteSubscriptionMetadata... Cmdlet    Returns the site subscription co...
Remove-SPSiteSubscriptionMetad... Cmdlet    Removes site subscription config...
Set-SPSiteSubscriptionMetadata... Cmdlet    Sets the site subscription confi...
Add-SPSiteSubscriptionProfileC... Cmdlet    Adds a new site subscription to ...
Set-SPSiteSubscriptionProfileC... Cmdlet    Sets the parameters of a site su...
Remove-SPSiteSubscriptionProfi... Cmdlet    Deletes a site subscription from...
To create a tenant environment:
Create an AD account and register it as a managed account for the subscription service application.
Create a web application where all the tenant’s site collections will be created.
Create managed paths for the tenant’s site collections.
Start the SharePoint Foundation Subscription Settings Service on one of the servers in the farm.
Create a Subscription Settings service application.
The last two tasks have to be completed using Windows PowerShell. For each set of tenants, using Windows PowerShell, create the following:
A subscription.
A tenancy administration site in its own site collection.
Feature packs, which you then associate with the subscription (optional).
A partition of a service application (optional).
One or more tenant site collections. You can also create these using the top-level site of the tenant’s administration site collection.
Note
See Also You can find more information about how to create a multitenant environment with SharePoint 2010 at www.harbar.net/articles/sp2010mt1.aspx.
Creating a PartitionMode BDC Service Application
To create a new Business Data Connectivity (BDC) service application in PartitionMode, start a BDC service instance on one server in the farm like any other service application, and then create the BDC service application. You can complete both of these tasks using Windows PowerShell, as shown in the following code:
Get-SPServiceInstance |
where{$_.GetType().Name -eq  "BdcServiceInstance"} | Start-SPServiceInstance'

$BDCName = "BDC SA PartitionMode"
New-SPBusinessDataCatalogServiceApplication -PartitionMode -Name $BDCName
   -ApplicationPool "SharePoint Web Services Default" -DatabaseName "BDC_PartitionedDB"
This command creates a BDC service application and its proxy, and includes the proxy in the default proxy group. If you delete the service application proxy that is created automatically, you must consequently delete the service application as well. Recreating the service application is the only way to create a service application proxy in partition mode.
After provisioning the BCS service application in partition mode, you will no longer be able to manage the service from the SharePoint 2010 Central Administration website—you must navigate to the BCS Management page from the Tenant Administration site. Remember, however, that only the BDC service application set as the default in the proxy group is used by web applications. Therefore, if a BDC service application already exists when you create the PartitionMode BDC service application, although it is added to the default proxy group, it will not be set as the default, and you will get an error when you try to administer it from the Tenant Administration page.
Note
With other service applications, the SharePoint cmdlet to create the service application will not create the service application proxy or add it to the default proxy group. For those service applications, you use either the relevant SharePoint cmdlets or the SharePoint 2010 Central Administration website.
Managing BCS from the Tenant Administration Site
To manage the partition of the BDC service application associated with a tenant, navigate to the Tenant Administration site, and then under System Settings, click Manage Business Data Connectivity, as shown in Figure 3-37. A page similar to Figure 3-15 displays, where you can manage BDC models, external systems, external content types (ECTs), metadata store BDC object permissions, and the configuration and creation of profile pages.
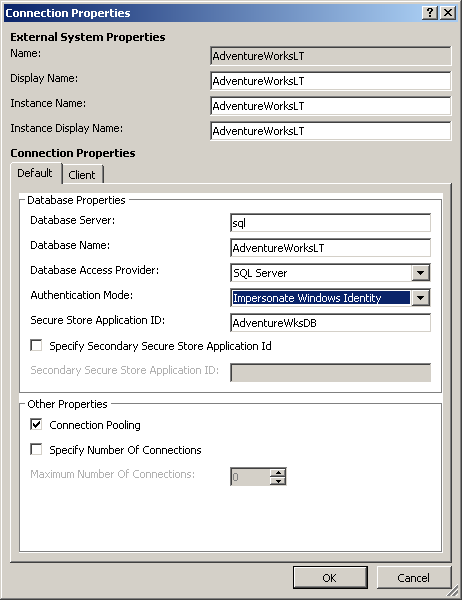
If your SharePoint solution is hosted in a tenant environment, you do not have access to the servers and cannot run the SharePoint cmdlets. If your company is the hosting organization, then you can manage the PartitionMode BDC service application using Windows PowerShell as you would a non-PartitionMode BDC service application, except the service context will be a tenant site collection—either the tenant administrator site collection or the site collection of a member site—and not the URL of a web application. To import a BDC model, you use the following code:
$catalog = Get-SPBusinessDataCatalogMetadataObject -BdcObjectType catalog '
   -ServiceContext http://intranet/tenant/T1admin
Import-SPBusinessDataCatalogModel -Identity $catalog -Path c:adventurewksCust.bdcm;
Summary
The Business Connectivity Services (BCS) connectivity layer is provided by the Business Data Connectivity (BDC) service application, which is a Microsoft SharePoint 2010 service application and can thus take advantage of the service application architecture. A SharePoint 2010 farm can host a number of BDC service applications that can be independently configured by different sets of administrators using the SharePoint 2010 Central Administration website or through Windows PowerShell.
Once you create the BDC service application, you need to complete a number of tasks before the data in the external system can be used:
Create BDC service application administrators.
Import the BDC model that contains the metadata information.
Set BDC metadata store permissions.
Configure profile page creation for the Enterprise edition of SharePoint Server 2010.
Configure the Secure Store Service (SSS) application if you plan to have any of the BDC models imported into the metadata store use this authentication mechanism.
The chapter also discussed external system throttling, which is enabled by default to prevent denial of service (DoS) attacks.