Chapter 4. Defining External System Connections Using SharePoint Designer
In this chapter, you will:
Create and manage external content types using SharePoint Designer
Create and modify data connections
Create and maintain data source operations
Export external content types
Business Connectivity Services (BCS) allows you to hook up external data with SharePoint and Office applications, enabling either professional developers or citizen developers in an organization to quickly develop composite solutions. To connect to the external system, the location of the external system, the protocol to use, and the credentials must be defined. Once connected, you need to define what operations on the data are allowed and the format of the data that will be returned. The operations that can be used on the external data and its format are defined in an external content type (ECT). The definition of the location of the external system together with the ECT is known as the Business Data Connectivity (BDC) model.
ECTs are a new concept in SharePoint 2010 and are the building blocks of BCS, similar to the entity object in SharePoint Server 2007. ECTs refer to external data objects and define the fields, the methods, and what a user can do with the data in SharePoint and Office client applications. Both read and write capabilities are included, along with batch and bulk operation support. You need to define the external system and ECT only once, and then you can use that ECT on many sites across all web applications associated with the BDC service application.
Note
See Also You can find information on BDC service applications and how to associate them with web applications in Chapter 3.
To create the BDC model, ECT, and BDC objects, you have a choice of tools: Microsoft SharePoint Designer 2010, Microsoft Visual Studio 2010, and third-party tools, and you can even use an XML editor, such as XML Notepad 2007, or a regular text editor, such as Notepad. The advantage of using SharePoint Designer is that it provides users with a wizard that, when configured, generates the XML that defines the BDC model, ECT, BDC objects, and operations. The user, however, does not need to learn the BDC XML schema to define the connection details to the external system.
Note
See Also For detailed information about the BDC model XML schema, see Appendix A.
Creating ECTs Using SharePoint Designer
Before you can create an external content type (ECT), you must create a Business Data Connectivity (BDC) service application, and the BDC service application administrator must set edit permissions on the BDC metadata store for users of SharePoint Designer who will be creating ECTs. This is a high level of privileged access to the entire store; therefore, if a SharePoint Designer user is only going to modify an existing ECT, then the BDC service administrator can remove the edit permission on the BDC metadata store and just give the user edit permission on the ECT.
To create an ECT, you need to complete the following tasks:
Identify the external system that contains the data needed by your solution, the business users who will use your solution, and the access those users will need. If you are not familiar with the external system, you will also need to engage the help of the business owner/analyst.
Provide a name, display name, and namespace for the ECT.
Define the external system connection.
Define the operations to create, read, update, and delete (CRUD) content stored in that external system that is needed for your solution, including setting filters and defining the association operation.
Generate profile pages and actions if required.
Save and test the ECT by presenting the data from the external system, using external lists, using external columns in existing lists, and using Business Web Parts or presenting external data from within an Office application.
Note
See Also You can find information about the different methods you can use to present external data in other chapters in Part II of this book.
Liaise with the BDC service application administration to configure the permissions on the ECT so that necessary business users can see content from the external system.
SharePoint Designer provides two pages to configure an ECT: the Summary View and the Operations Design View. You can switch between these two pages using the Summary View and Operations Design View commands in the Views group on the External Content Types ribbon tab. You will use these two pages to create the ECT, its connection to the external system, and the operations that can be used to access the external data in the external system.
Using the ECT Summary View
The Summary View page is divided into a number of areas, which work together with a context-sensitive ribbon tab. Before you can use the ECT Summary View, you need to start to create an ECT. Then you can use the ECT Summary View to define the ECT’s name, display name, and namespace, and configure it for use with Office applications.
Create an ECT
To create an ECT, follow these steps:
Open SharePoint Designer, and then open a SharePoint site in the web application associated with the BDC service application where you have edit permissions on the BDC metadata store.
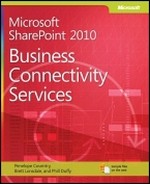
In the Navigation pane, click External Content Types to open the External Content Types gallery, as shown in Figure 4-1. The ECT gallery lists ECTs you have permission to see. The gallery may be empty if no ECTs have been created or if you do not have permission to view any. On the context-sensitive ribbon tab for the ECT gallery, you can create new ECTs and external lists, edit or delete an ECT, and export one or more ECTs in a BDC model.
Figure 4-1. The ECT gallery in SharePoint Designer is empty when no ECTs have been created or you do not have permission to view any.When the ECT gallery is empty, the only command active on the External Content Type ribbon tab is External Content Type in the New group—that is, you can only create new ECTs. Once an ECT is defined and is displayed in the ECT gallery, you can then use the ribbon to create external lists from an ECT, edit or delete an ECT, or export the BDC model that contains one or more ECTs. To select more than one ECT, select one ECT and then hold down the Shift or Ctrl key to select other ECTs, as you would when selecting multiple files in Windows Explorer.
On the External Content Types ribbon tab, click External Content Type in the New group. The Summary View of the ECT is displayed with an asterisk on the workspace label, as shown in Figure 4-2.
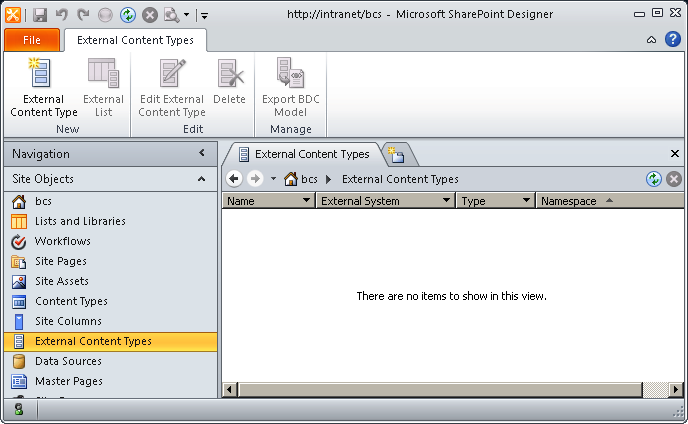
The asterisk identifies that you have not saved the ECT to the server. You have several ways of saving an ECT back to the BDC metadata store:
Click the floppy disk icon in the Quick Access bar.
Right-click the ECT workspace label where the asterisk is displayed, and click Save.
Use the keystroke Ctrl+S.
Areas on the Summary View Page
The Summary View page consists of five areas:
External Content Type Information is where you enter key information about the ECT, such as the name, display name, namespace, version, and identifiers; select an Office item type; enable Office Sync for external lists; and configure the connection options to the external system.
External Content Type Operations allows you to manage the operations for the ECT.
Permissions allows you to view the permissions settings for the ECT.
External Lists allows you to view and navigate to external lists using the ECT.
Fields displays the fields that are defined for the operations for the ECT.
External Content Type Information area Before configuring the connection details to the external system, you should name the ECT, select whether the external content is compatible for any Office format and, if you are using the Enterprise edition of SharePoint Server, choose whether users are allowed to take the content offline. You can set these properties in the External Content Type Information area:
Name Enter the name of the ECT, such as AdventureWorks_Customers or AdventureWorks_Sales. The ECT name is usually a short but meaningful name that preferably does not contain spaces. You cannot save an ECT until it has a name. Once you have saved the ECT, you cannot change the ECT name in SharePoint Designer; however, you can change the ECT display name. If you do name the ECT incorrectly, you can export the ECT as part of a BDC model, alter the XML in the file (for example, in Visual Studio), and then reimport the BDC model into the BDC metadata store. This will create a new ECT. You can then remove the misspelled ECT, but note that this will impact any external lists you have created from the misspelled ECT. An ECT is identified internally by a unique reference number, known as a globally unique identifier (GUID), which is generated using the name of the ECT and its namespace.
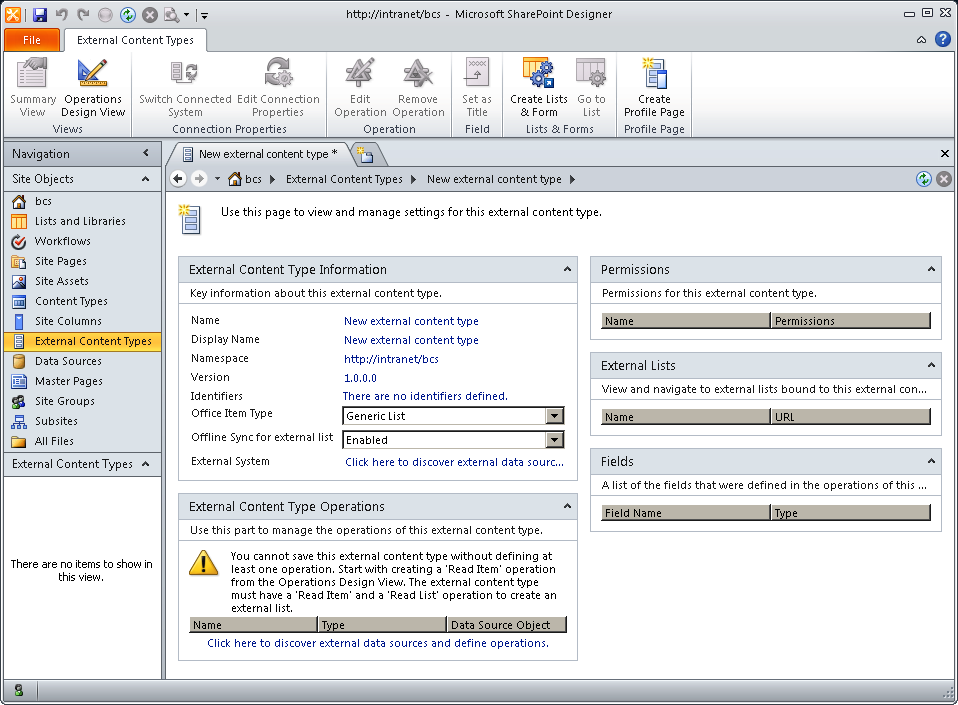
Display Name This is the name displayed in the External Content Type Picker dialog box, as shown in Figure 4-3. If you do not enter a display name, then the ECT name is used as the display name. You should enter a name that your users can relate to, as the External Content Type Picker dialog box is used when creating external lists and external columns and configuring Business Web Parts. It is stored in the BDC metadata store as a Unicode string with a maximum length of 255 characters.
Namespace By default, the namespace is configured as the URL of the website where you are creating the ECT. The External Content Types gallery in SharePoint Designer displays ECTs grouped by the name of their namespace, and you should change the namespace to a name that represents the business purpose of the external data—for example, http://AdventureWorksSalesInvoicing for all ECTs that relate to sales data for a company, no matter which data source they come from, or for all ECTs that you create from the same data source (for example, all ECTs based on the AdventureWorks database). As the namespace is a URL, it should not include spaces or characters such as $ & + , / : ; = ? @ “ < > # % { } | ~ ^ [ ] ’.
Version This string field has the format 1.0.0.0. SharePoint Designer will automatically increment the fourth digit each time you save the ECT, but if you make a major update, such as changing the external content source for the ECT, then the second digit is incremented. When either of the first two digits is changed, it is considered a breaking change, and any external lists built previously will not work. Specifically, the pages that were created to display or modify the contents from the external system will not work, such as views or forms, whether they are ASPX pages or InfoPath forms.
Multiple versions of an ECT can be stored in the metadata store, but only the active version is used. When SharePoint Designer creates a new version, it automatically makes the ECT version that it is creating the active version, and it deletes previous versions of the ECT.
When you use the SharePoint 2010 Central Administration website to import a BDC model that defines a new version of an ECT, the new version is activated. The version number is not automatically incremented, however, when you use the SharePoint 2010 Central Administration website, previous versions of the BDC model will be deleted. To view all versions for an ECT, use the following Windows PowerShell code:
Get-SPBusinessDataCatalogMetadataObject -BdcObjectType Entity  '
   -ServiceContext http://intranet  '
   -Name AdventureWorks_customers  -Namespace http://adventureworkscustomers;
To delete the current version, first deactivate it, activate the previous version, and then delete the version you wish to remove, as shown in the following code, where the variable $ecta references the ECT you wish to activate, and the variable $ectd: references the ECT you wish to delete.
$exta = Get-SPBusinessDataCatalogMetadataObject -BdcObjectType Entity  '
   -ServiceContext http://intranet  '
   -Name AdventureWorks_customers -Namespace http://adventureworkscustomers | '
   where {$_.version -eq "1.6.0.0"};

$extd = Get-SPBusinessDataCatalogMetadataObject -BdcObjectType Entity  '
   -ServiceContext http://intranet  '
   -Name AdventureWorks_customers -Namespace http://adventureworkscustomers | '
   where {$_.version -eq "1.6.1.0"};

$ectd.Deactivate();
$ecta.Activate();
$ectd.Delete();
Note
If an ECT has no active versions, then the ECT will not be visible when you use the SharePoint 2010 Central Administration website. If no ECTs are listed, it does not mean that there are no ECTs—just that there are no active ECTs. In SharePoint Designer, if an ECT exists but there is no active version, then the ECT displays in the ECT gallery, but when you click the ECT in the workspace, a message appears stating that SharePoint Designer cannot display the item.
To delete all but one version, use the following code:
Get-SPBusinessDataCatalogMetadataObject -BdcObjectType Entity  '
   -ServiceContext http://intranet  '
   -Name AdventureWorks_customers  -Namespace http://adventureworkscustomers |
   foreach { if ($_.version -ne "16.0.0.0") {
      $_.delete();
   }};
When you have deleted all versions of an ECT, you should ensure that the BDC metadata store does not contain any BDC models that are no longer needed. You can delete BDC models using the SharePoint 2010 Central Administration website or Windows PowerShell. Remember, an ECT is defined by its name and namespace, so different versions of the same ECT could have been defined in different BDC models. Also, a BDC model can contain more than one ECT, so take care when deleting BDC models.
Identifiers This column or field name contains a unique identifier for each item of data returned from the external system. When you use a database as your external source, this field is usually designated as the primary key. The column could contain a business unique number, such as a Social Security number, or it could be a number that the external system automatically generates, such as a GUID when using Microsoft SQL Server. You can choose the identifier when you create operations to access the external source. You create operations in the Operations Design View. When you first create an ECT, you have not selected either the external system or operations, therefore no identifier is set, and the message “There are no identifiers defined” appears.
Office Item Type If you want to display external data in an Office application, you can choose one of five options from the drop-down list: Generic List or one of the four Office item types (Appointment, Contact, Task, or Post). The Office item types are aimed at Microsoft Outlook 2010.
When you connect the external list to Outlook, the external content can be shown in the contacts, calendar, mail, or task pane, as well as in the SharePoint External Lists folder. If one of the external content fields is mapped to the Office email property, you can send an email to a person whose details are stored in the external system.
Note
See Also You can find more information on connecting external data with Office applications in Chapter 7, and Chapter 11.
When an Office item type is selected, you will need to map a field or fields from the external data source to an Office property when you create the Read Item operation. Each Office item type has mandatory properties that you must map to a data source field, as shown in Table 4-1. Also, you can choose mappings only for those fields that have a compatible Office properties data type, shown in parentheses in the table.
Offline Sync for external list Use this option if you want to connect any external lists created from the ECT to either Outlook or Microsoft SharePoint Workspace 2010. The Sync To SharePoint Workspace and Connect To Outlook commands can be found when displaying an external list in the Connect & Export group on the List ribbon tab. If you do not see these commands, check this setting within SharePoint Designer. The logic to take the data offline is provided by a Visual Studio Tools for Office (VSTO) ClickOnce deployment package, which is provided only in the Enterprise edition of SharePoint Server. With SharePoint Foundation and some Office 365 plans, you cannot take external list data offline in Outlook or SharePoint Workspace.
External System Use this option to define the external system authorization details and the external system details, such as the database server name, database name, and database access provider, for both SharePoint and when the external data is accessed using an Office application. When an ECT is first created, the hyperlink Click Here to Discover External Data Sources and Define Operations is displayed. Click this hyperlink to display the operations design view.
Permission area and permission implication for SharePoint Designer This area on the Summary View displays the permission settings for the ECT. These settings are retrieved from the BDC metadata store. You cannot set the ECT permissions from SharePoint Designer—you need to use the SharePoint 2010 Central Administration website, Windows PowerShell, or a third-party tool or develop your own code against the BDC Administration application programming interface (API).
Note
See Also You can find more information about how to configure permissions using the SharePoint 2010 Central Administration website in Chapter 3.
Each object stored in the BDC metadata store has an access control list (ACL) that specifies which users and groups have permissions on the objects. Out of the 13 BDC metadata objects, only the external system, ECTs, and the BDC model permissions can be set using the SharePoint 2010 Central Administration website. A professional developer can set the permissions using code for ECT operations and instances of those operations that specify how to use the operation by using a specific set of default values. Only five BDC metadata objects can have their own controllable ACLs: the external system, BDC model, ECTs, operations, and operation instances. These objects are referred to as individually securable metadata objects.
All other objects obtain their permissions from their parent object. For example, associations, actions, and identifiers cannot be assigned permissions directly but take their permissions from their parent ECT. However, by default, permissions do not propagate from one individually securable metadata object to another, so an ECT operation does not inherit its permissions from its ECT, unless the propagate check box is selected. However, if permissions are propagated from an ECT, all operations and operation instances for that ECT receive the new permissions, replacing the permissions originally set on those individually securable metadata objects.
You can set the following four permissions on the BDC metadata store and BDC metadata objects:
Edit
Execute
Selectable In Clients
Set Permissions
Not all permissions are applicable to all objects. For example, enabling the Execute and Selectable In Clients with the BDC metadata store or the external system has no effect. However, setting these permissions at the BDC metadata store or external system level and selecting the propagation check box can be useful when you do not want to individually configure ECTs or operations for these two permissions. There isn’t Edit permission on the ECT, but setting the Edit permission on the ECT is useful, so users of SharePoint Designer can create and modify objects that the ECT contains, such as operations, actions, and associations.
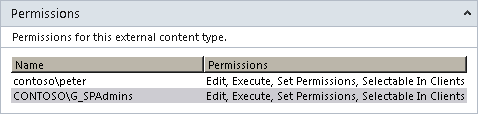
When you create an ECT with SharePoint Designer, you need to define an external system, which you can do using SharePoint Designer. When you save your newly created ECT, a BDC model is created. To create a definition for an external system, a BDC model, and an ECT, you must have Edit permissions on the BDC metadata store. However, the ECT will inherit permission settings only from the BDC metadata store, if the permission settings were configured to propagate. It is possible that you can create an ECT, and an external list from that ECT, but you may not be able to view data that the external list should display. Once an ECT is created, you can check the information in the Permissions area to see if the ECT inherited permissions from the BDC metadata store, as shown in Figure 4-4. If the Permissions area is empty or you do not have Edit, Execute, and Selectable In Clients permissions, you should contact your BCS administrator and ask them to set the permissions for you and for users who should access the external data.
To work with external data in SharePoint Designer and then test your ECT by displaying content from the external system in external lists or Business Web Parts, you will need the permissions shown in Table 4-2.
Permission | Permission to be set on BDC metadata objects | |
Create a new or import a BDC models or create an external system | Edit | BDC metadata store |
Edit and use an external system, including making the external system visible to SharePoint Designer on the Operations Design View | Edit | External system |
Edit BDC models | Edit | BDC model |
Export a BDC model | Edit | BDC model and all external systems in the model |
Create a new ECT | Edit | External system |
Use the ECT picker (for example, to create external lists and external columns, or when using Business Web Parts) | Selectable In Clients | ECT |
Edit an operation | Edit | Operation |
Execute operations or operation instances that allow you to complete CRUD operations on the external data | Execute | Operation and method instances of the ECT |
Microsoft recommends that users of SharePoint Designer not be given the Set Permissions permission. Also, to help ensure a secure solution, SharePoint Designer should be used to create ECTs in a test environment in which Edit permissions can be assigned freely. When you deploy the tested solution to a production environment, you should remove the Edit permissions to help protect the integrity of the external data. In a development environment, give users who build ECTs with SharePoint Designer all four permissions, and give to other users all but the Set Permissions permission on the metadata store, and propagate permissions to all BDC models, external systems, and ECTs in the BDC metadata store.
External Lists area This area lists external lists that were created from the ECT. Only the external lists created in the site opened in SharePoint Designer appear in this area; external lists created on other sites are not displayed. If one external list appears in this area, then the Create Lists & Forms command is active on the Externals Contents Ribbon tab in the Lists & Forms group.
When you select an external list in this area, the Go to List command in the Lists & Forms group becomes active, and when clicked, this command opens a new SharePoint Designer workspace tab to display the list settings page for the external list.
External Content Types Operations area You can use this area together with the Edit Operation and Remove Operation commands in the ribbon to manage the operations of the ECT. The ribbon commands are not active unless you click an operation, as shown in Figure 4-5.

With a newly created ECT, no operations will exist, and you will need to use the Operations Design View to create new operations.
Fields area This area displays the fields that were defined in the operations for the ECT.
Using the Operations Design View
Now that you have created an ECT and given it a display name and a namespace, you will want to select the external data source if previously defined or define a new content source, which you can do on the Operations Design View. You can display the Operations Design View in one of two ways:
The Operations Design View, as shown in Figure 4-6, consists of an area where you can add, remove, and explore data connections, and a second area where you can manage operations for the ECT.
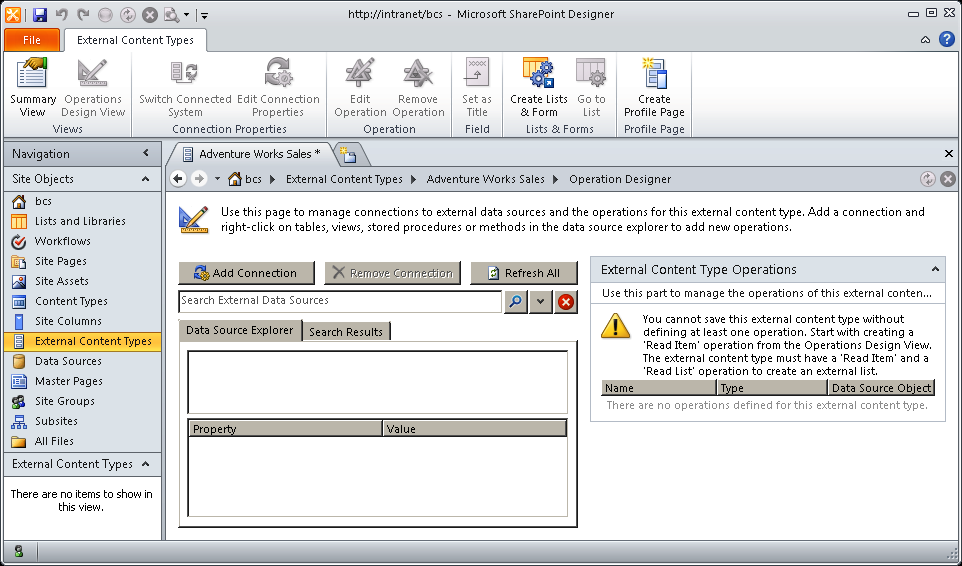
In a new installation of SharePoint, whether it is SharePoint Server, SharePoint Foundation, or Office 365, the Operations Design View will not list any data connection for you to select. The next task is to create a data connection.
Using the Summary View and Operations Design View Ribbon Tabs
The Summary View and the Operations Design View share the same context-sensitive ribbon tab named External Content Types. It consists of six groups, and the commands in each group will be active depending on the components selected within areas of the page.
Views
Use the two commands in this ribbon group to switch between the Summary View and the Operations Design View.
Connection Properties
The two commands in this group, Switch Connect System and Edit Connection Properties, can only be active on the Summary View. These commands allow you to reassign the ECT to another compatible external system or to edit the connection properties to the external system.
Operation
The two commands in this group are always active on the Operations Design View, but they will be active on the Summary View only if you select an operation in the External Content Type Operations area.
Field
This group contains only one command, Set as Title, which is active only on the Summary View and when a field is selected in the Field area. All SharePoint lists and libraries share a common column: the Title column. During a search, when an item or a file meets the search criteria, the contents of the Title column are displayed. Although it is not mandatory that you map an ECT field to the SharePoint Title property, if you plan to configure SharePoint so that it indexes the external content, then you should map a field in the Field area to the Title property.
Lists & Forms
This ribbon group contains two commands.
The Go to List command is active only on the Summary View and when an external list is selected in the External Lists area.
The Create Lists & Form command is active if there is at least one external list created for the ECT on the site that is opened in SharePoint Designer. When you click this command, the Create List and Form dialog box opens, as shown in Figure 4-7. Here you can either create a new form or create a new external list.
Note
See Also You can find information on creating external lists in Chapter 5.
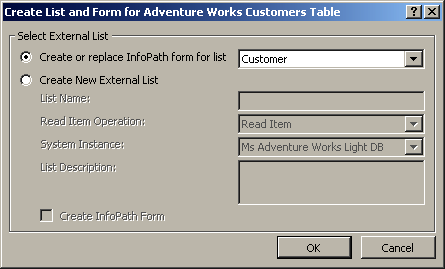
When you select the Create or Replace InfoPath Form for List option, you can select any external list that is created on the site from the ECT. When an external list is created, a number of pages are created: one page to display the items returned from the external content, and three form ASPX pages depending on the operations defined for the ECT that allow you to create a new item, display all the fields for one item, or edit the fields for one item. These ASPX pages, like other SharePoint lists, are created under the list and are named DispForm.aspx, EditForm.aspx, and NewForm.aspx. They contain the XSLT List Form Web Part.
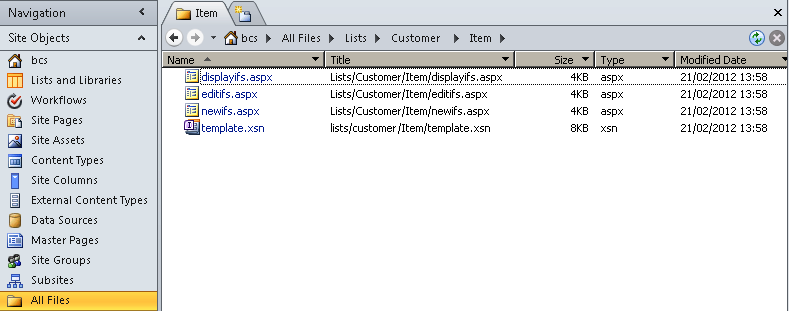
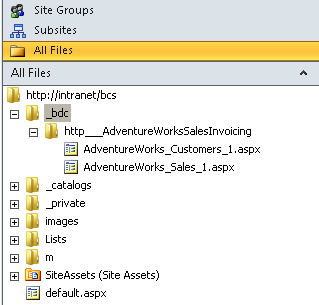
Using the Create List and Form dialog box, you can create InfoPath-equivalent forms for the three ASPX form pages. Three ASPX pages (displayifs.aspx, editifs.aspx, and newifs.aspx) are created, and each contains an InfoPath Web Part to display the newly created InfoPath form. The InfoPath form, named template.xsn, and the three ASPX pages that host the form are created in the Item folder under the list. You will find no reference to the InfoPath form on the external list settings page. You have to use the All Files option in the Navigation pane in SharePoint Designer to navigate to the Item folder, as shown in Figure 4-8.
Profile Page
In this ribbon group, you will see one command: Create Profile Page. This command is applicable only in the Enterprise edition of SharePoint Server. Prior to using the Create Profile Page option, the BDC service application administrator must configure a SharePoint site where the profile pages will be created. Microsoft recommends that you use a single dedicated SharePoint site to host the profile pages for all your ECTs. You also need to ensure that the permissions on the site are set up correctly. Users who will use the profile page to display all the fields associated with an ECT need read-only permissions. Users who create profile pages will need to be mapped to the Design permission level, which includes the Add and Customize Pages permission.
Note
See Also For information on defining the SharePoint site to host profile pages, see Chapter 3.
When you click Create Profile Page, SharePoint automatically creates a page in the designated hosted site, under a subfolder of the _bdc folder. The subfolder name takes its name from the ECT namespace, such as http__AdventureWorksSalesInvoicing. The page is named <ECT name>_n.aspx—for example, AdventureWorks_Sales_1.aspx, as shown in Figure 4-9.
Note
When you delete ECTs, their respective profile pages are not deleted. Using SharePoint Designer and the All Files object in the Navigation pane, you can delete profile pages that are no longer needed.
At the same time that SharePoint creates the profile page, it also creates an external data action named View Profile. This external action is the default action for the ECT, so when a user clicks an external data item, for example, in a list with an external column, the list item menu, also known by developers as the edit control block (ECB), displays at least one item: the link to the default action, View Profile, as shown in Figure 4-10.

Note
See Also You can find more information on external actions in Chapter 5.
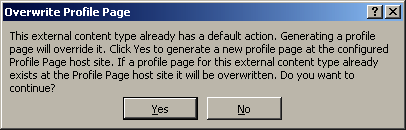
You should define all the operations your solution needs, including filters and the association operation, and save the ECT before you create a profile page. Also, if you click Create Profile Page a second time, an Overwrite Profile Page dialog box opens, as shown in Figure 4-11. This dialog box states that the ECT already has a default action at the profile page host site and asks if you want to overwrite it.
The profile page uses two Business Data Web Parts, Business Data Item Builder and Business Data Details, which are available only in the Enterprise edition of SharePoint Server 2010 and in the Office 365 E3 and E4 plans.
You can also have SharePoint automatically create a profile page for an ECT using the SharePoint 2010 Central Administration website. The ribbon on the Central Administration website is trimmed to not display this option on a SharePoint Foundation installation. However, SharePoint Designer will display the command on whatever version of SharePoint is installed.
On a SharePoint Foundation installation, when you click the Create Profile Page ribbon command, a Microsoft SharePoint Designer dialog box opens that states the server could not complete your request, but it does not provide any details as to why the request could not be completed. A second dialog box then opens that states the expected changes to the ECT could not happen and you should create the profile page again! Ignore these messages. SharePoint can’t automatically create profile pages using SharePoint Foundation 2010 or on most Office 365 plans. You can manually create a profile page for an ECT using the Data Form Web Part and BDC actions.
Creating and Modifying Data Connections
Out of the box, SharePoint provides a number of connectors that the Business Data Connectivity (BDC) server runtime can use to connect to the external system. These connectors define the types of data sources that an external content type (ECT) can connect to:
Databases
Cloud-based services
Windows Communication Foundation (WCF) endpoints
XML web services
.NET assembly that can gather data from multiple sources
Custom external systems that have nonstatic interfaces that change dynamically
On the Operations Design View, click Add Connection to display the External Data Source Type Selection dialog box, as shown in Figure 4-12.
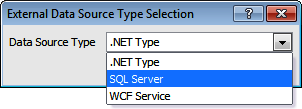
In Figure 4-12, notice how SharePoint Designer can only define external systems that use the data source types SQL Server, .NET Type, and WCF Service.
Defining a SQL Server Database Connection
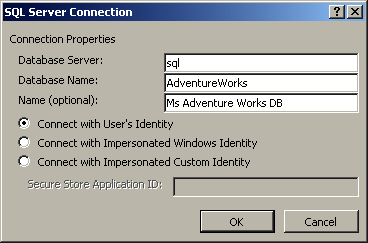
When you select SQL Server as your data source type, the SQL Server Connection dialog box opens, as shown in Figure 4-13. The SQL Server data source type is the easiest of the three data source types to configure in SharePoint Designer.
Note
You can use the out-of-the-box database connector to connect to databases stored in SQL Server, Oracle, MySQL, or any other database system that uses the ODBC connector. However, SharePoint Designer generates only the necessary methods to connect to an SQL database. You will need to create these ECTs by exporting a SQL Server ECT from SharePoint Designer and amending it, or using Visual Studio or a third-party tool.
In the SQL Server Connection dialog box, type the name of the SQL Server, the name of the database (such as AdventureWorksLT or AdventureWorks), and a display name, labeled as optional in the dialog box. The display name appears in the ECT picker that is used by site and list owners and users who create dashboards using the Business Data Web Parts.
Note
This book uses the Microsoft AdventureWorksLT or AdventureWorks database when creating SQL Server ECTs. These SQL Server ECTs are used in subsequent chapters to create external lists, external columns, and dashboards using Business Data Web Parts. If you want to create ECTs exactly as described in this chapter, you can download these databases from http://msftdbprodsamples.codeplex.com.
Authentication
Select the authentication method you are going to use to connect to the SQL Server. SharePoint Designer will use these credentials to directly connect to the external system. It will not go via the BDC service application on the server, as you cannot save the ECT to the BDC metadata store until at least one operation—the Read Item operation—is created, and the SharePoint Server cannot access the external data store until the ECT is in the metadata store. You can later change these settings to suit your authentication needs for the external system when the ECT is stored in the BDC metadata store.
Of the four authentication methods detailed in Chapter 3, the SQL Connection dialog box only allows you to select the user’s identity, also known as PassThrough, Impersonated Windows, and Custom identities. Later, when you configure the credentials that the BDC model should use, you will be able to select the BDC identity known as RevertToSelf. However, remember that this authentication method is disabled by default, and if you want to use it, you need to use Windows PowerShell to enable it.
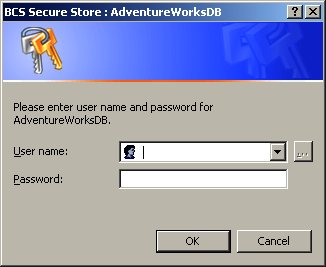
If you do choose one of the impersonation authentication methods at this point, then you need to supply the SSS Target Application ID for the external system. As SharePoint Designer is going to connect directly to the external system, when the impersonation methods are selected, a Connection Validation dialog box appears that states Wait While Your Connection Is Being Validated, followed by a BCS Secure Store dialog box, as shown in Figure 4-14.
Data Source Explorer
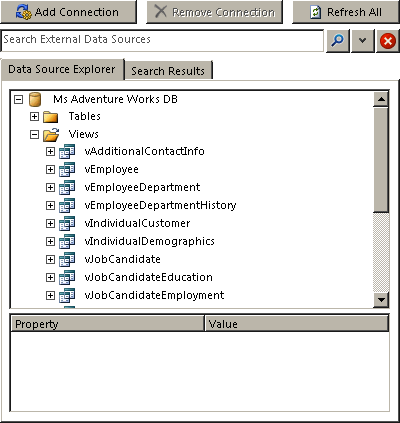
Once your credentials are authenticated by the external system, the external system will inform SharePoint Designer about the tables you are authorized to access, including views and stored procedures. SharePoint Designer will then display this information in the Data Source Explorer, as shown in Figure 4-15. When you select a stored procedure that requires input or output values, the name of the property and the property type are displayed in the bottom text box.
Note
Once you add a connection in SharePoint Designer, on the View External Systems page in the SharePoint 2010 Central Administration website, you will see listed an external system named SharePointDesigner-<Connection Name>-<User who created connection>-<GUID> (for example, SharePointDesigner-Ms Adventure Works DB-peter-44418237-5d92-462x-9d58-ab283793de24). This external system is not connected to any BDC models or ECTs that you subsequently create.
Defining a WCF Service Connection
When you select Windows Communication Foundation (WCF) Service as your data source type, the WCF Connection dialog box opens, as shown in Figure 4-16. You can use this data source to connect to WCF services and XML web services, also known as SOAP services. WCF services usually end with an .svc extension, and XML web services, if created using ASP.NET, end with an .asmx extension. Microsoft has provided a number of services for SharePoint with .svc and .asmx extensions, but none of them are BCS compatible.
Note
See Also You can find information on creating a BCS-compatible WCF service in Chapter 12.
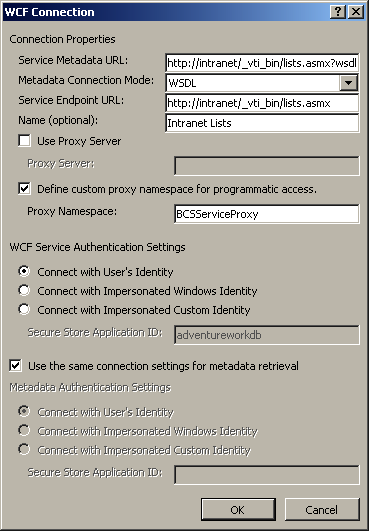
To complete the connection definition, supply the following information:
Service Metadata URL This information allows SharePoint Designer to receive the metadata/schema for the service so that the Data Source Explorer can be populated with web methods. You can then use these methods to create the ECT operations. For an XML web service ?wsdl is appended to the URL, and for a WCF service /mex is appended to the URL.
Metadata Connection Mode You have the option of using either WSDL or MEX. Select WSDL if your data source uses XML web services; select MEX if your data source uses WCF.
Service Endpoint URL SharePoint will use this URL to connect to the data source when displaying an external list, using an external column, or displaying data in a Business Data Web Part.
WCF Authentication Settings These options are the same as those you see when creating an SQL data connection.
Although doing so is optional, you should provide a name for the service, as this name appears in the ECT picker. You may also need to define a proxy for SharePoint to access the data source. This information will be provided by your developer if the WCF service is developed in-house, or in documentation provided by a third party.
Defining a .NET Assembly Connection
When you select .NET Type as your data source type, the .NET Type Selection dialog box opens, as shown in Figure 4-17. You can only select .NET connectors that are already deployed to the SharePoint server.
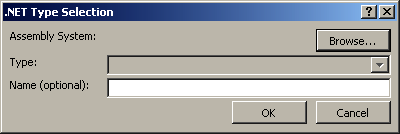
.NET assembly connectors are one of two types of BCS connectors that can be created with Visual Studio; the other is a custom connector. .NET connectors are typically developed internally to an organization to a particular instance of an external system, such as your own Exchange system that has all your organization’s configurations and settings. This connector gives you complete control over the operations on the external system with the code you write.
Custom connectors are typically developed by third-party companies so that the purchasers of the third-party solution can integrate the solution with their SharePoint installation. For example, a third party may develop a custom connector that connects to any Exchange system.
Modifying a Data Connection
Once you have created a connection, the next step is to create one or more data source operations, and then you can configure the data connection you would like SharePoint or an Office client to use to connect to an external data source. Switch to the Summary View by using the command on the External Content Types ribbon tab in the Views group. You can display the Connection Properties dialog box in one of the following two ways:
On the External Content Types ribbon tab, in the Connection Properties group, click Edit Connection Properties.
In the ECT workspace, in the External Content Type Information area to the right of External System, click the hyperlink that has the name of your data source. If you provided the optional name—display name—then that will be the name used for the hyperlink.
The Connection Properties dialog box, shown in Figure 4-18, allows you to configure the connection details for SharePoint (the Default tab) and for Office client applications (the Client tab).
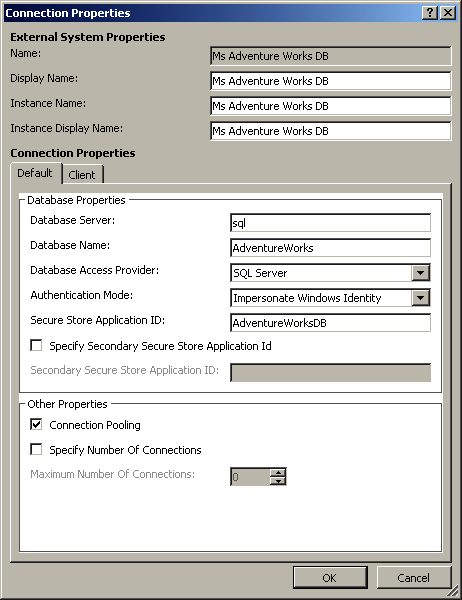
The Connection Properties dialog box for the WCF services provides different properties to an SQL connection as well as additional properties that are not present when you first add a data connection. For example, you can select whether the web service supports claims authentication.
Creating and Maintaining Data Source Operations
Once you have defined the external system authorization and connection details, you can define the ECT’s CRUD operations that you want to execute on the external data source. SharePoint Designer provides you with an operations wizard to create the different access methods you want for your solution. The operations wizard consists of three pages:
Operation Properties On this page, you enter the operation name, operation display name, and operation type. When you create operations for a database external data source, you have an option to create all operations by running the operations wizard once. In this scenario, the operation properties are automatically generated and the operation names will be Create, Read Item, Update, Delete, and Read List, and the operation display name will be of the format <ECT Name><Operation Name> (for example, AdventureWorks_Customers Read Item). When you create an external list from an ECT, a default view is created using the operation display name.
Parameters On this page, you can select those fields known as elements you use in your solution. The Properties section displays properties you can modify for each data source element, including the identifier name, the field name, and the name of the field when it is displayed in the browser. You must select at least one field that will be shown in the external item picker control.
Filter Parameters Use this page to optimize the amount of data returned from the external system.
To start the operations wizard and create the necessary operations, follow these steps:
On the Operations Design View, in the Data Source Explorer, expand the appropriate data source node by clicking the plus sign (+) to the right of the data source name, such as Ms Adventure Works DB, and then expand Tables, Views, or Routines. In this example, you are creating operations on a view.
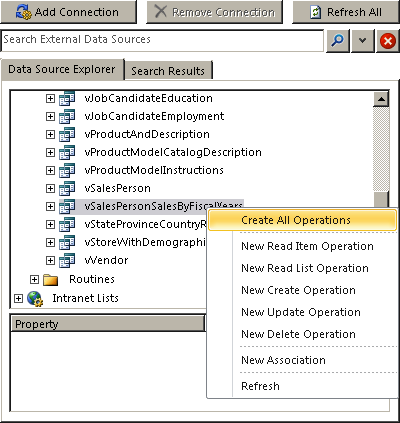
Right-click the view for which you want to create a BDC model, such as vSalesPersonSalesByFiscalYears, and then click the operation for the methods you want to create.
Depending on the methods exposed by the external system and the data source, you can create individual operations: Read Item, Read List, Create, Update, and Delete. For a database data source, you can create all operations, as shown in Figure 4-19.
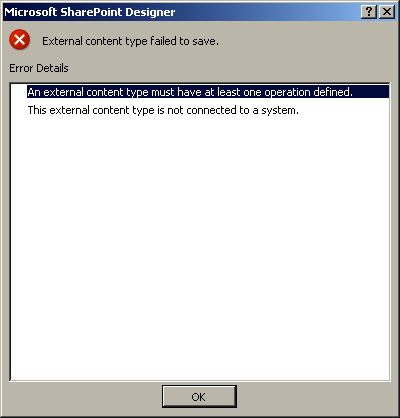
To save the ECT, you must create at least one operation: Read Item. If you want to use the ECT to create an external list, then you need two operations: Read Item and Read List. These operations allow users to easily view the content from the external data source but not update, modify, or delete the data. The ECT is not connected to the data source until one operation is defined. If you try and save an ECT without creating an operation, an error dialog box opens, as shown in Figure 4-20.
When you choose to create one or all operations, the three-page operations wizard opens, as shown in Figure 4-21. Each page contains a section at the bottom that displays issues, warnings, and errors as you configure the operations.
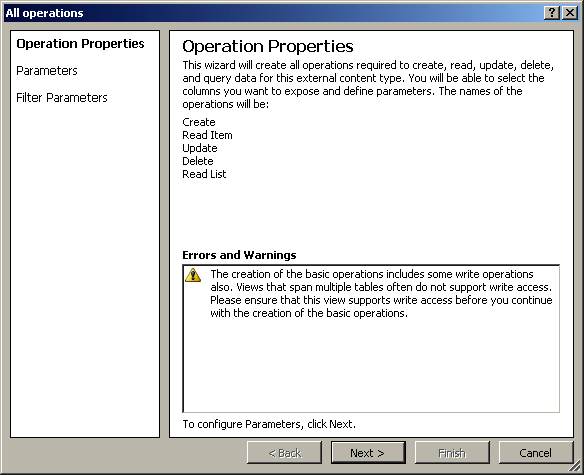
The three pages of the operations wizard are as follows:
Operation Properties When you create one operation, you can use this page to set the operation name and operation display name. If you choose all operations, then the operation properties are automatically generated, and this page is for information only. The operation names will be the name of the operation, such as Create, Read Item, Update, Delete, and Read List, and the operation display name will be used when views and forms are created for external lists.
Parameters Use this page to select those fields known as elements that you want to use in your SharePoint solution. You can modify each data source element, including the identifier name, the field name, and the name of the field when it is displayed in the browser.
Filter Parameters Use this page to add your own throttling conditions to your solution, which will optimize the time it takes to return the data from the external system. Remember, external content is not saved in the BCS database; rather, it is retrieved by the BDC server runtime when needed.
Once you have configured the operations for the data source, you have created a BDC model, and when you click the Save command, the BDC model will be stored in the BDC metadata store.
Defining Parameters for an Operation
The second page of the operations wizard allows you to map fields from the data source to BCS-related properties. Most options on this page of the wizard are self-explanatory, but a few need further clarification. By selecting the appropriate BCS property on this page, you make it easy for your users when working with data external to SharePoint.
Identifier
You must select at least one field that should be used as an identifier (primary key) that uniquely identifies an item from the data source. In the left box under Data Source Elements, select the field you want to use as the identifier, and then in the right box under Properties, select Map to Identifier, as shown in Figure 4-22.
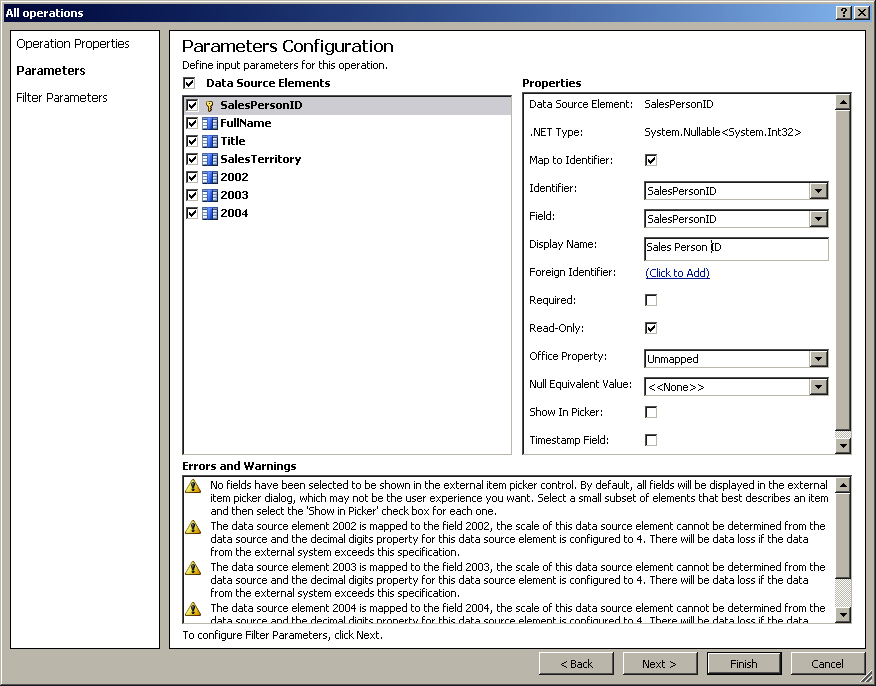
Show In Picker
By default, all fields will be shown in the external data item picker when list owner adds an external data column to a list or library. If the table, view, or routine returns a large number of fields, displaying them all in the external item picker will confuse users. Therefore, it is best to select a small set of elements that best describes an item. For the vSalesPersonSalesByFiscalYears view, for example, you might want to select FullName, Title, and SalesTerritory to show in the data item picker.
Office Property
If you selected an Office item type on the Summary View, you will use this page to map the external content data fields to Office properties. For example, say you are creating an ECT for the Customer table in the AdventureWorksLT database. You then create an external list from that ECT and want to connect it to Outlook, so each customer in the Customers table is recognized by Outlook as a contact, and you can use a customer’s email address when you want to send a message to that person without having to copy all the customers from the AdventureWorksLT database.
First, create an ECT with the name AdventureWorks_Customers, and create all operations on the Customers table. A Contact Office item type must have a data source field mapped to either the Last-Name or FullName Office property. When the second page of the operations wizard displays, in the bottom Errors and Warning box an error message is displayed stating that this is a requirement.
To map data source fields to an Office property, under Data Source Elements select Last Name, ensuring you have not cleared the check box, and then under Properties in the Office Property list select Last Name, as shown in Figure 4-23.
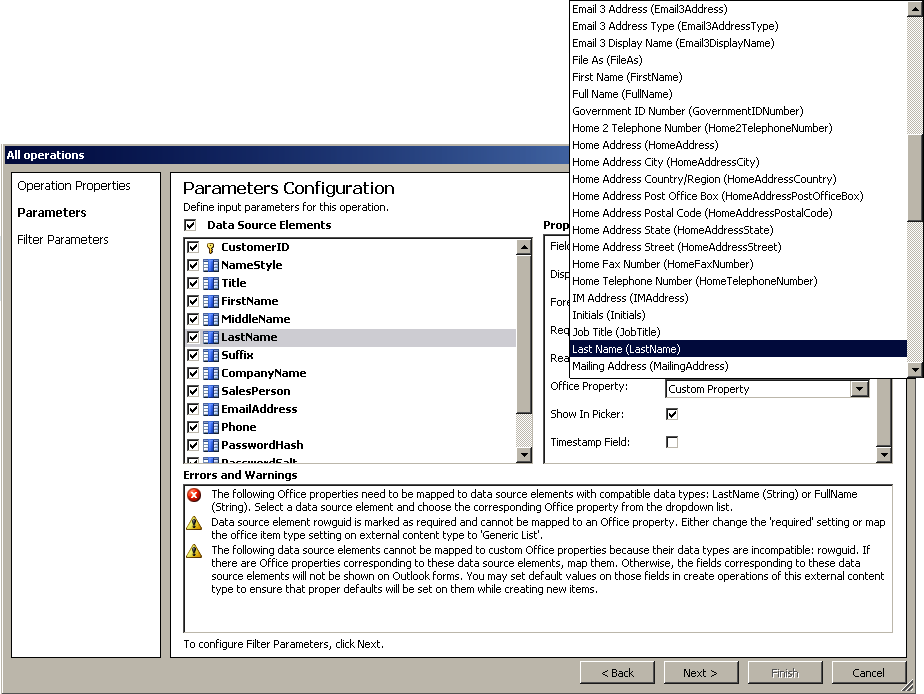
Repeat the previous step to map the following data resource element to the matching Office properties in Table 4-3.
The Office mapping form is part of the Read Item operation, so if you wish to modify these settings once an ECT is created, modify the return parameter properties of the Read Item operation. You can also change the Office item type on the summary page once an ECT is created.
Understanding Filters
The filter types available depend on the operation. For the Read List operation in SharePoint Designer, the filters are Comparison, Limit, Page Number, Timestamp, and Wildcard, as shown in Table 4-4. The value you specify for any of these filter types is passed to the external system, and external data items are returned if they meet the criteria. You can achieve the same effect by using the Filter section when configuring views on the external list, but defining an external data filter reduces network traffic and workload on the SharePoint servers.
Note
See Also When creating your ECT using Notepad, Visual Studio, or a third-party tool, more BCS filters are available, as described in the MSDN article “Types of Filters Supported by the Business Data Connectivity Service,” at http://msdn.microsoft.com/en-us/library/ee556392(office.14).aspx.
If you are going to configure SharePoint to index the external data source, then the default finder method (that is, the first Read List operation you create) will be used for this purpose. To ensure that SharePoint indexes all the data items from the external data source, you should not configure a filter on that operation. However, if more than 2,000 data items are returned when using the default find method on an external list, an error message is displayed.
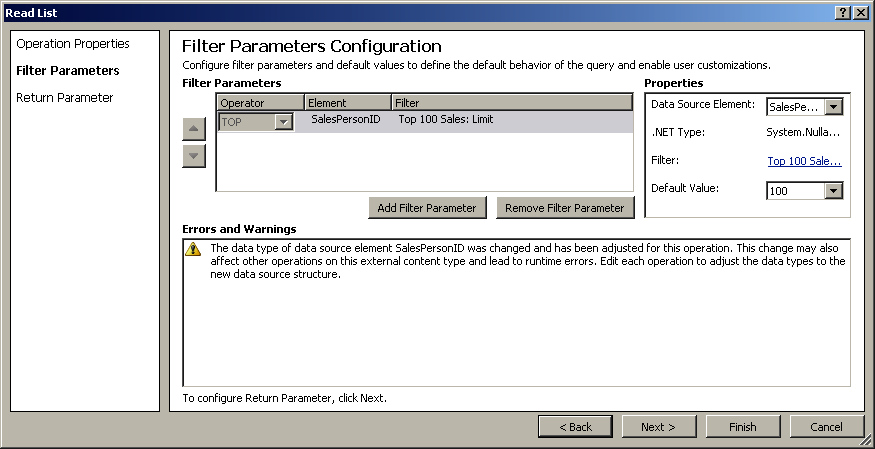
To create a limit filter either for a Read List operation or when you have selected to create all operations, follow these steps:
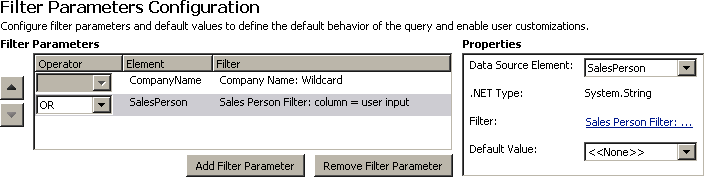
On the Filter Parameters Configuration page of the operations wizard, click Add Filter Parameter. Then under Properties, click Click to Add to display the Filter Configuration dialog box.
Select New Filter and type a meaningful name, such as Top 100 Sales. In the Filter Properties section, select a filter type of Limit and click OK. The Filter Configuration dialog box closes and under Properties, Top 100 Sales: Limit is displayed to the right of Filter.
Under Properties, in the Default Value list, highlight the text <<None>> and type 100, as shown in Figure 4-24.
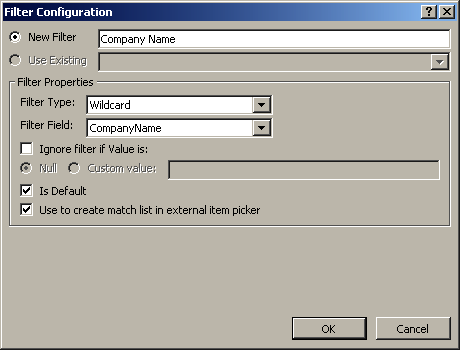
Creating other Read List filters follows a similar process. To create a wildcard filter, choose fields that contain values, where users may want to use the search options Starts With, Ends With, Contains, and Equals. Figure 4-25 shows the Filter Configuration dialog box for a Wildcard type. The Default Value on the Filter Parameters Configuration page would be set to an asterisk.
When you create more than one filter, you can choose whether you want the filters combined or OR’d, as shown in Figure 4-26. The user will be doing a wildcard search on the company name or filter by SalesPerson.
You can also create filters on the Read Item, Create, Update, Delete, and Association operations. For these operations, the filter is defined for the input parameters—that is, the input parameters are used to pass data to the operation. The filter types available for these operations are shown in Table 4-5.
Filter name | Value to be passed to operation |
Identifier of last item read. Used to return chunks of data. | |
Password | These two filters are used together with the Secondary Secure Store Application check box on the Connection Properties dialog box. The Username and Password filters will use Secure Store to fill in the correct data before making the operation call. This option is used when a service account is used to authenticate with the external system for performance reasons. When one account is used to access the external system, no matter the number of users who connect to the external system, all user connections are pooled to the single logon account. Then, values passed as these filter values are used to authenticate. |
Identity of the user who called the operation. Use this if a service account or a group ID is used to authenticate with the external system. | |
Used to supply a Secure Store Token, which is similar to a claim. | |
Profile of the current user. | |
GUID that represents the current operation context. In SharePoint Foundation, it uses a correlation ID. |
Note
Only trust filters that are used to pass security information when they come from SharePoint. When an Office application can directly connect to an external source, the filter values can be changed.
The amount of data returned from the external system is not solely controlled by the filter. BCS throttling is enabled by default to prevent denial of service (DoS) attacks. You are most likely to see the effect of this feature if no limit filter is created. In this case, you will see only a subset of the external data items, or when the BDC runtime attempts to retrieve data from the external system, it may time out due to the large amount of data it is trying to retrieve.
By default, the number of external data items returned from a database query is limited to 2,000, with a database connection timeout of 60 seconds. A WCF connection is not limited by the number of items, but by the size of the data returned. The default size for a WCF connection is 3 MB, with a connection timeout of 60 seconds.
Note
See Also For more information on BDC throttling, see Chapter 3.
Creating Associations
You can create associations when there is a relationship between two ECTs, such as customers and orders: each customer may have one or many orders. This is known as a one-to-many relationship. These two ECTs could define data from the same or two different external systems. The customer details could be stored in a CRM system, with the order details in a separate external system. Defining an association in an ECT documents this relationship. You must create an association if you wish to use the Business Data Related List Web Part to provide a relationship—a Web Part connection—between itself and a Business Data List Web Part, or when you customize a solution for Office applications, such as adding a custom task pane to Outlook, where the task pane shows both customer details and all active orders for that customer.
Note
You do not need to create an association in an ECT if you plan to use a Data Form Web Part (DFWP) to link data sources or when joining or merging data and displaying the data in a DFWP. Using a DFWP with external data is detailed in Chapter 5.
To create an association, you must have at least one field that is common to both ECTs, for example, so that orders can be identified with a unique customer. Usually the relation is configured such that the customer field in the orders ECT uses the same value that is the primary key field in the customers ECT. The customer field in the orders ECT is known as a foreign key. In the AdventureWorksLT database, the primary key in the Customers table is CustomerID, and the foreign key in the SalesOrderHeader table is CustomerID. It is common practice to design tables so that the primary key and the foreign keys have the same column names—this helps identify relationships between tables. You can also create cascading associations. An example of a cascading association is when a customer has many orders and each order consists of many products.
You can use SharePoint Designer to create one-to-many associations when the relationship is defined using foreign keys in database tables or views, including self-referential associations (relating instances of the same ECT). When you are using database views or a web service method, the external system needs to have a stored procedure or method that accepts the primary key from the parent ECT as a foreign key for the child ECT.
You can use alternate tools to create other relationships, such as one-to-many and many-to-many relationships when foreign keys are not used or where a primary key is made from multiple columns, known as a composite key.
Note
When you create an association between two ECTs, SharePoint 2010 cannot ensure data referential integrity between the two ECTs, unlike the linking of two tables in a relational database where business logic can used.
The trick to creating associations is to create the association on the ECT that is on the many side of the many-to-one relationship—that is, the ECT where the foreign key is used. This ECT is known as the child ECT. For example, using the customer and orders scenario, create the association on the orders data source.
In the following example, you will create an association between two ECTs using tables from the AdventureWorksLT database: an ECT named AdventureWorks_Customer, based on the Customer table, and an ECT named AdventureWorks_Orders, based on the SalesOrderHeader table.
In the External Content Types gallery, click the ECT where the foreign key is defined, such as AdventureWorksLT_Orders, and then go to the Operations Design View for the ECT.
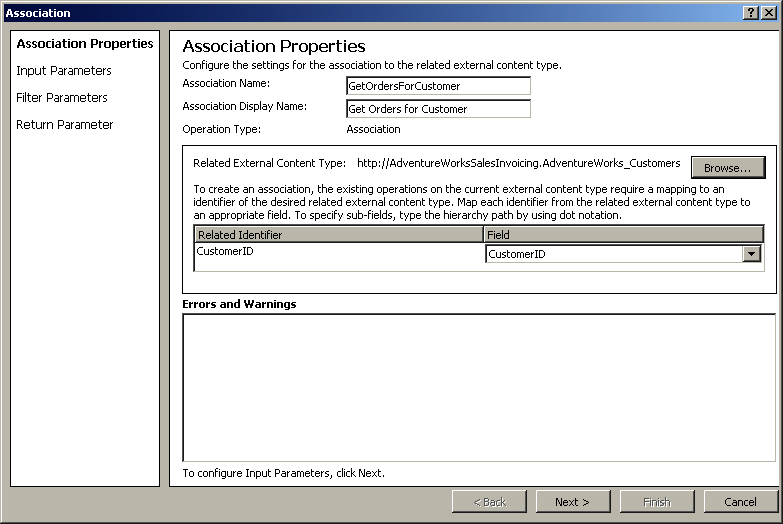
In the Data Source Explorer, expand Adventure Works LT DB, and then expand Tables. Right-click SalesOrderHeader, and then click New Associations to open the Association Wizard. This wizard consists of four pages: Association Properties, Input Parameters, Filter Parameters, and Return Parameters.
In the Association Name box, type GetOrdersForCustomer, and in the Association Display Name box, type Get Orders for Customer.
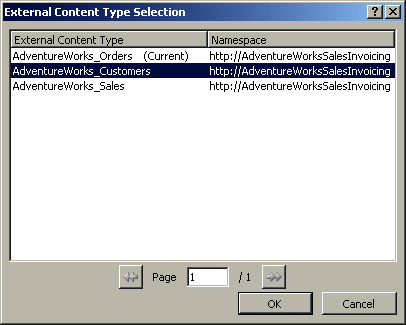
To the right of Related External Content Type, click Browse to open the External Content Type Selection dialog box, as shown in Figure 4-27.
Click AdventureWorks_Customer from the External Content Type picker and then click OK. The External Content Type Selection dialog box closes, and on the Association Properties page, under Related Identifier, CustomerID appears and is automatically mapped to the foreign key for the AdventureWorks_Orders ECT, as shown in Figure 4-28.
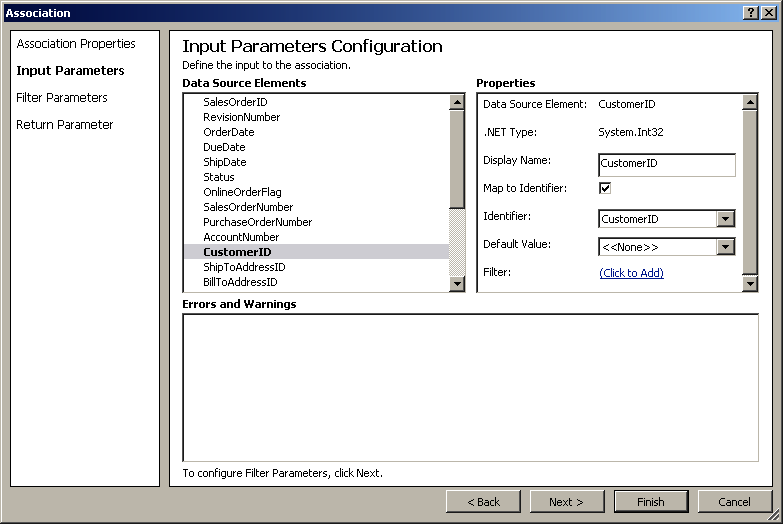
Click Next to display the Input Parameters page of the Association Wizard. Under Data Source Elements, click CustomerID, and then under Properties, select the check box Map to Identifier, as shown in Figure 4-29. The error message in the Errors and Warnings box disappears.
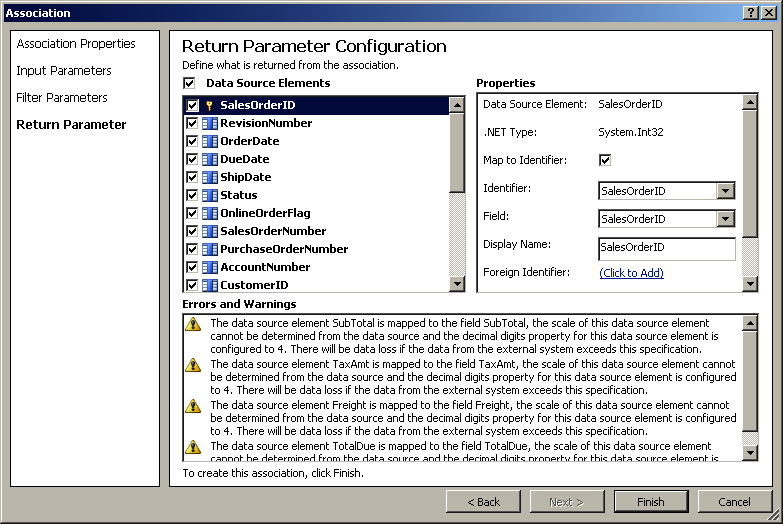
Click Next twice. The Return Parameter Configuration page of the Association Wizard displays. Under Data Source Elements, select SalesOrderID. Do not clear the check box, and under Properties, select the check box Map to Identifier if it isn’t already selected, as shown in Figure 4-30.
Click Finish to close the Association dialog box. In the External Content Type Operations area, the GetOrdersForCustomer association is listed, as shown in Figure 4-31.

You can also set or define associations when creating or modifying the Read List operation on the Return Parameter Configuration page of the operations wizard. On the child ECT, select the data source element that is to be the foreign key, and then under Properties, to the right of Foreign Identifier, click Click to Add.
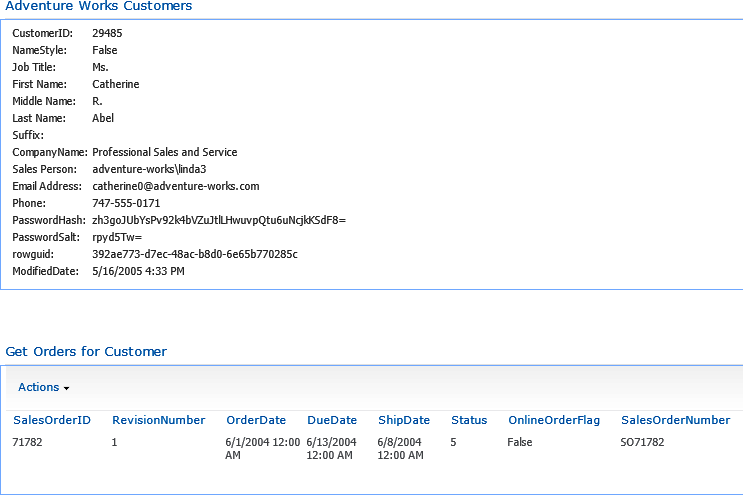
Once you define an association, if you create the profile page for the parent ECT, a Business Data Related List Web Part is added to the page for each child ECT associated with the parent ECT. When the profile page is displayed, it will automatically display related data defined in the child ECT, as shown in Figure 4-32.
On database-based ECTs, you create the association on a table—the same table used to create the other operations. For web service or WCF-based ECTs, you create the association on the appropriate web method. You can also add filter parameters to a database-based ECT association, but not on a WCF-based association. Reverse associations, where you provide an order ID and return the customer associated with that order, cannot be created on a database-based ECT.
Operation Considerations
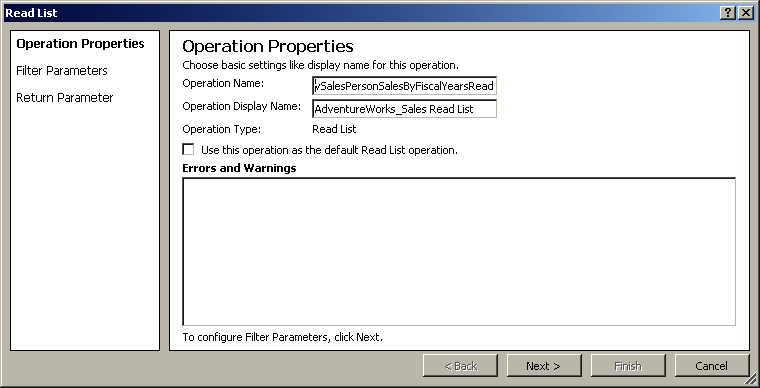
The Read List operation is also known as the Finder method, as it finds and returns one or more external data items, also known as an entity instances from the external data source. The Read List operation is used to create external lists, and it is also used in the Business Data Web Parts and search. You are not limited to creating only one operation of each type. The first Read List operation you create will be marked as the default Finder method. When you create subsequent Read List operations, on the first page of the operations wizard a check box displays that enables you to mark the new Read List operation as the default Read List operation, as shown in Figure 4-33.
The Read List operation used by search is also known as the root Finder method. You could create two Read List operations, one as the default Finder method (used by external lists) and the other as a root Finder method (used by search). However, the SharePoint Designer operations wizard does not allow you to do this, so if this functionality is required, you have to export the ECT, amend it, and import it.
Other developers may use different names for the operations created by SharePoint Designer—for example, the Read Item operation is known as the SpecificFinder method, Create as Creator, Update as Updater, and Delete as Deleter. A developer using Notepad, Visual Studio, or a third-party tool to amend the BDC model can create other operations, such as the AccessChecker method, which can be used to check whether a user has rights to access an external data item.
To modify an operation, in the External Content Type Operations area on the Summary View or the Operations Design View, either double-click the operation or select the operation. Then on the External Content Types ribbon tab, in the Operation group, click Edit Operation.
If you have elected to create all operations together, you may need to revisit some of the operations for the following reasons:
You want to change the operation name and display name to be more meaningful to users. For example, when you create an external list from the ECT, the default view’s page name and display name use the name and display name of the default Read List operation. The default view on other types of SharePoint list is AllItems with a display name of All Items; therefore, you might want to rename the Read List operation’s name to match, or you can rename the page to AllSales or All Sales. You should make this change prior to creating external lists. If you make this change after creating external lists, it will not affect already created list views.
On the Read Item and Read List operations, you may want to return only those data source elements you want displayed in the external list or Business Data Web Part. Although you can configure the external list view or the properties of the Business Data Web Part to display a limited number of the elements, for performance reasons and to minimize the amount of network traffic, it is best to configure the ECT to bring across to the SharePoint servers only wanted elements from the external data source.
Exporting ECTs
External content types (ECTs) are metadata objects defined in the Business Data Connectivity (BDC) model XML file, which usually use the extension .bdcm. You or other users who create an ECT using SharePoint Designer may not have created it on the SharePoint installation where it is to be used. You may have created it on a development or a prototype environment, so you will need to export it. Another reason to export a BDC model is that you may have created one for use with an Office application. You do have mechanisms available for exporting a BDC model from one SharePoint system to another (default export) and to an Office application (client export).
You can use the SharePoint 2010 Central Administration website or SharePoint Designer to export BDC models, but you can only use the SharePoint 2010 Central Administration website to import a BDC model. Also, you cannot use the SharePoint 2010 Central Administration website to export the client version of a BDC model. Whichever environment a BDC model is planned for—SharePoint or an Office application—again, you must test it once you have imported it into that environment. To export a BDC model from SharePoint Designer, follow these steps:
In the External Content Types gallery, click the icon to the left of the ECT you want to export. You can select more than one ECT by holding down either the Ctrl or Shift key as you would in Windows Explorer. Then on the External Content Types ribbon tab, in the Manage group, click Export BDC Model to open the Export BDC Model dialog box.
In the BDC Model Name text box, type a meaningful name, such as AdventureWorksCustOrders. In the Settings List, select the type of BDC model you want SharePoint Designer to create.
Note
See Also You can find information about how to import a BDC model into SharePoint in Chapter 3. For examples of importing a BDC model for use in an Office application, see Chapters Chapter 7 and Chapter 11.
Summary
Business Connectivity Services (BCS) allows you to hook up external data with SharePoint and Office applications. You use external content types (ECTs) to define how to connect to the external system, the connector to use, and credentials. You define in the ECT the operations you can use on the external data and its format. Using SharePoint Designer, you can define six operations: Read List, Read, Create, Delete, Update, and Association.
For performance reasons, such as limiting the amount of data transferred across the network and the load on the SharePoint servers, you should consider using filters when you define ECTs.
Once you have defined an ECT, you can use it to present data to end users. You can use the ECT to create external lists, to create external columns in SharePoint lists and libraries, and on pages with the use of Business Data Web Parts and the Data Form Web Part. You should define all the operations your solution needs, including filters and the association operation, and save the ECT before creating external lists or the profile page.
To uniquely identify an ECT, the ECT name and namespace are internally combined. The ECT name and the namespace, together with the operation names, will be visible to users. If you change either of these properties, any external list, Business Data Web Part, or external column that used the previous name will no longer work.