
Chapter 7. Using External Data with Office Client Applications
In this chapter, you will:
Learn how to use external data within Microsoft InfoPath forms
Discover how to modify external list forms with InfoPath 2010
Learn how to make external data available in Microsoft Word, Microsoft Outlook, Microsoft SharePoint Workspace, and Microsoft Access
Establish how to troubleshoot Business Connectivity Services on the client
Business Connectivity Services (BCS) is often misunderstood as being just a read-only view of data displayed via Microsoft SharePoint Web Parts, but BCS has many other services to offer. Potential users of BCS sometimes develop their own Web Parts to display external data, or even consider purchasing third-party products, without realizing the many capabilities of BCS. One of the most powerful services BCS can provide is the ability to use external data offline within Microsoft Office client applications, such as Microsoft Word and Microsoft Outlook.
Information workers often duplicate data unnecessarily. Users sometimes copy and paste external data into Word documents, such as customer address details into an invoice. They may type or copy and paste email addresses into Outlook when sending an email, or create calendar entries manually when an appointment is already recorded within an external data system. It is also very typical for users to print external data when going offline so they have the data available when traveling. With BCS, users can look up and select external data using the Microsoft Office client applications, and they can also access this data in these programs while offline.
For example, when using Word to create an invoice for a customer, you may need to enter the customer billing address details and also look up products and enter the price of each product. Rather than typing or pasting these values from external systems, you can look up the values using BCS, such as contact data made available within Outlook. Since many Outlook users make use of Microsoft ActiveSync, contacts can be made available to their mobile devices.
Note
ActiveSync, originally released in 1996, is a mobile data synchronization technology and protocol developed by Microsoft. The latest release, ActiveSync 4.5, is supported on Windows XP and can be downloaded from Microsoft’s download site at www.microsoft.com/downloads. For Windows Vista and Windows 7, when a mobile device is connected to a computer, it triggers an automatic download and install of Windows Mobile Device Center (WMDC), which can then be used to sync contacts stored in Microsoft Exchange. If you do not use Exchange, see the following webpage for details about how to sync contacts into Outlook: http://rhizohm.net/irhetoric/post/2010/11/16/Missing-ActiveSync-How-To-Sync-and-Import-Contacts-Into-Windows-Phone-7-From-Outlook-Using-Windows-Live-Hotmail-As-A-Bridge.aspx. See the following webpage for information about Exchange ActiveSync considerations when using Windows Phone 7 clients: http://social.technet.microsoft.com/wiki/contents/articles/exchange-activesync-considerations-when-using-windows-phone-7-clients.aspx.
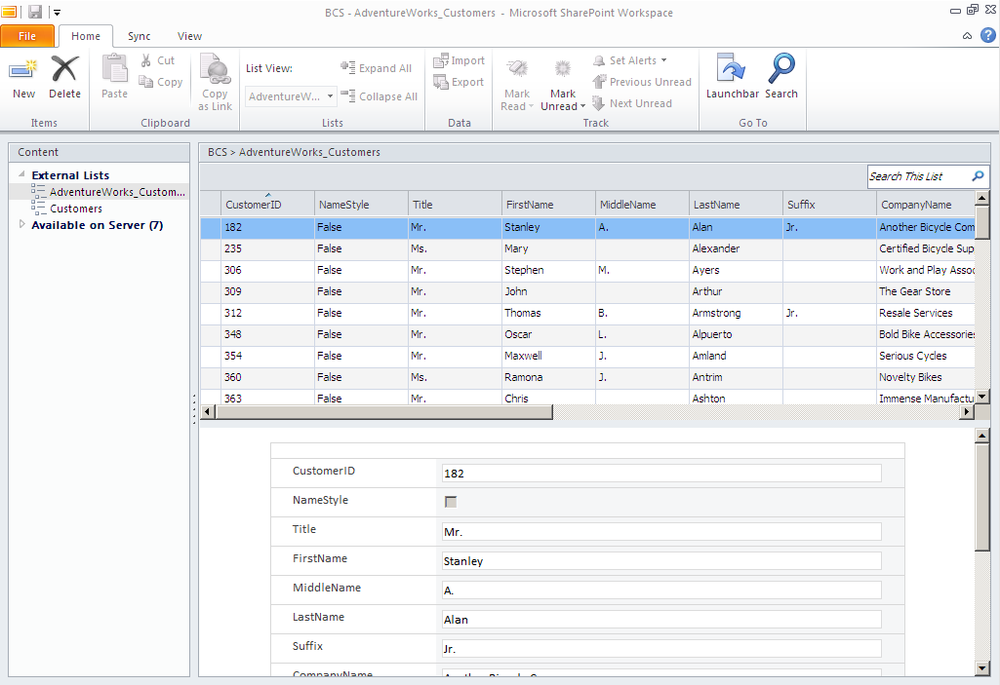
A new application introduced in Microsoft Office 2010 is Microsoft SharePoint Workspace 2010. SharePoint Workspace is not BCS specific, but it allows you to take any SharePoint list or library offline, including external lists, so that external data is available even when you are in a disconnected environment. BCS is also available through Microsoft InfoPath 2010 and Microsoft Access 2010.
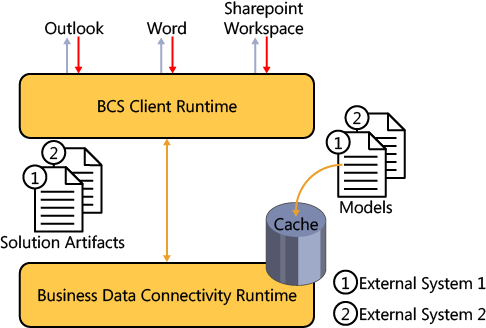
BCS is divided into server services and client services. The client services include a client runtime and cache of the external data, making it available within Microsoft Office applications. Figure 7-1 shows the BCS Business Data Connector, which provides a client-side connection to the external data. The external data is cached locally within an in-memory Microsoft SQL Compact Edition database, so that it can be made available to the Office application.
In this chapter, you will first examine how to make external business data available to Microsoft Word. Then you will learn how to configure Microsoft InfoPath 2010 to use business data and explore SharePoint Workspace, Microsoft Outlook, and Microsoft Visio. Finally, you will find out how to troubleshoot client-side connections to BCS.
Surfacing External Data in Word 2010
SharePoint users have by now familiarized themselves with the concept of document metadata. One issue with metadata is that the information you get out is only as good as the information you enter. So if users do not enter data in a consistent manner, trying to filter or create views on that data can be challenging. To answer this challenge, Business Connectivity Services (BCS) offers the external data column, which allows users to select metadata for a column within a list or library from an external data source. Once configured, the external data can be selected from the browser when setting the list item or document properties.
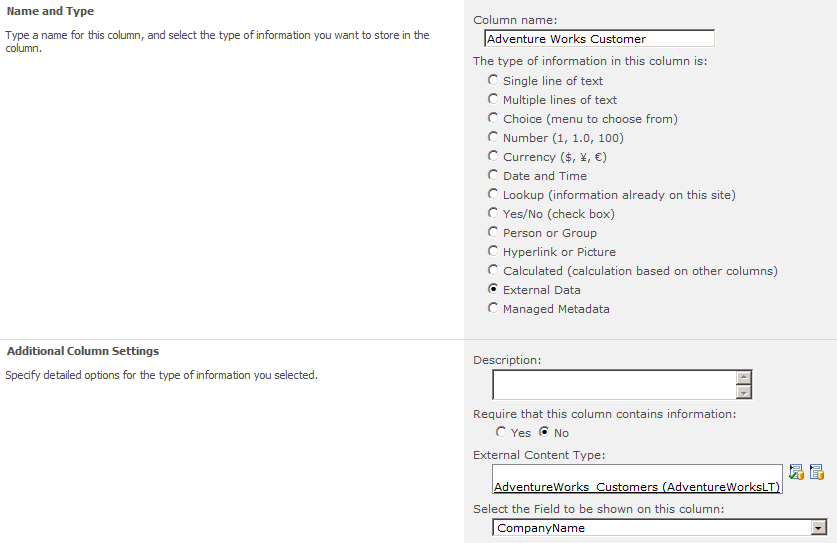
To configure the external data column, you enable the SharePoint Server Enterprise Site Collection features. You can then create a new external data column within a list or a library. You are able to choose an external content type (ECT) and the column from the ECT that you would like to store. As well as selecting the column value that you would like to store as a property value, you can select other column values from the external data source to display. Figure 7-2 shows the configuration of the external data column within a document library.
Note
See Also The capability to create external data columns is not available in SharePoint Foundation 2010. For more information about using external data in lists and libraries, see Chapter 5.
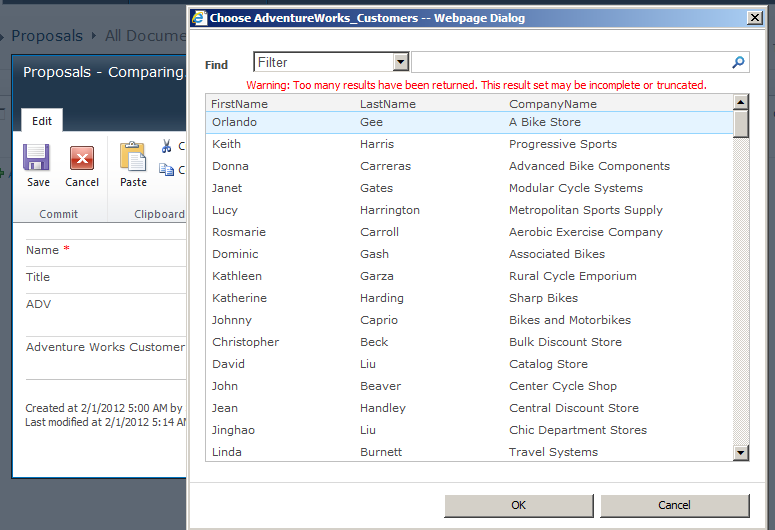
Once the column is configured, it is ready to be used within the browser. You can set the column value by editing the properties of an uploaded document and then choosing the metadata from the external data source. The dialog box for the external data column can show only 200 items at a time, so you may see a red error message indicating that results have been truncated. The only way to overcome this limitation is to create a filter on your read list method when creating the ECT in SharePoint Designer.
Note
See Also For more information about creating an ECT, see Chapter 4.
The filter allows you to set the returned results to fewer than 200. For example, you could create a Wildcard filter so that the first few values can be entered in the filter box to return fewer than 200 results. Figure 7-3 shows the dialog box where you can select an external data value to store as metadata.
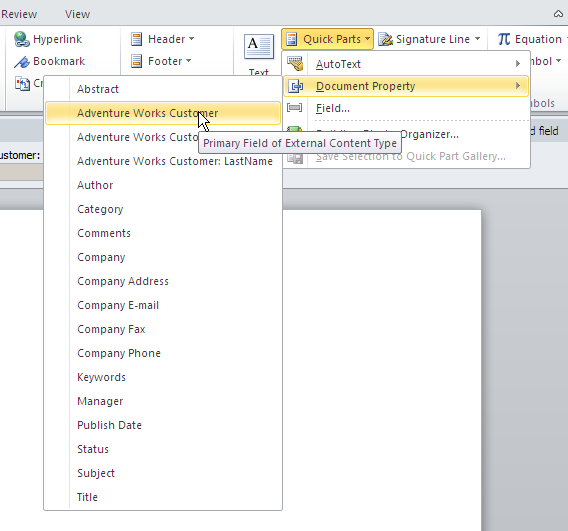
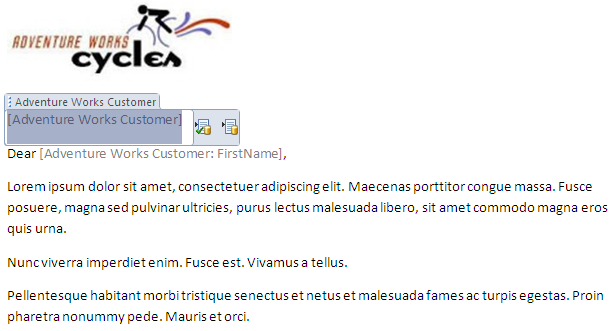
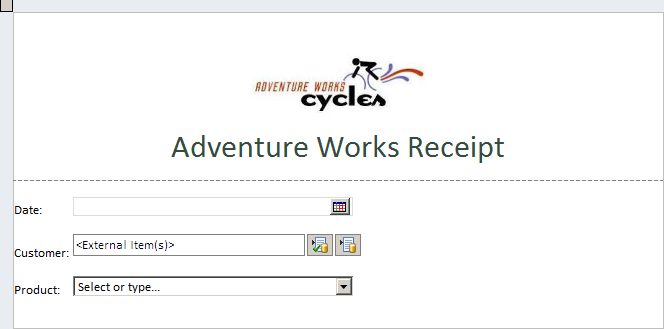
In addition to using external data as metadata on a document or list item, you can use external data within the Word document itself. In the Enterprise edition of Microsoft Office SharePoint Server 2007, you could achieve a similar result, but you had to write the code yourself using Visual Studio Tools for Office (VSTO). In Word 2010, you can insert a Quick Part into a document, which allows you to embed BCS data. You first select the external data column’s display name—for example, Adventure Works Customer, as shown in Figure 7-4. You can then insert the document properties into the page, which is automatically populated when a value is selected.
You can create the contents of the document in the same way you create a document with a mail merge. You can see in Figure 7-5 that the customer has the ability to enter a value or look up a value to be inserted into the Adventure Works Customer Quick Part.
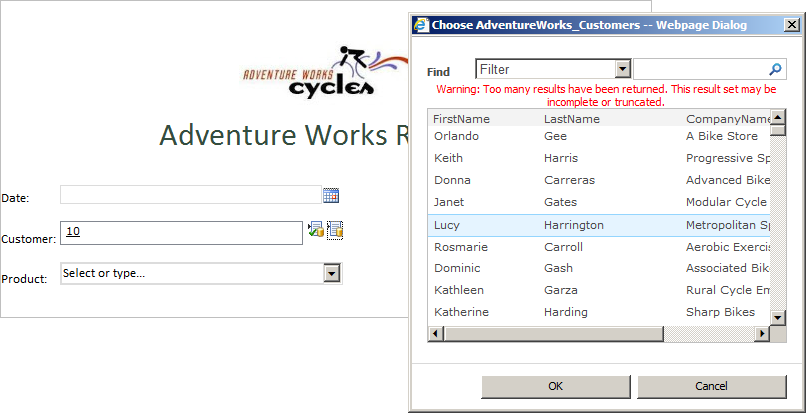
In Word, you can select external data in a similar way to how you select external data within the browser. You can browse to the external list item you would like to select, or you can search for a value using the search box provided (as shown in Figure 7-6).

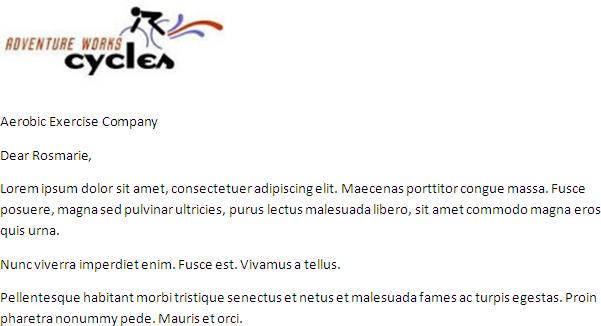
Once you select an external list item and click OK, the other display columns are populated with relevant values from the same row of data. Figure 7-7 displays the completed Word document.
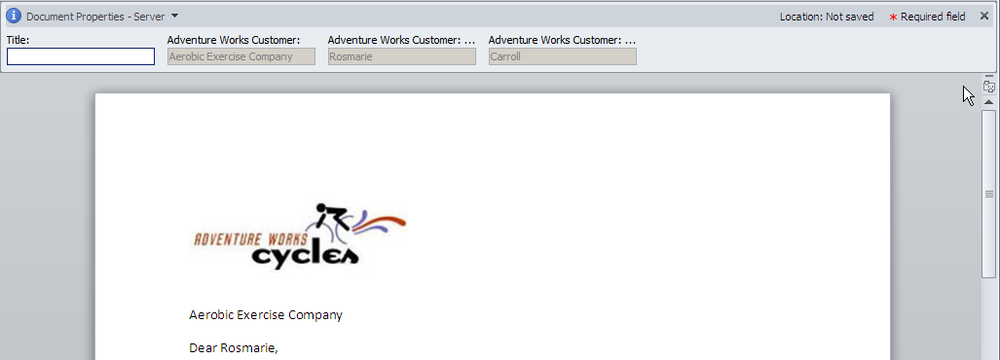
Notice that by setting document properties using a Quick Part, not only are the column values displayed within the document, but also your document properties are populated in the Document Information Panel (DIP) within Word, as shown in Figure 7-8. This in turn allows the metadata to be set and improves your ability to search and find the documents.
Using External Data in InfoPath Forms
InfoPath is still a relatively new addition to the Office product suite compared with Office products such as Word or Excel. Introduced in Microsoft Office 2003, InfoPath provides you with a great tool for collating electronic information in electronic form format. Prior to that (and even today, in some cases), Word or Excel was used to collect information from vendors, customers, and employees for all types of reasons. Trying to complete an electronic form in Word is simply frustrating, especially when underscores are used to indicate the area where you are to type your details. Any data entry ends up destroying the original page formatting.
For forms such as purchase requisition forms, purchase orders, or time-off requests, using InfoPath makes a lot of sense. As a nascent product, InfoPath’s adoption has been slow, mainly due to the lack of some required features. Dealing with date calculations was an issue, and until the Enterprise edition of SharePoint Server 2007, you needed an installation of InfoPath to enter data into the forms. This meant that InfoPath couldn’t be relied upon outside of an organization, as you couldn’t guarantee that your vendors or customers had adopted InfoPath. The Enterprise edition of SharePoint Server 2007 introduced integrated forms services, allowing data to be entered into forms using the browser. InfoPath 2010 is divided into two clients: InfoPath Designer 2010 and InfoPath Form Filler 2010. InfoPath Designer is required to design forms, but only InfoPath Form Filler is needed to complete forms that have already been designed.
InfoPath 2010 is now very well integrated with SharePoint 2010, not just through InfoPath Form Services, but also through the InfoPath Forms Web Part, which enables you to create InfoPath and SharePoint solutions. Information workers can complete forms using the InfoPath form embedded onto a SharePoint Web Part page. Having the InfoPath form embedded on the page creates an environment that is very efficient for filling in business information. The completed form can then be saved to a form library, allowing the information to be stored, analyzed, and consumed, perhaps as part of a workflow.
InfoPath has always (including the 2003 version) been able to write back to SQL databases or even look up information from SQL databases. As you learned in previous chapters, BCS can connect to all kinds of external data throughout your organization, not just Microsoft SQL. To bring all of that business information together in an InfoPath Form, InfoPath 2010 has now adopted BCS.
Using External Data as Lookup Data
One of the problems with collecting manually typed-in information is that it often contains abbreviations or typing mistakes, which can result in difficulties while analyzing the data or during a workflow run on the data. For example, a user may enter a vendor name as Adventure Works, Adventure Works Cycles, Adventure Works LLC, or even AW Cycles. As the form designer, you can create a lookup column with values already entered, but this requires a lot of maintenance to ensure that new vendors are added to the form design, plus the information already resides in the external data source. To provide consistency and accuracy, you can add a lookup field to the form that looks up data using an ECT. The lookup provides much more than just a list of company names, for example. You have the ability to show multiple columns, filter the values, and search the values using the lookup dialog box.
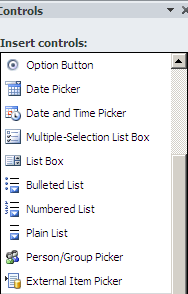
One of the controls in the InfoPath Designer toolbox is the External Item Picker, shown in Figure 7-9. You can bind the External Item Picker to a field within your form, allowing the looked-up data to be stored. Before you use the External Item Picker, it is recommended that you do a bit of homework. You will need to know certain information, which you can find in two places: in SharePoint Designer on the ECT settings page, or on the SharePoint 2010 Central Administration website in the BCS application. The information you need is:
ECT Namespace
ECT Name
System Instance Name
Finder Name
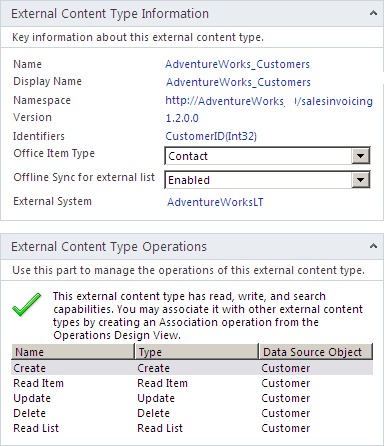
You can easily identify the ECT Name and ECT Namespace values in the External Content Type Information area in SharePoint Designer. The System Instance Name that InfoPath requires is listed as the external system in SharePoint Designer. The Finder Name is the ECT operation (method) that returns the list of information from the external data source. If you used SharePoint Designer to create your ECT, you will usually find that the operation is called Read List. Figure 7-10 shows the External Content Type Operations in SharePoint Designer, where you can gather the information InfoPath requests.
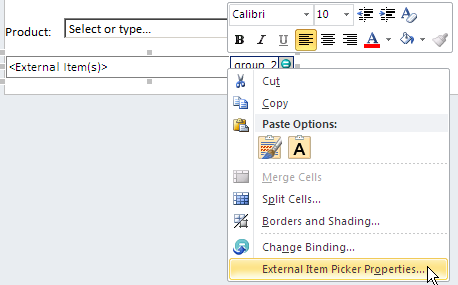
Upon adding the External Item Picker control to your InfoPath form, select the External Item Picker Properties menu item from the context menu of the External Item Picker control, as shown in Figure 7-11.
A large dialog box appears that allows you to name the control. The name you enter should reflect the type of information that you will be displaying from the external source—for example, Customer_Name.
Select the General tab (second tab) of the dialog box to enter the required ECT information you gathered in advance from SharePoint Designer. Figure 7-12 shows the information obtained from SharePoint Designer, now entered into the InfoPath External Item Picker control properties.
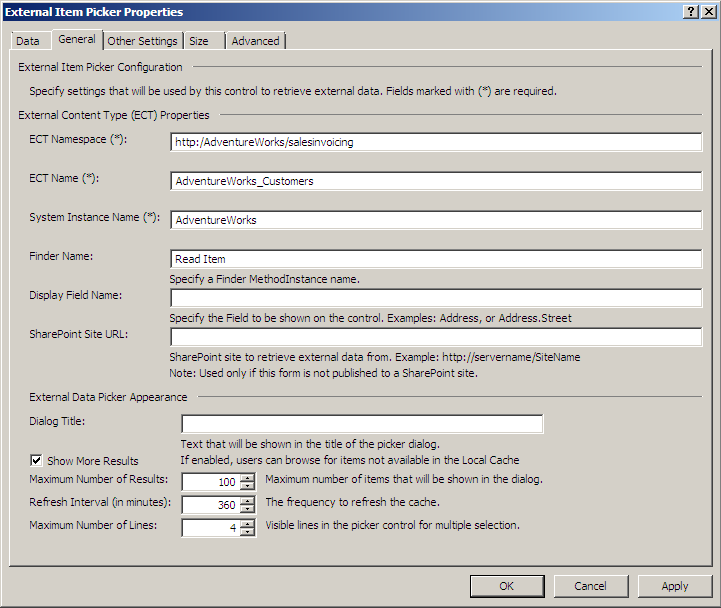
Another property that you may need to enter is the SharePoint Site URL. When you plan to publish the form to a form library within a SharePoint site, you should specify the SharePoint Site URL. If you do not set this property, the dialog box on the form will display empty results.
You can make other refinements using the dialog box that are not required but are useful, such as entering the Dialog Title information. Rather than displaying the text “Choose AdventureWorks_ Customers,” a more appropriate title is “Select a customer.”
Setting the maximum number of results is also useful. You may have over 1,000 customers—too many to display in the form’s dialog box. As long as you created a filter when you created the ECT, you will be able to filter the results. For example, you can display customers perhaps by region, or even by the first few letters of the company name, if a Wildcard filter was defined. Setting a filter also improves client performance.
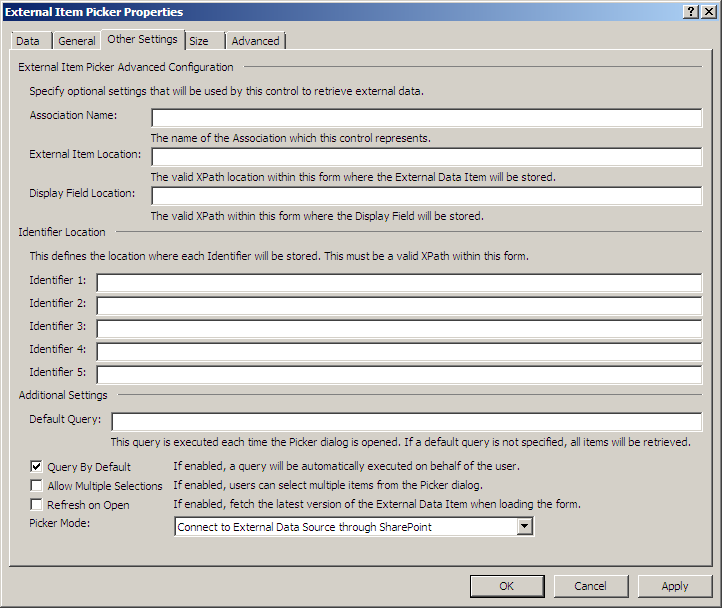
The Other Settings tab has a field that may determine if your External Item Picker control works successfully or not. You can set the Picker Mode to obtain cached data from the client or live data from the SharePoint server. In some cases, the data may not have been cached to the client, meaning that the dialog box displays empty results.
Depending on the complexity of the external data that you are using for lookup, you may have created an association between two ECTs to provide the information you would like to see. For example, Customer Name may be in a Customers table, while Customer Address is stored within a Contact Address table. Therefore, you will need to create an association between the two ECTs mapped to the two tables. In this instance, you set the Association Name, which you can also find in SharePoint Designer under the ECT properties. You set the Identifiers that are used to map the two ECTs. Figure 7-13 displays the Other Settings tab of the External Item Picker Properties dialog box and shows how you can set the Picker Mode at the bottom of the dialog box.
The External Item Picker control provides you with a text box and two icons, enabling you to type and then verify your entry using the icon with the green check mark, the first icon to the right of the text box, as shown in Figure 7-14. Alternatively, you can display the lookup dialog box using the second icon to the right of the text box. Figure 7-14 displays the External Item Picker control on the InfoPath form, illustrating how the data can be looked up.
You can now test the External Item Picker control by clicking Preview on the Home ribbon tab, in the Form group. You should be able to choose the data and store the selected value in the picker control. If results do not appear, check your settings and also review that you have permission to view the external data. The permissions for the ECT can be viewed and set using the ECT settings in SharePoint Designer.
Note
See Also For more information about setting permissions for external data, see Chapter 3.
A red message indicating that there are too many results to display may also appear. There is little that can be done about this, other than filtering the results. Users often need training on how the filters work to reduce the number of items to fewer than 200. Filtering on a column, such as Region, or the first few letters of a column will usually bring the number of returned items below 200. Figure 7-15 shows the external data being looked up from the External Item Picker control within a browser.
Implications of Web Forms vs. Client Forms
InfoPath allows forms to be completed using a client application or the Office Web Application (Form Services). In InfoPath 2007, there were many limitations when using the browser as compared with using the InfoPath client. The limitations include the use of some controls, such as Combo Box controls and Repeating List controls. The list of unsupported features in InfoPath 2010 is much shorter. Combo Box controls and other controls work the same in the browser as they do in the client application. Many more browser types are supported, and you are not limited if a browser lacks ActiveX control support. The good news is that the External Item Picker control is supported in the browser. Most forms will behave similarly whether you use the InfoPath client or the browser to complete the form, but some visual differences will be apparent.
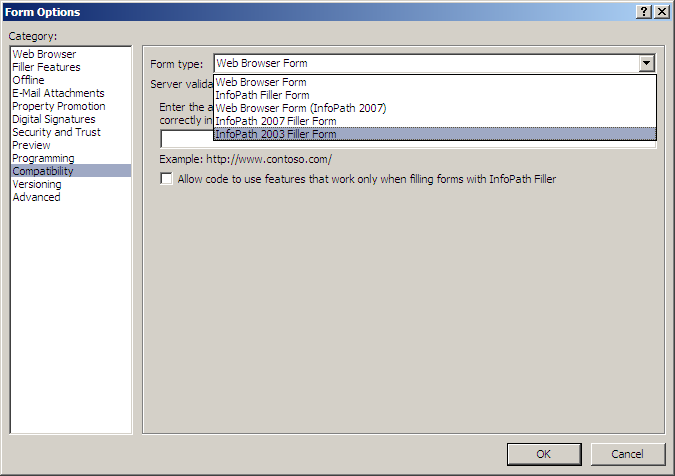
You can use Design Checker when designing a form for use in the browser. Using Design Checker is a good practice if you are designing a form for the client application and as a web form displayed in the browser. However, if you are designing a form specifically for use in the browser, you should set the Form Type in the Form Options dialog box, which opens when you click Form Options in the Microsoft Office Backstage view of InfoPath. You can switch to the Backstage view by clicking the File tab on the ribbon. Select the Compatibility category to select Web Browser Form to ensure that you will be able to use only Web Browser controls on your form. Figure 7-16 shows where to find the compatibility settings when designing a form for use within the browser.
InfoPath Data Connections
InfoPath data connections provide a mechanism to receive data or submit data to an external data source, including BCS external lists. InfoPath data connections can therefore contribute to an external data/SharePoint business solution. An InfoPath data connection allows you to submit data to and receive data from the following:
As well as collecting data within an InfoPath form and saving the form to a form library, you may want to store the collected data into an external data source. You can use a purchase order, for example, to store the purchase order information into a customer relationship management (CRM) system when an order is placed. External data can also be received from an external data source and displayed on the form.
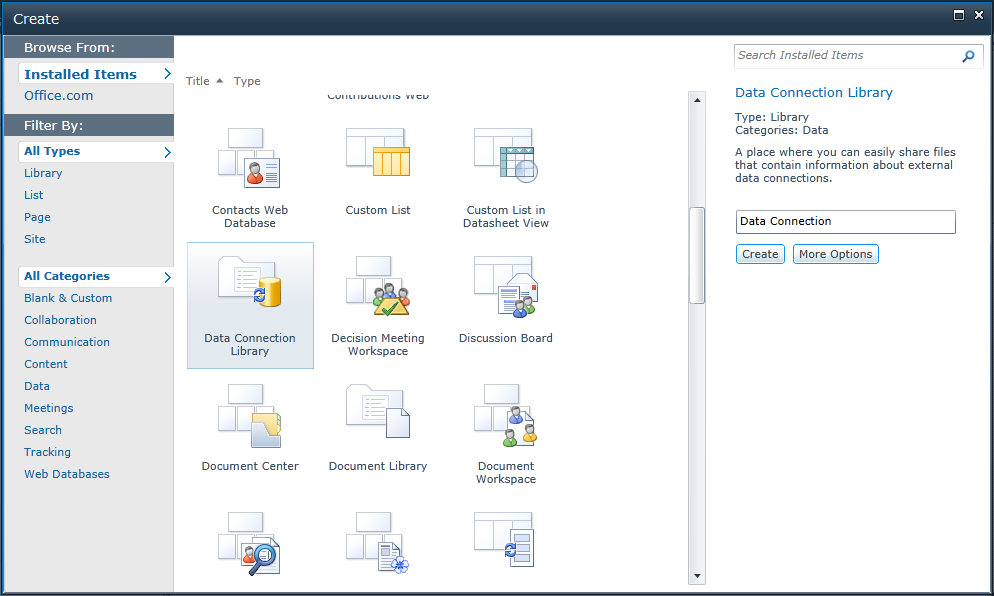
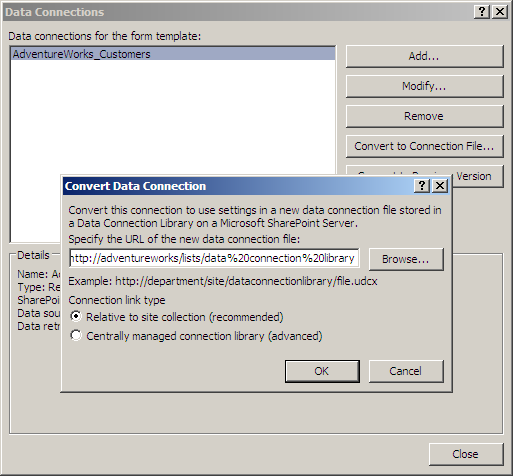
You can store the file that contains the data connection definitions in a Data Connection Library in SharePoint, so that the data connection definitions can be reused time and again. Storing the data connection file also means that if ever the database is moved between servers, you have only one place to make a change. Files are stored in the library as Office Data Connection (ODC) files or Universal Data Connection (UDC) files. InfoPath uses a version of UDC called UDCX.
To create a Data Connection Library, navigate to the SharePoint site where you would like to create it. You can then create the new library by clicking Create on the View All Site Content page, and then use the Data Connection Library template, as shown in Figure 7-17. It doesn’t matter what name you give to the library since the URL to the Data Connection Library will be copied and pasted.
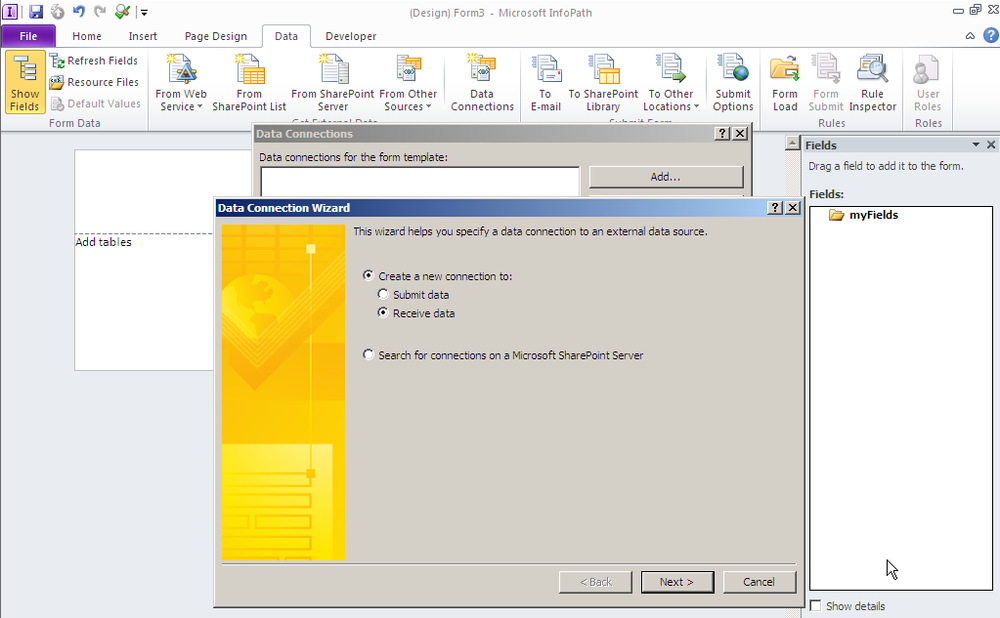
Once you have created the Data Connection Library, you can create a new blank form in InfoPath Designer 2010. In InfoPath Designer 2010, on the Data ribbon tab, in the External Data group, click Data Connections. You can then select to create a data connection to send (submit) data to or receive data from an external data source, as shown in Figure 7-18.
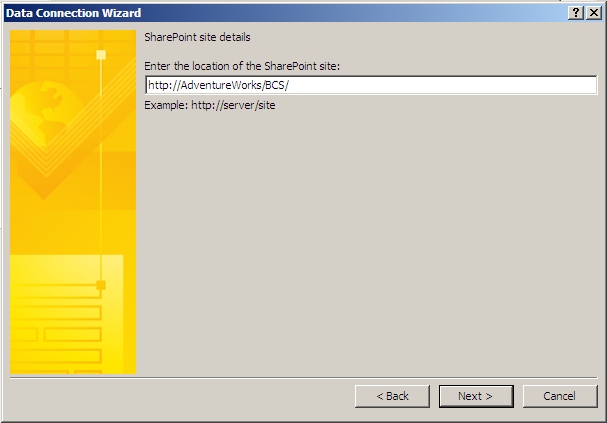
If you select Receive Data and then click Next, you can select the type of data source you want to create. If you select SharePoint List or Library and then click Next, the next page of the wizard allows you to provide the URL to a site containing an external list, as shown in Figure 7-19, where the URL is set to the Adventure Works BCS site.
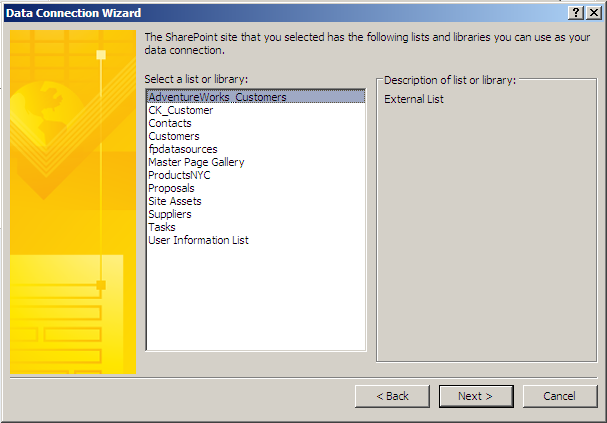
When you click Next, the SharePoint site will be contacted and the lists and libraries on that site will be displayed. You can then choose your external list, as shown in Figure 7-20. Having the external list as an external data source option is unusual in Microsoft Office, as InfoPath is the only client where an external list can be a valid data source using the Data Connection Wizard.
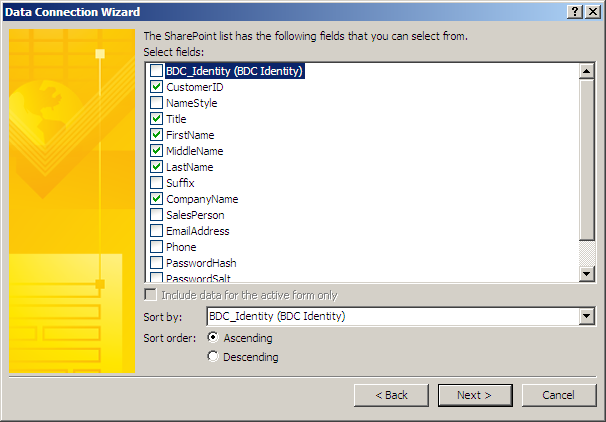
You can then select the columns from the external list that you would like to display within your InfoPath form. At this point, think carefully about the field you want to make available, to save working through the Data Connection Wizard again from the start. You should select any fields needed for your form, including any that you would like users to be able to update on the external data source. Figure 7-21 shows the Data Connection Wizard providing a list of external list columns for selection.
The data from the data source can also be stored within the form template so that it can be made available offline for the first use of the form. Making the data available on the first use means that there is no delay in opening the form while data is obtained. From that point onward, data will be synchronized. You are advised not to do this if the data is sensitive. However, do note that it will improve performance upon first use of the form.
When you click Finish, the fields from your data source will be available in two groups:
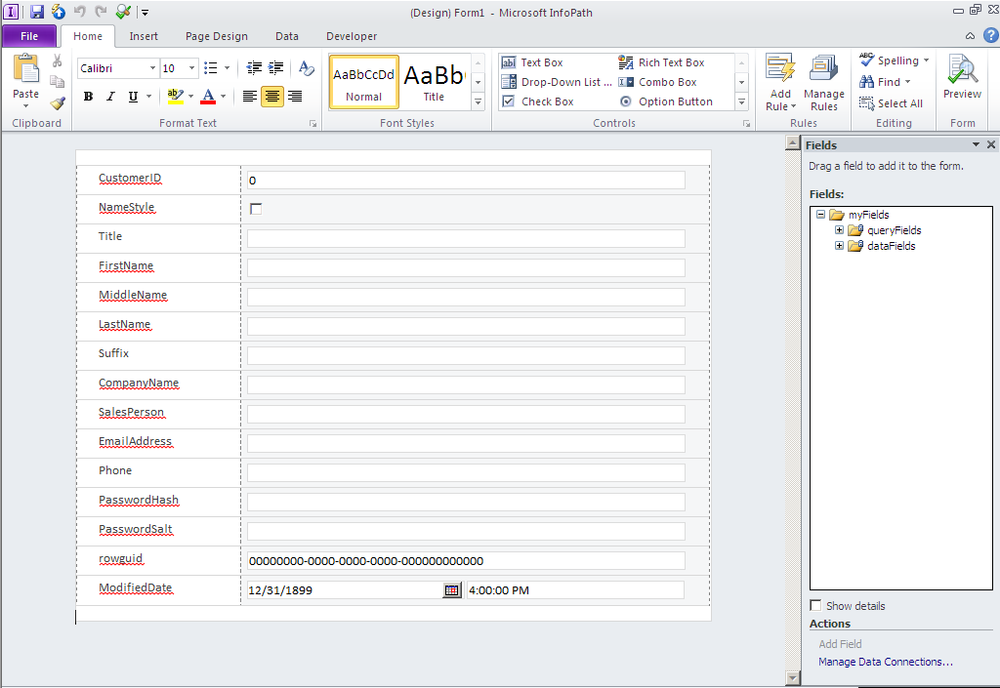
You can drag and drop the fields from either group onto the form. The Query Fields allow you to enter a value into a field to perform a query, whereas the Data Fields automatically show the data in a repeating section on the form. Figure 7-22 shows the InfoPath 2010 form in design mode, with the external data columns placed on the form with their labels.

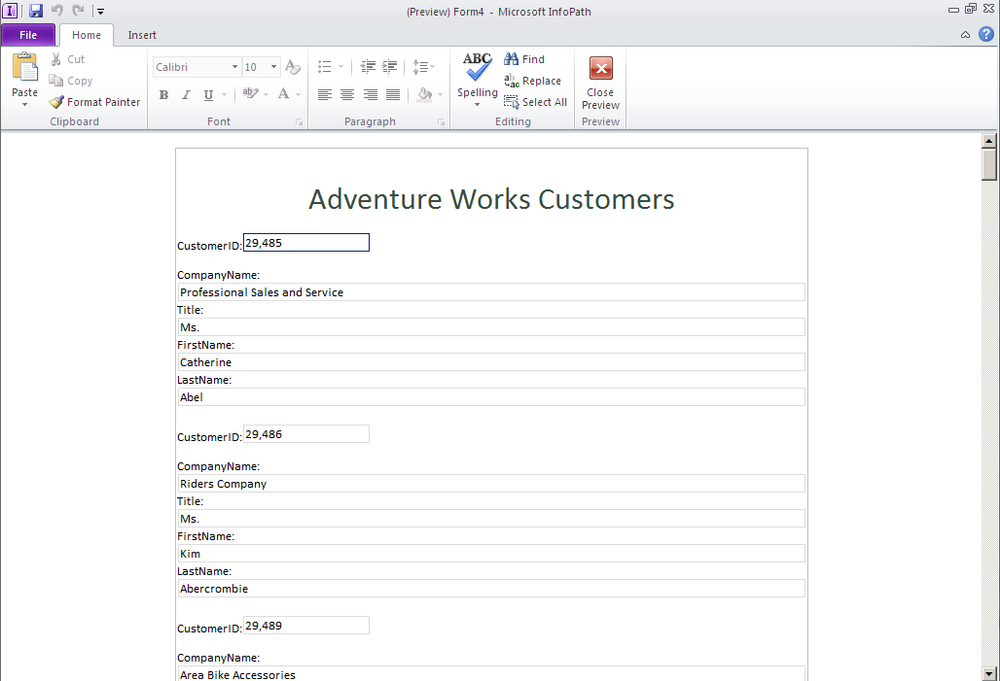
When you first preview your form to test the changes, you are asked if you want to allow the connection to take place for security reasons. Choose Yes if this is not a concern, and you will be able to view the external data. Figure 7-23 shows the external data displayed within the InfoPath 2010 client.
To submit data to an external list, add a Submit button to your page, and then configure the Submit action using the stored data connection file in the Data Connection Library. You may then reuse the connection file when you create an InfoPath form. Figure 7-24 shows the Submit button being configured.
Customizing External List Forms with InfoPath
InfoPath Designer 2010 is also the tool to customize external list forms. It is a common belief that you cannot customize external list forms in the same way you can customize other SharePoint lists. Throughout SharePoint, within SharePoint standard lists, you will find a Customize Form with InfoPath icon on the list ribbon. There is also a link within the list settings named Form Settings. Figure 7-25 shows the InfoPath 2010 Customize Form command on the List ribbon tab, in the Customize List group.

In an external list, the Customize Form command is unavailable, and if you choose the option to customize the form from the list settings within an external list, you will get a message indicating that the external list forms cannot be edited in InfoPath. Figure 7-26 displays the error message that appears if you try to modify an external list form with InfoPath 2010 via the List Settings page.

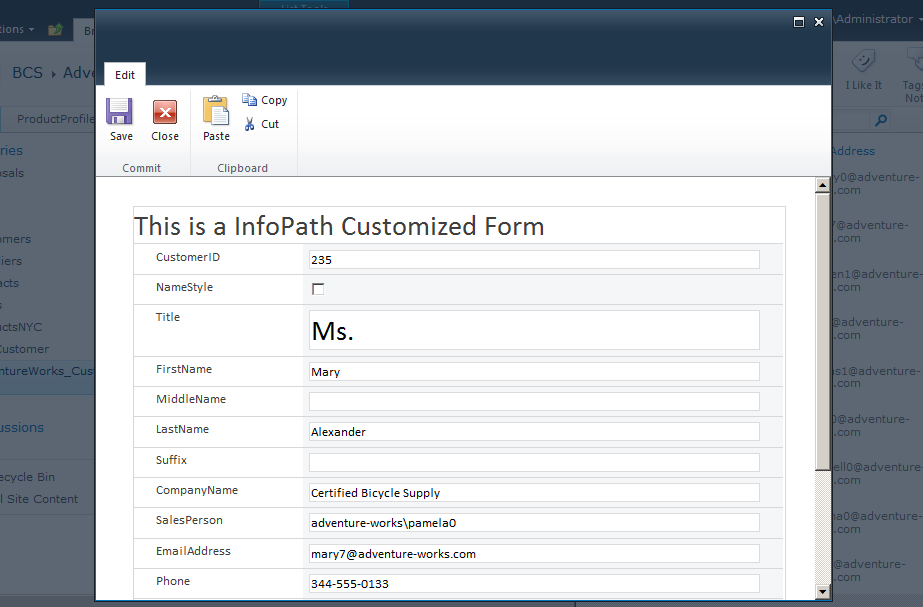
The way to modify an external list form is to use SharePoint Designer 2010 as a stepping stone to InfoPath 2010. Open your SharePoint site within SharePoint Designer by clicking Site Actions, and then click Edit in SharePoint Designer. Open the external list within SharePoint Designer, so you see the List Settings page displayed in the workspace. The Design Forms in InfoPath command is now available on the List Settings ribbon tab, in the Actions group, as shown in Figure 7-27. Click the Design Forms in InfoPath command to open the form in InfoPath.
Using InfoPath, you can apply logic such as input masks or validation rules to the fields within your form. You can use conditional formatting to highlight values such as low stock, and you can change fonts and colors as well as make other cosmetic changes. When you have completed your modifications, click the File tab, and then in the Backstage view, click Quick Publish, which publishes your form back to the external list. Figure 7-28 shows the external list form being modified in InfoPath 2010.
Once the form is published, you can test the changes within your external list. Some obvious changes have been made, as shown in Figure 7-29.
Connecting External Data with Office Client Applications
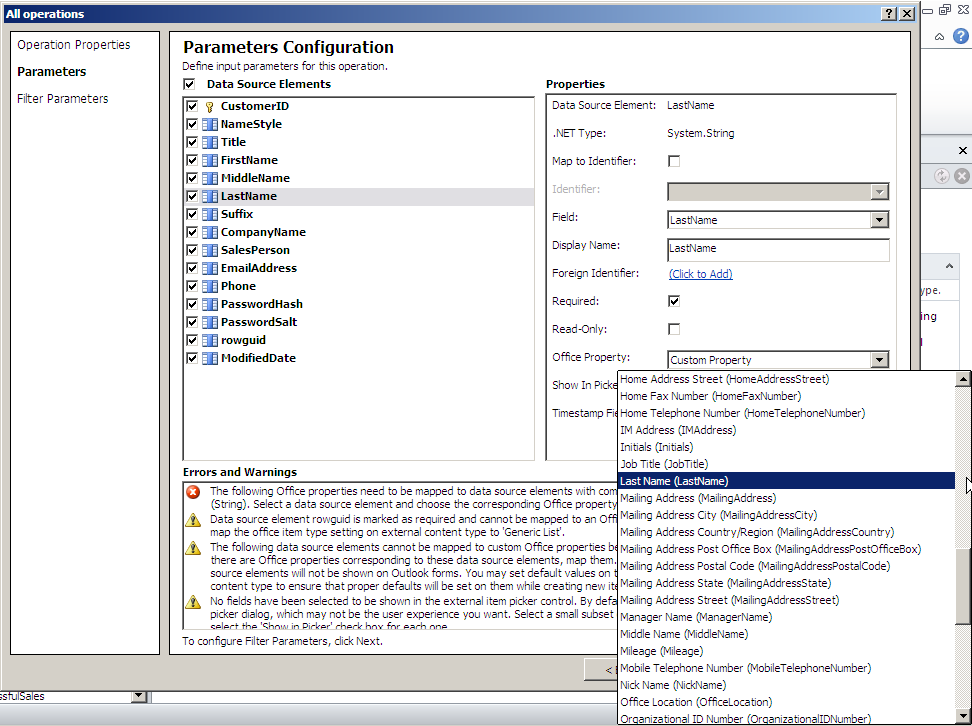
When you create an External Content Type (ECT) in either SharePoint Designer or Visual Studio, you can set the Office Item Type property for the ECT. This property determines the way your data is treated when you connect to the external data source in Microsoft Outlook 2010. While you are configuring the ECT, you can map each of the columns using the Office Property control for a specific Office item type. Setting the Office property is important so that Outlook 2010 displays the data as desired. The Office types include the following:
Figure 7-30 displays the ECT configuration wizard in SharePoint Designer 2010, where the mapping between external data columns and Office property columns is made.
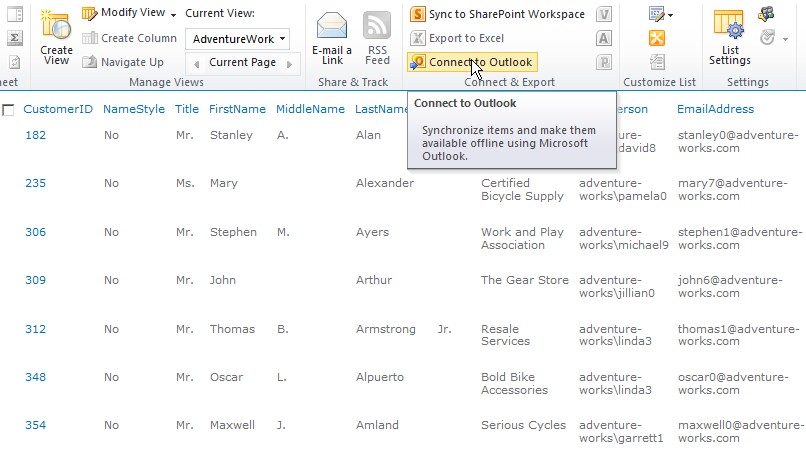
Once the Office type is set for the ECT and the Office properties are mapped, you can connect the external data to Outlook. Each user can make the data available in Outlook by clicking the Connect to Outlook button on the List ribbon tab in the List Tools tab set of an external list. Figure 7-31 shows an external list with Adventure Works customers being connected to Outlook as contacts.
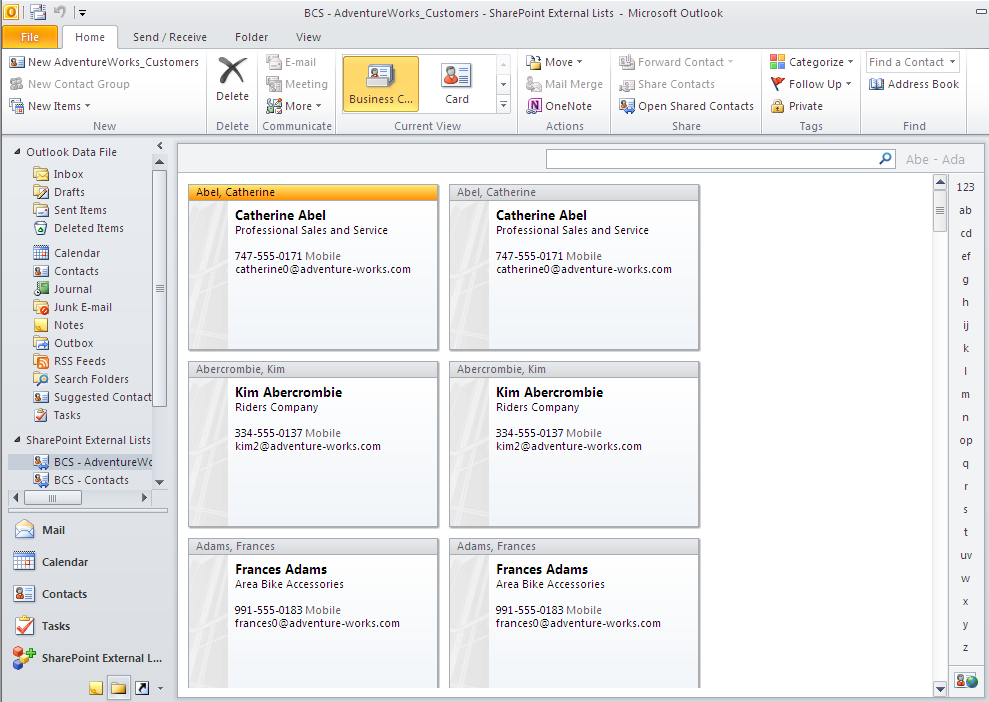
After you click the Connect to Outlook button and verify that you want to continue, the Outlook client opens and you can see a folder created under SharePoint external lists within your Outlook data file. The contacts will be synchronized, and you can use them as you do any Outlook contact. Modifying a contact also modifies the contact in the external list (if you have permission to do so), which in turn makes the modification in the external data source. Figure 7-32 shows the Adventure Works data residing in Outlook as a contacts list.
Unlike other SharePoint lists or libraries that are connected to Outlook, the synchronization settings of connected external lists are not controlled by the Send/Receive settings. External lists are synchronized by default every six hours. When you right-click an external list in Outlook, you can find the Synchronization status and when the data was last refreshed from the external system. You can then force synchronization.
If you have the Enterprise edition of SharePoint Server, and the ECT is configured to allow Offline Sync for External Lists, you can view and edit cached copies of the SharePoint content, but your modifications are not synchronized with the external data source. To synchronize the content, you must go online.
SharePoint Workspace 2010
SharePoint Workspace is a new Microsoft Office product (formerly known as Groove) that allows you to take some SharePoint list or library offline within a client application and keep the data synchronized with the list or library on the server. Some lists or libraries cannot be taken offline, including publishing libraries, page libraries, calendars, and wiki pages.
You can view, modify, and delete external data from SharePoint Workspace while you are disconnected—for example, perhaps you are traveling without an Internet connection. The Sync ribbon within SharePoint Workspace allows you to force synchronization between the client and the server. External list data is made available to SharePoint Workspace in the same way that external list data is made available to Outlook. When you have an external list open, you can click the Sync to SharePoint Workspace button on the list ribbon. Figure 7-33 shows the external data synchronized within SharePoint Workspace.
The external list functionality in SharePoint Workspace allows you to sort, filter, and search the external data. Double-clicking an item enables you to edit the item, and you can select the New and Delete options from the ribbon.
External Data and Access 2010
For a long time, you have been able to create linked tables from an external data source in Microsoft Access. A linked table means that the data does not actually reside within the Access database, but is linked to instead, and the Access database stores the schema for the external data source that it is connected to.
Within Access 2010, you can connect to the following external data sources:
These options provide you with plenty of opportunities to connect to most external data sources to create a linked table. Once you have a linked table in Access, the business solution opportunities are vast. You have the ability to create mashups of data from external sources and Access data within queries, build simple forms, and report on external data. You cannot connect to an external list as you would any other SharePoint list or library; rather, you need to use the external data source type Data Services.
Note
Mashup is a term used in web development. It refers to a page, dashboard, or application that combines data from two or more sources.
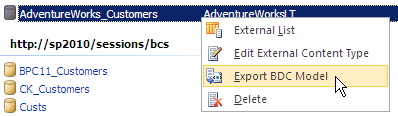
One of the types of external data sources you can connect to is Data Services, which allows you to connect to a BCS definition file, also known as the BDC model. First create a BDC model—that is, in SharePoint Designer, right-click the ECT that defines your external data source and select Export BDC Model, as shown in Figure 7-34.
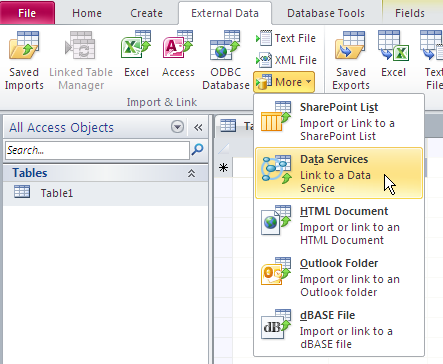
In the Export BDC Model dialog box, type the name of the BDC model and select Client from the Settings list. Save the file with an .xml extension to a location on your hard drive or desktop, and then open Access. Within Access, create a new blank database. On the External Data ribbon tab, in the Import & Link group, click More, and then click Data Services, as shown in Figure 7-35. A Create Link to Data Services dialog box opens that allows you to connect to your business data through BCS.
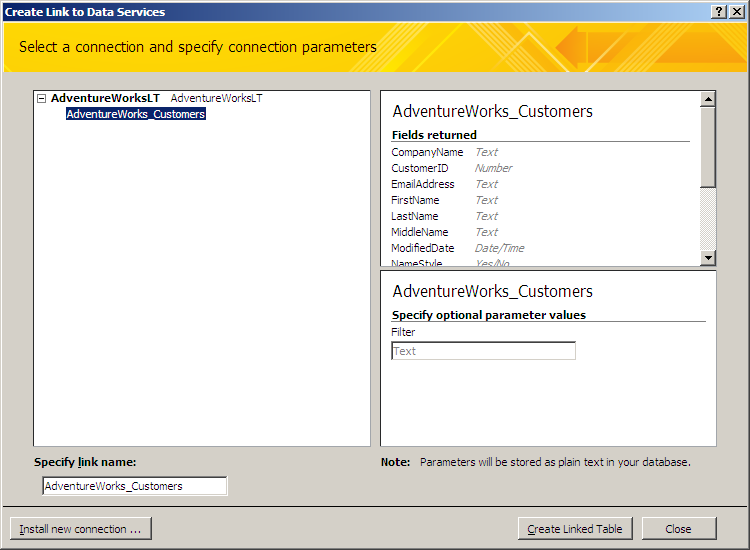
At the bottom-left of the Create Link to Data Services dialog box, click Install New Connection. The Select a Connection Definition File dialog box opens, where you can browse to the saved BDC definition file that you exported from SharePoint Designer 2010. When you open the definition file in Access, you can view the properties of the ECT and optionally provide a filter value to return a subset of the data, as shown in Figure 7-36. The filter must be configured already in the ECT.
At the bottom-right of the Create Link to Data Services dialog box, click Create Linked Table. You can open the linked table within Access to view the external data. Figure 7-37 displays the finished result: a linked table in Microsoft Access showing data accessed via BCS.
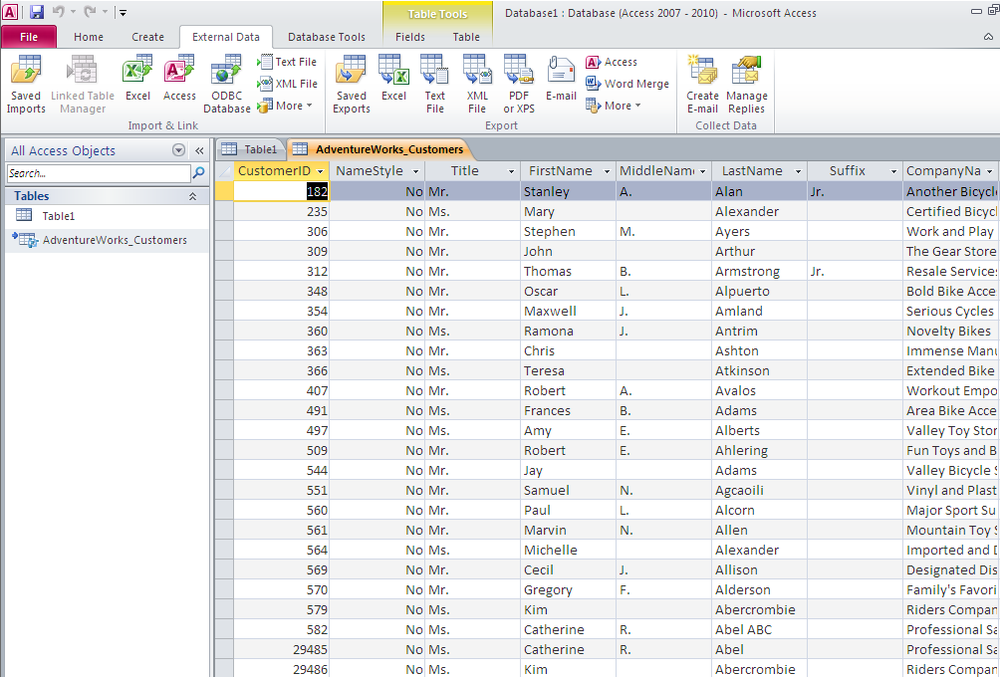
Using the linked table, you can now use Access to create queries, forms, and reports. You do not need to be connected via a SharePoint server—Access will connect directly with the external data source.
Data Visualization in Excel and Visio
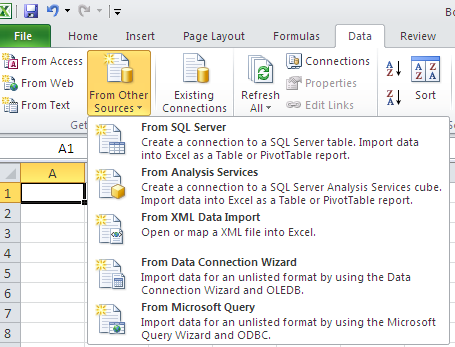
Microsoft Excel does not provide any integration with Business Connectivity Services (BCS). However, both Excel and Visio 2010 tools offer great data visualization. Data visualization is an interesting and effective way to display data. Data displayed in this way is easier to read than lists of data. Excel 2010 has improved on the way that external data can be displayed. Notice that in Excel 2010, you can connect to Microsoft SQL Server databases and Microsoft SQL Server Analysis Services (SSAS), among many other choices. Once you are connected to the data, you can create pivot tables and charts, and use conditional formatting to display the data in an appealing way. Although connecting to BCS is not an out-of-the-box option for Excel 2010, you can write server-side code to provide the connectivity to Excel from an external list. Connecting to Excel using server-side code is covered in Chapter 12. Figure 7-38 shows the external data connection choices in Excel 2010.
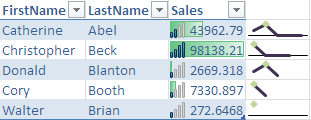
A new feature of Excel 2010 allows cell-embedded shading, charts, and icons to show the compared values within a table. These options are created by conditional formatting. Sparklines also add data visualization to a table of external data—these are the small line-graphs that compare values within a column, as you can see in Figure 7-39.
Visio 2010 also provides the ability to display data visualization diagrams, but it doesn’t currently connect directly to BCS. You can connect to an external data source using the Link Data to Shapes button on the Data ribbon tab, as shown in Figure 7-40.
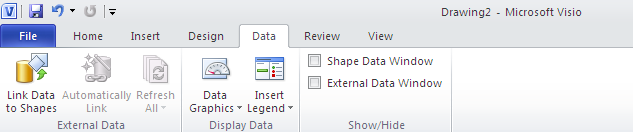
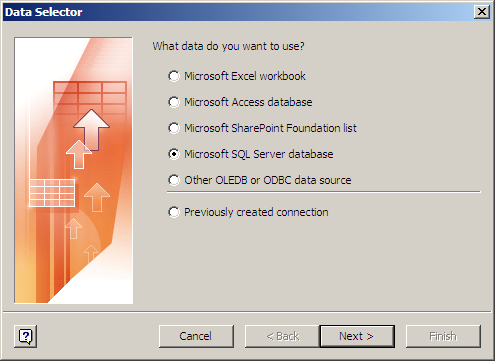
On the Data tab, in the External Data group, click Link Data to Shapes to open a dialog box with connection choices, as shown in Figure 7-41. If you select the option Microsoft SharePoint Foundation List, you cannot connect to a BCS external list as you can in InfoPath Designer, but you can still connect directly to an SQL database or any other SharePoint list.
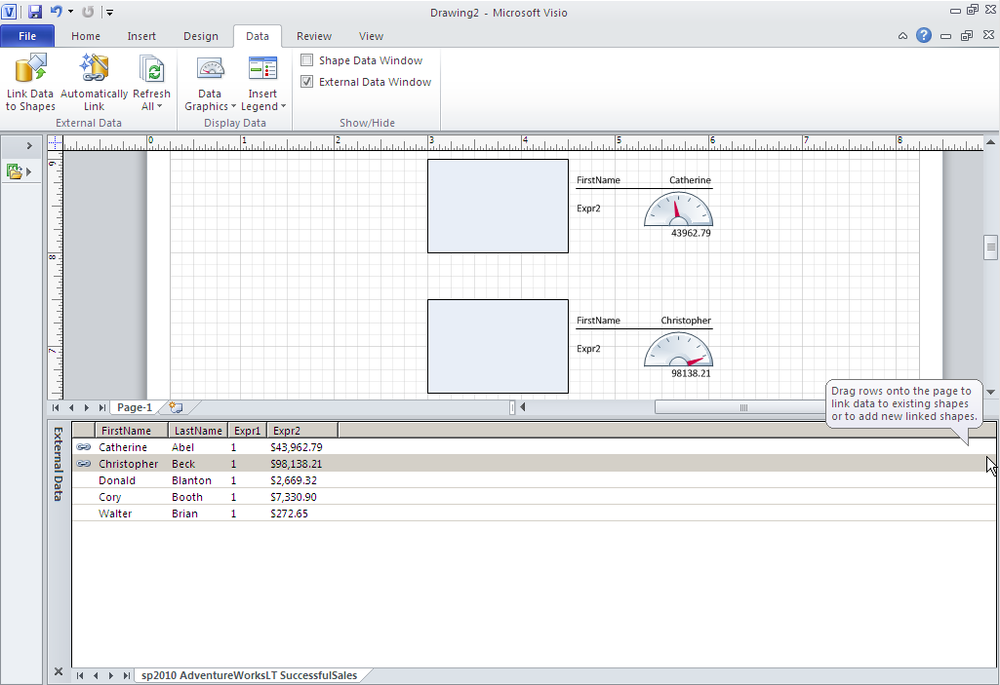
Once you have completed the connection wizard and connected to your external data source, you can drag rows of data from a table onto the page to insert a data shape. On the Data ribbon tab, in the Display Data group, click Data Graphics to refine the shape. Figure 7-42 shows the external data from SQL being mapped using shapes within a Visio diagram.
Troubleshooting BCS Solutions on the Client
Typically, any issues that arise in Business Connectivity Services (BCS) are related to the logged-on user having insufficient permissions to view or write back to the external data source. You can, however, create a trace to monitor BCS on the server and the client using Performance Monitor, and then view the events using Event Viewer.
To set up Performance Monitor to monitor BCS, follow these steps:
Click Start, and then type Perfmon in the Search Program and Files text box.
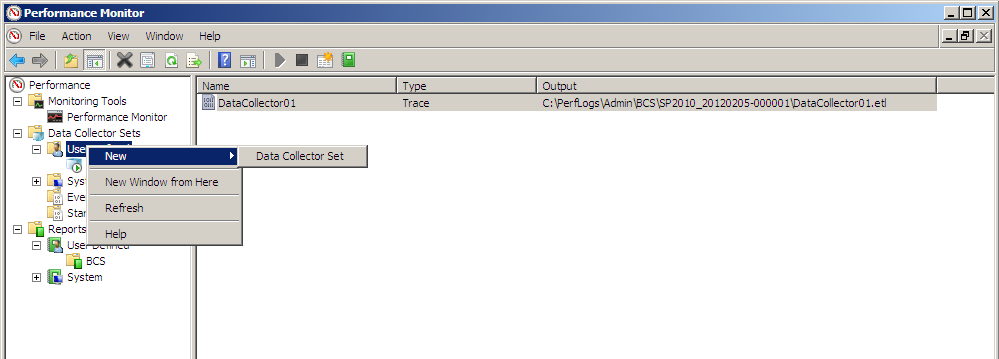
To display the Create New Data Collector Set dialog box, right-click User Defined, point to New, and then select Data Collector Set, as shown in Figure 7-43.
In the Name text box, type a name for your Data Collector Set and select Create Manually (Advanced).
Click Next to display the What Type of Data Do You Want to Include page.
Select Performance Counter and Event Trace Data. Then click Next to display the Which Performance Counters Would You Like to Log page.
For the Performance Counter, add a BDC Metadata Cache Hits Per Second counter and then click Next to display the Which Event Trace Providers Would You Like to Enable page.
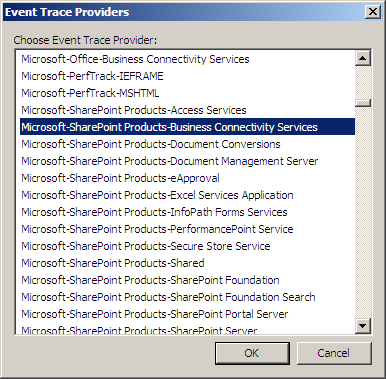
For the provider, add Microsoft SharePoint Products–Business Connectivity Services, as shown in Figure 7-44.
Follow these steps to open Windows Event Viewer:
Click the Start button, select Administrative Tools from the Start menu, and then select Event Viewer.
Right-click Saved Logs and choose Open Saved Log.
In the Open Saved Log dialog box, navigate to the Saved log you created in Performance Monitor.
Perform some offline activities such as view, edit, and delete.
View your event log.
Note
See Also For more information about monitoring and diagnostic logging in BCS, go to http://technet.microsoft.com/en-us/library/ff463594.aspx.
Optimizing Back-End Synchronization
You have a few options to consider when coding a BCS connection with Visual Studio that will have an impact on the performance of your data retrieval. When using SharePoint Designer to create the connection, one of the main methods of increasing back-end synchronization is to create filters—the less data to synchronize to the client, the better. Using SharePoint Designer 2010, when you create an ECT, you can create a filter on your data.
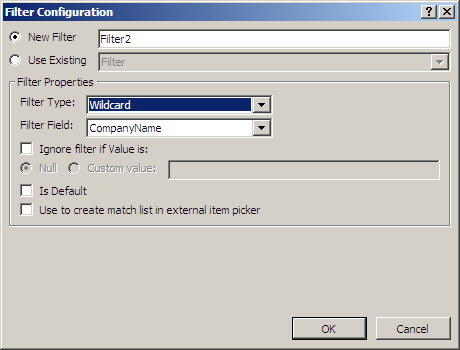
The filters supported by the synchronization framework that you can use to reduce the number of items downloaded are Wildcard, Comparison, and Limit filters. You can use a Wildcard filter to synchronize all customers whose company name starts with A as the filter value, for example. Or you can select all customers whose zip code is equal to “34216” by using a Comparison filter. You can use a Limit filter to limit the number of returned items. Since external lists can provide a maximum of only 5,000 items, you will be forced to display fewer items than you actually have within your external data source. If you sort your customers as an example by country, it may mean that if you have 5,500 customers, the last 500 of those in the United Kingdom or United States are not shown. You can therefore create better filters, such as a view for United Kingdom customers only, and create your own filter, such as 500 if you only had around 300–400 customers. These filters are also useful for limiting the items below 200, which is beneficial for the item picker dialog box, which can display a maximum of 200 items. Figure 7-45 shows the Filter Configuration dialog box within the SharePoint Designer ECT configuration wizard.
Summary
In this chapter, you explored how you can use Business Connectivity Services (BCS) within client applications. You examined using SharePoint Designer when setting the Office type, which controls the behavior of the data when it is connected to in Outlook. You also looked at how to use SharePoint Workspace to take data offline, along with Microsoft Access, Microsoft Word, and Microsoft InfoPath. You learned that you can now use Microsoft Access to create a linked table to BCS, and how you can use InfoPath and Word to look up external data.