

In this chapter, you will learn how to | |
|---|---|
✓ | Add WordArt text. |
✓ | Insert symbols and equations. |
✓ | Insert screen clippings. |
✓ | Create hyperlinks. |
✓ | Attach actions to text or objects. |
We have looked at some of the more common graphic elements you can add to a slide to reinforce its concepts or to make it more attention grabbing or visually appealing, such as pictures, diagrams, and charts. But for some slides, you might need more specialized visual elements. You might also need to add navigation aids or ways to access supporting materials that are external to the presentation.
In this chapter, you’ll use WordArt text to create a fancy title. You’ll also insert a symbol, build a simple equation, and capture a screenshot from a Web page. Finally, you’ll add hyperlinks and action buttons that jump to slides within a presentation, open files and message windows, and display Web pages.
Practice Files
Before you can complete the exercises in this chapter, you need to copy the book’s practice files to your computer. The practice files you’ll use to complete the exercises in this chapter are in the Chapter09 practice file folder. A complete list of practice files is provided in Using the Practice Files at the beginning of this book.
If you’re familiar with WordArt in earlier versions of Microsoft PowerPoint, you’re in for a surprise. WordArt has matured from the fun little tool you might have used in the past to create slide titles in molded shapes and gaudy colors. Its capabilities are now oriented toward creating more sophisticated text objects that you can move independently, just like text in a text box.
To insert WordArt text, you click the WordArt button in the Text group on the Insert tab and click a text style in the WordArt gallery. Then you enter the text in a text box that appears in the middle of the slide. You can edit the text, adjust the character formatting in the usual ways, and change the WordArt style at any time.
Tip
You can also select existing text in a placeholder and then click a thumbnail in the WordArt Styles gallery to apply a fancy style to the text.
See Also
For information about character formatting, see Changing the Alignment, Spacing, Size, and Look of Text in Chapter 4.
When a WordArt text object is selected, you can use the commands on the Format contextual tab to format it to meet your needs. For example, from the Format tab, you can change the fill and outline colors, add effects such as shadows and beveled edges, and change the text direction and alignment.
In this exercise, you’ll insert a new WordArt text object and then modify it.
Set Up
You need the Organization_start presentation located in your Chapter09 practice file folder to complete this exercise. Open the Organization_start presentation, and save it as Organization. Then follow the steps.
Display slide 1. Then on the Insert tab, in the Text group, click the WordArt button.
The WordArt gallery appears, displaying a list of styles.
In the gallery, click the third thumbnail in the fifth row (Fill – Orange, Accent 2, Warm Matte Bevel).
PowerPoint inserts a WordArt object in the slide.
With the placeholder text selected, type Organization 101.
The replacement text has the same style as the placeholder text.
Click the border of the WordArt object to select it for manipulation. Then move and resize the WordArt object so its frame spans the middle of the top half of the slide.
Tip
A WordArt object works just like any other text box. You click inside it to edit the text and you click its border to select the object as a whole. For information about text boxes, see Adding Text Boxes in Chapter 3.
Select the text, and on the Format contextual tab, in the WordArt Styles group, display the gallery, and try a few other styles. When you have finished exploring, click the second thumbnail in the first row (Fill – None, Outline – Accent 2).
With the text still selected, in the WordArt Styles group, click the Text Fill arrow. Then under Theme Colors, click the third box in the orange column (Orange, Accent 2, Lighter 40%).
In the WordArt Styles group, click the Text Outline arrow, and then under Theme Colors, click the third box in the third column (Ice Blue, Background 2, Darker 50%).
In the WordArt Styles group, click the Text Effects button, point to Transform, and then under Warp, click the last thumbnail in the first row (Triangle Down).
With the text still selected, click the Text Effects button again, point to Reflection, and then under Reflection Variations, click the second thumbnail in the second row (Half Reflection, 4 pt offset).
The reflections vary by the amount of reflection shown and the starting point below the text.
Drag the pale blue handle in the middle of the bottom of the frame down until the reflection sits just above the subtitle.
The letters in the middle of the WordArt object stretch so that the triangle effect is more exaggerated.
Click an edge of the slide to release the selection.
You can now see the results.


Some slide text requires characters not found on a standard
keyboard. These characters might include the copyright (©) or
registered trademark (®) symbols, currency symbols (such as € or £),
Greek letters, or letters with accent marks. Or you might want to add
arrows (such as ![]() or
or ![]() ) or graphic icons (such as ☎ or
) or graphic icons (such as ☎ or
![]() ). PowerPoint gives you easy access to a huge
array of symbols that you can easily insert into any slide. Like
graphics, symbols can add visual information or eye-appeal to a slide.
However, they are different from graphics in that they are characters
associated with a particular font.
). PowerPoint gives you easy access to a huge
array of symbols that you can easily insert into any slide. Like
graphics, symbols can add visual information or eye-appeal to a slide.
However, they are different from graphics in that they are characters
associated with a particular font.
Keyboard Shortcut
You can insert some common symbols by typing a keyboard combination. For example, if you type two consecutive dashes followed by a word and a space, PowerPoint changes the two dashes to a professional-looking em-dash—like this one. (This symbol gets its name from the fact that it was originally the width of the character m.) To use these keyboard shortcuts, display the Backstage view, click Options, and then, on the Proofing page of the PowerPoint Options dialog box, click AutoCorrect Options. On the AutoCorrect page of the AutoCorrect dialog box, ensure that the Replace Text As You Type check box is selected, and then select or clear check boxes in the Replace Text As You Type area of the AutoFormat As You Type page.
See Also
For more information about keyboard shortcuts, see Appendix A at the end of this book.
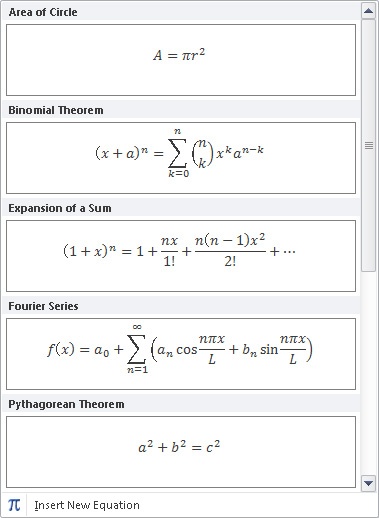
You can insert mathematical symbols, such as π (pi) or Σ (sigma, or summation), the same way you would insert any other symbol. But you can also create entire mathematical equations on a slide. You can insert some predefined equations, including the Quadratic Formula, the Binomial Theorem, and the Pythagorean Theorem, with a few clicks. If you need something other than these standard equations, you can build your own equations by using a library of mathematical symbols. Equations are accurately rendered mathematical formulas that appear in the slide as fields.
The buttons for inserting symbols and equations are in the Symbols group on the Insert tab.
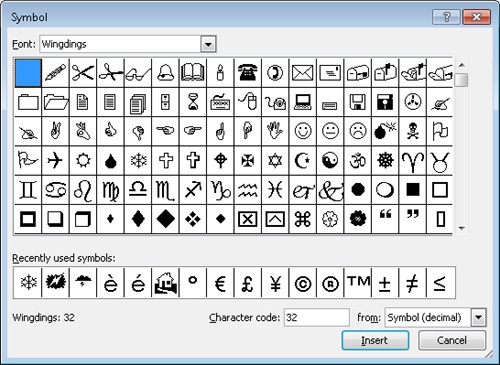
Clicking the Symbol button displays the Symbol dialog box, where you can select from hundreds of symbols and special characters in a variety of fonts.
Clicking the Equation arrow displays the Equation gallery of commonly used equations.
Clicking the Equation button inserts a box where you can type an equation, and also adds the Design contextual tab to the ribbon. This tab provides access to mathematical symbols, structures such as fractions and radicals, and the Equation Options dialog box.

In this exercise, you’ll add a symbol to a slide. Then you’ll build a simple equation and display it in various ways.
Set Up
You need the TemperatureCelsius_start presentation located in your Chapter09 practice file folder to complete this exercise. Open the TemperatureCelsius_start presentation, and save it as TemperatureCelsius. Then follow the steps.
Display slide 13, and in the table, click to the right of Winter.
On the Insert tab, in the Symbols group, click the Symbol button.
The Symbol dialog box opens.
In the dialog box, display the Font list, scroll to the bottom, and then click Wingdings.
The Symbol dialog box now displays all the characters in the Wingdings font.
Click an icon that represents winter, such as the snowflake in the fourth row. Then click Insert, and click Close.
PowerPoint inserts the selected symbol at the cursor.
Repeat step 4 to insert symbols for Spring, Summer, and Fall, switching to different fonts if necessary to find the symbols you want.
Each season now has a symbol.
Click a blank area of the slide to deselect the table. Then on the Insert tab, in the Symbols group, click the Equation button.
A text box containing an equation field appears near the middle of the slide, and the Design contextual tab appears on the ribbon.
Click the border of the text box to select it for manipulation, and drag it to the lower-left corner of the slide.
In the text box, the equation field appears as a placeholder that you can replace with your equation.
Troubleshooting
The appearance of buttons and groups on the ribbon changes depending on the width of the program window. For information about changing the appearance of the ribbon to match our screen images, see Modifying the Display of the Ribbon at the beginning of this book.
Click anywhere in the equation placeholder, and press the Home key to position the cursor at the left end of the placeholder, before the equation field. Then type To convert to Celsius: (including the colon and a space).
Click the equation placeholder, and on the Design contextual tab, in the Structures group, click the Fraction button.
The Fraction gallery appears.
In the gallery, click the first thumbnail in the first row (Stacked Fraction).
The structure for a simple fraction is inserted in the field at the cursor.
Click the top box in the fraction structure, and type F-32. Then click the bottom box, and type 9.
Click the blank area to the right of the equation field. Then press the Spacebar, type x, press the Spacebar, and type 5. Then click a blank area of the slide.
This equation subtracts 32 from the Fahrenheit temperature and divides the result by 9, and then multiplies that result by 5 to yield the Celsius temperature. PowerPoint has taken care of formatting the fraction so that it looks professional.
Click the fraction, and then on the Design contextual tab, in the Tools group, click the Linear button.
The format of the fraction changes.
Right-click the fraction, point to Math Options, and then click Professional.
Right-click the fraction again, point to Math Options, and then click Change to Skewed Fraction.
Right-click again, point to Math Options, and then click Change to Stacked Fraction.


Setting Math AutoCorrect Options
If you frequently create slides that contain mathematical formulas, you don’t have to rely on the Design contextual tab to insert mathematical symbols. Instead, you can type a predefined combination of characters and have PowerPoint automatically replace it with a corresponding math symbol. For example, if you type infty, PowerPoint replaces the characters with the infinity symbol.
This replacement is made possible by the Math AutoCorrect feature. You can view all the predefined combinations by displaying the Backstage view, clicking Proofing, and then clicking AutoCorrect Options. Then in the AutoCorrect dialog box, click the Math AutoCorrect tab.

Tip
You can create custom Math AutoCorrect entries in the same way you create text AutoCorrect entries. For information, see Correcting and Sizing Text While Typing in Chapter 3.
These days, many people rely on the Web as a source of the information they use in their daily life. Sometimes that information is presented in a graphic that would be useful in a PowerPoint presentation. Included in PowerPoint 2010 is a screen clipping tool that you can use to capture an image of anything that is visible on your computer screen.
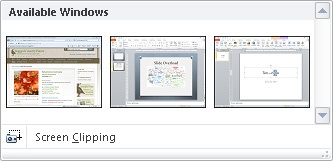
After you display the content you want to include in a slide, you switch to PowerPoint and click the Screenshot button in the Images group on the Insert tab. You can then insert a screen clipping in one of two ways:
Clicking a window thumbnail in the Screenshot gallery inserts a picture of that window into the slide at the cursor.
Clicking Screen Clipping at the bottom of the gallery enables you to drag across the part of the screen you want to capture, so that only that part is inserted as a picture into the slide.
In this exercise, you’ll capture a screen clipping from a Web site and then insert it into a slide.
Set Up
You need the DesertPlants_start presentation located in your Chapter09 practice file folder to complete this exercise. Open the DesertPlants_start presentation, and save it as DesertPlants. Then follow the steps.
Display slide 2, and then at the right end of the program window title bar, click the Minimize button.
Start your Web browser, and display a Web site from which you want to capture a screen clipping.
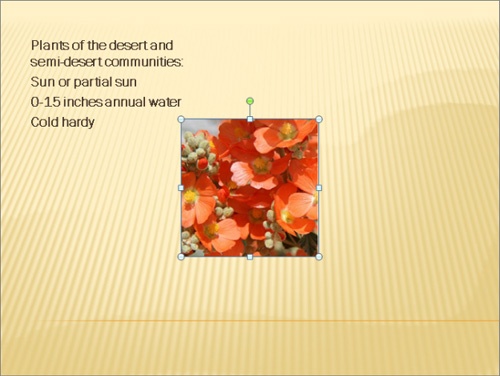
For example, we searched for pictures of desert plants.
On the Windows Taskbar, click the button for the DesertPlants presentation. Then on the Insert tab, in the Images group, click the Screenshot button.
A gallery displays the open windows from which you can capture a screen clipping.
At the bottom of the gallery, click Screen Clipping.
The PowerPoint program window is minimized on the Windows Taskbar, and a translucent white layer covers the entire screen.
On the Web page, point to the upper-left corner of the image you want, and drag down and to the right to select it.
For example, we dragged across a picture of a desert flower.

As you drag, the white layer is removed from the selected area so that you can see what you are selecting.
When you release the mouse button, PowerPoint inserts the screen clipping into the center of the slide.
See Also
For information about formatting pictures, see Inserting Pictures and Clip Art Images in Chapter 5 and Editing Pictures in Chapter 8.

Presentations that are intended to be viewed electronically often include hyperlinks to provide access to supporting information. That information might be on a hidden slide, in another presentation, in a file on your computer or your organization’s network, or on a Web site. You can also use a hyperlink to open an e-mail message window so that people viewing the presentation can easily contact you.
You can attach a hyperlink to any selected object, such as text, a graphic, a shape, or a table. Clicking the hyperlinked object then takes you directly to the linked location. Editing the object does not disrupt the hyperlink; however, deleting the object also deletes the hyperlink.
In this exercise, you’ll create one hyperlink that opens an e-mail message window and another that opens a document. You’ll also create a hyperlink with an informative ScreenTip that starts the default Web browser and jumps to a specific Web page.
Set Up
You need the OrganizationLinks_start presentation and the Procedures document located in your Chapter09 practice file folder to complete this exercise. Be sure an e-mail program is configured on your computer and connect to the Internet before beginning this exercise. Open the OrganizationLinks_start presentation, and save it as OrganizationLinks. Then follow the steps.
Display slide 8, and in the lower-right shape, select the words Contact Info.
On the Insert tab, in the Links group, click the Hyperlink button.
The Insert Hyperlink dialog box opens.
Under Link to, click E-mail Address.
The dialog box options change to those needed for an e-mail hyperlink.
In the E-mail address box, type [email protected], and then in the Subject box, type Organization presentation.
Notice that PowerPoint changes the entry in the E-mail Address box to mailto:[email protected].
Click OK, and then click away from the diagram.
The text is now underlined and gray, the color designated by the presentation’s theme for hyperlinks.
On the View Shortcuts toolbar, click the Reading View button.
Click Contact Info.
Your default e-mail program displays a message window with the specified e-mail address entered in the To box and the specified subject entered in the Subject box.
Close the message window without sending the message, and then press Esc to return to Normal view.
Display slide 4, and then click the graphic.
On the Insert tab, in the Links group, click the Hyperlink button, and then in the Insert Hyperlink dialog box, under Link to, click Existing File or Web Page.
The list box in the center changes to show the contents of the last folder you accessed.
With the contents of the Chapter09 folder displayed, double-click the Procedures document.
Switch to Reading view, point to the graphic to see the path of the hyperlinked file displayed as a ScreenTip, and then click the graphic.
Tip
The pointer changes to a pointing hand when you move it over a hyperlinked object. Any time the pointer has this shape, you can click to follow a hyperlink.
Microsoft Word 2010 opens and displays a document about office procedures.
Close Word, and then press Esc to return to Normal view.
Display slide 5, and then click the clock to the left of the table.
In the Links group, click the Hyperlink button, and then in the upper-right corner of the Insert Hyperlink dialog box, click ScreenTip.
The Set Hyperlink ScreenTip dialog box opens.
In the ScreenTip text box, type Check out this book, and then click OK.
Back in the Insert Hyperlink dialog box, in the Address box, type http://go.microsoft.com/fwlink/?LinkId=192151, and then click OK.
Display the slide in Reading view, and point to the clock graphic.
PowerPoint displays the ScreenTip you entered.
Click the graphic.
Your Web browser starts, and if you are connected to the Internet, you are taken to the Web page for our book Microsoft Outlook 2010 Step by Step.
Close the browser window, and then press Esc to return to Normal view.


In addition to attaching hyperlinks to text or objects by clicking the Hyperlink button, you can attach them by clicking the Action button, which is also in the Links group on the Insert tab. In the dialog box that opens, you can specify whether the action should take place when you point to the linked text or object or when you click it. You can designate a target to which PowerPoint should jump if the link is pointed to or clicked, or designate an action to perform such as starting a program or playing a sound.
If attaching an action to existing text or an object on a slide doesn’t suit your needs, you can insert an action button. PowerPoint provides navigation action buttons (Back, Forward, Beginning, End, Home, and Return) and display action buttons (Document, Help, Information, Movie, and Sound) as well as a generic action button that you can customize.
In this exercise, you’ll select a word in a bulleted list and attach an action that displays a hidden slide when the word is clicked. You’ll also attach a sound that plays when you point to a slide title. Finally, you’ll create action buttons that you can click to move between presentation slides and an overview slide.
Set Up
You need the MeetingAction_start presentation located in your Chapter09 practice file folder to complete this exercise. Open the MeetingAction_start presentation, and save it as MeetingAction. Then follow the steps.
Display slide 8, switch to Reading view, and then click the Next button to move to the next slide. Press Esc to return to Normal view.
On the Slides tab of the Overview pane, notice that PowerPoint skipped from slide 8 to slide 10 because slide 9 is hidden. Let’s create an action to display this slide when appropriate.
See Also
For information about hiding slides, see Adapting Presentations for Different Audiences in Chapter 14.
On slide 8, select the words Equipment replacement.
On the Insert tab, in the Links group, click the Action button.
The Action Settings dialog box opens.
On the Mouse Click page, in the Action on click area, click Hyperlink to, display the list, and then click Slide.
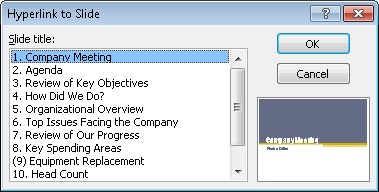
The Hyperlink To Slide dialog box opens.
In the Slide title list, click (9) Equipment Replacement.
You want to be able to click the words Equipment replacement to go to the slide containing the replacement costs, when appropriate.
Click OK to close the Hyperlink to Slide dialog box, and then click OK again to close the Action Settings dialog box.
The words Equipment replacement are now underlined and displayed in the color assigned by the theme to hyperlinks.
Display slide 4, and select How Did We Do?
In the Links group, click the Action button, and then in the Action Settings dialog box, click the Mouse Over tab.
This page of the dialog box is almost identical to the Mouse Click page.
Below the Action on mouse over area, click Play sound, display the list of built-in sounds, click Applause, and then click OK.
The title is now underlined and displayed in the hyperlink color.
Switch to Reading view, and then point to How Did We Do?.
The Applause sound plays.
Right-click the screen, point to Go to Slide, and then click 8 Key Spending Areas.
In the bulleted list, click Equipment replacement.
PowerPoint displays the hidden slide.
Press Esc to return to Normal view, and then display slide 6.
On the Insert tab, in the Illustrations group, click the Shapes button.
The Shapes gallery appears.
Under Action Buttons at the bottom of the gallery, click the Action Button: Home icon.
The pointer changes to a cross.
In the upper-right corner of the slide, drag the cross pointer to create a Home action button about half an inch square.
When you release the mouse button, the Action Settings dialog box opens with the Hyperlink To option selected and First Slide in the box below. At the bottom of the dialog box, the Highlight Click check box is selected, but dimmed to indicate that you cannot change this setting.
Display the Hyperlink to list, and click Slide.
The Hyperlink To Slide dialog box opens.
In the Slide title list, click 2. Agenda, and then click OK twice.
With the action button still selected on the slide, on the Format contextual tab, in the Shape Styles group, click the More button, and then in the gallery, click the pale green thumbnail in the fourth row (Subtle Effect – Olive Green, Accent 2). Then click away from the button.
The color of the Home action button is now compatible with the background.
When you click the action button in Reading view or Slide Show view, you’ll jump to slide 2, which is an overview of slides 3 through 11. Referring back to this slide after showing half of the listed topics is a good idea, but suppose you need a quick way of jumping back to slide 6 so that you can resume the discussion.
Display slide 2, and then on the Insert tab, in the Illustrations group, click the Shapes button.
The Shapes gallery appears.
Under Action Buttons at the bottom of the gallery, click the Action Button: Return icon. Then in the upper-right corner of the slide, drag the cross pointer to create a Return action button about half an inch square.
When you release the mouse button, the Action Settings dialog box opens with the Hyperlink To option set to Last Slide Viewed.
Click OK to close the Action Settings dialog box.
Change the color of the action button to one that is compatible with the background.
The button is all ready for action.
Display slide 6, switch to Reading view, and then click the Home action button to jump to slide 2.
On slide 2, click the Return action button to jump back to slide 6, and then click the mouse button to display slide 7.
Press Esc to return to Normal view.


Fancy titles created with WordArt can have much more impact than regular text.
The Symbols dialog box provides access not only to the symbols you might need for a slide but also to little icons that can add pizzazz.
You can construct complex math equations on your slides and have PowerPoint display them in traditional math formats.
You can capture graphical information from Web sites or other programs for use on your slides.
In electronic presentations, you can add hyperlinks to text or objects to directly link to another slide or to a presentation, file, or Web address.
Action buttons also provide convenient ways to jump to other locations, play sounds, or run programs when you click or point to them.