The topics in this section include general VoIP features of Office Communications Server 2007 R2. The next section, "Examining the Technical Details Behind VoIP Scenarios," describes the technical aspects of using these features.
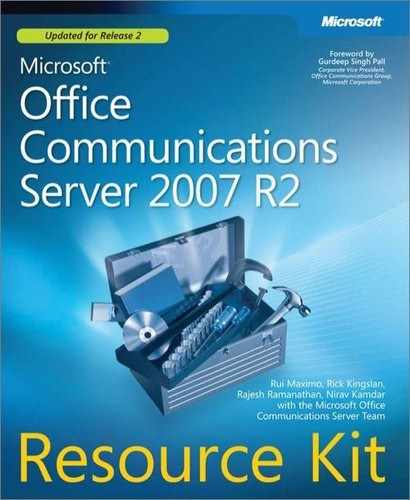
With basic two-party calling, one party can dial a number and establish an audio conversation with another party. The user can select a contact from his contact list and click the call icon. A conversation subject can be set so that the called party knows what the call is about. Alternatively, the user can right-click the contact and select a number from the drop-down menu, as shown in Figure 11-1. After the user installs Office Communicator, this right-click menu is also available in every Microsoft Office program (Word, Outlook, and so on) including Office SharePoint, as shown in Figure 11-2. This consistent user experience reinforces users’ familiarity with making a call.
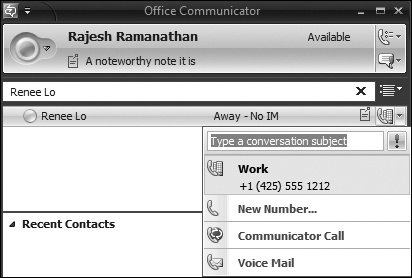

Calling an internal user is one click away because the caller can dial based on user name by locating the called party in the contact list or performing a search. But what about external users? In the case of external users, the caller will not be able to locate the party to be called by name unless the user adds this external party to the Outlook address book. Instead, a phone number must be dialed. Dialing from Communicator is as simple as typing the phone number in the Search field and pressing the Enter key or clicking the phone icon, as shown in Figure 11-3.

When an internal or external call is placed, Communicator displays an unobtrusive conversation window with visual controls that replace the obscure dial codes of PBX phones, making it much easier for users to discover these features and use them, as shown in Figure 11-4.
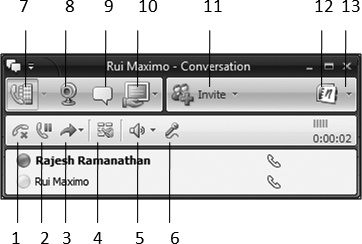
The controls shown in Figure 11-4 are numbered to match the following descriptions:
End the call.
Hold the call.
Transfer the call.
Expand the standard 3 × 4 dial pad.
Change the volume.
Mute the microphone.
Click to call.
Add video to the call.
Once video is added to a call, the video controls are displayed. These controls enable the user to change video size, change picture in picture, pause, or hold video. Note that changing to Large Size will cause the quality of the video to switch to VGA resolution (640 × 480) automatically. Selecting Full Screen can enable full-screen, high definition (HD)-quality–video for the call, provided the administrator has enabled this functionality for the user. See Chapter 19, for details.
Add IM to the call.
Add a Desktop Sharing session to the call.
Once Desktop Sharing is added to the call, the desktop sharing controls are displayed to the sharer on top of the screen. The sharer’s screen also displays a border highlighting the content that is shared.
Invite additional participants to the call.
Take notes associated with the call, using Microsoft OneNote.
The down-arrow caret displays a drop-down menu with additional options, such as taking notes, sending a file to the other person the user is talking to, and setting and changing the conversation subject so that the called party gets an indication of the topic the calling party wants to discuss before answering the call. Also, similar to e-mail messages, the caller has the option to set a high-priority importance indicator for the called party to see.


Once the call is established, the audio comes through the computer speakers and microphone. For optimal audio quality, use a Universal Serial Bus (USB) phone or headset that is certified to work with Microsoft Office Communicator.
Call deflection refers to the ability of the called party to redirect the calling party to a different phone number before picking up the call. This capability is valuable if you’re about to step out for a meeting but need to answer a call, which perhaps is a call you’ve been expecting. Ideally, the called party is able to redirect the call to her cell phone to take the call while commuting to her next appointment. Redirecting the call from your office phone to your mobile phone is a valuable feature that’s possible with Office Communicator 2007 R2. When a call comes in, a small window containing a system alert appears by default in the bottom right corner of the computer screen with an accompanying ringing sound. Deflecting the call is as simple as clicking the Redirect caret and selecting a phone number to forward the call to, as shown in Figure 11-5. This is essentially call forwarding on the fly.

Users have the flexibility to receive calls directed to their work numbers from home. For example, if your home computer doesn’t have Communicator 2007 R2 installed, you can sign in to Office Communications Server by using Microsoft Office Communicator Web Access (2007 R2 release) from a Web browser. Like Communicator 2007 R2, Office Communicator Web Access (2007 R2 release) also supports call deflection. Similar to Office Communicator, a system alert appears on the screen indicating a call is incoming, as shown in Figure 11-6. To deflect the incoming call from your work number to your home number, click the Redirect caret and select one of the published phone numbers to forward the call to. The caller thinks the call was answered at the office even though the call was forwarded seamlessly to a different number.

Before an incoming call can be redirected to a predefined phone number, the phone number must be published in the user’s settings. Once published, these phone numbers are available for selection in the Redirect drop-down menu. To publish these phone numbers, navigate to the Options dialog box under Tools and select the Phones menu, as shown in Figure 11-7.

Call forwarding enables you to configure your phone to automatically forward incoming calls directly to voice mail, to a contact, or to another phone number published in your Phones menu, as shown in Figure 11-7. Alternatively, the option to simultaneously ring a PSTN phone number or to forward the call is available. Figure 11-8 shows how to locate these settings and configure them from Office Communicator 2007 R2.

The Call-Forwarding Settings dialog box provides a quick way for users to share their own phone line with their delegates, similar to how they manage calendar delegates by using Outlook.
Office Communicator 2007 R2 provides two methods to share the phone line with other users or delegates. The first is a simple lightweight delegation option that enables users to configure Team Call. With Team Call, a user can let his colleagues pick up incoming calls on his behalf. All the user needs to do is to configure a Team-Call Group list in the call-forwarding settings (see Figure 11-8) with appropriate colleagues. If the user doesn’t answer an incoming call, the call is forwarded to the Team-Call Group members. Team Call works with the user and his colleagues, who are all using Office Communicator 2007 R2.
The second method is for users who have dedicated assistants to pick up their calls. Users can easily configure one or more assistants (who are using Office Communications Server 2007 Attendant Console R2) as their delegates. When using the delegation feature, Office Communications Server 2007 Attendant Console R2 (Attendant Console) is the recommended client for the delegate to obtain the best experience. This client enables the delegate not only to receive incoming calls on behalf of the user, but also to place outgoing calls on behalf of the user. There are several interesting scenarios for delegation that are solved by the Attendant Console. For example, setting up recurring conference calls by using templates is possible, as is taking notes during a call. Figure 11-9 shows the Attendant Console.

Communicator Web Access (2007 R2 release) provides a nearly identical interface for configuring these settings. So, if you’ve already left the office and forgot to configure your call-forwarding settings, it’s not too late to do it as soon as you are within reach of any computer with an Internet connection, as shown in Figure 11-10.

Office Communications Server 2007 R2 supports voice mail with Exchange Server 2007 Unified Messaging (UM) as the voice mail storage application—or in the case where Office Communications Server 2007 R2 is integrated with a supported PBX, Office Communications Server 2007 R2 enables the PBX to handle voice mail. Even if Communicator is not running, calls are routed to the user’s voice mail, and the user can later call her voice mail to listen to her messages or retrieve them directly from within her Outlook inbox. Chapter 12, covers voice mail in more detail.
A conference call occurs when three or more parties participate in the same call. There are multiple ways to establish an ad hoc conference call. A conference call can be started by adding all the parties at once—such as calling everyone on an e-mail thread from Microsoft Office Outlook 2007 or selecting the participants from the contact list in Office Communicator and initiating the call—or adding additional participants to a two-party call in progress. Figure 11-11 shows how to add participants to a two-party call. The peer-to-peer two-party call is changed on the server into a conference call. A focus is started. The focus is directed to one of the available conferencing servers associated with the pool, where the leader is homed to create a conferencing session. The session mixes all the audio feeds before sending the audio back to all the participants.

Another way of conducting an ad hoc conference call is to select all the participants before beginning the conversation. Instead of escalating from a two-party call, this approach immediately establishes a conference call, as shown in Figure 11-12.

Office Communicator 2007 R2 provides seamless pairing and integrated operation with Office Communicator Phone Edition R2. Using this capability, users can accept an incoming call from Office Communicator, and the audio will be handled by Office Communicator Phone Edition. Office Communicator Phone Edition will automatically answer the call and go into speaker mode. Office Communicator Phone Edition acts as an independent deskphone that terminates audio and yet can be controlled by Office Communicator from the desktop computer so that operations such as calling from Microsoft Outlook can be supported. Other capabilities such as making calls, escalating to conferences, and adding video are also supported. Advanced scenarios such as conferencing become easy because users can drag other users from Office Communicator’s user interface instead of using the keypad or the touch screen on Office Communicator Phone Edition. This experience is similar to Remote Call Control (RCC), as described in Chapter 9. The main difference is that no additional hardware equipment or configuration is needed to support this scenario.
To get the integration experience, Office Communicator Phone Edition must be connected to the desktop computer by using a USB cable. Office Communicator automatically detects and pairs with the Office Communicator Phone Edition (deskphone) if the USB connection is available. Figure 11-13 shows Office Communicator 2007 R2 paired with the deskphone. The USB interface has several uses. First, it enables Office Communicator to detect and connect to the deskphone. Users who are using laptop computers can simply dock their computers or connect the USB cable to get integration with their deskphone. Second, it enables Microsoft Office Live Meeting to stream audio to the deskphone, thus reducing the need to deploy a separate audio device for meetings.

Several other scenarios are possible from this integrated configuration:
Locking and unlocking the desktop computer will automatically lock or unlock Office Communicator Phone.
Signing on and performing password updates are simpler because the user no longer needs to enter the password in the Office Communicator Phone by using the touchpad.
Office Live Meeting 2007 R2 can now use Office Communicator Phone’s speaker and microphone capabilities to play Live Meeting audio.
The calling experience on Office Communicator is similar between the paired and unpaired modes. However, Office Communicator Phone Edition supports only a single audio source, which can be the USB interface to the desktop (for scenarios involving Live Meeting or video), an audio call, an ongoing audio, or an audio conference call on the phone. Users can choose what audio stream they would like to hear and can select the appropriate one from the Phone’s user interface. This is illustrated in Figure 11-14.

Response Group Service for Office Communications Server 2007 R2 provides the equivalent of hunt groups for Automated Call Distribution (ACD) services. Using Office Communicator, a user can search for hunt groups and easily differentiate them from other users or distribution groups in Office Communicator. Chapter 13, provides more details about Response Group Service.