The Enterprise Voice applications that come as part of Office Communications Server 2007 R2 (Response Group Service, Conferencing Attendant, Conference Announcement Service, and Outside Voice Control) are by default deactivated. To active one or more of them, run the Application Activation Wizard from the Office Communications Server 2007 R2 Management Console in the Administrative Tools folder, as shown in Figure 13-10. Installing and running Enterprise Voice applications is available only on Standard Edition Servers and Enterprise pool front-end servers.

It is best not to activate the same Enterprise Voice application on different front-end servers in the same Enterprise pool at the same time. Because of delays in Active Directory replication, allow sufficient time for replication to propagate to all Global Catalog Domain Controllers between installations of the application. Enterprise Voice applications are installed uniformly on all front-end servers in an Enterprise pool, so the application benefits from the high availability that an Enterprise pool provides.
This section gives an overview of concepts used in the Response Group Service.
Response Group. This term is used for the name of the application, but also to represent a particular instance of a workflow that has been configured by an admin.
Workflow. This term is used to represent the interactive part of the Response Group, for instance, where a user may hear music-on-hold or may be prompted for input.
Contact objects. Contact objects are Active Directory objects that are used to identify and route to Response Groups. Each Response Group must correspond to one and only one unique contact object (that is, two Response Groups cannot share the same contact object).
Hunt group. This is a special case of a Response Group configuration where the system attempts to route calls to a set of defined agents without prior interaction with the caller. Different routing methods (or "hunting" methods) can be defined to control in which order the system rings the agents.
Queues. Queues are used to hold the calls in the order they were received until an agent is available to answer the call or until an action is taken on the call because a timeout has been reached. Each Response Group routes to at least one queue. The IVR can be represented as a tree with one starting point that branches out every time a caller is presented an option. Each "end node" of the IVR (that is, a place where the caller has finished selecting the options he wants in the IVR) in which a caller may reach a queue needs to be configured. For a simple hunt group, a single queue needs to be configured. For a Response Group with one question leading to two options, two queues need to be configured. Note that a queue can be referenced by different Response Groups and could even be referenced several times by one Response Group.
Agent groups. This defines the set of agents that have the same agent Participation policy and can be routed to by using the same routing method (such as serial routing or parallel routing). At least one agent group must be associated with each queue. An agent group can be used for any number of queues that may be linked to different Response Groups. There are two types of agents:
Formal agents These are agents who sign in to the Response Groups of which they are a member to receive calls from that Response Group. Note that Office Communicator and Agent Communications Panel for Dynamics CRM 4.0 are the only clients that support signing in to specific Response Groups by using the Agent tab.
Informal agents These are agents who do not need to sign in to a Response Group to receive a call from the Response Groups to which they are a member. The Response Group effectively considers them to always be signed in to the group and only looks at the presence state of the agent to know whether he is available to take a call.
The Response Group Service management consists of two parts:
Response Group Configuration tool. This is the Web interface used to manage the configuration settings related to the caller experience, such as the description for the Response Group in Office Communicator, the welcome message heard when calling the Response Group, the business hours, and the questions that are asked to the caller in case of an interactive template. The Office Communications Server administrator and the Response Group manager use this tool.
Response Group Administration snap-in. This is the Microsoft Management Console (MMC) interface used to manage the way the system handles the routing of calls. This is where various settings can be administered, such as the set of groups that handle a queue and their order, the group membership, the routing methods, the queue timeout, and overflow values. This tool is used only by the Office Communications Server administrator.
Figure 13-11 shows the elements that make up a Response Group.

Figure 13-11 is an example of a Response Group deployment that shows how the contact object, IVR, queue, agent group, and agents work together. This figure is composed of the following three parts that correspond to the administrative steps and tools required to create and configure a Response Group:
Contact object. This is configured using the Contact Object Creation tool.
Workflow or IVR. In the diagram, the example depicts a workflow in which the caller is asked a question. The answer must lead to one of three possible options. Each of the options prompts another question that leads to two other possible options. These final options lead the caller to a queue, Q1–Q4. This workflow is configured using the Response Group Configuration tool. Note that queues, as in the case of Q4, can be used for multiple options.
Queues, groups, and agents. These are configured using the Response Group Administration snap-in (MMC). In the example diagram, some queues have one group serving them (for example, Q4) and some have two groups (for example, Q1). The Group Gc is serving two queues.
The Response Group Service is installed as part of the Office Communications Server 2007 R2 installation. The administrator simply has to select the Response Group Service option in the UI during the installation phase to activate the service.
Note that as for the other Office Communications Server applications, the LCS Command tool can be used to activate the Response Group Service, if this was not done during setup.
Although a Response Group can have agents that are homed on any pool in the enterprise, it is recommended to deploy the Response Group on the Office Communications Server pool that has the highest number of agents.
The Response Group deployment is performed in four simple steps:
Contact objects are Active Directory objects that Office Communications Server uses to represent application endpoints, such as Response Groups. For each Response Group that needs to be created, a corresponding contact object needs to be created. This step can be completed using RGSCOT and requires domain admin privileges to be run.
In this step, the following actions must be taken:
The Unified Communications (UC)–enabled Office Communications Server users that are to be considered for an agent role on a given Response Group pool must be added as agents to that pool. This is an operation that must be done once for each agent, regardless of the number of Response Groups for which he ends up acting as an agent.
The agent groups that define a group of agents need to be created. When the group is defined, the routing method for that group should be selected.
The queues that are to be used by each Response Group must be created.
In this step, you must select the template that you want to use for a given Response Group, which then defines what the caller experience is. As part of the template configuration, the administrator can select the queues to be used to handle the calls for the Response Group.
This step is required only for agents who must be able to sign in and sign out of agent groups.
The following sections and Table 13-3 through Table 13-5 summarize the deployment steps referenced in the preceding step 4.
Table 13-3. Content Object Creation
TASK | MANDATORY OR OPTIONAL | SETTING | DESCRIPTION |
|---|---|---|---|
Contact object creation | Mandatory | Contact object URI | This is the address of the Response Group, by which it can be reached. |
Mandatory | Display Name | This is the display name for the Response Group, as seen by the caller in the Office Communicator client. | |
Mandatory | Home server or pool FQDN | This is the Office Communications Server server pool on which the Response Group is homed. |
Table 13-4. Agents, Groups, and Queue Configuration
TASK | MANDATORY OR OPTIONAL | SETTING | DESCRIPTION |
|---|---|---|---|
Agent selection | Optional[*] | Agents | Before agents can be added to a group, they need to be defined as agents for the Response Group Service. To be able to be considered as agents, the users must be UC-enabled users. |
Group creation and configuration | Mandatory | Group name | The name of the agent group created by the administrator. This name is used only for administrative purposes. |
Mandatory | Members | These are the agents that are members of the group. | |
Optional[**] | Routing method | The method that will be used to route to the agents that are members of the group. Configuration is marked optional because this method has a default value of longest idle. | |
Optional[**] | Agent type selection | This defines whether the agent is required to sign in to the Response Group to receive calls from it. | |
Queue creation | Mandatory | Name | The name of the queue. This name is used only for administrative purposes. |
Mandatory | Groups | This is the list of groups associated with the queue. At least one group should be associated with each queue. If multiple groups are configured, the first group is considered first for a new call, then the second group, and so on. | |
[*] Not necessary if all groups are defined using distribution lists. [**] These fields are marked optional because they have default values that the administrator has to modify only if she wants to use a different value. | |||
Table 13-5. Template Selection and Configuration
TASK | MANDATORY OR OPTIONAL | SETTING | DESCRIPTION |
|---|---|---|---|
Workflow template selection and configuration | Mandatory | Selection of the contact object | This is the contact object that is to be used for the workflow being configured. |
Language selection | Mandatory | Language | Selection of the language used for the workflow. Note that the language matters only in cases where text to speech is being used. |
Response Group activation | Optional | Active/Inactive | This setting indicates whether the given Response Group is active, that is, it can receive calls. |
Description | Optional | Description | The description of the Response Group that is being displayed to the caller. |
Business hours definition | Optional | Business hours and holidays | This is where the opening hours can be defined and the holiday sets can be selected. Note that the holiday sets themselves need to be defined in the MMC. |
Optional | Out of business hours message | This is the message that is played to the caller when the call is received outside of business hours | |
Queue and action | Mandatory | Queue | Selection of the queue to be used for calls made to the given Response Group. In scenarios where an interactive template was selected, one queue needs to be selected for each option that the caller can select. |
Mandatory | Timeout and action | This is the maximum amount of time a call should stay in the queue and the action that should be taken on the call after the timeout has been reached. | |
Response Group manager definition | Optional | Manager | This is the set of owners who can be assigned to the Response Group. The owners are the users who are enabled to configure certain settings using the Web interface. This is available only on simple and enhanced hunt group templates. |
Tool used. Response Group Service Contact Object Tool (RGSCOT)
Permissions required. Domain Administrators
If in the previous steps, you defined some of your agent groups to be configured with an agent Participation policy of formal, you should deploy the Office Communicator Agent tab for these agents so that they can sign in and out of the agent groups to which they are a member.
Configuring Conferencing Attendant is a simple process. It involves defining an application contact object that associates a phone number, SIP URI, and location profile to the Conferencing Attendant. This process can be summarized with the following steps.
Reserve a phone number.
Associate the phone number to the Conferencing Attendant.
Map the Conferencing Attendant to a location profile.
PSTN users who want to join a conference need to be able to dial in. One or more phone numbers, including toll-free numbers, can be associated with the Conferencing Attendant. Reserve the Direct Inward Dialing (DID) numbers from your service provider.
After the phone number is reserved, it must be associated to the Conferencing Attendant. To perform this action, follow these steps.
Run the Office Communications Server 2007 R2 Management Console under the Administrative Tools folder.
Right-click the forest node and select Conferencing Attendant properties.
Click the Access Phone Numbers tab. This lists all phone numbers associated with all Conferencing Attendant instances in the forest.
Click Add to add a new Conferencing Attendant phone number, as shown in Figure 13-12.

The following settings for adding a new Conferencing Attendant number are described in detail:
Display number. The display number is included in the meeting request the organizer sends to all participants. Participants will dial this number. Make sure this number can be dialed from different countries and is easy to read.
Display Name. This name identifies the Conferencing Attendant. It will appear in the caller ID information when dialed by users.
LineURI. This represents the Tel URI of the Conferencing Attendant. This is the phone number reserved for the Conferencing Attendant in E164 format, as shown in step 1.
SIP URI. Similar to a user, the Conferencing Attendant must be configured with a SIP URI. When calling the Conferencing Attendant from Office Communicator, this SIP URI appears in the conversation history. It is recommended to keep it short and readable because users will see it.
Serviced by pool. Select the pool to which the Conferencing Attendant belongs.
Languages. A Conferencing Attendant must be associated with a primary language. Secondary languages are optional. The language chosen is used to interact with the caller when the user calls the Conferencing Attendant.
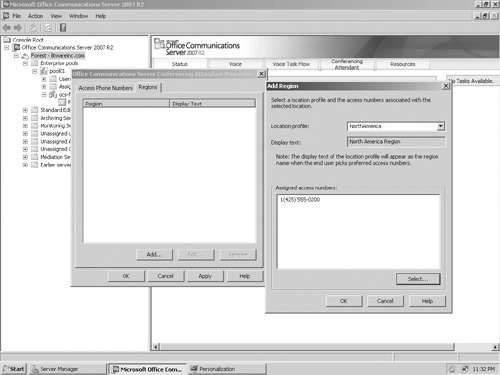
After the phone number is associated with the Conferencing Attendant, it must be mapped to a location profile, also referred to as a region.
To create a region, select a location profile and associate the phone number from step 1, as shown in Figure 13-13. Each region may have multiple phone numbers.