
CHAPTER 5
LOOPING STRUCTURES
In this chapter I show you how to build iteration into your programs using VBA looping structures such as Do and For loops. In addition, you will learn some new VBA controls for managing groups of items and how to build random numbers into your programs.
INTRODUCTION TO LOOPING STRUCTURES
To loop, or iterate, computers need instructions known as looping structures, which determine such things as how many times a loop’s statements will execute and by what condition the loop exits. Each programming language implements its own version of looping structures, but most languages, including VBA, support some variation of Do and For loops. Although the syntax of looping structures varies from language to language, looping structures share similar characteristics:
• Loops are logical blocks that contain other programming statements.
• Loops can increment a counter.
• Loops implement a condition by which the loop exits.
• Many looping structures support conditions at either the top or bottom of the loop.
• Special statements can cause the loop to exit prematurely.
Before looking at specific VBA implementations, I discuss some possibilities for looping, some of which may not be so apparent at first. Consider the following list of programming scenarios, each of which requires the use of looping structures:
• Displaying a menu
• Running the autopilot system for an airline
• Finding a person’s name in an electronic phone book
• Controlling a laser-guided missile
• Listening to a playlist on an iPod
• Applying a 5% bonus to all employees in a company
• Sorting a list of addresses by zip code
• Spinning the wheels in an electronic slot machine
All of the preceding scenarios have already been implemented by programmers using looping techniques and concepts, albeit more complex, but nevertheless akin in basic principle to the ones I show you in this chapter.
Some scenarios require a predefined number of iterations. For example, if I write a software program to apply a 5% raise to all employees in a company, I can be sure there are a limited number of iterations, or so at least the CEO hopes! In other words, the number of times the loop executes is directly related to the number of employees in the company. Displaying a menu, however, can be a much different scenario. Take an ATM (automated teller machine) menu, for example. After a customer withdraws money from the ATM, should the ATM menu display again for the next customer? You know the answer is yes, but then how many times should that same menu display and for how many customers? The answer is indefinitely. It doesn’t happen often, but there are times when a loop needs to be infinite.

Infinite loops are created when a loop’s terminating condition is never met:
     Do While 5 = 5

        MsgBox “Infinite loop”

     Loop
In the previous code example, the loop will never terminate because the expression 5 = 5 will always be True. To break out of an endless loop in VBA, try pressing the Esc key or Ctrl+Break keys simultaneously.
To ensure loops are not endless, each loop has a condition that must be met for the loop to stop iterating. It’s important to note that loops use expressions to build conditions, just as an If block or Select Case structure does. Moreover, each loop’s condition evaluates to either True or False.
Many times, a loop’s exiting condition is determined by a counter that is either incremented or decremented. In VBA, numbers are incremented and decremented using VBA assignment statements. In a nutshell, you must reassign a variable to itself with either an increment or decrement expression.
‘ Increment x by 1
x = x + 1

‘ Decrement y by 1
y = y - 1
After this cursory overview on looping structures, you’re now ready to look at some specific VBA implementations. Specifically, you learn about the following VBA looping structures:
• Do While
• Do Until
• Loop While
• Loop Until
• For
Do While
The Do While loop uses a condition at the top of the loop to determine how many times statements inside the loop will execute. Because the loop’s condition is checked first, it is possible that the statements inside the loop never execute.
Dim x As Integer
Dim y As Integer

Do While x < y

   MsgBox “x is less than y”

Loop
In this loop, it’s possible that x is less than y, preventing the statement inside the loop from ever executing.
In the Do While loop, the statements are executed so long as the condition evaluates to True. In other words, the loop stops when the condition is False.
In the next example, the Do While loop uses an increment statement to satisfy the condition, which allows the loop to iterate five times.
Dim x As Integer
Dim y As Integer

x = 0
y = 5

Do While x < y

   MsgBox “The value of x is ” & x
   x = x + 1

Loop
Knowing that the loop executes five times, what do you think the value of x is after the last iteration? The value of x is 4 after the last iteration. If you’re having trouble seeing this, try placing this code in the Click event of a command button so you can step through it one iteration at a time, with each click of the command button.
Do Until
Similarly to the Do While loop, the Do Until loop uses reverse logic to determine how many times a loop iterates.
Dim x As Integer
Dim y As Integer

Do Until x > y

   MsgBox “Infinite loop!”

Loop
In the preceding example, the statement inside the loop executes until x is greater than y. Since there is no incrementing of x or decrementing of y, the loop is infinite.
Note that x being equal to y does not satisfy the condition. In other words, the statement still executes inside the loop. Only when x is greater than y does the looping process stop.
Now study the following code and determine how many times the loop iterates and what the value of x is after the loop terminates.
Dim x As Integer
Dim y As Integer

x = 0
y = 5

Do Until x > y

   MsgBox “The value of x is ” & x
   x = x + 1

Loop
This Do Until loop executes six times, and the value of x after the last iteration is 6.
Loop While
Say I wanted to make sure the statements inside a loop execute at least once despite the loop’s condition. The Loop While loop solves this dilemma by placing the loop’s condition at the bottom of the loop:
Dim x As Integer
Dim y As Integer

x = 5
y = 2

Do

   MsgBox “Guaranteed to execute once.”

Loop While x < y
Because the preceding loop’s condition executes last, the statement inside the loop is guaranteed to execute at least once, and in this case, only once.
Loop Until
Using logic combined from the Do Until and Loop While loops, the Loop Until loop uses a reverse logic condition at the end of its looping structure.
Dim x As Integer
Dim y As Integer

x = 5
y = 2

Do

   MsgBox “How many times will this execute?”
   y = y + 1

Loop Until x < y
Using an increment statement, this loop’s statements execute four times. More specifically, the loop iterates until y becomes 6, which meets the loop’s exit condition of True.
For
The next and last type of looping structure this chapter investigates is For. The For loop is very common for iterating through a list. It uses a range of numbers to determine how many times the loop iterates.
Dim x As Integer

For x = 1 To 5

   MsgBox “The value of x is ” & x

Next x
Notice that you are not required to increment the counting variable (in this case variable x) yourself. The For loop takes care of this for you with the Next keyword.
![]()
Although it is common to specify the counting variable after the Next keyword, it is not required. When used by itself, the Next keyword automatically increments the variable used on the left side of the assignment in the For loop.
Using the For loop, you can dictate a predetermined range for the number of iterations:
Dim x As Integer

For x = 10 To 20

   MsgBox “The value of x is ” & x

Next x
You can determine how the For loop increments your counting variable using the Step keyword. By default, the Step value is 1.
Dim x As Integer

For x = 1 To 10 Step 2

   MsgBox “The value of x is ” & x

Next x
The preceding For loop using the Step keyword with a value of 2, iterates five times, with the last value of x being 9.
Though it is common to use number literals on both sides of the To keyword, you can also use variables or property values:
Dim x As Integer

For x = Val(Text1.Value) To Val(Text2.Value)

   MsgBox “The value of x is ” & x

Next x
Using the value of two text boxes, I can build a dynamic For loop that obtains its looping range from a user.
LIST AND COMBO BOXES
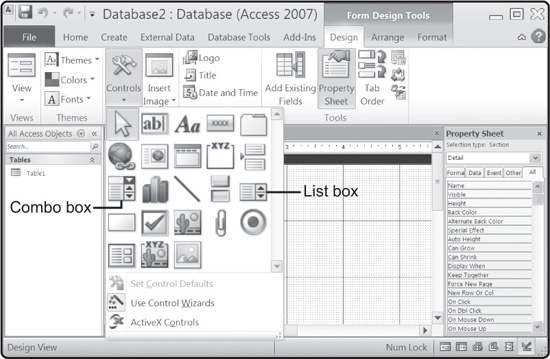
Both list and combo boxes store a list of items defined in design time, in runtime with VBA, or through a linked database form such as Access. Shown in Figure 5.1, list and combo boxes can be added to your forms using the Toolbox.
FIGURE 5.1 Viewing the combo box and list box from the VBA Toolbox.
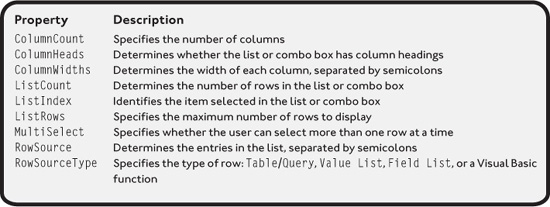
Whether you are building list and combo boxes manually or through a wizard, you must take into account many properties. The most common properties are listed in Table 5.1.
TABLE 5.1 COMMON LIST AND COMBO BOX PROPERTIES
In addition to common properties, both list and combo boxes share two important methods for adding and removing items. In VBA they are appropriately called AddItem and RemoveItem.
In the next subsections, you learn the most common approaches for managing items in both list and combo boxes.
Adding Items
Depending on the source, adding items with VBA can be a bit different between list and combo boxes. When used in a straightforward manner, however, both list and combo boxes support the AddItem method. Before using the AddItem method, you must set your combo or list box’s RowSourceType property to Value List.
Forgetting to set your list or combo box’s RowSourceType property to Value List causes a runtime error when using the AddItem method.
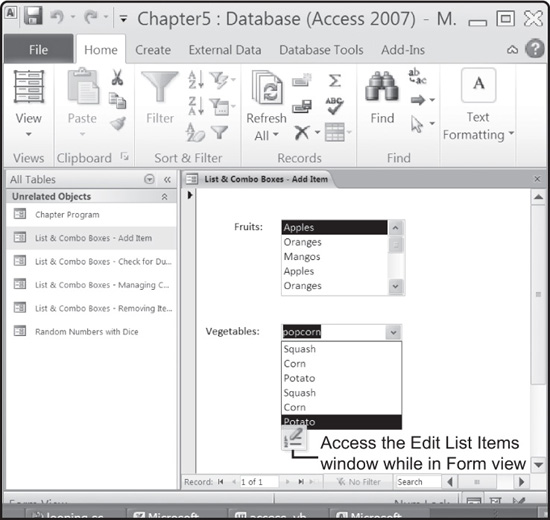
The next program, seen in Figure 5.2, uses the form Load event to execute multiple AddItem methods for both a combo and a list box.
FIGURE 5.2 Using the AddItem method to populate a list box with fruit and a combo box with vegetables.
Private Sub Form_Load()

    lstFruits.AddItem “Apples”
    lstFruits.AddItem “Oranges”
    lstFruits.AddItem “Mangos”

    cboVegetables.AddItem “Squash”
    cboVegetables.AddItem “Corn”
    cboVegetables.AddItem “Potato”


End Sub
![]()
Beginning with Access 2007 and carried over into 2010, the Edit List Items icon (seen in Figure 5.2) appears when a cursor enters the list or combo box. When clicked, an Edit List Items window appears that enables you to add, remove, and set the default value of a list or combo box without VBA while in Form view. This feature can be turned off by setting the list or combo box’s Allow Value List Edits property to No.
The AddItem method takes two parameters (Item and Index), the first of which is required.
Many times, loops populate list and combo boxes with static data or table information from a database.
Private Sub Form_Load()

   Dim x As Integer

   ‘ Add 25 items to the list box.
   For x = 1 To 25

      lstFruits.AddItem “The value of x is ” & x

   Next x

End Sub
So far, adding items has been fairly static. To make things more interesting, you can add items to your list box or combo box based on user input. Before doing so, however, it’s fairly common to check for duplicates before adding the item, which the following program and its output in Figure 5.3 demonstrate.
FIGURE 5.3 Checking for a duplicate item before adding the item to a list box.

Option Compare Database
Option Explicit
Private Sub cmdAddItem_Click()

   Dim iCounter As Integer

   ‘ Search for a duplicate item.
   ‘ If none is found, add the item.
   For iCounter = 0 To (lstFruits.ListCount - 1)

      If lstFruits.ItemData(iCounter) = txtInput.Value Then

         MsgBox “Duplicate item. Can‘t add item.”
         Exit Sub ‘ A duplicate was found, exit this procedure.

      End If

   Next iCounter

   ‘ No duplicate found, adding the item.
   lstFruits.AddItem txtInput.Value
End Sub
Private Sub Form_Load()

   ‘ Add preliminary items to the list box.
   lstFruits.AddItem “Apples”
   lstFruits.AddItem “Oranges”
   lstFruits.AddItem “Mangos”

End Sub
A few statements may appear new to you in the preceding program code. First, note the use of the ListCount property in the For loop. The ListCount property contains the number of items in a list or combo box. This number starts at 1, but the lowest number in a list box starts with 0. This is why I subtract 1 from the ListCount property in the For loop statement.
To compare what’s in the text box to each item in the list box, I can use the list box’s Item-Data property, which takes an index (in this case the looping variable) as a parameter and passes back the item’s value.
Last but not least is the presence of the Exit Sub statement. This statement is very common with Visual Basic and VBA programmers when needing to exit a procedure prematurely. In my case, I want to exit the procedure prematurely (of course, after letting the user know) if a duplicate item is found.
If I choose to use a combo box when accepting input from a user, an additional text box control is not needed because the combo box already contains a text box. In reality a combo box is really two controls: a list box and text box. To accept new input from a user with a combo box, your combo box’s LimitToList property must be set to No (the default). When retrieving user input from the combo box, work with its Value or Text properties (which is similar to working with a text box).
Removing Items
Removing items from a list or combo box is quite easy. Specifically, you use the RemoveItem method, which takes a single parameter called Index as a value. Generally speaking, items are removed based on a user’s selection. Before removing items, however, it is always a good idea to ensure that a user has selected an item first. To do so, simply check the list or combo box’s ListIndex property, as the next program demonstrates. Output is seen in Figure 5.4.
FIGURE 5.4 Checking that an item has been selected before using the RemoveItem method.

Option Compare Database
Option Explicit
Private Sub Form_Load()

   ‘ Add preliminary items to the list box.
   lstMovies.AddItem “Episode I”
   lstMovies.AddItem “Matrix”
   lstMovies.AddItem “Conspiracy Theory”
   lstMovies.AddItem “Men in Black”

End Sub
Private Sub cmdRemoveItem_Click()

   ‘ Has the user selected an item first?
   If lstMovies.ListIndex = -1 Then

      ‘ The user has not selected an item.
      MsgBox “Select an item to remove.”

   Else

      ‘ The user selected an item, so remove it.
      lstMovies.RemoveItem lstMovies.ListIndex

   End If

End Sub
If no items in a list or combo box have been selected, the ListIndex is set to -1. Otherwise, the ListIndex contains the index of the currently selected item (starting with index 0 for the first item). This means you can pass the ListIndex property value to the RemoveItem method. This is an efficient and dynamic means of using property values to pass parameters to methods.
Managing Columns
Adding and managing columns with your list and combo boxes is really quite easy. The important rule to remember is that a column header is considered a row or item (index 0) in a list or combo box. This means the header must be treated as an extra item when deleting items or searching for items.
To add and manage columns, you work with the following properties either in design time or through VBA code in runtime:
• ColumnCount: Specifies the number of columns to display
• ColumnHeads: Determines whether the list or combo box has a column header
• ColumnWidths: Specifies the width of each column (separated by semicolons) in inches or centimeters
Remembering that a column header is treated like another item, a column header is added using the list or combo box’s AddItem method. Figure 5.5 depicts the visual appearance of columns and column headers.
FIGURE 5.5 Adding columns and column headers to a list box.

Option Compare Database
Option Explicit
Private Sub Form_Load()

   lstBooks.ColumnCount = 3
   lstBooks.ColumnHeads = True
   lstBooks.ColumnWidths = “1.5in;1in;1in”

   lstBooks.AddItem “Title;Author;ISBN”
   lstBooks.AddItem “Access VBA Programming...;” & _
         “Michael Vine;1592000398”
   lstBooks.AddItem “Visual Basic Programming...;” & _
         “Michael Vine;0761535535”
   lstBooks.AddItem “C Language Programming...;” & _
         “Michael Vine;1931841527”
   lstBooks.AddItem “JavaScript Programming...;” & _
         “Andy Harris;0761534105”

End Sub
When the ColumnHeads property is set to True, the first AddItem method encountered by VBA is used to populate the column headers. Note that when working with columns, you have to remember to separate each column or column data with semicolons.
![]()
Do not confuse the ColumnHeads property with the singular version, ColumnHead. They are different properties belonging to completely different controls.
RANDOM NUMBERS
One of my favorite beginning programming concepts is random numbers. Random numbers allow you to build a wide variety of applications ranging from encryption to games. In this section, I show you how to build and use random numbers in your programs using two VBA functions called Randomize and Rnd.
The Randomize function initializes VBA’s internal random number generator. It is only necessary to call this function (no argument required) once during the lifetime of your program. Most often, the Randomize function is executed during startup routines such as a form Load event. Without the Randomize function, the Rnd function generates random numbers in a consistent pattern, which of course is not really random at all.
The Rnd function takes a number as an argument and returns a Single data type. When used in conjunction with the Randomize function, the Rnd function can generate random numbers. To create a range of Integer-based random numbers, use the following VBA statements:
Dim x as Integer
x = Int((10* Rnd) + 1)
The Int function takes a number as argument and converts it to an integer value (whole number). Remember that the Rnd function returns a Single number type, so the Int function is used to convert a decimal number into a whole number. Adding 1 to the result of (10* Rnd) creates a random number between 1 and 10. Removing the addition of 1 causes the random number range to be 0 through 9.
One way of utilizing random numbers is through a simulated dice roll. Figure 5.6 reveals the design-time form I used to simulate this. Note that there are eight images (which can be found on the companion website, www.courseptr.com/downloads), six of which have their Visible property set to False. This way only two dice are visible to the user during runtime.
![]()
Set the Size Mode property of the Image control to Stretch, which stretches the image to fit the size of the Image control.
FIGURE 5.6 Using random numbers and image-swapping techniques to emulate rolling of the dice.
Option Compare Database
Option Explicit
Private Sub Form_Load()
   Randomize
End Sub
Private Sub cmdRoll_Click()

    Dim iRandomNumber As Integer

    ‘ Generate random number (die) for die 1.
    iRandomNumber = Int((6* Rnd) + 1)

    Select Case iRandomNumber

        Case 1
           imgDie1.Picture = Image1.Picture
        Case 2
           imgDie1.Picture = Image2.Picture
        Case 3

           imgDie1.Picture = Image3.Picture
        Case 4
           imgDie1.Picture = Image4.Picture
        Case 5
           imgDie1.Picture = Image5.Picture
        Case 6
           imgDie1.Picture = Image6.Picture

     End Select

    ‘ Generate random number (die) for die 2.
    iRandomNumber = Int((6 * Rnd) + 1)

    Select Case iRandomNumber

        Case 1
           imgDie2.Picture = Image1.Picture
        Case 2
           imgDie2.Picture = Image2.Picture
        Case 3
           imgDie2.Picture = Image3.Picture
        Case 4
           imgDie2.Picture = Image4.Picture
        Case 5
           imgDie2.Picture = Image5.Picture
        Case 6
           imgDie2.Picture = Image6.Picture

     End Select

End Sub
To simulate the dice roll, I use the Click event of a command button to create a random number ranging from 1 to 6 for each die. After that, I perform a bit of image swapping based on a Select Case structure. Image swapping in this case is performed by assigning one Picture property to another. Remember, to work with programs that use images found on the website, you will need to change the path of the image’s Picture property to a path on your local computer.
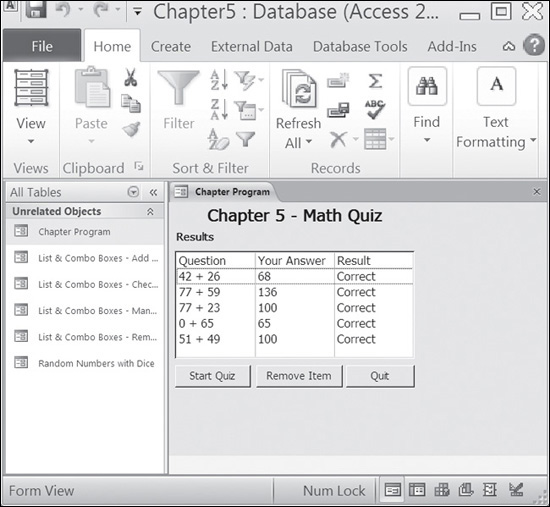
CHAPTER PROGRAM: MATH QUIZ
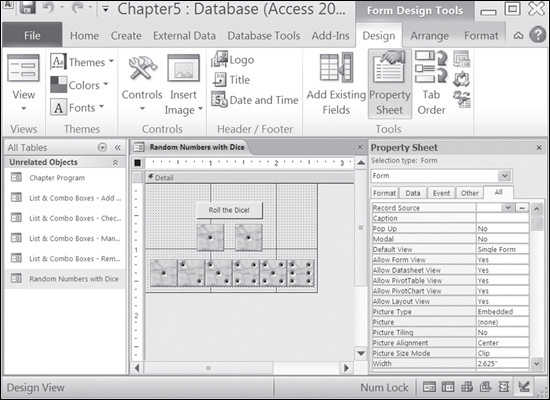
The Math Quiz program in Figure 5.7 is a fun way of learning how to incorporate chapter-based concepts such as loops, random numbers, and list boxes into your VBA applications.
The program prompts a user for the number of math questions she would like to answer. Then, Math Quiz prompts the user with a predetermined number of addition questions using random numbers between 1 and 100. A list box with columns stores each question, the user’s response, and the result.
FIGURE 5.7 Using chapter-based concepts to build the Math Quiz program.
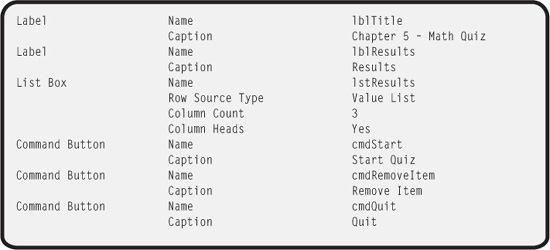
Controls and properties to build the Math Quiz program are described in Table 5.2.
TABLE 5.2 CONTROLS AND PROPERTIES OF THE MATH QUIZ PROGRAM

All of the code required to build Math Quiz is seen next.
Option Compare Database
Option Explicit
Private Sub cmdQuit_Click()
    DoCmd.Quit
End Sub
Private Sub Form_Load()
   Randomize
End Sub
Private Sub cmdRemoveItem_Click()

   ‘ Determine if an item has been selected first
   If lstResults.ListIndex = -1 Then
      MsgBox “Select an item to remove.”
   Else
      lstResults.RemoveItem lstResults.ListIndex + 1
   End If

End Sub
 Private Sub cmdStart_Click()

    Dim sResponse As String
    Dim sUserAnswer As String
    Dim iCounter As Integer
    Dim iOperand1 As Integer
    Dim iOperand2 As Integer

    ’ Determine how many math questions to ask.
    sResponse = InputBox(“How many math questions would you like?”)

    If sResponse <> “” Then

       ’ Add header to each column in the list box if one
       ’ hasn’t already been added.
       If lstResults.ListCount = 0 Then
          lstResults.AddItem “Question;Your Answer;Result”
       End If

       ’ Ask predetermined number of math questions.
       For iCounter = 1 To Val(sResponse)

           ’ Generate random numbers between 0 and 100.
           iOperand1 = Int(100 * Rnd)
           iOperand2 = Int(100 * Rnd)

           ’ Generate question.
           sUserAnswer = InputBox(“What is ” & iOperand1 & _
              “ + ” & iOperand2)

           ’ Determine if user’s answer was correct and add an
           ’ appropriate item to the multi-column list box.
           If Val(sUserAnswer) = iOperand1 + iOperand2 Then

            lstResults.AddItem iOperand1 & “ + ” & _
                iOperand2 & “;” & sUserAnswer & “;Correct”
           Else
              lstResults.AddItem iOperand1 & “ + ” & _
                  iOperand2 & “;” & sUserAnswer & “;Incorrect”
           End If

       Next iCounter

    End If

End Sub
SUMMARY
• VBA supports the Do While, Do Until, Loop While, Loop Until, and For loop structures.
• Looping structures use conditions to determine the number of iterations the loop will execute.
• An infinite, or endless, loop is caused when the loop’s condition is never met.
• Generally a loop’s exiting condition is determined by a counter that is either incremented or decremented.
• The For loop uses a range of numbers to determine how many times the loop iterates.
• Loops are often used to populate list and combo boxes with static data or table information from a database.
• To use the AddItem method of a list or combo box, the RowSourceType property value must be set to Value List.
• The ListIndex property of a list and combo box can be used to determine which item a user has selected.
• If no items are selected in a list or combo box, the ListIndex property is set to -1.
• Columns can be added to list and combo boxes by setting the ColumnCount, ColumnHeads, and ColumnWidths properties.
• Columns are managed through runtime with VBA or through design time by separating individual columns with semicolons.
• VBA uses the Randomize and Rnd functions to generate random numbers.
• The Randomize function initializes VBA’s internal random-number generator.
• The Rnd function takes a number as an argument and returns a Single data type.
1. Place a single command button on a form. Write code in the Click event of the command button to display a message box five times using a Do While loop. Remember to use a counting variable in the loop’s condition, which increments each time the loop iterates.
2. Modify Challenge 1 to use a For loop that iterates 20 times with a Step value of 3.
3. Add a combo box and command button to a form. In the form’s Load event, add three items to the combo box using the AddItem method. In the Click event of the command button, add input from the combo box’s Value property (input from the user). Remember to check for duplicate items and turn off the Edit List Items functionality by setting the combo box’s Allow Value List Edits property to No.
4. Enhance the Math Quiz program to randomize not only numbers but the type of math problem. More specifically, use an additional variable to hold a random number between 1 and 4 where each number represents addition, subtraction, multiplication, or division.