
CHAPTER 2
ACCESS ESSENTIALS
Now that you’ve seen what’s new in Access 2010, it’s time to take a look at how to design a database through normalization and implement it using tables, relationships, forms, controls, and queries. I’ll show you how this is done by designing and building a small database to manage students and homework.
For those of you already familiar with database normalization, Access databases, and objects, you may want to skip right to Chapter 3, “Introduction to Access VBA,” but if this is your first encounter with Access, or if you need a refresher in beginning database skills, I strongly recommend this chapter as a prerequisite for the remainder of this book.
DATABASE NORMALIZATION
A relational database allows developers to link one or more tables using keys. Before physically creating and linking two tables however, database developers model their data, or normalize it, using database normalization techniques.
Database normalization is in essence the process by which one optimizes table structures to enhance query performance and eliminate data integrity issues by investigating data requirements and their relationships to each other. To get started, let’s review the following key database normalization terms that are essential to this chapter and the remainder of the book.
• Entity: An entity is the main data object for which you are collecting information to be saved in a table. For example, a student entity would generally be composed of student-like data such as first name, last name, date of birth, and a student id.
• Attribute: Attributes are the bits of related information that make up an entity. Attributes such as first name, last name, and student id make up the student’s entity.
• Primary key: A primary key is either a single field or a combined set of fields that uniquely identifies a single row of data in a table. Examples of unique identifiers that would make a good candidate for a primary key are social security number, ISBN, student id, or any other value that would uniquely identify every row in a table. Note that most database management systems, including Microsoft Access, allow you to create a primary key for each table using a built-in data type called AutoNumber, which increments automatically each time a new row is entered into the table.
• Foreign key: The foreign key creates the foundation of a relationship between two tables by inserting the primary key from one table into another table. For example, a student id from a student’s entity would be placed into a grades entity to show a relationship between students and their grades.
• One-to-one relationship: Though not very common, a one-to-one relationship denotes that each row of information for one entity relates to exactly one row of information for another entity. For example, you might want to remove sensitive information from an Employee table and put it into a separate table called Employee_Private to hold private data such as social security and salary data. In this case, for each record in the Employee table, there would be one matching record in the Employee_Private table.
• One-to-many relationship: The most common of table relationships is the one-to-many relationship, which is created by adding the primary key (one or more fields) from one table into a second table that will hold many occurrences of said primary key. For example, the relationship between an Assignment table and an Assignment_Results table is one-to-many because for each assignment there will be multiple assignment results (rows) representing the many students who took the assignment.
• Many-to-many relationship: To build a many-to-many relationship, you need to create a third table that breaks the many-to-many relationship into two one-to-many relationships. You accomplish this by inserting the primary key from each of the two tables into the third table and as a result the third table’s primary key is the combination of keys from the first two tables.
Leveraging the terms above and through a series of normal forms (processes), I can model student and homework data used to create this chapter’s sample database. Before proceeding however, let’s take a look at my data requirements, which include:
• Store student information with name, college, and chosen major.
• Store assignment information with a description and assigned grades for each student for one class.
1st Normal Form
The first form in the database normalization process is rather simple and is most appropriately called 1st Normal Form. The essential rules for the 1st Normal Form are:
• Create separate tables for each group of related data and ensure each row is unique by identifying a primary key.
• Eliminate duplicate columns from the same table.
Since my goal for this chapter is to create a database that can manage both student and homework data for a single class, I will create two entities that separate distinct groups of data.
A Student entity with associated attributes:
• Student_Id (primary key)
• First_Name
• Last_Name
• College
• Major
An Assignment_Results entity with associated attributes:
• Assignment_Id (primary key)
• Student_Id (primary key)
• Assignment_Description
• Assignment_Completed
• Assignment_Score
Entities need to have an identifier (attribute) that will uniquely identify each row of information. Remember that unique identifiers in the world of databases are called primary keys. The primary keys for the student entity will be Student_Id and the primary key for the homework results entity will be comprised of two attributes, Assignment_Id and Student_Id. Note primary keys are often a single attribute, but they can be created using more than one attribute, as in the case of the homework results entity.
2nd Normal Form
Continuing our normalization process, we’ll now look at the 2nd Normal Form, which concentrates on removing redundant data from tables. Specifically, the essential rules of the 2nd Normal Form are:
• Meet all requirements of the 1st Normal Form.
• Remove redundant data and place them in separate tables.
• Create relationships between tables through the use of foreign keys.
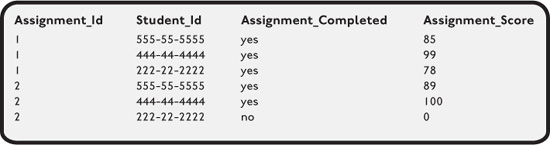
To demonstrate, let’s look at some sample data for our Assignment_Results table (entity) in Table 2.1.
TABLE 2.1 SAMPLE DATA FOR THE ASSIGNMENT RESULTS TABLE

Please note I’ve migrated from using the term entity to using table, but for the sake of this discussion they are synonymous with each other.
Looking at Table 2.1 you might notice the existence of duplicate data being stored in my Assignment_Results table, namely in the Assignment_Description field. Adhering to the 2nd Normal Form rule, I’ll need to remove redundant textual data, which over time will degrade query performance, by defining a new table called Assignment and removing the Assignment_Description field from the Assignment_Results table. Tables 2.2 and 2.3 demonstrate sample values from my new Assignments table and updated Assignment_Results tables.
TABLE 2.2 SAMPLE DATA FOR THE ASSIGNMENTS TABLE

TABLE 2.3 SAMPLE DATA FOR THE ASSIGNMENT RESULTS TABLE
Looking at Tables 2.2 and 2.3, you can see the Assignment_Id field has become a primary key in the Assignments table and a foreign key in the Assignment_Results table. This association is considered a one-to-many relationship because for every one Assignment_Id in the Assignments table, I will have many Assignment_Ids in the Assignment_Results table.
3rd Normal Form
Though not the last form in the database normalization process, the 3rd Normal Form is typically the last form exercised in beginning database development, and therefore is the most appropriate conclusion for this section. The rules for the 3rd Normal Form are:
• Meet all requirements of the 2nd Normal Form.
• Remove all attributes from a table that are not directly dependent on the primary key.
To demonstrate 3rd Normal Form, consider sample data from our Students table in Table 2.4.
Looking at Table 2.4, not only can we see repeating information, which breaks the rule for 2nd Normal Form, but we also have an attribute, College, that is not directly dependent on the Students table primary key, Student_Id. Rather, the College attribute is actually dependent on the Major attribute. To adhere to the rules of the 3rd Normal Form, I will remove the College attribute from the Students table and replace the Major attribute with a Major_Id field. My new Students table with sample data is revealed in Table 2.5.
TABLE 2.4 SAMPLE DATA FOR THE STUDENTS TABLE

TABLE 2.5 SAMPLE DATA FOR THE STUDENTS TABLE

As you might expect, additional tables would need to be created to support both college and major information. I will now define those two new tables with sample data to hold information about the colleges and majors and their relationships to each other, as shown in Tables 2.6 and 2.7.
TABLE 2.6 SAMPLE DATA FOR THE MAJORS TABLE

TABLE 2.7 SAMPLE DATA FOR THE COLLEGES TABLE

Now that we’ve defined our data and normalized it, let’s create our database in Access 2010.
CREATING A NEW ACCESS 2010 DATABASE
As mentioned in Chapter 1, Access 2010 comes with a suite of downloadable templates that you can leverage for creating database solutions. I personally like templates and find that they can be a time-saving feature during database development. From my professional experience however, most out-of-the-box database templates don’t meet all your requirements and thus get altered, which means you need to be familiar enough with the database design you’re working with to have created the template in the first place! Since this is a database essentials chapter, we’ll steer away from the templates and create our own database from scratch.
Let’s get started by launching the Access program icon via the Start/Programs menu, or from any other shortcut you may have created during or after the Microsoft Office (Access) installation.
Once opened, you should see the Getting Started with Microsoft Office Access page, from which you double-click the Blank Database icon in the upper-middle part of the window, as shown in Figure 2.1.
FIGURE 2.1 The Getting Started with Microsoft Office Access page.
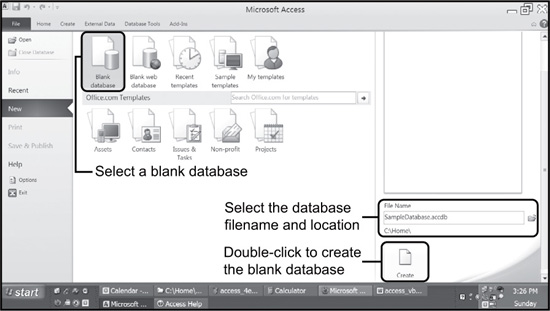
Once you have double-clicked on the Blank Database icon, you can now name the database file, select its location, and click the Create button, as shown in Figure 2.1.
![]()
Microsoft Access databases are stored in binary files with the file extension .accdb. These files store relevant information about your Access database, including tables, fields, reports, queries, and much more.
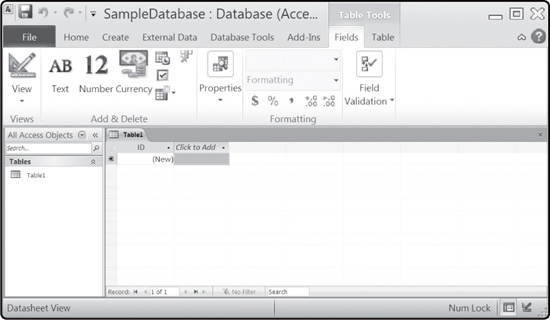
After the database has been created by Access, you’ll see a window similar to that shown in Figure 2.2, which in essence is your blank canvas to begin creating and working with various Access components such as tables and fields.
FIGURE 2.2 A newly created Access database.
TABLES AND FIELDS
Each field has a definition that tells Access how the field values should be stored. For example, an Assignment_Id field is stored as a number as opposed to an Assignment_Description field, which is stored as text.
Each Access table must contain at least one or more fields. Together the fields comprise a row of data also known as a record. Tables should be assigned a primary key, which identifies each row of information in the table as unique. For example, the Student_Id field in the Students table is an excellent candidate for the primary key. The notion of primary keys is essential for creating relationships between tables in Access.
To create a table in Access 2010, simply click the Table icon from the Create tab of the Ribbon, as shown in Figure 2.3.
FIGURE 2.3 Creating tables in Access 2010.

Access puts you in the Datasheet view when first creating a table. The Datasheet view allows you to add fields, lookup columns, relationships, dependencies, and assign data types and primary keys. Additionally, you can also use the Datasheet view to enter values directly into your table.
Looking at Figure 2.4, you can see that I’ve added three fields by entering the field names into the column headers and assigned the appropriate data types to my new table that will ultimately become the physical embodiment of my Students table.
FIGURE 2.4 Adding fields to a new table.
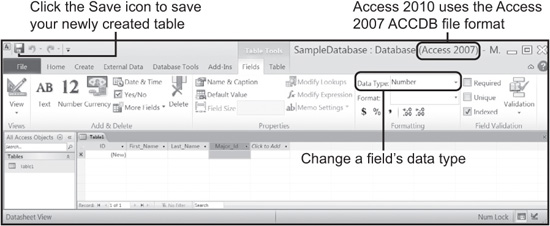
Once your table has been defined with fields, you will name and save your table by clicking on the Save icon from the Quick Access toolbar also shown in Figure 2.4. When the Save icon is clicked, you will be prompted to name your table or other Access object, as shown in Figure 2.5.
FIGURE 2.5 Saving and naming a newly created table.

Clicking the Save icon from the Quick Access toolbar, or clicking the Save icon from the Backstage view only saves the selected (highlighted) table or Access object. To save a newly created table or object, ensure it is first selected, then save or right-click the tab of the newly created object in Datasheet view, and select the Save option. Access will also prompt you to save all unsaved objects when closing the current database or the entire Access application.
![]()
You may have noticed that your Access 2010 application window displays Access 2007; if not, look now at Figure 2.4. Microsoft did not release a new database file format with Access 2010; instead, it uses the same Access 2007 ACCDB file, which replaces the legacy MDB file. Microsoft displays the Access database file format in the application title window, and since that format by default is 2007, that is what’s displayed. The version displayed in the application window will change if you open a legacy Access file in MDB format.
Now that I’ve saved and named my Students table, it’s worth taking a glance back at Figure 2.4 to discuss the first field in the Students table called ID. Each time you create a new table in Access 2010, it automatically inserts an AutoNumber data type field that will act as your primary key. If you prefer not to use the auto-generated ID field, you can change it or remove it by switching to Design view. Speaking of data types, let’s now take a look at the various data types that can be assigned to fields in Access 2010, as shown in Table 2.8.

Trying to insert data greater than the maximum size allowed in a Text field type (255 characters) will generate a database error. If your Text field storage needs require greater length, use the Memo field type.
To better understand data types and their use, see if you can match the following data descriptions to an Access data type (shown in Table 2.8).
1 An employee’s social security number.
2 The start time of a test.
3 The number of employees in a company.
4 The annual budget amount allocated to each department in a company.
TABLE 2.8 ACCESS 2010 DATA TYPES

5 Determines if a user is currently logged into a system.
6 Stores the address of homes.
7 The textual content of an essay.
8 An ID generated each time a new user is created.
9 The cost of a book.
10 An Excel spreadsheet.
The correct data types for the previous storage needs are listed here:
1 Text (If dashes are used when entering data)
2 Date/Time
3 Number
4 Currency
5 Yes/No
6 Text
7 Memo
8 AutoNumber
9 Currency
10 Attachment
Depending on the data type, each field in a table has a number of attributes such as field size, caption, required input, validation rules, and many others that can be preset and/or updated in Design view, as shown in Figure 2.6.
FIGURE 2.6 Viewing a field’s attributes in Design view.
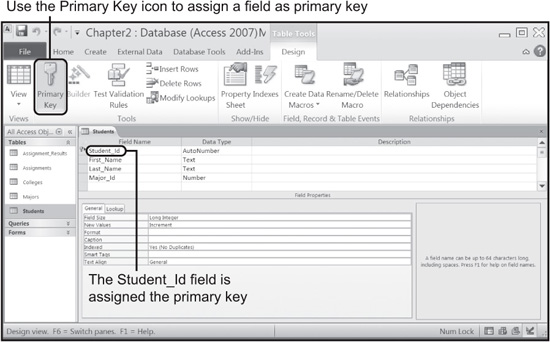
Note the presence of the key symbol next to the Student_Id field in Figure 2.6. The key symbol denotes that a field has been assigned as the primary key for the given table. The primary key assignment can be added, changed, or removed by either right-clicking on the field or selecting the Primary Key icon on the Design view tab of the Ribbon. Also, you may remember from the Database Normalization section that I chose the Student_Id (something similar to a social security number) as the primary key for the Students table. In theory, something similar to a social security number will work as a primary key because of its uniqueness, but in practice an auto-generated number such as the one generated by Access’s AutoNumer data type is a much better choice for the primary key because social security numbers are generally considered private information and wouldn’t be appropriate for use in public queries and reports.
The remainder of the tables and fields that will be used in our chapter-based database will be referenced throughout this chapter and can also be found on this book’s accompanying website (www.courseptr.com/downloads).
TABLE RELATIONSHIPS
Remembering that table relationships are the essence of a relational database such as Access, we must create physical relationships between our tables to bring data back together that we have separated during the database normalization process. Let’s get started by creating a relationship in Access between our two tables, Majors and Colleges. We’ll accomplish this through the Relationships window found under the Database Tools tab of the Ribbon, as shown in Figure 2.7.
FIGURE 2.7 Creating table relationships using the Relationships window.

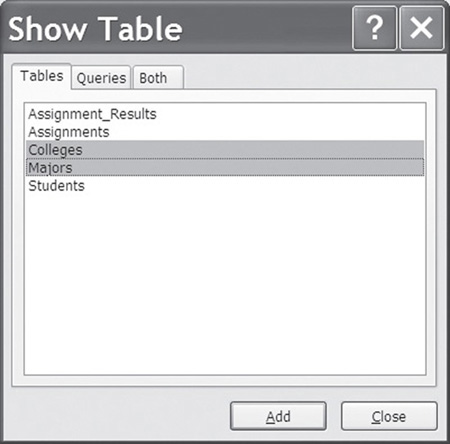
Once the Relationships icon is selected, a Show Table window is launched, shown in Figure 2.8, that allows you to select the tables and/or queries that will be used to create the relationship. Note, you may need to click the Show Table icon from the Design tab, before selecting the Majors and Colleges tables. With both the Majors and Colleges tables selected, I can now create a relationship by clicking the Add button.
FIGURE 2.8 Selecting tables to create a relationship.
You will now see the Relationships window opened with your selected tables, as revealed in Figure 2.9.
FIGURE 2.9 The Relationships window.

From the Relationships window I will click a primary key from one table and drag it to the foreign key in the other table. To drag more than one field, hold the Ctrl key while selecting each field, then drag. For my purposes, I want to create a relationship between the two tables (Majors and Colleges) using the College_Id key from each table. When I drag the College_Id from the Colleges table onto the College_Id from the Majors table, a new window opens to edit the relationship, as shown in Figure 2.10.
FIGURE 2.10 The Edit Relationships window.
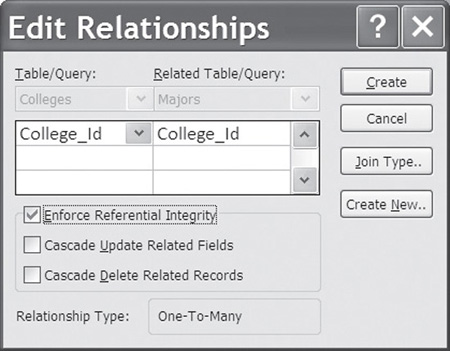
Click the Enforce Referential Integrity check box to ensure the primary key exists when entering a foreign key and then click the Create button. I have now created a one-to-many relationship, which means for every College_Id in the Colleges table, there are many occurrences of that College_Id in the Majors table (in other words, each college has many majors). Moreover, the primary key in the Colleges table, College_Id, has also now become a foreign key in the Majors table.
You will need to close all database objects (i.e., tables) that will be used in creating the relationship before the relationship can be created. Access needs exclusive access to the required database objects before a relationship can be created.
Consider the following options from the Edit Relationships window when creating a relationship between tables:
• Enforce referential integrity, which means values entered into the foreign key must match values in the primary key.
• Enforce cascading updates between one or more tables, which means related updates from one table’s fields are cascaded to the other table or tables in the relationship.
• Enforce cascading deletes between the two tables. In short, this means any relevant deletions from one table cascade in the other table(s).
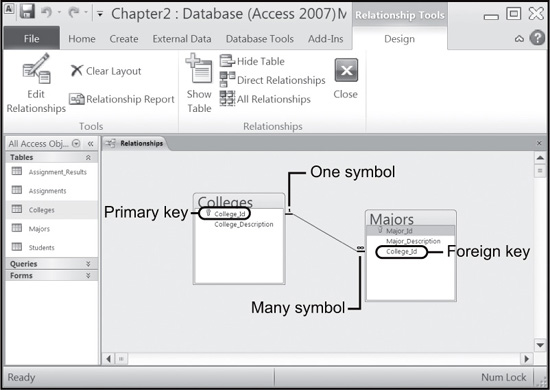
As shown in Figure 2.11, my Relationships window will now have a graphical link depicting a one-to-many relationship between my two tables and their keys.
FIGURE 2.11 A table relationship established using primary and foreign keys.
To better visualize the relationship, I’ll enter a few records into the Colleges table via the Datasheet view. You will notice that for each record in the Colleges table a small plus sign (+) exists to the left of the row. Shown in Figure 2.12, I expanded the plus sign by clicking it for one row, which allows me to enter records directly into the Majors table via a one-to-many relationship.
FIGURE 2.12 Entering records into tables via a one-to-many relationship.
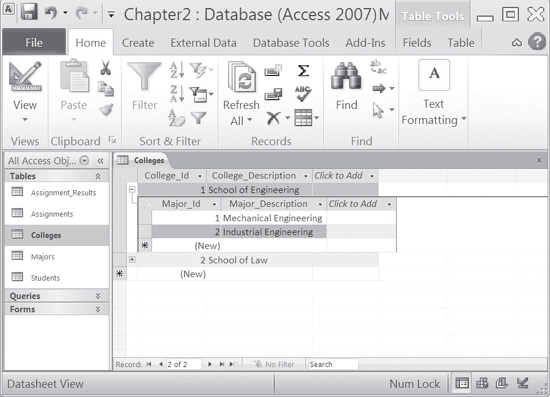
Shown in Figure 2.13, I opened my Majors table in Datasheet view and it reveals the records I entered earlier via the Colleges table. Also important are the College_Id values in the Majors table, courtesy of my one-to-many relationship, which have become foreign key values back to the Colleges table. Very cool!
FIGURE 2.13 Newly created records via a one-to-many relationship.

FORMS
Though careful data analysis is the key to a well-designed and adaptive database, end users are just as likely to appreciate a well-built user interface time and again. A good interface leverages forms and controls in a way that is intuitive to users for managing data. User interfaces should hide the complexities of a database, such as business rules and relationships.
Access forms are graphical controls that act as containers for other graphical controls such as text boxes, labels, and command buttons. Though most of the forms in this book will be created from scratch without the aid of any wizard, Access 2010 has done an excellent job making simplistic form creation easy through the use of the Form tool, which I’ll show you next.
To use the Form tool, select the table or query you want available on the form (in my example it’s the Assignments table) and then click the Form icon from the Create tab of the Ribbon, as shown in Figure 2.14.
The Form tool automatically creates a new form with all the necessary controls to support data from the selected query or table in Layout view. While in Layout view you can scroll through the data and adjust the controls, such as the placement and size of a text box. If your table has a one-to-many relationship to another table, Access places a datasheet onto the new form as it did for my Assignments table, which has a one-to-many relationship with the Assignment_Results table, as revealed in Figure 2.15.
FIGURE 2.14 Creating a new form in Access using the Form tool.

FIGURE 2.15 Viewing a new form created by the Form tool.

After creating a form, ensure you save it by clicking the Save icon in the Quick Access toolbar, or from the Office button; you can also leverage the keyboard combination Ctrl+S to save the selected or highlighted objects.
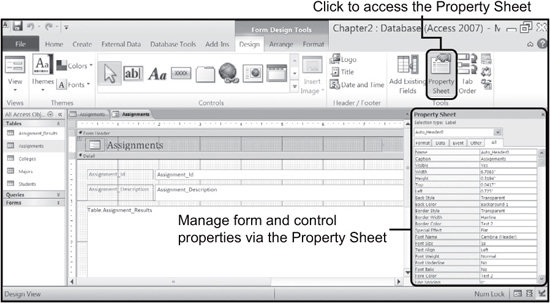
Both forms and controls have properties that describe how they look and behave (attributes). You can manage these attributes in Design view using the Property Sheet window shown in Figure 2.16.
FIGURE 2.16 Using the Property Sheet to manage form and control attributes.

If you’re unable to see the Property Sheet window, ensure you’re in Design view and then choose the Property Sheet icon from the Design tab shown in Figure 2.16.
It’s important to note, not all control properties are accessible or are available through the Property Sheet in Design view. This means other properties are available only during runtime through VBA statements.
Common Controls
Controls can be accessed and placed onto your form manually by clicking the control in the Controls section of the Design tab. Access places the control on your form in a predetermined shape and size. You can resize controls using your left mouse button, or by clicking the control and then using the Shift and arrow keys combination to resize the control. Use the Ctrl button and arrow keys simultaneously to move the control.
Just like data fields, controls have properties that determine the control’s various attributes or settings. A control’s properties can be accessed by right-clicking the control and selecting Properties from the menu.
![]()
Both the Field List and Property Sheet windows can be moved by dragging the top part of the window in and around Access. Both windows can also be docked by double-clicking the top of the window.
I’ll now show you four common controls: text boxes, labels, images, and buttons. You can see in Figure 2.17 a visual depiction of where these common controls are located in the Controls section of the Design tab.
FIGURE 2.17 Common controls including Text Box, Label, Image, and Button.

To get started working with these common controls, I will create a new form called Manage Students from scratch using the Blank Form option that will allow a user to add, update, and delete students from my database. By default, Access puts you directly in Layout view after creating a new table. When creating a form from scratch, it’s better, in my opinion, to switch directly to Design view. Design view provides among other features, gridlines that will assist you in aligning and sizing your controls for a uniform look.
As shown in Figure 2.18, I have created my new Manage Students form from scratch and have switched to Design view revealing the grid lines.
FIGURE 2.18 Creating a form from scratch using the Blank Form option.

You may have noticed previously that the Form tool automatically bound both form and controls (text boxes) to my Students table. I’ll now show you how to create bound controls from scratch. First, I need to bind my Manage Students form to the Students table by setting the form’s Record Source property (by selecting it from the Data tab in the Property Sheet window) to the Students table, as shown in Figure 2.19. You may need to right-click the Form’s Detail section, and select Form Properties if you do not see the form’s properties in the Property Sheet window.
FIGURE 2.19 Binding the Manage Students form to the Students table.
After binding my Manage Students form to the Students table, I now have the ability to bind other controls, such as text boxes, to the fields in the Students table. First I will place one label control at the top of the form by clicking the Label control icon from the Controls section of the Ribbon and dropping it onto the form. This label control is for display purposes only and will not be bound to any data field. Next, I will set the following label property values via the All tab of the Property Sheet window:
• Name: lblManageStudents
• Caption: Manage Students
• Font Size: 14
• Text Align: Center
Remember that the Property Sheet window displays properties for a single control, unless you select multiple controls to view common updatable properties. To switch between control properties, use the drop-down box at the top of the Property Sheet window.
Below the label, I will add three text boxes by clicking on the text box control from the Controls section of the Ribbon and align them on the form, one below the other. Notice after adding a text box control that you actually get two controls for the price of one. Specifically, you get one text box and one label control just to the left. Both controls have their own, distinct properties and can be moved and deleted independently of each other.
Assign the following properties to each respective text box via the All tab of the property sheet:
• Name: txtStudentId
• Control Source: Student_Id
• Locked: Yes
• Name: txtFirstName
• Control Source: First_Name
• Locked: No
• Name: txtLastName
• Control Source: Last_Name
• Locked: No
Note that I’ve set the txtStudentId Locked property value to Yes. I did this because the txtStudentId field is a primary key with a data type of AutoNumber. Since an AutoNumber is generated automatically by the Access system, it is neither necessary nor advisable to let users manage this field manually.
Assign the following properties to each respective text box label via the All tab of the property sheet:
• Name: lblStudentId
• Caption: Student Id:
• Text Align: Right
• Name: lblFirstName
• Caption: First Name:
• Text Align: Right
• Name: lblLastName
• Caption: Last Name:
• Text Align: Right
I’ll now add one image control to the upper-right corner of the form and assign the following property values. I’ve copied the image used in this control to the book’s website (www.courseptr.com/downloads) for your convenience.
• Name: imgTeacher
• Picture: teacher.JPG
Last but not least, I’ll add a button to my new form that exits the user from the application and assigns the following property values:
• Name: cmdQuit
• Caption: Quit Application
When you add a command button to any form, Access launches a Wizard that can aid you in assigning various built-in actions to your command button’s click event. Though I typically shy away from wizards in this book, this is a good example of when using one is helpful in assigning a simple action to a control.
As seen in Figure 2.20, I have selected the Application Category and Quit Application Action from the Command Button Wizard.
FIGURE 2.20 Using the Command Button Wizard to assign an action to a button.

After updating all control property values, I will resize them by left-clicking one of the control’s re-sizing boxes (re-sizing boxes are the small boxes in and around a control’s outer boundary) and dragging a side or corner, and I will re-position them by left-clicking the control and dragging it to its appropriate location.
Now that the controls have been bound to the Students table, users can view, update, and add student records using the form’s built-in navigation bar shown in Figure 2.21.
FIGURE 2.21 Managing student information with bound controls.

You have now seen how to create a table from scratch and bind controls to data fields by hand. You can of course add bound controls to forms created by scratch by dragging and dropping table fields from the Field List window, but that wouldn’t give you the necessary insight into how controls are bound! Nevertheless, the Field List window is available by clicking the Add Existing Fields icon in the Tools section of the Design tab.
In future chapters I will show you how to further control the relationship between controls, tables, and fields by harnessing the power of the Access VBA language.
Hungarian Notation
You may have noticed the naming convention I used to assign control names in the previous section. I recommend using a naming convention for controls to provide readability and consistency throughout your database and code.
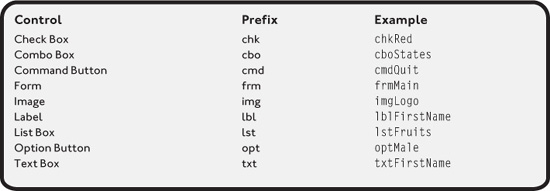
The naming convention I use and recommend is called Hungarian Notation (named after a computer scientist). To apply this notation, simply modify the Name property of each control to use a three-letter prefix (all in lowercase) that indicates the control type followed by a meaningful description. Each word that describes the control (not the prefix) should have its first letter capitalized.
Table 2.9 shows some sample naming conventions for controls discussed throughout this book.
TABLE 2.9 COMMON CONTROL-NAMING CONVENTIONS
QUERIES
Database queries provide the mechanism by which people can question their data and get responses. Database queries are typically written using a database language called SQL (Structured Query Language), which I’ll discuss in Chapter 9, “Microsoft Access SQL.” Nevertheless, I’ll show you how to create queries using Microsoft’s built-in query designer, which is sufficient for most database queries in Access.
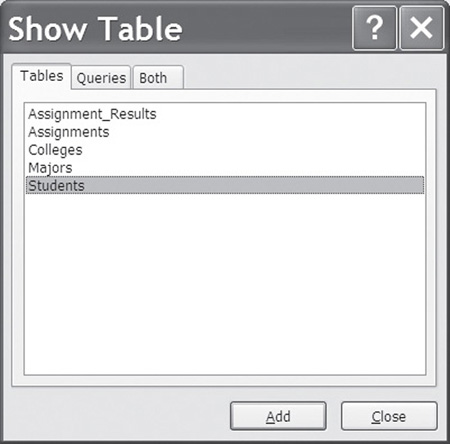
To get started, I will ask my database for the first and last names of all students in my Students table. First, I will click the Query Design icon from the Queries section in the Create tab of the Ribbon. Next, a Show Table window is opened where I will select and add my Students table, as shown in Figure 2.22
FIGURE 2.22 Select and add a table to a query.
Access has now created an empty query object for me in Design view with the Students table available for field selection. I will now select both last- and first-name fields, displaying them in ascending order. This can be accomplished in one of three ways: Double-clicking one or more fields in the Students table, selecting one field at a time in each Fields drop-down box in the matrix at the bottom of the window, or by dragging and dropping a field from the graphical depiction of the table. After selecting the Last_Name and First_Name fields, your query should look like Figure 2.23.
FIGURE 2.23 Selecting fields from a table to build a query.
![]()
You can easily select all fields in a table for a query by selecting the asterisk (*) character at the top of a table.
Access allows you to verify the underlying SQL query generated by the Access query designer by selecting the SQL View item from the View menu. The SQL query generated for my students query looks like this:
SELECT Students.First_Name,  Students.Last_Name
FROM Students
ORDER BY Students. First_Name, Students.Last_Name;
I will now save my query and name it Retrieve Student Names.
To execute or run a query, simply click the exclamation mark (!) icon in the Results area of the Design tab. Results from my Retrieve Student Names query are shown in Figure 2.24.
FIGURE 2.24 Viewing the results of the Retrieve Student Names query.
I’ll now create a new query that asks a more pointed question of my student data. Specifically, my new query will ask: “Give me a list of all student names and their grades for the Chapter 1 Exercises - Boolean Algebra assignment (Assignment_Id=7).” I will accomplish this by creating a new query called Chapter 1 Exercise Results and selecting both the Students and Assignment_Results tables.
Notice in Figure 2.25 that Access displays the relationship between both tables by displaying a graphical link between the Student_Id primary and foreign keys.
To build the query, select the following fields in the following order by double-clicking each field from the corresponding table in the query designer.
• Last_Name (ascending order)
• First_Name (ascending order)
• Assignment_Score
• Assignment_Id
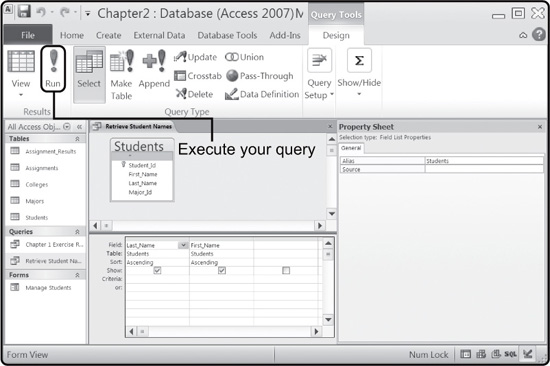
My query is almost done, but not yet—I still need to tell the query to limit the results to show only assignment scores for assignment number 7. I can accomplish this by specifying criteria (or a condition) of =7. Moreover, since the criteria is applied against the Assignment_Id field, which I don’t want displayed in the query results, I’ll tell the query designer to not show the field by unchecking the Show check box. The finished query is depicted in Figure 2.25.
FIGURE 2.25 Creating an Access query with multiple tables and a condition.

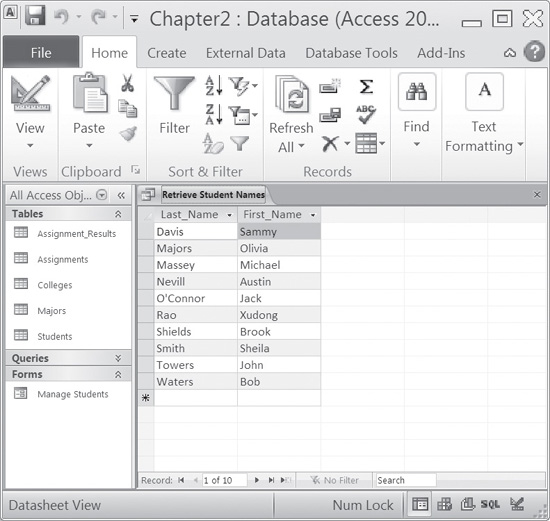
After saving and naming my query, I’ll run (execute) it with results, as shown in Figure 2.26.
FIGURE 2.26 Viewing the Chapter 1 Exercise Results query results.

Shown in Figure 2.26, Access has limited query results based upon my criteria to show all students and their scores where Assignment_Id=7.
I will teach you how to write your own SQL statements later in this book, but for now I would like you to appreciate what happened behind the scenes in the Chapter 1 Exercise Results query by looking at the following SQL statements that Access created.
SELECT Students.Last_Name, Students.First_Name, Assignment_Results.Assignment_Score
FROM Students INNER JOIN Assignment_Results ON Students.Student_Id =
Assignment_Results.Student_Id
WHERE (((Assignment_Results.Assignment_Id)=7))
ORDER BY Students.Last_Name, Students.First_Name;
As you can see from the previous SQL query, Access has done a lot of work behind the scenes in creating the necessary SQL joins and conditions.
SUMMARY
• Database normalization is the process by which one optimizes table structures to enhance query performance and eliminate data integrity issues by investigating data requirements and their relationships to each other.
• An entity is generally described as the overall description of a set of data to be saved in a table.
• Attributes are the bits of related information that make up an entity.
• A primary key is either a single field or a combined set of fields that uniquely identifies a single row of data in a table.
• The foreign key creates the foundation of a relationship between two tables by inserting the primary key from one table into another table.
• A one-to-one relationship denotes that each row of information for one entity relates to exactly one row of information for another entity.
• A one-to-many relationship is created by adding the primary key from one table into a second table that will hold many occurrences of the primary key.
• To build a many-to-many relationship, you need to create a third table that breaks the many-to-many relationship into two one-to-many relationships.
• Access tables must contain at least one or more fields.
• The AutoNumber data type is an autogenerated number whose values can be incremented or randomly generated. It is often used as the table’s primary key.
• If you require a number of characters greater than 255 (the maximum size allowed in a Text field), you need to use the Memo field type.
• Referential integrity means values entered into the foreign key must match values in the primary key.
• Access forms are graphical controls that act as containers for other graphical controls such as text boxes, labels, and command buttons.
• Controls have properties that determine how the control will look and behave.
• Access allows you to bind controls to tables, fields, and queries.
• Database queries provide the mechanism by which people can ask their data questions and get responses.
• You can limit the result set of a query using criteria, also known as conditions.
CHALLENGES
1. Create a new table called Teachers that holds the teacher’s name and a teacher id (primary key). Assign appropriate data types to each field.
2. Create a new table called Courses that holds a course description, course id (primary key), and another field to hold a teacher id. Assign appropriate data types to each field.
3. Create a one-to-many relationship that links the Teachers table to the Courses table and remember to enforce referential integrity.
4. Create a new form called Manage Teachers that allows a user to manage both the Teachers and Courses table. Using the form, enter sample records into both the Teachers and Courses tables. Make sure to leave one or more teacher record that does not have a corresponding entry in the Courses table.
5. Using the data entered into the Teachers and Courses tables from challenge 4, create a new query called Courses without Teachers that will list all courses without an assigned teacher.