
CHAPTER 12
MACROS AND PERFORMANCE TUNING
In this chapter you learn about macro objects in Access 2010, including how to create and debug stand-alone macros, and convert macros to VBA code. You’ll also learn about form, VBA code, query, and index performance considerations to build a well-tuned Access database application. I will also show you how to leverage out-of-the box database optimization hints through Access’s Performance Analyzer.
MACROS
Macros are Access objects that you build and assign to form, report, or control events to automate tasks and processes without VBA programming. Macros hide the implementation details of the VBA programming language much like a class definition encapsulates the complexities of an object’s functionality. For example, you can create a macro to open a query when a user clicks a command button on a form by associating the macro name to the command button’s On Click event property.

VBA is incompatible with SharePoint Access services. If you plan to publish your Access 2010 database to a SharePoint server running Access services, macros must be used for programming responsibilities instead of VBA.
Access 2010 has added and enhanced many macro features including:
• Embedded macros are inserted in an event property of objects such as controls, and stay with the object when it is moved or copied.
• Error handling and debugging, which includes new macro actions to handle errors and the ability to step through macro actions one at a time.
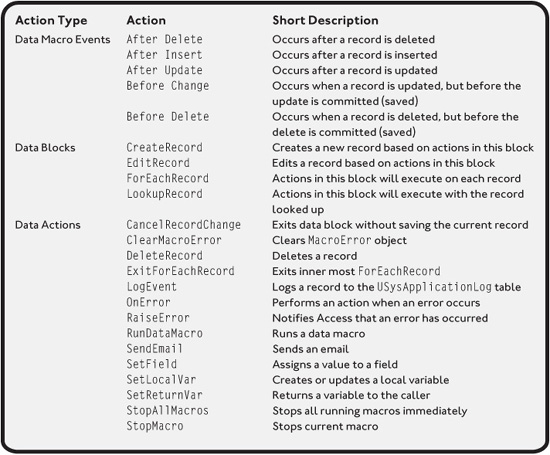
• Data macros allow you to implement the concept of a database “trigger” by creating macros assigned to data events.
• Temporary variables can now be created and used in a macro’s conditional expression and passed among forms and reports. A macro’s temporary variables can also be accessed in VBA.
You can also use macros to assign an action, or set of actions to a key by creating and saving a macro as AutoKeys. Another popular requirement is to have a set of actions performed when the database is first opened, and before any other task is performed, which can be accomplished by creating a macro named AutoExec. A macro named AutoExec will load before a startup form, and any of its VBA code in the Open or Load events.
Macro Builder
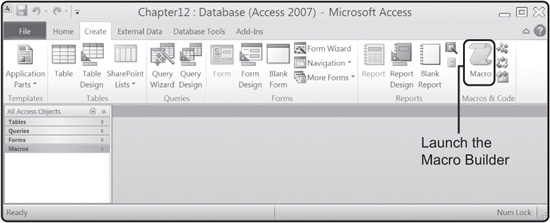
Macros are created using the Macro Builder by selecting the Macro icon from the Macros & Code group of the Create tab, as seen in Figure 12.1. Once launched, Access 2010 displays an empty macro in Design view as revealed in Figure 12.2.
FIGURE 12.1 Create a new macro using the Macro Builder.
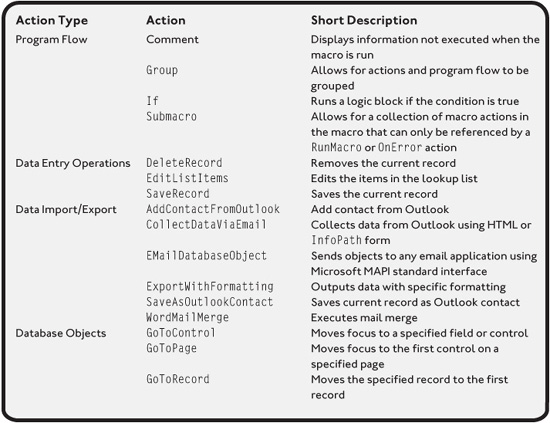
To create your macro, select one or more macro actions and program flow as seen in Figure 12.3; after which, enter values for each action’s arguments. Referenced in Table 12.1, macro actions contain common Access database processes that build automation.

TABLE 12.1 ACCESS 2010 MACRO ACTIONS


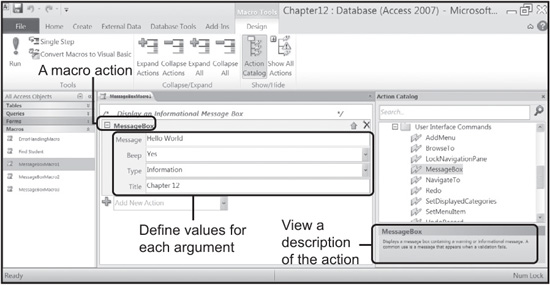
Some actions have no arguments, whereas others contain one or more. An action’s argument enables you to customize how the action will behave. A short description can be seen for each argument at the bottom right of the screen by selecting the action in the Action Catalog window as seen in Figure 12.3.
FIGURE 12.3 Selecting a macro action and defining the action’s arguments.
After your macro has been created and saved, the actions can be executed by clicking the Run icon in the Tools section of the Design tab, as seen in Figure 12.4.
FIGURE 12.4 Running a macro in Design mode.

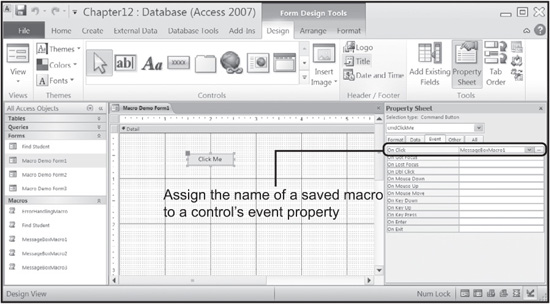
With a macro created and saved, you can assign the macro to a report, form, or control event property. For example, Figure 12.5 demonstrates assigning a macro name to the On Click event property of a command button.
Macros can also be executed from a VBA event procedure via the RunMacro or RunDataMacro method of the DoCmd object. For example, the next VBA Form_Load() event procedure runs the macro called MessageBoxMacro by passing the macro name (in double quotes) to the RunMacro method of the DoCmd object.
FIGURE 12.5 Assigning a macro to a control’s On Click event property.
Private Sub Form_Load()
  DoCmd.RunMacro “MessageBoxMacro”
End Sub
Conditions can be added to macros to ensure a set of criteria is met before the macro action occurs. Macro conditions are much like VBA conditions in that they must evaluate to either True or False. If the macro condition evaluates to False, the macro condition will not execute. If the macro condition evaluates to anything other than False, the macro action will execute. To place conditions in your macros, simply click the Conditions icon in the Show/Hide area of the Design tab, as shown in Figure 12.6.
FIGURE 12.6 Enabling and creating macro conditions.

![]()
EnterFalse as a Condition to temporarily have Access ignore a macro action.
As seen in Figure 12.6, I created two actions for my macro. The first action uses the IsNull function to check for text in the txtName Text Box. If the condition evaluates to True, the action will execute, in this case alerting the user to enter his or her name. The second condition also uses the IsNull function, but in this case the action will only execute if the condition evaluates to False.
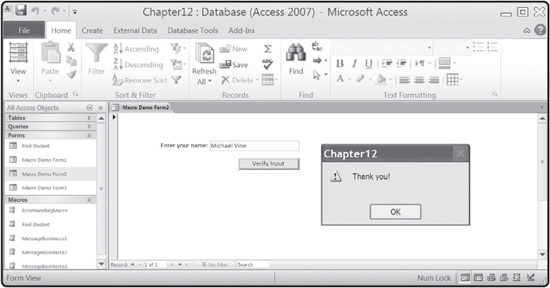
I’ll use my new macro with conditions by creating a simple form containing one text box with a corresponding label, and one command button. Next, I will assign my new macro called MessageBoxMacro2 to the command button’s On Click event. After entering my name (Michael Vine) into the text box control, I’ll click the command button that has the associated macro name assigned to the On Click event property, with output shown in Figure 12.7.
FIGURE 12.7 Sample output using a macro with conditions.
Access objects, such as controls or forms, used in a macro’s condition should have an explicit reference to the object’s location. For example, the following macro condition will generate an error, shown in Figure 12.8, if the macro is run in Design view.
IsNull([txtName])
To execute a macro with a reference to a control name (for example, in a macro condition or argument value), you must specify what report or form the control belongs to, by using the Forms or Reports collection, followed by the form or report name, then the control name. Furthermore, use an exclamation mark (!) in between each object, and surround each object with brackets ([]), as demonstrated in the following code.
FIGURE 12.8 Attempting to execute a macro in Design view that has an improperly referenced control in a condition.

IsNull([Forms]![Macro Demo Form2]![txtName])
If referencing a form, report, and/or control, it’s important to know that a macro cannot execute by itself in Design view without the associated form or report also opened in Design, Report, or Layout view. Attempting to execute a stand-alone macro in Design view without the associated form or report opened will generate an error, as shown in Figure 12.9.
FIGURE 12.9 Attempting to execute a macro in Design view without the associated form or report also opened.

Data Macros
Data macros are an exciting and much welcomed feature in Access 2010 that allows you to implement the concept of a database “trigger.” Database triggers are an easy concept to understand—specifically, they are procedures (code) that are executed when INSERT, UPDATE, or DELETE statements are run against a table. Data macros work just like triggers, allowing you to automatically execute a series of actions based on specified events to preserve and/or enhance information integrity. Typical uses of a data macro, or trigger, include:
• Audit changes: Document the user who updated and/or inserted a record
• Event logging: Document when a record was inserted and/or updated
• Replicating data: Save a record of every change made
• Enforcing business rules: Ensure that every student record has at least one college major
• Apply business rules: Send a supervisor an email when a purchase limit has been reached
Just like regular macros, data macros have events and actions as documented in Table 12.2.
TABLE 12.2 ACCESS 2010 MACRO ACTIONS
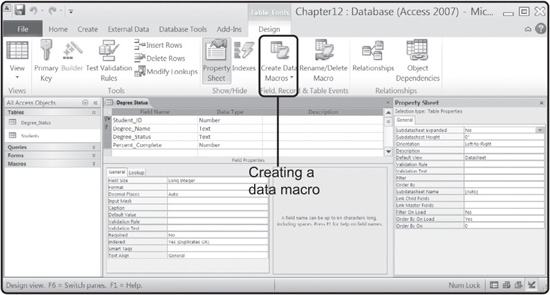
Data macros are just as easy to create as regular macros, and as you’ve already learned, data macros are created using the Macro Builder. To create a data macro, launch the Macro Builder through the Field, Record & Table Events area of the Design tab, as referenced in Figure 12.10.
As seen in Figure 12.10, I created a table called Degree_Status to hold information about student’s degree progress, and specifically the degree name, progress, and percent complete. My data macro requirements are to initiate (trigger) updates to the Percent_Complete field based on two business rules:
FIGURE 12.10 Launching the Macro Builder in Form Design view.
• Update the Percent_Complete field to 100 when the Degree_Progress is updated with “Complete”
• Update the Percent_Complete field to 0 when the Degree_Progress is updated with “Not Started”
I can implement my data macro requirements by selecting a before change data macro as revealed in Figure 12.11.
FIGURE 12.11 Using data macros to update fields based on data events.

Figure 12.11 demonstrates using If and Else If program flow events to evaluate when the Degree_Status field has been updated, but before the changes have been committed (saved).
When either of the conditions is met, the data macro uses the SetField action to update the Percent_Complete field.
Macro Troubleshooting and Error Handling
As you learned in Chapter 8, “Debugging, Input Validation, File Processing, and Error Handling,” Access VBA provides mechanisms for debugging code such as stepping through one line of code at a time. A similar offering is given to macro developers to allow them to step through macro actions, and isolate any defects or errors encountered. This is accomplished by clicking the Single Step icon in the Tools area of the macro Design tab, as shown in Figure 12.12.
FIGURE 12.12 Observe a macro’s flow by stepping through each action.
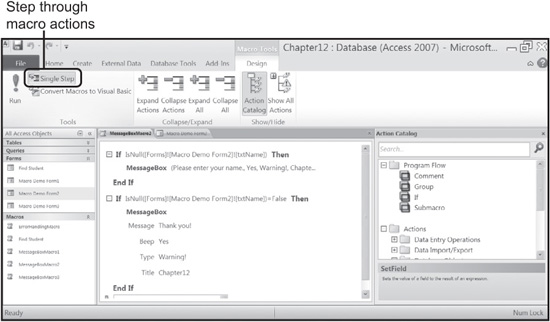
Macro actions can be executed successfully all at once, or one at a time from within the macro Design view by clicking the Run icon (!) in the Tools area. If the Single Step option has been selected, a Macro Single Step window will appear (as shown in Figure 12.13) that allows you to view each macro’s condition, action name, arguments, and any associated errors.
Once selected, the single step functionality can also be invoked outside of the macro Design view by assigning the macro name to a report, form, or control event property.
Just as with VBA code, it’s always a good idea to implement error-handling routines for those unexpected results or defects, or as I like to call them “undocumented features.” Macro developers can implement error-handling routines using the OnError Action, which has two arguments that are described next.
FIGURE 12.13 Stepping through one action at a time using the Macro Single Step window.

• Go to: Denotes the behavior to occur when an error is generated. Default values include:
• Next: Moves macro execution to the next action.
• Macro Name: Stops macro execution and runs the macro identified in the macro Name argument.
• Fail: Stops macro execution and displays an error message.
• Macro Name: Identifies the macro to be used in error handling if the Macro Name Go to value is selected. For example, the error-handling macro could be titled ErrorHandler, and include a MessageBox action to customize error communication to the user.
Generally speaking, the OnError action should be placed at the top of the macro actions (before any other action) so that error handling is in effect for subsequent actions.
Access 2010 also includes the MacroError object that incorporates properties for determining specific information about runtime macro errors. The next bulleted list describes properties of the MacroError object.
• ActionName: The macro action that was running when the error occurred.
• Arguments: The specified arguments in the macro action that was running when the error occurred.
• Condition: The condition the macro action was using when the error occurred.
• Description: Represents the error message text.
• MacroName: The name of the macro executed when the error occurred.
• Number: The current error number.
The MacroError object and its properties can be used in macro actions to customize and display information about macro errors. Because the MacroError object contains information about a single error only, the MacroError object will hold information about the last error encountered in a series of errors. The MacroError object and its properties can be used in macro actions (for example, the Message argument of the MessageBox action) to customize and display information about errors as the next line of code demonstrates.
=“Error ” & [MacroError].[Number] & “ with “ & [MacroError].[ActionName] & “.”
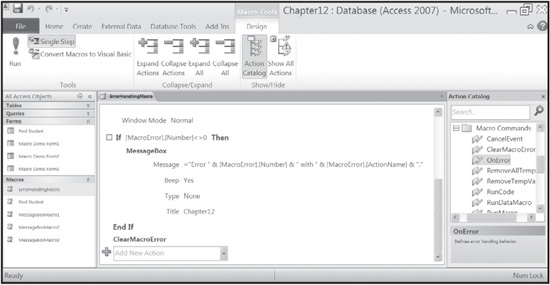
Although all property information in the MacroError object is reset (cleared) when a macro ends, Access does provide the ClearMacroError action should you need to clear property information for the MacroError object before the macro ends. Figure 12.14 demonstrates error handling using the OnError and ClearMacroError actions in conjunction with the MacroError object.
FIGURE 12.14 Incorporating error handling into macros using the OnError and ClearMacroError actions.
Converting Macros to VBA
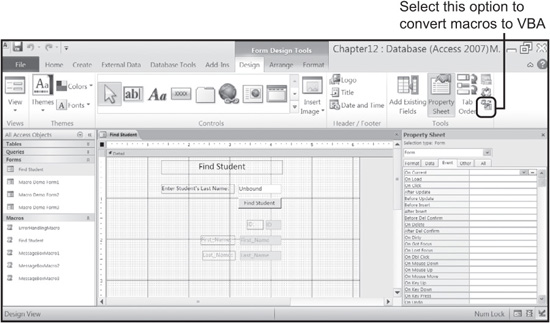
Microsoft Access 2010 can convert macros to VBA procedures, which will in turn perform similar actions as the original macro. This conversion process is fully automated, and is easily performed by simply opening the form or report in Design view, and clicking the Convert Form’s Macros to Visual Basic icon from the Tools area of the Design tab, as demonstrated in Figure 12.15.
FIGURE 12.15 The Convert Form’s Macros to Visual Basic option.
Once selected, Access prompts you with two conversion options, which are to add VBA error handling to generated functions and include macro comments, as revealed in Figure 12.16.
FIGURE 12.16 Selecting macro to VBA code conversion options.

After the macro conversion has completed, Access creates all necessary VBA procedures and code to produce similar functionality. Furthermore, the conversion process reassigns values in event properties (for example, On Click) from a macro name, to the [Event Procedure] value.

The macro objects are not deleted from the Access database after a macro to VBA conversion completes.
To demonstrate, I successfully converted a macro called Find Student to Visual Basic (VBA) code. Shown next is the VBA code, including comments and error handling, automatically generated by the macro conversion process.
---------------------------------------------------
’
’ cmdFindStudent_Click
’
’
------------------------------------------------------------------------

Private Sub cmdFindStudent_Click()
On Error GoTo cmdFindStudent_Click_Err

    If (IsNull(Forms![Find Student]!txtLastName)) Then
        Beep
        MsgBox “Please enter a Student’s last name.“, vbOKOnly, “Chapter 12”
    End If
    DoCmd.SearchForRecord acForm, “Find Student”, acFirst, “Last_Name = ’” & Forms!
[Find Student]!txtLastName & “’”

cmdFindStudent_Click_Exit:
    Exit Sub

cmdFindStudent_Click_Err:
    MsgBox Error$
    Resume cmdFindStudent_Click_Exit

End Sub
Notice the If condition in the preceding command button Click event procedure. This VBA condition contains the same conditional logic and subsequent actions as does the macro! In addition to VBA conditions, the conversion process also created comments, and VBA error-handling routines for my event procedure, as specified in the conversion options window (refer to Figure 12.16).
ACCESS DATABASE PERFORMANCE CONSIDERATIONS
There comes a time in every developer’s life when an application’s performance has become undesirable. Generally speaking, performance problems are the result of one or more oversights that may include: an unexpected increase in data volume that slows query and data operation responses, not having enough time to tune the application properly during or after application development, or not having the knowledge about what performance optimizations to consider in the first place. Whether you created the application yourself or inherited the support of an existing application, performance issues can lead to end-user dissatisfaction, and ultimately a lack of trust and use of the application. By learning and leveraging key performance considerations and techniques, you’ll be sure to keep your Access database application humming.
The most common areas one should consider Access performance optimizations are with forms, VBA code, queries, and indexes. I will show you some common optimization techniques in each of these areas that you can consider during application design, construction, and maintenance. Before moving into area-specific performance considerations however, consider the following general recommendations for Access installed on a local computer:
• For non-shared databases, install Access and all databases on a local disk drive rather than on a network shared drive.
• Open an Access database for “Exclusive Use” if the database has only one user. This is accomplished one of two ways: First, in the Access Open dialog box, click the arrow next to the Open button and select Open Exclusive. Or, use the /excl command line switch in a program shortcut, or via the Windows Start/Run procedure as shown in the following line of code.
“c:Access 2010msaccess.exe” /excl “c:database_folderdatabase_name.accdb”
• Ensure the Access program has enough memory to successfully run and execute processes by closing all unnecessary programs and ensuring available memory in your system meets minimal requirements as described in the “System Requirements” section from Chapter 1.
• Keep Access databases on uncompressed disk drives.
• Regularly delete unneeded files from the Windows Recycle Bin and run the Windows Disk Defragmenter.
• Use blank screen savers, or none at all, and solid color desktop wallpapers.
Forms
Though the performance of forms may not be an obvious consideration during database tuning, the following recommendations can shave seconds off of the loading and processing of graphical controls and improve the overall performance of your Access application.
• Close all non-used forms to reclaim memory.
• Set a form’s Data Entry property to Yes for forms that will be used primarily for entering new records. Otherwise, Access will read all records before showing the empty record at the end of the recordset.
• Use graphical objects sparingly, or convert graphics from color to black and white.
• Remove code from forms that that do not require VBA, and set the form’s Has Module property to No. Instead of using VBA code for simple event procedures, consider using macros. Forms without code modules can still have controls that call functions and procedures from a standard module. Forms without code modules load more quickly.
• Only include fields in sub forms that are absolutely necessary. Base a sub form’s data on a saved query rather than a table.
• Fields used in a sub form that are part of criteria or are linked to the main form should be indexed.
• The source of list and combo boxes should be based on a saved query rather than a SQL statement or table, by changing the list or combo box’s Row Source property.
• Fields displayed in a list or combo box should be indexed.
VBA Code
The following VBA code performance considerations should be evaluated during the design and development of new Access applications, and can be applied to existing applications without changing the application’s external behavior.
• Ensure variables are explicitly declared by checking the Require Variable Declaration option from the VBA code window’s Tools/Options menu item.
• Remember to remove unused procedures and variables to conserve memory.
• Leverage constants whenever possible.
• Use the Variant data type sparingly.
• Compile VBA code by either saving an Access databases in the ACCDE file format, or by using the Compile option from the Debug menu in the VBA code window.
• When possible, leverage the Integer or Long data types for mathematical operations.
• Use indexed fields for the FindRecord and FindNext methods.
• Create object variables to store control or form property values rather than identifying and accessing the control or form property numerous times.
• Leverage the Me keyword for form references within event procedures.
• Avoid using the IIF function for return expressions that take a long time to process.
• Leverage the Erase or ReDim statements with dynamic arrays to reclaim memory.
• Encourage Access VBA to load modules as needed and conserve memory by putting related procedures in the same modules.
Queries and Indexes
The most common approach to tuning a database’s performance or solving an existing performance problem is to analyze your queries and indexes, as optimizing queries and indexes often result in the largest gains in database performance. A poorly written query, or the lack of proper index utilization, can bring the system the database resides on to its knees. Consider the following recommendations to prevent a frozen system, or a query that seems to never return any results.
• Before creating a query, know how many rows are in the table or tables being queried, and approximately how many rows you expect back from the query.
• When appropriate, leverage conditions in a SQL WHERE clause to minimize the number of rows returned by a query.
• When possible, avoid sorting hefty resultsets, which can consume large amounts of memory.
• Leverage GROUP BY instead of DISTINCT to eliminate duplicate rows. The GROUP BY clause eliminates duplicate rows sooner in the query process than does the DISTINCT clause.
• Leverage indexes to find and sort data quicker. Indexes store record locations by the field or fields indexed. When a query finds the location from an index, it is able to move directly to the record’s location rather than scanning through the entire table.
• As a general rule of thumb, indexes should be used on primary and foreign keys.
• The WHERE clause in large queries should reference indexed fields.
• Create indexes on other columns that are used in table joins.
• Avoid indexing small tables to save the cost of loading and processing indexes.
• Avoid indexing columns that are frequently updated, which increases the amount of database write time.
• Only use indexes as required. Each index consumes disk space, and must be managed by the database system.
Performance Analyzer
Now that you’ve learned about performance considerations and optimization best practices for Access databases, let me show you how to leverage the built-in Performance Analyzer for receiving feedback and hints directly from Access itself!
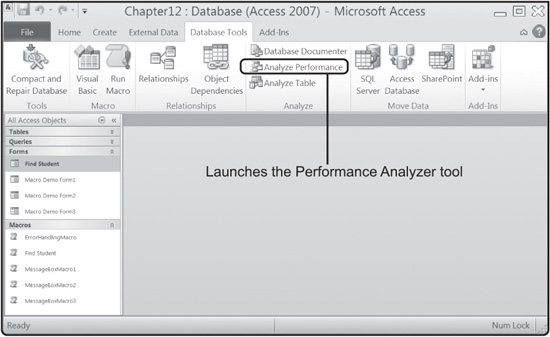
The Performance Analyzer can be accessed via the Analyze Performance icon in the Analyze area of the Database Tools tab, as shown in Figure 12.17.
FIGURE 12.17 Accessing the Performance Analyzer tool from the Database Tools tab.
Once launched, the Performance Analyzer window, demonstrated in Figure 12.17, allows you to select which Access objects (tables, queries, forms, reports, macros, and modules), you’d like analyzed. Each tab allows you to select one or more objects by category. You can also view all objects under the All Object Types tab. For the example, I ran Performance Analyzer against the Northwind database that comes with Access 2010, as shown in Figure 12.18.
FIGURE 12.18 The Performance Analyzer tool.

After selecting the Access objects you’d like analyzed, click the OK button. Using predetermined performance-tuning considerations, the Performance Analyzer scans the identified objects and returns the results in a new window, as observed in Figure 12.19.
FIGURE 12.19 Viewing Performance Analyzer results.

Performance Analyzer considers and lists three types of results as defined next:
• Recommendation: Advice that will most likely improve the performance of the Access object analyzed. Performance Analyzer can perform these optimizations for you, and mark the Recommendation as Fixed once complete.
• Suggestion: Advice that has potential trade-offs (good and bad) that should be considered before optimizing. Performance Analyzer can perform these optimizations for you, and mark the Recommendation as Fixed once complete.
• Idea: General advice that may improve the performance of the object analyzed. Idea optimizations must be performed by you.
You can view information about each analysis by clicking a result in the list, and viewing the details in the Analysis Notes box at the bottom of the window.
Microsoft Access Performance Analyzer should be the first place you start looking to optimize the performance of your Access database.
SUMMARY
• Macros allow you to automate tasks and processes without VBA code.
• Macros are created using the Macro Builder.
• Macro actions contain common Access database processes that build automation.
• You can use macros to assign an action, or set of actions to a key by creating and saving a macro as AutoKeys.
• You can have a set of actions performed when the database is first opened, and before any other task is performed by creating a macro named AutoExec.
• Macro action arguments allow you to customize how the action will behave.
• Macros can be assigned to a report, form, or control event property.
• Macros can also be executed from a VBA event procedure via the RunMacro method of the DoCmd object.
• Conditions can be added to macros to ensure a set of criteria is met before the macro action runs.
• Macro conditions evaluate to either True, causing the action to execute, or False, preventing the macro action from executing.
• The Single Step option allows you to view a macro’s arguments, conditions, and any associated errors one action at a time.
• The OnError action is used to implement error handling in macros.
• Access 2010 includes the MacroError object that includes properties for determining specific information about runtime macro errors.
• The ClearMacroError action resets property information for the MacroError object.
• Data macros work just like triggers, allowing you to automatically execute a series of actions based on specified events to preserve and/or enhance information integrity
• Microsoft Access 2010 is capable of converting stand-alone macros to VBA code.
• The most common Access database areas to consider while performance tuning are with forms, queries, indexes, and VBA code.
• Indexes store record locations by the field or fields indexed.
• Access 2010 includes the Performance Analyzer tool that can aid in optimizing your database application by reviewing a database’s design and providing recommendations for change.
• Performance Analyzer lists three types of optimization advice, including recommendations, suggestions, and ideas.
• Optimization recommendations and suggestions can be performed by the Performance Analyzer. Idea optimizations must be performed by you.
1. Create a new form with one command button titled cmdCloseForm. Create a new macro called Close Form with the Close action value. The arguments for the Close action should close the form. Save both objects and test the macro by assigning the macro name to the command button’s On Click event property.
2. Create a new form with one text box and one command button. The form will allow a user to enter their age into the text box, and click the command button to validate input. Create a new macro called Test User Input with one MessageBox action that uses the IsNumeric function in the action’s condition to validate numeric (non-text) data was entered into the text box. If the user did not enter numeric data into the text box, use the MessageBox action to display a message box to the user.
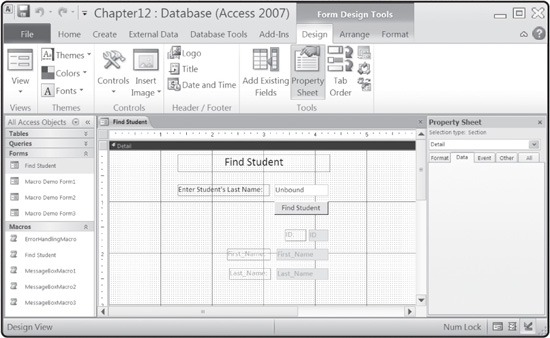
3. Create an Access table named Students with three columns, Student_Id,Last_Name, and First_Name. Insert sample records into the Students table. Create a new Access form called Find Student, similar to the one shown in Figure 12.20 with the controls and properties shown in Table 12.3:
TABLE 12.3 CONTROLS AND PROPERTIES OF THE FIND STUDENT FORM
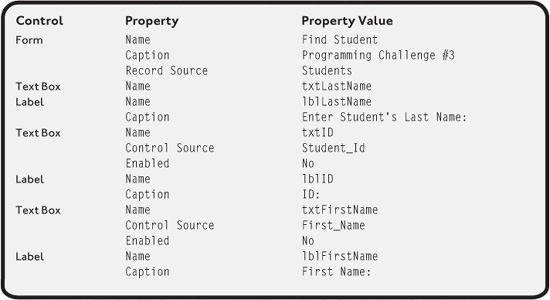

FIGURE 12.20 The Find Student form from Programming Challenge #3.
Create a macro also called Find Student, which will use a SearchForRecord macro action. The SearchForRecord macro action will use input from the txtLastName text box to locate a matching record in the Students table, and in turn display the ID, First_Name, and Last_Name information in the corresponding text boxes. Hint: The Where Condition argument of the SearchForRecord action should resemble the following:
=“Last_Name = ’” & [Forms]![Manage Students]![txtLastName] & “’”