
CHAPTER 4
CONDITIONS
In this chapter, I’ll show you how to implement conditions, which allow programmers to build decision-making abilities into their applications using If blocks and Select Case structures. In addition, I’ll show you how to leverage VBA’s built-in dialog boxes and additional controls to enhance your graphical interface and your system’s intelligence.
IF BLOCKS
A basic component of a high-level language is the ability to construct a condition. Most high-level programming languages offer the If block as a way to evaluate an expression. Before proceeding into If blocks, I discuss what an expression is in terms of computer programming.
In programming terms, expressions are groupings of keywords, operators, and/or variables that produce a variable or object. Expressions are typically used to conduct calculations and to manipulate or test data. Moreover, expressions can be used to build conditions, which return a Boolean value of True or False. This is an important concept, so I am repeating in italics: Expressions can be used to build conditions that evaluate to True or False.
VBA programmers can use expressions in an If condition.
If (number1 = number2) Then
   Me.Label1.Caption = “number1 equals number2”
End If
Known as an If block, the preceding code reads “If the variable number1 equals the variable number2, then assign some text to the Caption property of Label1.” This means the expression inside the parentheses must evaluate to True for the VBA statement inside the If block to execute. Note that the parentheses surrounding the expression are not required, but provide readability.
Also note the inclusion of the Then keyword at the end of the If statement. The Then keyword is required at the end of each If statement.
![]()
Always indent VBA statements inside of a condition or loop to provide easy-to-read code. A common convention is to indent two or three spaces or to use a single tab. Doing so implies that the VBA assignment statement belongs inside the If block.
But what if the expression does not evaluate to True? To answer this question, VBA includes an Else clause, which catches the program’s execution in the event the expression evaluates to False. The If/Else block is demonstrated next.
If (number1 = number2) Then
   Me.Label1.Caption = “number1 equals number2”
Else
   Me.Label1.Caption = “number1 does not equal number2”
End If
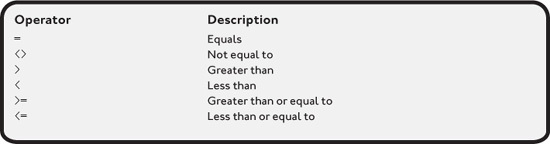
Given the preceding examples, you might be asking yourself about possibilities for building simple expressions with operators other than the equals sign. As shown in Table 4.1, VBA supports many common operators to aid in evaluating expressions.
In addition to the Else clause, VBA provides the ElseIf clause as part of a larger expression. The ElseIf clause is one word in VBA and is used for building conditions that may have more than two possible outcomes.
TABLE 4.1 COMMON OPERATORS USED IN EXPRESSIONS
If (number1 = number2) Then
   Me.Label1.Caption = “number1 equals number2 ”
ElseIf (number1 > number2) Then
   Me.Label1.Caption = “number1 is greater than number2 ”
ElseIf (number1 < number2) Then
   Me.Label1.Caption = “number1 is less than number2 ”
End If
Notice in the preceding example that the ElseIf clause must include an expression followed by the keyword Then, just like an If condition. In addition, you can use the Else clause to act as a concluding clause in the event that none of the conditions evaluates to True, as seen next.
If (sColor = “red”) Then
   Me.Label1.Caption = “The color is red”
ElseIf (sColor = “white”) Then
   Me.Label1.Caption = “The color is white”
ElseIf (sColor = “blue”) Then
   Me.Label1.Caption = “The color is blue”
Else
   Me.Label1.Caption = “The color is not red, white or blue”
End If
Nested If Blocks
There are times when you may need to provide one or more conditions inside of another condition. This concept is known as nested conditions and can often require much thought regarding the flow of the program.
To exhibit the concept of nested conditions, I build a nested If block, which implements a simple payroll system.
If (sEmployeeType = “salary”) Then
   ‘ Employee is paid a salary.
   cPay = cSalary
Else
   ‘ Employee paid hourly wages and has worked 40 or less hours
    If (iHoursWorked <= 40) Then
       cPay = cHourlyRate * iHoursWorked
   Else
      ‘ Employee earned overtime, which is time and a half
      cOverTime = (iHoursWorked - 40) * (cHourlyRate * 1.5)
      cPay = (cHourlyRate * 40) + cOverTime
   End If
End If
Because I used indenting techniques, you can easily see I have a nested If block inside of the Else block. This nested If block is executed only if the first If condition evaluates to False. If the first, or outer, If condition evaluates to True, the employee wage is calculated as a salary, after which program control is sent to the outer, or last, End If statement.
Without indentation, the preceding nested program code is very difficult to read. Always indent program statements that include nested If blocks inside conditions.
Compound If Blocks
So far, you’ve seen how to build simple and nested conditions using If blocks. There is, however, much more to consider if you plan to build more complex decision-making capabilities such as compound conditions into your VBA applications. To build compound expressions, VBA programmers can use the conditional operators And, Or, and Not.

Conditional operators such as And, Or, and Not are considered reserved keywords and must be used in an expression. Otherwise, VBA will generate a compile error.
To get a better understanding of the conditional operators And, Or, and Not, I use what’s known as truth tables to demonstrate possible scenarios and results for each operator. A truth table must include inputs and their possible results. Each input can evaluate to either True or False. Using one or more inputs and a corresponding operator, you can build all possible results in a truth table. Regardless of the number of inputs and type of operator, a compound expression ultimately results in either True or False.
TRUTH TABLES
Truth tables are commonly used in areas of logic such as quantitative analysis, discrete mathematics, and Boolean algebra. Using logical operators, truth tables allow one to evaluate all possible results to prove an outcome.
Table 4.2 demonstrates the truth table for the And operator. The And operator uses two inputs to determine the result for the entire expression.
TABLE 4.2 TRUTH TABLE FOR THE AND OPERATOR
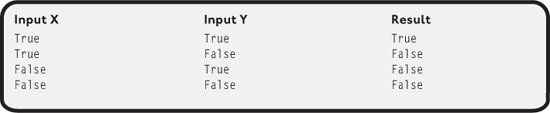
You can see from the truth table that there is only one occasion when the And operator generates a True result in an expression—when both inputs are True.
The next program block implements a compound condition in VBA using the And operator.
If (sEmpType = “salary” And sEmpEvalResult <> “poor”) Then
   ‘ Employee is given a 20% bonus.
   cBonusPay = cSalary * .20
End If
In the preceding example, the employee is given a 20% bonus only if both conditions within the parentheses are True. If either condition is False, the entire compound condition evaluates to False and the employee is not awarded the bonus.
The Or operator in Table 4.3 has a much different effect based on its inputs. More specifically, the Or operator always generates a True value, provided at least one input is True. The only time a compound condition using the Or keyword results in a False result is when both inputs on each side of the Or operator are False.
TABLE 4.3 TRUTH TABLE FOR THE OR OPERATOR

The next block of code demonstrates a compound condition in VBA using the Or operator.
If (sMonth = “June” Or sMonth = “July”) Then
   sSeason = “Summer”
End If
As long as the variable sMonth is either June or July, the variable sSeason is set to Summer. Only one side of the expression needs to be True for the entire condition to be True.
The truth table for the Not operator (seen in Table 4.4) contains only one input. In a nutshell, the Not operator reverses the value of its input value such that Not true results in False and Not false results in True.
TABLE 4.4 TRUTH TABLE FOR NOT OPERATOR

The Not operator is implemented next in VBA, as seen in the next program block.
If Not(5 = 5) Then
   Me.lblResult.Caption = “true”
Else
   Me.lblResult.Caption = “false”
End If
Given the preceding code, what do you think the value of the label’s Caption property will be? If you said False, you would be correct. Why? To understand, you must look at the result of the inner expression (5=5) first, which evaluates to True. The outer expression, Not(True) or Not(5=5), evaluates to False, which means the statement inside the If condition does not execute. Instead, the statement inside the Else condition executes.
SELECT CASE STRUCTURES
The Select Case structure is another tool for VBA programmers to use to build conditions. Specifically, the Select Case structure evaluates an expression only once. It’s useful for comparing a single expression to multiple values.
Select Case sDay
    Case “Monday”
       Me.lblDay.Caption = “Weekday”
    Case “Tuesday”
       Me.lblDay.Caption = “Weekday”
    Case “Wednesday”
       Me.lblDay.Caption = “Weekday”
    Case “Thursday”
       Me.lblDay.Caption = “Weekday”
    Case “Friday”
       Me.lblDay.Caption = “Weekday”
    Case Else
       Me.lblDay.Caption = “Weekend!”
End Select
In this case (excuse the pun) the Select Case structure evaluates a string-based variable and uses five Case statements to define possible expression values. The Case Else statement catches a value in the top expression that is not defined in a Case statement.
The Case Else statement is not required in a Select Case structure. After code within a Case or Case Else block is executed, program control is then moved to the End Select statement, which is required.
The Select Case structure is very flexible. For example, I can simplify the preceding structure by using Select Case’s ability to place multiple items in a single statement separated by commas.
Select Case sDay
    Case “Monday”, “Tuesday”, “Wednesday”, “Thursday”, “Friday”
       Me.lblDay.Caption = “Weekday”
    Case Else
       Me.lblDay.Caption = “Weekend!”
End Select
In the following code, the Select Case structure also allows you to check for a range of values using the Is and To keywords.
Select Case dTemperature
    Case Is < 32
       Me.lblTemperature.Caption = “Freezing”
    Case 32 To 45
       Me.lblTemperature.Caption = “Cold”
    Case 46 To 69
       Me.lblTemperature.Caption = “Cool”
    Case 70 To 89
       Me.lblTemperature.Caption = “Warm”
    Case Is > 89
       Me.lblTemperature.Caption = “Hot”
End Select
Using ranges of values and comparison operators, I can easily build logic into my Case statements to determine temperature ranges.
DIALOG BOXES
Dialog boxes are generally small windows that prompt the user for a response. Dialog boxes can be configured to include one to three command buttons, which provide the user with various options for interaction. In this section you learn about two common VBA dialog boxes: the message box and the input box.
Message Box
VBA’s MsgBox function is a built-in function that can generate a dialog box. The MsgBox function takes five parameters, separated by commas, as input:
MsgBox Prompt, Buttons, Title, HelpFile, Context
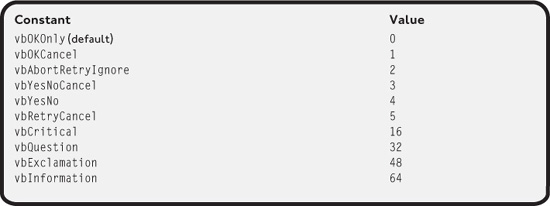
The only argument required by the MsgBox function is the Prompt parameter, which is displayed on the dialog box to the user. Though not required, the Buttons parameter is very useful. You can specify various VBA constants to customize the available buttons. The most common of these constants are shown in Table 4.5.
Another useful but not required parameter is the Title argument, which displays text in the title bar area of the message box. Using these parameters, I can create and display a simple dialog box in the Click event of a command button:
Private Sub Command1_Click()
   MsgBox “I created a dialog box.”, vbInformation, “Chapter 4”
End Sub
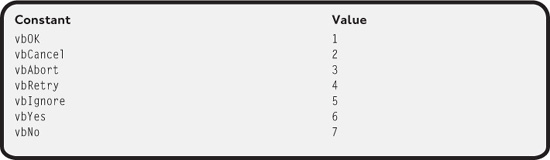
To successfully use the Buttons parameter of the MsgBox function, you work with variables and conditions. Specifically, you need to create a variable that holds the user’s response when the user selects a button on the dialog box. The variable gets its value from the result of the MsgBox function. That’s right; the MsgBox function not only creates a dialog box, but also returns a value. This is how VBA programmers determine which button on the dialog box was clicked. The possible return values are described in Table 4.6.
TABLE 4.6 MSG BOX FUNCTION RETURN VALUES
Remember from Chapter 3, “Introduction to Access VBA,” that constants are containers for data that cannot be changed. The built-in VBA constants, such as the ones seen in Tables 4.5 and 4.6, hold integer values. This means you can use either the constant name or its value directly. To see how this works, examine the next program. This program uses the MsgBox function, one variable, and a Select Case structure to determine what button the user has pressed.
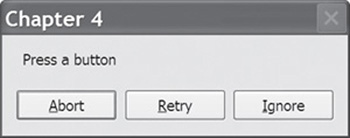
Private Sub Command1_Click()

   Dim iResponse As Integer

   ‘ Display a message box to the user
   iResponse = MsgBox(“Press a button”, _
   vbAbortRetryIgnore, “Chapter 4”)

   ‘ Determine which button was selected.
   Select Case iResponse
      Case vbAbort
         Me.lblResponse.Caption = “You pressed abort.”
      Case vbRetry
         Me.lblResponse.Caption = “You pressed retry.”
      Case vbIgnore
         Me.lblResponse.Caption = “You pressed ignore.”
   End Select

End Sub
Figure 4.1 demonstrates the message display to the user from the preceding code.
FIGURE 4.1 A multibutton message box.
![]()
Linefeed characters can be added in a message box prompt using the Chr(10) function call.
     MsgBox “This prompt demonstrates how to add a” & _
          “ line feed character” & Chr(10) & “in a message box.”
When using the message box function in an expression such as the following, realize that parentheses are required to surround parameters, which are values passed to the function (in this case the MsgBox function).
iResponse = MsgBox(“Press a button”, _
    vbAbortRetryIgnore, “Chapter 4”)
Without parentheses, the VBA compiler complains and prevents further execution. On the other hand, the VBA compiler does not like the use of parentheses when the MsgBox function is used by itself.
MsgBox “I created a dialog box.”, vbInformation, “Chapter 4”
This is standard operating procedure when working with VBA functions, so it’s worth repeating again in italics: Functions in expressions require the use of parentheses for their parameters, whereas functions outside of expressions or by themselves do not.
Input Box
The input box also displays a dialog box, but allows a user to input information (hence the name). Like the message box, the input box is created with a function call but takes seven parameters.
InputBox Prompt, Title, Default, XPos, YPos, HelpFile, Context
The most common InputBox parameters are Prompt, Title, and Default, where Prompt and Title behave similarly to the same parameters of the message box. The Default argument displays default text in the text box area of the input box. Also note that the InputBox function does not have a Buttons parameter. The only required parameter is Prompt.
The InputBox function returns a string data type, so you need to declare a String variable to capture its return value.
In Figure 4.2, I use an input box to prompt a user with a question.
FIGURE 4.2 Using an input box to prompt a user for information.

Sample VBA code for Figure 4.2 would look like the following.
Private Sub cmdAskQuestion_Click()

   Dim sResponse As String

   sResponse = InputBox(“What is the Capital of Florida?”, _
        “Chapter 4”)

   If sResponse = “Tallahassee” Then
      Me.lblResponse.Caption = “That is right!”
   Else
      Me.lblResponse.Caption = “Sorry, that is not correct.”
   End If

End Sub
I will now enhance the previous code to ensure the user has clicked the default OK button on the input box prior to validating the user’s response. More specifically, if the user clicks the Cancel button, a zero-length string is returned by the InputBox function. To check for this, I can use an outer If block.
Private Sub cmdAskQuestion_Click()

  Dim sResponse As String

  sResponse = InputBox(“What is the Capital of Florida?”, _
       “Chapter 4”)

   ‘ Check to see if the user clicked Cancel.
   If sResponse <> “” Then

      If sResponse = “Tallahassee” Then
         Me.lblResponse.Caption = “That is right!”
      Else
         Me.lblResponse.Caption = “Sorry, that is not correct.”
      End If

   End If

End Sub
COMMON CONTROLS CONTINUED
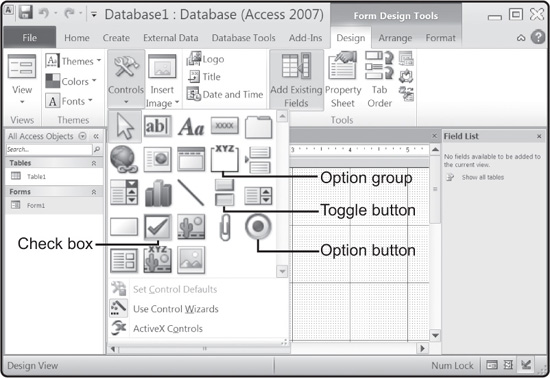
Beyond what you’ve already seen from Chapter 3, there are a number of more common controls available to you in Access. In this chapter you learn about a few more that can require the use of conditions. Specifically, I discuss the following common controls, as shown in Figure 4.3:
• Option groups
• Option buttons
• Check boxes
• Toggle buttons
FIGURE 4.3 Common controls continued.
Option Group
The option group control is a container that logically groups controls such as option buttons, check boxes, and toggle buttons. Though not required, the option group provides a very effective wizard for grouping your controls inside the option group’s frame.
When first adding an option group to your form, Access initiates the Option Group Wizard. As shown in Figure 4.4, the first step in the wizard is to add label names for each item in your group. At this stage, it doesn’t matter what control you’re using—you’re only adding textual descriptions for each item in the group.
The Option Group Wizard does not activate if you’ve turned off the Control Wizards item in the Access toolbar.
FIGURE 4.4 Adding label names for each control in the option group.

After you’ve added all label names and clicked Next, the wizard asks you to choose a default control if one is desired. In Figure 4.5, I’ve asked the wizard to make my item, called Red, the default control.
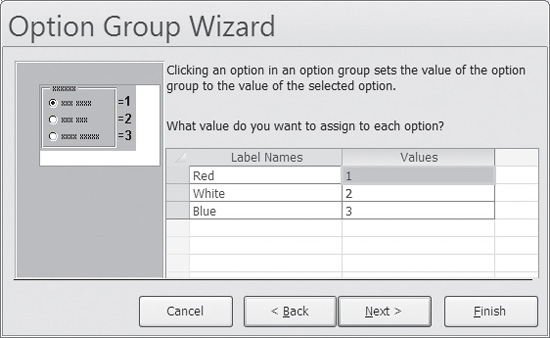
Figure 4.6 depicts the next step in the wizard, where you set values for each option in the group. Option values allow VBA programmers to tell which option the user has selected in the group. The wizard’s default values for each option are acceptable.
FIGURE 4.5 Selecting a default control.

FIGURE 4.6 Providing values for each option.
The next wizard screen, displayed in Figure 4.7, allows you to select what type of option controls are displayed in your option group.
FIGURE 4.7 Choosing an option control type for the option group.

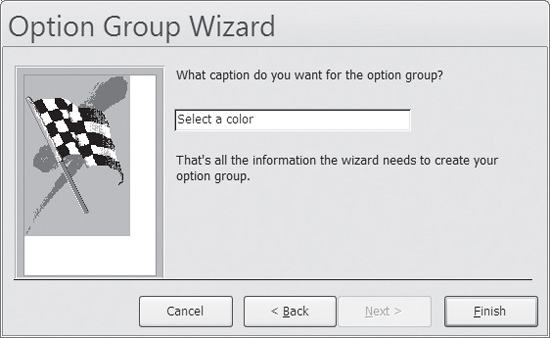
The last screen in the wizard (see Figure 4.8) prompts you to enter a caption for your option group frame. This caption is actually a property of a label control that automatically sits at the top of the frame.
FIGURE 4.8 Entering a caption for the option group’s label.
In the next three sections I show you specific implementations of option groups.
Option Buttons
Often referred to as radio buttons, option buttons provide a user with a list of selectable choices. Specifically, the user can select only one option at a time. Individual option buttons comprise two controls, a label, and an option button. Each has its own properties and can be managed during design time or runtime via VBA.
![]()
After creating an option group either manually or with the Option Group Wizard, you should change the name of each option control to one that contains a meaningful description. This greatly reduces confusion when working with VBA code.
To determine which option button has been selected in a group, you use the option group’s Value property. For this to work, each option button must have been assigned a valid and unique number in its OptionValue property (set by default in the Option Group Wizard). When a user clicks an option button, the Value property is set to the same number as the option button’s OptionValue property. These concepts are demonstrated in the next program code, which implements the graphical user interface (GUI) in Figure 4.9.
FIGURE 4.9 Using option buttons to determine an employee’s pay type.

Option Compare Database
Option Explicit

Const SALARY As Double = 350.25
Const HOURLYRATE = 7.75
Private Sub cmdCalculatePay_Click()

Dim dOverTime As Double
Dim dNormalPay As Double

If Me.fraEmployeeType.Value = 2 Then

   ‘ Employee is paid a salary
   Me.lblPay.Caption = “Your weekly salary is $” & SALARY

Else

   ‘ Employee is paid by the hour
   ‘ Find out if the employee has worked overtime
   If Val(Me.txtHoursWorked.Value) > 40 Then

      dOverTime = (Val(Me.txtHoursWorked.Value) - 40) _
        * (HOURLYRATE * 1.5)
      dNormalPay = HOURLYRATE * 40
       Me.lblPay.Caption = “Your weekly pay is $” & _
        dNormalPay + dOverTime

   Else

       Me.lblPay.Caption = “Your weekly pay is $” & _
        HOURLYRATE * Val(Me.txtHoursWorked.Value)

   End If

End If

End Sub
Private Sub optHourly_GotFocus()
   Me.txtHoursWorked.Enabled = True
   Me.lblPay.Caption = “”
End Sub
Private Sub optSalary_GotFocus()
   Me.txtHoursWorked.Enabled = False
   Me.lblPay.Caption = “”
End Sub
The option group is really defined as the name of the frame. (An option group is really a frame control.) Notice that I used the GotFocus method of each option button to disable the Hours Worked text box. The GotFocus event is triggered whenever the option button receives focus.
Check Boxes
When used in an option group, check boxes behave much like option buttons. If you have experience in other graphical languages, you might be surprised to learn that a user can select only one check box at a time when it is located in an option group. Remember that an option group provides a single selection for any option-based control such as check boxes, option buttons, and toggle buttons.
To use check boxes in a multiselection facility, you need to add them manually, outside of an option group. In addition, you need to set each check box’s DefaultValue property to a unique number during design time.
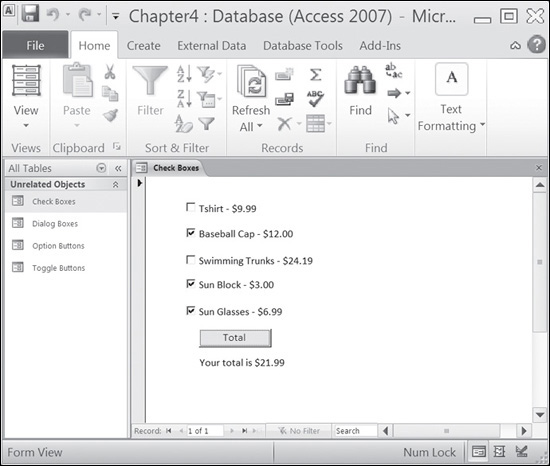
Implemented in Figure 4.10, the following code demonstrates how one might use check boxes in a multiselection capacity without an option group.
FIGURE 4.10 Selecting more than one check box at a time.
Option Compare Database
Option Explicit
Dim dRunningTotal As Currency

Private Sub cmdTotal_Click()

   dRunningTotal = 0
   If Me.chkTShirt.Value = True Then
      dRunningTotal = dRunningTotal + 9.99
   End If

   If Me.chkBaseballCap.Value = True Then
       dRunningTotal = dRunningTotal + 12#
   End If

   If Me.chkSwimmingTrunks.Value = True Then
      dRunningTotal = dRunningTotal + 24.19
   End If

   If Me.chkSunBlock.Value = True Then
       dRunningTotal = dRunningTotal + 3#
   End If

   If Me.chkSunGlasses.Value = True Then
      dRunningTotal = dRunningTotal + 6.99
   End If

   Me.lblTotal.Caption = “Your total is $” & _
        dRunningTotal

End Sub
I can use the Value property of each check box to determine whether the user has selected it. If the check box has been checked, the Value property is set to True; if not, it is set to False.
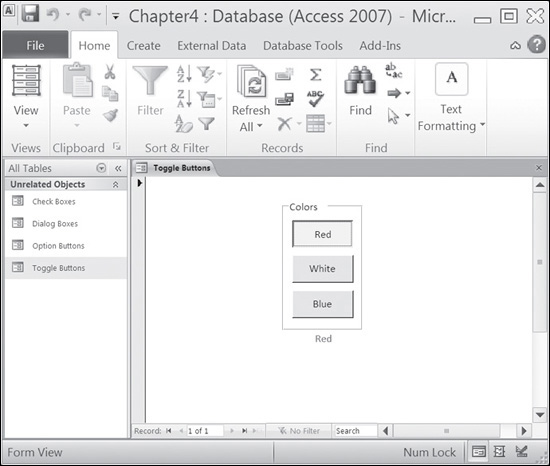
Toggle Buttons
When used in an option group, toggle buttons serve the same purpose as option buttons and check boxes, which allow a user to select one item at a time.
In the next example (seen in Figure 4.11), I use an option group of three toggle buttons to change label properties.
FIGURE 4.11 Using toggle buttons in an option group.
Option Compare Database
Option Explicit
Private Sub tglRed_GotFocus()
   lblOutput.ForeColor = vbRed
   lblOutput.Caption = “Red”
End Sub
Private Sub tglWhite_GotFocus()
   lblOutput.ForeColor = vbWhite
   lblOutput.Caption = “White”
End Sub
Private Sub tglBlue_GotFocus()
   lblOutput.ForeColor = vbBlue
   lblOutput.Caption = “Blue”
End Sub
Toggle buttons, check boxes, and option buttons behave similarly when used in an option group. To use one or the other is simply a preference on your part.
If your VBA code is not executing for an option group control, ensure the controls’ On Got Focus property has the [Event Procedure] value assigned.
CHAPTER PROGRAM: HANGMAN
Hangman is a game common among school-aged children where a player tries to guess a word or phrase before a figure of a man (in this case a monster) is hanged. Each time the player guesses incorrectly, a portion of a body is shown until the body is complete, at which time the game is over. The player wins by guessing the word or phrase before all body parts are shown.
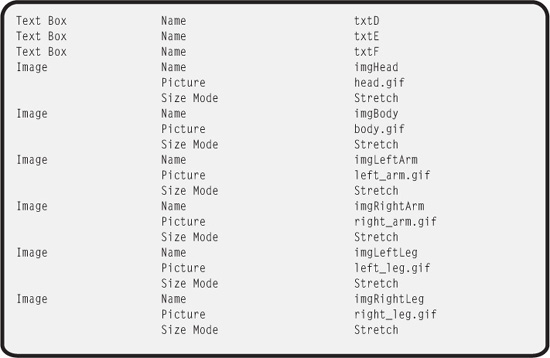
To build the Hangman program, simply construct the graphical interface as seen in Figure 4.12. The graphic of the monster is really six different graphics files, all of which can be found on the companion website.
FIGURE 4.12 Using chapter-based concepts to build the Hangman program.
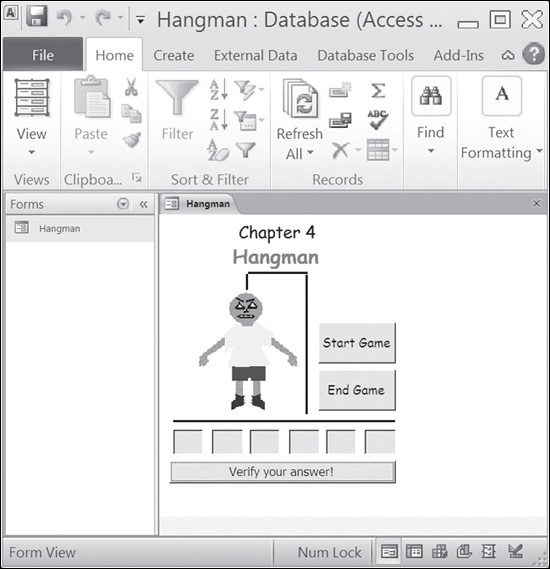
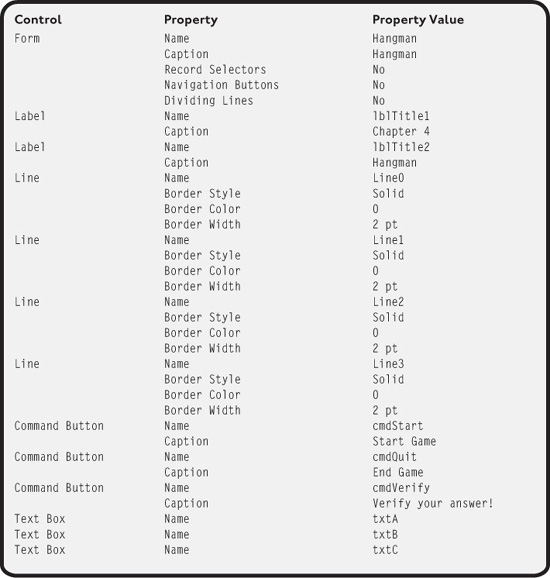
Controls and properties to build the Hangman program are described in Table 4.7.
TABLE 4.7 CONTROLS AND PROPERTIES OF THE HANGMAN PROGRAM
All of the code required to build the Hangman program is seen next.
Option Compare Database
Option Explicit
‘ Form level variables to track game results.
Dim iCounter As Integer
Dim letter1 As String
Dim letter2 As String
Dim letter3 As String
Dim letter4 As String
Dim letter5 As String
Dim letter6 As String
Private Sub cmdStart_Click()

     MsgBox “A five letter word for database.”, , “Hangman”

     ‘Reset the game board
     iCounter = 0

     Me.cmdVerify.Enabled = True

     Me.imgHead.Visible = False
     Me.imgBody.Visible = False
     Me.imgLeftArm.Visible = False
     Me.imgRightArm.Visible = False
     Me.imgLeftLeg.Visible = False
     Me.imgRightLeg.Visible = False

     Me.txtA.Enabled = True
     Me.txtB.Enabled = True
     Me.txtC.Enabled = True
     Me.txtD.Enabled = True
     Me.txtE.Enabled = True
     Me.txtF.Enabled = True

     Me.txtA.Value = “”
     Me.txtB.Value = “”
     Me.txtC.Value = “”
     Me.txtD.Value = “”
     Me.txtE.Value = “”
     Me.txtF.Value = “”
End Sub
Private Sub cmdVerify_Click()

     ' Did the user win?
     If (Me.txtA.Value & Me.txtB.Value & Me.txtC.Value & _
         Me.txtD.Value & Me.txtE.Value & Me.txtF.Value) _
         = "Access" Then
           MsgBox "You won!", , "Hangman"
           Me.cmdStart.SetFocus
         Me.cmdVerify.Enabled = False
Else

         ' User did not guess the correct letter.
         ' Find an available body part to display.
         If Me.imgLeftLeg.Visible = False Then
            Me.imgLeftLeg.Visible = True
            iCounter = iCounter + 1
         ElseIf Me.imgRightLeg.Visible = False Then
            Me.imgRightLeg.Visible = True
            iCounter = iCounter + 1
         ElseIf Me.imgBody.Visible = False Then
            Me.imgBody.Visible = True
            iCounter = iCounter + 1
         ElseIf Me.imgLeftArm.Visible = False Then
            Me.imgLeftArm.Visible = True
            iCounter = iCounter + 1
         ElseIf Me.imgRightArm.Visible = False Then
            Me.imgRightArm.Visible = True
            iCounter = iCounter + 1
         ElseIf Me.imgHead.Visible = False Then
            Me.imgHead.Visible = True
            iCounter = iCounter + 1
         End If
         ' Find out if the user has lost.
         If iCounter = 6 Then
            MsgBox "Sorry, you lost.", , "Hangman"
            Me.txtA.Enabled = False
            Me.txtB.Enabled = False
            Me.txtC.Enabled = False
            Me.txtD.Enabled = False
            Me.txtE.Enabled = False
            Me.txtF.Enabled = False
         Else
            MsgBox "You have " & 6 - iCounter & _
            " chances left!", , "Hangman"
         End If
         End If

End Sub
Private Sub Form_Load()

    ‘ Start the game by calling an event procedure
    cmdStart_Click

End Sub
 Private Sub txtA_LostFocus()
    ‘ Ensure correct case
    If Me.txtA.Value = “a” Then
        Me.txtA.Value = “A”
    End If
End Sub
Private Sub txtB_LostFocus()
    ‘ Ensure correct case
    If Me.txtB.Value = “C” Then
        Me.txtB.Value = “c”
    End If
End Sub
Private Sub txtC_LostFocus()
    ‘ Ensure correct case
    If Me.txtC.Value = “C” Then
        Me.txtC.Value = “c”
    End If
End Sub
Private Sub txtD_LostFocus()
    ‘ Ensure correct case

    If Me.txtD.Value = “E” Then
        Me.txtD.Value = “e”
    End If
End Sub
Private Sub txtE_LostFocus()
    ‘ Ensure correct case
    If Me.txtE.Value = “S” Then
        Me.txtE.Value = “s”
    End If
End Sub
Private Sub txtF_LostFocus()
    ‘ Ensure correct case
    If Me.txtF.Value = “S” Then
        Me.txtF.Value = “s”
    End If
End Sub
Private Sub cmdQuit_Click()
   DoCmd.Quit
End Sub
SUMMARY
• Expressions can be used to build conditions that evaluate to True or False.
• VBA conditions are built with If blocks and Select Case structures.
• Compound conditions have two or more conditions and are built using the operators And, Or, and Not.
• The Select Case structure is useful for checking an expression against a list of values.
• The Case statements in a Select Case structure can check a single value, multiple values, or a range of values.
• VBA contains the built-in functions MsgBox and InputBox for building dialog boxes.
• The MsgBox function returns an integer value, whereas the InputBox function returns a string.
• The option group control contains a useful wizard for building groups of option buttons, check boxes, and toggle buttons.
• In an option group, a user can select only one check box, toggle button, or option button at a time.
CHALLENGES
1. Construct a simple math quiz that asks a user to answer a math problem of your choice. On the form, place one text box (txtAnswer) and two command buttons (cmdAskQuestion and cmdVerifyAnswer). Store the correct answer as a module-level constant and assign the user’s answer in a local or procedure-level variable. Write code in the Click event of one command button to display a math question to the user with a message box. Write code in the other command button’s Click event to compare the user’s response to the module- level constant and inform the user of the results (correct or incorrect) also using a message box.
2. Construct another quiz program, this time using an input box to ask the question and return the user’s answer. Reveal the user’s result in the form of a message box. Remember to check for an empty string (user clicks the Cancel button) before checking the user’s response.
3. Enhance the Hangman program to allow the player multiple chances to win. More specifically, display a message box that gives the player a Yes or No option to restart the game only if the game were lost.
4. Create a simple word processor that allows a user to enter text into a large text box. (Hint: Set the Enter Key Behavior property of a text box to New Line in Field.) The user should be able to change the foreground and background colors of the text box using option buttons in an option frame. Also, the user should be able to change the font size of the text box using option buttons in another option frame.