Chapter 11: Server Infrastructure Management
The data center is constantly evolving, and services traditionally used by hosting servers in physical data centers are now virtualized and using serverless computing models in the cloud. No matter how your infrastructure is deployed or what infrastructure is used, each presents a unique security challenge for an organization. In this chapter, we will provide an overview of the data center and cloud models as they exist today. We will discuss security access strategies for Windows servers as they are relevant to all infrastructure models, to ensure that no one can access Windows without going through the proper access controls. You will learn about the available management tools used for on-premises, hybrid, and cloud deployments, as well as how to leverage Azure services to expand your data center reach to the cloud. Then, we will provide an overview of the Azure services that are used to manage Windows servers, including the Azure portal and Azure Resource Manager (ARM). It's important to understand the existence of these tools and services so that you have a high-level understanding of each when building out your security program. Depending on the size of your organization, services such as these may require several teams to control access, including physical security, a security operations center (SOC), and identity and access management (IAM) teams. All of these play a vital role in ensuring your Windows systems are properly managed and protected.
In this chapter, we will cover the following topics:
- Overview of the data center and the cloud (infrastructure as a service (IaaS), platform as a service (PaaS), and software as a service (SaaS))
- Implementing access management in Windows servers
- Understanding Windows Server management tools
- Using Azure services to manage Windows servers
- Connecting securely to Windows servers remotely
Let's get started!
Technical requirements
Throughout this chapter, we will be referencing different services available in Azure. We've discussed configuring services in Azure already, but if you would like to follow along, you can sign up for a free Azure account for 30 days and get United States dollars (USD) $200 credit at https://azure.microsoft.com/en-us/free/.
To complete the role-based access control (RBAC) example provided later in this chapter, you will need the following:
- PowerShell (version 5.1 recommended) with the Azure Active Directory (Azure AD) module installed
- Global Administrator rights to your Azure subscription
- A text viewer to open JavaScript Object Notation (JSON) files
Let's start by looking at an overview of the different data center types.
Overview of the data center and the cloud (IaaS, PaaS, and SaaS)
Over the years, the data center has changed quite significantly as it relates to the hardware our services run on. Most notably, the operating systems, versions, and virtualization of those services have recently shifted to running fully on cloud-based technologies. In the past, a traditional enterprise data center typically consisted of physical mainframes to store and access information. Data centers during these times were sometimes located on location or at a separate facility under the management of the organization. As the technology evolved, there was a shift from the mainframe to server-based data centers. This is where the Windows Server family became widely adopted and grew in popularity.
Moving beyond standard hardware-based server models is where virtualization technology entered the picture. The ability to run many servers on minimal physical hardware changed the dynamics of the data center significantly. Fast forward to today, and we are in a major shift to cloud computing. Organizations are slowly moving away from the traditional on-premises data center and moving all their workloads into cloud environments. With the cloud data center, organizations can continue to run traditional servers and services, but the overhead of owning and managing physical infrastructure is greatly reduced or eliminated.
Another major change with a shift to the cloud is the elimination of on-site facility management and physical operations. Building and maintaining a data center is an enormous undertaking that is challenging and comes with substantial cost implications when designing for highly available services and disaster recovery (DR) as part of a business continuity plan (BCP). Moving to the cloud changes these dynamics significantly. Your cost model changes to a subscription-based model with zero upkeep of the physical hardware and facilities. This allows opportunities for a more robust BCP with the flexibility to spread services across multiple data centers in different locations.
This shift also changes the dynamics of security for the data center. Traditionally, physical security with access controls, locks, badge readers, and security cameras was all needed. This goes away with the cloud, but how do you ensure the cloud provider is protecting the access and controls? How do you ensure your data is safe? These are all valid concerns and change the way we manage security as opposed to the traditional data center perspective.
Next, let's look at the three common data center types.
Types of data center
This section will provide an overview of each of the current scenarios mostly being used today.
On-premises data center
As mentioned previously, an on-premises data center is considered the traditional model. Organizations build out and operate their infrastructure on your business's property or off-site at a separate facility. In this model, you are fully responsible for everything in the physical infrastructure (building, power, cooling, hardware, security, access, and so on) and everything that runs on the hardware.
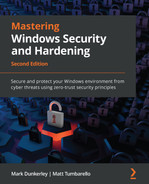
The following diagram provides an example of a traditional on-premises model:
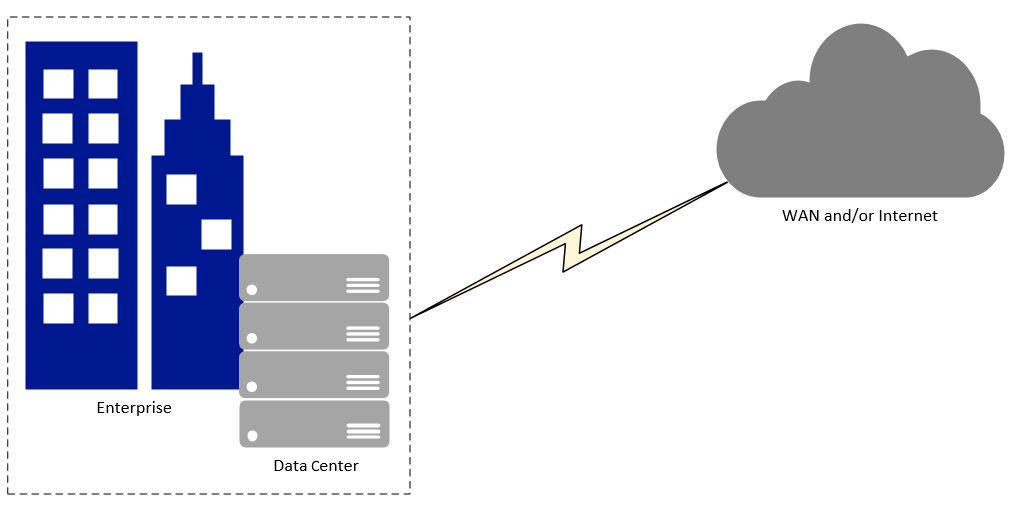
Figure 11.1 – On-premises data center
Next, let's review the cloud data center model.
Cloud data center
As we look further into the cloud model, it is important to understand public and private cloud offerings. A public cloud is where the services are hosted by the provider and the underlying infrastructure is shared with other organizations. Your environment will be logically separated from other organizations, but the underlying hardware, network, and storage are shared with other subscribers on the same service. A private cloud offering is where the services are hosted in a dedicated environment and only your organization runs on the underlying services. Determining the appropriate model will most likely be dictated by your organization's industry and compliance requirements.
Tip
You can find more information on Microsoft Azure's public versus private offerings here:
https://azure.microsoft.com/en-us/overview/what-are-private-public-hybrid-clouds/
The following diagram provides an example of a cloud model:

Figure 11.2 – Cloud model
Cloud solutions typically offer three different categories of primary services available for consumption, as outlined here:
- IaaS requires the most involvement from your organization and is operated very similarly to a virtualized environment on-premises. The difference is that businesses have no responsibility for physical infrastructure, and the servers, storage, and underlying network fabric are all managed by the hosting provider. You can simply turn on virtual machines (VMs) and services as needed.
Tip
For additional information about IaaS in Azure, visit this link:
- PaaS provides you with the needed platform or service, all bundled together from the cloud provider. Typically, with PaaS, the physical infrastructure, operating system, middleware, and other tools to run services are maintained by the hosting provider. For example, in a traditional IaaS Windows environment to host Internet Information Services (IIS) or a Structured Query Language (SQL) database, you would need to install these components and roles onto the operating system. With PaaS, you simply subscribe to the service, and you consume it directly. There is no installation or maintenance of any underlying software to run these apps. In Microsoft Azure, IIS is run on Azure App Service, and SQL can be hosted using Azure SQL Database.
Tip
For additional information about PaaS in Azure, visit this link:
- SaaS requires the least involvement and essentially provides you with the entire software solution preconfigured and ready to be consumed. In addition to what is managed for both the IaaS and PaaS services, the hosting provider also maintains the application itself, including keeping it current and up to date. An example of a SaaS offering would be Exchange Online, in which your entire Exchange environment is hosted, kept up to date, and managed by Microsoft. You simply consume the email services for your organization.
Tip
For additional information about SaaS in Azure, visit this link:
Now that we have covered what each of the cloud services is, let's look at some examples within the Microsoft ecosystem. The following diagram provides examples of offerings you can subscribe to within each of the mentioned services:
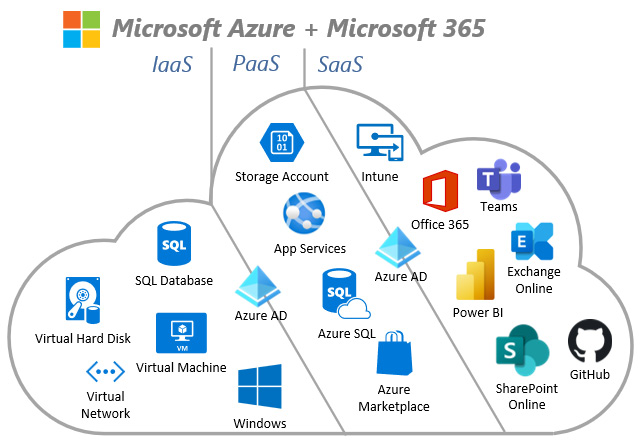
Figure 11.3 – Microsoft IaaS, PaaS, and SaaS examples
Next, we will review the hybrid data center model.
Hybrid data center
The last model we will review is the hybrid model. A hybrid model essentially combines the on-premises model with the cloud model, allowing an organization's on-premises deployment to co-exist with cloud services. This model is most likely going to be preferred for established organizations with existing on-premises data centers simply because they can't easily be moved to a cloud model overnight or due to compliance requirements. What the hybrid model does is allow a pathway from on-premises to the cloud while providing services using both environments.
The following diagram provides an example of a hybrid model:

Figure 11.4 – Hybrid model
The focus of this book will be primarily on on-premises, hybrid, and IaaS models as this is where your Windows servers will reside and operate. With the PaaS and SaaS models, the underlying operating system is managed and secured by the service provider (SP).
Now that we've covered the different models available for operating data centers, let's review access management as it relates to Windows Server. In the next few sections, we will cover securing access to Windows Server and introduce common strategies and security access best practices used by organizations.
Implementing access management in Windows servers
The concept of building a solid access foundation is critical as it relates to server management as part of securing the overall infrastructure. You must consider everything, from the physical access down to protecting unified management consoles that control multiple virtual servers at once. In the next few sections, we will discuss physical access and user access to the infrastructure and the importance of each. Next, we will discuss privileged isolation in AD through a tiered model approach and provide an overview of privileged access management (PAM) and privileged identity management (PIM) solutions for just-in-time (JIT) access. Implementing these tools will provide a robust solution to control server access management. First, let's look at physical access and security.
Physical and user access security
An important factor to consider with the on-premises model is to ensure all physical access to any server location is protected and only accessible to those with approved access. Your Windows servers and other physical infrastructure are typically located in a server room, a closet in your office building, or in a remote facility that is under your ownership. Security access controls should be well enforced, in addition to server hardening. The physical access needs to be locked down to avoid equipment theft and help prevent insider attacks such as installing malware or keyloggers through a Universal Serial Bus (USB) device. Encryption needs to be enabled on all Windows servers in the event theft does occur to help circumvent any information from being stolen from the data disks.
Tip
Don't forget that your facility management and physical site access policies are just as important as your user access management (UAM) to the servers.
As you make your move into the cloud world, your access management changes considerably. Physical access is now the responsibility of the cloud provider. The challenge is this: how do you validate they are protecting your data with the utmost standards? This is where your contracts come into play, but also—more importantly—your due diligence, as it relates to audit requirements and SaaS questionnaires being provided by the cloud provider. We will cover audits in more detail in Chapter 15, Testing and Auditing.
The next consideration with the cloud model is the software management plane. Most on-premises deployments by nature allow for management solutions to be isolated from the internet and only accessible from the internal network. With the cloud, the management plane and unified portals are typically internet-accessible, whereby you can access all your resources in one place from anywhere. To help circumvent this risk, very stringent access policies are needed for privileged identities. This includes having standard user accounts separate from privileged accounts and strong access controls including limiting access by safe-listing trusted locations and devices—no exceptions! It's also important to keep a limited number of privileged accounts in your environment. This is where RBAC helps by defining permissions and carving out the scope of who needs to access which resource.
Next, let's review using a tiered model for privileged access.
Using a tiered model for privileged access
A tiered model approach for privileged access in an AD environment is to isolate and build layers of containment between the Windows systems through the directory structure. This is most easily accomplished through AD organizational units (OUs) by incorporating a design that is divided into three or more parent containers, commonly labeled as tiers. For example, in a three-tier OU structure, there are tier 0, tier 1, and tier 2 OUs respectively. Tier 0 contains the systems, accounts, and security groups of the highest security concern, such as domain controllers (DCs), Azure AD Connect servers, and identity management systems. The goal of this isolation or tiered approach is to prevent escalation across tiers by provisioning access to privileged identities only to the tier they need access to in order to perform an operation. This level of separation provides security boundaries should an account with access from a lower tier get compromised. Its elevation will be restricted to its assigned tier or lower in the model. All access can be controlled through security group assignments and should be audited on a schedule. For example, all privileged accounts that must access a tier 0 server would be in the T0-operators security group, and permissions on the T0 servers, such as membership to the administrator's group, would be managed by a Restricted Groups Group Policy Object (GPO). Let's look at examples of how each of the tiers can be modeled in a three-tiered approach.
Tier 0
Tier 0, the most restricted tier, typically contains a small number of assets and those deemed critical to your infrastructure. Administrators in tier 0 usually have administrative rights to each level tier below using a top-down approach. These assets are of utmost importance and must remain protected and audited for suspicious activity. We would want to limit the use of and accessibility to tier 0 servers and minimize the number of accounts with provisioned access. Access restrictions should apply to resources in tier 0 to ensure only trusted sources can access using expected protocols. Any non-critical function, such as checking email or browsing the internet, should be restricted from running on these servers. Deploy a PAM solution to include password rotation, an approval request flow process, auditing logs, session recording, and even remote Remote Desktop Protocol (RDP) or Secure Shell (SSH) launchers where credentials are hidden from users.
Tip
Take protection a step further by implementing application control policies using Windows Defender Application Control to only allow authorized software to run. You can also limit access to systems by funneling traffic through SSH proxies from a PAM solution.
Tier 1
Tier 1 is your middle tier and contains systems such as business servers, file servers, web application servers, and database servers. Administrators with access to tier 1 will be able to control servers in both tier 1 and tier 2 if using a top-down approach. These servers need to be protected with similar precautions as resources in tier 0. When architecting the organizational structure of the tiered model, create a child OU nested under the tier 1 parent and label them by business unit (BU), application name, or function to create a descriptive structure. This will allow more flexibility for applying Group Policy to define restricted groups that explicitly grant access permissions and allow additional groups to be granted access. Group members will have access to RDP and log on interactively only to resources in their assigned child OU and not all servers in the tier 1 hierarchy. This provides more granularity and organization, especially if access is required by non-information technology (IT) staff such as a database administrator. In some scenarios, it may be necessary to restrict non-critical functions such as checking emails or browsing the internet. Certain precautions need to be taken in the event an account becomes compromised. As a best practice, deploy a PAM solution and implement similar features to those in tier 0.
Tier 2
Tier 2 will contain common devices seen in the everyday workplace. This includes end-user workstations, laptops, printers, and virtual desktops. Access to administer resources in this tier is typically assigned to IT support and field IT staff. Child OUs should be created for separation, and allow fine-grained controls if necessary.
Each environment will have unique considerations and the strategy may differ, but the three-tiered approach outlined previously is a great starting point that can be incorporated into your AD structure. The following screenshot shows an example of an OU structure using the tiered model approach. Each parent OU contains a child OU to organize users, computers, and service accounts. This allows for fine-grained policy control using Group Policy:
Figure 11.5 – An example OU structure of a tiered model approach
Let's recap by reviewing some important considerations when implementing access management.
Important considerations
In addition to the tiered access model, there are important considerations worth reviewing that can add a substantial layer of security to your Windows systems, as outlined here:
- For RDP and interactive logons, allowed sources should be restricted to a privileged access workstation (PAW), trusted device, or isolated management environment, preferably requiring a form of passwordless or biometric authentication, or multi-factor authentication (MFA).
- Network restrictions should be considered for tier 0 access scenarios by restricting RDP connections and other management ports to sources from known virtual networks (VNets), subnets, and workstations.
- When designing your tiered solution, be mindful and think about built-in security groups with inherited elevated permissions such as Enterprise Admins, Domain Admins, Schema Admins, and Server Operators, to name a few.
- Local accounts can also become a problem if they're not managed properly and are an easy way for someone to create a backdoor without your knowledge. A PAM solution with account discovery can be used to notify security teams when these accounts are added. If you're leveraging local accounts in an AD domain, you can also implement Microsoft's Local Admin Password Solution (LAPS) to rotate passwords.
- Implement fine-grained password policies and enforce stricter password requirements for administrative accounts.
- Leverage security baselines and Group Policy to further restrict access using restricted groups.
For hybrid cloud or IaaS deployments, PAWs can be deployed using virtualized desktop services such as Azure Virtual Desktop, Cloud PC, or Citrix. Azure also has PaaS offerings available to cater to this scenario, such as the Azure Bastion service. Azure Bastion allows you to securely RDP or SSH directly to VMs over Secure Sockets Layer (SSL), eliminating the need to expose your servers directly to the internet. This can all be done directly in the Azure portal.
Privileged access strategy
Next, we will look at Microsoft's privileged access strategy, which is now being recommended as a replacement for the Enhanced Security Admin Environment (ESAE) administrative forest model. We covered ESAE in the first version of this book and, as a reminder, this model requires the setup of a separate AD forest for administrative purposes only. There are no requirements to migrate away from ESAE, but if you are building out a new environment or looking to enhance your security for AD, you will want to follow the privileged access strategy.
The privileged access strategy follows zero-trust principles to provide the best protection for your privileged accounts across all your identity sources throughout your environments. As covered in Chapter 1, Fundamentals of Windows Security, zero trust is a foundation that builds in multiple layers of security with your environment, and we should never trust, always verify. There are four initiatives to follow with the implementation of this strategy, as outlined here:
- End-to-end session security.
- Protect and monitor identity systems.
- Mitigate lateral traversal.
- Rapid threat response.
More information on the privileged access strategy can be found in this article:
https://docs.microsoft.com/en-us/security/compass/privileged-access-strategy
To help accomplish the privileged access strategy with your traditional on-premises AD deployment, Microsoft advises using the rapid modernization plan (RAMP). RAMP is built on a roadmap that provides the steps needed to implement the recommended controls. The first section of the roadmap focuses on separate and managed privileged accounts, and is outlined here:
- Ensure you have emergency access accounts in the event of an emergency.
- Enable and implement Azure AD PIM.
- Identity and audit all privileged accounts and limit who needs privileged accounts.
- Ensure separate accounts for on-premises and Azure; ensure no mailbox on administrator accounts.
- Enable and configure Microsoft Defender for Identity.
The second section focuses on how to improve the credential management experience and is outlined here:
- Enable self-service password reset (SSPR) and enable the combined security information registration experience.
- Require MFA or allow passwordless on all privileged user accounts.
- Block legacy authentication protocols.
- Disable the ability for users to consent to Azure AD applications.
- Enable Azure AD Identity Protection and ensure notifications are set up to review and clean up alerts.
The last section covers administrator workstations' deployment and is outlined here:
- Set up dedicated workstations for privileged users to log in and use with their privileged accounts.
You can learn more about RAMP here:
https://docs.microsoft.com/en-us/security/compass/security-rapid-modernization-plan
Setting up the preceding recommendations requires time and investment to implement correctly. It is easy to fall back and apply elevated access to standard users and over-permission accounts to meet deadlines and so on. Don't fall into this trap! Ensure you spend time implementing these recommendations correctly from the ground up and clearly define the account provisioning process.
Next, let's review PAM and its importance as part of access management within the traditional server model.
Understanding privileged account management
Three critical access models for privileged identities that should be considered for controlling access within your server environment are PAM, JIT access, and PIM. All three provide an additional layer of protection around privileged accounts and help ensure they are only available as needed, have an expiration date regarding their usage, and are fully audited and monitored when accessing Windows. Uncontrolled privileged accounts could possibly be your weakest link if not protected properly, and investing in these models should be a requirement. We covered each of these models in detail in Chapter 5, Identity and Access Management.
Equally as important as implementing an access management solution is creating a segregation layer between your servers. To do this, organizations architect a tiering model to isolate different groups of servers based on their criticality to the infrastructure. In the next section, you will learn about using a tiered model and what this means for privileged access security.
PAM
PAM is an access model to help secure and monitor your sensitive accounts traditionally focused on the on-premises data center and AD. We covered PAM in detail in Chapter 5, Identity and Access Management, and it is an essential tool as part of your Windows Server infrastructure management. It is highly recommended that a PAM tool be implemented in addition to the recommendations provided in the previous sections. For customers who rely heavily on the Microsoft stack, a PAM solution will help fill gaps that aren't covered with native Microsoft products. Some of the limitations with Microsoft in addition to credential management include the ability to automatically rotate passwords, account discovery of your entire directory, management of local and service accounts, a workflow approval process, and the ability to never expose passwords to your administrators.
Although Microsoft does have the ability to deploy PAM within its Microsoft Identity Manager (MIM) on-premises identity solution, most third-party vendors who specialize in this area will have a richer feature set. An example of a vendor that specializes in PAM is Delinea, with their solution called Secret Server (https://delinea.com/products/secret-server). Secret Server can be deployed on-premises or in the cloud and provides a secure secret vault with AD integration. Once up and running, you can set up your secrets (passwords) for your privileged accounts with granular control over how they are accessed and by whom. Access is provided through the Secret Server portal, where users will be able to access and check out secrets they have permission to access. Applying a secret template will determine rules about how the secret is managed. For example, the template in the following screenshot requires the secret to be checked out with a maximum duration set to 12 hours. The password will be changed once the secret is checked back in, and it requires approval before allowing checkout:

Figure 11.6 – Secret template within Delinea Secret Server
This is a simple example of the benefits of a PAM solution. In addition to controlling account access, you must remember to ensure your PAM solution is protected with multiple layers of security. For example, ensure controls such as single sign-on (SSO), MFA, Conditional Access, Identity Protection, and audit logging are all enabled.
Now, let's recap and talk about access management best practices.
Access management best practices
Securing access to your environment can be a long and complex journey with many considerations to keep in mind. Security is an ever-evolving space due to the complexity and frequency of cyberattacks. New tools and services are regularly becoming available that help organizations without the resources, funds, or capabilities to simplify the deployment of the solutions needed to protect them. Here is a high-level list of best practices to keep in mind when thinking about the scope of privileged access for your Windows servers and business services:
- Enforcing MFA should be at the top of the list. Require MFA for all cloud-based accounts using Azure MFA or another provider. For on-premises servers, you will need to implement a third-party tool to enforce MFA or restrict access only from a Bastion environment or PAW and apply MFA to access those services in lieu of MFA for servers.
- Deploy a PAM solution.
- Use JIT access to assign permissions dynamically and avoid permanent assignments for your privileged accounts. Helpful services include Azure Privileged Identity Management (Azure PIM) coupled with Azure Security Center JIT access.
- Have an effective account provisioning and deprovisioning process. Automate disabling accounts when employees leave the company.
- Constantly audit and monitor privileged accounts in your environment.
- Limit the number of administrators. Always consider job role and function when provisioning administrative accounts and ensure PoLP applies.
- Separate administrative accounts with regular users' accounts. This will help mitigate credential exposure if the administrator's workstation becomes compromised.
- Limit access to email and internet browsing when applicable from privileged systems.
- Enforce strict fine-grained password policies on administrative accounts.
- Limit the amount of emergency “backdoor” accounts and monitor their usage.
- Ensure any changes to the environment go through an approval process by a change advisory board. This can include access to highly sensitive systems.
With technology constantly evolving, so does the need to keep your access model and strategy up to date, especially as more workloads shift to the cloud. Visit Microsoft's Privileged administration documentation library to ensure you keep current with the latest recommendations on securing privileged access: https://docs.microsoft.com/en-us/security/compass/privileged-access-deployment.
Now that you understand the different recommendations for protecting access to Windows servers, next, we will discuss the tools used to help manage them. Although some are common, it is important to be aware of their utility when building baselines and hardening Windows.
Understanding Windows Server management tools
There are many tools available for Windows Server that are useful for both managing and securing the infrastructure. Management technologies were traditionally developed for on-premises deployments, but now, with cloud-based SaaS offerings and expanded remote work opportunities, it seems the available solutions are growing exponentially. Microsoft offers solutions for enterprise-grade management through its System Center suite of tools such as Operations Manager (SCOM) and Configuration Manager (SCCM). There are also third-party paid solutions from companies such as ConnectWise, SolarWinds, and CA Technologies, to name a few. Each offers a different feature set depending on your management needs, and with varying price points. In this section, we will review the more common built-in tools available in Windows Server, including Server Manager, Event Viewer, and Windows Server Update Services (WSUS) for patch management. Then, we will discuss Windows Admin Center and how it can be used to manage servers and help transition workloads into the Azure cloud.
Introducing Server Manager
Server Manager was introduced in Server 2008. It provides a centralized management plane to view your servers, roles, and services and can support up to 100 remote servers per running instance. The number of available remote servers could vary based on the system performance of the server running it. Server Manager can also be installed on a workstation computer with Remote Server Administration Tools (RSAT). To remotely manage servers, Server Manager remote management must be enabled either through Server Manager, PowerShell, or the command line. This is enabled by default in Windows 2012 and later. Let's review which tasks can be completed through Server Manager, as follows:
- Create, edit, or add custom server groups or pools of servers and clusters.
- Install, uninstall, or make changes to roles and features on both the local and remote servers.
- Open management tools such as Computer Management, Windows PowerShell, Registry Editor, and other Microsoft Management Console (MMC) tools.
- Start and stop services, identify events, and collect performance data for analysis.
- Restart servers.
- Export settings to be imported on another system.
To add remote servers to Server Manager from the Dashboard view, right-click All Servers and choose Add Servers. Once servers have been added, all available roles will be visible on the left-side column and can be managed from one centralized point. Creating a server group will create a link on the left column for quick access to different sets of servers for organizational purposes. The following screenshot shows the MyServers server group:
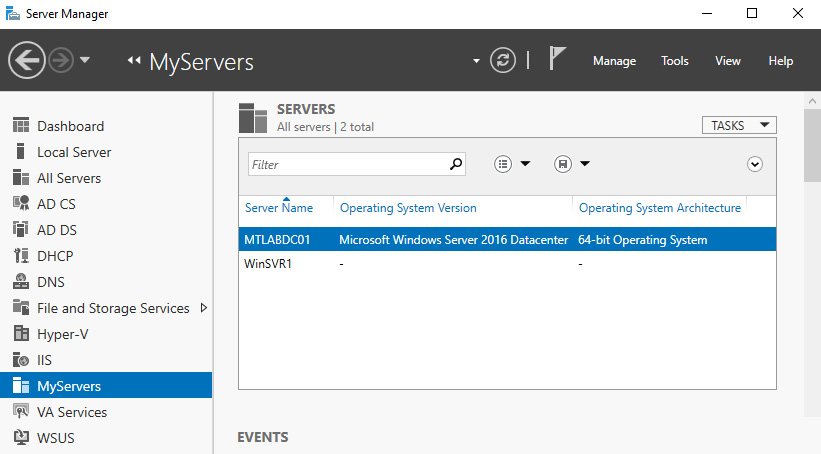
Figure 11.7 – Server Manager
Server Manager is a great place for centralized management to view events, services, and performance from within a single dashboard. Event logs can be viewed and configured from every page except the dashboard. Certain event logs such as application logs are selected by default and include Critical, Error, and Warning severity levels, but they can be customized to fit your needs. The thumbnail alerts can be configured to include other events, and different severities can be included in alert highlighting. Only critical events are highlighted by default.
Using the Best Practices Analyzer tool
The Best Practices Analyzer (BPA) tool is used to help reduce vulnerabilities by scanning configured roles and comparing your configurations to what experts believe to be best-practice guidelines. BPA can be executed from Server Manager as well as through Windows PowerShell. After the scan completes, the results can show whether a role is compliant with these best-practice recommendations. The summary outlines the problem in detail, as well as lists the impact and resolution steps. This can be seen in the following screenshot:
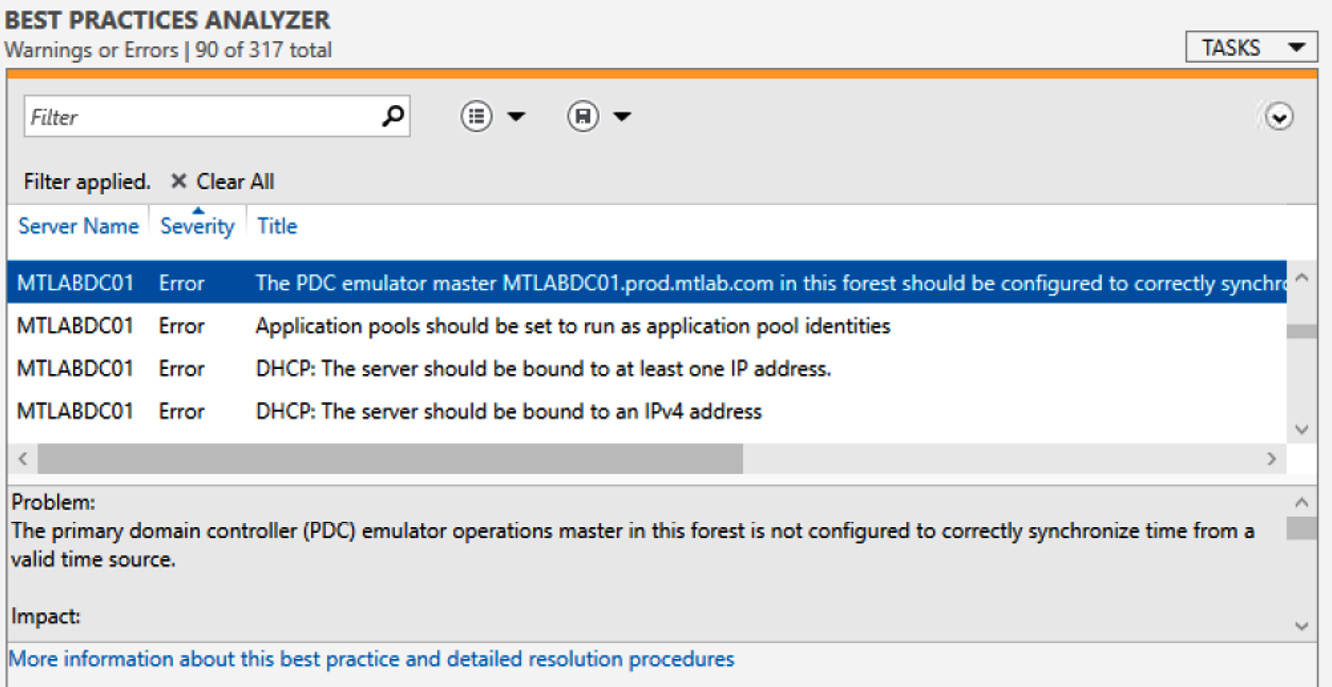
Figure 11.8 – Results from a BPA scan
For more information, please go to https://docs.microsoft.com/en-us/windows-server/administration/server-manager/run-best-practices-analyzer-scans-and-manage-scan-results.
Next, we'll look at using Event Viewer and examine common event identifiers (IDs).
Looking at Event Viewer
Event Viewer is used to view log files from applications, including security and system-related events. Events are categorized by error, warning, and informational events, which can be useful for troubleshooting both security and performance issues. PowerShell can be used in addition to Event Viewer to query for events, including logs from remote computers. To open Event Viewer using Windows Search, type in event viewer. To view logs on a remote computer, right-click on Event Viewer (local) at the top of the tree and choose Connect to Another Computer….
Event Viewer can also be used for automating actions based on certain events. Using Attach a Task to this Event action, a basic scheduled task can be created and run based on when an event appears in the log.
Tip
Event Viewer is very important for monitoring Windows events from a security perspective. Security professionals should pay close attention to sources around login activities, application crashes, network firewall rule changes, clearing of event logs, audit policy changes, and Group Policy changes.
To view security-specific logs, open Windows Logs > Security. In the following screenshot, event ID 4624 indicates a successful logon. This event ID contains a lot of detailed information about the logon, including the Logon Type, account information, and network information about the user who has logged on:
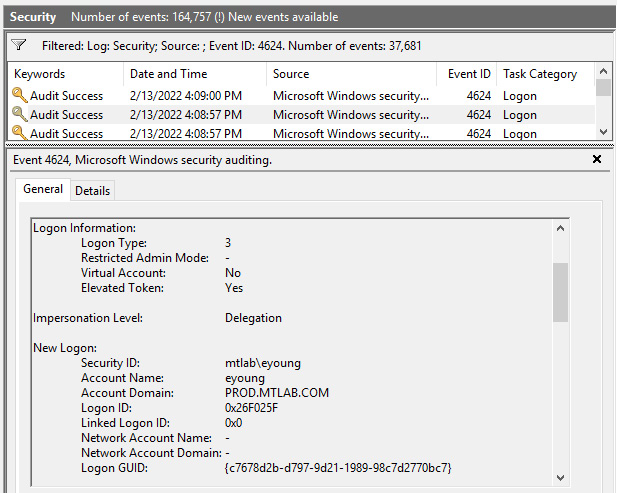
Figure 11.9 – Event 4624: successful logon in Event Viewer
There are common security events to look for under Windows Logs > Security that could indicate an attacker attempting to access the system. While these event IDs are normal and typically do not indicate an attack, in the event a compromise did occur, they are useful in helping build a timeline around the attack and provide additional details during forensic analysis. The event IDs are presented here:
- Event ID 4625: Audit Failure Logon
- Event ID 4624: Audit Success Logon
- Event ID 4648: Login with explicit credentials
- Event ID 4735: Security-Enabled local group was changed
- Event ID 4728, 4732, and 4756: Member added to a security group
- Event ID 4740: Account Lockout
- Event ID1102: Log Clear may indicate an evasive tactic by an attacker
Event ID 4624 includes a Logon Type field, which is useful for identifying how an account has logged in to the system. The following screenshot demonstrates the different logon types that are associated with event ID 4624:

Figure 11.10 – Logon types for event ID 4624
In addition to monitoring security logs, Microsoft Defender logs are useful for detecting evasion techniques such as disabling virus and threat protection settings. They can be found under Applications and Services Log > Microsoft > Windows > Windows Defender. Interesting events such as canceling or pausing malware protection scans could indicate a malicious actor or the prevalence of malware or could warrant further investigation.
Tip
Further reading on Microsoft Defender antivirus event IDs can be found at https://docs.microsoft.com/en-us/microsoft-365/security/defender-endpoint/troubleshoot-microsoft-defender-antivirus?view=o365-worldwide.
From an operational perspective, especially when a SOC is used for monitoring multiple systems, looking at Event Viewer on servers individually isn't the most effective method. It is recommended to incorporate a security information and event management (SIEM) solution to better track and analyze event logs. Examples of SIEM solutions include Microsoft's security monitoring tools such as Azure Sentinel, Microsoft Defender for Endpoint, Microsoft Defender for Cloud Apps, and Azure Defender, or third-party tools such as Splunk and QRadar can be used for log repositories and analysis. We'll cover SIEM tools and security monitoring in more detail in Chapter 13, Security Monitoring and Reporting, and Chapter 14, Security Operations.
Next, let's look at how WSUS can be used to manage Windows updates and patch vulnerabilities in Windows Server.
Using WSUS
WSUS is a solution for managing Windows updates and for keeping security patch-level compliance across your servers. In some instances, maintaining the same patch level across servers is critical for applications to function, and relying on the standalone Windows Update doesn't suffice for this level of control. WSUS allows you to approve updates using a management dashboard and choose when to deploy them. In a simple WSUS architecture, the WSUS downstream server acts as the middleman between the client and the Microsoft Update content delivery network (CDN). Using a management dashboard, an administrator can download and approve critical updates, security patches, security rollups, service packs, feature packs, Microsoft product updates, and antivirus definition files. Computers connecting to WSUS can then be grouped together and targeted for an update deployment.
Most WSUS implementations require minimal processing power on the host computer, and a single WSUS instance can host upward of 100,000 clients. For environments greater than 100,000 endpoints, multiple WSUS servers can be deployed by using a load-balanced frontend. A single SQL Server database is needed that can be shared by each WSUS instance to allow updates to be controlled for multiple locations and branch offices through a single centralized dashboard.
From a network and firewall perspective on the endpoints, clients connect to WSUS over Hypertext Transfer Protocol/Transmission Control Protocol (HTTP/TCP) port 8530. It is recommended to secure communications by deploying a custom SSL for clients to connect HTTPS/TCP over port 8531. IIS is required if you wish to use WSUS in both scenarios.
You can see an overview of the WSUS management console in the following screenshot:
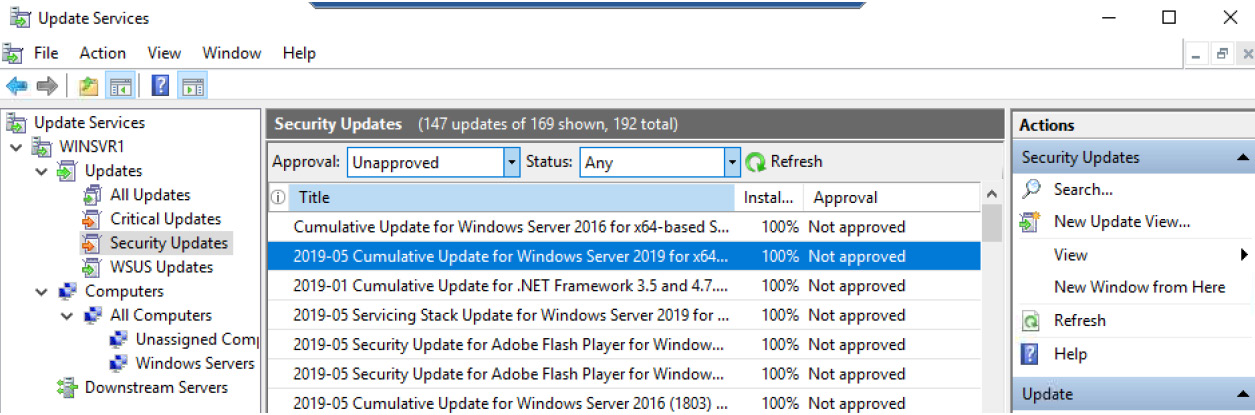
Figure 11.11 – WSUS management console
For an endpoint to receive updates, they must first be approved through the console. To help ease the administrative effort required to manage WSUS, automatic approvals can be configured for updates and antivirus definitions if necessary.
WSUS also supports the deployment of third-party updates for commonly used software vendors such as Adobe. Combining WSUS with a Configuration Manager software update point will allow you to subscribe to a vendors' update catalog that has partnered with Microsoft to approve and deploy third-party software updates. For servers hosted in the Azure cloud, WSUS can be enhanced further by leveraging Update Management in Azure Automation. Update Management can manage updates for Windows and Linux systems hosted both in Azure and on-premises directly through the Azure portal. This service supports Windows Server downward to 2008 Release 2 (R2) and will be covered in more detail later in this chapter and in Chapter 12, Keeping Your Windows Server Secure.
Here are some helpful links for staying up to date on the latest released security updates:
- Microsoft Security update guide: https://msrc.microsoft.com/update-guide/en-us
- Patch Tuesday dashboard: https://patchtuesdaydashboard.com/
- Information about Common Vulnerabilities and Exposures (CVE): https://www.cve.org/About/Overview
Next, let's review managing servers using Windows Admin Center.
Introducing Windows Admin Center
Windows Admin Center is a browser-based tool that provides an alternative to the classic MMC and is supported on Windows 10/11 and Windows Server 2016 or later. It can support the management of servers down to 2008 R2 but with limited functionality. The user interface (UI) frontend is a locally deployed browser-based tool that leverages PowerShell with Windows Management Instrumentation (WMI) and supports remote management to remotely manage servers. To support down-level servers (Windows Server 2012 R2 and lower), Windows Management Framework (WMF) 5.1 must be installed on those target systems. The official documentation, including installation instructions, can be found at the following link: https://aka.ms/WindowsAdminCenter.
Tip
Windows Admin Center runs in HyperText Markup Language 5 (HTML 5) and requires Microsoft Edge or Google Chrome browser to run on Windows Server. It cannot be installed directly on a DC.
Windows Admin Center's toolset for server connections includes Active Directory, DHCP, DNS, Firewall, Remote Desktop, Roles and Features, Scheduled Tasks, and Updates, to name a few. Many more features are available, and features can be extended through extensions that include support for third-party developers.
Windows Admin Center can be used to manage on-premises servers and servers in the cloud. While its core functionality is built around hybrid management, it has no dependency on Azure and is included for free with your Windows Server license. For Azure cloud customers, Windows Admin Center can centrally manage Azure hybrid services and cloud workloads extended to on-premises servers directly from the UI.
Some of the Azure services available through Windows Admin Center include the following:
- Azure Backup
- Azure File Sync
- Azure Kubernetes Services (AKS)
- Azure Security Center
- Azure Monitor
- Azure Update Management
- Support for Azure AD authentication
Windows Admin Center can be fully integrated with Azure AD for authentication; it supports MFA and is now available directly from the Azure portal. The following screenshot shows the Overview pane of Windows Admin Center using the Microsoft Edge browser:

Figure 11.12 – Windows Admin Center in Microsoft Edge
Windows Admin Center can also be used to create and configure standalone Azure VMs. By leveraging Storage Migration Service and Storage Replica, on-premises server workloads including data transfer and VM creation can all be orchestrated from Windows Admin Center. This is helpful for DR, high availability (HA), or to permanently migrate the server and cut over the workload to the Azure cloud. Additional information about Storage Migration Service in Windows Admin Center can be found at the following link: https://docs.microsoft.com/en-us/windows-server/storage/storage-migration-service/migrate-data.
Windows Admin Center can help administrators manage hyper-converged infrastructure workloads. A hyper-converged cluster can be added like any other Windows Server and intuitively managed including cluster monitoring of the underlying resources and management of storage spaces, Hyper-V VMs, and software-defined networks. Windows Admin Center can manage failover clusters too for highly available and fault-tolerant workloads. Nodes can be managed as individual servers or added together and managed as a group in the console. Windows Admin Center deployments that use a gateway server also support a failover cluster architecture to ensure HA of the management console. To view the available deployment options, visit the following link: https://docs.microsoft.com/en-us/windows-server/manage/windows-admin-center/plan/installation-options.
Using RBAC, Windows Admin Center has flexibility for securing access to the management console and the underlying resources. It supports authentication using AD, smartcard authentication, or Azure AD with support for Conditional Access and MFA. Using PowerShell Just Enough Administration (JEA), administrator permissions on the underlying server resources can be limited and temporary. We discuss JEA in more detail later, in Chapter 12, Keeping your Windows Server Secure.
In this section, we have covered several Windows management tools including Server Manager, Event Viewer, WSUS, and Windows Admin Center. Next, let's look at using Azure services that are useful for managing Windows Server environments.
Using Azure services to manage Windows servers
As discussed in the Understanding Windows Server management tools section, Windows Admin Center exposes Azure cloud services that can provide additional benefits for managing Windows servers. It is recommended that you start moving workloads to the cloud not only as part of your digital transformation but also as a security initiative. Azure AD roles and RBAC allow for a fine-grained level of access provisioning over the management plane. In the next section, you will learn about the Azure services that are available for managing Windows servers for both IaaS and on-premises deployments. We will cover the following topics:
- The Azure portal and Marketplace
- ARM
- Implementing RBAC
- Using Azure Backup
- Leveraging Azure Site Recovery (ASR)
- Introducing Azure Update Management
- Understanding Azure Arc
- Using Azure Automanage
The Azure portal and Marketplace
The Azure portal is a web UI that's used to manage resources in the Azure cloud. Most management operations today can be performed directly through the Azure portal, but occasionally you may find they require the use of the Azure command-line interface (CLI), Azure PowerShell, or direct calls to the Graph application programming interface (API). Microsoft is doing a great job of consistently adding new operations only supported by the command-line tools directly to the Azure portal interface. To sign in to the Azure portal, follow these steps:
- Open a browser and navigate to https://portal.azure.com.
- Sign in with your Azure account username and password.
- If you don't have an Azure account, click Create one! to set one up.
To view and access your virtual servers within the Azure portal, simply click on Virtual Machines. You will be provided with the Virtual machines management page, as illustrated in the following screenshot:
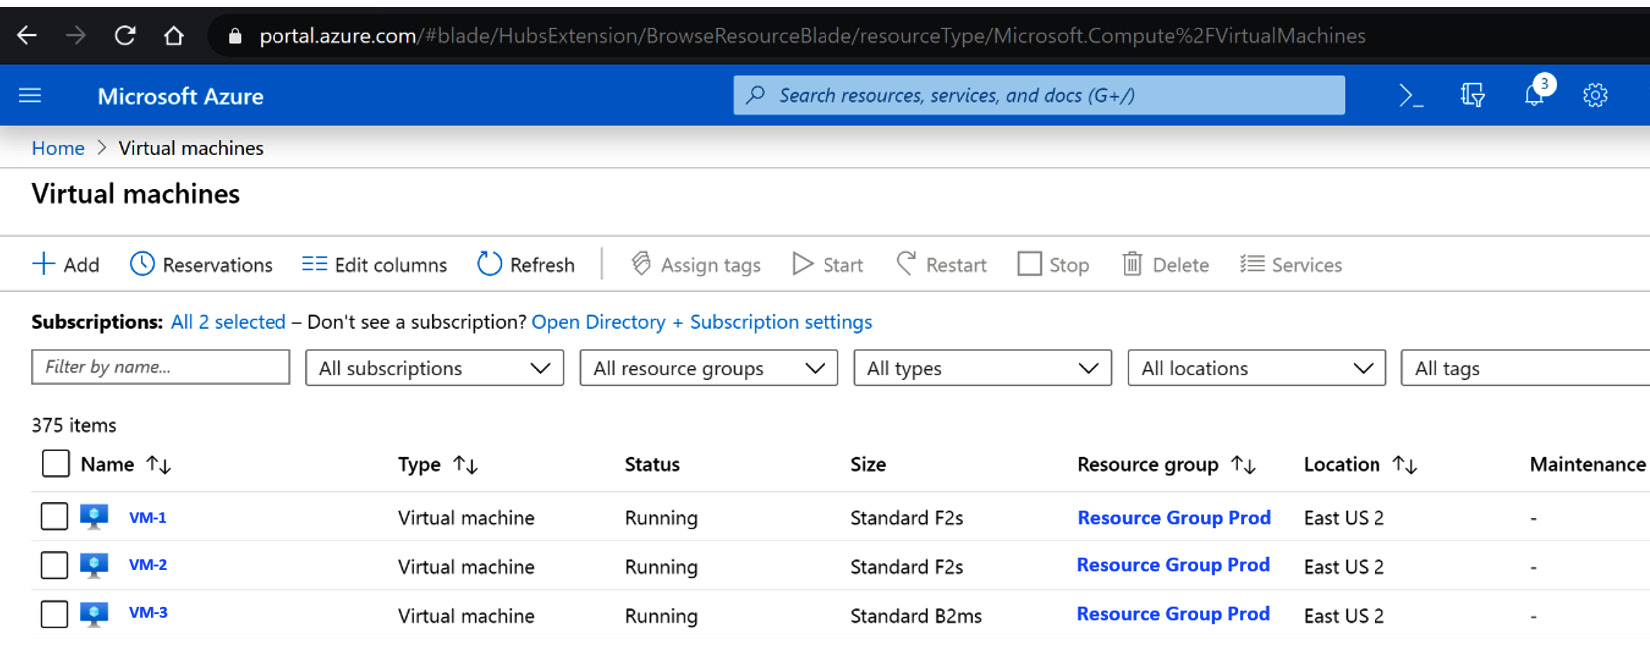
Figure 11.13 – Microsoft Azure portal Virtual machines page
We won't be going into detail about navigating the Azure portal, but we do want to call it out as an important tool for not only managing Windows servers, but also all Azure cloud-based resources. For detailed instructions on customizing its look and feel, as well as creating custom dashboards and setting favorites, you can visit https://docs.microsoft.com/en-us/azure/azure-portal/azure-portal-overview.
Using the Azure Marketplace
The Azure Marketplace is a storefront in Azure where you purchase resources and solutions and deploy them directly to your tenant. There are many offerings available, from custom VM images to databases, networking solutions, internet of things (IoT), development-operations (DevOps), and more. It can be accessed from the Azure portal or by going directly to the following link after logging in: https://azuremarketplace.microsoft.com/en-us/marketplace/.
For deploying Windows Server, the marketplace has many pre-built images that can be deployed onto a VM in just a few clicks. If you have found a pre-built image that you like, you can use the Azure Marketplace to customize the deployment and specify all the necessary resource types for creating a Windows Server instance, and then capture the customizations in a JSON template. By using this JSON, multiple servers can now be deployed at scale with all your custom configurations. The following screenshot shows a Windows Server 2022 Datacenter core edition as the image type:
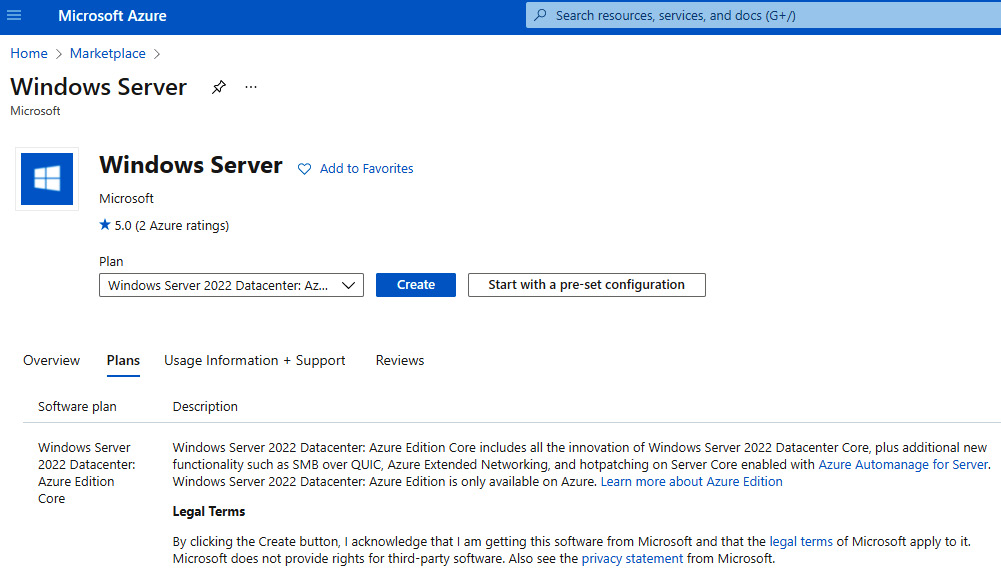
Figure 11.14 – Windows Server purchasing option from the Azure Marketplace in the Azure portal
Using RBAC, resource creation can be locked down to only allow certain users to create resource types that are specified in your deployment configurations.
Next, we'll look at the current management plane for Azure resources, which is called ARM.
ARM
It is important to be aware of ARM if you're working with the Azure cloud to deploy Windows servers and other infrastructure. ARM is defined as a highly resilient management plane for all services that run in Azure. Any controls used that directly affect the management and security of resources are done through ARM. ARM is the underlying plane that is manipulated directly using the Azure portal, Azure PowerShell, Azure CLI, or through APIs and custom tools developed with a software development kit (SDK). Custom templates written in JSON can be created and declaratively deploy resources repeatedly, at scale, and are tracked directly in the Azure portal. More information about creating ARM templates, including the sections that make up the JSON, can be found at https://docs.microsoft.com/en-us/azure/azure-resource-manager/templates/.
Tip
Additional information, including key terminology, benefits, and a descriptive understanding of the scope of the management plane, can be found at https://docs.microsoft.com/en-us/azure/azure-resource-manager/management/overview.
Next, we'll look at how to lock down access to Azure resources by implementing RBAC. We will also learn how to create a custom role using PowerShell and JSON.
Implementing RBAC
RBAC in Azure is used to authorize access to resources through role assignments. An RBAC role contains a role definition that defines permissions as to what a user can access. Roles are assigned to security principals, which can be users, groups, service principals, or managed identities. When a role is assigned, you can define a scope to determine the set of resources to which the access applies. This can be directly at the subscription level or more granularly to a resource group or resource. Permissions are inherited from parent scopes in a top-down manner, so if a role assignment is set on the resource-group level, all resources nested under that resource group will inherit the permissions defined in the role definition. When assigning permissions to users and groups, RBAC takes an additive model that is slightly different from what we've traditionally seen in an AD environment. For example, if the user is assigned multiple roles, the least restrictive role doesn't take priority and the user will be assigned any additional permissions as outlined in the role definition. Explicit deny assignments must be applied to determine which set of actions is not allowed; otherwise, access is permitted.
Azure has many built-in roles that are ready for assignment. Each role has its own role definition that contains a collection of properties that identify the role and determine permissions to be applied. In addition to basic identification such as role name and description, role definitions include actions that specify what is allowed or denied on the control plane and data plane. These action properties are identified as Actions, NotActions, DataActions, and NotDataActions. Actions refers to the control plane in which actions are permitted, such as deleting a resource or listing contents of a container in blob storage. DataActions refers to the data plane that controls the permissions to the underlying data within the object. An example of a data action is permissions to read data inside a blob in a storage account. Azure offers many built-in RBAC roles that are preconfigured for specific use cases as they pertain to certain resources. If you need to build custom roles, you can export a built-in RBAC role and modify it to fit your needs. For more information regarding the role definition structure, go to https://docs.microsoft.com/en-us/azure/role-based-access-control/role-definitions.
Let's look at a basic example of creating a custom role. In the following tutorial, we will copy the Virtual Machine Contributor role definition and build a custom role to include an additional DataAction to allow administrative login to VMs. To support administrative login, Windows VMs in Azure must support Azure AD authentication. For more information on this, refer to the following link: https://docs.microsoft.com/en-us/azure/active-directory/devices/howto-vm-sign-in-azure-ad-windows.
Let's get started. Proceed as follows:
- Open PowerShell as an administrator and run the following commands to install the Azure module and use the Connect-AzAccount cmdlet. We will then use the Get-AzSubscription cmdlet and take note of the subscription ID for later:
Install-Module -Name Az
Connect-AzAccount
Get-AzSubscription | Select ID
- The first step is to export the built-in Virtual Machine Contributor role as a JSON template. Run the following commands to export the role definition as JSON using the Get-AzRoleDefinition cmdlet:
Get-AzRoleDefinition -Name "Virtual Machine Contributor" | ConvertTo-Json | Out-File "C:MyFolderVMContributor.json"
- Open the VMContributor.json file using a code editor of your choice, such as Notepad++, Visual Studio Code (VS Code), or Notepad. We will need to make some modifications and save the file to be reimported.
- On line 2, change the value of "Name" to Administrative Virtual Machine Contributor, like so:
"Name": "Administrative Virtual Machine Contributor"
- On line 4, change the value of "IsCustom" to true, like so:
"IsCustom": true,
- Modify "Description" on line 5 so that it reads as follows:
"Description": "Lets you manage virtual machines, but not access to them, and not to the virtual network or storage account they are connected to. Allow administrator login.",
To allow administrative login, we will need to add the following resource provider operations in the DataActions property type:
- Microsoft.Compute/virtualMachines/login/action
- Microsoft.Compute/virtualMachines/loginAsAdmin/action
- Find the DataActions property (around row 55) and add the two resource operation providers, as in the following example:
"DataActions": [
"Microsoft.Compute/virtualMachines/login/action",
"Microsoft.Compute/virtualMachines/loginAsAdmin/action",
]
- Next, we need to populate the "AssignableScopes" section. If you exported the built-in role, the "/" root value will be prepopulated, but this is only applicable to built-in roles, and we will need to plug in the subscription ID. Assignable scopes can be scoped to multiple subscriptions, management groups, resource groups, or resources. In this example, we will use the subscription ID of our tenant that we saved earlier. Modify the "AssignableScopes" section so that it includes the subscription ID, as in the following example:
"AssignableScopes": [
"/subscriptions/8c24xxxa2-xxxx-47xx-3d-8929345de830"
]
- Finally, save the edited JSON file. We will now import it using the New-AzRoleDefinition cmdlet, as follows:
New-AzRoleDefinition -InputFile "C:MyFolderVMContributor.Json"
If its creation was successful, the custom role will be seen from the Access control (IAM) blade in your Azure subscription, as illustrated in the following screenshot:
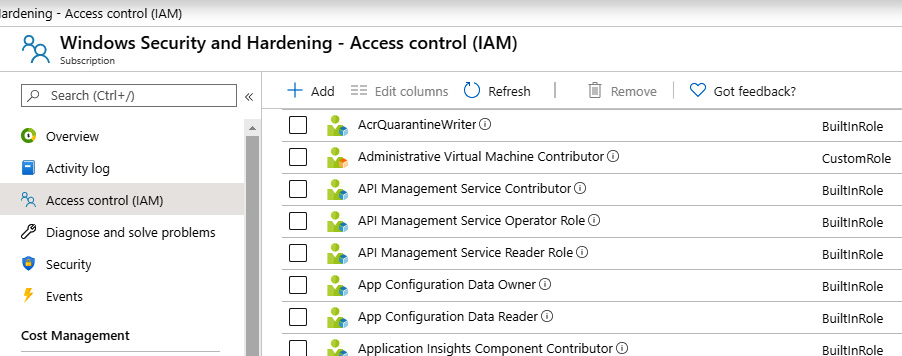
Figure 11.15 – Administrative Virtual Machine Contributor custom role
For more information about the resource provider operations that are available, visit this link: https://docs.microsoft.com/en-us/azure/role-based-access-control/resource-provider-operations.
For more information about JSON, visit this link: https://www.w3schools.com/whatis/whatis_json.asp.
In the next section, we will talk about using Azure Backup for creating backups of our servers.
Using Azure Backup
Having a good backup strategy with clean reliable backups is a critical piece in any business resiliency and DR planning. Part of that strategy should also include planning for recovery from cyberattacks such as ransomware. If there is ever a circumstance where systems needed to be recovered, the inability to restore systems from a backup could have a significant business impact and cost burden. Traditional on-premises backup solutions typically included either network-attached storage, backup servers, or physical tapes. To reduce the risk of environmental disasters destroying backups, IT teams would need to replicate data to another on-premises data center or physically move tapes to another location for safekeeping. Moving to a cloud backup solution could help reduce some of the burden involved with maintaining data backups and help to meet recovery objectives. Azure Backup is a cloud service that can be used to replace an on-premises backup solution or as an automatic storage management tool for hybrid scenarios where data is stored both on-premises and in the cloud. It requires zero infrastructure, has unlimited scaling capabilities, provides application-consistent backups, and data is encrypted both in transit and at rest. Azure Backup offers unlimited data transfer ingress and egress from Azure at no additional cost. There are locally redundant storage (LRS) and geo-redundant storage (GRS) options available depending on your HA needs, with no time limits regarding data retention, and up to 9,999 recovery points.
Important Note
For additional information on the Azure Backup service, go to https://docs.microsoft.com/bs-latn-ba/azure/backup/backup-overview.
If using a server management tool such as Windows Admin Center, you can take advantage of the built-in management and monitoring tools, all from within the Backup dashboard.
Azure Backup's requirements include the following:
- A valid subscription
- Resource group
- Recovery Services vault
- Agent deployment
Azure Backup includes application and crash-consistent backups. Let's look at what these are, as follows:
Application-Consistent Backup: This uses the Windows Volume Shadow Copy Service (VSS) to create a backup and capture memory content and pending input/output (I/O) operations. When recovering a VM using an application-consistent snapshot, there is no data loss.
Crash-Consistent Backup: This occurs if an Azure VM shuts down during the time of a backup. Only disk data at the time of the backup is captured and recovery doesn't guarantee data consistency.
The following screenshot is of the Azure Recovery Services vault where you can restore a VM from a backup:

Figure 11.16 – Azure Recovery Services vault
We will now review securing Azure backups.
Securing Azure Backup
In addition to ensuring a good backup strategy is in place for any recovery scenario, it's important the backups are safe and secured from alteration. This includes ensuring backups are encrypted and only the necessary users have access to manage backups.
For on-premises backups, encryption is done using a customer-specified passphrase. Once in transit, data is encrypted using Advanced Encryption Standard (AES) 256 and sent over HTTP Secure (HTTPS) to Azure. For Azure VMs, data at rest is encrypted using Storage Service Encryption (SSE) and protected by HTTPS in transit while never leaving Azure. Azure Backup can also back up VMs that are encrypted using Azure Disk Encryption.
Tip
For customer-specified passphrases, DO NOT lose the encryption passphrase. It is required to restore backups. Microsoft CANNOT recover this for you.
Backup data contains highly critical information and needs to be properly secured from unauthorized access. Access can be managed using Azure RBAC. Authentication also takes place through Azure AD where monitoring and auditing are supported. Let's highlight the built-in RBAC roles for Azure Backup, as follows:
- Backup Contributor has permissions to create and manage backups but cannot grant access or delete Recovery Services vaults.
- Backup Operator has similar permissions to the contributor except for removing backups and changing policies.
- Backup Reader can view all backup operations for monitoring purposes only.
For hybrid scenarios, additional security features are available, such as configuring retention periods and notifications for changes, and the ability to create security pins.
Another security feature for backups is soft delete. Soft delete is a feature that retains backups for 14 days after a deletion action and allows recovery without data loss at no additional cost. While this feature is enabled by default, you can permanently delete soft-deleted backup items immediately or disable the feature altogether.
Azure backup also supports a feature known as Resource Guard. Resource Guard helps protect the Recovery Services vault that stores your backups by adding an extra layer of protection for critical operations. When a resource guard is in place, for an Azure backup administrator to perform a critical operation, they must also be granted additional permissions on the resource guard. Critical operations include soft delete, disabling Resource Guard, and modifying backup policies and protections. If the administrator needs to perform an operation, they can request access through a security administrator or using Azure PIM. This model is known as multi-user authorization (MAU).
Tip
More information about Resource Guard for Azure Backup can be found here:
https://docs.microsoft.com/en-us/azure/backup/multi-user-authorization
In Chapter 1, Fundamentals of Windows Security, we provided an overview of ransomware preparedness. We briefly mentioned backups as an item that needs to be reviewed because intruders are specifically looking to target backups to corrupt or delete them from being used. This can cause severe damage to an organization, so it is critical you spend quality time ensuring your backups are well protected. To expand on what we covered in Chapter 1, here are a few recommended best practices for protecting backups on-premises and stored in Azure:
- Maintain multiple copies of backups; for example, the 3-2-1 backup that requires three copies of the backed-up data on two different types of media and one being off-site.
- Maintain a copy of your backups offline and ensure they cannot be accessed by any network of internet connectivity, also known as an airgap backup.
- Encrypt all backups and ensure the private keys are secured.
- Ensure backups are immutable and unable to be altered.
- Ensure both application- and crash-specific backups are being taken, or consult with the business to document the backup.
- Regularly test your backups.
- Review and keep backup procedures up to date.
- Ensure you have a multi-layered access model that includes MFA and PIM or use a PAM solution to keep accounts that can manage backups protected.
- Monitor and alert on backup access.
- Audit all backup activity.
- Enable and enforce a PIM access model to manage backups.
- Use Resource Guard for your Recovery Services vaults.
Next, let's look at using ASR. ASR helps to recover servers and workloads in other regions during DR or as a tool to move systems in Azure.
Leveraging ASR
ASR is a BC and DR solution built into Azure for all types of workloads. The solution covers both Azure and on-premises Windows servers and VMs. ASR consists of two major components, as outlined here:
- Site Recovery Services, which is used for the replication of VMs and workloads from a primary to a secondary region in Azure
- Backup Services, which uses the Azure Backup service for data backup and recovery
For more information on ASR, visit this link:
https://docs.microsoft.com/en-us/azure/site-recovery/site-recovery-overview
When building a BC and DR strategy, most organizations outline recovery time objectives (RTOs) and recovery point objectives (RPOs) for each business-critical service and application. These objectives determine the amount of time in which services are required to be restored and the point in time at which any incurred data loss is acceptable. Using the ASR service, during a DR scenario, workloads are replicated from the primary to the secondary region based on configurations set around the RTO and RPO strategy. If a regional outage occurs in Azure, you can orchestrate a failover to meet these objectives to restore services. Let's review this in more detail, as follows:
- An RTO is the established duration of time for each business process in which services must be restored to meet service-level agreements (SLAs).
- An RPO is the maximum amount of data that could be lost during any major outage. For example, if the RPO is 24 hours and the last backup was completed 6 hours ago at the time of an outage, there are 18 hours to restore the data until the business will suffer a significant volume of data loss.
ASR supports building customized recovery plans that allow you to strategically plan which services, VMs, and critical infrastructure fail over and when. Using PowerShell and Azure Automation, many tasks during the failover/recovery process can be automated to reduce the amount of manual effort needed by IT staff. ASR also supports testing the failover process using recovery plans. The following screenshot is of the Overview dashboard. Here, you can monitor the site recovery and backup status of resources that are scoped within the ASR service:

Figure 11.17 – ASR dashboard
Tip
ASR can also be used for migrating on-premises machines to Azure using the same steps that were defined for DR, but without failback! For more information, go to https://docs.microsoft.com/en-us/azure/site-recovery/migrate-tutorial-on-premises-azure.
Next, let's look at keeping Windows servers up to date using Azure Update Management to deploy Windows updates to servers.
Introducing Azure Update Management
As described earlier in the Using WSUS section, Update Management is an Azure cloud-based solution for managing system updates for Windows and Linux. Update Management can be used for servers in both the cloud and on-premises.
The requirements to deploy Azure Update Management for Windows are listed as follows:
- An Azure subscription
- Resource group
- Log Analytics workspace
- Azure Automation account
- Deployment of the Microsoft Monitoring Agent (MMA)
- Microsoft Update or WSUS configured on your systems
Onboarding servers into Update Management can be done individually on the server directly or using the Azure portal and other methods for bulk enrollment. For step-by-step instructions on how to onboard multiple servers from the Azure portal, visit the following link: https://docs.microsoft.com/en-us/azure/automation/update-management/enable-from-portal.
After the servers are onboarded, you can view them in the Azure portal by going to the Automation Account selected during the onboarding processing and opening Update Management. The following screenshot shows the overall compliance of all your machines onboarded into the solution:
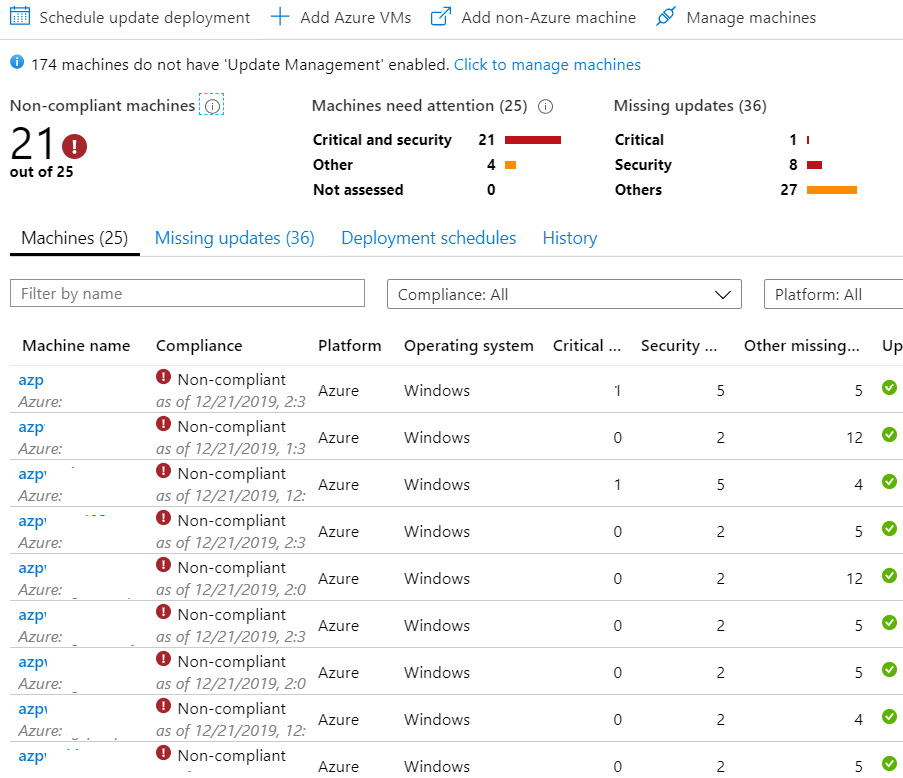
Figure 11.18 – Azure Automation Update Management
The compliance report will be aligned with the latest updates available for Windows Update or approved updates if your deployment is linked to WSUS. To add other machines, click on Add Azure VMs at the top of the page. For non-Azure servers, deploy MMA and configure it to use the Update Management Log Analytics workspace during setup. Clicking on Missing Updates will provide an overview of all the available updates and a count of machines missing the update. The following screenshot shows all missing updates, and it includes details such as the update name, classification, number of machines missing the update, operating system, and a knowledge base (KB) information hyperlink:
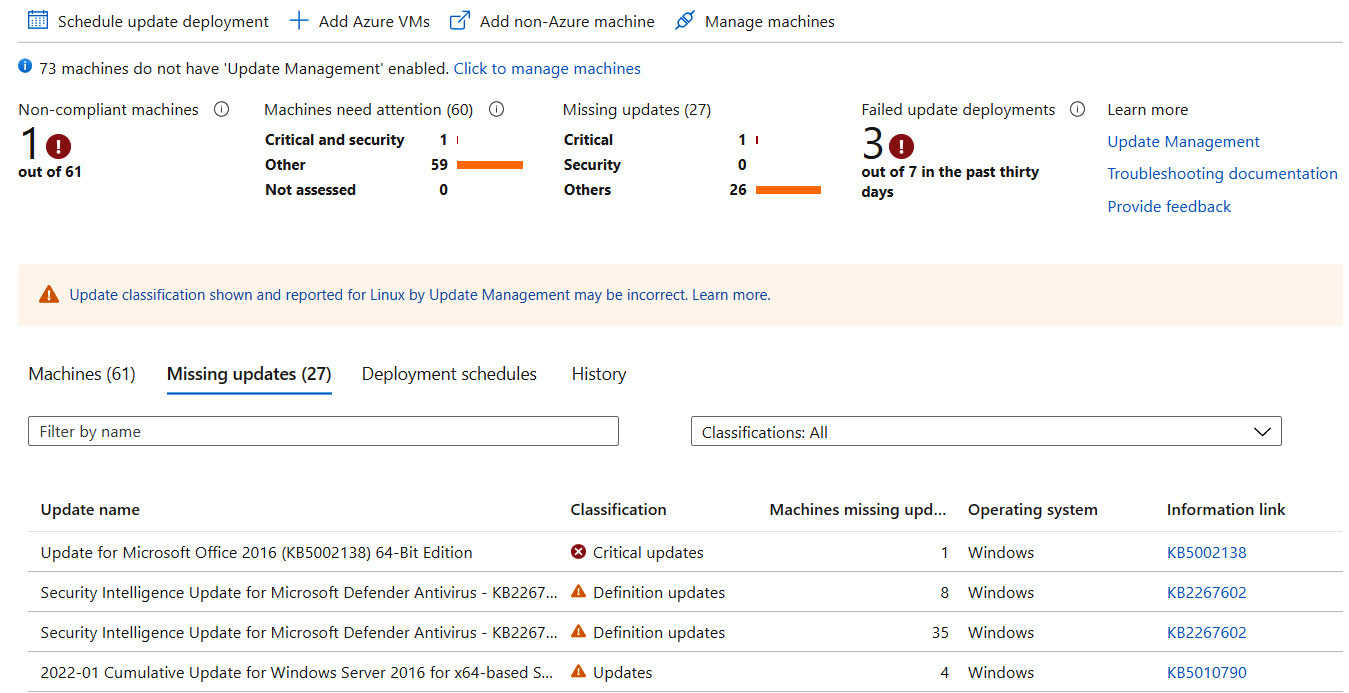
Figure 11.19 – Overview of available updates and machines missing each update
When you're ready to schedule a deployment, click on the Schedule update deployment option at the top of the toolbar to configure the deployment settings. By selecting Groups to update, you can organize groups of computers together by selecting them manually or by using dynamic queries based on resource groups, locations, and tags. For granularity around the type of updates to deploy, there is a dropdown to scope which classification of update to deploy. The Update classifications dropdown will let you select a category of updates (such as Critical and Security), and you can choose the Include/exclude updates option to define specific KBs in the deployment. The Schedule settings option allows you to set a one-time deployment or a recurring deployment. Additional options include setting a maintenance window time and reboot behaviors, and the ability to link pre- and post-scripts that should be executed before or after an update deployment run.
The deployment status can be monitored with alerts using Azure Monitor. By configuring Action groups, notifications can be sent out via email, Short Message Service (SMS), push notification, voice, and even by triggering a webhook or Azure Automation runbook.
For additional information about the Update Management solution in Azure, go to https://docs.microsoft.com/en-us/azure/automation/update-management/overview.
The following Windows operating systems are supported by Azure Automation Update Management:
- Windows Server 2022
- Windows Server 2019
- Windows Server 2016
- Windows Server 2012 and R2
- Windows Server 2008 R2
Tip
Windows clients and Windows 2016 Nano Server are not supported at this time.
We will cover how to set up and configure Azure Automation Update Management in more detail in Chapter 12, Keeping Your Windows Server Secure.
Next, let's look at how resources outside of Azure can be managed with Azure Arc.
Understanding Azure Arc
Azure Arc is a Microsoft Azure offering that allows you to extend your Azure cloud infrastructure and services management capabilities to your on-premises infrastructure, other public cloud infrastructure, and edge devices. This allows companies to better streamline governance and management by centralizing and unifying the management of resources. The current resource types outside of Azure that can be managed by Azure Arc include the following:
- Windows and Linux servers
- VMs on VMware vSphere and Azure Stack HCI
- SQL servers
- Azure data services
- Kubernetes clusters
Focusing on the management of Windows servers, Azure Arc-enabled servers allow for the management of Windows servers and Windows VMs outside of your Azure environment. This includes the ability to manage Windows servers located on your local corporate network or other cloud providers. To connect your Windows machines that are hosted outside of your Azure environment to Azure, you will need to install the Azure Connected Machines agent on each machine. Then, you can install the Log Analytics agent to monitor the operating system, collect telemetry data, and use Automation runbooks, Update Management, Microsoft Defender for Cloud, and so on. Once your Windows machine is connected to Azure, it can be managed just like any other Azure VM. Some of the actions supported include the following:
- Governance by assigning Azure Policy guest configurations
- Protection using Microsoft Defender for Endpoint, Microsoft Defender for Cloud, and Microsoft Sentinel
- Configurations with Azure Automation, Update Management, Azure Automanage, and VM extensions installed on Arc-enabled servers
- Monitoring using Log Analytics workspaces and VM Insights in Azure Monitor
You can learn more about Azure Arc by visiting the documentation located here:
https://docs.microsoft.com/en-us/azure/azure-arc/
Finally, let's look at automating the management of your Windows VMs in Azure with Azure Automanage.
Using Azure Automanage
One of the newer features now available in Azure (currently in preview as of this writing) is Azure Automanage. Azure Automanage provides a fully automated solution for Windows VMs that leverages best-practice recommendations from Microsoft to automatically manage and configure VMs. Automanage can help simplify the management of your VMs by automating tasks, applying security updates and configurations, and detecting and remediating configuration drifts. By leveraging the participating services, Windows VMs can automatically be onboarded to Azure services that support best practices for Azure server management outlined in the Cloud Adoption Framework for Azure. For additional information about Azure server management services, visit the following link: https://docs.microsoft.com/en-us/azure/cloud-adoption-framework/manage/azure-server-management/.
The following current prerequisites must be met before you can use Azure Automanage on your Windows VM:
- Windows Server 2012/R2 or later.
- VMs must be in a region that supports Azure Automanage.
- RBAC permissions must be configured correctly.
- Sandbox subscriptions and Windows client images are currently not supported.
For more details on the requirements, visit this article:
https://docs.microsoft.com/en-us/azure/automanage/automanage-virtual-machines#prerequisites
The following participating services will be auto-onboarded, configured, and monitored for configuration drift using Azure Automanage:
- Machines Insights Monitoring
- Backups
- Microsoft Defender for Cloud
- Microsoft Antimalware
- Update Management
- Change Tracking and Inventory
- Guest configuration
- Boot Diagnostics
- Windows Admin Center
- Azure Automation Account
- Log Analytics Workspace
You can view more details on the services here:
https://docs.microsoft.com/en-us/azure/automanage/automanage-windows-server#participating-services
To enable Azure Automanage for your existing Windows servers, follow these steps:
- Log in to the Azure portal at https://portal.azure.com.
- Search for Automanage – Azure machine best practices and select a service to open.
- Click on Automanage machines, then click on Enable on existing machine.
- Select a configuration profile you would like to use. You can click on View Azure best practices profiles to view more details on each of the best practices being applied.
- Click Select machines to view all machines and select the ones you would like to apply the profile. Click Select, then click Enable.
If you would like to create a custom profile for your Windows servers, follow the instructions provided here:
https://docs.microsoft.com/en-us/azure/automanage/virtual-machines-custom-profile
There is an overwhelming number of tools and services available in Azure that support the management of both on-premises and cloud deployments of Windows infrastructure. Visit the following link to view a comprehensive list of all Azure services: https://azure.microsoft.com/en-us/services/
In this section, we covered many of the Azure services used to manage Windows servers. These services included the Azure portal and Marketplace, ARM, RBAC, Azure Backup, ASR, Azure Update Management, Azure Arc, and Azure Automanage. Next, let's look at how to securely connect to Windows servers remotely.
Connecting securely to Windows servers remotely
Careful consideration should be made when setting up and configuring remote access in your environment. It's important to have a well-defined access model in place, keep access points to a minimum, and limit the availability of these access points from over the internet. Allowing remote access directly over the public internet significantly increases risks and could easily allow an attacker to gain access to your servers. If possible, it's best to eliminate internet availability entirely by properly configuring secure remote access tools and using virtual private network (VPN) connections. Let's look in more detail at the tools you can use to enforce a secure remote access policy.
Remote management and support tools
Remote management is a critical task that is needed to support both your end users and the infrastructure within your environment. There are many solutions available to help remotely manage and access your environment in a secure manner. The types of users that will require remote access will include system administrators, business developers, security teams, and IT support staff for accessing end-user devices. Ensure whichever remote support tool is selected is thoroughly reviewed and provides as secure a connection as possible. In remote support scenarios, it's also important that support staff cannot connect to your user's device unattended without the user's proper consent, as this could become a liability issue.
For managing your infrastructure remotely, most system administrators will likely leverage tools such as RDP or PowerShell. Just as with end-user support, there are many options available for remote management with RDP. As an organization, you should define and enforce policies that specify exactly how remote management tasks are handled. Let's look at a few recommendations to consider in your remote access strategy, as follows:
- Never allow direct remote management from the internet.
- Only allow access from a PAW or use a VPN at a minimum.
- If a server must be accessible from the public internet, change the default RDP port from 3389.
- User separate accounts or PAM to manage account access to servers.
- Enforce MFA when applicable.
- Use strong encryption methods for remote connections and limit where connections can originate from. For example, you can lock down access by certain locations or device types.
- Minimize the number of support staff accessing your infrastructure and servers.
- Monitor and audit all access to your infrastructure and servers.
Tip
To limit interactive logons to servers, you can deploy RSAT to administrative workstations:
https://docs.microsoft.com/en-us/windows-server/remote/remote-server-administration-tools
Next, let's look at controlling access by using JIT access and Azure Bastion services to provide additional security within your remote access management strategy.
Using Microsoft Defender for Cloud JIT access
As a feature of Microsoft Defender for Cloud, JIT allows you to access systems by controlling or gating access at the network layer in Azure. Resources in Azure typically sit behind a firewall or network security group (NSG) that controls allow/deny rules for network protocols and connectivity. JIT works by creating or modifying NSG and firewall rules programmatically to only allow remote access protocols for a specified time. Ports that you would like to be available are configured through the JIT access configuration. For example, when a user needs JIT access, they issue an access request through Microsoft Defender for Cloud. A workflow approval process is started, and once approved, the solution automatically adds an inbound rule opening the configured ports on the resources' NSG or firewall. The network traffic is allowed for the duration of time specified in the access request, and once the time allotment expires, the NSG rules are returned to the previous deny state. Configuring access to the request workflow can be controlled using a custom RBAC role that can be assigned directly to users or groups. The RBAC role must contain the following actions:
- Microsoft.Security/locations/jitNetworkAccessPolicies/initiate/action
- Microsoft.Security/locations/jitNetworkAccessPolicies/*/read
- Microsoft.Compute/virtualMachines/read
- Microsoft.Network/networkInterfaces/*/read
We covered creating a custom role earlier in the Using Azure services to manage Windows servers section. To read more information about the resource policy providers, visit https://docs.microsoft.com/en-us/azure/role-based-access-control/resource-provider-operations.
Tip
These policies must be scoped to the subscription or resource group in which the VM and network interface reside.
Further information about Microsoft Defender for Cloud JIT access can be found at https://docs.microsoft.com/en-us/azure/defender-for-cloud/just-in-time-access-usage.
Let's create a JIT access rule that allows for RDP over port 65001. While it's not recommended to expose servers directly to the internet, this can be useful if a jump box is needed until stronger access controls can be put into place. Earlier, in Chapter 4, Networking Fundamentals for Hardening Windows, we provided an example of how to modify the default listening port for RDP to 65001 on a Windows Server. If you don't have Microsoft Defender for Cloud enhanced security and wish to follow the example, you can enable a free 30-day trial and continue with the step-by-step instructions, as follows:
- Open Microsoft Defender for Cloud by searching for it in the Azure portal.
- Click on Workload protections and choose Just in time VM access in the Advanced protection section.
- In the Virtual Machines section, click on Not Configured to view VMs that can be configured for JIT VM access to be applied.
Tip
The Unsupported tab lists VMs that may either not be running or are not protected by an NSG.
- Select the VM with the modified RDP port. Choose Enable JIT on 1 VMs.
- On the JIT VM access configuration page, default port rules are already created. Let's add a new rule to add port 65001.
JIT VM access configuration already has default rules for the following ports:
- Port 22 is common for SSH.
- Port 3389 is the default RDP port.
- Port 5985 and 5896 are WinRM HTTP/HTTPS ports.
- Click on Add and enter 65001 for the port number, choose TCP for the protocol, and leave Allowed source IPs as default. Leave the Max request time field at 3 hours. Click on OK.
- Click on Save.
Let's look at the new configuration as applied to the NSG. In the Azure portal, navigate to the VM we selected and click on Networking under Settings. In the following screenshot, notice a new inbound augmented security rule called SecurityCenter-JITRule that has all the ports specified in the configuration. By default, the action is set to Deny:
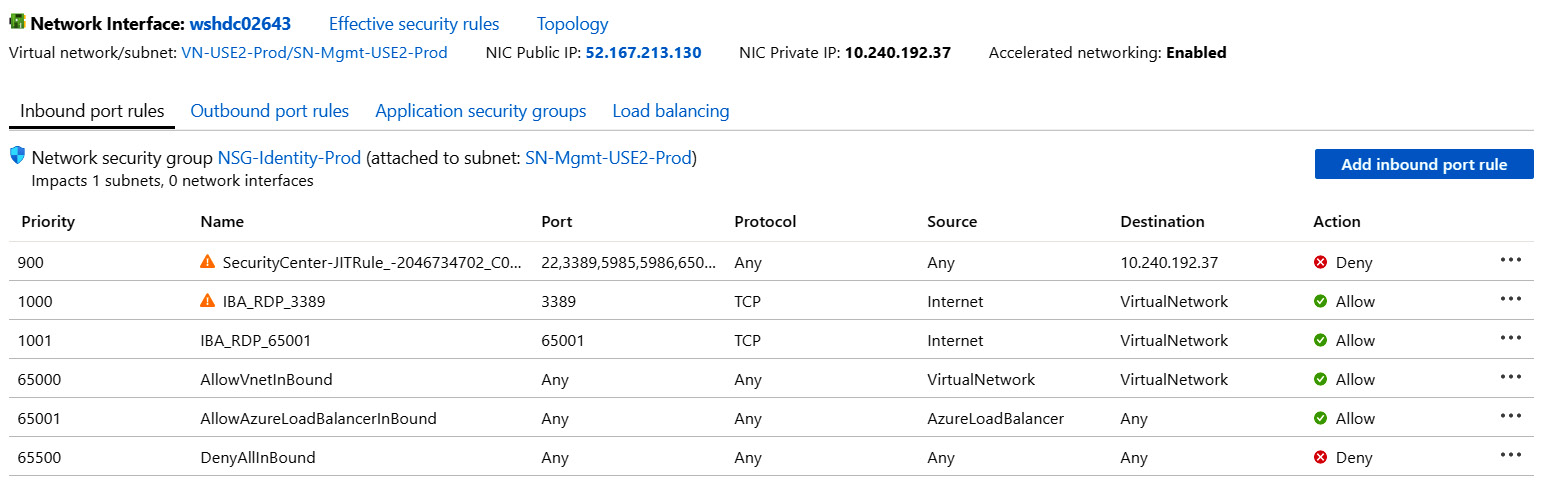
Figure 11.20 – NSG in Azure
Tip
Security Center JIT rules default to a priority of 4096, which is the highest integer value that you can set in a custom security rule. If custom rules were created to allow RDP previously, modify the priority of the new Security Center rule to be a lower integer, or delete the previous rules.
Once the JIT access rule has been configured, RDP will effectively be blocked. To request access, follow these steps:
- Navigate to Microsoft Defender for Cloud in the Azure portal.
- Choose Just in time VM access within Workload protections.
- Under the Configured tab, select the VM to RDP into, and choose the Request Access button.
- Toggle the rule for port 65001 to On and select My IP in the Allow Source IP column. We can leave the time range at 3 hours.
- Enter a justification and choose Open Ports.
The following screenshot shows the custom port rule we created. During the access request, you can specifically choose the ports you need for connectivity:

Figure 11.21 – JIT VM access
If the appropriate RBAC is applied to request access to a VM, the access request will be approved, as indicated in the Last access column in the following screenshot:

Figure 11.22 – JIT access rule over port 65001 showing as active
The RDP over port 65001 is now active. Browse back to the VM network interface inbound port rules. A new Allow rule has been added using your public IP as the source, as seen in the following screenshot:

Figure 11.23 – Active JIT rule
Following the approval of the JIT rule, the source is configured from your public Internet Protocol version 4 (IPv4) address. Network address translation (NAT) is automatically handled in Azure to allow for connectivity to the host VM with a private IP address. To connect to this server with RDP, enter the port number at the end of the IP address. In this example, 52.167.213.130:65001 would be used to create a connection.
Next, let's look at using the Azure Bastion service to connect to a VM without having to expose the host directly to the public internet.
Connecting with Azure Bastion
Azure Bastion is a PaaS service in Azure that allows for SSL-secured RDP or SSH connections directly to VMs from the Azure portal. It's a great alternative method for secure remote connections to internal resources without the need for a VPN or jump box.
To configure Azure Bastion, an isolated or bastion subnet is deployed directly inside your VNet IP range. This allows all RDP and SSH traffic to remain inside of your private VNet and keeps these protocols from being exposed over the internet. This helps protect your hosts from threat actors looking for targets with active port scanning and significantly reduces the attack surface. Your internal resources can remain on your private IP scheme without the need for a public IP address. To connect to a host, Azure Bastion supports RDP or SSH with HTML 5.
In this example, let's look at configuring Azure Bastion to connect to a host. To deploy the Azure Bastion service, a bastion subnet will be created inside your VNet, named AzureBastionSubnet. It must contain a minimum Classless Inter-Domain Routing (CIDR) range of /27 to support this service. The subnet must be created first before creating a bastion. Proceed as follows:
- Log in to the Azure portal at https://portal.azure.com.
- Search for Bastions and select Bastions under Services.
- Click on Create Bastion.
- Select your Subscription type and choose a Resource group type. We selected the resource group our VNet was in.
- Give it a friendly name and choose the region your resources are in.
- Select your VNet and choose AzureBastionSubnet.
- Create a new IP address and give it a friendly name.
- Click on Review + Create. Then, select Create.
Tip
Azure Bastion does not support customized TCP ports. If you are using the VM configured earlier, the RDP listening port must be changed back to 3389 or you will receive a bad connection error. Additionally, NSG rules will need an allow rule to open access to the default 3389 RDP port, and any JIT access rules need to be accounted for or connections may be blocked.
To connect to a VM with Azure Bastion, follow these steps:
- Go to the Virtual Machines pane inside the Azure portal.
- Search for your VM and select it to bring it up in the Overview pane.
- Click on Bastion under Operations.
- Enter the VM's administrator username and password and click on Connect.
You may have to allow popups if your pop-up blocker is enabled. The following screenshot shows the Connect to virtual machine menu:
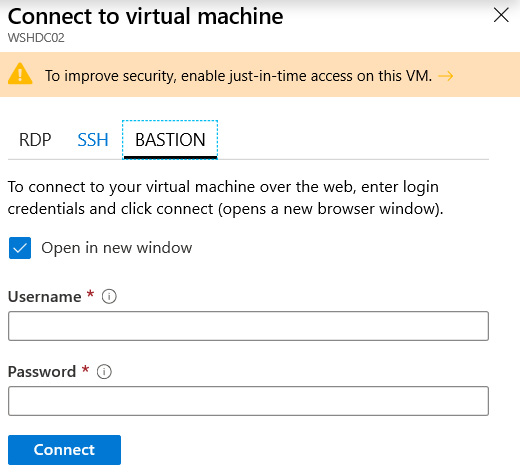
Figure 11.24 – Azure Bastion connection
Select the BASTION tab to connect.
Summary
In this chapter, we provided an overview of the traditional on-premises data center, hybrid, and cloud models. Within the cloud model, we covered three primary service offerings known as IaaS, PaaS, and SaaS. Next, we reviewed implementing access management as it relates to both physical and user access to Windows servers and infrastructure. We then covered using the tiered model approach in AD and best practices around implementing the privileged access strategy model.
The following section covered Windows Server management tools. We reviewed local tools such as Server Manager and Event Viewer and discussed deploying Windows Updates using WSUS and managing servers remotely with Windows Admin Center. We then moved on to Azure services for managing Windows servers both on-premises and in the cloud. In this section, we provided details about the Azure portal, using the Marketplace, permissions with RBAC, ARM Azure Backup, Azure Update Management, ASR, Azure ARC, and Azure Automanage. We finished off the chapter with an overview of connecting securely to servers remotely. We hope the acknowledgment of these services has sparked an interest to research further and see how these services can be implemented in your own environment to help increase your overall security posture.
In the next chapter, we focus on keeping your Windows Server secure. This chapter will cover the Windows Server versions, including reviewing the various server roles, configuring Windows updates, protecting servers with Microsoft Defender for Endpoint, and other strategies to harden Windows Server.