Chapter 12: Keeping Your Windows Server Secure
In this chapter, we will discuss best-practice recommendations for hardening Windows Server. We will review the available Windows Server versions, cover new security features in Windows Server 2022, and discuss the built-in roles and features that add functionality to server deployments. Next, we will cover onboarding Windows Server into Microsoft Defender for Endpoint to enable endpoint detection and response (EDR) capabilities and deploy Windows Defender security baselines. Then, we will review deploying security updates with Windows Server Update Services (WSUS) and Azure Automation Update Management. Keeping servers updated with the latest patches and virus definitions could be considered by many the number 1 recommendation for overall hardening. It also requires the most operational overhead, and these two technologies are foundational in that regard.
Next, we will cover the security controls on Windows Server by implementing a security baseline using recommendations from Microsoft and CIS. We will provide general hardening tips and discuss controls for managing accounts and securing the logon and authentication process. We will finish the hardening section by covering disk encryption with Azure Disk Encryption and provide an example of how to apply application control policies with Windows Defender Application Control. Finally, we will finish this chapter by reviewing PowerShell security and Just Enough Administration (JEA).
In this chapter, we will cover the following topics:
- Windows Server versions
- Security roles in Windows Server
- Configuring Windows updates
- Configuring Windows Defender
- Hardening Windows Server
- Application control policies using WDAC
- Implementing PowerShell security
Technical requirements
To follow the examples in this chapter, you will need basic knowledge of PowerShell, access to add server roles and features, and the permissions to modify Group Policy and deploy resources in Azure. The following products and tools will be referenced:
- Windows Server 2022 Core and Desktop versions
- WSUS
- An Azure subscription with contributor rights
- Licensing for Microsoft Defender for Cloud
- PowerShell, including the Azure PowerShell Az module
Windows Server versions
Many servers hosting workloads that contain sensitive data run critical services, and host applications are likely to run in Windows environments. Any security breach inside the server environment has the potential to cause significant damage and loss of data. Windows Server contains many security controls built directly into its operating system, but they may not necessarily be enabled by default.
Just like with Windows clients, there is no one solution or collection of settings that provides a silver bullet in terms of defense for servers. It will require adding security layers that introduce boundaries to make it more difficult for attackers to break through. The number of layers varies by organization and it's up to your company to determine what features to enable that fit your security stature. During the hardening process, enable small subsets of controls at a time, followed by performing rigorous testing and validation to ensure functionalities are not interrupted until your baseline controls are satisfied. As mentioned in Chapter 1, Fundamentals of Windows Security, organizations such as NIST can offer guidance for making the decisions that are needed that help define your security stature.
The topics in this book mainly focus on features that are available in Windows Server 2016 and later. Many of the features we will cover may be available in earlier versions too, but we recommend reviewing this further if a version is not specifically mentioned. Windows Server follows Microsoft's life cycle policy and currently supports versions of Windows Server 2008 and 2012 hosted in Azure until 2024 and 2026 if extended support is purchased. In addition to the life cycle policy, it is important to be familiar with the release and servicing options. These can be reviewed at https://docs.microsoft.com/en-us/windows-server/get-started/windows-server-release-info.
To view the life cycle for a specific Windows Server version, go to https://docs.microsoft.com/en-us/lifecycle/products/?products=windows.
Tip
Starting with Windows Server 2022, the Long-Term Servicing Channel (LTSC) is the only release channel available.
Windows Server 2022 has three editions to choose from: Standard, Datacenter, and Datacenter: Azure Edition. The Datacenter versions provide additional features over the Standard version, and each edition has the following installation options available:
- Desktop Experience is the traditional deployment of Windows Server and includes a graphical user interface (GUI). This option is only available in the LTSC version.
- Server Core has a smaller OS footprint and doesn't include the GUI.
- Nano Server was first introduced in Server 2016, has an even smaller footprint than Server Core, and can only be remotely administered. A couple of examples include using Nano Server for Internet Information Services (IIS) or a DNS server. This option is only available as a container-based Windows image.
Windows Server now includes a version called Secured-core. A Secured-core server contains certified hardware from equipment manufacturers and OEMs that provide support for the latest hardware-based security features. These hardware and firmware-based security capabilities include System Guard and virtualization-based security. Secured-core servers can be found at Azure Stack HCI or the Window Server catalog at https://www.windowsservercatalog.com/noresults.aspx?1&bCatID=1333&cpID=0&avc=10&ava=0&avt=0&avq=140&OR=1&PGS=25#/catalog?FeatureSupported=securedCoreServer.
When choosing an installation option, it's recommended to use the most minimal installation option possible to reduce the footprint of the server. Deploying a server without a GUI and limiting logon types to remote administration using tools, such as PowerShell and Microsoft Management Console, is a significant security improvement and should be implemented as a standard best practice.
Windows Server 2022 includes the following new security highlights:
- Hardware-based security features are available in Secured-core PCs such as UEFI Secure Boot, VBS, and hardware root-of-trust.
- Secured protocols such as HTTPS and TLS 1.3 are enabled by default.
- Support for DNS-over-HTTPS (DoH) for secure DNS.
- Supports the latest cryptography for SMB with automatic negotiation for the highest cryptography suite possible. SMBv1 is disabled by default.
- Support for SMB over QUIC (https://docs.microsoft.com/en-us/windows-server/storage/file-server/smb-over-quic).
- Support for hotpatching using Azure Automanage in Windows Server 2022 Datacenter: Azure Edition. Hotpatching allows you to install updates on VMs that don't require a reboot after installation to maintain uptime.
The following URL provides a list of all the new features of Windows Server 2022: https://docs.microsoft.com/en-us/windows-server/get-started/whats-new-in-windows-server-2022.
Next, will we review Windows Server's roles and list features that have security-specific components to help you secure your environment.
Security roles in Windows Server
Server roles and features in Windows Server help add additional functionality to your Windows deployment. For example, a basic DNS server role allows you to create a catalog of computer name-to-IP mappings for name resolution services on your internal network. As additional roles are installed on a server, new services become enabled, so it's critical that hardening is taken into consideration to ensure vulnerabilities aren't exposed due to misconfigurations. As a best practice, it's recommended not to install any unnecessary roles on servers for the most secure configuration. For example, on a domain controller (DC), you should not enable additional roles other than Active Directory domain services and DNS services. A DC holds the keys to authentication and hardening will be different than that of a server that hosts a web application and the IIS web server role. Any misconfigurations could provide a hacker with the opportunity to exploit or infiltrate your environment.
Some examples of roles and features in Windows Server 2022 that include security-related features are as follows:
- Active Directory Certificate Services
- Active Directory Domain Services
- Active Directory Federation Services
- Active Directory Rights Management Services
- Device Health Attestation
- Host Guardian Service
- Network Policy and Access Services
- Remote Access
- Remote Desktop Services
- Windows Server Update Services
- BitLocker Drive Encryption
- BitLocker Network Unlock
- Group Policy Management
- Remote Server Administration Tools (RSAT)
- Windows Defender Features (installed by default)
- Windows PowerShell (installed by default)
The following URL provides a complete list of all Windows Server 2022 roles and features that are available in each edition: https://docs.microsoft.com/en-us/windows-server/get-started/editions-comparison-windows-server-2022.
Reducing the Windows Server footprint
Any opportunity where unnecessary roles and features can be reduced, or actions that can be enforced to limit the amount of direct interaction with the server, should be taken. For example, if Windows Server Core has a role for Active Directory domain services, it is recommended to deploy it using Server Core. Once deployed as a Core version, this role can be fully managed through remote tools such as PowerShell, Microsoft Management Console (MMC), and Windows Admin Center. This significantly reduces your threat footprint. Most of the roles and features that are included with the Desktop Experience are also supported by Server Core.
When you're planning for a new deployment of Windows Server, you can consult the following link to determine if the feature is supported in Server Core: https://docs.microsoft.com/en-us/windows-server/administration/server-core/server-core-roles-and-services.
Enabling features on Server Core 2022
Server Core is a lightweight installation option that's available for Windows Server and has fewer roles to choose from but is the most secure option. As we mentioned earlier, with a Sever Core deployment, you can use remote management tools such as PowerShell, MMC, and Windows Admin Center to manage the server without having to log directly into the physical system. The option to install Server Core can be chosen at installation time or by selecting it from the Plan dropdown when choosing an image from the Azure Marketplace:
Figure 12.1 – Windows Server 2022 Datacenter
After the installation is complete, you will be asked to configure a local administrator account to log in. Then, you will be brought to the SConfig screen, which will present several menu options. Let's look at how to install a role.
Using PowerShell, let's install WSUS on Windows Server 2022 Core edition by following these steps:
- Deploy Windows Server 2022 Core using the installation wizard or through the Azure Marketplace.
- After logging into Windows Server Core, choose the Exit to command line (PowerShell) option.
- Type Install-WindowsFeature UpdateServices and press Enter.
- The installation will take a few minutes. After it completes, it will look as follows with an Exit Code of Success:
Figure 12.2 – Installing WSUS in Server Core
The WSUS feature is now enabled. We will complete the configuration in the next section.
Next, let's learn how to configure services to manage the deployment of Windows updates to servers, including using WSUS and Azure Update Management.
Configuring Windows updates
One of the top recommendations for hardening Windows Server is to run the latest version of the OS with the latest security patches installed. To be able to install the latest updates, the Windows machine must be able to download and install updates directly from Windows Update or a software update distribution point. Just like Windows clients, you can configure Windows Update for Business policies on servers with Group Policy, but this won't allow for fine-grained control regarding the approval and timing of update deployments. To accommodate this scenario, WSUS has been the standard method for deploying Windows updates for on-premises deployments.
WSUS allows companies to effectively manage, distribute, and orchestrate update installations to clients and servers to maintain security compliance and patch-level continuity within the environment. A WSUS deployment is a great method for deploying updates, but it does have prerequisites that require deploying infrastructure to support its functionality. To get around these requirements, Microsoft offers an alternative solution for Azure customers known as Azure Automation Update Management. Using Update Management, IT can manage both Windows and Linux updates for cloud and on-premises resources without the need for a WSUS implementation.
We provided an overview of WSUS and Azure Automation Update Management in Chapter 11, Server Infrastructure Management. Additionally, if you don't want to allow servers to have direct connectivity to Windows Update services, you can configure a WSUS instance in a DMZ and securely distribute update packages on your internal network in Azure.
Now, let's learn how to configure WSUS on Windows Server Core and configure Windows Update Group Policy to onboard clients.
Implementing WSUS
Earlier, in the Enabling features on Server Core 2022 section, we installed the WSUS role within Windows Server Core. Before we can access the management console, there are a few post-installation tasks to complete. Let's use PowerShell to complete these tasks:
- Log back into your Windows Core WSUS server and choose the Exit to command line (PowerShell) option from the Sconfig menu.
- Enter each of the following commands one at a time to complete the setup process:
New-Item -Path "c:" -Name "WSUS" -ItemType "directory"
CD "C:Program FilesUpdate ServicesTools"
.wsusutil.exe postinstall CONTENT_DIR=C: "WSUS"
After the post-installation activities are complete, we can install RSAT on a Server Desktop edition or Windows client to manage WSUS remotely.
Let's install them on a Windows 2022 Desktop edition by completing the following steps:
- Log onto a Windows Server that's used for management and open Server Manager.
- Click on Manage, then Add Roles and Features.
- Click Next (leave everything with the default settings) until you get to Features.
- Scroll down to Remote Server Administration Tools and expand the menu, expand the Role Administration Tools menu, and then select Windows Server Updates Services Tools.
- Click Next, then Install. Click Close once the installation is complete.
Now, we can use the MMC to connect to the Windows Server Core WSUS server and configure it further:
- Search for Windows Server Update Services and open it.
- Click Connect to Server in the Actions menu. The following dialog box will appear:

Figure 12.3 – Connecting to the WSUS server
- Enter the WSUS Server name or IP that was configured, leave the port as 8530 if SSL is not configured, and then click Connect.
Tip
The following guide provides instructions on how to configure and enable SSL for your WSUS environment: https://docs.microsoft.com/en-us/windows-server/administration/windows-server-update-services/deploy/2-configure-wsus#25-secure-wsus-with-the-secure-sockets-layer-protocol.
- In the WSUS Configuration Wizard, click Next, then Next. Select Synchronize from Microsoft Update and then click Next.
- If you're using a proxy, select Use a Proxy and then enter the required information. If not, leave this unchecked and click Next. Then, click Start Connecting (this step may take a while to complete).
- Once complete, click Next, select the languages needed, and click Next.
- Select all the products you want to scope into WSUS management and click Next.
- Select Classification of Updates. At a minimum, select Critical Updates and Security Updates. Then, click Next.
- Select Synchronize automatically and schedule your first sync (Outside of Business hours). Select how many times you wish to sync per day and click Next.
- Select Begin initial synchronization and click Next. Click Finish to view the management console. You should see an overview similar to the following:
Figure 12.4 – WSUS management console
Additional configurations, including modifying those chosen during setup, can be viewed by clicking on Options in the left management pane under Update Services.
A few additional configurations are needed before we can connect clients to WSUS. First, we must create a computer group that can be used to test updates. Computer groups allow you to organize groups of clients and servers to schedule update deployments. Navigate to and expand the Computers menu, right-click All Computers, and then click Add Computer Group…. Name your group and then click Add.
Next, we will configure WSUS so that it uses Group Policy to efficiently manage the auto-configuration of Windows servers. To do this, choose Options within the management console and click on Computers. Change the option to Use Group Policy or registry settings on computers and click OK.
Finally, we are ready to configure Group Policy so that it instructs your Windows servers where to connect for Windows updates:
- Open the Group Policy Management Console and create a new GPO in an OU where there are server computer objects.
- Browse to Computer Configuration | Policies | Administrative Templates | Windows Components and select Windows Updates.
- Configure the following settings:
- Set Configure Automatic Updates to Enabled. Choose the options that fit your preferences.
- Set Specify intranet Microsoft update service location to Enabled. Add your WSUS server to the Set the intranet update service for detecting updates and Set the intranet statistics server settings. Use the http://servername.domain.com:8530 format for HTTP or https://severname.domain.com:8531 for HTTPS if you're using an SSL.
- Set Enable client-side targeting to Enabled. Enter the group name that you created within the WSUS management console for testing.
The following screenshot shows the three settings you need to configure within the GPO to force WSUS to be the update endpoint for your Windows servers:
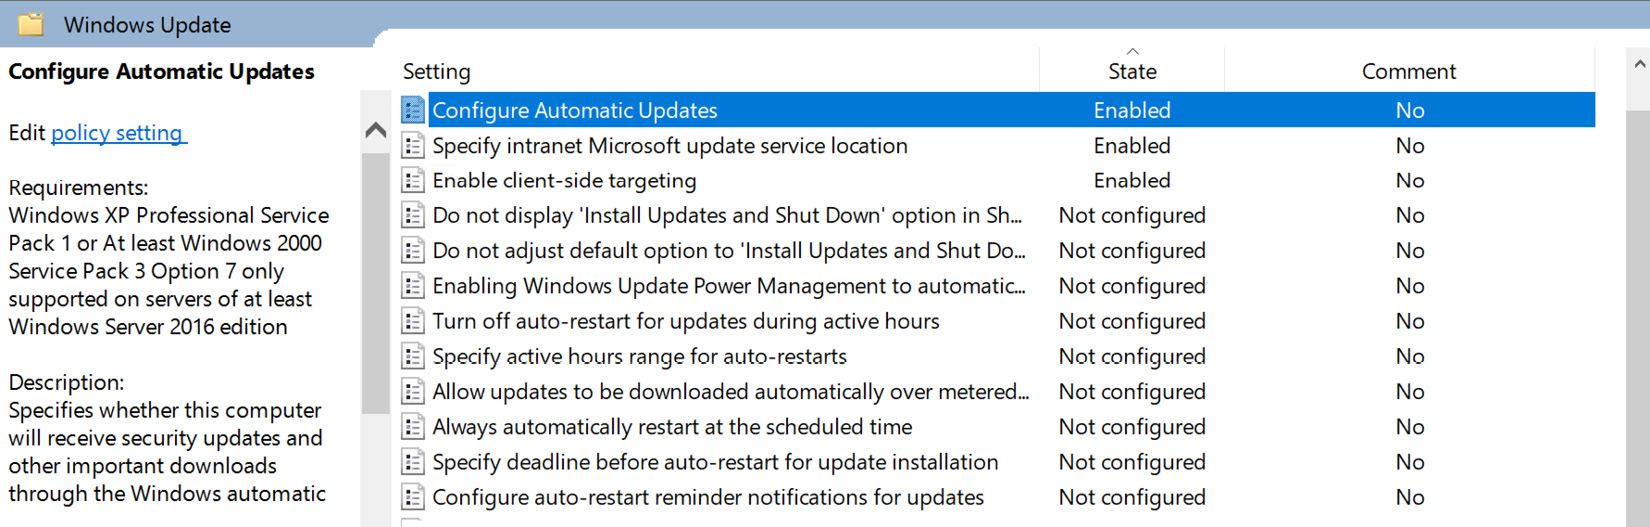
Figure 12.5 – Group Policy configuration
Now that the servers have been configured to connect to the WSUS server, the last step is to approve and push the updates to the clients:
- From the WSUS management console, browse to Updates and click Updates needed by computers on the main screen. Select all the available updates that need to be deployed, right-click, and then click Approve to open the Approve Updates dialog box, as shown in the following screenshot:

Figure 12.6 – Approve Updates
- Click the group you would like to deploy to (your test group, if it's the first time you're installing the patch), select Approved for Install, and click OK. The updates will be installed at the scheduled time you configured within Group Policy.
To help reduce the administrative overhead with approving updates, you can configure automatic approval rules in WSUS. Each computer group can have different rules and include settings for installation deadlines that will force the installation of updates to meet compliance requirements. Update types that are good candidates for automatic approval rules include critical security updates and antivirus definition updates.
To set up automatic approvals, browse to Options within the WSUS management console and click on Automatic Approvals to set up the rules.
Next, we will review Azure Automation Update Management. Update Management is a cloud-based solution that includes support for Linux and Windows servers, both on-premises and in Azure. In addition, Update Management is provided as a service within Azure and can eliminate the need for on-premises resources to support a WSUS deployment. Currently, Update Management in Azure does not support Windows clients.
Implementing Azure Automation Update Management
To use Update Management in Azure, you will need permissions to create the following resources in addition to having an active Azure subscription:
- Log Analytics Workspace to collect and analyze the data
- Azure Automation Account to be able to configure Azure Automation Update Management
- Resource Group to store the Log Analytics workspace and Automation account
Update Management works by installing an agent on a server known as the Log Analytics VM extension. The extension is configured with the workspace ID of the Log Analytics workspace to send telemetry data into Azure. This is then analyzed by the Update Management solution in Azure Automation. Update Management gets the latest Windows updates and compares them to what's installed on your servers and allows you to review, assess, and schedule a deployment directly in the Azure portal. The installation orchestration of Windows updates is handled by the Azure Automation Hybrid Runbook Worker role. This worker allows automation runbooks to be executed directly against local resources on the target server.
For the server to be able to download available Windows updates, it must have connectivity to Microsoft update services, a WSUS server, or a similar repository. Onboarding virtual machines into Update Management is handled directly through the Azure portal; otherwise, the agent can be downloaded and deployed using an offline application installation methodology. To allow servers to send data into Log Analytics, there are a few additional networking requirements. Details can be found at https://docs.microsoft.com/en-us/azure/automation/automation-network-configuration.
First, let's create the Automation account and Log Analytics workspace:
- Log into https://portal.azure.com and search for Automation Accounts.
- Click Add and enter a Name, Subscription, Resource group, and Location.
- Choose Yes to create an Azure Run As account and click Create, as shown in the following screenshot:
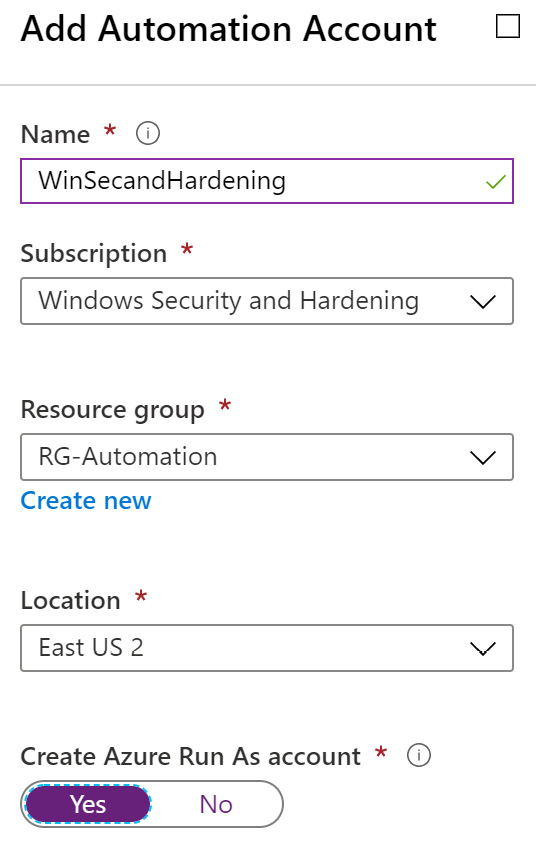
Figure 12.7 – Add Automation Account
- Once the Automation account has been created, click on it to view the overview.
- Click on Update Management within the Log Analytics Workspace section, click the drop-down menu, select Create New Workspace, and click Enable.
- Once complete, choose Update Management to get to the overview pane, as shown here:
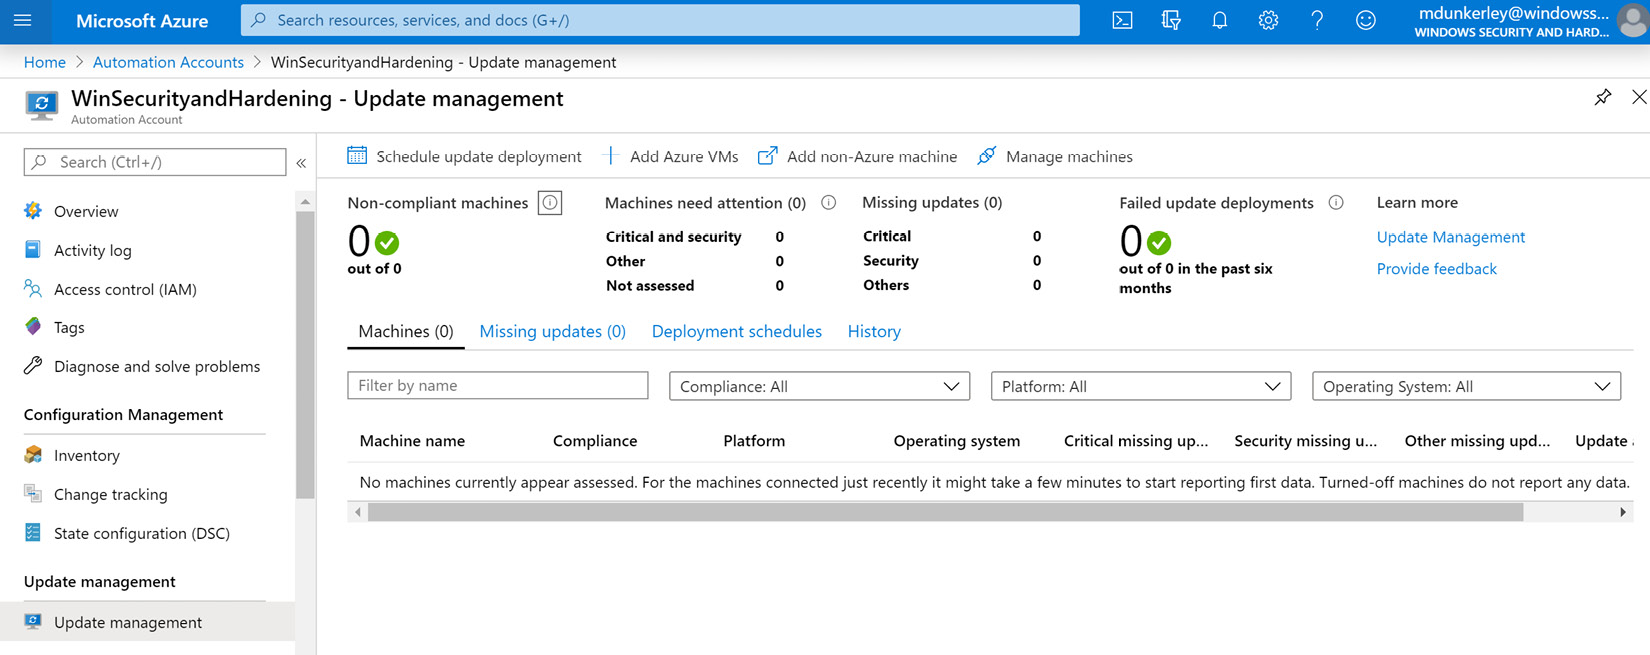
Figure 12.8 – Azure Update Management console
Now that the Update Management solution has been configured, we can onboard virtual machines using the following methods in the Azure portal:
- From within the VM settings in Azure, click on Update Management and then click Enable.
- From within the Update Management console, click on Add Azure VMs. Select the VMs you would like to enable and then click Enable.
Once VMs have been enabled, it can take up to 6 hours for the telemetry data to become available in Log Analytics. Once the data has populated, the update data will be parsed in the Update Management solution, and you will see the overview dashboard populated with data, as shown here:
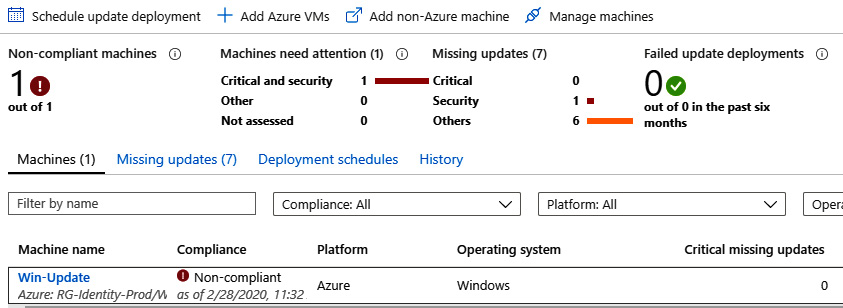
Figure 12.9 – Azure Update Management console
Tip
The following article provides troubleshooting advice for Update Management: https://docs.microsoft.com/en-us/azure/automation/troubleshoot/update-management.
To add non-Azure VMs, you will need to manually install the agent on the machines and configure the workspace ID and primary key of the Log Analytics workspace. The agent can be deployed using any enterprise deployment tool such as Configuration Manager or Group Policy and can be found by following these steps:
- Open the Log Analytics workspace that's connected to your Automation account.
- In the Overview section, click Agents Management under Settings.
- Click on Windows servers and download the 32 or 64-bit Windows agent. Make note of the Workspace ID, Primary key, and Secondary key details.
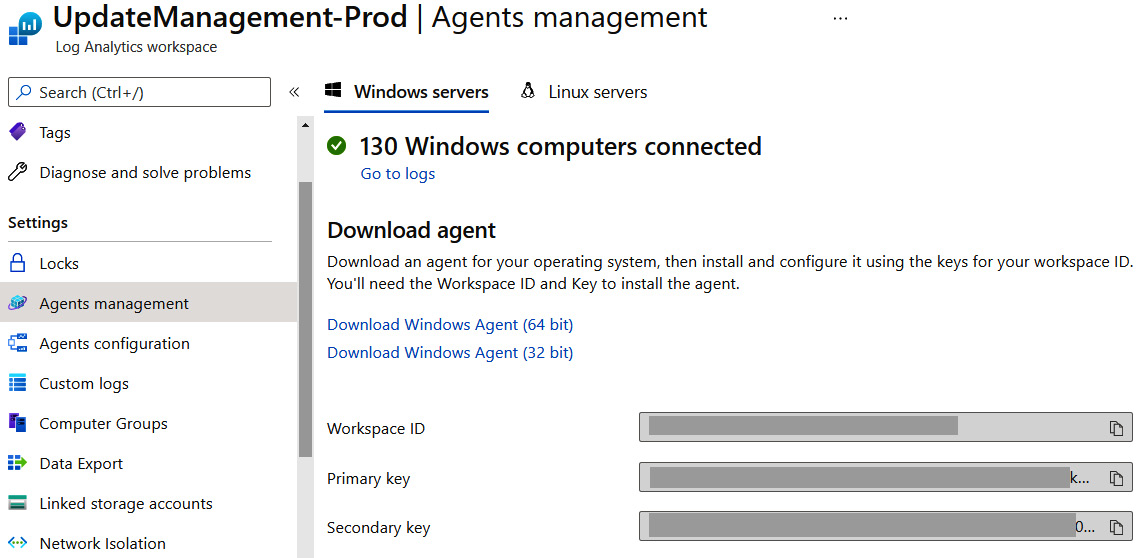
Figure 12.10 – Log Analytics – Download agent
- Log on to the Windows server, install the downloaded agent, and configure the workspace ID and key following the onscreen instructions. The Microsoft Monitoring Agent applet is available through the control panel, and you can view the status of the connection or add additional workspaces, as shown here:
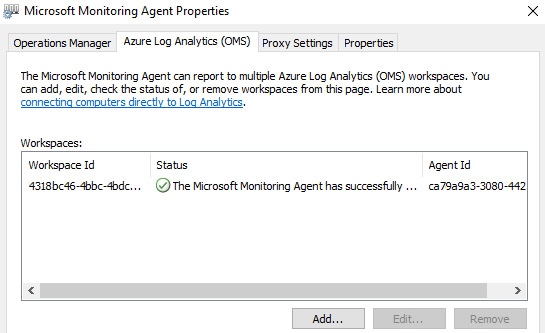
Figure 12.11 – Microsoft Monitoring Agent Properties
- Once the workspace ID has been configured and enough time has passed to allow for data collection, an additional step is needed to enable it for Update Management. Browse back to the Update Management console within your Automation account and click Manage Machines to add the server.
Now, we can schedule when updates are deployed by configuring a deployment schedule. You will notice many similarities to WSUS, including options to select the update classification, choose specific machines or machine groups, include or exclude specific updates, configure scheduling, and set reboot options. To configure a deployment schedule, follow these steps:
- Open Update Management from Automation Accounts and click on Schedule update deployment.
- Complete the setup by providing the required information to create your new update deployment. Some of the available settings can be seen in the following screenshot:
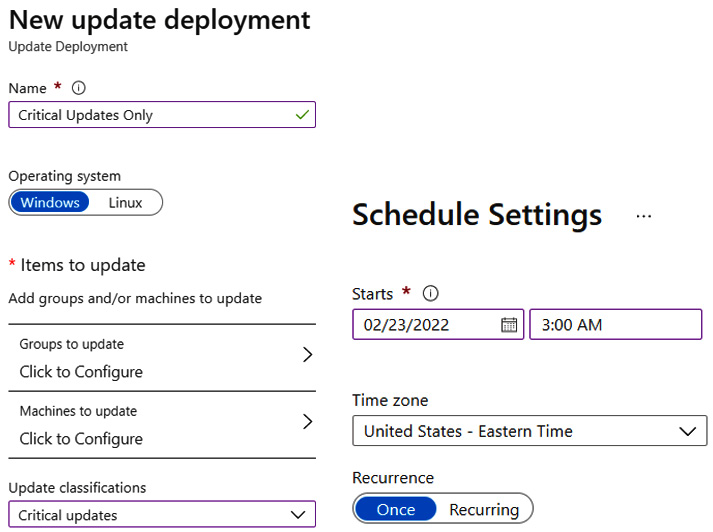
Figure 12.12 – New update deployment
- Click Create once you're finished.
The deployment schedule is now active, and you can use the Update Management console to track the overall compliance of the deployment. In the following screenshot, Non-compliant machines is 0. This means that all the latest available updates that have been scoped in the deployment schedule have been deployed:

Figure 12.13 – Azure Update Management console with a compliant server
Tip
When choosing Update Classifications in your deployment schedule, don't forget to include Definition Updates if you're using Microsoft Defender Antivirus.
Update Management still relies on client-specific policies for automatic update behavior. For additional information about configuring update settings on servers connected to Azure Automation Update Management, visit https://docs.microsoft.com/en-us/azure/automation/update-management/configure-wuagent.
Alert rules can be configured in Azure Monitor to help track the status of scheduled deployments in Update Management. To learn more about the available configurations, we recommend reviewing the details at https://docs.microsoft.com/en-us/azure/automation/update-management/overview.
Keeping servers updated plays a critical role in any well-rounded security program. Today, many IT organizations have adopted minimum security standards that require systems to have the latest critical and security updates within 30 days of release to maintain compliance. It's necessary to have a solution in place that can effectively deliver and orchestrate update installations.
Next, let's look at onboarding servers to Microsoft Defender for Endpoint to take advantage of Microsoft's EDR capabilities.
Configuring Windows Defender
Microsoft Defender Antivirus or Windows Defender is the available antivirus solution for Windows Server. It is enabled by default, but the service can be toggled on or off by adding or removing the server role in Server Manager, or with PowerShell. Windows Server supports other third-party antivirus solutions and Defender is designed to run congruently alongside them if you enable passive mode or disable the feature. In Windows Server 2022, you can use the Windows Security app to configure features of Windows Defender such as Virus & threat protection settings and other advanced settings. To enhance server protection and enable EDR capabilities, Defender Antivirus for servers and other third parties is designed to work with Microsoft Defender for Endpoint. To view a list of benefits for connecting to Defender for Endpoint, visit https://docs.microsoft.com/en-us/microsoft-365/security/defender-endpoint/why-use-microsoft-defender-antivirus?view=o365-worldwide.
Defender for Endpoint was initially designed to support Windows clients but now includes support for Windows Server if you follow the onboarding process. Once the servers have been connected, the Microsoft 365 Defender portal can be used as a unified console to investigate threats and provide real-time protection and remediation capabilities across all onboarded endpoints. The following Windows Server versions are currently supported:
- Windows Server 2008 R2 SP1
- Windows Server 2012 R2
- Windows Server 2016
- Windows Server Semi-Annual Channel
- Windows Server 2019 and later
- Windows Server 2019 Core
- Windows Server 2022
Let's review a few methods for onboarding servers in bulk.
Connecting to Microsoft Defender for Endpoint
Onboarding Window Server requires both an installation and onboarding package, depending on the version. Any of the following methods can be used to deploy these components:
- Local script or Group Policy
- Microsoft Configuration Manager
- Microsoft Defender for Cloud
These components can be installed independently from one another or using the unified solution package from Microsoft. If you have previously onboarded Windows Server 2016 and below to Defender for Endpoint, it is recommended to migrate to the unified solution package. This will enable support for new advanced protection features such as blocking potentially unwanted apps, network protection, ASR rules, and tamper protection.
Onboarding with Microsoft Defender for Cloud
Onboarding servers can be completed automatically if you are using server protection in Microsoft Defender for Cloud. Auto-provisioning capabilities will automatically onboard servers to Defender for Endpoint, without requiring any additional steps. Defender for Cloud is designed to work congruently with Defender for Endpoint, adds additional vulnerability detection capabilities, and allows you to monitor Defender for Endpoint signals directly in the console in Azure. There are additional costs to using Defender for Cloud, depending on the plan you choose, and any data consumption costs for using Log Analytics to store telemetry data. The following screenshot shows the Auto provisioning feature from the Azure portal, which automatically onboards servers by deploying the Log Analytics agent for Azure VMs:
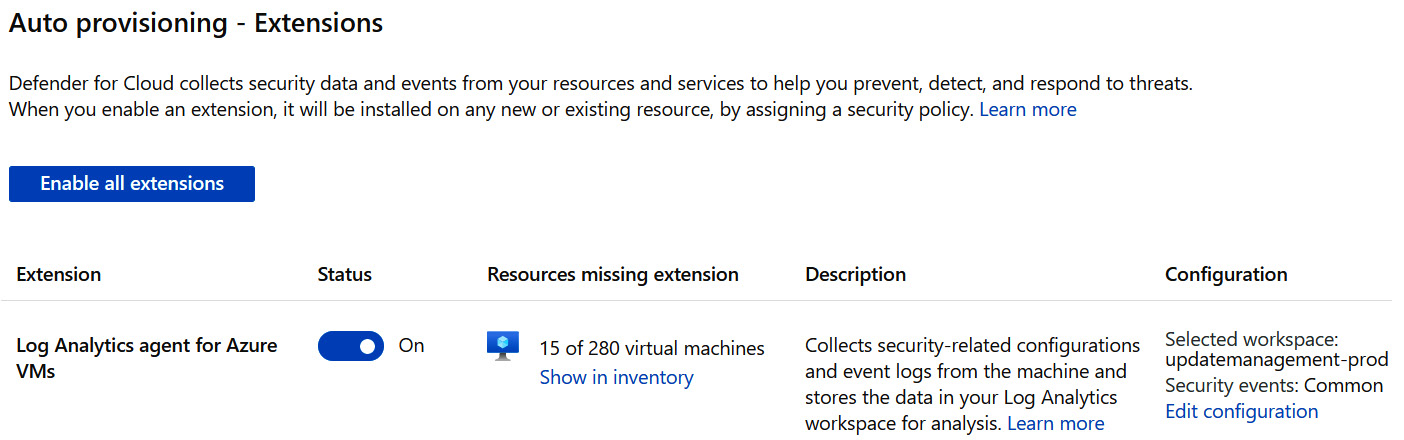
Figure 12.14 – Microsoft Defender for Cloud – Auto provisioning
For additional pricing information for Microsoft Defender for Cloud, visit https://azure.microsoft.com/en-us/pricing/details/defender-for-cloud/.
For Windows Server 2019 and above, only the onboarding package is required for Defender for Endpoint. Let's look at how to onboard Windows Server to Defender for Endpoint by using Group Policy.
Onboarding with Group Policy
In this example, we will use Group Policy to onboard Windows Servers 2019 and later. If you are looking to onboard Windows Server 2016 and earlier, visit the following link for detailed instructions: https://docs.microsoft.com/en-us/microsoft-365/security/defender-endpoint/configure-server-endpoints?view=o365-worldwide#windows-server-2012-r2-and-windows-server-2016.
You will need access to download the onboarding package from the Microsoft 365 Defender portal and permission to modify Group Policy. A network share with a UNC path that allows read-only access for computer accounts is required to be able to deploy the package. Follow these steps:
- Sign into the Microsoft 365 Defender portal at https://security.microsoft.com.
- Choose Settings and select Endpoints. Click on Onboarding in the Device management section.
- Choose Windows Server 1803, 2019, and 2022 for the operating system type and select Group Policy from the Deployment Method dropdown. Click on Download onboarding package.
Extract the contents of the onboarding package to a directory on your network share. The extracted contents should look like the image below.

Figure 12.15 – Windows Defender for Endpoint onboarding package
- Open Group Policy Management Editor and create a new policy. Link it to an OU where your target Windows Server objects reside. Give it a friendly name, such as Windows Server – Defender for Endpoint.
- Go to Computer Configuration | Preferences | Control Panel Settings and right-click Scheduled Tasks. Select New and choose Immediate Task (At least Windows 7). Give it a friendly name, such as Defender for Endpoint Onboarding.
- Under Security Options, select Change User or Group and type in SYSTEM. Click Check Names and choose OK to select NT AUTHORITYSystem.
- Select the radio button next to Run whether user is logged on or not.
- Choose Run with highest privileges.
The New Task window should look as follows:

Figure 12.16 – Creating a scheduled task with Group Policy
- Click the Actions tab, click New, and choose Start a program under Action.
- Under Program/script, enter the UNC path of the WindowsDefenderATPOnboardingScript.cmd file from the extracted contents earlier using the fully qualified domain name. Click OK and then OK again to commit the change.
The New Action settings should look as follows:
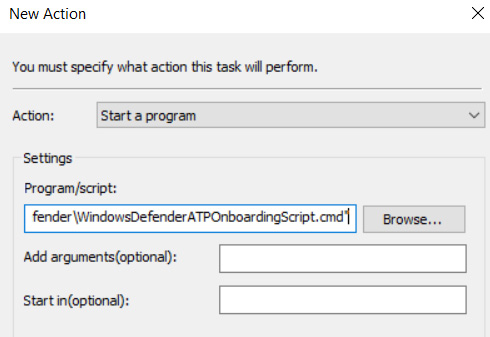
Figure 12.17 – Configuring a new action for a scheduled task
The scheduled tasks should now be visible in the GPO in the Scheduled Tasks section.
- Close any open Group Policy windows.
Target servers should begin to receive policies within 90 minutes if a policy update isn't forced. Typically, machines onboard within 24 hours of executing the file, but it can take several days for telemetry data to flow in Defender for Endpoint. To check the machine's status, go to the Microsoft 365 Defender portal at https://security.microsoft.com. In the search bar, enter the hostname of a target server to search for results. You can also click on Device Inventory to view the list of discovered endpoints, as shown here:
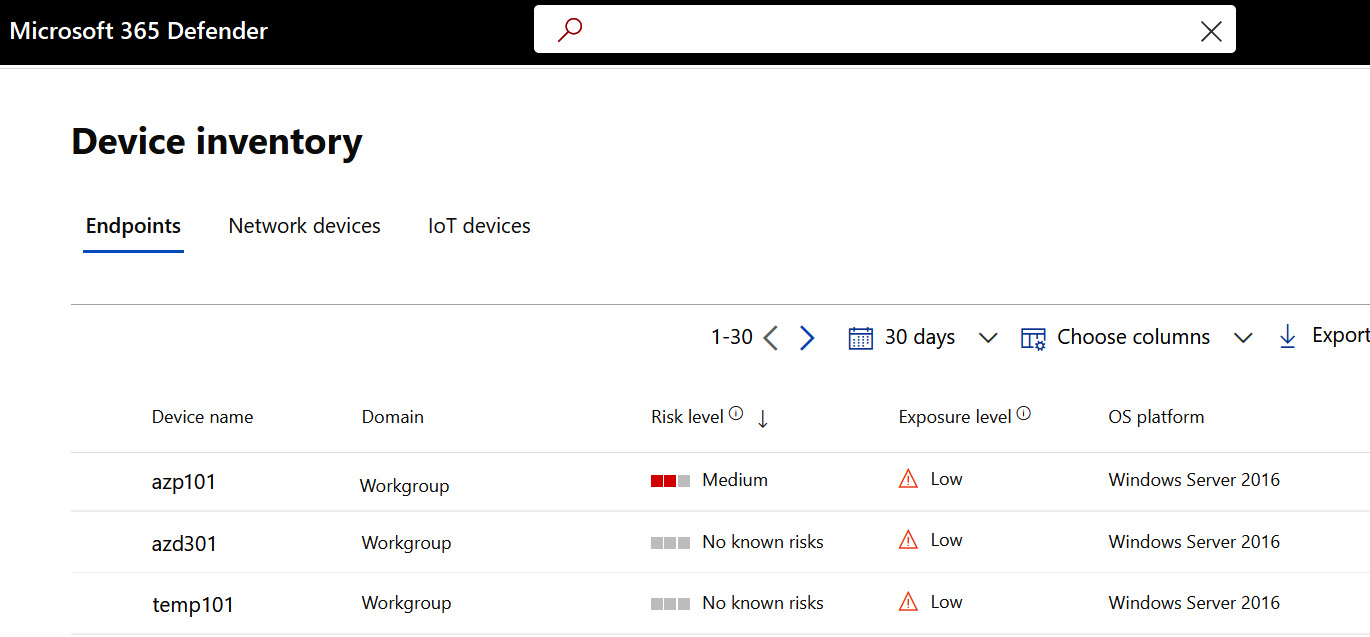
Figure 12.18 – Microsoft 365 Defender – Device inventory
If you want to learn about the other methods for onboarding servers, clients, and VDI hosts, visit https://docs.microsoft.com/en-us/microsoft-365/security/defender-endpoint/configure-server-endpoints?view=o365-worldwide.
Next, let's look at configuring a Windows Defender security baseline using Microsoft Security Baseline recommendations.
Windows Defender security baseline
A Windows Defender security baseline is available in the latest version of Microsoft Security Baseline for Windows Server 2022. These controls focus specifically on configuring features of Windows Defender Antivirus. When using Policy Analyzer to analyze the Microsoft recommendations against an out-of-the-box Windows Server 2022 installation, you will see that 24 settings are not configured by default. This includes settings for real-time protection, PUA protection, network protection, cloud-delivered protection, and ASR rules.
The baseline recommendations can be applied by importing the reference GPO into a new or existing GPO that's been scoped to an OU where our target servers reside. The process to do this is the same as what we explained in Chapter 8, Keeping Your Windows Client Secure, in the Deploying Windows Security Baselines section.
The Windows Defender GUI in Server 2022 can be found by opening the Windows Security app. Here, we can view all the enabled features and configure additional settings such as exclusions if needed. If the security baseline was deployed using Group Policy, we can validate the settings that are being managed by clicking on Virus & threat protection | Manage settings under Virus & threat protection settings. Policies that are managed will be grayed out and a message stating This setting is managed by your administrator will be shown, as shown here:
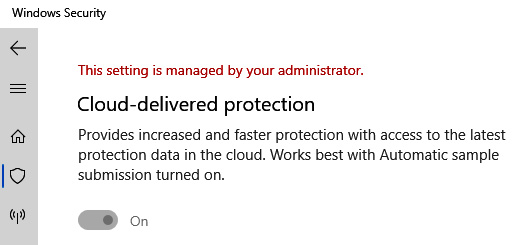
Figure 12.19 – Setting controlled by Group Policy
Windows Defender can also be queried with PowerShell to view and configure additional features. The main PowerShell cmdlets to get information about Defender Antivirus are as follows:
- Get-MpPreference will return information about the configured Defender Antivirus settings, including scanning behavior and the status of enabled features.
- Get-MpComputerStatus will return details about the antimalware version, signature definition date, and scanning details.
Microsoft Security Baselines provides a good set of configurations, but it is recommended to also enable Tamper Protection for Windows Server 2012 R2 and above. Tamper Protection helps prevent unauthorized modification of Defender security features through the registry, Group Policy, and PowerShell. At the time of writing, the feature is not available in Group Policy, but it can be enabled using Microsoft Endpoint Configuration Manager, through the Microsoft 365 Defender portal, or individually on the server. If you use the Defender portal, this setting will be applied to all onboarded devices in the tenant. It can be enabled by going to https://security.microsoft.com and selecting Settings | Endpoints | Advanced features | Tamper protection. To enable it on an individual device, open the Windows Security app, choose Virus & threat protection | Manage settings (under Virus & threat protection settings), and toggle Tamper Protection to On, as shown in the following screenshot:
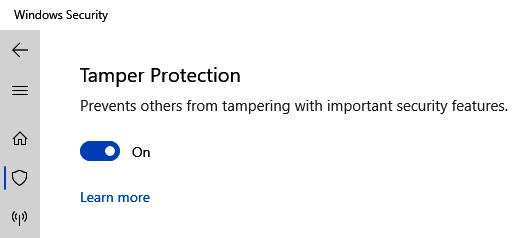
Figure 12.20 – Tamper Protection in Windows Server 2022
Windows Server versions 2016 and lower won't have this setting in the Window Security app, so you must validate that it's enabled by opening PowerShell as an administrator and typing Get-MpComputerStatus | Select-Object IsTamperProtected, RealTimeProtectionEnabled. A value of true means it's enabled.
Tip
To use Tamper Protection on Windows Server 2012 R2, you must onboard devices using the modern unified solution package.
In addition to the Microsoft security baselines, a few additional policies are recommended in the CIS Level 1 benchmarks for Windows member servers. To configure them using Group Policy, navigate to Computer Configuration | Administrative Templates | Windows Components | Microsoft Defender Antivirus. Do the following:
- Set Turn off Microsoft Defender Antivirus to Disabled.
- Set Turn on behavior monitoring to Enabled. This can be found under Microsoft Defender Antivirus | Real-Time Protection.
- Set Configure local setting override for reporting to Microsoft MAPS to Disabled. This can be found under Microsoft Defender Antivirus | MAPS.
- Set Turn on e-mail scanning to Enabled.
Next, let's look at implementing baseline controls to harden Windows Server.
Hardening Windows Server
Hardening Windows Server with the appropriate security controls plays a key role in maintaining a good security posture. Many security controls are built directly into Windows Server, but they may not necessarily be enabled by default. Security teams must do their due diligence to find the appropriate balance of usability to risk when determining what controls to enable. To help with the hardening process and as a fundamental first step, we can implement a preconfigured security baseline designed for Windows Server. In the next section, we will cover implementing these preconfigured recommendations from Microsoft and CIS.
Implementing a security baseline
From a program level, a security baseline is a foundation that consists of clearly defined policies, standards, procedures, and guidelines. They are more than just a set of configurations that apply to devices. In Chapter 2, Building a Baseline, we covered these concepts and discussed their importance, as well as providing an overview of the different frameworks seen today. We also introduced benchmarks from the Center for Internet Security (CIS) and Microsoft as a guideline for building the specific configurations that apply to your Windows servers.
First, let's look at a comparison of these recommendations against the default server settings and review the results. Then, we will use the preconfigured GPO from Microsoft and apply it to a group of target systems. The PDF version of the CIS benchmark for Windows Server 2022 can be downloaded from https://www.cisecurity.org/cis-benchmarks/.
The latest baselines from Microsoft Security and Compliance Toolkit can be downloaded from https://www.microsoft.com/en-us/download/details.aspx?id=55319.
Using Policy Analyzer, we can compare the preconfigured GPOs from Microsoft and the CIS build kits. Looking first at Microsoft Security Baseline for Windows Server 2022, we analyzed three different policy sets against the effective state of the system. The Total column contains the total number of policies analyzed. The Differences column shows values that haven't been configured by default in Windows Server or that conflict with the baseline. The Score column shows the total percentage of compliance with the recommendations. This analysis can be seen in the following table for the Member Server, Defender Antivirus, and Credential Guard policies:
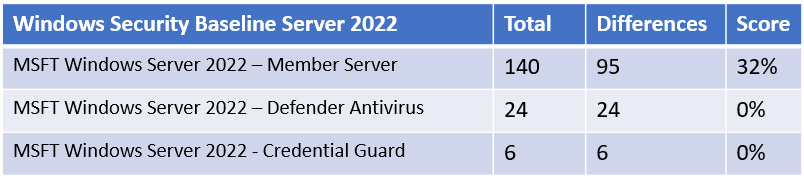
Figure 12.21 – Microsoft Security Baseline analysis
Next, we used the CIS Microsoft Windows Server 2022 Build Kit and compared the Level 1 and Level 2 benchmarks using Policy Analyzer. In the CIS build kits, the Level 2 reference GPO only contains additions to the Level 1 to avoid duplication. In the following table, we can see the comparison to the default Windows settings using the same method that was used previously:

Figure 12.22 – CIS Windows Server 2022 Benchmark analysis
It's worth mentioning that the CIS build kit also includes an additional GPO for Windows services. It includes a recommendation to disable the Print Spooler service in response to CVE-2021-34527, also known as the PrintNightmare vulnerability.
CIS build kits are included as part of a SecureSuite membership. More information about them can be found at https://www.cisecurity.org/cis-securesuite/cis-securesuite-build-kit-content/build-kits-faq.
Now that the analysis is complete, we can implement the Microsoft recommendations using the preconfigured Group Policy. Then, we can run an analysis to compare them against the CIS benchmarks. To import the Member Server baseline, follow these steps:
- Open Group Policy Management Editor. Create a GPO that is linked to an OU that contains member servers. Give it a friendly name, such as MSFT Windows Server 2022 – Member Server.
- Click on the Group Policy Objects folder, find the GPO, then right-click and choose Import Settings.
- Click Next twice and choose Browse. Navigate to the GPO folder of the extracted ZIP file and click OK. Then, click Next.
Tip
The Windows Server 2022 Security Baseline can be downloaded from https://www.microsoft.com/en-us/download/details.aspx?id=55319.
- Select the MSFT Windows Server 2022 – Member Server GPO and click Next. Click Next again. Click Next on the Migrating References page to copy them identically from the source. Then, click Finish.
- Click OK to finish importing the policy settings.
Once the GPO has been imported, we must force a policy update and restart a target server before running the analysis. The following table shows the comparison of Microsoft Security Baseline to the CIS benchmarks:

Figure 12.23 – Microsoft Security Baseline compared to CIS
This is not inferring that Microsoft Security Baseline doesn't offer great protection. We wanted to demonstrate the differences between the two baselines by running this analysis.
Now that a baseline has been applied, it's important to monitor settings to watch for configuration drift and report on compliance when baseline recommendations are updated. This can be done using tools such as Configuration Manager or by deploying assessment tools like CIS CAT Pro Dashboard or other vulnerability scanning solutions like Nessus Tenable, that support auditing policy configurations. Azure Log Analytics also has a solution called Change Tracking and Inventory that can monitor changes to software, Windows services, and registry entries. In Chapter 8, Keeping Your Windows Client Secure, we covered importing a GPO to a Configuration Baseline in the Converting a GPO into a Configuration Baseline section. Following this guide, you can deploy a baseline using Configuration Manager in monitor mode and report on non-compliance against your GPO settings.
In addition to Group Policy enforcement, Azure Automation State Configuration can be used as a configuration management solution to monitor and remediate any configuration drifts. Azure Automation State Configuration is built on PowerShell Desired State Configuration (DSC) technology and is useful for maintaining consistent base configurations when deploying new resources. It also helps ensure systems remain in the state outlined in the configuration file. For additional information about Azure Automation State Configuration, visit https://docs.microsoft.com/en-us/azure/automation/automation-dsc-overview.
Next, let's look at general best practices for hardening Windows Server.
Hardening tips for Windows Server
Security baselines are a fundamental step in your overall hardening efforts. In addition to well-defined controls, any opportunity to reduce unnecessary roles, services, and unintentional privileges will greatly help reduce the overall attack surface. At the network level, carefully monitor communications (both ingress and egress) and only allow the required ports and protocols to support application functionality.
Let's look at a few additional general security recommendations for Windows Server and domain controllers:
- Domain controllers should be updated with priority and run the latest Windows versions if possible. They hold the keys to authentication and authorization in Active Directory environments.
- DCs should only run Active Directory Domain Services (AD DS) and DNS server roles.
- Use a Server Core installation for DCs and purchase hardware that supports Secure-Core if you're hosting physical servers on-premises.
- Block the DC from connecting directly to the internet. Only allow exclusions for WSUS or Windows Update services if possible.
- Admins should only interact with DCs from known workstations, jump servers, or Bastion environments. This includes remoting tools such as PowerShell, Windows Admin Center, and MMCs.
In addition to the recommendations for DCs, the following tips also apply to member servers:
- Enable the Credential Guard, Device Guard, and Code Integrity policies for application control.
- Only allow signed scripts to be executed.
- Restrict hosts that are allowed to perform administrative actions. Use safelists by IPs and only allow access from a PAW or other trusted device.
- Use PowerShell Just Enough Administration for remote administration with PowerShell. This will only allow access to certain functions within PowerShell and help to remove any unintentional privileges.
- For remote management over WinRM, enable WinRM over HTTPS to encrypt data in transit using certificates.
- Avoid creating privileged accounts that have permission to perform multiple administrative functions when possible.
Next, let's review how to configure account control settings on Windows Server. Many of these best practice recommendations will already be applied if you imported one of the security baselines from CIS or Microsoft.
Account controls for Windows Server
Account controls in Windows Server include settings that help define policies such as configuring password requirements, account lockout thresholds, and security options around local accounts on the system. First, let's look at some of the controls for configuring local accounts.
Configuring accounts
Implementing policies around the types of accounts that have access to servers is part of any good security and access strategy. In domain environments, administrative access should be controlled using domain-based Kerberos authentication and not with the use of local accounts. Managing local accounts on systems and scheduling password changes can be challenging and may require third-party tools to increase management efficiency. Controlling the identity is a key component of the overall security framework, and we want to ensure that local accounts are locked down and protected.
Using Group Policy, go to Computer Configuration | Windows Settings | Security Settings | Local Policies | Security Options to find account policies. The following table includes some recommended policies you should consider enabling for local accounts:

Figure 12.24 – Accounts policy settings
Next, let's look at configuring account policies specifically in domain environments.
Configuring account policies
Setting account policies for domain accounts includes setting password requirements and lockout settings. They are commonly applied to all accounts at the domain level using the Default Domain Policy GPO. If any account policies are created in a child OU, they will only apply to local accounts on the member servers in scope unless you're using a Password Settings Object (PSO) from Active Directory Administrative Center. The Default Domain Policy is configured with predefined settings once Active Directory Domain Services is enabled and can be found nested directly under the root of the domain. Let's look at modifying some of the default values.
To find the policy settings in GPMC, go to Computer Configuration | Windows Settings | Security Settings | Password Policy. The following screenshot shows the best practice recommendations from the predefined Default Domain Policy:
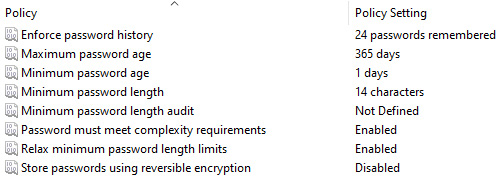
Figure 12.25 – Default Domain Policy – Password Policy
In the preceding screenshot, we can see the following:
- Maximum password age is set to 365 days.
- Minimum password length is set to 14 characters.
- Relax minimum password length limits is set to Enabled. This policy was introduced in Windows 10 and Server 2022 and allows the minimum password length to be increased beyond the limit of 14.
Tip
Based on recent research from NIST, Microsoft, and others, the latest password recommendations are to remove periodic password change requirements and to only change a password in case of potential threat or compromise.
Next, let's look at recommendations for Account Lockout Policy. To find the policy settings in GPMC, go to Computer Configuration | Windows Settings | Security Settings | Account Lockout Policy. The policy settings can be seen in the following screenshot:

Figure 12.26 – Account Lockout Policy
In the preceding screenshot, we can see that the following policies have been configured:
- Account lockout duration is set to 15 minutes.
Leaving this setting as 0 will require an administrator to manually unlock an account every time it's in a locked state. This can lead to increased calls to the support desk. Setting a duration can also help mitigate a potential denial of service (DoS) attack.
- Account lockout threshold is set to 5 invalid logon attempts.
Setting a lockout threshold helps to prevent brute-force attacks by triggering an account lockout. The account will remain locked out for the duration set in the first policy. Be mindful that if all accounts are subjected to an account lockout threshold, an attacker could effectively lock out all the accounts in a DoS-type attack. Use fine-grained password policies to change these settings on a subset of privileged accounts if needed.
- Reset account lockout counter after is set to 15 minutes.
This setting determines how long before the lockout threshold resets. Keep this setting aligned with the lockout duration. The default settings could be vulnerable to DoS attacks and can lock out users in your environment permanently until they're manually unlocked by an administrator.
For more granular control over account policies, configure a Default Domain Policy and supplement it with fine-grained password policies or Password Settings Objects (PSOs).
Implementing fine-grained password policies
Fine-grained password policies and PSOs are configured separately from Group Policy account policies. Some use cases include setting stronger password requirements for administrator and service accounts or changing the account lockout thresholds for DoS mitigations. Fine-grained password policies are configured in Active Directory Administrative Center and can be applied directly to specific users or security groups. To learn how to implement a fine-grained password policy, go to Chapter 5, Identity and Access Management, and find the Securing your passwords section.
As a recap, we can configure a PSO by opening Active Directory Administrative Center and changing to the Tree view. Expand the domain, go to System container, and find Password Settings Container. Click New, then select Password Settings under Tasks to create a new policy. The following screenshot shows a password policy targeted at the Domain Admin security group:
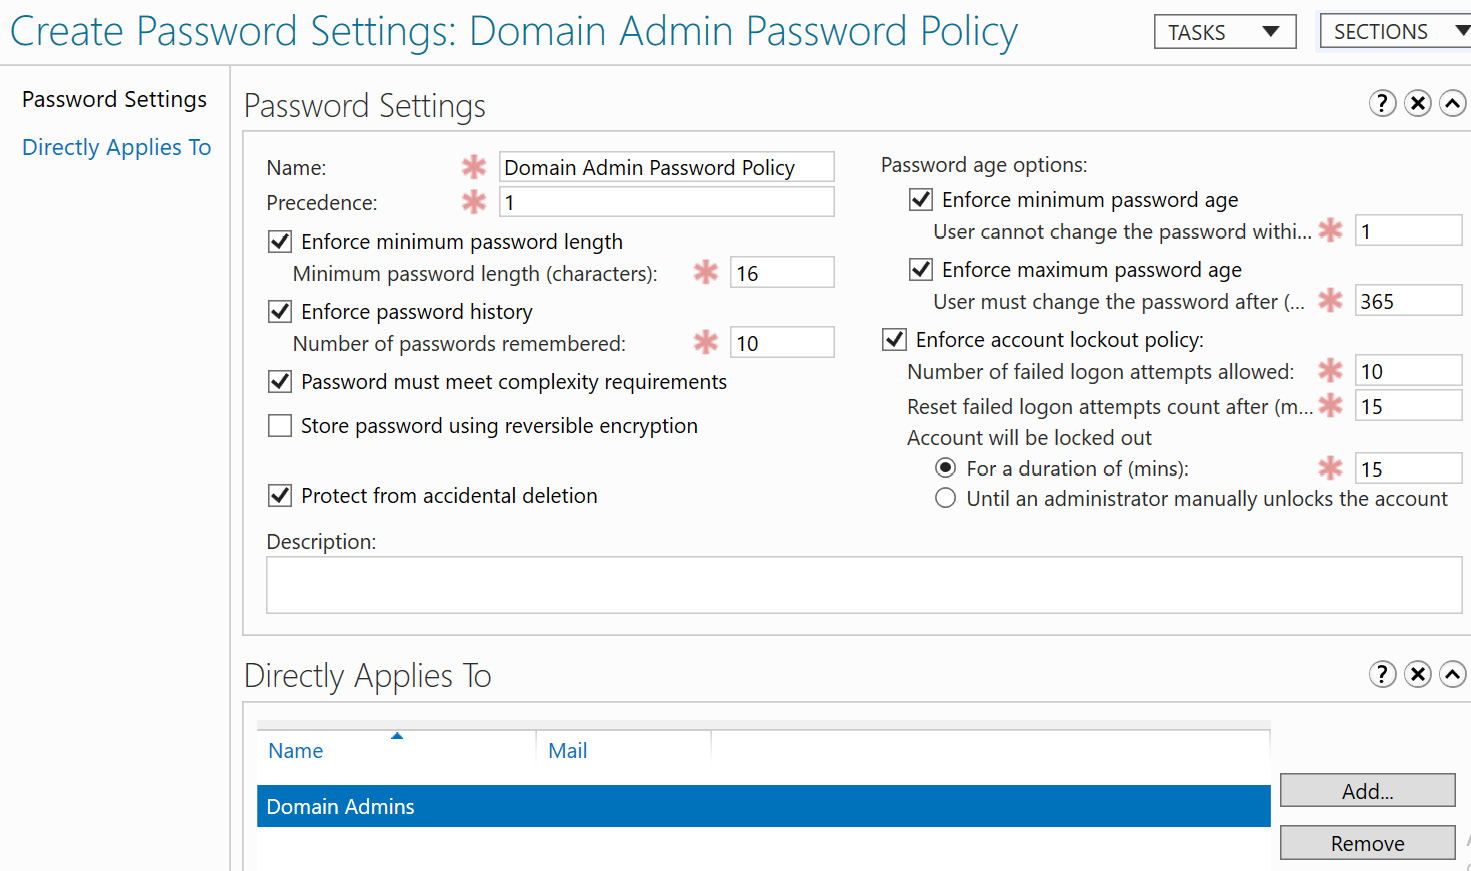
Figure 12.27 – Fine-grained password policy in Active Directory
Next, we'll look at controlling user rights assignment in Windows Server.
Controlling user rights assignment
User Rights Assignment policies define the ways a user or service can log on and interact with a server locally. Examples of rights assignments include who can log on locally or through Remote Desktop Services, who can join workstations to the domain, and blocking access to run batch jobs or services locally on the system. User Rights Assignment policies can be found under Computer Configuration > Windows Settings > Security Settings > Local Policies > User Rights Assignment. The CIS benchmark includes 48 combined recommendations across Level 1 and Level 2 for configuring User Rights Assignment policies in Windows Server 2022. A few examples of additional recommendations from CIS to complement the Microsoft Security Baseline can be seen in the following table:
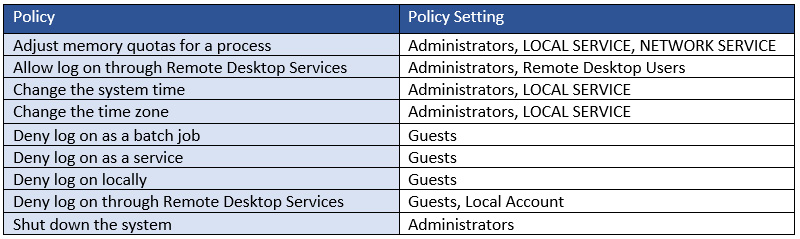
Figure 12.28 – Recommended User Rights Assignment settings
We can further control access to built-in local groups by governing the memberships using a Restricted Groups policy. This will control which users and groups are allowed to be members of the built-in security groups on each server.
Let's look at creating a Restricted Groups policy using GPO. In this example, we will add a security group named T1-Operators to the local Administrators group on a server by modifying our existing MSFT Windows Server 2022 – Member Server GPO:
- Go to Computer Configuration | Windows Settings | Security Settings | Restricted Groups. Right-click and choose Add Group.
- Click on Browse, search for the T1-Operators group, and click Check Names. Once you've found the group, click OK. Click OK again on the Add Group menu.
- On the Properties menu, click Add next to the This group is a member of section. Click Browse, type in Administrators, and choose Check Names. Click Ok.
- Click OK on the Properties menu to commit the changes.
After the target server processes Group Policy, the security group will be in the BUILTINAdministrators group. The following screenshot shows the security group listed in the Restricted Groups policy in the Group Policy Management MMC:
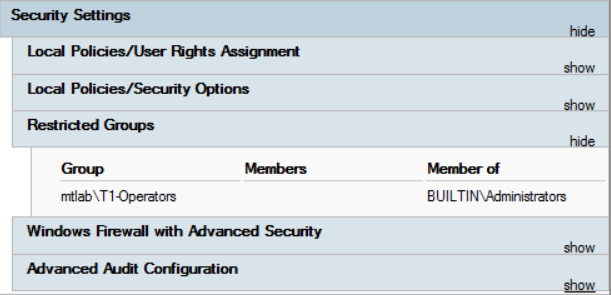
Figure 12.29 – Restricted Groups policy
Tip
If a user is added locally to a built-in group on the server and they are not a member of the domain group or added through the Restricted Groups policy, they will be removed on the next policy sync.
Next, let's look at User Account Control settings.
User Account Control
User Account Control (UAC) helps to control the context in which an application can run. Its protection dictates that applications will be opened in standard user context unless otherwise specified or invoked with the aid of an elevated parent process. This helps prevent unauthorized apps from automatically installing and prevents users from making changes to protected system settings. It also keeps permission continuity if a parent process running as a standard user invokes a child process. The child process will need to be explicitly elevated by admin consent. The familiar UAC experience can be seen in the following screenshot, which shows the consent prompt that appears when an application requires an administrator's access token:

Figure 12.30 – UAC in Windows Server 2022
By design, when an administrator logs into a system, both a standard and an administrator access token are granted to the user object. When the administrator runs an application, it will attempt to use the standard user access token until a higher integrity level is required and will prompt for consent for permissions.
To protect the UAC consent process flow, it is recommended to secure UAC prompts using the secure desktop. This is the default Windows behavior and can be noticed by the dimming of the desktop during the elevation attempt. The secure desktop helps ensure that only Windows processes can interact with the consent flow and prevents the risk of an attacker stealing credentials by using a fraudulent UAC prompt. The following table lists a few recommendations for UAC policies:
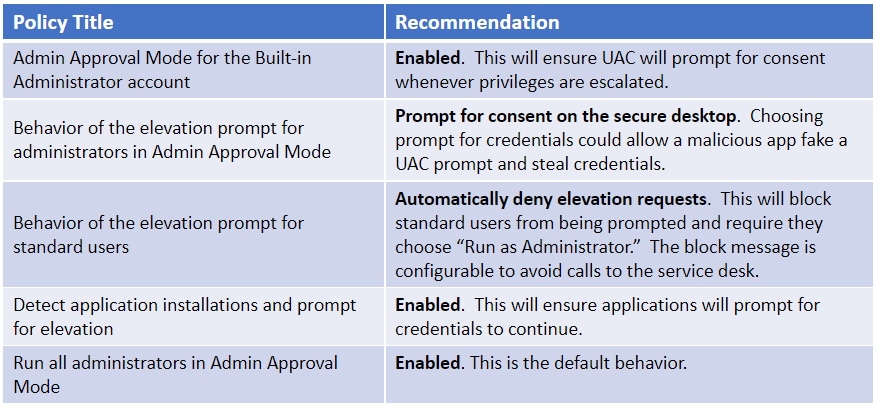
Figure 12.31 – User Account Control policies
The location of User Account Control policies in Group Policy can be found by going to Computer Configuration | Windows Settings | Security Settings | Local Policies | Security Options | User Account Control. For detailed information about UAC security policy settings, visit https://docs.microsoft.com/en-us/windows/security/identity-protection/user-account-control/user-account-control-security-policy-settings.
Next, let's review protecting domain accounts by using the Protected Users security group in Active Directory.
Protected Users
The Protected Users security group helps safeguard domain accounts by reducing the exposure of credential caching that occurs in an Active Directory environment. It also limits the authentication and encryption types that are accepted for these accounts. Once a user object has been placed into this group, the protections that apply are non-configurable and if any authentication issues occur, the user will need to be removed from the group. Due to some limitations with protected users, it is not recommended to use this group for user-based SPNs or computer accounts as it could result in authentication errors. Let's review some of the protections that are available to members:
- User credentials will not be cached in plain text when using Windows Digest, NTLM, Kerberos, or CredSSP.
- Offline sign-in will not work.
- NTLM authentication does not work when authenticating with a Domain Controller.
- Kerberos will no longer use DES or RC4 encryption.
- Kerberos Ticket Granting Tickets (TGTs) cannot be renewed after their initial 4-hour lifetime.
In domain environments, it is recommended to deprecate NTLM authentication as soon as possible in favor of Kerberos. Using the Protected Users group is a good way to start testing applications for Kerberos support. To get the full protection benefits, clients and hosts must run, at a minimum, Windows 8.1 and Windows Server 2012 R2 or later. For additional information about configuring protected users, visit https://docs.microsoft.com/en-us/windows-server/identity/ad-ds/manage/how-to-configure-protected-accounts.
Next, let's look at ways to secure the logon and authentication process.
Securing the logon and authentication process
To log in and authenticate with a server, most administrators use remote administration tools such as Remote Desktop Services, PowerShell, or Microsoft Management consoles. We've mentioned the importance of limiting the locations administrators can log in from, but there are additional controls that can be enabled further to protect the logon process. Some of these controls include configuring interactive logon settings, configuring the allowed authentication protocols, and using authentication policies and silos. Each control will add another boundary to your layer of defenses and help reduce the attack surface. First, let's look at configuring interactive logon authentication settings.
Configuring interactive login
Interactive login is when a user logs into a server either physically or remotely with terminal services. In an interactive logon, users typically enter a password or supply credentials through a PIN, smart card, or biometrics. Through a remote interactive logon, the user connects using Windows Remote Desktop Services (RDS), also known as Terminal Services, using Remote Desktop Client (RDC) software. The RDC client that's built into Windows is often referred to as MSTSC, which references the name of the application located in %windir%System32. Interactive logon policies help secure the logon process for these logon types. CIS includes nine recommendations in the L1 profile, and they can be configured in Group Policy under Computer Configuration | Windows Settings | Security Settings | Local Policies | Security Options. Let's review some of the recommendations:
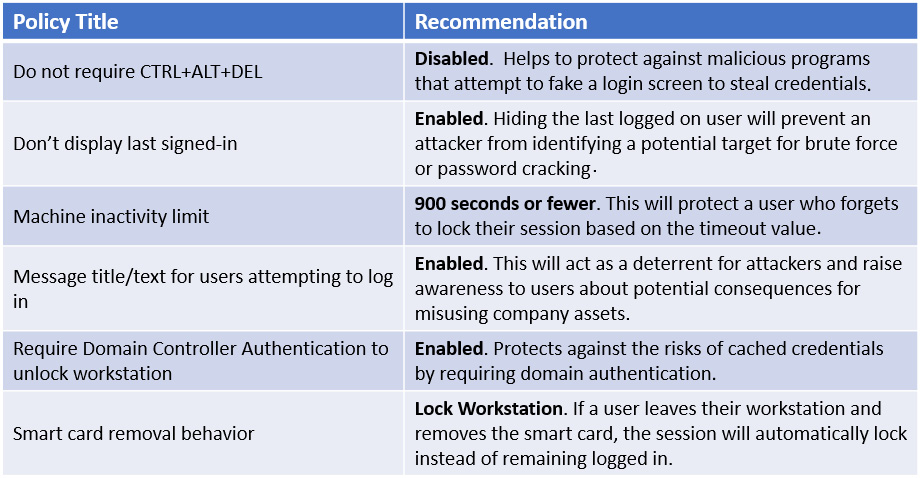
Figure 12.32 – Interactive logon policies
For example, configuring the message title and text policy for users attempting to log in can help raise awareness about the potential consequences of misusing company assets. This messaging can help educate users to follow security best practices and ensure they lock or log out of their sessions. The following screenshot shows an example of what this looks like when connecting with RDS in Windows Server 2022:
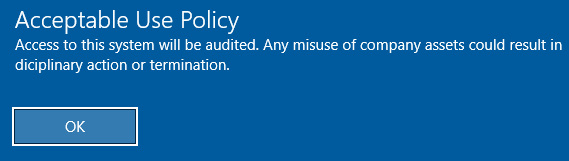
Figure 12.33 – Interactive logon warning
Tip
If you're configuring RDS, make sure to allow connections through Windows Firewall and enable RDS through Group Policy or locally.
Next, we'll look at configuring timeout limits for RDS. This will increase security by disconnecting idle user sessions and free up system resources.
Setting RDP session time limits
RDP session time limits can be set to limit the amount of time that idle users remain logged into a session. Some of the advantages include preventing password lockouts, protecting inactive sessions, and freeing up system resources. If a Privileged Access Management (PAM) solution is configured with password rotation, allowing idle sessions could result in increased account lockouts. You can also avoid configuring RDS licensing by limiting the number of concurrent sessions through automatic logout. RDP session time limits can be configured using Group Policy by going to Computer Configuration | Policies | Administrative Templates | Windows Component | Remote Desktop Services | Remote Desktop Session Host | Session Time Limits. The recommendations shown in the following table include inactive and idle time limits:

Figure 12.34 – Session time limits for Remote Desktop Protocol
To enforce automatic logoff, set the End session when time limits are reached policy to Enabled. Be mindful when configuring automatic logging off as users may complain if they run long batch processes using RDS.
Next, we'll look at configuring policies that protect information exposure on the logon screen.
Securing the logon screen
Securing the logon screen can help reduce the risk of exposing potential attack targets by setting policies that limit what's visible at Windows logon. Configuring these settings can stop the enumeration of users, hide account details, and limit interaction with network connections. CIS has 7 recommendations in the L1 profile regarding logon screen policies. The following table shows the additional recommendations not enforced in the Microsoft baseline.
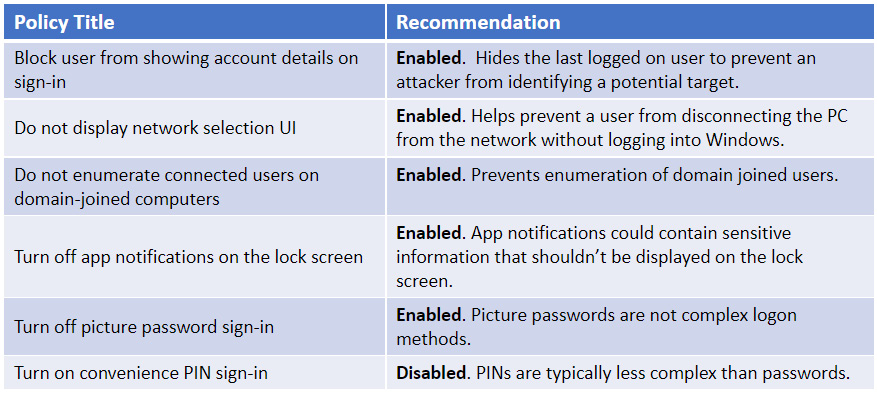
Figure 12.35 – Recommended login processes
Tip
If picture password sign-in is enabled, the domain password will be cached in the system vault and subject to extraction.
Many of these settings are already disabled by default in Windows, so it's best to enforce them to ensure a user with administrative access does not modify the default logon settings.
Next, we will review authentication silos and how they can be used to restrict account access and the scope of what an account has rights to do on a privileged system.
Using authentication policies and silos
Authentication silos are containers inside AD DS that contain sensitive users, computers, and service account objects. The objects inside this container are assigned authentication policies that provide enhanced protection by creating conditions that must be met to allow access to a system. An authentication silo, like a security group, is another way to organize privileged accounts. Policies can be applied to silos or directly to the objects inside the silo. If the conditions of the policies are not satisfied during the authentication process, access is denied. Authentication silos are commonly used to complement the Protected Users group we mentioned earlier.
When an authentication policy is assigned to an object, a flag is assigned to the account to notify the domain controller that additional security checks are required during the authentication request to verify access. These policies contain restrictions that are placed on the account and include configuring a short TGT lifetime, restricting which devices can request a TGT, and access control conditions or claims that require the authentication request to come from a specific computer to receive a ticket. To support this functionality, both the client host and the domain controller must be able to support Kerberos Armoring. Kerberos Armoring or Flexible Authentication Secure Tunneling (FAST) provides a secure channel between the client and the Key Distribution Center (KDC) to protect pre-authentication data during a Kerberos ticket request. It also denies any downgrade or fallback attempts to use NTLM authentication as Kerberos becomes the only acceptable method.
To create and assign users to authentication policies and silos, you can use Active Directory Administrative Center. To support the use of user claims with Dynamic Access Control (DAC), enable the Kerberos client support for claims, compound authentication, and Kerberos armoring policy located in Computer Configuration | Administrative Templates | System | Kerberos.
An authentication policy must exist before a silo can be created. To do this, open ADAC, click on Authentication Policies, and choose New to create a new policy. In the following screenshot, you can see the User Sign On properties specifying a TGT lifetime and an access control condition so that the TGT request can only come from the specified computer account:
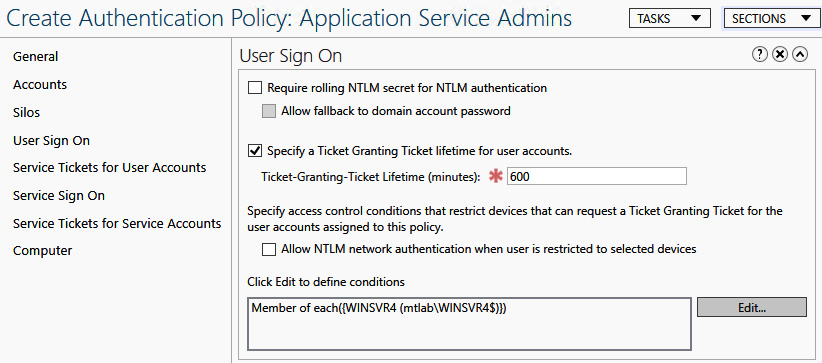
Figure 12.36 – Authentication Policy
Once a policy has been created, a user can be assigned to a policy or silo directly in Active Directory Administrative Center, as shown in the following screenshot:
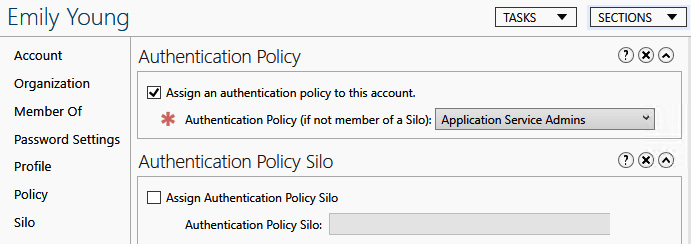
Figure 12.37 – Assigning a policy to a user in ADAC
We recommend reviewing the Microsoft docs in detail to understand all the pre-requisites that are required to use authentication policies and silos, including troubleshooting details. Additional information can be found at https://docs.microsoft.com/en-us/windows-server/identity/ad-ds/manage/how-to-configure-protected-accounts#BKMK_CreateAuthNPolicies.
Next, let's discuss disabling NTLM authentication in favor of Kerberos in a domain environment for a more secure authentication protocol.
Disabling NTLM authentication
NTLM authentication is a challenge and response protocol family that contains multiple security protocols that are used in the authentication process. These protocols include LAN Manager, NTLMv1, NTLMv2, and the NTLM2 session protocols. NTLM authentication is still supported today and is enabled by default in Windows Server. It is recommended to reduce or eliminate the use of NTLM authentication in favor of Kerberos wherever possible as it is vulnerable to MiTM and pass-the-hash types of attacks. NTLM hashed passwords can also be easily cracked if password policies do not enforce lengthy and complex password requirements. In Chapter 10, Mitigating Common Attack Vectors, we demonstrated how an attacker can use an Adversary-in-the-Middle attack to capture NTLM hashes and use unsecure SMB and LDAP protocols in an NTLM relay attack to authenticate with other systems.
To deprecate NTLM usage in your environment, you must do the following:
- Understand how the NTLM protocols work in Windows environments and what systems are using them.
- Assess their usage by enabling auditing and review logs.
- Restrict their use through Group Policy.
We covered how to do this in the Enabling Kerberos authentication section of Chapter 10, Mitigating Common Attack Vectors, in detail, but we recommend reviewing the official documentation from Microsoft to fully understand the effects of disabling NTLM. You can find detailed information at https://docs.microsoft.com/en-us/previous-versions/windows/it-pro/windows-server-2008-R2-and-2008/dd560653(v=ws.10).
If you need to add exceptions and allow NTLM, the following policies can act as a safe list to allow servers to be exempt from enforcement until Kerberos can be supported:
- Network Security: Restrict NTLM: Add server exceptions for NTLM authentication in this domain and add any servers for which an exception must be listed.
- Network Security: Restrict NTLM: NTLM authentication in this domain must be set to Deny for domain servers or Deny all. Setting the policy to Deny for domain servers will allow those listed in the exemption list.
The Protected Users group is a great way to begin testing application support for Kerberos authentication, as it will be enforced for all the members in the group and deny any downgrade attempts to NTLM.
Next, let's review how to harden the SMB protocol by enabling signing requirements.
Configuring SMB signing requirements
Server Message Block (SMB) is a common protocol that's used for transferring files and facilitating Microsoft Remote Procedure Calls (MSRPC) in Windows. It is most notably used for file-sharing capabilities on workstations and servers. Today, there are three versions of SMB known as SMB1, SMB2, and SMB3. In a modern environment, SMB1 should be disabled due to high-security risks and because it is missing many of the protections that were added by the later versions. Without the proper security controls in place, clients attempting a connection over SMB will negotiate any way possible and can be tricked into downgrading the version, thus becoming susceptible to attacks. Additionally, without requiring SMB signing, newer versions of SMB are also vulnerable to MiTM-type attacks. In Chapter 10, Mitigating Common Attack Vectors, we covered how an attacker can scan a domain to identify targets that don't require signing and still have SMB1 enabled. We also reviewed how to enable SMB signing in the Requiring SMB signing section. We recommended these steps to help secure SMB connections:
- Enforce SMB signing requirements for clients and servers for all three versions of SMB.
- Disable SMBv1 clients whenever possible.
Starting with Windows Server 2019, SMB1 (both client and server) is disabled by default. To check the status of SMB1 on a Windows Server instance, run Get-WindowsOptionalFeature -Online -FeatureName SMB1Protocol using an administrative PowerShell window. In the following screenshot, you can see the SMB1's State is Enabled on a Windows Server 2016 domain controller:
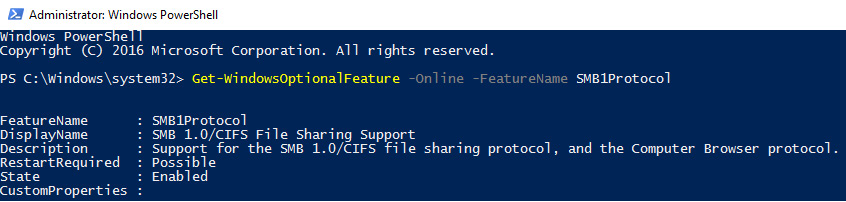
Figure 12.38 – SMB1's State
To disable SMB1 on a server, three registry settings need to be set to disable the service and remove SMB1 from the dependency chain of other SMB services:
- To do this, deploy a Group Policy that configures the following registry key:
HKLMSYSTEMCurrentControlSetServicesLanmanServerParameters
The following entry should be configured:
- Entry: SMB1
- REG_DWORD: 0
- Next, disable the SMB1 service by setting the following registry keys:
HKLMSYSTEMCurrentControlSetServicesmrxsmb10
The following entry should be set:
- Entry: Start
- REG_DWORD: 4
- Finally, remove SMB1 from the dependency chain of other SMB services by modifying the following registry key:
HKLMSYSTEMCurrentControlSetServicesLanmanWorkstation
The following entry should be modified:
- Entry: DependOnService
- REG_MULTI_SZ: "Browser","MRxSMB20","NSI"
Failure to update the dependency chain will break SMB once the service is stopped. To query the enabled protocols for the client, open an administrative Command Prompt and run sc.exe qc lanmanworkstation. In the following screenshot, the MRxSMB10 service is not listed as a dependency on Window Server 2022:
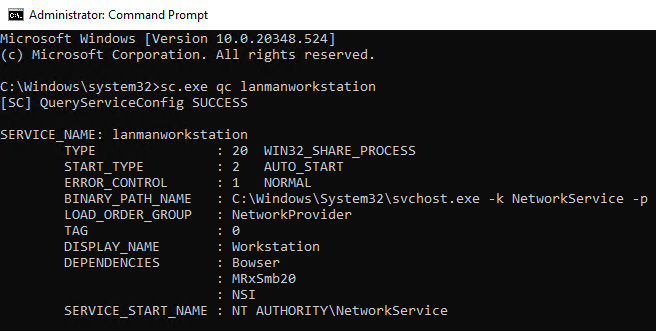
Figure 12.39 – Status of the SMB client on Windows Sever
For detailed information about detecting and disabling SMB, go to http://docs.microsoft.com/en-us/windows-server/storage/file-server/troubleshoot/detect-enable-and-disable-smbv1-v2-v3.
Next, let's review securing LDAP by enabling LDAP signing and channel binding.
Configuring LDAP signing and channel binding
Lightweight Directory Access Protocol (LDAP) is an application protocol that can be used to query directory services such as Active Directory. This includes looking up data such as usernames, passwords, and computer objects. LDAP is also used in authentication and to perform administrative actions such as resetting passwords and modifying security groups, which makes it a flexible and powerful protocol. To help secure LDAP, we can enable LDAP signing and channel binding to secure the default configuration in Active Directory and reduce the risk of MiTM-style attacks. In Chapter 10, Mitigating Common Attack Vectors, we discussed using LDAPS and how to enforce security controls using Group Policy. It's important to understand the potential effect of enabling these controls for applications that do not support signing and channel binding. To harden these configurations, Microsoft recommends performing the following steps, as outlined in the security advisory ADV190023:
- Install the latest available Windows security updates to enable logging and policies for LDAP signing and channel binding events.
- Set the LDAP events with diagnostic logging to capture LDAP signing and channel binding failure events.
- Identify any sources of failures and investigate them. Plan for remediation activities.
- Enable LDAP signing and channel binding on supported devices.
You can review how to enforce these policies in the Enabling LDAP signing and LDAP channel binding section of Chapter 10, Mitigating Common Attack Vectors. We encourage you to read the advisory and detailed enablement steps by Microsoft at https://support.microsoft.com/en-us/topic/2020-ldap-channel-binding-and-ldap-signing-requirements-for-windows-kb4520412-ef185fb8-00f7-167d-744c-f299a66fc00a.
Next, we'll look at adding another security boundary by using a domain isolation policy design.
Using domain isolation policies
The concept of domain isolation is to build barriers between trusted and non-trusted devices both inside and outside of your organization and its network. One of the core design principles ensures that each network connection is authenticated using either an IPsec or certificate-based connection unless it has been explicitly exempted. This design helps protect systems from unsolicited inbound network traffic and non-managed, untrusted devices. To implement a domain isolation policy, the environment relies on Active Directory, Group Policy, and connection security rules in Windows Firewall. Source systems are allowed to securely authenticate from outside of the domain when you plan for a certificate-based isolation design in the domain isolation policy. A properly configured domain isolation policy looks to accomplish the following:
- Protect devices in domain isolation from untrusted network traffic.
- Restrict access only to devices you trust.
- Add additional layers of encryption when accessing sensitive systems.
There are a few design considerations when planning the architecture, including overall network perimeter design, domain isolation zones, boundary zones, encryption zones, and any exemptions to connection security rules. In the domain isolation zone, Windows devices joined to Active Directory rely on Kerberos authentication to satisfy the security requirements. They typically do not allow inbound connections from untrusted sources.
To create isolation inside the domain, connection security rules are used to define the boundaries of communications inside of Active Directory, instead of trusting the entire domain. In the boundary zone, devices are trusted but configured to accept inbound connections from both trusted and untrusted sources. In the encryption zone, trusted Windows and non-domain-joined systems are configured to communicate with each other using IPsec cryptographic certificates created by an internal certificate authority or a third-party provider. For enhanced protection on domain-joined systems, connection security rules can then be configured to accept both Kerberos and certificate-based connections from within the encryption zone.
In terms of Advanced Authentication Methods, Windows Defender Firewall with Advanced Security is configured to use Kerberos first, followed by a certificate issued from the internal certificate authority, as shown here:
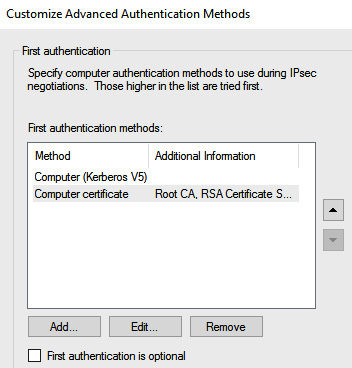
Figure 12.40 – Connection methods in Windows Defender Firewall
An example of how a domain isolation policy can be architected is shown in the following diagram:
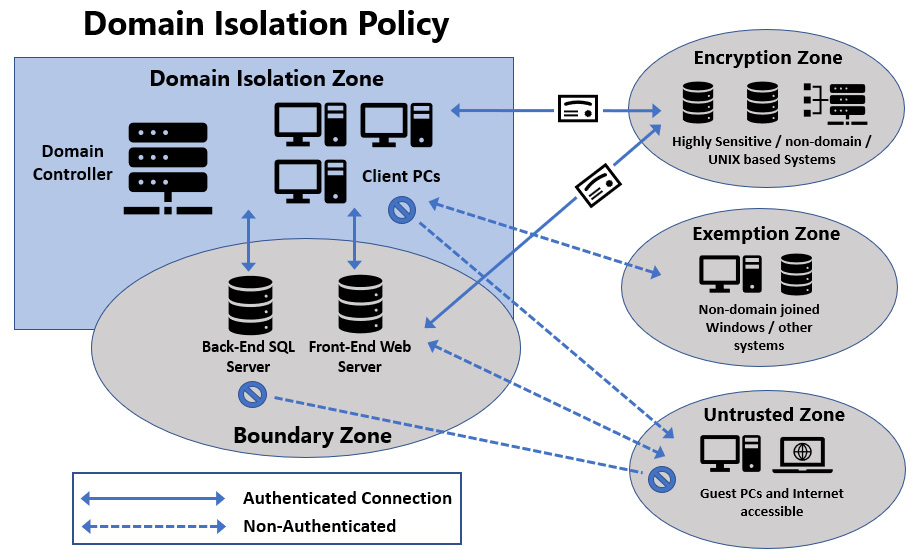
Figure 12.41 – Domain isolation policy architecture
By default, network traffic between zones is not encrypted, making it susceptible to eavesdropping. Enabling IPSec connection security rules will ensure that all inbound and outbound traffic is encrypted.
For additional information on planning and designing domain isolation policies, visit https://docs.microsoft.com/en-us/windows/security/threat-protection/windows-firewall/domain-isolation-policy-design.
Next, let's look at BitLocker encryption on servers and review enabling Azure Disk Encryption for virtual machines running in Azure.
Enabling Disk Encryption to prevent data theft
Enabling Azure Disk Encryption on Windows clients and servers can help protect against data being stolen from lost or stolen disk drives. BitLocker is the primary full volume data encryption technology that is included in Windows and can be enabled on Windows Server 2008 and later. The encryption uses the AES encryption algorithm and data can be recovered using a generated recovery key or by placing the drive back into the system with the original components that were used to initially encrypt the drive. In Windows Server, BitLocker can be enabled by adding the feature using Server Manager. After the installation is complete, the server will be enabled to encrypt its drives and includes BitLocker remote administration tools.
Using Group Policy, BitLocker can be deployed to systems and configured to store the recovery key information in AD DS. Until recently, many companies used solutions such as Microsoft BitLocker Administration and Monitoring (MBAM) or Microsoft Endpoint Configuration Manager to handle the indexing and administration of recovery keys. With the increase in cloud adoption, Microsoft strongly recommends moving your BitLocker administration workloads into Azure. MBAM is no longer being developed but includes extended support until 2024. If you are running virtual machines in Azure, Microsoft offers an option to encrypt server drives using Azure Disk Encryption (ADE) to reduce the workload on the IaaS server. ADE uses BitLocker to provide the same full volume encryption, but the service and recovery keys are managed in the cloud. Let's review how to enable it.
Enabling Azure Disk Encryption
Virtual machines running in Azure need to have attached storage to host the operating system and other application data. Managed disks are the most common storage type seen associated with virtual machine resources. Disk encryption can be enabled for managed disks using a few different methodologies:
- Client-side encryption is where all encryption and decryption operations are handled by services outside of the Azure resource provider, either by a customer-managed application or from inside a customer data center. Azure can be used to host the application and handle storage and encryption operations, but it does not have access to decrypt the data itself.
- Server-side encryption uses Azure resource providers to handle all the encryption operations, including key management and storage. Depending on the security and compliance requirements, you can bring an encryption key, known as a customer-managed key, and choose whether to store recovery keys in Azure or your repository elsewhere.
When it comes to a full end-to-end solution for all disks attached to a VM, ADE is the available solution from Microsoft to encrypt OS, data disks, and temporary volumes. With ADE, disk encryption keys are stored in Azure Key Vault with the option to provide a customer-managed key. For more information about ADE, visit the FAQ page at https://docs.microsoft.com/en-us/azure/virtual-machines/windows/disk-encryption-faq.
Let's learn how to enable ADE on managed disks attached to a virtual machine running Windows Server in Azure. To follow along with these steps, you will need a VM that's been deployed with an attached OS disk running Windows Server. You will also need permissions to create resources in a resource group, including an Azure Key Vault. In this example, we will use the Azure portal to achieve this in just a few steps:
- Log in to the Azure portal at https://portal.azure.com.
- Select a virtual machine to view the overview page and choose Disks on the left-hand side under Settings.
- Click on Additional Settings on the top bar to view the encryption options.
- Under Encryption Settings, click the Disks to encrypt dropdown and choose OS and data disks.
- Under Key Vault, choose Create new.
- Leave the resource group set with its default selection and enter a Key vault name. Click on Next: Access policy.
Tip
The Azure Key Vault that stores the encryption keys must exist in the same subscription and geographic region as the disk it's encrypting.
- Select the Azure Disk Encryption for volume encryption checkbox.
- Click Review + create. Review the details and click Create.
- Back on the Disk settings page, leave the Key field blank and click Save.
- After the settings update, the server will reboot and enable encryption. During the deployment, the AzureDiskEncryption extension will be installed on the server.
After the deployment finishes, we can log back into our server and validate that BitLocker is enabled. If we open Server Manager and go to Add roles and features, we will see that the BitLocker Drive Encryption feature is enabled. The OS disk will also have a padlock over it, indicating it's encrypted, or that encryption is in progress. Next, we can open the new Azure Key vault we created and click on Secrets under Settings. In the following screenshot, the BitLocker Encryption Keys (BEKs) have been uploaded for drive recovery from our encrypted disk:
Figure 12.42 – Azure Key Vault – disk encryption
ADE can be enabled at scale using Azure CLI, PowerShell, or Azure Resource Manager templates instead of the Azure portal. If you're tracking vulnerabilities in Microsoft Defender for Cloud, ADE also satisfies the Enable encryption at rest control in the available recommendations.
Now that we have covered enabling ADE, let's review deploying a code integrity policy using WDAC. WDAC allows admins to create application controls that significantly reduce the attack surface by blocking untrusted processes.
Deploying application control policies using WDAC
WDAC policies allow you to configure zero-trust application control principles that determine which applications and drivers are allowed to run on Windows systems. A WDAC policy, previously referred to as a Configurable Code Integrity (CCI), contains policy rules and policy rule options that apply entirely to the system, irrelevant of the user who is logged in. This is important to note, as user-based targeting is currently not supported. In Windows Server 2022, WDAC can support up to 32 active policies at once. Policy rules can be defined based on the following attribute principles:
- Attributes of a code-signing certificate
- Attributes of app binaries that come from metadata, such as the original filename, version, or hash
- The app's reputation, as defined by Microsoft Intelligent Security Graph (ISG)
- The process that launched the app or the path where the process or file is located
- Managed packaged apps or universal Windows apps
- COM object configurability
- Application plugins, add-ins, and modules
To deploy a WDAC policy for Windows systems, you can use Group Policy, Configuration Manager, Intune, or PowerShell. It's strongly recommended to carefully design, plan, audit, and test before deploying WDAC in a production environment. An improper policy configuration could cause systems not to boot. During the initial design and testing phases, WDAC supports an audit-only rule option that enables event logging. These logs should be carefully analyzed to understand all the effects of the policy before enforcing it. The logs can be found in Event Viewer and are sent to Microsoft Defender for Endpoint if the server is onboarded.
Tip
WDAC policies can be highly complex. We strongly encourage you to read the Microsoft policy design guide and build a strategy that fits your organization's needs: https://docs.microsoft.com/en-us/windows/security/threat-protection/windows-defender-application-control/windows-defender-application-control-design-guide.
For companies with customized line-of-business applications, Microsoft recommends signing the application with a code signing certificate for the greatest compatibility. This helps ease how the policies are administrated. If code signing is not an option, for the most secure configuration, you can safelist the application using the hash value from the app's binary metadata. Just note that relying on the hash will require the WDAC policy to be updated every time application updates are installed as the hash value will change. To create a signing certificate, you can do the following:
- Use an internal digital certificate or public key infrastructure (PKI).
- Use a third-party signing authority such as Entrust, DigiCert, or GlobalSign.
- Use the Windows Defender Device Guard signing portal through Microsoft Store for Business.
Sometimes, multiple policies will need to be created, depending on the system workload type. For example, in a managed device scenario such as an Intune-joined Windows client, you may have more leniency with the policy rule options by allowing apps with a known good reputation (enabling the Intelligent Security Graph option) or enabling the managed installer option. Windows servers may have fixed workloads, and the rules can be stricter as the level of variability regarding the apps and binaries could be a smaller sample set. The following link includes tips for the fixed-workload scenario: https://docs.microsoft.com/en-us/windows/security/threat-protection/windows-defender-application-control/create-initial-default-policy.
To help with policy creation, Microsoft has released a tool known as the WDAC Wizard that can be used to create a baseline and supplemental policies with a friendly user interface. A reference to the tool can be found at https://webapp-wdac-wizard.azurewebsites.net/
Let's look at creating a WDAC policy using PowerShell. To build the policy, we will use a reference system to act as the starting point. After the policy has been built and tested on the reference system, we can expand the deployment to other systems in audit mode for analysis and append new rules to accommodate additional apps and binaries. Once we are comfortable that the event logs are not showing errors that will interrupt expected application functionality, we can remove the audit mode rule option to ensure the policy is enforced.
First, let's learn how to build a reference policy from a clean Windows Server installation. Windows includes a directory that has several base templates to choose from. We will use the DefaultWindows_audit.xml template, which has the rule option for audit mode enabled, by following these steps:
- In File Explorer, create a new directory on the root of the OS drive called WDAC.
- Go to C:WindowsschemasCodeIntegrityExamplePolicies. Copy the DefaultWindows_Audit.xml policy and paste it into the C:WDAC directory. Rename it something friendly, such as WSHMemberSVR_CIPolicy.xml.
- Open PowerShell ISE as an administrator. First, let's define a variable for the policy file called $PolicyFile, as follows:
$PolicyFile = "C:WDACWSHMemberSVR_CIPolicy.xml"
- For version control, we need to assign a unique ID, name, and version using the Set-CIPolicyIDInfo and Set-CIPolicyVersion cmdlets. Enter the following in the script pane and execute the selection:
$PolicyFile = "C:WDACWSHMemberSVR_CIPolicy.xml"
Set-CIPolicyIDInfo -FilePath $PolicyFile -PolicyName "WSHMemberSVR_CIPolicy"
Set-CIPolicyVersion -FilePath $PolicyFIle -Version "1.0.0"
Open the XML file using Notepad or another text editor. The version number you set previously will be under the <VersionEx> element. The policy name will be under the <PolicyInfo> element toward the bottom of the file. Toward the top of the XML is where the rules are defined.
Information about the WDAC policy rules options can be found at https://docs.microsoft.com/en-us/windows/security/threat-protection/windows-defender-application-control/select-types-of-rules-to-create.
Let's set a few additional rules to enable Microsoft Intelligent Security Graph and its managed installer options:
- To configure the policy rule options, we will use the Set-RuleOption cmdlet and enable options 13 and 14. We can add the following to the script pane and execute the selection:
Set-RuleOption -FilePath $PolicyFile -Option 13
Set-RuleOption -FilePath $PolicyFile -Option 14
Option 13 is used to allow applications that have been installed by a managed installer. Option 14 is used to allow apps with a known good reputation by attesting them against Microsoft Intelligent Security Graph. Additional information on the managed installer can be found at https://docs.microsoft.com/en-us/windows/security/threat-protection/windows-defender-application-control/configure-authorized-apps-deployed-with-a-managed-installer.
- Next, convert the policy file into a binary file format using the ConvertFrom-CIPolicy cmdlet.
ConvertFrom-CIPolicy $PolicyFile "C:WDACWSHMemberSVR_CIPolicy.bin"
To deploy the policy, the .bin file can be placed on a network share that servers can access. In this example, we are building a reference WDAC policy and are not ready for a deployment, so we will leave it in the exported path.
- Open Local Group Policy Editor, go to Administrative Templates | System | Device Guard, and select the Deploy Windows Defender Application Control policy.
- Select Enabled and enter the C:WDACWSHMemberSVR_CIPolicy.bin path. Click OK. Then, restart the server.
To confirm that the policy has been applied, open Event Viewer and go to Applications and Services | Microsoft | Windows | Device Guard | Operational. Event ID 7010 will appear if the policy was successfully processed, as shown in the following screenshot. Restart the server for the policy to take effect:

Figure 12.43 – DeviceGuard – Operational logs
To view the audit events that were generated by the WDAC policies, go to CodeIntegrity | Operational under Applications and Services. Here, we can review any processes that tried to execute and whether they violated the WDAC policy. In the following screenshot, the warning level shows that the file would have violated the policy:
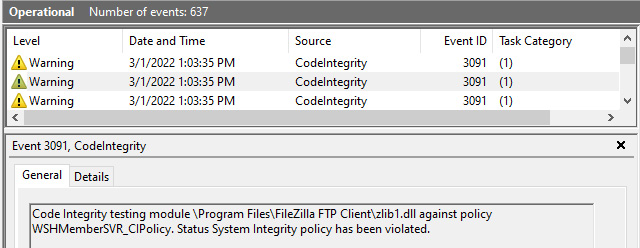
Figure 12.44 – CodeIntegrity – Operational logs
After enough time has passed for a good data sample to be captured, the event logs will be ready to be reviewed. Using PowerShell, we can export the audit entries and merge them with the template policy. To do this, we will use the New-CIPolicy cmdlet by following these steps:
- Run the following command to export the audit logs, set the policy level, and create a new CI policy:
New-CIPolicy -Audit -Level Publisher -Fallback Hash -FilePath "C:WDACEventLog_Audit.xml" -UserPEs
Using the Publisher level will allow all signed software from the application's publisher based on the certificate trust chain. Using a fallback of Hash will allow any unsigned applications that have been identified in the audit logs to be safely listed by their hash metadata. To review the list of file rule levels, go to https://docs.microsoft.com/en-us/windows/security/threat-protection/windows-defender-application-control/select-types-of-rules-to-create#windows-defender-application-control-file-rule-levels.
- Next, we will set a few variables to specify the policy paths and run the Merge-CIPolicy cmdlet to combine both the original and audit log policies:
$BasePolicy = "C:WDACWSHMemberSVR_CIPolicy.XML"
$AuditCI = "C:WDACEventLog_Audit.xml"
$CombinedCI = "C:WDACWSHMemberSVR_CIPolicy_v2.xml"
Merge-CIPolicy -PolicyPaths $BasePolicy,$AuditCI -OutputFilePath $CombinedCI
- Update the policy rule and version number in the XML file:
$CombinedCI = "C:WDACWSHMemberSVR_CIPolicy_v2.xml"
Set-CIPolicyIDInfo -FilePath $CombinedCI -PolicyName "WSHMemberSVR_CIPolicy_v2"
Set-CIPolicyVersion -FilePath $CombinedCI -Version "1.1.0"
- Use the ConvertFrom-CIPolicy cmdlet to convert the merged policy into a binary file:
$CombinedCI = "C:WDACWSHMemberSVR_CIPolicy_v2.xml"
$CombinedBIN = "C:WDACWSHMemberSVR_CIPolicy_v2.bin"
ConvertFrom-CIPolicy $CombinedCI "C:WDACWSHMemberSVR_CIPolicy_v2.bin"
- If you wish to audit the new policy before enforcing it, update the local Group Policy setting to the new .bin file. Restart the server.
Depending on how strict you need the policy to be, you can use the FilePublisher level with a fallback level of Hash and scan the entire OS drive. To do this, run the following cmdlet (assuming the OS disk is drive C):
$OSPolicyCI = "C:WDACOSDrive_CI.xml"
New-CIPolicy -ScanPath "C:" -Level FilePublisher -Fallback Hash -UserPEs -FilePath $OSPolicyCI
Tip
Running the New-CIPolicy cmdlet on the OS drive to complete the scan will take some time.
If you decide to use -ScanPath to create a new CI policy, be sure to merge the policy rules and increment the version by following Steps 2 to 4.
Before enforcing the policy, it's recommended to set rule options 9, Advanced Boot Options Menu, and 10, Boot Audit on Failure. This way, if the WDAC policy blocks a driver during startup, Windows will continue to boot.
To do this, follow the steps below.
- To enable the Advanced Boot Options Menu and Boot Audit on Failure rule options, run the following commands:
$CIPolicyPath = "C:WDACWSHMemberSVR_CiPolicy_v2.xml"
Set-RuleOption -FilePath $CIPolicyPath -Option 9
Set-RuleOption -FilePath $CIPolicyPath -Option 10
- Let's make a copy of the policy for a backup and append Enforced to the end of the filename by running the following command. This will help us differentiate between the XML files:
Copy $CIPolicyPath "C:WDACWSHMemberSVR_CIEnforced.xml"
- To set the policy to enforced mode, we will delete rule option 3, which enables auditing, by using the following commands:
$EnforcedCI = "C:WDACWSHMemberSVR_CIEnforced.xml"
Set-RuleOption -FilePath $EnforcedCI -Option 3 -Delete
- Next, let's update the ID information and policy version using the following commands:
$EnforcedCI = "C:WDACWSHMemberSVR_CIEnforced.xml"
Set-CIPolicyIDInfo -FilePath $EnforcedCI -PolicyName "WSHMemberSVR_CI_Enforced"
Set-CIPolicyVersion -FilePath $EnforcedCI -Version "1.2.0"
- Convert the policy into binary format by running the following command:
ConvertFrom-CIPolicy $EnforcedCI "C:WDACWSHMemberServer_CIEnforced.bin"
The WDAC policy is now ready to be tested in enforced mode. After updating Group Policy and restarting the server, we can open the DeviceGuard | Operational log under Applications and Services to confirm it's enforced. In the following screenshot, you can see that Event ID 7010 will show that Configurable Code Integrity policy = Enabled:
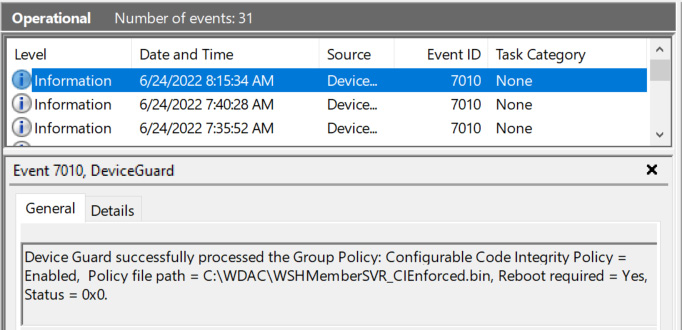
Figure 10.45 – Device Guard – Operational logs in Event Viewer
Tip
After time has passed and you're comfortable that applications are functioning correctly, rule options 9 and 10 can be removed to add additional protection.
Earlier, we enabled rule option 14 for Intelligent Security Graph Authorization. This option allows file hash and signing information to be sent to the Microsoft Intelligent Security Graph (ISG) for analysis. Even if the app or binary is not explicitly listed in your WDAC policy, if it passes the integrity check by ISG, it will be allowed to run. ISG is the same technology that's used for SmartScreen and the PUA protection features of Microsoft Defender. If WDAC policies are deployed using MDM or Configuration Manager, the necessary services will automatically be started. Otherwise, for local testing, you can run the appidtel start command in an administrative command prompt to start the necessary components. For additional information about confirming application reputation using the ISG, visit https://docs.microsoft.com/en-us/windows/security/threat-protection/windows-defender-application-control/use-windows-defender-application-control-with-intelligent-security-graph.
When attempting to launch an application that is not safely listed in WDAC, the users will be presented with a popup that looks similar to the following:

Figure 12.46 – Application blocked by WDAC
The AppLocker logs under Applications and Services can also show us whether applications and scripts have been blocked because of the WDAC policy. Event ID 8029, as shown in the following screenshot, shows a PowerShell script that was not signed and was blocked by the WDAC policy:
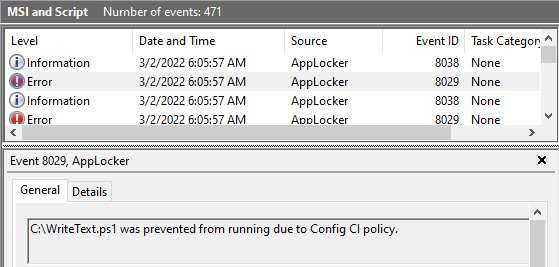
Figure 12.47 – AppLocker logs in Event Viewer
For more information regarding the full list of rules, system requirements, and tips for deployment planning, visit https://docs.microsoft.com/en-us/windows/security/threat-protection/windows-defender-application-control/windows-defender-application-control.
Next, let's look at how we can secure PowerShell by enabling logging, discussing language modes, and implementing just-enough administration.
Implementing PowerShell security
PowerShell has become an invaluable command-line interface in the administrator's toolbox, with uses ranging from executing remote management tasks to fully automating processes. It has deep integration with Windows and can be used to manipulate most aspects of the OS, including Windows Management Instrumentation (WMI) and other security and hardware-based features. As a result, PowerShell can be a viable attack tool. Due to its flexibility and general trust in Windows as a safe utility, PowerShell can be exploited as a living-off-the-land binary (LOLBin) and used for malicious intent, such as downloading payloads and executing code.
This can be a security concern because the integration with Windows allows for defense evasion and makes it difficult to alert users about suspicious commands. While it's not recommended to disable PowerShell completely, we can make a few setting changes to help secure its operations. The first step is to configure PowerShell logging to help aid in forensic analysis, should an incident occur.
Configuring PowerShell logging
PowerShell logging enables audit logs to be stored in Event Viewer for auditing purposes. This can be valuable for forensic investigations where PowerShell was used to help trace the activities that occurred during an incident. Some of the available logging options are as follows:
- PowerShell Transcription allows Windows to capture the input and output of PowerShell commands into text-based transcripts. PowerShell Transcription can be enabled through the following Group Policy or registry setting:
Computer Configuration / Policies / Administrative Templates / Windows Components / Windows PowerShell / Turn on PowerShell Transcription
- Enable the policy and specify an output directory. Documents is the default output directory if nothing is specified.
- HKEY_LOCAL_MACHINESOFTWAREPoliciesMicrosoftWindowsPowerShellTranscription:
- EnableTranscription DWORD equals 1
- OutputDirectory REG_SZ equals PATH TO DIRECTORY
Tip
CIS recommends that PowerShell Transcription is set to Disabled. Enabling the policy risks passwords being stored in plain text in the transcript files, but you trade off on auditing PowerShell events.
- PowerShell Script Block Logging enables the logging of all PowerShell script blocks in Event Viewer. PowerShell Script Block Logging can be enabled through Group Policy or the registry:
Computer Configuration / Policies / Administrative Templates / Windows Components / Windows PowerShell / Turn on PowerShell Script Block Logging
- Enable the policy and select Log script block invocation start/stop events for additional logging.
- HKEY_LOCAL_MACHINESOFTWAREPoliciesMicrosoftWindowsPowerShellScriptBlockLogging:
- EnableScriptBlockLogging REG_DWORD equals 1
- EnableScriptBlockInvocationLogging REG_DWORD equals 1
Tip
CIS recommends not enabling script block invocation logging as it can generate a high volume of event logs.
To view the PowerShell logs in Event Viewer, go to Applications and Services Logs | Microsoft | Windows | PowerShell | Operational. If Window Server has been configured to send telemetry data to Log Analytics, PowerShell logs can be collected by enabling the Microsoft-Windows-PowerShell/Operational logs under Agents configuration | Windows event logs from the Log Analytics workspace. This will allow you to configure alerts based on the events or forward them to a Security Information and Event Management (SIEM) solution such as Azure Sentinel for monitoring. Defender for Endpoint also does a great job of alerting users about malicious PowerShell commands that have been executed on the system if the server is onboarded with real-time protection enabled.
Tip
Consider expanding the Windows Event Log size if you're enabling script block logging to avoid logs being overwritten too quickly.
Next, let's explore how to use PowerShell constrained language mode to restrict the available commands.
Enabling PowerShell constrained language mode
PowerShell constrained language mode is used to restrict access to commands that can invoke Windows APIs. Some of the default restrictions of constrained language mode include creating instances of most COM objects, using Add-Type to load arbitrary C# code or Win32 APIs, and some .NET methods. To view the list of allowed types, along with a detailed definition of constrained language mode, open PowerShell and run Get-Help about_ConstrainedLanguage.
PowerShell allows you to enforce constrained language mode through User Mode Code Integrity (UMCI) policies using Windows Defender Application Control (WDAC). This will ensure scripts can only execute in constrained language mode unless your code-signing authority is added to the WDAC policy, allowing them to run in full language mode. Alternatively, constrained language mode can be configured by creating an environment variable via a GPO and setting __PSLockdownPolicy to a value of 4. However, this can easily be circumvented if the user has the right to override these settings.
To check the current language mode of the execution context in PowerShell, run the following command from a PowerShell window:
$ExecutionContext.SessionState.LanguageMode
The following current language modes are supported in PowerShell:
- FullLanguage
- ConstrainedLanguage
- RestrictedLanguage
- NoLanguage
To read more about the different types of language modes in PowerShell, visit https://docs.microsoft.com/en-us/powershell/module/microsoft.powershell.core/about/about_language_modes?view=powershell-7.2.
Next, let's look at enforcing PowerShell script execution.
PowerShell script execution
PowerShell execution policies determine which types of scripts are allowed to run on a system and help prevent unintentional script execution. Script execution policies should not solely be relied upon for security purposes, as they can easily be circumvented by typing the contents of a script manually into the command line. A few examples of script execution policies are as follows:
- Restricted is the default for Windows workstations and allows individual commands but prevents scripts from running.
- Bypass is where scripts and commands run freely without warning.
- RemoteSigned requires scripts to be signed by a trusted publisher if they've been downloaded from the internet.
- AllSigned requires all scripts to be signed by a trusted publisher, including ones created locally. PowerShell will prompt you before allowing the script to run from unknown publishers.
To learn more about script execution policies in PowerShell, type in Get-Help about_execution_policies. It is recommended that you keep the default setting of Restricted or use RemoteSigned. PowerShell script execution policies can be configured for both computer and user scopes. To configure the machine policy with Group Policy, go to the following locations:
- Computer Configuration | Administrative Templates | Windows Components | Windows PowerShell | Turn on Script Execution:
- Choose Allow local scripts and remote signed scripts to set the MachinePolicy scope to RemoteSigned.
To view the current execution policy list by scope, from an administrative PowerShell window, type get-executionpolicy -list. The following screenshot shows five different scopes. If all the scopes are set to Undefined except for 1, then that is the currently effective policy. The computer scope takes precedence over the user scope when configured with Group Policy:
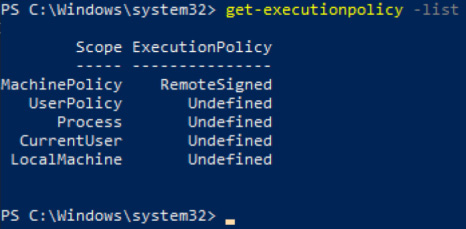
Figure 12.48 – Execution policy scope list
Next, let's review enabling Just Enough Administration (JEA) to control the available cmdlets administrators can run and reduce the scope of unintentional privileges on systems through PowerShell remoting.
JEA
PowerShell JEA helps reduce the available attack surface on Windows servers by limiting the scope of an administrator's capabilities using principle of least privilege concepts through PowerShell remoting. JEA enables admins to run defined sets of cmdlets and functions through remote PowerShell without providing access to log on locally or the need to provide administrative rights to the underlying system.
For example, suppose a member server contains multiple server roles and that multiple IT admins manage each role. Traditionally, each admin would be provided full administrative rights to the system and, in effect, administer the roles for their job function. By specifying roles capabilities in JEA, admins can access the JEA endpoint, execute their assigned cmdlets, and don't require unintentional access that grants them permissions to other roles or the OS and filesystem. If the cmdlets require administrative privileges, JEA can be configured with a temporary privileged virtual account to obtain the correct access tokens. This also allows admins to connect to sensitive servers with non-admin privileges and perform their tasks securely.
JEA can be implemented by following these high-level steps:
- Validate that the server meets the minimum prerequisite requirements and allows for PSRemoting. PowerShell script block and module logging can be enabled to track all actions that are taken by JEA users.
To view the list of prerequisites, go to https://docs.microsoft.com/en-us/powershell/scripting/learn/remoting/jea/prerequisites?view=powershell-7.2.
- Configure the necessary role capabilities. Role capabilities define what someone can do in a JEA session by defining the available cmdlets, functions, scripts, and providers they can access from inside the PowerShell session.
- Create the identity that JEA will use to act as the account broker between the IT admin and the underlying system. This can be in the form of a local virtual account or a group-managed service account and is configured in a session configuration file.
- Define role definitions to determine the mapping of users to their roles.
- Create the session configuration file and register it with the JEA endpoint. This file applies the role definitions, assigns the JEA identities, and determines who has access to the endpoint.
To enhance JEA, conditional access rules are supported in the session configuration for just-in-time (JIT) access management. For example, you can map a security group to a role definition and require an IT admin to request access using a PIM or PAM solution to become a member of the security group. In the following diagram, you can see how JEA administration works. In this example, the JEA user only has access to PowerShell cmdlets that can manage DNS services:
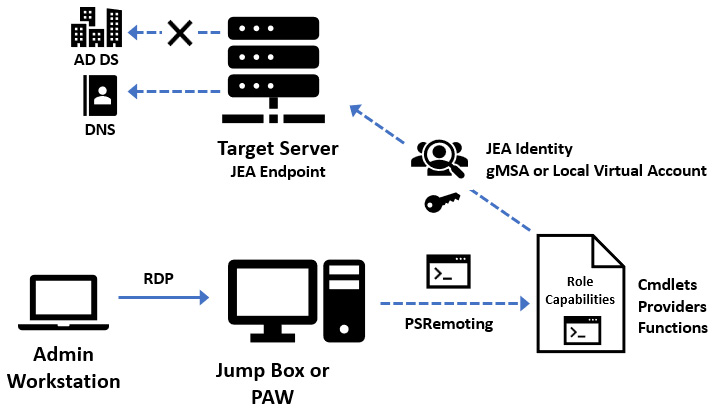
Figure 12.49 – Just Enough Administration
To review all the prerequisites and requirements for enabling JEA, visit the official Microsoft documentation at https://docs.microsoft.com/en-us/powershell/scripting/learn/remoting/jea/overview?view=powershell-7.2.
We have just provided an overview of several methods that can be used to secure your PowerShell sessions. Ensure you understand how to configure PowerShell logging, how to enable PowerShell constrained language mode, how to enable PowerShell execution policies, and how to correctly implement JEA.
Summary
In this chapter, we covered securing Windows Server. First, we reviewed different installation options for Windows Server and looked at new security enhancements for Windows Server 2022. In the next section, we discussed different server roles and features and highlighted specific roles that could be used as part of your security strategy. Then, we learned how to install WSUS on a Windows Server Core installation.
In the next section, we covered managing Windows updates with WSUS and Azure Automation Update Management. We reviewed extending Microsoft Defender for Endpoint capabilities to Windows Server and the methods available to onboard them using Group Policy or Azure Defender. After, we discussed hardening Windows Server and walked through implementing a baseline. We analyzed both CIS benchmarks and Microsoft Security Baseline using Policy Analyzer and reviewed controls that protect user accounts and secure the login process. We finished this section by discussing encryption using Azure Disk Encryption and walked through deploying a Windows Defender Application Control policy. Finally, we reviewed PowerShell security and how JEA can be used to limit administrative access to servers.
In the next chapter, we will cover security monitoring and reporting. We will review onboarding Windows clients to Defender for Endpoint with Intune, monitoring services in Azure with Log Analytics and Azure Monitor, and reviewing onboarding servers to Microsoft Defender for Cloud for vulnerability assessments.