
Chapter 5: Identity and Access Management
In this chapter, we will be reviewing identity and access management in depth, as well as their importance within enterprises today. In a zero-trust model, identity has become extremely critical, and the need to protect them has never been more important. Through third-party SaaS providers and the data center shift to the cloud, users can now access their corporate information from anywhere over the internet. A simple breach of just their identity can allow an intruder to log in and access their information and a greater variety of data within the environment. Because of this, we need to revisit the traditional authentication methods and add enhanced protection to our identity and access model.
In today’s world, the use of passwords is becoming obsolete. Due to major breaches and the advancement of technology, it’s not implausible to assume our passwords have been breached and are sitting on the dark web for sale. In addition, bad password management leads to the reuse of passwords on other accounts or with slight variations that are easy to crack. What does this mean? Essentially, someone with your password will be able to easily start accessing all your accounts, especially if no additional security protections are in place. It’s commonplace to see attackers use the same user accounts and passwords within services that haven’t been breached to try and gain additional access. This type of attack is known as credential stuffing, and unfortunately, it is working!
In this chapter, we will provide an overview of identity and access management and many of the components required to build a robust program. We will cover account and access management, followed by authentication and Multi-Factor Authentication (MFA), and discuss moving away from passwords with passwordless technologies. We will finish off the chapter with powerful Microsoft cloud technologies that can better protect your identities – Conditional Access and Identity Protection.
This chapter will include the following topics:
- Identity and access management overview
- Implementing account and access management
- Understanding authentication, MFA, and going passwordless
- Using Conditional Access and Identity Protection
Technical requirements
In this chapter, we will refer to identity management solutions, such as Microsoft Identity Manager (MIM). We will also provide overviews of different access and identity management services within Azure and the varying levels of licenses and requirements. It is encouraged that you research the specific licensing requirements for each solution independently if they fit your needs. At a minimum, you can follow along with the referenced solutions using the following:
- An Azure tenant with subscription owner and Global Administrator rights
- Azure AD Premium P2
Now, let’s take an overview of identity and access management.
Identity and access management overview
Identity and access management has never been as important as it is today. Identity can be somewhat considered as the foundation for security within your organization. Although there are other methods of compromising data, simply gaining access to a user or administrative account can be destructive. If an intruder compromises an account, they now acquire the same account level of access across all systems and data. All this can take place without anyone being alerted. It is very important that you are rigid with your identity and access policies. The role of least-privilege is a must! This is a role where no access is added to your account until needed, based on your job function. We will cover this in more detail in the Authorization section of this chapter that follows. Essentially, if you don’t need access, you don’t get it. In addition, ensuring that you use separate user accounts for administrative accounts is critical. There should never be elevated or privileged permissions added to your regular user accounts where general day-to-day tasks are performed. As already stated, passwords have become obsolete and do not provide the level of security needed today. You need to start implementing multi-factor-level authentication as soon as possible, along with more modern technologies, to protect your users’ and your organization’s data.
Let’s look at the foundation or framework of what comprises a solid identity and access management program. If you have studied for your Certified Information Systems Security Professional (CISSP) certification or some other security-related exam, you will be familiar with the term Identification, Authentication, Authorization, and Accountability (IAAA) or just Authentication, Authorization, and Accountability (AAA). Here, we will use IAAA to emphasize identity as the first component of the process because, without an identity, the proceeding components cannot exist.
Identity
The identity portion of your access relates to something that identifies who you are. Simply put, it is a unique identifier that you enter to let a system know that it is you who is trying to access it. A simple example could be a username, an email address, or an employee ID number. Traditionally, within a windows environment, you may be familiar with sAMAccountName, which was essentially a username that only worked within your corporate network. Using this outside your corporate network was not possible, as there was no unique identifying factor that accompanied the username on places such as the internet. Today, you will need to adopt the User Principal Name (UPN) method for your identity to best support internet and cloud-based technologies. The UPN appends a domain that you own to the end of your username to provide a unique or immutable identity no matter where you are and how you access it. An example of a UPN identity could be [email protected]
Authentication
After you have entered your identity, you will typically be presented with some form of authentication to validate that you are the person who should be gaining access to the system. The most common form of this is entering a password. As part of authentication, there are four different methods to authenticate your identity that are worth mentioning:
- Type 1 is something you know. This is currently the most common and widely adopted method of authentication. Some examples include a password, PIN, or passphrase.
Tip
An example of a password is W!nd0ws11, while a similar passphrase is W!nd0ws $ecure 11. Typically, passphrases can contain spaces, are longer, and are easier to remember than a password.
- Type 2 is something you have. This authentication method consists of something you have with you to confirm it is you. Some examples include a hard token, a soft token on your phone, or a smart card. With Microsoft, the Authenticator app is an example of this.
- Type 3 is something that you are. This authentication method is commonly known as biometrics or something physical that is used to authenticate you. Some examples of this include your fingerprints, and facial or iris scans. On Microsoft, Windows Hello falls under this category of authentication.
- Type 4 is location-based. This authentication method may not be as commonly used but can be extremely powerful with the advancement of cloud compute and AI technologies. Authenticating based on location allows you to authenticate users based on a defined geolocation. Think of a company that only conducts business within the United States. Why would they expect anyone to access their servers from outside the country? Anyone accessing them from outside the United States is expected to be an intruder and should be blocked. In Azure, Conditional Access can provide this level of authentication.
Next, let’s look at authorizing your identity against the system to gain access to data.
Authorization
Once you have been authenticated into your environment or system, you will need to access data or systems that you have been authorized to access. Authorization is a method in which permissions have been added to your identity to allow access to some information or system. Just because you have been authenticated doesn’t mean that you are authorized to access data or a system. This is where the principle of least-privilege comes into play, and as a best practice, there should be no authorization added to a new identity by default. Authorization isn’t an easy task, especially as an organization grows. Ensuring that someone only has access to what they are authorized to do can be a full-time role, especially ensuring that authorization is updated and removed as roles change. To better help with authorization and to define your users’ job functions, a well-defined access model should be in place to implement Role-Based Access Control (RBAC), using identity management tools and centralized management of users and groups that use Azure AD or on-premises AD.
Now that the identity has been authenticated and authorized to your system, let’s look at what accountability is in terms of actions and data accessed inside an environment.
Accountability
The last function is known as accountability, also referred to as accounting. This is the function that allows us to ensure that an identity or user is not abusing their rights or the authorization provided. Here, we need to ensure that we track all the activities of our users and ensure auditing is in place to hold anyone accountable for any misuse of their identity and access. This is also a critical process as part of any investigative and forensic work that is carried out for attempted breaches or compromised accounts. Knowing exactly where an account has been authenticated and what data it has accessed must be captured and audited for historical purposes.
As you can see, the full scope of an identity and access management program takes great effort and time to implement correctly. With the identity of your users being at the forefront and serving as the key to your data and systems, organizations must implement a well-rounded and robust identity and access management program. As we discussed earlier in this book, ensure your policies and standards have leadership support to ensure your program is effective.
Tip
As a start, to assist with password management practices, it is highly recommended that you provide a form of password manager for your users. It is also recommended that you educate your users about identity protection services. There are many services available, and you can view the service as insurance coverage for your identity. It is worth the investment!
To finish off this section, we wanted to remind you of the importance of physical access security. Ensuring that an intruder can’t easily walk onto your site is not only critical to your data but also the safety of your employees. Nothing is more important than human safety! Referring back to the National Institute of Standards and Technology (NIST) cybersecurity framework, there is a specific category and subcategory to ensure you implement the minimum recommended guidelines for physical security, as shown here:

Figure 5.1 – The NIST cybersecurity framework’s physical access to the assets guidelines
The following link gives you access to NIST Special Publication 800-53, referenced in the preceding figure: https://csrc.nist.gov/publications/detail/sp/800-53/rev-5/final.
Next, we will review account and access management and what is involved in the identity management life cycle.
Implementing account and access management
One of the most important tasks with your identity and access management program is the management and life cycle of accounts and the auditing of the access they have. The whole life cycle process in account and access management may involve multiple teams to make the process efficient and successful. Likely, there’s a chance that multiple systems and tools are involved in the life cycle management, including manual human processes that increase vulnerability due to poor housekeeping and being error-prone. Account and access management is a complex process and only becomes more challenging through the ongoing expansion of the application portfolio, as well as the shift to the cloud. A typical account and access management program may involve resources from HR, identity and security teams, technical operations teams, hiring managers, and potentially others.
To ensure success with your account and management program, it must start with well-defined policies that enforce the correct standards and procedures throughout the life cycle process. Any mismanagement of this process can result in significant damage to your organization due to the critical nature of the identity in security. Some examples of this include applying the principle of least privilege to a user account, untimely terminations, or not managing and auditing your privileged accounts. One method to help with any mismanagement or even manual errors is implementing automation. The more you can automate, the fewer errors will occur. There will always be a need for manual processes, whether it be the initial input of user data, physical validation that the information is correct, or applying an end date to a user, but the more you can reduce these processes, the less error-prone they will be.
Every organization is structured differently, but for the most part, you will likely have accounts categorized as Full-Time Employees (FTE), contractors, vendors, guests, or service accounts and service principals. For each of these categories, you will need separate policies and procedures for their management. Your FTE accounts may be managed differently than your contractor accounts, as well as your vendor and guest accounts. Ensuring all these accounts are managed correctly will require close collaboration between HR, the identity and security teams, and the hiring or reporting managers of these accounts.
Tip
Never use shared accounts within your environment. All users who access your environment should have an account assigned that identifies them. Without an assigned identity, individual accountability is difficult.
Let’s look at a typical account and access life cycle scenario that starts with HR as the source of authority for the identity.
HR and identity management
Your identity management life cycle needs to start somewhere, and that is most likely with your HR department. This is where your employees start their journey within your organization. Once an employee has accepted a position, their digital profile is created. HR software is very specialized and is typically independent of the core IT identity services. Within an HR system, you can expect to manage your personal information, time off, payroll, performance, the employees you manage, and employee training, to name a few. The big challenge with your HR system is efficiently integrating the application into your core identity services.
Tip
There are many HR platforms available on the market today. Some examples include Microsoft Dynamics 365 Human Resources, SAP SuccessFactors, Workday, and Oracle PeopleSoft.
When you look at your core identity service, it’s common that it will consist of an on-premises AD deployment that’s synchronized to Azure AD, creating a hybrid identity model. One of the challenges with the traditional deployment using on-premises AD is the limitation on delivering a well-rounded identity service beyond basic account management. Having the ability for employees to request contractor accounts, manage their own AD groups, update profile information, use a self-service portal, manage the account life cycle process, and build automation are not native features of AD. This is where an identity management solution sits between your HR source and AD to provide the required efficiency.
From a Microsoft standpoint, this solution is known as MIM, which is the latest edition of Forefront Identity Manager (FIM). MIM is an extremely powerful management tool and serves as a critical component of the overall identity life cycle. MIM deployments can be highly complex, depending on the level of customizations needed. To learn more about MIM and its capabilities, visit https://docs.microsoft.com/en-us/microsoft-identity-manager/microsoft-identity-manager-2016.
Tip
The HR system will contain Personal Identifiable Information (PII), so it is critical that you work closely with the HR team to ensure that data is correctly secured and encrypted both in transit and at rest.
As cloud adoption increases, an ideal scenario is to directly integrate your HR system with a cloud identity provider, such as Azure AD. Unfortunately, while many organizations have compliance requirements to keep identities and passwords on-premises, many applications still rely on AD for authentication, with on-premises architecture fully deployed, making it hard to shift this model.
At some point soon, you are going to need to shift to a direct provisioning model from your HR system to Azure AD. Because of this, it is recommended you start planning out this journey, as a transition this complex will take time. Microsoft already supports provisioning from some of the more common HR platforms, including Workday and SAP SuccessFactors. You can find more information here for planning purposes: https://docs.microsoft.com/en-us/azure/active-directory/app-provisioning/plan-cloud-hr-provision.
Next, we will review the available Microsoft directory service technology to support your identity life cycle.
Integrating directory services
Beyond an HR system with integration into your identity management solution or MIM is Active Directory (AD). AD is an on-premises hierarchical directory that stores objects, such as user accounts, passwords, user information, computer objects, and security groups. This is where the user objects will be active and enabled for accessing the IT systems within your environment.
Referring back to the overall identity life cycle, once a record has been established in MIM based on the HR feed, it will then provision an account in AD for the user. The MIM object isn’t the account that the user will use but is typically set up as the authoritative source to the AD object. What this means is if the MIM object is set to be termed because the HR system sent a term instruction, the AD object will be disabled. Depending on your configuration, re-enabling the account directly within AD will eventually revert it to a disabled state, since MIM is authoritative. This is extremely powerful and exactly how the process should work. It also helps to prevent anyone with access to AD from creating and enabling accounts that they shouldn’t. All requests should filter through MIM, or other identity management tools, for better control and accountability, as they serve as the centralized place for all identity and access requests.
Tip
Protecting your active identities is critical, and AD needs to be at the core of this protection. The following is Microsoft’s best practices for securing Azure AD: https://docs.microsoft.com/en-us/windows-server/identity/ad-ds/plan/security-best-practices/best-practices-for-securing-active-directory.
For on-premises identities to work in a cloud directory, a copy will need to be synchronized to support the identity and authentication requirements of the modern world. Typically, a synchronization tool is used between your on-premises AD and the cloud provider. This will enable what’s known as the hybrid identity for your organization. Microsoft’s Azure AD Connect provides that synchronization for all or any selected objects, Organizational Units (OUs), and user attributes from your AD into Azure AD. With Azure AD Connect, you can provide a single identity for your user to access both on-premises resources as well as cloud-based resources.
Azure AD is Microsoft’s enterprise cloud identity provider, providing the next generation of identity management and security for your users. Some examples of cloud resources that a user will log in to using their Azure AD identity are Exchange Online, OneDrive for Business, SharePoint Online, Windows (Azure AD Join), and so on. The user will not know the difference between the traditional AD account and the Azure AD account that is optimal for the user experience. Let’s review a little more about hybrid identities with Azure AD Connect.
Hybrid identities with Azure AD Connect
Azure AD connect supports the synchronization of users, user attributes, security groups, and other on-premises objects. One important decision to make about Azure AD Connect is the method of authentication for your users to sign in. For hybrid identities, the two supported models are cloud authentication and federated authentication. While there are many considerations when choosing the authentication model, in cloud authentication, Azure AD handles the sign-in, whereas with the federated model, the sign-in is passed back to on-premises AD Federation Services (FS). To learn more about the considerations for each authentication model, visit this link: https://docs.microsoft.com/en-us/azure/active-directory/hybrid/choose-ad-authn.
For the remainder of this section, we will be referencing features of the cloud authentication model. Let’s now review how passwords can be managed between on-premises and Azure AD.
Since Azure AD only syncs a copy of your identity, you need to determine how to manage your passwords within the cloud. Azure AD Connect provides the option to sync the password hash (known as password hash synchronization) to Azure AD. It also supports pass-through authentication back to on-premises so that users can use the same password both in the cloud and on-premises. If you have an on-premises deployment of AD FS, you can also use the federated integrated feature to take advantage of additional AD FS capabilities. Let’s review the difference between pass-through authentication and password hash sync. If you plan to invest in Microsoft-based cloud identity security solutions, it is strongly recommended to enable password hash sync.
Tip
Microsoft does not sync the actual passwords of your user accounts. For optimal security of your user passwords, a hash of the password with a per-user salt is synced to Azure AD.
Azure AD pass-through authentication validates passwords between on-premises and the cloud against AD. If you wish to enforce on-premises security and password policies and do not want passwords to be stored with the Azure AD authentication service, choose pass-through authentication.
Azure AD password hash synchronization synchronizes the stored on-premises password hash to the Azure AD authentication service with Azure AD Connect. Authentication takes place against Azure AD, not against on-premises AD. Whenever a password is changed on-premises, the password is synced (within 2 minutes) to Azure AD. If password writeback is configured, then a user can change the password from the cloud and sync it back on-premises. Some on-premises password policies will still apply to the cloud identity if configured for password hash sync. For example, an on-premises password complexity policy will override any policies configured in the cloud. Additionally, any on-premises expiration policy will not affect the cloud identity, as the default configuration is set to never expire. If a user’s password expires on-premises, cloud services will not be interrupted.
Azure AD Connect also supports two additional features to help with password management.
The EnforceCloudPasswordPolicyForPasswordSyncedUsers feature of the MSOnline PowerShell module allows you to enforce users to comply with a password expiration policy in Azure AD. To learn more about setting this cmdlet, visit this link:
If using on-premises tools such as Active Directory Users and Computers (ADUC) to reset passwords, you can set the ForcePasswordChangeOnLogOn feature of the Azure AD Connect PowerShell module to support the temporary password flag in Azure AD. This will allow the user to reset their password the next time they log in to Azure AD resources if it needs to be reset by the helpdesk.
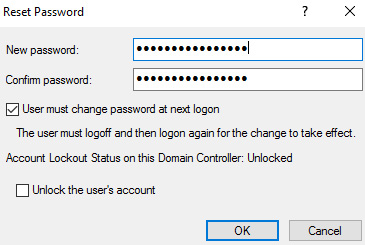
Figure 5.2 – The Reset Password option in ADUC
Azure AD Connect monitoring is available to check the health status through the Azure portal. To view Azure AD Connect Health, log in to Azure AD at https://portal.azure.com and search for Azure AD Connect Health. You can click on your service name to view additional details about your servers and alerts.

Figure 5.3 – The Azure AD Connect Health dashboard in the Azure portal
Now that we have covered Azure AD Connect and options for managing passwords, let’s review the life cycle process.
Completing the account life cycle process
Simply put, once the identity is synchronized to the cloud, this completes the life cycle of a user’s identity from the system of record. While there may be variances in the products between vendors, the life cycle framework and policy provided can be applied using any identity service or vendor. To recap, the following workflow should be referenced to process your identities:
HR > identity management system > traditional directory service > identity synchronization > modern directory services
It’s also critical to ensure the off-boarding process works correctly throughout this life cycle. If properly configured, when HR initiates a termination, the account should be disabled throughout all directories. Any failures in this process can allow a user to access resources after they have left the organization, which can cause a serious security risk.
Tip
Make sure you are fully aware of synchronization times within each of your identity systems. Terminating a user within HR can take time to synchronize downstream through your systems. For immediate action, you may need to manually intervene to ensure identities are correctly disabled in a timely fashion.
In addition to your identity life cycle is your group management strategy. Ensure you constantly audit group memberships and understand what services, applications, and data your users have access to. Ensure users don’t have access to groups that they shouldn’t, and as users change roles, it is critical they are removed from groups that they no longer need access to. Group management must be a part of your identity life cycle, and the correct processes and procedures are critical to ensure they are managed correctly.
The following diagram illustrates a high-level architecture of what your identity life cycle may look like:

Figure 5.4 – The identity life cycle architecture example
The account life cycle can be very complex, and mismanagement of this process can easily create vulnerabilities. Some best practices with this architecture include working closely with your HR team, ensuring all traffic, feeds, and integrations are encrypted, minimizing the number of privileged identities, and enforcing MFA on all accounts. Be sure to enable auditing to hold accountability and add safeguards to ensure the identity portal is secure and not accessible over the internet if possible.
Next, let’s look at managing external or guest identities in Azure AD, which are commonly referred to as B2B.
Managing Azure external user access (B2B)
Azure AD B2B is a game-changer within the enterprise identity space. When looking back at the traditional model with AD and on-premises applications, providing access to external partners was far from an easy task. For most organizations, setting up an identity within their local AD was probably a standard practice. This meant the need for local AD accounts to be managed and governed within your environment, as with contractors and employees. Many organizations may have set up AD FS or third-party federation applications to support the ability to allow an external party to use their own ID. The issue with this is the involvement, complexity, and effort to set up the federation between both parties. The more external vendors you work with, the more integrations you will need to set up and systems to manage.
Azure AD B2B greatly simplifies this process by allowing you to invite a guest user into your Azure environment and provide them with access to your applications and services. Once invited into your organization, the guest user then authenticates using their current organization’s work identity to access approved applications hosted in your subscription. There is no need to provision new domain accounts or add any additional infrastructure to support this collaboration model. The best part of this process is that the user’s identity is managed and maintained by their hosting organization, which is a significant improvement from an account management perspective. Although housekeeping will be required in your Azure AD to clean up stale accounts, once the external user is disabled within their hosting environment, they can no longer access your environment using that identity, which is a major advantage. Azure B2B also supports collaboration with organizations through external identity partners, such as Facebook, Google, Microsoft accounts, and other Security Assertion Markup Language (SAML)/Web Services Federation (WS-Fed) identity providers.
You can learn more about Azure AD B2B at https://docs.microsoft.com/en-us/azure/active-directory/b2b/what-is-b2b.
Tip
Entitlement management is a feature of Azure AD that can help manage the identity life cycle of B2B accounts. To learn more about this feature, visit https://docs.microsoft.com/en-us/azure/active-directory/governance/entitlement-management-overview.
To view and access the external collaboration settings for your tenant, log in to https://portal.azure.com, click on the portal menu at the top left, and choose Azure Active Directory. Select External Identities and click on External collaboration settings. The following screenshot is of the Guest user access settings in the Azure portal:
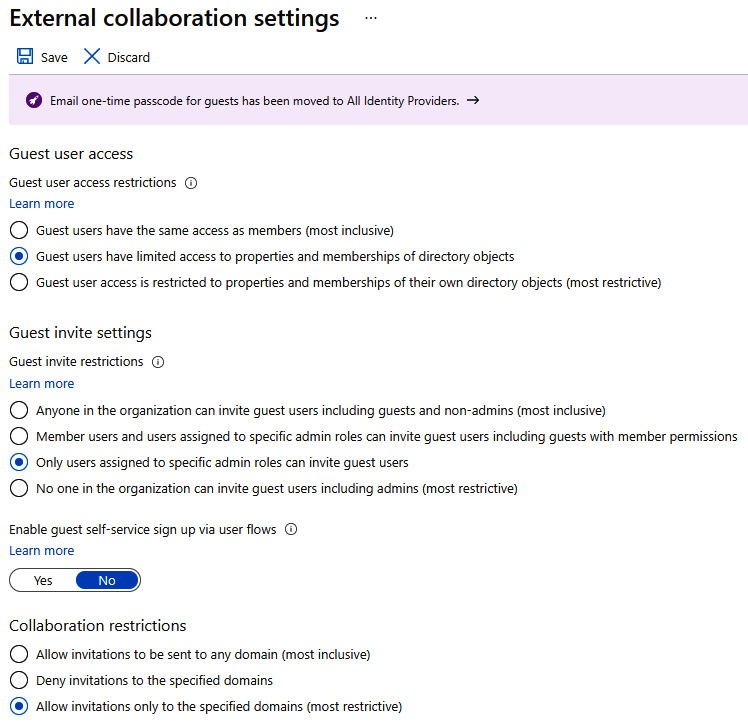
Figure 5.5 – The Azure AD Guest user access settings
For a more secure configuration, it is recommended to select the following external collaboration settings:
- Guest user access is set to Guest users have limited access to properties and memberships of directory objects.
- Guest invite settings is set to Only users assigned to specific admin roles can invite guest users.
- Enable guest self-service sign up via user flows is set to No
- Collaboration restrictions is set to Allow invitations only to the specified domains (most restrictive).
To invite a new guest user into your organization, go back to the Azure AD management screen and click on Users, and then click on New Guest User. You will be asked to provide information, but only an email address is required to send an invite. By default, the user will have very limited access. Once this information is entered, click on Invite.
The external user will receive a welcome email to accept the invitation and gain access to your tenant. The welcome email can be customized to an extent like the example in the following screenshot:
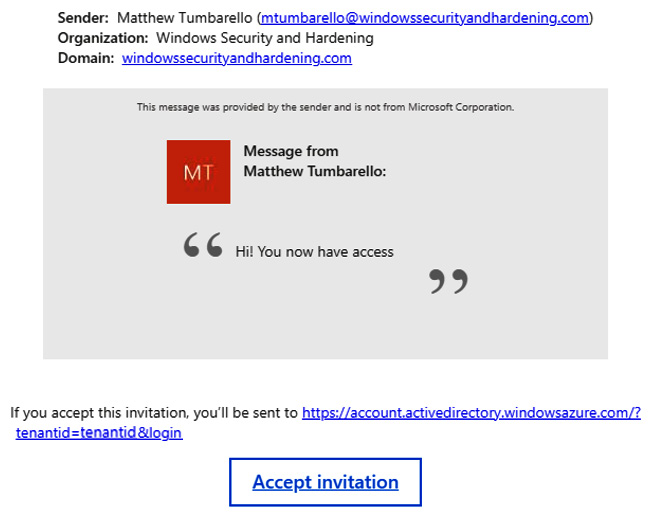
Figure 5.6 – An invitation example for B2B access
If you have selected the Allow invitations only to the specified domains (most restrictive) collaboration restriction, make sure to whitelist the domains under Target domains or you will receive an error sending any guest invites.
Microsoft has both B2B and B2C as part of its guest access services. You can visit https://docs.microsoft.com/en-us/azure/active-directory/b2b/compare-with-b2c to view the differences, as B2C requires a separate tenant from your organization’s Azure AD.
The Azure AD B2B model is extremely powerful and allows you to move away from old methods of needing to provision accounts within your environment. The model is very simple and, from a security and auditing perspective, is a great improvement on previous processes.
Next, let’s discuss the different types of administrative roles available in Azure AD and using RBAC. It’s important to cover these roles, as they can directly relate to your Windows systems due to their control over the management plane in your Azure tenant.
Understanding the Azure cloud administrative roles
In your Azure subscription, there are many roles for controlling access to resources and services. There is Azure RBAC, which is the authorization system that is built around Azure Resource Manager (ARM) and is used to control access to different ARM-based resources, such as resource groups or virtual machines. There are Azure AD roles that are used for managing all the different services that interact with Azure AD and Microsoft 365. An example of this is the Guest Inviter role, which can grant permission to helpdesk staff to invite B2B guests. Additionally, if you’re using Microsoft Endpoint Manager for managing endpoints, Intune also has its own set of roles for better fine-grained access control over enterprise-managed devices. Let’s look at the Azure AD and Microsoft 365 admin roles.
Azure AD and Microsoft 365 admin roles
Administrative role permissions are worth mentioning, as they can have a direct impact on your Windows clients and servers that rely on cloud-based services to run effectively. It is important that these permissions are only assigned as needed and managed through privileged identity management for just-in-time access. While there are many cloud-based administrative roles that serve different purposes, there will be overlap in permissions, so it’s important to review them in detail before assigning them to your staff. A few different types of admin roles available across Azure AD and Microsoft 365 services include the following:
- Azure AD and Azure RBAC roles
- Endpoint Manager roles
- Security and Compliance Center admins
- Exchange Online admin toles
- Teams admin roles
- SharePoint admin
- Power BI and Power Platform admins
Many of the services in Microsoft 365 will also have additional fine-grained permissions available that can be assigned from their respective admin portals. For example, Microsoft Endpoint Manager and Exchange Online have their own subsets or roles that allow you to customize permissions for admins to perform different functions. Both examples also have the capability to create custom roles if the built-in role templates don’t meet your needs. The following screenshot is from the Microsoft Endpoint Manager admin center, showing the different available Intune built-in roles for assignment:

Figure 5.7 – Intune role assignments in the Microsoft Endpoint Manager admin center
The Microsoft 365 admin center also has a useful feature that lets you compare Azure AD roles. To use compare roles, log in to the Microsoft 365 Admin center at https://admin.microsoft.com. Click Show All to view all the navigation options and select Roles | Role assignments. Here, you can select up to three Azure AD roles and choose Compare roles to view their permissions side by side. The following screenshot shows output comparing two admin roles:

Figure 5.8 – The Microsoft 365 admin center Compare roles page
Now that we have reviewed the different types of privileged roles in Azure AD and Microsoft 365, let’s discuss Azure RBAC.
Azure RBAC
RBAC in Azure is used for the authorization of access to Azure resources by using role assignments. An example of an Azure resource could be anything from a virtual machine and a virtual network interface to Azure Firewall and a load balancer, to name a few. RBAC is built around a role definition that defines the permissions based on Actions, DataActions, NotActions, and NotDataActions. They can be assigned a specific scope as well that dictates what set of resources the role applies to. RBAC roles can be assigned directly to users, groups, service principals, or managed identities. Azure already has many built-in roles for use, but custom roles can be built using the pre-defined roles as a template and customizing them to fit your needs. To read the official documentation on RBAC for Azure resources, visit https://docs.microsoft.com/en-us/azure/role-based-access-control/. Assigning roles to a set of resources in the Azure portal is accomplished through the access control (IAM) feature. You can use IAM to also view available roles and their permissions, current role assignments, and how they are inherited. To access the access control (IAM) feature, log in to https://portal.azure.com, search for and select Subscriptions, select your subscription, and then click on Access control (IAM).
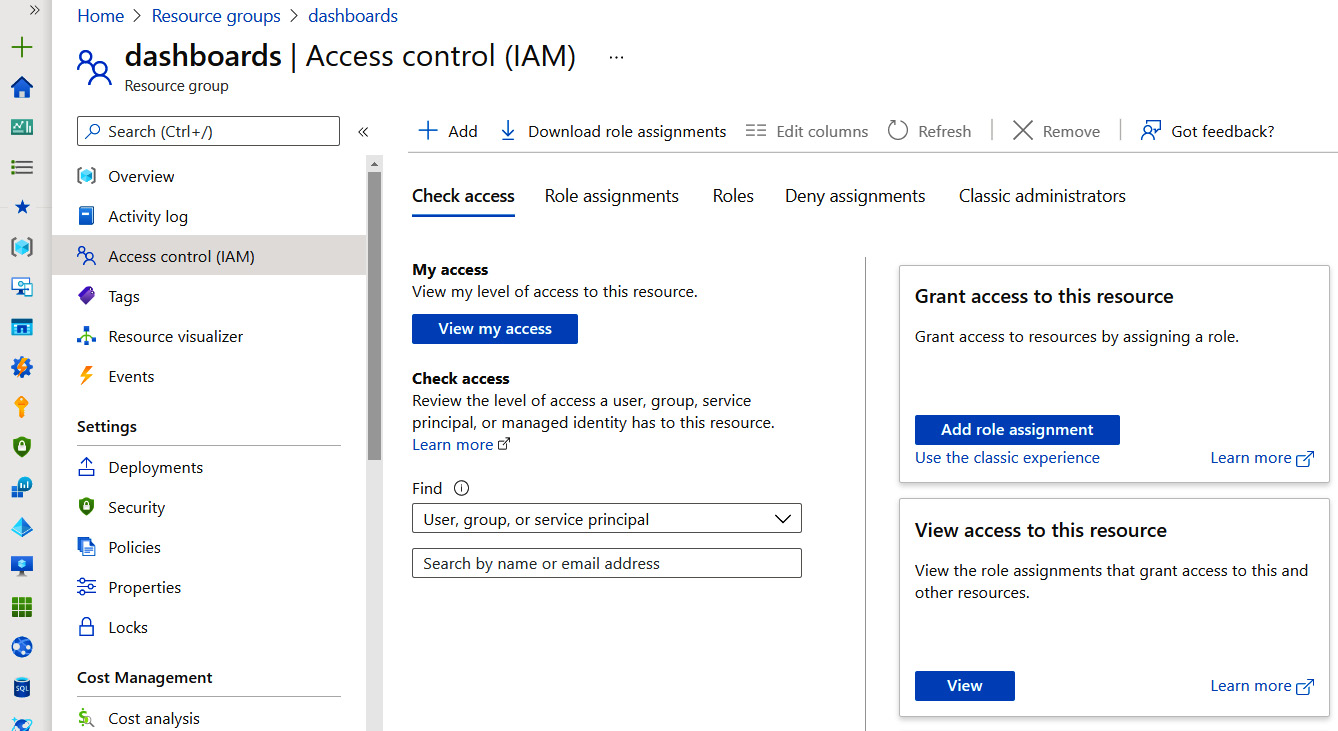
Figure 5.9 – Access control in Azure AD
Here are a few security recommendations to think about when assigning security roles in Azure AD or RBAC:
- Enable MFA for all admins and privileged users.
- Notify admins when other admins reset their passwords.
- Restrict access to the Azure AD portal for admin accounts to compliant devices or privileged access workstations.
- Limit the number of Global Administrators.
- Assign the least permissive roles for admins to perform their job.
- Use privileged identity management with approvals to grant access to roles.
- If no privileged identity management is available, use a separate account for any privileged activity.
Next, let’s look at implementing PAM, PIM, and JIT, which are common acronyms for privileged access management security tools.
Implementing privileged access security tools (PIM, PAM, and JIT)
Privileged access security, in terms of securing access to Windows systems, can be thought of as the duty of securing access to an account or service with elevated permissions on a system for just-in-time access. There can be many uses for this account, such as being used interactively with remote desktop, using tools such as PowerShell, or running a Windows service or scheduled task. We don’t want anybody to have unmanaged access to use these accounts or leave freestanding access to your admins, as this goes against the principle of least privilege. Let’s look at three ways to secure access, using the Privileged Identity Management (PIM), Privileged Access Management (PAM), and Just-In-Time (JIT) solutions.
Enabling admins with Azure AD PIM
Azure AD PIM is a service that allows you to control access to resources and services in Azure at the identity level. Let’s consider a scenario where a service desk employee needs certain administrative access to perform duties to help resolve support tickets. Using the standard model of assigning free-standing access, it’s likely at some point the service desk agent has been over-provisioned and has more access than typically needed to perform normal daily tasks. Their roles may include local administrator rights to Windows devices, access to reset users’ passwords and MFA methods, or the ability to perform a remote wipe on Intune-managed devices.
This service desk employee’s account would be considered a privileged identity. By allowing free-standing access, not only is the principle of least privilege not being implemented, but waiting for the scheduled auditing of account permissions to flag this account as high risk could also be too late and leave your organization at risk if the account is compromised. Implementing Azure PIM helps balance these security risks while still allowing your employees to perform their duties safely and effectively. In fact, a key benefit of PIM is detecting which users are assigned privileged roles as part of the built-in auditing capability. PIM is built around a concept referred to as eligibility. An eligible assignment allows the user to activate their role JIT when they need to perform an administrative function. Azure PIM can manage both Azure AD and ARM-based roles.
For more information on the Azure PIM service, go to https://docs.microsoft.com/en-us/azure/active-directory/privileged-identity-management/pim-configure.
In the following example, we are going to set up an eligible admin in Azure AD PIM to allow a user to request the Intune Administrator Azure AD role. In the role settings, we will require a justification and a ticket number reference to submit the request. The associate will also need to specify how long they need the role. Once it’s submitted, it will need to be approved to complete the activation.
Tip
The Privileged Role Administrator in Azure AD has permissions to manage the Azure AD PIM service.
To use Azure AD PIM, an Azure AD Premium P2 or an Enterprise Mobility + Security (EMS) E5 license is required: https://docs.microsoft.com/en-us/azure/active-directory/privileged-identity-management/pim-getting-started.
Follow these steps to enable a workflow approval and configure an eligible admin for the Intune Administrator role:
- Log in to the Azure portal at https://portal.azure.com.
- Search for Azure AD Privileged Identity Management and select it.
- Select Azure AD Roles from the Manage section.
- Select Settings under Manage.
- Find and select Intune Administrator. Click Edit.
- Change the Activation maximum duration (hours) setting to 2.
- For On activation, require, select Azure MFA.
- Check the Require Justification on activation, Require ticket information on activation, and Require approval to activate fields.
- Scroll down and click on Select approvers and choose your account or an approver. Choosing at least two approvers is recommended.
- Click Save.
Now, let’s make a user an eligible admin for this role:
- Under Manage, click on Roles, and select Intune Administrator.
- Keep Eligible assignments selected and click on Add assignments.
- Choose No member selected under Select members and find an eligible user, and then click on Select.
- Click Next.
- Leave assignment type as Eligible and keep Permanently eligible selected. Click on Assign to complete the assignment.
Once the assignment is complete, the next time the user logs in to the Azure portal, they can search for Azure AD PIM and request the role, requiring them to fill out the details configured in the previous steps, as shown in the following screenshot:

Figure 5.10 – Activating the Intune Administrator role in Azure PIM
This is a very basic example of how Azure PIM can be used for JIT access. PIM also supports privileged access groups where roles can be assigned directly to Azure AD security groups. There is also a discover and monitor feature that can find and audit existing privileged roles in your subscription.
Tip
Azure PIM also supports external users to collaborate on Azure resources using B2B.
Next, let’s review what it means to grant JIT access to resources.
Granting JIT access
The JIT concept is useful for providing access to an account or assigning a role to an identity that adds the permissions needed to perform administrative actions for a set duration. JIT access provides an additional security layer that helps to mitigate risks from free-standing or always-available accounts. Typically, access is granted through an approval workflow process with a set of policies that defines who can request a defined role or account. Naturally, JIT helps enforce the principle of least privilege by eliminating permanent assignment. Many PAM solutions have a JIT solution built into their product today as standard functionality. In Azure, two solutions that provide JIT access are Azure PIM and Microsoft Defender for Cloud’s (JIT) Virtual Machine (VM) access. JIT VM access works by gating the inbound traffic ports used for the remote management of your VMs by creating rules enforced through network security groups. By incorporating an approval workflow through Defender for Cloud, the locked-down ports are opened after approval for the specified duration.
Tip
Chapter 11, Server Infrastructure Management, includes a walk-through of how to configure JIT VM access, but further information can be found at https://docs.microsoft.com/en-us/azure/defender-for-cloud/just-in-time-access-overview.
Next, let’s look at managing privileged accounts using PAM.
Protecting privileged accounts with PAM
A PAM solution can be critical in helping organizations secure access to systems, meet compliance, and monitor the privileged accounts used in their environment. With an ever-growing threat landscape and a seemingly unlimited amount of attack vectors, implementing a PAM solution can provide a huge benefit in strengthening your company’s security posture. Free-standing accounts will always exist in the environment, whether they are actively in use or not, and make great attack targets for malicious actors. By implementing a PAM solution, coupled with a JIT request approval process and password rotation, the risk of compromise is greatly reduced. PAM solutions typically include auditing capabilities that help organizations maintain compliance and avoid penalties from access violations.
When choosing a PAM solution, look for the following core set of features:
- Account discovery for all systems, devices, and applications, which includes, but is not limited to, Windows, Linux, Unix, Cisco devices, and other networking equipment
- The ability to manage local accounts and service accounts and orchestrate restarting services with minimal impact
- Credential management capabilities, including password rotation, a workflow approval process, and auditing trails
- Expiration policies with password rotation for stale, free-standing (always-existing) privileged accounts
- The ability to provide access to systems using middleware tools, such as web password fillers and Remote Desktop Protocol (RDP)/Secure Shell (SSH) launchers, that never expose credentials to users
- Discovery alerts to notify the security team whether new backdoor accounts were created without approval
- Automation workflows for privileged execution using scripted tasks
- Monitoring and auditing capabilities through remote session recording, command logging, and analytics
- The capability to link to an IT Service Management (ITSM) tool or a change management process
- SIEM integration for leveraging Security Operations Center (SOC) services
- Third-party access leveraging Single Sign-On (SSO) authentication and MFA
SaaS solutions are becoming a popular option in the PAM space. Depending on your use case for PAM, a SaaS solution can offer a lighter footprint and eliminate the need to deploy an extensive infrastructure.
Tip
As part of a Critical Incident Response Plan (CIRP), it’s a good idea to have dedicated accounts in PAM, only to be used by first responders. This will help ensure that audit logs are kept clean when helping identify the source of the intrusion.
In this section, we covered various topics that covered the identity and access management space. We reviewed the account life cycle process and talked about the importance of controls to ensure timely housekeeping. Throughout the rest of this section, we reviewed different admin roles in Azure AD and Microsoft 365, as well as guest B2B user accounts. Finally, we discussed managing privileged identities with PIM, PAM, and JIT.
Next, let’s review the use of local administrator accounts on your Windows systems.
Securing local administrative accounts
Local administrator account access and built-in or default administrator accounts can be a challenge from both a risk and management perspective when securing your Windows devices. Two main problems exist with the local or built-in accounts in Windows (such as administrator or guest) and business users requesting administrative access to their accounts for installing applications or performing certain functions. For the latter, there may be legitimate scenarios where a business user needs these rights, but generally, this is not the case, and they should be leveraging support teams or a temporal admin elevation process that is closely audited. If they are running a process locally that requires elevated rights, that process should be revisited and transitioned to where it can be monitored under tighter controls. Allowing business users this access is an obvious vector for privilege escalation through account compromise on some of the most exposed attack surfaces, the endpoints.
Privilege escalation is a common attack tactic, considering that most applications, including malicious payloads, typically require some form of elevated rights in Windows to be installed. Many times, privilege escalation is accomplished simply by compromising a local or user account due to a vulnerability or misconfiguration. If the account has permanent admin rights, this becomes a problem. Additionally, any other stagnant local accounts left enabled on a system can be used to gain access, maintain persistence, and for dumping credentials of other accounts to move laterally. To help combat this, let’s look at some security recommendations for dealing with local accounts in Windows:
- Disable both the built-in administrator account and guest account. If these accounts aren’t needed, it’s best to disable them. Managing passwords for local admin accounts can be a challenge, and the built-in administrator account cannot be locked out, making it a good target for an attacker. Additionally, the guest account allows users to log in without a password, opening a situation for reconnaissance activities, depending on your policies.
- While disabling these accounts is preferred, if they must exist, it is recommended to recreate them with different names that are not easily identifiable. If you just rename the built-in accounts, the security identifiers (SID) still exist and can be leveraged instead of the account name.
- Enable the Do not enumerate connected users on domain-joined computers policy and disable Enumerate local users on domain-joined computers. Configuring these policies can help prevent reconnaissance and discovery tactics, such as gathering information about account names that can later be targeted in other attacks, such as brute force or password spraying.
- Enable success and failure auditing for sensitive privilege use. This audit policy will log when a user account uses sensitive privileges on a system. Having these logs enabled is helpful for security forensics teams.
- For enterprise scenarios, disable the Accounts: Block Microsoft Accounts policy. In most cases, a user should not be able to log in to their work device with a Microsoft account. They should only be using corporate-issued identities.
Managing user requests for local admin accounts can be challenging, and some organizations have adopted processes that allow users to temporarily request admin rights for a duration of time. This can be accomplished in many ways, such as through temporary group membership in an AD, using a unified endpoint management solution, or implementing a request workflow in Azure AD PIM for Azure AD joined devices. Here are a few recommendations to better manage local admin accounts:
- For domain-joined systems, implement a system known as a Local Admin Password Solution (LAPS) to rotate local administrative account passwords if they must exist.
- Use a PAM solution from reviewed vendors, such as Delinea, CyberArk, or BeyondTrust, to manage the local administrative accounts on your workstations. These vendors offer robust solutions, can manage multiple account types, and have reporting and auditing functionalities built into them.
- Use Windows Autopilot or bulk enrollment methods to join devices to Azure AD. This will allow a standard user to enroll a device on Azure AD and Intune without becoming an administrator.
- For Azure AD joined devices, leverage the Azure AD Joined Device Local Administrator role.
Tip
Using the Azure AD role is a convenient way to add accounts as local administrators, but be mindful that this will make them an administrator on all Windows devices joined to Azure AD.
Next, let’s look at the methods used for authentication and how to use them to provide users with a seamless and secure sign-in experience.
Understanding authentication, MFA, and going passwordless
In this section, we will review authentication as commonly used today. We will discuss MFA and passwordless methods used to protect users’ identities. As already stated, a compromise of credentials is one of the most common methods of a breach today, and commonly used authentication models are outdated and need updating. The traditional method of entering a username and password is simply not acceptable. If you don’t have a strategy in place to improve your authentication posture, add it to your top three security priorities. Investing in a zero-trust strategy means that you always assume the possibility of a breach, and account credentials are no exception.
Looking at an on-premises AD deployment, authentication methods consist of Kerberos, Integrated Windows authentication, Digest Authentication, NTLM authentication, or Transport Layer Security (TLS)/Secure Sockets Layer (SSL), depending on what you are accessing from your device and how you are accessing it. Modern authentication within Azure AD typically uses an access security token with claims, OAuth 2.0, and SAML. Using a hybrid model will likely include a blend of all these protocols as part of your authentication process, depending on where the service is being provided.
Tip
For your on-premises deployment of AD, it is highly recommended that you enforce secure Lightweight Directory Access Protocol (LDAP). By default, LDAP traffic is not encrypted and can easily be viewed by an attacker within your network.
Let’s now look at password management and recommendations for how to manage and secure passwords.
Securing your passwords
Since passwords are still relevant and will be for a while, it is important to review your current policies, and it could be time to make some changes based on updated guidance. Common policies include changing them every 90 days, using 8 characters as a minimum, and ensuring complexity. Now, security research has suggested new recommendations due to the advances in cracking tools, password leaks on the dark web, predictable passwords due to frequent change, and users writing them down due to complexity. The following guidelines are now widely recommended to counter these challenges:
- Consider using passphrases over passwords.
- Use a minimum of 12 characters – the more, the better.
- Remove the periodic requirements to change passwords and only change them in the event of account compromise.
- Ban common passwords through a blocklist.
- Reduce complexity rules to allow passphrases to be easier to remember.
- Go passwordless.
In your Windows AD environment, a domain-level password policy can be configured easily if you only require one policy for all users. If there is a requirement to deploy additional password policies, then a fine-grained password policy can be configured and scoped to users and groups, allowing for multiple password policies. A use case for this would be to enforce stronger password requirements for privileged users and system accounts.
Tip
You can only apply a fine-grained password policy against global security groups or user objects. Furthermore, to use fine-grained password policies, the domain functional level must use Windows Server 2008 or newer.
Follow these steps to implement a password policy using Group Policy:
- To change the password policy using Group Policy, open the Group Policy Management snap-in from your management workstation.
- Right-click on Default Domain Policy, select Edit, and then browse to Computer Configuration | Policies | Windows Settings | Security Settings | Account Policies | Password Policy. In the following screenshot, you can see where to configure your domain password policy:
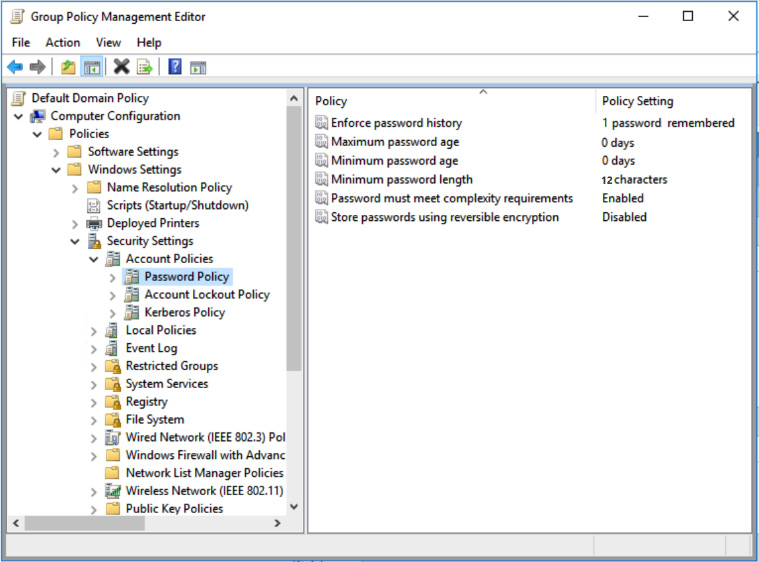
Figure 5.11 – The default AD domain password policy
Follow these steps to implement more than one password policy, using a fine-grained password policy:
- To use fine-grained password policies, log in to your domain controller (Windows 2012 or newer) with the appropriate permissions.
- Search for AD Administrative Center and click on domain (local), double-click on System, and then double-click on Password Settings Container.
- Right-click on the main screen and select New, and then click on Password Settings.
- Fill out the requirements for your password policy and select the groups of users that the policy will apply to, and then click OK. The following screenshot shows the new policy screen:
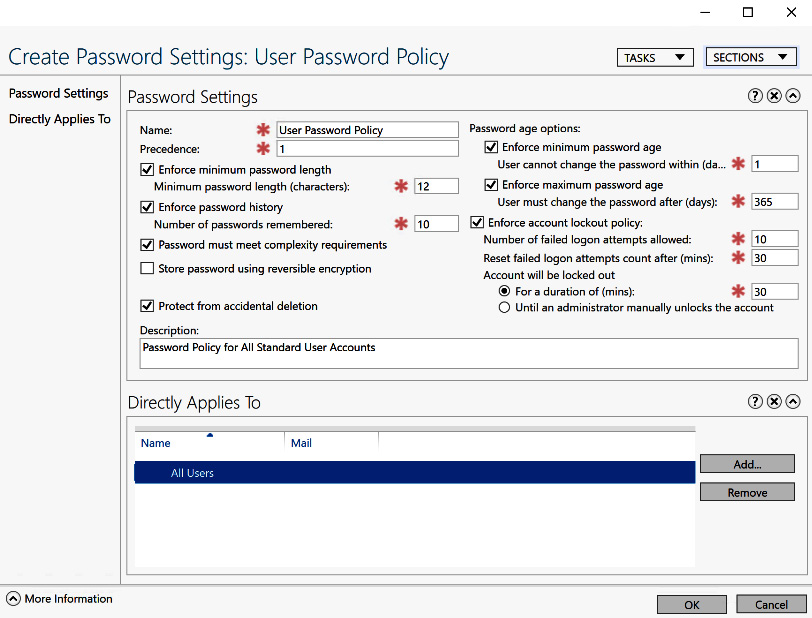
Figure 5.12 – The fine-grained password policy
If you are using cloud-managed identities in Azure AD and Microsoft 365, your options to modify the password policy are different. By default, any account created in Azure AD can use a password that is between 8 and 256 characters, requires complexity, expires every 90 days, receives a notification after 14 days of setting it, and doesn’t allow the last used password to be used again when changed. Most Azure AD password policies are configured with PowerShell using the Set-MsolPasswordPolicy cmdlet. There are also options to configure a custom banned password list and enforce Azure AD Password Protection settings back to on-premises AD through an agent deployment. Let’s look at where to set the password expiration policy in the Microsoft 365 admin center. To modify these settings, follow these steps:
- Log in to https://admin.microsoft.com with the correct permissions.
- Click on the menu at the top left. Click on Show All and select Settings. Click on Org settings in the sub-menu. When the page opens, choose the Security & Privacy tab, and select Password expiration policy.
- Select Set user passwords to expire after a number of days to configure the two options. These policies apply to any accounts created directly in Azure AD.
Tip
As mentioned earlier, the Azure AD Password expiration policy does not apply to hybrid identities synced with Azure AD Connect.
Next, let’s look at where to configure the Azure AD Password Protection options in Azure AD.
Configuring Azure AD Password Protection
The Azure AD Password Protection service helps to block weak and well-known passwords using a global banned password list managed by Microsoft, which is generated by analyzing telemetry data of commonly used and weak passwords. By default, this is enforced in Azure AD for cloud-only users; otherwise, you will require an Azure AD Premium P1 or P2 license if you synchronize users from on-premises AD or use the custom banned password list. Password Protection has a custom banned password list that can be used to blacklist organizational-specific terms, such as brand or product names, that an attacker may attempt to use for password cracking.
To modify these settings from the Azure portal, follow these steps:
- Log in to https://portal.azure.com with the correct permissions.
- Click on the menu at the top left. Click on Azure AD and then the Security blade under Manage. Choose Authentication Methods under Manage and select Password Protection.
Here, you can modify the lockout threshold and the lockout duration in seconds, enable a custom banned list, and enable password protection on-premises.

Figure 5.13 – Azure AD Password protection
To learn more about deploying Azure AD Password Protection on-premises, visit this link: https://docs.microsoft.com/en-us/azure/active-directory/authentication/howto-password-ban-bad-on-premises-deploy.
Next, let’s look at configuring Self-Service Password Reset (SSPR) as a self-help tool for your users.
Enabling SSPR
SSPR is a feature of Azure AD that allows users to reset, change, or update their passwords. This is a free feature for cloud-only identities looking for password change functionality, but it requires an Azure AD Premium P1 or equivalent license if syncing from an on-premises directory. SSPR can considerably reduce support calls and save users time if they forget their password or device PINs. Depending on the SSPR configuration, at a minimum, all that is required for user self-service is an internet connection and an alternative method of authentication. Let’s look at how to enable SSPR functionality for Windows clients and configure a link on the Windows 11 login screen.
To enable SSPR and set up the authentication and registration methods for hybrid identities with Azure AD Connect, follow these steps:
- Log in to the Azure portal at https://portal.azure.com.
- Go to Azure AD, select Users, and choose Password Reset. Choose All (or Selected to test) and then click Save.
Tip
You can only choose one security group if you are using the Selected option to enable SSPR. Keep this in mind if you’re thinking about rolling this out.
- Choose Authentication methods under the Manage menu. Select 1 for the number of methods required to reset and select Mobile app code and Mobile phone as the methods available to users. Click Save.
- Choose Registration under the Manage menu. Leave Yes selected to require users to register when signing in and leave the default value of 180 days to require reconfirmation of their authentication information.
Tip
If SSPR is enabled for All users, then all user accounts (including service accounts) will be required to reconfirm their verification methods every 180 days, which can cause interruptions for automated processes.
- Choose Customization under the Manage menu. Choose Yes to customize the helpdesk link and enter an email or URL for your service desk.
- Choose On-Premises integration under the Manage menu. To configure password writeback, Azure AD Connect must be set up with the password writeback configuration. Choose Yes, and select No for the option to allow users to unlock accounts without resetting their password.
The following screenshot shows the Write back passwords to your on-premises directory option on the self-service password reset page:

Figure 5.14 – On-premises AD integration
For more information about how to configure password writeback with Azure AD Connect, visit https://docs.microsoft.com/en-us/azure/active-directory/authentication/howto-sspr-writeback.
Once the self-service password reset has been configured, users can go directly to https://aka.ms/sspr to reset their passwords.
After they enter their user ID and enter the characters for the CAPTCHA, they will be asked to verify their identity with an alternative method, as shown here:
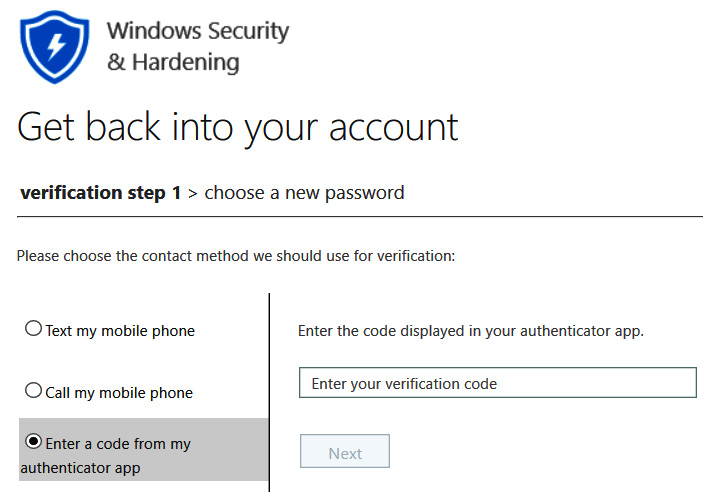
Figure 5.15 – The self-service password reset portal asking for additional security verification
Now that we have enabled SSPR, let’s look at how to implement the Reset password link on the Windows sign-in screen.
Enabling the self-service password link for Windows sign-in
To complete this section, Windows clients need to be Azure AD joined and Intune-managed. We will be using a custom OMA-URI setting on Intune device restriction profiles to deploy the Configuration Service Provider (CSP).
For more information about the limitations and restrictions of using the Reset password link for Windows clients, visit https://docs.microsoft.com/en-us/azure/active-directory/authentication/howto-sspr-windows.
To enable the Reset password link on the Windows sign-in screen, follow these steps:
- Log in to the Microsoft Endpoint Manager admin center at https://endpoint.microsoft.com.
- Click on Devices and choose Configuration profiles under Policy. Create a new profile.
- Select Windows 10 and later for Platform and choose Templates and select Custom under Template name.
- Give the profile an identifiable name and click on Next to view the configuration settings.
- Click on Add to add a new OMA-URI setting with the following configurations:
- Name: Self-Service Password Reset
- Description: Windows Sign-On Reset Password link
- OMA-URI: ./Vendor/MSFT/Policy/Config/Authentication/AllowAadPasswordReset
- Data Type: Integer
- Value: 1
- Click on Save and select Create. Click on Assignments and choose a security group or specific users or devices.
The following screenshot shows the Reset password link that takes the user to the Azure AD SSPR web page:

Figure 5.16 – The Self-Service Password Reset link
Tip
SSPR is also available in the Settings catalog under Authentication in Intune.
We just covered passwords and the best practices for password management. Next, let’s look at one way to eliminate the need for users to enter passwords multiple times, creating a better and more secure user experience, with Azure AD Seamless SSO.
Authenticating with Azure AD from Windows
Full Azure AD joined Windows devices can enjoy a seamless SSO experience during sign-on and across other applications running on windows without the need to enter a password. When a user signs in to Windows, the Azure AD Cloud Authentication Provider (CloudAP) is the modern authentication provider used to verify the user credentials against those stored in Azure AD. This includes support for Windows Hello for Business, biometrics, a device PIN, and password-type credentials. For devices with a supported hardware, Trusted Platform Module (TPM), hardware-based security is used to bound private cryptography keys to the TPM, and public keys are sent into Azure AD when the device joins Azure AD. This authentication model uses a Primary Refresh Token (PRT) formatted as a JSON Web Token (JWT) that contains the claims necessary to identify the device to Azure. This identification is also compatible with Azure AD-registered devices and other third-party applications running on Windows by using the Azure AD Web Account Manager (WAM) plugin to leverage the PRT token and enable SSO support. An example of this is a web browser such as Google Chrome with the Windows 10 Accounts extension. When the extension is enabled, users on Azure AD joined devices can visit websites and services hosted in your organization’s Azure and Microsoft 365 subscription without the need to enter credentials.
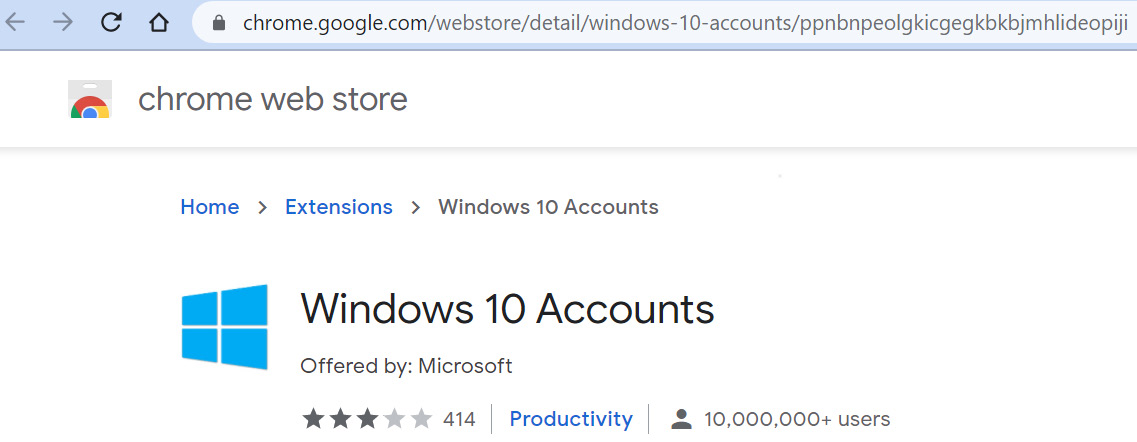
Figure 5.17 – The Windows 10 Accounts extension for Google Chrome
The following is another example that shows the flow when using a PRT for SSO for an Azure URL within a browser:
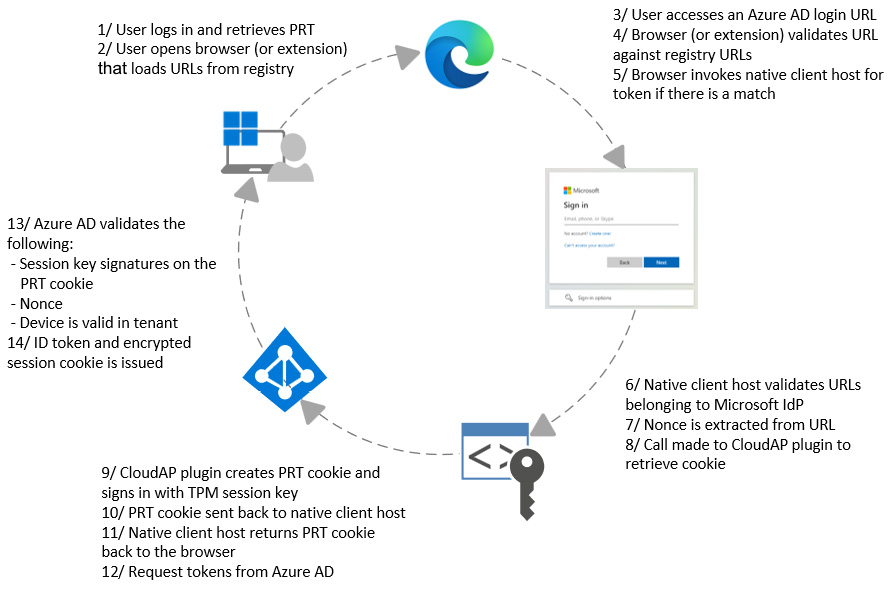
Figure 5.18 – Using PRT for SSO with the Azure URL in a browser
To learn more about Azure AD authentication and the PRT, visit this link: https://docs.microsoft.com/en-us/azure/active-directory/devices/concept-primary-refresh-token.
Next, let’s look at how Azure AD can be used as an identity provider for other third-party applications.
Enabling SSO for apps with an Azure identity
Having SSO in your environment provides significant improvement from both a security and user experience perspective. Without SSO, users would need to manage usernames and passwords for every unique application they access. Not only is managing passwords a nightmare and susceptible to bad practices, but it can also quickly become overbearing on IT staff from an administration and auditing perspective. Using one identity to access many applications also comes with its own risks, and therefore it is important to ensure strong access and management policies are in place with your user accounts. Access requirements such as MFA, device-based compliance requirements, and location-based access conditions significantly reduce risks if an identity becomes compromised.
SSO with Azure identity isn’t only limited to Azure AD joined devices. Microsoft also supports integration with other third-party SaaS providers. You can integrate directly with most SaaS, on-premises, or custom-developed apps that support standard SSO protocols, such as the SAML. Historically, many deployments of SSO used AD FS. This has served a great purpose traditionally for federation and SSO, but the infrastructure needed to support and maintain deployment can become very complex. Shifting this service to Azure requires no infrastructure to maintain, and integrating SSO has become very simple, with minimum configuration and clicks needed. In addition to the standard SSO integration, Azure AD supports the System for Cross-Domain Identity Management (SCIM) standard for provisioning users and groups directly into applications and enables advanced cloud-based security features, such as Azure AD Conditional Access or a Cloud Access Security Broker (CASB).
A simple SSO setup for a non-gallery enterprise app using SAML can be configured by following these steps:
- Log in to https://portal.azure.com.
- Search for Enterprise Applications and navigate to the management console.
- Click on All applications on the left, and then click on New Application.
- Select Create your own application and choose Integrate any other application you don’t find in the gallery (Non-gallery).
- Enter a name for the app and click on Create.
- After the app is created, click on Single sign-on on the left-hand-side menu, and then click on SAML.
Here is where you can configure a basic SAML configuration. Most third-party SaaS providers will provide you with the correct SAML information unique to your app instance or have an XML metadata file that can be imported to pre-populate SSO settings. Finally, you can export the SAML signing certificate to be used when signing requests and responses and import it into the third-party app. Most applications support the default attributes and claims that are already pre-configured in the SAML settings.
The following screenshot is of the SAML SSO configuration page:

Figure 5.19 – The Azure Enterprise app with the Azure SSO SAML configuration screen
On the left-hand-side menu in the preceding screenshot, you can see additional options to configure app access with Users and groups, and you can apply Conditional Access policies, view audit logs, and much more to ensure access to your enterprise applications is hardened and secured.
Next, let’s look at how to enable MFA.
Configuring MFA
One of the more important technologies in a zero-trust strategy that we recommend you deploy immediately is MFA. Passwords have become obsolete, especially when used as the only factor for authentication. If you aren’t using MFA with your Azure subscription, then make doing so a priority now. Implementing MFA in Azure can be completed in a variety of ways, including Conditional Access policies, Azure AD Identity Protection, or enabling security defaults. Enabling MFA doesn’t necessarily force the user to use MFA all the time, but instead, you can apply rules or risk-based conditions that will assess the need to prompt for additional verification. This provides a very powerful secure deployment and allows for minimum disruption for your users.
Tip
Azure MFA is included in the free Azure AD license, but to take advantage of the advanced conditions, you will need to upgrade to a premium license. The following link provides an overview of the different license types: https://azure.microsoft.com/en-us/pricing/details/active-directory/.
To access the Azure MFA settings, follow these steps:
- Log in to https://portal.azure.com/.
- Click on the portal menu at the top left and choose Azure AD.
- Select Security and choose MFA. You will see the following screen:

Figure 5.20 – The Azure MFA settings
Tip
From the Getting started screen, click on Additional cloud-based MFA settings to add or remove the specific verification options you want your users to use.
You can find additional details on the configurations shown in the preceding screenshot at https://docs.microsoft.com/en-us/azure/active-directory/authentication/howto-mfa-mfasettings.
At the time of writing, there are several authentication methods supported in Azure AD. They include the following:
- Using the Microsoft Authenticator app on your Apple or Android device:
- A verification code provided on the app (renews every 30 seconds)
- A push notification where you click on Approve when prompted
- Passwordless sign-in by entering the numbers provided on the screen in the app
- A verification code provided by a hardware token
- A call to your phone where you will need to press # (not recommended)
- A text message to your phone with a verification code (not recommended)
There are three supported methods in which MFA can be required by your users:
- Enabled at the user level, which will require MFA every time the user authenticates. This option takes precedence over the other two methods, so it may not be the most practical one to use. This option is more appropriate for privileged accounts.
- Enabled using Conditional Access policies, allowing the use of advanced criteria, such as the location, device state, device compliance, approved applications, and assigned roles. This requires an Azure AD Premium license.
- Enabled using Azure AD Identity Protection, applied when any detected sign-in attempt or user risk occurs. This also requires an Azure AD Premium license.
You can enable user-level MFA by following these steps:
- Log in to https://portal.azure.com.
- Click on the portal menu at the top left, and then click on Azure AD.
- Click on Users, and then put a checkmark next to the user you want to enable MFA for.
- Click on Per-user MFA, and a new window will open.
- Put a checkmark next to the user you want to enable, and then click on Enable, as in the following screenshot:

Figure 5.21 – Enabling MFA for a user
- Click on Enable multi-factor auth on the pop-up window, and then click Close.
When the user you enabled accesses the portal for the first time, they will be required to set up MFA for their account. If the user is using the free version of an MFA license, they will only see the mobile app option.
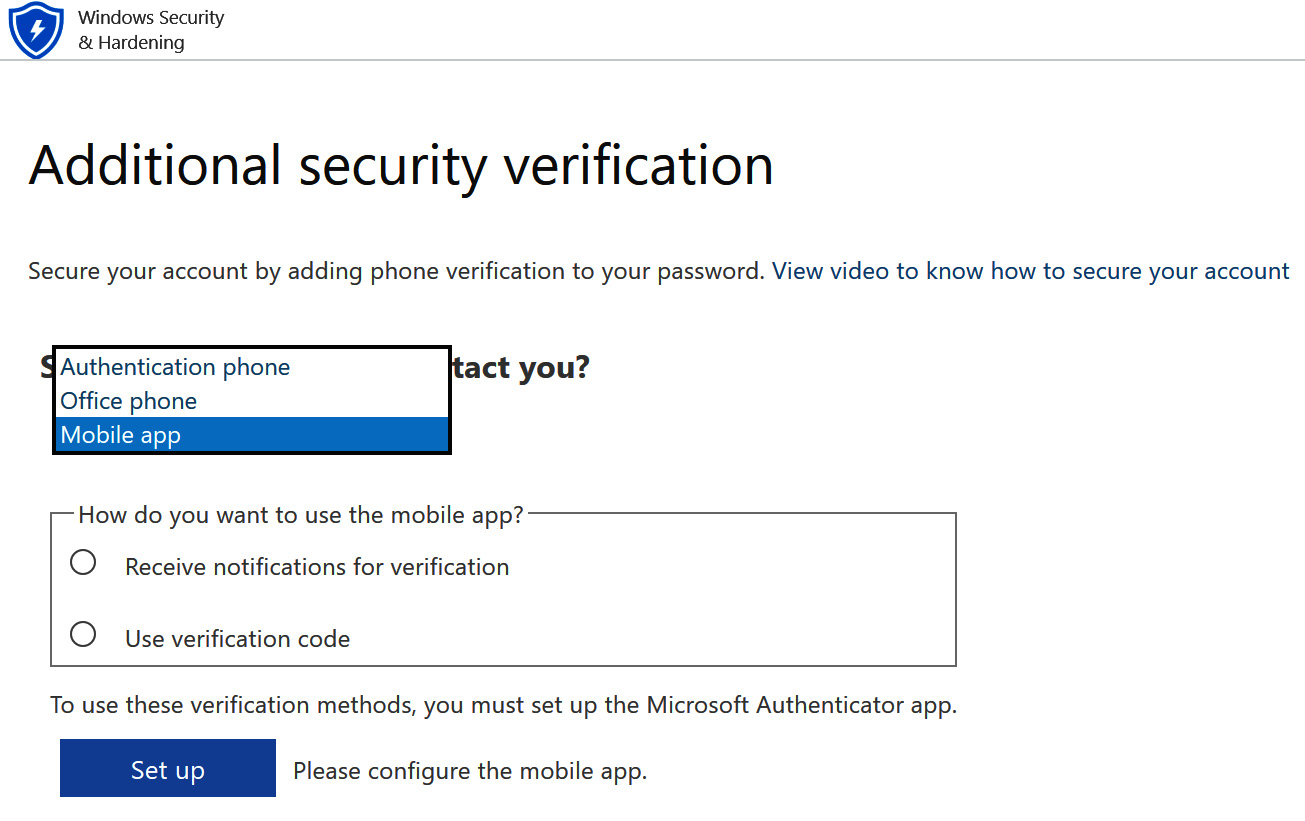
Figure 5.22 – Setting up MFA for the first time
Tip
Microsoft no longer supports the MFA server as of July 1, 2019. To protect your on-premises infrastructure with MFA, you will need to review the third-party options or ensure you have PAM in place for the best protection.
Next, let’s look at what it means to go passwordless.
Transitioning to passwordless authentication
Going passwordless is the future, and Microsoft’s making a big push in this direction as an authentication strategy. The technology is already available, and you can go passwordless today. Unfortunately, it may not be easy to get to a passwordless world straightaway, but you do need to understand and begin this journey sooner rather than later. The methods that are used to provide a passwordless world are currently much more secure for your users.
With the elimination of passwords, authentication is improved by using something you already have, such as a phone or a security key, in addition to something you are or know, such as biometrics or a PIN. Microsoft supports passwordless authentication with Windows Hello for Business, the Microsoft Authenticator app, or a Fast ID Online (FIDO) 2 security key.
Tip
FIDO is an alliance that works toward improving today’s authentication challenges with passwords. They are looking to provide simpler and more secure authentication methods using open standards. You can view additional information about this at https://fidoalliance.org/.
To enable passwordless authentication in Azure, follow these steps:
- Log in to https://portal.azure.com.
- Click on the portal menu at the top left and choose Azure AD.
- Click on Security, and then choose Authentication methods.
- Click on Policies. Here, you can configure FIDO2 and the Microsoft Authenticator app for passwordless sign-in.
The following screenshot shows the configuration screen for passwordless authentication:
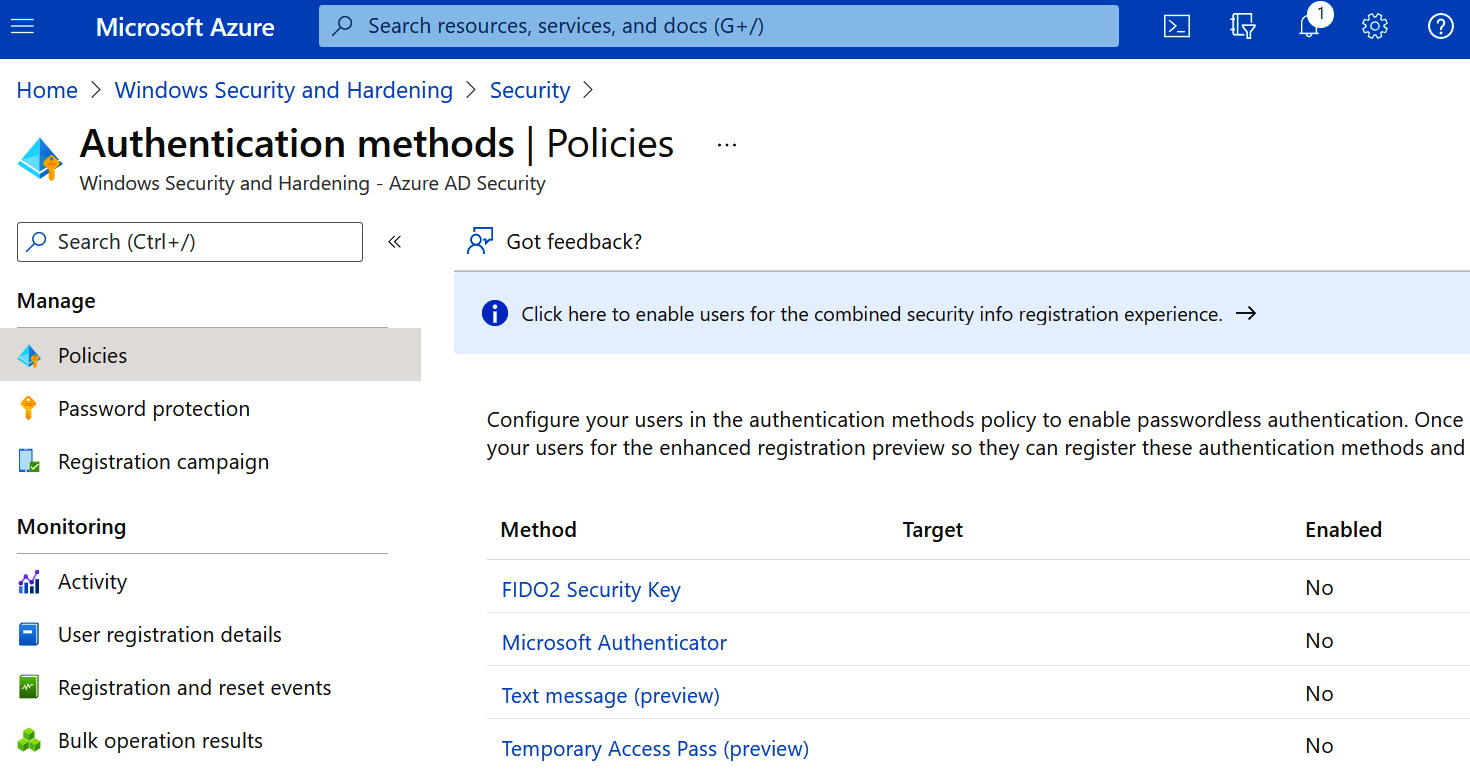
Figure 5.23 – Passwordless authentication in Azure AD
When configuring the Microsoft Authenticator app for passwordless authentication, a user does not need to enter their password to complete the sign-in. After entering the user ID, the sign-in notification asks the user to type the number seen on the screen into the Authenticator app. Once completed, this will log the user in and satisfy the need for MFA. To add additional security when logging in with passwordless authentication, or using the Authenticator app in general, it is recommended you enable the Show additional context in notifications option. Enabling this will provide you with a map of the location where the login is originating from, visually allowing you to validate whether the login is legitimate or not. The following screenshot is what the Show additional context in notifications option looks like:
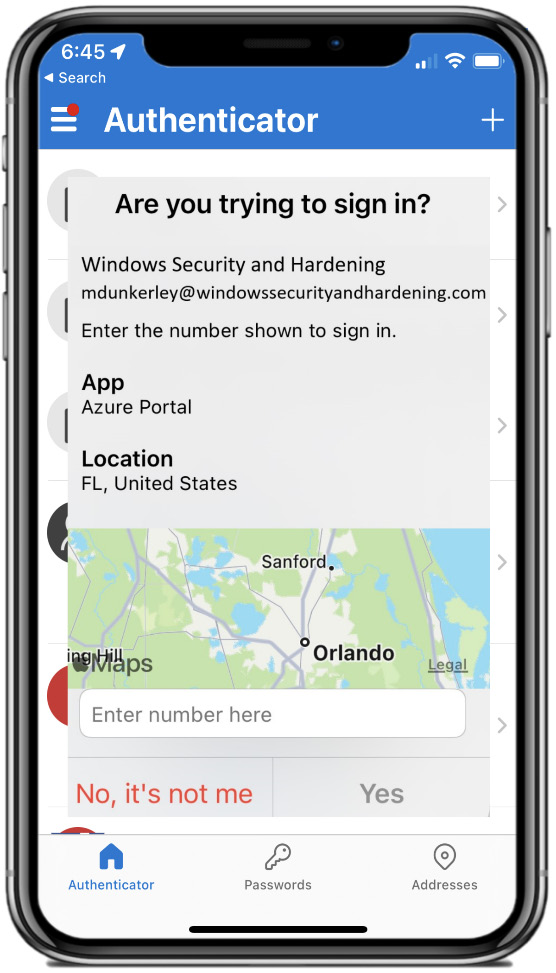
Figure 5.24 – Additional context in notifications
Next, let’s look at using a form of biometric authentication to log in to our Windows devices, known as Windows Hello.
Passwordless authentication using Windows Hello
Windows Hello is Microsoft’s biometric or PIN authentication feature for Windows devices. This technology can replace the traditional password authentication methods that have always been used on Windows devices. Windows Hello for Business supports cloud-only, hybrid, and on-premises deployments and FIDO v2.0-certified authenticators, such as a security key. When using Windows Hello-supported hardware, biometric data and PINs are only stored on the local device and are not available externally. This is a significant security enhancement that helps ensure an attacker can’t get a copy of your biometric data. Today, the two available options for Windows Hello biometrics are as follows:
- Facial recognition
- Fingerprint recognition
Depending on your deployment method, the prerequisites will vary. We will cover enabling Windows Hello for Business in the cloud-only deployment later in Chapter 8, Keeping Your Windows Client Secure, but if you want to learn more, visit the following link: https://docs.microsoft.com/en-us/windows/security/identity-protection/hello-for-business/hello-identity-verification.
Next, let’s review Azure AD Conditional Access and Azure AD Identity Protection and how to leverage the power of the cloud for advanced identity protection.
Using Conditional Access and Identity Protection
Two tools available in Azure AD that provide powerful identity-based security are known as Azure AD Conditional Access and Azure AD Identity Protection. Both solutions leverage identity-based signals that can help you create policies that define access controls as well as automate protection mechanisms when an anomaly occurs, based on machine learning and behavioral analytics used to determine risk. Let’s review how to enable Azure AD Conditional Access.
Enabling Azure AD Conditional Access
Conditional Access is an Azure cloud policy tool that enforces compliance based on conditions for your users. The Conditional Access policies allow you to specify criteria against your users that will trigger specific requirements or exceptions, such as the sign-in location, device platform or type, application, and group membership. For example, if a user is not on a compliant managed device or from a trusted IP and is trying to access their email via Exchange Online, they can be required to use MFA. This is a simple example, but the possibilities of this scenario are extensive and allow increased fine-grained security controls. Conditional Access is a necessity within the cloud world, and you need to use it. If not, prioritize and enable it immediately.
You can learn more about Conditional Access at https://docs.microsoft.com/en-us/azure/active-directory/conditional-access/overview.
The following is a list of several use cases to get you started today with Conditional Access:
- Require MFA for your admins (privileged roles).
- Require compliant mobile devices before allowing access to company resources.
- Enable MFA for all guest users.
- Block all legacy authentication protocols.
- Allow users on trusted company devices to access resources without MFA.
- Block any access outside a specific region – for example, a United States-based company can block any connection from outside the country.
- Enforce MFA on any app that contains PII, whether on a trusted device or not.
- Only allow specific applications to be accessed from trusted devices.
To set up a Conditional Access policy, follow these steps:
- Log in to https://portal.azure.com.
- Click on the portal menu at the top left and choose Azure AD. Click on Security, then Conditional Access, then New Policy, and then Create new policy.
Tip
By default, Microsoft enables security defaults, which are a set of standard security features that it enforces. To set up your own Conditional Access policies, you will need to disable this by going to the portal menu at the top left. Click on Azure AD | Properties | Manage Security Defaults. Change this setting to No, and then click Save.
The following screenshot shows where you will need to set up your new Conditional Access policy:
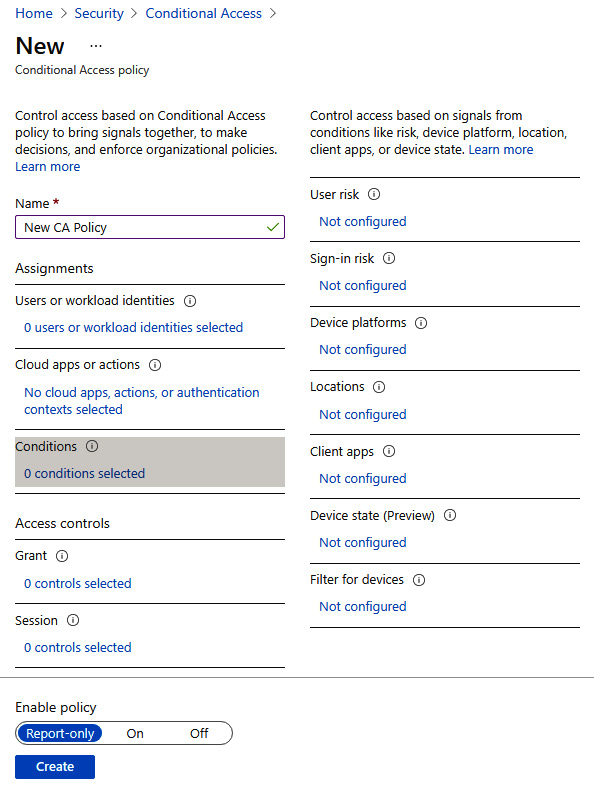
Figure 5.25 – A new Conditional Access policy
Within the new policy, configure your assignments and the following configurations:
- Users or workload identities is where you can include and/or exclude users and groups.
- Cloud apps or actions is where you can include or exclude apps as part of the policy, as well as any user-specific actions or authentication contexts.
- Conditions is where you configure specific conditions for the policy. These include User Risk, Sign-in risk, Device platforms, Locations (using IP ranges or countries/regions), Client apps, Device state, and Filter for devices.
- Next, you will configure your access controls:
- Grant is where you can grant or block access. If you grant access, you can select multiple requirements to comply with – for example, requiring MFA, devices to be marked as compliant, or using an approved client app.
- Session applies session limits to cloud apps such as sign-in frequency and using Conditional Access app control to send sessions into Defender for Cloud Apps.
- Finally, select Report-only to review the policy or select On to enable them immediately, and then click on Done to complete the policy setup.
Tip
Thoroughly test the Conditional Access policy before enabling it for the organization. There are scenarios where you can lock yourself out or cause major disruption to your users if you don’t test and validate.
The following screenshot shows the Conditional Access | Insights and reporting page, which can be found by logging in to https://portal.azure.com, searching for and clicking on Security, clicking on Conditional Access, and then navigating to Insights and reporting.

Figure 5.26 – Conditional Access | Insights and reporting
Location conditions can also be used to block anyone from accessing the organization outside of a specific country. To do this, you can build locations within the Named locations option of the Conditional Access policy menu and add a new location based on IP ranges or country/region.
Next, let’s review Azure AD Identity Protection and how to build conditions for automated risk remediation.
Configuring Azure AD Identity Protection
Azure Identity Protection, like Conditional Access, is an Azure identity-based security tool. It works by analyzing identity-based signals from user activity to generate a user risk level, as well as identifying risky sign-ins as they occur in real time. With the advancement of the cloud and its collective customers, Microsoft currently analyzes 6.5 trillion signals per day to help better protect its customers and support services such as Identity Protection. By analyzing these signals against your user’s activity to identify detection markers, Identity Protection can provide automated remediation for identity-based risks. Detection markers are used to determine the level of risk, and examples include atypical travel, anonymous IP addresses, malware-linked IP addresses, and a variety of others. Risks are split up into low, medium, and high categories for both user and sign-in risk. User risk detection helps to determine whether an account has been compromised, and sign-in risk detection helps determine whether the authentication request is from the real owner. By creating policies based around both user risk and risky sign-ins, automated protection mechanisms can apply controls in real time to block access to high-risk sign-ins or use the risk-level tag as a condition in a Conditional Access policy for fine-grained control.
Tip
To learn more about the risks, visit https://docs.microsoft.com/en-us/azure/active-directory/identity-protection/concept-identity-protection-risks.
To access Identity Protection and enable the policies, follow these steps:
- Log in to https://portal.azure.com.
- Go to the portal menu at the top left, click on Azure AD, choose Security, and click on Identity Protection to access the Identity Protection features.
- Within this management console, you can enable User risk policy, Sign-in risk policy, and MFA registration policy (required to protect against sign-in risks unless you block access).
- To enable the user risk policy, select User risk policy on the left and configure each of the following options:
- Users: Decides who will be included or excluded from the policy
- User Risk: Where you select the likelihood the user is compromised (Low and above, Medium and above, or High)
- Access: To block or allow access and require a password change if allowed
- Once configured, change the policy to On and click Save. The following screenshot shows the User risk policy configuration screen:

Figure 5.27 – Enabling the user risk policy
Complete the preceding steps again for the sign-in risk policy and ensure you enable the MFA registration policy as well.
Tip
To best protect your users, it is highly recommended you configure both the user risk policy and the sign-in risk policy to High, with the Block access control enabled.
Summary
In this chapter, we covered identity and access management and its importance to ensure you provide the best protection for your users. We started with an overview, covering the foundation of IAAA and each of its components. We then reviewed account and access management, which covered the account life cycle, as well as external access and privileged access.
Next, we covered authentication methods, including securing your passwords and password management, enabling SSPR, and authenticating with Azure AD using SSO. The remainder of this section included a review of passwordless authentication and enabling Windows Hello for Business. We finished this chapter by covering advanced cloud identity and access protection tools, known as Conditional Access and Identity Protection.
In the next chapter, we will look at the administration and policy management of our Windows environment. We will review device management evolution and how to remotely manage devices in an enterprise environment.