
Chapter 26
Understanding the Outlook Object Model and Key Objects
In this chapter, you'll begin to come to grips with the Outlook object model and using VBA to manipulate Outlook. You'll learn where Outlook stores VBA items, meet the VBA objects for Outlook's creatable objects and main user-interface items, and work with some of the main Outlook objects. You'll explore a variety of objects, from the Application object that represents the entire application through the objects that represent individual messages, calendar items, and tasks. You'll also learn how to search programmatically (via macros rather than the keyboard or mouse).
Getting an Overview of the Outlook Object Model
Many people find Outlook harder to work with programmatically than other Office applications (except for OneNote), so it's particularly helpful to explore the Outlook object model to see which objects Outlook uses and how they're related. Above all, when working with objects, seeing VBA code examples in the online Help system or elsewhere online can be invaluable.
Office has been bifurcating, as it migrates to the cloud. And Microsoft is “suggesting” that you migrate to browser-based applications along with them. So currently there are two versions of some Office applications: an online-only cloud version that works only within a browser, and a separate desktop version that works as a Windows application.
If when you launch Outlook it appears within your browser, you will need to install the Windows desktop version to learn to program it using VBA as described in this chapter. Go to your Windows Start page, open the Microsoft store, search for Outlook, then install it. You'll be asked for your Microsoft account username and password, and then your new Windows desktop version of Outlook will appear.
Once you're working with the desktop version of Outlook, you need to make a couple of adjustments:
- Go to File ➢ Options.
- Select Trust Center.
- Click the Trust Center Settings button.
- Click Macro Settings.
- Select Enable All Macros.
- Click OK to close the trust dialog.
- Click Customize Ribbon in the Outlook Options dialog box.
- In the Main Tabs list box, select Developer to add that to the Ribbon.
- Click OK to return to Outlook.
The Outlook Object Model
You can find the Outlook object-model reference by following these steps:
- Launch or switch to Outlook, and then click Developer ➢ Visual Basic to switch to the VBA Editor.
- In the Editor, click Help ➢ Microsoft Visual Basic For Applications Help F1.
Although it says that F1 is an alternative way to get to the same web page, it's not.
- Click the Outlook VBA Reference link in the web page.
- Click the Object Model link on the left side of the web page.
You'll now have access to the whole collection of Outlook 2019 VBA objects, their syntax specifications, useful descriptions, and code examples (one of which is shown in Figure 26.1).
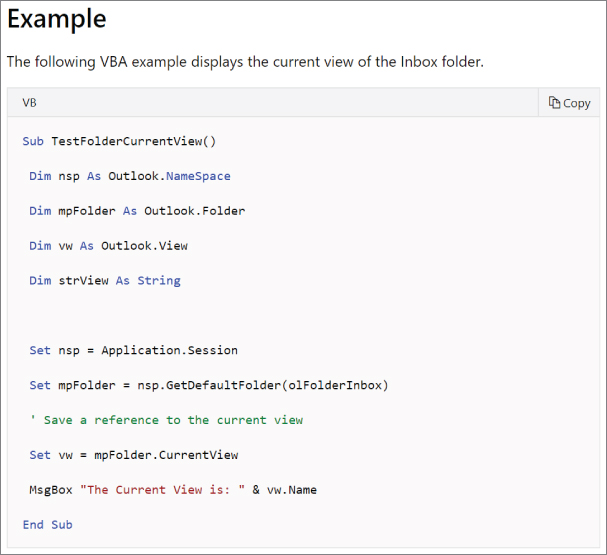
Figure 26.1 Sample code found in the Outlook object-model reference will help you write your own VBA code.
Understanding Where Outlook Stores VBA Macros
As you saw earlier in this book, Word and Excel let you store VBA projects either in a global location (the Normal.dotm template in Word or the Personal Macro Workbook in Excel) or in individual templates or document files. PowerPoint lets you store VBA projects in presentation files and templates.
Outlook, by contrast, doesn't let you store VBA projects in its individual items (such as its email messages or contacts). Instead, Outlook saves all projects in one file called VbaProject.OTM, which is stored in the following folder:
C:UsersRichardAppDataLocalPackagesMicrosoft.Office.Desktop_8wkay0ofk3dbLocalCacheRoamingMicrosoftOutlook
The file will be created as soon as you close Outlook 2019 after having created your first macro.
Instead of Richard in this path, substitute your username, and instead of Desktop_8wkay0ofk3db your location code will differ. So you're best off just using File Explorer to search for VbaProject.OTM. Or if you prefer a far superior file-search utility, download a tool named Everything from Ninite.com.
Understanding Outlook's Most Common Creatable Objects
In Outlook VBA, the Application object represents the entire Outlook application, so you can access any Outlook object by going through the Application object. However, Outlook also exposes various creatable objects, allowing you to reach some of the objects in its object model without explicitly going through the Application object. Recall that “creatable” merely means that when you're writing code involving these objects, using the word Application is optional. You can get the same result by using either of the following code styles:
Application.Explorers
or more simply,
Explorers
Here is a list of Outlook's most common creatable objects; you'll work with most of them in more detail later in this chapter and in the next chapter:
- The
Explorerscollection contains anExplorerobject for each window that displays the contents of a folder. - The
Inspectorscollection contains anInspectorobject for each window that's open displaying an Outlook item. - The
COMAddInscollection contains aCOMAddInobject for each COM (Component Object Model) add-in loaded in Outlook. - The
Reminderscollection contains aReminderobject for each reminder.
The most prominent objects in the Outlook user interface are represented in VBA by items with names that are descriptive of their purpose, such as these, for example:
- The
MailItemobject represents a mail item. - The
ContactItemobject represents a contact. - The
TaskItemobject represents a task. - The
AppointmentItemobject represents an appointment. - The
JournalItemobject represents a journal entry. - The
NoteItemobject represents a note.
You'll learn how to work with these objects later in this chapter and in the next chapter.
Working with the Application Object
You can have only one instance of the desktop version of Outlook running at a time. By contrast, you can run multiple instances of Word or Excel at the same time. And you could, of course, have the desktop version and the cloud version of Outlook running simultaneously.
You probably won't find this a limitation when you're writing macros that work within Outlook. But if you create a procedure in another application (such as Word) that will communicate with and manipulate Outlook, you will need to check whether there is an instance of Outlook currently running in the computer before you create an instance programmatically. (See Chapter 30, “Accessing One Application from Another Application,” for instructions on how to communicate between Office applications using macros.)
Introducing the NameSpace Object
Here is a new concept: the NameSpace. Among all the VBA-enabled Office applications, only Outlook employs this technique. That the NameSpace approach is unique to Outlook demonstrates beyond all doubt that the various Microsoft Office application teams work—to put it politely—somewhat independently when building their object-model structures.
Working with Namespaces
Many Outlook VBA activities, such as accessing email messages, tasks, or contacts programmatically, require that you use the GetNameSpace method of Outlook's Application object to return a NameSpace object that represents the root object of the data source. Anyway, that's the official version.
Just remember that you use the following syntax to get most jobs done in Outlook VBA:
expression.GetNameSpace(Type)
Here, expression is a required expression that returns an Application object. Type is a required String argument that specifies the type of namespace you want to return. Outlook supports only the MAPI data source, so you always use Type: = “MAPI” with the GetNameSpace method. For example, the following statement returns the NameSpace and uses the CurrentUser property to display the name of the current user in a message box:
MsgBox Application.GetNamespace("MAPI").CurrentUser
ACCESSING DEFAULT FOLDERS WITHIN THE NAMESPACE OBJECT
Outlook's NameSpace object contains the folders that Outlook uses—both the collection of default folders used to store default items such as email messages, tasks, and contacts as well as any other folders created by the user or by custom procedures. These folders are represented in Outlook's VBA by MAPIFolder objects that are organized into a Folders collection.
You'd probably expect that to find out which are the current default folders, you would use a method of the Folders collection. Nope. Given that we're in a special situation here (dealing with email), GetDefaultFolder is a method of the NameSpace object. The syntax is as follows:
expression.GetDefaultFolder(FolderType)
Here, expression is a required expression that returns a NameSpace object. FolderType is a required argument that specifies which default folder you want to return. The constants are self-explanatory: olFolderCalendar, olFolderConflicts, olFolderContacts, olFolderDeletedItems, olFolderDrafts, olFolderInbox, olFolderJournal, olFolderJunk, olFolderLocalFailures, olFolderManagedEmail, olFolderNotes, olFolderOutbox, olFolderRSSFeeds, olFolderSentMail, olFolderServerFailures, olFolderSuggestedContacts, olFolderSyncIssues, olFolderTasks, olFolderToDo, or olPublicFoldersAllPublicFolders.
The following example creates the object variable myCal and assigns the default calendar folder to it:
Dim myCal As MAPIFolderSet myCal = Application.GetNamespace("MAPI") _.GetDefaultFolder(FolderType:=olFolderCalendar)
ACCESSING OTHER FOLDERS WITHIN THE NAMESPACE OBJECT
Accessing the default folders in the NameSpace object via the GetDefaultFolder method is easy, but often you'll need to access other folders. In this case, you do use the Folders collection.
The following example displays a message box (see Figure 26.2) containing a list of all the folders contained in the namespace:
Sub List_All_NameSpace_Folders()Dim myNS As NameSpaceDim myFolder As MAPIFolderDim mySubfolder As MAPIFolderDim strFolderList As StringstrFolderList = "Your Outlook NameSpace contains these folders:" _& vbCr & vbCrSet myNS = Application.GetNamespace("MAPI")With myNSFor Each myFolder In myNS.FoldersstrFolderList = strFolderList & myFolder.Name & vbCrFor Each mySubfolder In myFolder.FoldersstrFolderList = strFolderList & "* " & mySubfolder.Name & vbCrNext mySubfolderNext myFolderEnd WithMsgBox strFolderList, vbOKOnly + vbInformation, "Folders in NameSpace"End Sub
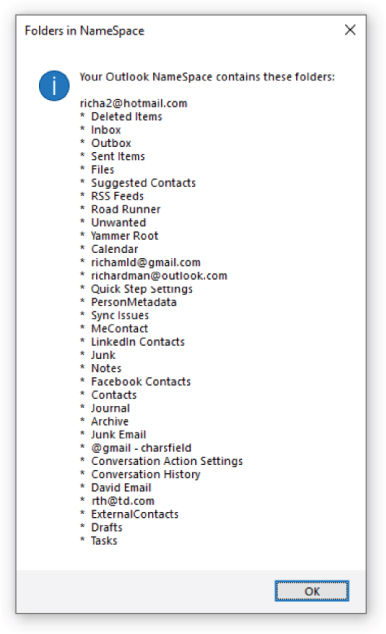
Figure 26.2 Listing the folders contained in the NameSpace object
Understanding Inspectors and Explorers
VBA uses two major Outlook objects that most users wouldn't recognize from working with the Outlook user interface alone:
- An
Inspectoris an object that represents a window displaying a specific Outlook item, such as an email message or an appointment. - An
Explorerobject represents a window that displays the contents of a folder, such as a list of emails.
OPENING AN INSPECTOR WINDOW
To open an Inspector window for an object, use the Display method of the Inspector object. For example, the following statement displays an Inspector window for the object referenced by the object variable myItem:
myItem.Display
RETURNING THE INSPECTOR ASSOCIATED WITH AN ITEM
To return the inspector associated with an item, use the GetInspector property of the appropriate object. The following example returns the inspector for the item identified by the object variable myItem:
myItem.GetInspector
RETURNING THE ACTIVE WINDOW, INSPECTOR, OR EXPLORER
Unlike Word, Excel, and PowerPoint, Outlook doesn't have an ActiveWindow object that represents the active window. However, Outlook's Application object does have an ActiveWindow method, which returns the topmost Outlook window. (If there is no window, ActiveWindow returns Nothing.)
This window will be either an Inspector object or an Explorer object. Similarly, the ActiveExplorer method of the Application object returns the active explorer, and the ActiveInspector method of the Application object returns the active inspector. Got it?
You can use the TypeName function to determine which type of window is active. The following example displays a message box that states which window type is active if there is an active window:
If Not TypeName(ActiveWindow) = "Nothing" ThenMsgBox "An " & TypeName(ActiveWindow) & " window is active."End If
Notice that we say here If Not…Nothing. The double negative means “if the active window isn't nothing.”
WORKING WITH THE ACTIVE INSPECTOR
In many procedures, you'll need to determine what the topmost inspector in the Outlook application is, either so that you can work with that inspector or so that you can restore the inspector to the topmost position at the end of a procedure that manipulates other inspectors. (Remember, you should always try to restore an application to the state it was in when your procedure started execution. This is a courtesy to the user and evidence of careful, quality programming.)
To find out which is the topmost inspector, use the ActiveInspector method of the Application object. For example, the following statement maximizes the window of the topmost inspector:
Application.ActiveInspector.WindowState = olMaximized
Note that this example attempts to maximize an Inspector window, so there must actually be an Inspector window open when you run the code. In other words, double-click an email message in Outlook to open it in a window separate from the Outlook window. This separate window, showing a single email, is an inspector. If you want to trap this error (and you should) to prevent your macro from crashing when no inspector exists, here's how to make sure there is an active inspector. You can check that the TypeName function does not return Nothing when run on the ActiveInspector method of the Application object, like this:
Sub MaxIt()If TypeName(Application.ActiveInspector) = "Nothing" ThenMsgBox "No item is currently open."End 'shut down the macroElseApplication.ActiveInspector.WindowState = olMaximizedEnd IfEnd Sub
Creating Items
To create new items in Outlook, you use the CreateItem method or the CreateItemFromTemplate method of the Application object. The CreateItem method creates default items, while the CreateItemFromTemplate method creates items based on the templates you specify.
USING THE CREATEITEM METHOD TO CREATE DEFAULT ITEMS
The syntax for the CreateItem method is as follows:
expression.CreateItem(ItemType)
Here, expression is a required expression that returns an Application object. ItemType is a required argument that specifies the type of item to create: olAppointmentItem, olContactItem, olDistributionListItem, olJournalItem, olMailItem, MobileItemMMS, MobileItemSMS, olNoteItem, olPostItem, or olTaskItem.
The following example creates a new email message; assigns a recipient (by setting the To property), a subject (by setting the Subject property), and body text (by setting the Body property); and then displays the Message window:
Dim myMessage As MailItemSet myMessage = Application.CreateItem(ItemType:=olMailItem)With myMessage.To = "[email protected]".Subject = "Test message".Body = "This is a test message.".DisplayEnd With
Quitting Outlook
To quit Outlook, use the Quit method of the Application object. This method takes no arguments:
Application.Quit
You may also want to work with the events available to the Application object. See Chapter 27, “Working with Events in Outlook,” for a discussion of how to work with these application-level events and with item-level events.
Understanding General Methods for Working with Outlook Objects
Many of the objects in Outlook use the methods covered in the following sections. You'll see brief examples showing you how to use the methods, as well as further examples on the individual types of objects—email messages, appointments, contacts, tasks, and so on—later in this chapter and in the next.
Using the Display Method
To open an item in an Inspector window, use the Display method. The syntax is as follows:
expression.Display(Modal)
Here, expression is a required expression that returns the type of object you want to display—for example, a ContactItem object or a MailItem object. Modal is an optional Variant argument that you can set to True to make the window modal. A window is modeless by default, or it becomes modeless if you set Modal to False. Making the window modal means that users must close the window before they can work with another window.
Note that the Modal argument isn't available for Explorer and MAPIFolder objects.
For example, the following statement uses the Display method to display the Inbox:
Application.GetNamespace("MAPI").GetDefaultFolder(olFolderInbox).Display
Using the Close Method
To close a window, use the Close method. The syntax is as follows:
expression.Close(SaveMode)
Here, expression is a required expression that returns the object you want to close. SaveMode is a required argument that specifies whether to save changes (olSave), discard the changes (olDiscard), or prompt the user to decide whether to save the changes (olPromptForSave).
The following example closes the active inspector and saves any changes to its contents:
ActiveInspector.Close SaveMode:=olSave
Remember that this code requires that an inspector be currently open. See the warning earlier in this chapter in the section titled “Working with the Active Inspector.”
Using the PrintOut Method
To print an item, use the PrintOut method. This method takes no arguments. The following example prints the item with the index number 1 in the Inbox:
Application.GetNamespace("MAPI").GetDefaultFolder(olFolderInbox) _.Items(1).PrintOut
Using the Save Method
To save an item, use the Save method. This method takes no arguments. The following example creates a new task; assigns it a subject, start date (today), and due date (a week from today); turns off the reminder for the task; and then saves it:
Dim myTask As TaskItemSet myTask = Application.CreateItem(ItemType:=olTaskItem)With myTask.Subject = "Arrange Review Meeting".StartDate = Date.DueDate = Date + 7.ReminderSet = False.SaveEnd With
This item will appear in the ToDo list of the MyTasks section of your Outlook Tasks. Look in the lower-left corner of your Outlook window, as shown in Figure 26.3.
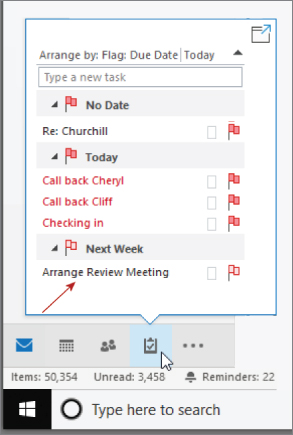
Figure 26.3 A new task, added programmatically
Using the SaveAs Method
To save an item as a separate file, use the SaveAs method. The syntax is as follows:
expression.SaveAs(Path, Type)
Here, expression is a required expression that returns the object to be saved. Path is a required String argument that specifies the path and filename under which to save the file. Type is an optional Variant argument that you can use to control the file type used for the file, as shown in Table 26.1.
TABLE 26.1: Type arguments for the SaveAs method
| ARGUMENT | TYPE OF FILE |
olHTML |
HTML file |
olMSG |
Outlook message format (.msg filename extension) |
olRTF |
Rich Text format |
olTemplate |
Template |
olDoc |
Word document format (email messages using WordMail) |
olTXT |
Text file |
olVCal |
vCal file |
olVCard |
vCard file |
olICal |
iCal file |
olMSGUnicode |
Outlook Unicode message format (.msg filename extension) |
The following example saves the message open in the active inspector. So before testing this example, be sure that a message has been double-clicked and is, thus, open in its own window separate from the main Outlook window. Remember that code involving the active inspector requires that an inspector be currently open. See the warning, and a way to error-trap this, earlier in this chapter in the section titled “Working with the Active Inspector.”
If the IsWordMail property of the ActiveInspector object returns True, the example saves the message as a .doc file; if the IsWordMail property returns False, the example saves the message as an .rtf file. If no Inspector window is active, the example displays a message box pointing out that problem to the user:
If TypeName(ActiveInspector) = "Nothing" ThenMsgBox "This macro cannot run because " & _"there is no active window.", vbOKOnly, "Macro Cannot Run"EndElseIf ActiveInspector.IsWordMail ThenActiveInspector.CurrentItem.SaveAs "c: empmessage.doc"ElseActiveInspector.CurrentItem.SaveAs "c: empmessage.rtf"End IfEnd If
To test this example, ensure that there's a emp folder on your C: drive.
Working with Messages
If you or your colleagues use Outlook's email capabilities extensively, you may be able to save time by programming Outlook to create or process messages automatically. The following sections show you how to create a new message, work with its contents, add an attachment, and send the message.
Creating a New Message
To create a new message, use the CreateItem method of the Application object and specify olMailItem for the ItemType argument. The following example creates a MailItem object variable named myMessage and assigns to it a new message:
Dim myMessage As MailItemSet myMessage = Application.CreateItem(ItemType:=olMailItem)
Working with the Contents of a Message
To work with the contents of a message, set or get the appropriate properties. These are the most widely useful properties:
Tois the recipient or recipients of the message.CCis the recipient or recipients of copies of the message.BCCis the recipient or recipients of blind copies of the message.Subjectis the subject line of the message.Bodyis the body text of the message.BodyFormatis the message's formatting type:olFormatPlainfor text only,olFormatRichTextfor text with formatting, andolFormatHTMLfor HTML formatting.Importanceis the relative importance of the message. Set it toolImportanceHigh,olImportanceNormal, orolImportanceLow.
The following example creates a new message item and assigns it to the object variable myMessage. It then adds an addressee, a subject, and body text; applies the HTML format; sets the importance to high; and sends the message:
Dim myMessage As Outlook.MailItemSet myMessage = Application.CreateItem(olMailItem)With myMessage.To = "[email protected]".Subject = "Preparation for Review".BodyFormat = olFormatHTML.HTMLBody = "Please drop by tomorrow and spend a few minutes" _& " discussing the materials we need for Darla's review.".Importance = olImportanceHigh.DisplayEnd With
When this message, shown in Figure 26.4, is created, all the data you fed it appears where you'd expect it to.
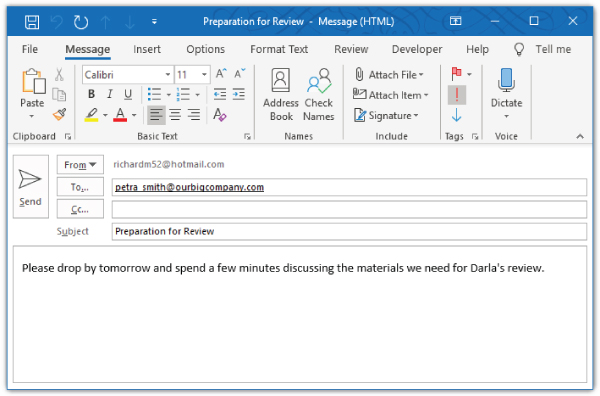
Figure 26.4 A message of high importance is created
Adding an Attachment to a Message
To add an attachment to a message, use the Add method with the Attachments collection, which you return by using the Attachments property of the MailItem object. The syntax is as follows:
expression.Add(Source, Type, Position, DisplayName)
Here are the components of the syntax:
expressionis a required expression that returns anAttachmentscollection.Sourceis a required String argument that specifies the path and filename of the attachment.Typeis an optional String argument that you can use to specify the type of attachment.Positionis an optional String argument that you can use with rich-text messages to specify the character at which the attachment is positioned in the text. Use character0to hide the attachment,1to position the attachment at the beginning of the message, or a higher value to position the attachment at the specified character position. To position the attachment at the end of the message, use a number higher than the number of characters in the message.DisplayNameis an optional String argument that you can specify to control the name displayed for the attachment in the message.
The following example attaches to the message referenced by the object variable myMessage the file Corporate Downsizing.pptm stored in the folder Y:Sample Documents, positioning the attachment at the beginning of the message and setting its display name to Downsizing Presentation:
myMessage.Attachments.Add _Source:="Y:Sample DocumentsCorporate Downsizing.pptm", _Position:=1, DisplayName:="Downsizing Presentation"
To test this, insert this code into the example code from the previous section (“Working with the Contents of a Message”), like this:
Dim myMessage As Outlook.MailItemSet myMessage = Application.CreateItem(olMailItem)myMessage.Attachments.Add _Source:="Y:Sample DocumentsCorporate Downsizing.pptm", _Position:=1, DisplayName:="Downsizing Presentation"With myMessage.To = "[email protected]".Subject = "Preparation for Review".Body = "Please drop by tomorrow and spend a few minutes" _& " discussing the materials we need for Darla's review.".BodyFormat = olFormatHTML.Importance = olImportanceHigh.SendEnd With
Sending a Message
To send a message, use the Send method. This method takes no arguments. The following example sends the message referenced by the object variable myMessage:
myMessage.Send
To check whether a message has been sent, check its Sent property. This Boolean property returns True if the message has been sent and False if it has not.
Working with Calendar Items
If you create or receive many calendar items, you may be able to save time or streamline your scheduling by using VBA. The following sections show you how to create a calendar item and work with its contents.
Creating a New Calendar Item
To create a new calendar item, use the CreateItem method of the Application object and specify olAppointmentItem for the ItemType argument. The following example creates an AppointmentItem object variable named myAppointment and assigns to it a new appointment item:
Dim myAppointment As AppointmentItemSet myAppointment = Application.CreateItem(ItemType:=olAppointmentItem)
Working with the Contents of a Calendar Item
To work with the contents of a calendar item, set or get the appropriate properties. These are the most widely useful properties:
Subjectis the subject of the appointment.Bodyis the body text of the appointment.Startis the start time of the appointment.Endis the end time of the appointment.BusyStatusis your status during the appointment:olBusy,olFree,olOutOfOffice, orolTentative.Categoriesis the category or categories assigned to the item.ReminderSetdetermines whether the appointment has a reminder (True) or not (False).ReminderMinutesBeforeStartis the number of minutes before the event that the reminder should occur.
The following example creates a new AppointmentItem object and assigns it to the object variable myAppointment. It then sets the subject, body, start date (2:30 PM on the day seven days after the present date), and end date (one hour after the start); marks the time as busy; assigns the Personal category; sets a reminder 30 minutes before the appointment; and saves the appointment. You'll see the results in Figure 26.5:
Dim myAppointment As Outlook.AppointmentItemSet myAppointment = Application.CreateItem(ItemType:=olAppointmentItem)With myAppointment.Subject = "Dentist".Body = "Dr. Schmitt " & vbCr & "4436 Acacia Blvd.".Start = Str(Date + 7) & " 2.30 PM".End = Str(Date + 7) & " 3.30 PM".BusyStatus = olBusy.Categories = "Personal".ReminderMinutesBeforeStart = 30.ReminderSet = True.SaveEnd With
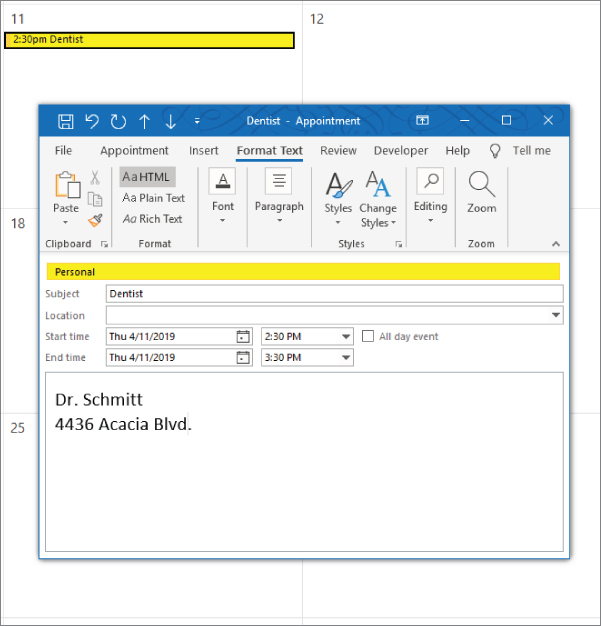
Figure 26.5 To see the results, open your calendar.
The AppointmentItem object has a grand total of 71 properties. If you want to explore more of them, take a look at this MSDN web page:
http://msdn.microsoft.com/en-us/library/office/jj900814.aspx
Working with Tasks and Task Requests
VBA can automate tasks and task requests. The following sections show you how to create a task, work with the contents of a task item, and send a task request.
Creating a Task
To create a new task item, use the CreateItem method of the Application object and specify olTaskItem for the ItemType argument. The following example creates a TaskItem object variable named myTask and assigns to it a new task item:
Dim myTask As TaskItemSet myTask = Application.CreateItem(ItemType:=olTaskItem)
Working with the Contents of a Task Item
To work with the contents of a task item, set or get the appropriate properties. These are the most widely useful properties:
Subjectis the subject of the task.Bodyis the body text of the task.Startis the start time of the task.DueDateis the due date of the task.Importanceis the importance of the task. Set it toolImportanceHigh,olImportanceNormal, orolImportanceLow.Statusis the status of the task:olTaskNotStarted,olTaskWaiting,olTaskDeferred,olTaskInProgress, orolTaskComplete.PercentCompleteis the percentage of the task completed.Companiesspecifies the companies associated with the task.BillingInformationis the company or department to bill for the task.
The following example creates a TaskItem object variable named myTask and assigns to it a new task item. It then sets the subject and body of the task, specifies a due date in the future, sets the status to olTaskInProgress and the percentage complete to 10, specifies the company involved and who to bill, sets the importance to High, and then saves the task:
Dim myTask As TaskItemSet myTask = Application.CreateItem(ItemType:=olTaskItem)With myTask.Subject = "Create a business plan".Body = "The business plan must cover the next four years." & _vbCr & vbCr & "It must provide a detailed budget, " & _"staffing projections, and a cost/benefit analysis.".DueDate = Str(Date + 28).Status = olTaskInProgress.PercentComplete = 10.Companies = "Acme Polyglot Industrialists".BillingInformation = "Sales & Marketing".Importance = olImportanceHigh.SaveEnd With
The TaskItem object has 69 properties. If you want to explore more of them, take a look at this MSDN web page:
https://msdn.microsoft.com/en-us/library/office/jj871952.aspx
Assigning a Task to a Colleague
To assign a task to a colleague, use the Assign method of the TaskItem object, and then use the Add method of the Recipients collection to add one or more recipients. Finally, you can use the Send method to send the task to your colleague.
The following example creates a task, uses the Assign method to indicate that it will be assigned, specifies a recipient, and sends the task:
Dim myTaskAssignment As TaskItemSet myTaskAssignment = Application.CreateItem(ItemType:=olTaskItem)With myTaskAssignment.Assign.Recipients.Add Name:="Peter Nagelly".Subject = "Buy Bagels for Dress-Down/Eat-Up Day".Body = "It's your turn to get the bagels on Friday.".Body = .Body & vbCr & vbCr & "Remember: No donuts AT ALL.".DueDate = Str(Date + 3).SendEnd With
Searching for Items
To search for items, use the AdvancedSearch method of the Application object. The syntax is as follows:
expression.AdvancedSearch(Scope, Filter, SearchSubFolders, Tag)
Here are the components of the syntax:
expressionis a required expression that returns anApplicationobject.Scopeis a required String argument that specifies the scope of the search (which items to search). Usually, you'll search a particular folder. For example, you might search the Inbox for messages that match certain criteria, or you might search the Tasks folder for particular tasks.Filteris an optional String argument that specifies the search filter. While this argument is optional, you will need to use it unless you want to return all the items within the scope you've specified.SearchSubFoldersis an optional Variant argument that you can set toTrueto search through any subfolders of the folder specified by theScopeargument, orFalseto search only the specified folder. The default isFalse.Tagis an optional Variant argument that you can use to specify a name for the search you're defining. If you create a name, you can call the search again.
The following example searches the Inbox (SearchWhere = "Inbox") for all messages with their subject line containing trial. If any messages are found, the procedure produces a list of sender names, which it assigns to the String variable strMessages and displays in a message box.
In their often-successful efforts to avoid backward compatibility while simultaneously not fixing years-old bugs, Microsoft has not repaired a timing problem in its AdvancedSearch code—a problem that's been known for at least three years. AdvancedSearch simply won't work unless you insert a delay into the macro.
If you run the following example code, you may have to fiddle with the 3000 delay argument I used for the Sleep command. For me, three seconds works, but you might need to raise it to 4000 or even higher.
Without that workaround delay, you will get zero results from your search, even if your code has no bugs. However, if you press F8 repeatedly to step through the code, it works as expected. Single-stepping of course severely retards execution speed, and gives Microsoft's AdvancedSearch method time to do its job correctly.
#If Win64 ThenPrivate Declare PtrSafe Sub Sleep Lib "kernel32" (ByVal dwMilliseconds As LongLong)#ElsePrivate Declare Sub Sleep Lib "kernel32" (ByVal dwMilliseconds As Long)#End IfSub AdvancedSearch()Dim objResults As SearchDim myFilter As StringDim SearchWhere As StringDim myTag As StringDim myResults As ResultsDim strMessages As StringDim intCounter As Integer'replace "trial" in myFilter below with a word likely to appear several times'in the subject lines in your Outlook inbox messagesmyFilter = Chr(34) & "urn:schemas:httpmail:subject" & Chr(34) & " like '%trial%'"SearchWhere = "Inbox"myTag = "SubjectSearch"Set objResults = Outlook.AdvancedSearch(Scope:=SearchWhere, Filter:=myFilter, SearchSubFolders:=True, Tag:=myTag)Set myResults = objResults.Results'Adjust this delay as necessary to get resultsSleep (3000)strMessages = "Total Hits: " & myResults.Count & vbCr & vbCrFor intCounter = 1 To myResults.CountstrMessages = strMessages & _myResults.Item(intCounter).SenderName & vbCrNext intCounterMsgBox strMessages, vbOKOnly, "Search Results"End Sub
The Bottom Line
- Work with the
Applicationobject. VBA uses two major Outlook objects that most users wouldn't recognize from working with the Outlook user interface alone.- Master It One of these objects represents a window that displays the contents of a folder. The other represents a window displaying an Outlook item, such as an email message or an appointment. What are the names of these two objects?
- Work with messages. To work with the contents of a message in VBA, you set or get various properties.
- Master It Name one of the most widely useful properties employed when manipulating the contents of a message in a procedure.
- Work with calendar items. You can create new calendar appointment items via VBA.
- Master It To create a new calendar item, you use a particular method of the
Applicationobject and specifyolAppointmentItemfor theItemTypeargument. What is the method?
- Master It To create a new calendar item, you use a particular method of the
- Work with tasks and task requests. You can assign a task to a colleague and then add one or more recipients. You can then send the task to your colleague and, optionally, the additional recipients.
- Master It What methods do you use to assign, add, and send a task to others?