
Chapter 4
Creating Code from Scratch in the Visual Basic Editor
In this chapter, you'll practice creating macros (procedures) from scratch in the Visual Basic Editor. The examples walk you through the process of creating a macro in Word, Excel, and PowerPoint.
For the examples in this book, the Visual Basic Editor should be set up a certain way visually, and set to require explicit declarations of variables (considered a good programming practice), so we'll start off this chapter by ensuring that these conditions are met.
The purpose of this chapter is to give you a feel for creating code in the Visual Basic Editor before you study the details of the VBA language in future chapters. Here you'll work briefly with VBA elements (such as objects, properties, methods, variables, and constants), but you will learn about them more fully later in this book.
Also you'll meet here several of the many helpful tools that the Visual Basic Editor provides, including the Macro Recorder, the Object Browser, and the Help system. You'll explore these tools, too, more thoroughly later in this book.
Setting Up the Visual Basic Editor to Create Macros
You'll find it easiest to follow the instructions in this chapter's macros—and in the rest of the book—if you have the Visual Basic Editor set up in a custom configuration. (Any changes you make to the VBA Editor will be in effect across all VBA-enabled Office applications.) So, if you set up the Editor as described next, it will look like this whether you open it in Excel, Word, Access, Outlook, or PowerPoint.
The following steps describe how to set up the Visual Basic Editor so it looks like Figure 4.1:
- Open the Visual Basic Editor.

Figure 4.1 The default configuration for the VBA Editor - If the Project Explorer isn't displayed, choose View ➢ Project Explorer or press Ctrl+R to display it.
- If the Properties window isn't displayed, choose View ➢ Properties Window or press the F4 key to display it.
- Unless you really prefer things otherwise, dock the Project Explorer in its traditional position at the upper-left corner of the main Visual Basic Editor area.
- Dock the Properties window below the Project Explorer, again in its default position.
To change docking:
- Choose Tools ➢ Options.
- Click the Docking tab, and select the Docking options.
To dock a window that is undocked (floating), double-click its title bar. And to float a window, double-click its title bar again.
Now we'll set up the Visual Basic Editor to enforce a requirement that your variables be declared explicitly. The Editor will then create a rule that says you must declare each variable formally before you can use it in your code.
- Choose Tools ➢ Options to display the Options dialog box, ensure the Require Variable Declaration check box on the Editor page is checked, and then click the OK button.
We'll discuss variable declaration in greater detail later in the book, but here's a brief summary. This setting makes the Visual Basic Editor automatically enter an Option Explicit statement for all code modules and user forms you create from now on. And that statement causes the Editor to check during runtime (when you execute a macro) for any implicitly declared variables (considered bad practice) and remind you that you must declare them explicitly, like this:
Dim txtName As StringCreating a Procedure for Word
The macro you'll create for Word causes the Track Changes feature to toggle how deleted text will be displayed (whether Strikethrough or Hidden). In other words, using this macro, you'll be able to switch instantly between having deleted text remain onscreen with a line through it or having it simply disappear.
Start by using the Macro Recorder to provide the necessary object qualifications. Then you can modify the code by hand in the Editor to specify the toggle behavior we're after.
Follow these steps to record the macro:
- Start Word. If Word is already running, exit it and restart it.
- Record a macro to get to the object qualifications (properties and settings) you need. (Remember that to some, recording may feel like cheating, but the Macro Recorder is truly a gift when it comes to finding objects and getting complicated syntax correctly coded.) Follow these substeps:
- Click the Developer tab on the Ribbon; then click the Record Macro button in the Code section to display the Record Macro dialog box.
- Either accept the macro name that the Macro Recorder automatically assigns (
Macro1,Macro2, and so on) or create a scratch name of your own, such asTemp, that will remind you to delete the macro if you forget to do so. - Leave the Store Macro In drop-down list set to All Documents (Normal.dotm). Leave the description blank. This is a temporary macro just for practice, so we won't add it to our permanent collection.
- Click the OK button to start recording the macro.
- Click the Review tab on the Ribbon, and then click the small arrow in the lower-right corner of the Tracking section.
The Track Changes Options dialog box opens.
- In that box, click the Advanced Options button. Now ensure that Strikethrough is selected in the Deletions drop-down list (see Figure 4.2), and then click OK twice to close the two Track Changes Options dialog boxes.
Strikethrough is the default, so it's probably already selected—but we want the Recorder to show us how this option is coded in VBA. Clicking OK to close a dialog box records all the current settings in that box.

Figure 4.2 The Advanced Track Changes Options dialog box in Word
- Repeat the preceding steps (e and f) to reopen the Track Changes Options dialog box.
- Now, select Hidden in the Deletions drop-down list, and again click OK twice to close the dialog boxes.
- Stop recording the macro by clicking the white recording button in the status bar or by clicking the Stop Recording button on the Developer tab on the Ribbon.
- Click Developer ➢ Macros to display the Macros dialog box.
- Select the Temp macro you just recorded and click the Edit button to open it for editing in the Visual Basic Editor.
Your code should look like this:
1. Sub temp()2. '3. ' temp Macro4. '5. '6. With Options7. .InsertedTextMark = wdInsertedTextMarkUnderline8. .InsertedTextColor = wdRed9. .DeletedTextMark = wdDeletedTextMarkStrikeThrough10. .DeletedTextColor = wdRed11. .RevisedPropertiesMark = wdRevisedPropertiesMarkNone12. .RevisedPropertiesColor = wdByAuthor13. .RevisedLinesMark = wdRevisedLinesMarkOutsideBorder14. .CommentsColor = wdRed15. .RevisionsBalloonPrintOrientation = _wdBalloonPrintOrientationPreserve16. End With17. ActiveWindow.View.RevisionsMode = wdMixedRevisions18. With Options19. .MoveFromTextMark = wdMoveFromTextMarkDoubleStrikeThrough20. .MoveFromTextColor = wdGreen21. .MoveToTextMark = wdMoveToTextMarkDoubleUnderline22. .MoveToTextColor = wdGreen23. .InsertedCellColor = wdCellColorLightBlue24. .MergedCellColor = wdCellColorLightYellow25. .DeletedCellColor = wdCellColorPink26. .SplitCellColor = wdCellColorLightOrange27. End With28. With ActiveDocument29. .TrackMoves = False30. .TrackFormatting = True31. End With32. With Options33. .InsertedTextMark = wdInsertedTextMarkUnderline34. .InsertedTextColor = wdRed35. .DeletedTextMark = wdDeletedTextMarkHidden36. .DeletedTextColor = wdRed37. .RevisedPropertiesMark = wdRevisedPropertiesMarkNone38. .RevisedPropertiesColor = wdByAuthor39. .RevisedLinesMark = wdRevisedLinesMarkOutsideBorder40. .CommentsColor = wdRed41. .RevisionsBalloonPrintOrientation = _wdBalloonPrintOrientationPreserve42. End With43. ActiveWindow.View.RevisionsMode = wdMixedRevisions44. With Options45. .MoveFromTextMark = wdMoveFromTextMarkDoubleStrikeThrough46. .MoveFromTextColor = wdGreen47. .MoveToTextMark = wdMoveToTextMarkDoubleUnderline48. .MoveToTextColor = wdGreen49. .InsertedCellColor = wdCellColorLightBlue50. .MergedCellColor = wdCellColorLightYellow51. .DeletedCellColor = wdCellColorPink52. .SplitCellColor = wdCellColorLightOrange53. End With54. With ActiveDocument55. .TrackMoves = False56. .TrackFormatting = True57. End With58. End SubThat's a daunting amount of code for the few rather simple actions you took. Remember that this is because the Macro Recorder records the settings for all of the possible options in the Track Changes Options dialog box that you visited, not just the single option you selected and modified.
- Look over the code briefly to see the many settings that were recorded from the options inside the dialog box displayed in Figure 4.2.
If you look at the figure, you can see how the code reflects the settings. For example, see the
.SplitCellColor = wdCellColorLightOrangeline of code and locate the setting it refers to in the dialog box.A second set of nearly identical settings in the code represents your second visit to the dialog box. Notice lines 9 and 35 in particular; these are key. Line 35 reflects the change made on your second visit—specifying a hidden rather than strikethrough property for the
DeletedTextMarkproperty of theOptionsobject. Notice, too, the two values for this property:wdDeletedTextMarkStrikeThrough(when you recorded the Deletions drop-down specifying Strikethrough) andwdDeletedTextMarkHidden(when you set it to Hidden). - Now in the Editor, select the entire recorded macro, from the
Sub tempstatement down to theEndSubstatement, and press the Delete key to get rid of it. - Make sure the Visual Basic Editor is set up as described in the section “Setting Up the Visual Basic Editor to Create Macros” earlier in this chapter.
- In the Project Explorer window, right-click anywhere in the
Normalitem and choose Insert ➢ Module from the context menu.The Visual Basic Editor inserts a new module in the
Normal.dotmglobal template and displays a Code window for it. - Press the F4 key to activate the Properties window for the new module. (By activate I mean give the focus to—whatever window has the focus is the one where typing will be displayed or mouse clicks will have an effect.)
The Visual Basic Editor selects the
(Name)property, the only property available for this new module. (Confusingly, the property's name is enclosed in parentheses.) - Type a name for the new module in the Properties window. For this example, delete the default name (
Module 1orModule 2or whatever it is) and type the nameProcedures_to_Keep_1. - Press the F7 key or click in the Code window to activate it.
- Verify that the Visual Basic Editor has entered the
Option Explicitstatement in the declarations area at the top of the code sheet (the code area) in the Code window. If not, go back and complete steps 4 and 5 in the list at the start of this chapter. - Below the
Option Explicitstatement, type theSubstatement for the procedure and press the Enter key. Name the procedureToggle_Track_Changes_between_Hidden_and_Strikethrough:Sub Toggle_Track_Changes_between_Hidden_and_StrikethroughWhen you press the Enter key, the Visual Basic Editor inserts for you the required parentheses at the end of the
Substatement, a blank line, and theEndSubstatement and places the insertion point on the blank line, ready for you to start typing in some programming:Sub Toggle_Track_Changes_between_Hidden_and_Strikethrough()End Sub - Press the Tab key to indent the first line below the
Substatement. - Type
if options.(in lowercase, and be sure to end with the period).Now the Editor displays the List Properties/Methods drop-down list.
- Type down through the list (type
d,e, and thenl) and use the ➢ key, or simply scroll with the mouse, to select theDeletedTextMarkentry. - Now just type
=(the equal sign).The Visual Basic Editor enters the
DeletedTextMarkcommand for you, followed by the equal sign, and then displays the List Properties/Methods list of constants that can be used with theDeletedTextMarkproperty (see Figure 4.3).
Figure 4.3 The Visual Basic Editor's List Properties/Methods list displays the constants available for the DeletedTextMark property.
- Select the
wdDeletedTextMarkHiddenitem and enter it into your code by pressing the Tab key or by double-clicking it. - Type
Thenand press the Enter key.Note that when you start the next line of code (by pressing Enter), the Visual Basic Editor checks the line of code for errors. If you used lowercase for the
If Optionspart of the statement, the Visual Basic Editor applies capitalization. (This is just for show—thankfully, VBA pays no attention to capitalization when executing code). If there are no space characters on either side of the equal sign, the Visual Basic Editor adds them too. - Enter
Options.DeletedTextMark=wdDeletedTextMarkStrikethrough, using the assistance offered by the Visual Basic Editor's Auto List Members features (described earlier, in steps 15 through 17), and then press Enter. - Press the Backspace key or Shift+Tab to unindent the new line of code by one tab stop.
- Type the
ElseIfkeyword, and then enter the rest of the procedure as follows:ElseIf Options.DeletedTextMark = wdDeletedTextMarkStrikeThrough ThenOptions.DeletedTextMark = wdDeletedTextMarkHiddenEnd If - Make sure your completed procedure looks like this:
Sub Toggle_Track_Changes_between_Hidden_and_Strikethrough()If Options.DeletedTextMark = wdDeletedTextMarkHidden ThenOptions.DeletedTextMark = wdDeletedTextMarkStrikeThroughElseIf Options.DeletedTextMark = wdDeletedTextMarkStrikeThrough ThenOptions.DeletedTextMark = wdDeletedTextMarkHiddenEnd IfEnd Sub - Click Developer ➢ Visual Basic to switch to Word, and then type in a line or two of text.
- Arrange the Word window and the Visual Basic Editor window side by side.
- In Word, click the Review tab on the Ribbon, and click the upper half of the Track Changes button (the graphic icon) to activate the feature that marks up (or otherwise handles) revisions.
- Delete a word in your text, and notice whether it is struck through or is simply hidden.
- You have a macro that toggles between these two behaviors, so in the Visual Basic Editor, press the F5 key or click the Run Sub/UserForm button (on the Standard and Debug toolbars) to run the macro.
- Back in Word, see what effect the deletion has now. You can also take a look at the Track Changes Options dialog box to see that the Deletions setting has changed.
- Click the Save button on the Standard toolbar in the Visual Basic Editor.
Note that you could alternatively write this macro using a
Withstatement for theOptionsobject so that it looks like this:Sub Toggle_Track_Changes_between_Hidden_and_Strikethrough_2()With OptionsIf .DeletedTextMark = wdDeletedTextMarkHidden Then.DeletedTextMark = wdDeletedTextMarkStrikeThroughElseIf .DeletedTextMark = wdDeletedTextMarkStrikeThrough Then.DeletedTextMark = wdDeletedTextMarkHiddenEnd IfEnd WithEnd Sub
There are usually several ways to code a given behavior in VBA. Although formal (professional) programmers learn a set of “best practices,” if you're just a hobbyist writing VBA for your own personal use, go ahead and code however you wish. Use whatever works.
Creating a Macro for Excel
The macro you'll create for Excel is short but helpful. When the user runs Excel, this macro maximizes the Excel window and opens the last file used. The macro also illustrates some useful techniques, including:
- Writing a macro that executes when an application first starts up
- Working with events
- Using the Object Browser to find the objects, methods, and properties you need
Follow these steps to create the procedure:
- Start Excel if it's not already running.
- If necessary, press Alt+Tab to cycle through your workbooks to locate
Personal.xlsb. If your Personal Macro Workbook is currently hidden:- Click the Unhide button in the Window section of the View tab on the Ribbon.
- Select
PERSONAL.XLSBin the Unhide Workbook list box. - Click the OK button.
- Click Developer ➢ Visual Basic to open the Visual Basic Editor.
- Make sure the Visual Basic Editor is set up as described earlier in this chapter.
- In the Project Explorer window, expand
VBAProject (PERSONAL.XLSB)if it's collapsed. To expand it, either double-click its name or click the + sign to its left. - Expand the Microsoft Excel Objects folder.
- Double-click the
ThisWorkbookitem to open its code sheet in a Code window.The
ThisWorkbookobject represents the current workbook. - Verify that the Visual Basic Editor has entered the
Option Explicitstatement in the declarations area at the top of the code sheet. If not, go back and complete steps 4 and 5 in the list at the start of this chapter. - In the Code window click below any existing macros, and press Enter to make room for this new macro. Then type
Private Sub Auto_Openand then press the Enter key.
The Editor will add the required parentheses and the
End Subline. - Open the Object Browser: press the F2 key, or choose View ➢ Object Browser, or click the Object Browser button on the Standard toolbar to display the Object Browser window (see Figure 4.4).

Figure 4.4 Use the Object Browser to find the objects, methods, and properties you need for a procedure.
The first action we want to take in this macro is to maximize the Excel's application window. As in any application, VBA uses the
Applicationobject to represent the Excel application, but you need to find the correct property of this object to utilize. - Select Excel in the Project/Library drop-down list (see the label in Figure 4.4), type
maximizein the Search Text box, and either click the Search button or press the Enter key.The Object Browser displays the result of the search (see Figure 4.5) in its Search Results pane (which was collapsed and not visible in Figure 4.4). The constant
xlMaximizedis a member of the classXlWindowState.
Figure 4.5 The result of the search for “maximize” in the Object Browser
- Press the F7 key to activate the Code window. (Alternatively, click the Code window, choose View ➢ Code, or choose the Code window from the Window menu.)
- Type
application.(in lowercase and including the period) so that the Visual Basic Editor displays the drop-down list, typewto jump to the items beginning with W, and select theWindowStateitem. - Type
=to enter theWindowStateitem in your code and to display the list of constants available forWindowState(see Figure 4.6).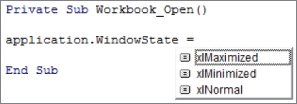
Figure 4.6 Use the list of constants to enter a constant quick and easilly. - Select the
xlMaximizeditem and press Enter to insert that property in the code, and move down a line to start writing a new statement.The second action for the macro is to open the last file used—file 1 on the recently used files list (this is the list that appears in the Recent Documents list when you click the Recent item in the File tab on the Ribbon).
- Press the F2 key to activate the Object Browser again.
- Leave Excel selected in the Project/Library drop-down list, type
recent, and either press the Enter key or click the Search button.The Object Browser displays the results of the search (see Figure 4.7). The item you need is the
RecentFilesproperty of theApplicationobject. TheRecentFilesproperty returns theRecentFilescollection, an object that knows the information about the files in the recently used files list.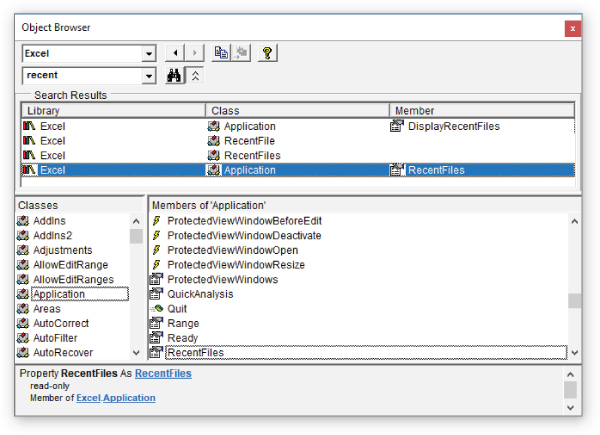
Figure 4.7 The result of the search for “recent” in the Object Browser
- Press the F7 key to return to the Code window. Type
application.and selectRecentFilesfrom the List Properties/Methods drop-down list. - Type
(1).to indicate the first item in theRecentFilescollection, and select theOpenmethod from the List Properties/Methods list:Application.RecentFiles(1).OpenThat's it. Your procedure should look like this:
Private Sub Auto_Open()Application.WindowState = xlMaximizedApplication.RecentFiles(1).OpenEnd Sub - Press Alt+Q or choose File ➢ Close And Return To Microsoft Excel to return to Excel.
- Click the File tab on the Ribbon and choose Save.
- Click the Hide button in the Window section of the View tab on the Ribbon. This hides
PERSONAL.XLSBfrom view. - Open a sample document, type something into one of the cells, save it, and close it.
- Press Alt+F4 to exit Excel. If you are asked if you want to save the changes you made to the current workbook and your Personal Macro Workbook, choose Yes.
- Restart Excel.
Notice how Excel automatically maximizes the application window and opens the most recently used file. If you see an error message, it most likely means that you've renamed or moved the most recently used file. To prevent this problem, you can add some error-trapping code. We'll explore the
On Errorcommand thoroughly in Chapter 17, “Debugging Your Code and Handling Errors.” - But if you like, you can make the following changes to your
Auto_Openmacro:Private Sub Auto_Open()On Error GoTo ProblemApplication.WindowState = xlMaximizedApplication.RecentFiles(1).OpenExit SubProblem:MsgBox “Error: “ & Application.RecentFiles(1).Path & “ can't be opened."End Sub
The Auto_Open name is special. When you name a macro Auto_Open, VBA knows that whatever actions are in the macro code should be executed when Excel starts running. This is one of a handful of special names called Excel's events—things that happen to an object, in this case the Open event of the Excel application. (Notice that an object's methods are actions it can take, such as a print method sending a document to the printer. Conversely, an object's events are things that can happen to it, such as a user clicking a button or opening an application.)
Creating a Procedure for PowerPoint
The procedure you'll create for PowerPoint is short and straightforward, but it can save the user enough effort over the long run to make it worthwhile. It adds a title slide to the active presentation, inserting a canned title that includes the current date and the company's name as the presenter.
Follow these steps to create the procedure:
- Start PowerPoint. If PowerPoint is already running, close it and restart it.
- Click to open the Blank Presentation template. (Or if you've suppressed Start Screen, choose File ➢ New ➢ Blank Presentation.)
- Click Developer ➢ Visual Basic to open the Visual Basic Editor.
If the Developer option isn't visible on the Ribbon, follow the instructions in the sidebar titled “A Warning about Security” in Chapter 1.
- Make sure the Visual Basic Editor is set up as described earlier in this chapter.
- In the Project Explorer window, right-click
VBAProject(Presentation1)and choose Insert ➢ Module from the context menu.The Visual Basic Editor inserts a new module in the project, displays a Code window containing the code sheet for the module, and expands the project tree in the Project Explorer.
- Verify that the Visual Basic Editor has entered the
Option Explicitstatement in the declarations area at the top of the code sheet. If not, go back and complete steps 4 and 5 in the list at the start of this chapter. - Press the F4 key to activate (move to) the Properties window.
- Delete the default name
Module 1and replace it by typingGeneral_Procedures. - Press the F7 key or click in the Code window to give it the focus.
- Below the
Option Explicitstatement, type theSubstatement for the procedure and press the Enter key:Sub Add_Title_SlideWhen you press Enter, the Visual Basic Editor enters the parentheses at the end of the
Substatement, a blank line, and theEndSubstatement for you, and places the insertion point on the blank line:Sub Add_Title_Slide()End Sub - Press the Tab key to indent the first line below the
Substatement.This is strictly for your benefit. It makes the code a little easier to read.
- Let's now identify which objects we need for this macro. You'll be working with the active presentation, which is represented by the
ActivePresentationobject. As you'll see in Part 6 of this book, “Programming the Office Applications”—which is all about objects—there are several ways to get information when programming with objects. For now, let's try searching online help rather than using the Editor's built-in Object Browser. - Using Google, search for
object model reference powerpoint 2019. (It should be dated 2018 or later, but if you see earlier dates on various pages within this reference material, that's fine.) Now you can locate the details about the application object'sActivePresentationproperty object, as shown in Figure 4.8.
Figure 4.8 The ActivePresentation property screen - Click the
Presentationlink in “Returns a Presentation object…” near the top, as shown in Figure 4.8.This link will take you to the
Presentationobject's Help screen. We're drilling down in this Help system to find example code and other assistance that will show us how to work with slides and related objects. All this will become much clearer to you in Part 6 of this book. For now, just follow along to get the general idea. - Now on the Presentation object's Help page, scroll way down to locate the
Slidesobject in the properties list. - Click the Slides link. Then click a second Slides link.
See the pointing finger in Figure 4.9. Now you see the information about the
SlidesCollection object, as shown in Figure 4.10. From this screen, you learn two pieces of information: first, that a slide is represented by aSlideobject (stored in aSlidescollection), and second, that you use theAddmethod to create a new slide.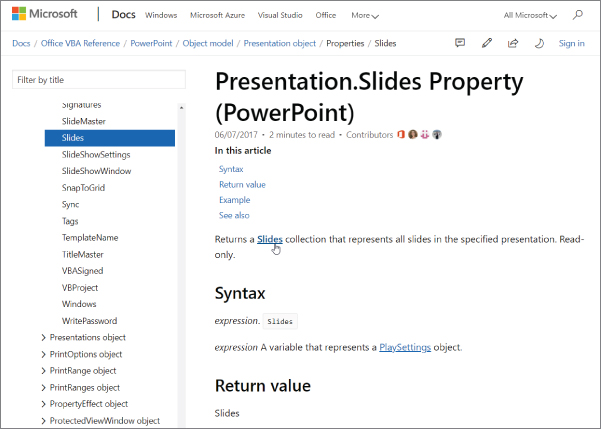
Figure 4.9 Select the Slides object from the list.

Figure 4.10 The Slides Collection Object Help screen
- Here's a shortcut when writing code. Type the following code line:
Dim sldTitleSlide As SlideIt's a declaration for an object variable of the
Slideobject type, which will be used to represent the slide created in this Sub. Notice that after you typeasand a space, the Visual Basic Editor displays the list of available objects. - Type
sandlto move down the list until you seeSlideselected (highlighted) and then press the Enter key to complete the code line and move down to the next line.Here's another shortcut. Use a
Setstatement to assign to thesldTitleSlideobject a new slide you create by using theAddmethod. - Type
set sldand then press Ctrl+spacebar to make the Editor's Complete Word feature entersldTitleSlidefor you. - Then type
=activepresentation.slides.add(, using the Visual Basic Editor's assistance, so that the line reads as shown here:Set sldTitleSlide = ActivePresentation.Slides.Add(When you type the parenthesis, the Auto Quick Info feature displays the syntax for the
Addmethod, as shown in Figure 4.11.
Figure 4.11 The Auto Quick Info feature displays the syntax for the Add method when you type the parenthesis after the Add method.
- Type the
Indexargument, a colon, an equal sign, the value1(because the title slide is to be the first slide in the presentation), and a comma:Set sldTitleSlide = ActivePresentation.Slides.Add(Index:=1, _Layout:=ppLayoutTitle) - Break the statement to the next line with a line-continuation character (an underscore preceded by a space).
- Then type a tab to indent the new line, type the
Layoutargument, a colon, and an equal sign, and pick theppLayoutTitleconstant from the List Properties/Methods drop-down list, as shown in Figure 4.12.
Figure 4.12 Choose the ppLayoutTitle constant for the Layout argument. - Type the parenthesis to end the statement:
Set sldTitleSlide = ActivePresentation.Slides.Add(Index:=1, _Layout:=ppLayoutTitle) - Press the Enter key to start a new line, and then press either the Backspace key or Shift+Tab to unindent the new line by one tab stop.
- You'll be working with the
sldTitleSlidefrom here on, so create aWithstatement using it, and place the insertion point on the line between theWithstatement and theEnd Withstatement:With sldTitleSlideEnd WithNext, the macro will manipulate the two items on the slide. To make it do so, you need to know the objects that represent them. You could use the Macro Recorder to find the objects, but this time try a more direct method.
- Place the insertion point on the line within the
Withstatement and type.(a period) to display the List Properties/Methods drop-down list of available properties and methods for theSlideobject.Sometimes the List Properties/Methods drop-down list is of little help because it displays so many possibly relevant properties and methods that you can't identify the property you need. But if you scan the list in this case, you'll see that the
Shapesproperty (which returns theShapescollection) is the only promising item for our purposes. - Press Ctrl+G, choose View ➢ Immediate, or click the Immediate Window button on the Debug toolbar to display the Immediate window for a bit of testing.
- Type the following test statement into the Immediate window and press the Enter key to execute this statement:
ActivePresentation.Slides(1).Shapes(1).SelectThe Immediate window is a sometimes helpful and quick way to test individual lines of code without having to run the entire macro.
- Now switch to the PowerPoint window to see if the item was, in fact, selected (whether it has a frame drawn around it).
- Click Developer ➢ Visual Basic or click the View Microsoft PowerPoint button on the Standard toolbar to display the PowerPoint window to verify that VBA has selected the first
Shapeobject on the slide.Okay, this is the right object to start with, but now you need to find out how to add text to the shape.
- Go back to the Code window (click in the Code window or press the F7 key). Press the Backspace key to delete the period, and then type it again to redisplay the list.
- Type
teto jump down to the items in the list whose names start with text. - Select the
TextFrameitem in the list, and then type a period to enter the term and display the next list. - Scroll down the list, select the
TextRangeobject, and type a period to enter the term and display the next list. - In the next list, select the
Textproperty. - Type an equal sign to enter the term.
- Then type double quotation marks followed by the text to assign to the text property
Pollution Update:(with a space after it), double quotation marks, an ampersand, and the date (supplied by theDatefunction):Shapes(1).TextFrame.TextRange.Text = “Pollution Update: “ & Date - Assign information to the second
Shapein the same way:.Shapes(2).TextFrame.TextRange.Text = “JMP Industrials."The finished procedure should look like this:
Sub Add_Title_Slide()Dim sldTitleSlide As SlideSet sldTitleSlide = ActivePresentation.Slides.Add(Index:=1, _Layout:=ppLayoutTitle)With sldTitleSlide.Shapes(1).TextFrame.TextRange.Text = _“Pollution Update: “ & Date.Shapes(2).TextFrame.TextRange.Text = _“JMP Industrials"End WithEnd Sub - Press F5 to test the procedure. Look at the slides in PowerPoint. There should be a new first slide in the collection of slides on the left.
- Delete all slides from the presentation: select slides by pressing Shift while clicking a range of slides in the left pane, and then press Delete.
- If you want, right-click the Quick Access Toolbar in the upper-left corner of PowerPoint's screen, and then choose Customize Quick Access Toolbar. Then add a Quick Access Toolbar button for the
Add_Title_Slidemacro. - Save the presentation under a name such as
Procedures.pptm. - You might see a warning about personal-information risks. Click OK to close that Be Careful! message box.
- Create a new presentation; then test the toolbar button or menu item for the procedure.
- If you see a security warning, read the sidebar titled “A Warning about Security” in Chapter 1.
- Close the presentation without saving changes.
Creating a Procedure for Access
Access has a long tradition of dissimilarity from the other Office applications, and this applies as well to its implementation of macros. It has no Recorder, for example, nor does it permit you to assign macros to shortcut key combinations.
In addition, Access includes a legacy “Macro Builder,” which you can take a look at by double-clicking the Macro button on the Create tab of the Ribbon. (Note that in Access there is no Developer tab on the Ribbon. Another divergence. You open the Visual Basic Editor from the Database Tools tab.)
The Macro Builder utility has been generally unpopular over the years because the Visual Basic Editor offers far more options, objects, and features. The Builder is for nonprogrammers—a way to create simple macros via lists rather than actual programming. However, the Builder has now and then been somewhat improved over the years, including new provisions for error handling and the ability to embed macros within individual forms.
Additional improvements were made for Access to the point that enough enhancements were added that Microsoft renamed it the Macro Designer! But a dead rose by any other name is still a dead rose. If you're interested in details about the Macro Designer and its curious, some might say simplistic, reliance on repeated If…Then structures, see the sidebar titled “Using the Macro Builder” in Chapter 28, “Understanding the Access Object Model and Key Objects.”
For the reasons I mentioned, you will likely prefer to use the Visual Basic Editor rather than the Builder/Designer for any but the most elementary macros. After all, relying on a list of If queries is not only limiting, it's downright clumsy.
So let's now get a brief taste of how to write a real VBA macro in Access. In this example, you'll write a macro that displays today's date and time:
- Start Access.
- Double-click the Blank Desktop Database icon.
- Click Database Tools ➢ Visual Basic to open the Visual Basic Editor.
- Right-click the database name in the Project Explorer, and then choose Insert Module to open a new module in the Code window, where you can write macros.
- In the Code window, type the following macro:
Sub ShowDate()MsgBox ("Hi there! It's: “ & Now)End Sub - Click anywhere within this code, and then press F5 to execute the macro.
You should see a message box that displays the current date and time. (Note that you don't type the
End Sub. The Editor automatically inserts it for you.)
We'll cover Access macro programming in depth in Chapters 28 “Understanding the Access Object Model and Key Objects,” and 29, “Accessing One Application from Another Application.” Also, you might have noticed that the Editor automatically inserted a line of code at the top: Option Compare Database. This specifies a particular way to go about comparing text strings.
The Bottom Line
- Set up the Visual Basic Editor to create macros. How you arrange the various components of the Visual Basic Editor is your personal choice, but while using this book, it's easiest if you set up the Editor to resemble the way it appears in the book's figures. Besides, this arrangement is quite close to the default layout, which has proven to be the most effective one for the majority of programmers (according to various focus groups and polls) for the decades that Visual Basic has been used.
- Master It Press a single key to toggle (to display and then hide) the Properties window.
- Create a macro for Word. Using the Help feature in any VBA-enabled application allows you to find code examples that you can copy and paste into your own code.
- Master It Open the Code window and use Help to find a code example.
- Create a macro for Excel. Certain procedure names are special. In a previous Excel exercise, you added line numbering and gave that procedure a name of your own choice. But some procedure names have a special meaning—they are triggered by an event in Excel itself. They will execute automatically when that event takes place (you don't have to run events by choosing Run from the Macro dialog box or by assigning the macro to a keyboard shortcut or Quick Access Toolbar button). One such event is Excel's
Auto_Openprocedure.- Master It Display a message to the user when Excel first executes.
- Create a macro for PowerPoint. As you type a procedure, the Visual Basic Editor provides you with lists of objects' members (the Auto List Members feature) and with syntax examples, including both required and optional arguments (the Auto Quick Info feature). These tools can be invaluable in guiding you quickly to the correct object and syntax for a given command.
- Master It Use the Auto List Members and Auto Quick Info features to write a macro that saves a backup copy of the currently active presentation.
- Create a procedure for Access. Although Access includes a variety of macro-related features that are unique (such as its Macro Builder/Designer), its Visual Basic Editor is quite similar to the Visual Basic Editors in the other Office applications.
- Master It Open the Visual Basic Editor in Access and write a macro that displays today's date using the
Datefunction rather than theNowfunction. Use the Access Visual Basic Editor Help system to understand the difference between these two functions.
- Master It Open the Visual Basic Editor in Access and write a macro that displays today's date using the