Chapter 9
iCloud Is Made for MacBooks
IN THIS CHAPTER
![]() Introducing iCloud
Introducing iCloud
![]() Using your iCloud Drive
Using your iCloud Drive
![]() Sharing documents with iOS devices by using Handoff
Sharing documents with iOS devices by using Handoff
![]() Setting iCloud preferences
Setting iCloud preferences
![]() Managing iCloud storage
Managing iCloud storage
Readers often ask me to name my favorite reasons why they should switch platforms. In other words, why should a Windows user who thinks all is well move to the Apple universe? I always mention the facts that Apple makes superior hardware and that Catalina is a much better operating system than Windows 10. My favorite selling point is innovation. Apple comes up with the best ideas first, and everyone else plays catch-up.
Here’s the perfect example: The folks at Apple got tired of synchronizing their iOS devices with their computers over USB cable. Remember those archaic days? When you took a photo with your iPhone or created a new document with your iPad, your new additions just sat in their original locations until you had a chance to sync your device with your MacBook. But with Apple’s iCloud functionality, your stuff gets automatically synchronized and backed up across the Internet — something that the Windows world still doesn’t perform seamlessly, even today!
In this chapter, I save you the trouble of researching all the benefits of iCloud. Heck, that’s one of the reasons why you bought this book, right?
So How Does iCloud Work, Anyway?
All of today’s iOS devices can display or play the same media: photos, music, books, TV shows, and such. Heck, iOS devices (your iPhone, iPad, and iPod touch) can even share applications. Therefore, it makes sense to share all your digital media effortlessly across these devices, and that’s what iCloud is all about. Apple calls this synchronization pushing.
Here’s how the pushing process works. Imagine that you just completed a Pages document on your MacBook (an invitation for your son’s birthday party), but you’re at the office, and you need to get the document to your family so they can edit and print it from your son’s iPad.
Before iCloud, you had to attach the document to an email message or upload it to some type of online storage (such as Dropbox or Microsoft’s OneDrive); then a family member had to download and save the document to the iPad before working with it. With iCloud, you simply save the document on your MacBook to the Pages folder on your iCloud Drive, and macOS automatically pushes the document to the iPad (using the same Apple ID). Your document appears on the iPad, ready to be opened, edited, and printed — and it appears as well on any other devices that uses the same Apple ID. Figure 9-1 gives you an idea of what’s happening in the background when one of your devices pushes data with iCloud.

FIGURE 9-1: iCloud works by pushing data among all your iOS devices.
I’ll admit that Windows eventually implemented a similar process with OneDrive. You can save documents within Office 365 to OneDrive and access them on other PCs and devices. Ah, but iCloud isn’t limited to digital media! Catalina can also automatically synchronize your email accounts, Calendar, and Contacts entries with other iOS devices across the Internet, so staying in touch is much easier (no matter where you are or which device you happen to be using at the moment).
Apple also throws in 5GB of free online storage that you can use for all sorts of things — not only digital media files, but also documents that you’d like to save online for safekeeping. Items you buy through the iTunes Store, iBooks Store, or App Store — music, video, podcasts, books, and applications — don’t count against your 5GB limit. (More on how you can expand that 5GB limit later in the chapter.)
 To join the iCloud revolution, you need an Apple ID. If you didn’t create one during initial Catalina setup, you can create an Apple ID from the App Store.
 You can also access your documents through the web at
 https://www.icloud.com. Log in with your Apple ID and password to send mail; access your contacts and calendar; edit your notes and reminders; locate your devices; and use online versions of Photos, Pages, Numbers, and Keynote.
Moving, Saving, and Opening iCloud Documents
iCloud online storage for your documents is definitely neat. Your iCloud Drive functions much like other popular online storage services such as Dropbox and Microsoft OneDrive, allowing you to save documents, load documents, and move files to and from your MacBook’s drive with ease by using a Finder window. In fact, iCloud Drive keeps things tidy for you: If you move a file from your iCloud Drive to your local drive, it’s also deleted automatically from iCloud Drive on your other Macs and iOS devices that use the same Apple ID. (Catalina prompts you for permission first, of course.)
Figure 9-2 illustrates my iCloud Drive in action. You can access your iCloud Drive from the Finder window’s Sidebar. Note that iCloud folders are automatically created for supported applications, such as Pages and Numbers, allowing you to click the corresponding iCloud folder from the application’s Open dialog. In other words, both your iCloud Drive and the application-specific iCloud folder are available within the application’s Open dialog. It’s about as convenient as you can get.
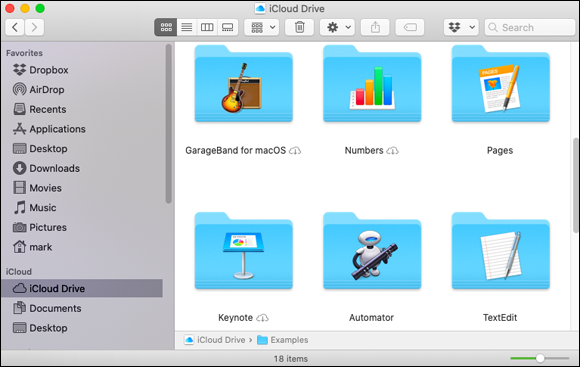
FIGURE 9-2: Each of these iCloud folders can joyously store documents.
Catalina also allows you to share a folder on your iCloud Drive with others by sending them an invitation with a link via Mail or Messages. Right-click the desired folder within your iCloud Drive, choose Share from the contextual menu, and then choose Add People from the submenu. You can choose who will receive invitations and offer full (or read-only) access to the contents of that folder.
Putting Handoff to Work
If you’re like me, your favorite moment in a team track event is the all-important handoff of the baton from one runner to the next. Handoff is the perfect name for this macOS feature, because it transfers what you’re doing on your iOS devices to matching applications on your Mac!
Suppose that you’re using Maps on your iPhone, and you realize that you’d rather view the location on your MacBook’s larger screen (as well as print it from the USB printer connected to the laptop). If you’re within Bluetooth-signal range of your MacBook, Handoff is ready to go: An icon for the macOS version of Maps automatically appears at the left end of the Dock in Catalina. One click of that icon, and your MacBook opens Maps and displays the same location!
You’re not restricted to just one application. Each time you open an application that Handoff supports (such as Safari or Mail), macOS offers you the chance to open the matching application on your MacBook and displays the current data from the iOS app. All this is trouble-free; there’s nothing to configure or set.
Caveats? Only three at this writing:
- Bluetooth is required. Bluetooth networking must be turned on for both the iOS device and the MacBook for Handoff to work, and the iOS device must be within a 30-foot radius of your laptop. (That’s the maximum distance over which Bluetooth hardware can broadcast; walls and other obstructions reduce that range.)
- You need the right hardware. To use Handoff, you’ll need a 2012-model MacBook or later that includes Bluetooth LE hardware.
- iOS 8 is a must. Handoff is compatible only with iOS devices running iOS 8 or later.
Handoff works in the other direction as well, allowing you to pick up where you left off on your MacBook application by transferring the active session to your iPhone, iPad, or iPod touch. Swipe the icon that appears on your iOS device to start the ball rolling.
Configuring iCloud
You control all the settings for iCloud from Catalina’s Apple Account pane in System Preferences (shown in Figure 9-3). Click the System Preferences icon on the Dock and then click the Apple Account icon. (If you’re prompted to sign in, enter your Apple ID and your password.) Click the iCloud entry in the list on the left side of the window to display the iCloud panel.
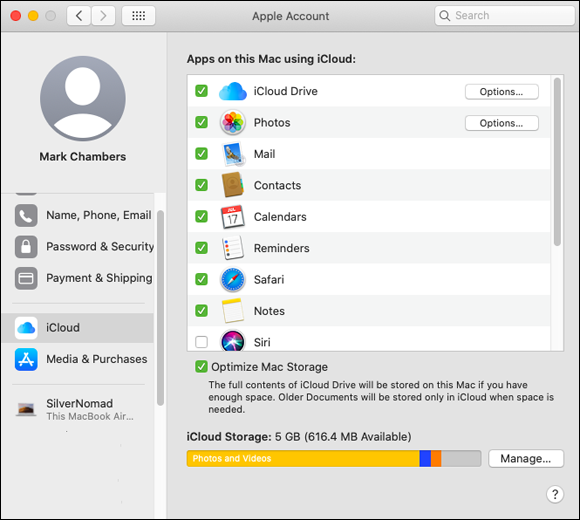
FIGURE 9-3: The iCloud panel appears in System Preferences.
Most of the check boxes on the iCloud panel control whether a particular type of data — such as a Contacts entry, Keychain password, Mail message, or calendar in Calendar — is pushed to all your iOS devices. (If an Options button appears next to an entry, you can click it to specify additional settings.)
Note, however, that you can enable three other unique features from this pane:
Photos: Click the Options button and enable the My Photo Stream check box to allow your MacBook to receive photos from your iOS devices automatically. Take a photo with your iPhone, for example, and that image is immediately pushed to your laptop, iPad, and iPod touch. On the MacBook, however, Photo Stream goes one step further: The photos appear automatically in Photos in a special album titled Photo Stream. To store all your photos in iCloud, enable the iCloud Photos check box. (If you have a large number of photos, you may have to buy additional iCloud storage space to use the iCloud Photo Library feature.) You can also enable Shared Albums, which allows you to share photos with others from Photos.
To turn on My Photo Stream or iCloud Photos from within Photos, choose Photos ⇒ Preferences, click the iCloud button, and select the desired check boxes.- iCloud Drive: Click the Options button to specify which apps have access to store documents and data on your iCloud Drive.
Find My Mac: Talk about Buck Rogers! Imagine locating a lost or stolen MacBook from your iPhone or iPad. Now think about this: With Find My Mac, you can even lock or completely wipe your Mac’s hard drive remotely, preventing unauthorized use and erasing your private data! After you access your MacBook from another iOS device, you can play a sound, send a message to be displayed onscreen, remotely lock the machine, or remotely wipe the drive.
 After you wipe the drive, you can’t locate your MacBook again.
Managing Your iCloud Storage
Apple knows that you’re curious about how much space you’ve taken up in your personal iCloud. To monitor your iCloud storage, click the Manage button in the bottom-right corner of the iCloud panel. On the sheet that appears, shown in Figure 9-4, you can see how much space you’re using for document and data storage.
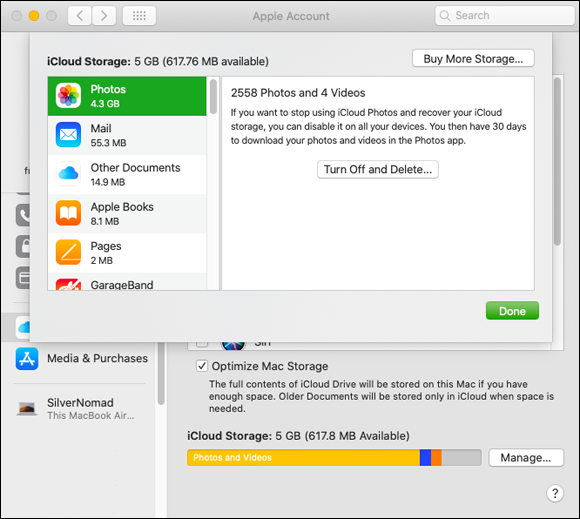
FIGURE 9-4: Checking on your iCloud storage
Click the data type in the left column, and iCloud displays the amount of storage space that’s being used for that data. In Figure 9-4, I’m checking the amount taken by my iCloud Photo Library. Other items that might appear on this sheet include Mail and selected iPad and iPhone apps that support iCloud.
If you find yourself running out of iCloud storage space, delete any stored item by selecting it in the list on the right side of the sheet and clicking Delete.
And if you need more elbow room than 5GB, Apple is happy to provide 50GB, 200GB, or even a whopping 2TB of additional storage for a monthly subscription fee of 99 cents, $2.99, or $9.99, respectively. Click the Manage button on the iCloud panel and then click the Buy More Storage button to subscribe.