Chapter 8
Let’s Go on Safari!
IN THIS CHAPTER
![]() Introducing the Safari window and controls
Introducing the Safari window and controls
![]() Visiting websites with Safari
Visiting websites with Safari
![]() Moving between sites
Moving between sites
![]() Selecting a home page
Selecting a home page
![]() Working with bookmarks
Working with bookmarks
![]() Using the Reading List
Using the Reading List
![]() Downloading files with Safari
Downloading files with Safari
![]() Seeing where you’ve been
Seeing where you’ve been
![]() Surfing with your tabs showing
Surfing with your tabs showing
![]() Sending pages to the printer
Sending pages to the printer
![]() Protecting your privacy on the web
Protecting your privacy on the web
I proudly surf the web via a lean, mean — and fast — browser application. That’s Safari, of course, and it keeps getting better with each new version of macOS. Safari delivers the web the right way, without the wait. You’ll find that features have been added to Safari that no other browser offers, such as the Reading List, which allows you to easily select articles and pages for later perusal.
If you need a guide to Safari, this chapter is yours. Sure, you can start using Safari immediately, but wouldn’t you rather read a few pages so that you can surf like a power user?
Within these pages, I show you how to use those other controls and toolbar buttons in Safari — you know, the ones in addition to the Forward and Back buttons. You’ll discover how to keep track of where you’ve been and where you’d like to go.
Pretend You’ve Never Used This Thing
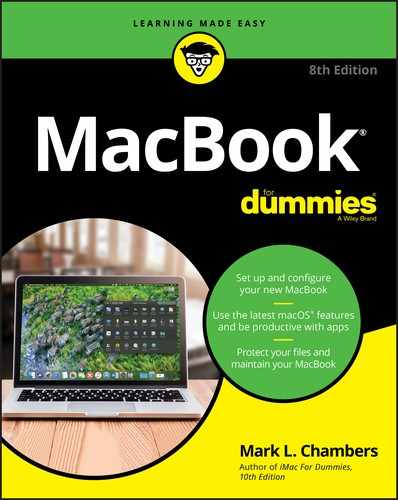
Figure 8-1 illustrates the Safari window. You can launch Safari directly from the Dock, or you can click the Safari icon in Launchpad.
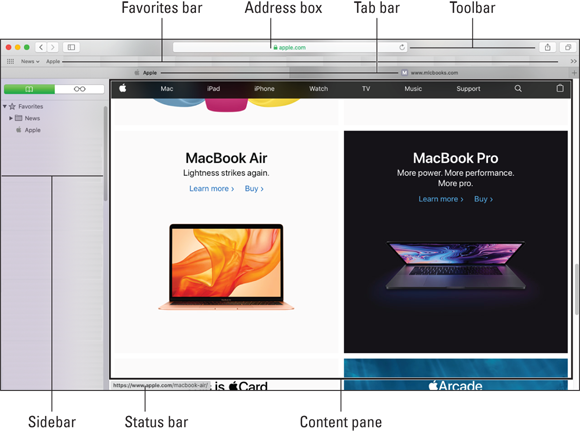
FIGURE 8-1: Safari at a glance
These are the major sections of the Safari window:
- The toolbar: Here are the most-often-used commands for tasks such as navigation, sharing content, and searching Google (or Yahoo!, or DuckDuckGo, or Bing). Also, here is where you can type or paste the addresses of websites that you’d like to visit.
- The Favorites bar: Consider this bar to be a toolbar that allows you to jump directly to your favorite websites with a single click (or two). I show you later, in the section “Adding and Using Bookmarks,” how to add sites to and remove sites from your Favorites bar. For now, remember that you can toggle the display of the Favorites bar by choosing View ⇒ Hide/Show Favorites Bar or pressing ⌘ +Shift+B.
- The Tab bar: This toolbar allows you to quickly switch among multiple web pages that you’ve loaded, using what appear to be old-fashioned file-folder tabs (something familiar; familiar is good.) To hide or display the Tab bar, choose View ⇒ Hide/Show Tab Bar. You can also pin sites to the Tab bar permanently (in the sidebar “Power users pin sites” later in this chapter).
- The Sidebar: The Sidebar pane allows you to organize and read your bookmarks, Reading List, and shared links. To hide or display the Sidebar, choose View ⇒ Hide/Show Sidebar or press ⌘ +Shift+L.
The Content pane: Congratulations! At last, you’ve waded through the pregame show and reached the area where web pages are displayed. The Content pane can be scrolled, and when you minimize the Safari window to the Dock, you get a thumbnail (minimized) image of the Content pane.
 The Content pane often contains underlined text and graphics that transport you to other pages when you click them. These underlined words and icons are links, and they zip you right from one area of a site to another area (or to a different site altogether). You can tell when your pointer is resting on a link because it changes to that reassuring pointing-finger hand. Handy! (Sorry about that.)
- The Status bar: The Status bar displays information about what the pointer is resting on, such as the address of a link or the name of an image; it also updates you about what’s happening while a page is loading. To hide or display the Status bar, choose View ⇒ Hide/Show Status Bar or press ⌘ +/ (forward slash).
Visiting Websites
Here’s the stuff that virtually everyone over the age of five knows how to do … but I get paid by the word, and some folks might not be aware of the many ways to visit a site. You can load a web page by using any of these methods:
- Click the Address box. If you’re not viewing your Top Sites display, click the Address box to display a scrolling thumbnail list of your Favorites and most frequently visited sites. Click a thumbnail to jump to that page immediately. That’s about as simple as life gets!
Type (or paste) a website address in the Address box on the toolbar, and press Return. If you’re typing an address, and Safari recognizes the site as one that you’ve visited in the past, it “helps” by autocompleting the address for you. Press Return if you want to accept the suggested site. If the site is a new one, just keep typing.
The Safari Address box also acts as a smart address field, displaying a new pop-up menu of sites that match the text you enter. Safari does this by using sites taken from your History file and your bookmarks, as well as sites returned from Google, Yahoo!, DuckDuckGo, or Bing. If the site you want to visit appears in the list, click it to jump there immediately.
- Click a Bookmarks or Favorites entry. Bookmarks appear in the Sidebar and on the Bookmarks menu, whereas Favorites appear on the Favorites bar.
- Click a tab for a pinned site. Pinned tabs appear as icons at the left end of the Tab bar.
- If the Home button appears on your toolbar, click the button to go to the home page that you specify. Read more on this in the upcoming section “Setting Up Your Home Page.”
- If the Top Sites button appears on the toolbar, click it to open the Top Sites display. Safari displays a wall of preview thumbnail pages from your most frequently visited sites, and you can jump to a site by clicking the preview.
- Click an item you saved earlier on the Sidebar’s Reading List tab. To display items in your list, click the button bearing the eyeglasses icon at the top of the Sidebar.
Click a page link in Apple Mail or another Internet-savvy application. These links are typically highlighted or underlined to make them easier to see.
 Never click a link in an email unless you know and trust the sender!
- Click a page link on another web page. By default, Safari opens the new page in a separate tab.
- Select a web address in a document and choose Services ⇒ Open Page in Safari. Safari automatically loads and displays the page.
Type a search term in the Address box. By default, Safari uses Google as a search engine, but you can also use Yahoo!, Bing, or DuckDuckGo if you prefer. To set the default search engine, choose Safari ⇒ Preferences; then, on the Search tab of the Preferences dialog, make a choice from the Search Engine drop-down menu. (You can switch to another engine by clicking the magnifying-glass icon that appears before you start typing in the Address box.)
Click the Address box, type the contents that you want to find, and press Return. Safari presents the search results page in Google for the text you entered. (In case you’ve been living under the Internet equivalent of a rock for the past several years, Google (
https://www.google.com) is the preeminent search site on the web. People use Google to find everything from used auto parts to ex-spouses.) Of course, if you’ve chosen a different default search engine, Safari displays results from that engine instead.Click a Safari page icon on the Dock or in a Finder window. Drag a site from your Favorites bar (or drag the icon from the left side of the Address box), and drop it at the right end of the Dock. Clicking the icon that you add launches Safari and automatically loads that site.
This trick works only on the end of the Dock to the right of the vertical line.If you minimize Safari to the Dock, you’ll see a thumbnail of the page with the Safari logo superimposed on it. Click this thumbnail on the Dock to restore the page to its full glory.
Speaking of full glory, Safari supports the same full-screen mode as many other Catalina applications. Click the Zoom/Full Screen button in the top-left corner of the Safari window to switch to full-screen mode, or press the ⌘ +Control+F shortcut (a good shortcut to memorize because it works with virtually all Catalina-compatible applications). To make things convenient for you, the toolbar, Favorites bar, and Tab bar remain. To exit full-screen mode, press Esc or the ⌘ +Control+F shortcut again.
Navigating the Web
A typical web-surfing session is a linear experience. You bop from one page to the next, absorbing the information you want and discarding the rest. After you visit a few sites, however, you may find that you need to return to where you’ve been or head to the familiar ground of your home page. Safari offers these navigational controls on the toolbar:
- Back: Click the Back button (the left-facing arrow) on the toolbar to return to the last page you visited. Additional clicks take you to previous pages, in reverse order. The Back button is disabled if you haven’t visited at least two sites.
Forward: If you’ve clicked the Back button at least once, clicking the Forward button (the right-facing arrow) takes you to the next page (or through the pages) where you originally were, in forward order. The Forward button is disabled if you haven’t used the Back button and haven’t navigated to another page.
Safari supports several trackpad gestures. You can swipe in either direction with two fingers to move backward and forward, for example, just as you’d move with the Forward and Back buttons. To zoom in and out on the Content pane, you can double-tap the trackpad or pinch with two fingers — yes, just like on an iPhone. (Ever get the notion that someday, we’ll have a single box called “The Device” that does it all?)Home: Click this button (look for the little house) to return to your home page.
 Not all these buttons and controls may appear on your toolbar; you may not see many of these toolbar controls unless you add them yourself. To display or hide toolbar controls, choose View ⇒ Customize Toolbar. The sheet that appears works just like the Customize Toolbar sheet in a Finder window: Drag the control you want from the sheet to your Safari toolbar, or drag a control that you don’t want from the toolbar to the sheet. As with most buttons and controls in Mac applications, if you hover your pointer over an unfamiliar button on the toolbar, Safari displays a tooltip to identify the button for you.
- Show/Exit Tab Overview: A click of this toolbar button displays all the tabbed sites you’ve opened, as well as the iCloud tabs from Safari on your other Macs, PCs, and iOS devices.
AutoFill: If you fill out lots of forms online — when you’re shopping on websites, for example — you can click the AutoFill button (which looks like a little text box and a pen) to complete these forms for you. You can set what information is used for AutoFill by choosing Safari ⇒ Preferences – click the AutoFill toolbar button at the top of the Preferences dialog to specify the information Safari will automatically insert in forms.
To be honest, I’m not a big fan of automatically releasing any of my personal information to any website, so I don’t use AutoFill. If you do decide to use this feature, make sure that the connection is secure (look for the padlock icon in the Address box), and read the site’s Privacy Agreement page first to see how your identity data is treated. Never enter credit-card numbers or personal information on a website without a secure connection!- Top Sites: Click this button to display the Top Sites screen, which I discuss earlier. If you’re having trouble finding it, the button bears a tiny, fashionable grid of squares.
- Zoom: Shrink or expand the text on the page, offering smaller, space-saving characters (for the shrinking crowd) or larger, easier-to-read text (for the expanding crowd). To do so, click one of the Zoom buttons, which are labeled respectively with a small and large letter A, respectively. (From the keyboard, you can press ⌘ += (equal sign) to expand and ⌘ + - (hyphen) to shrink.)
- Bookmarks: Click this button (which carries the Favorites symbol sandwiched between two horizontal lines) to display or hide the Favorites bar.
- Stop/Reload: Click Reload (a circular arrow in the Address box) to refresh (reload) the contents of the current page. Although most pages remain static, some pages change their content at regular intervals or after you fill out a form or click a button. By clicking Reload (look for the curved arrow in the Address box), you can see what’s changed on these pages. (I use Reload every hour or so on CNN.com, for example.) While a page is loading, the Reload button turns into the Stop button — with a little X mark — and you can click it to stop the loading of the content from the current page. This feature is a real boon when a download takes foorrevverr, which can happen when you’re trying to visit a popular or slow website. Using Stop is also handy if a page has very large graphics that are likely to take a long time to load.
- Sidebar: Click this toolbar button at the left end of the Address box to hide or display the Safari Sidebar. You’ll find the complete description of the Sidebar in the upcoming sections “Adding and Using Bookmarks” and “Working with the Reading List.”
- History: Click this button, which bears a clock symbol, to display or hide the History list, which I discuss in “Using History” later in this chapter.
- Mail: Click this button (bearing an envelope icon) to send an email message with a link to the current page, just as though you clicked the Share button and chose Email This Page from the drop-down menu. Safari automatically opens Apple Mail (or your default email application) and creates a new message with the link already in the body. Shazam!
- Print: Click this convenient button to print the contents of the Safari window. (Dig that crazy printer icon!)
- Website Preferences: Click this button to display (or change) the preferences settings you’ve selected for this specific website. You can elect to use the Reader whenever possible to prevent most advertisements from appearing (more on this feature in the section titled “Working with the Reading List”), set the Zoom level, and enable or disable the Auto-Play feature for videos that contain an audio track.
- Share: If you have an iPhone, iPod touch, or iPad, you’re probably familiar with this button, which carries a rectangle-and-arrow symbol. Click the Share button to send the current page (or a link to it) to various destinations, including your Reading List, an email message, or your Notes or Messages applications. You can also add a bookmark to the current page by clicking the Share button. Figure 8-2 illustrates the Share button in action.
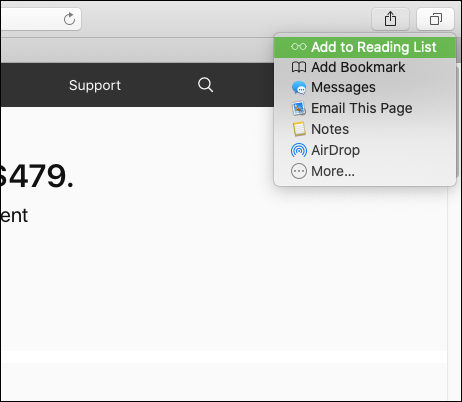
FIGURE 8-2: The Share button makes it easy to spread goodness and light!
Setting Up Your Home Page
Choosing a home page is one of the easiest methods of speeding up your web surfing. But a large percentage of the MacBook owners with whom I’ve talked have never set their own home pages; instead, they simply use the default home pages provided by their browsers. Declare your independence! With Safari running, take a moment to follow these steps and declare your freedom to choose your own home page:
In Safari, display the web page that you want to become your new home page.
I recommend selecting a page with few graphics or a fast-loading popular site.- Choose Safari ⇒ Preferences or press ⌘ +, (comma).
Click the General tab of the Preferences dialog.
You see the settings shown in Figure 8-3.
- Click the Set to Current Page button.
- Click the Close button to exit the Preferences dialog.
FIGURE 8-3: Adding your own home page is an easy change you can make.
Alternatively, click the New Windows Open With pop-up menu and choose Empty Page if you want Safari to open a new window with a blank page. This choice is the fastest one for a home page.
Visit your home page at any time by clicking the Home button on the toolbar. If it doesn’t appear on your toolbar, you can add it by choosing View ⇒ Customize Toolbar.
Adding and Using Bookmarks
No doubt about it: Bookmarks make the web a friendly place. As you collect bookmarks in Safari, you’re able to jump from one site to another with a single click of the Bookmarks menu or the buttons on the Favorites bar.
To add a bookmark, first navigate to the desired page and then do any of the following:
Choose Bookmarks ⇒ Add Bookmark.
Safari displays a sheet where you can enter a name and description for the bookmark, and choose where it appears (Favorites bar, Top Sites display, Bookmarks folder, or Bookmarks menu).
Press the ⌘ +D keyboard shortcut.
Again, the sheet requests a name and location.
Drag the icon next to the web address from the Address box to the Favorites bar.
This trick works with other applications besides Safari, including in a Mail message or Messages conversation. Drag the icon from the Safari Address box to the other application window, and the web page link is added to your document.
You can also drag a link on the current page to the Favorites bar, but note that doing this adds a bookmark only for the page corresponding to the link — not the current page.
To jump to a bookmark, do one of the following:
- Choose it from the Bookmarks menu. If the bookmark is contained in a folder, which I discuss later in this section, hover your pointer over the folder name to show its contents, and click the bookmark.
- Click the bookmark on the Favorites bar. If you’ve added a great number of items to the Favorites bar, click the More icon (which bears the >> icon) at the edge of the Favorites bar to display the rest of the buttons.
- Click the Show Sidebar button on the Safari toolbar, click the Bookmarks button on the Sidebar, and then click the desired bookmark. The Sidebar (shown in Figure 8-4) displays all your bookmarks, allowing you to review each collection at your leisure.
Choose Bookmarks ⇒ Edit Bookmarks or press ⌘ +Option+B to open the Bookmark list. For those who prefer more information (and more onscreen elbow room) while selecting or organizing their bookmarks, the Bookmark list is the cat’s meow. It displays both the name and web address of each bookmark in your collection.
The more bookmarks you add, the more unwieldy the Bookmarks menu and the Sidebar can become. To keep things organized, choose Bookmarks ⇒ Add Bookmark Folder, and in the resulting dialog, type a name for the new folder. With folders, you can organize your bookmarks as collections, which appear in the column on the left side of the Sidebar; as folders in the Bookmark list; and as menus on the Bookmarks bar. (Collections also appear as separate submenus on the Bookmarks menu on the Safari menu bar.) You can drag bookmarks into the new folder to help reduce clutter.
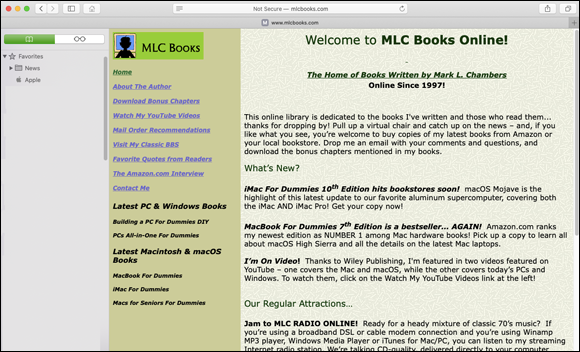
FIGURE 8-4: The Sidebar's Bookmarks tab puts all your bookmarks in easy reach.
To delete a bookmark or a folder from any of these locations, right-click the icon next to the entry and choose Delete from the shortcut menu.
If you have other Macs or iOS devices using the same Apple ID, Safari can share your bookmarks and Reading List selections across all Safari applications, including your iPad and iPhone! (It’s a neat feature for those of us who rely heavily on bookmarks while surfing.) You can configure what Safari shares through iCloud from the Apple ID pane in System Preferences.
Working with the Reading List
Now that you know all about bookmarks, I’ll introduce another method of loading, saving, and retrieving specific pages in Safari. This method is hiding in the now-familiar confines of the Safari Sidebar!
The Sidebar’s Reading List tab allows you to save entire pages for later perusal. From the keyboard, press ⌘ +Shift+L to display the Sidebar, and click the Reading List button. Click Bookmarks ⇒ Add to Reading List or press ⌘ +Shift+D to add the current page to the list, or hover your pointer over the left end of the Address box and click the circular icon with the plus sign that appears. Oh, and don’t forget that you can click the Sharing icon on the toolbar and choose Add to Reading List from the drop-down menu to achieve the same victory.
When you click one of those entries in the Reading List and then click the Show Reader View icon (it looks like a paragraph) that appears at the left end of the Address box, the real magic begins! If you click it, the Reader panel appears, displaying text articles free of advertisements and silly pop-ups. And if an article is continued over multiple web pages, the Reader panel automatically stitches them together to form a continuous block of text. (Think of an e-book displayed in Books on your MacBook, and you get the idea.)
To delete an item from the Reading List, right-click the item and choose Remove Item from the shortcut menu.
If the Show Reader View icon appears in Safari’s Address box — and you’re not using the Reading List — don’t panic! Because the page you’re reading contains text articles, Safari is offering to display it in the Reader panel. (If a page has nothing to display in the Reader panel, the icon disappears.) To display the page in the Reader panel, click the Show Reader View button in the Address box. To return to your mundane browsing experience, click the Reader icon again.
If you’re as big a fan of Reader View as I am, you’ll be thrilled to learn that you can turn on this feature for every page on a website! When Reader View is the default, every page on a website that’s compatible with the Reader panel automatically displays in Reader view. (I always set all my news websites — such as CNN and Macworld — to default to Reader view.) When you’ve navigated to the desired website, click the Website Preferences button on the toolbar (if you’ve added it), or choose Safari ⇒ Settings for This Website. Click the Use Reader When Available check box to enable that feature, and you’re good to go!
Downloading Files
A huge chunk of the fun you’ll find on the web is downloading images and files. If you’ve visited a site that offers files for downloading, you typically click the Download button or the download-file link, and Safari takes care of the rest. While the file is downloading, feel free to continue browsing or even to download additional files; the Downloads status list helps you keep track of what’s going on and when everything will finish transferring.
To display the Downloads status list from the keyboard, press ⌘ +Option+L. You can also click the Download button in the top-right corner of the window to display the Downloads list.
By default, Safari saves any downloaded files to the Downloads folder (which I like and use) on your Dock. To specify the location where downloaded files are stored (to scan them automatically with an antivirus program, for example), follow these steps:
- Choose Safari ⇒ Preferences or press ⌘ +, (comma).
- Click the General tab of the Preferences dialog (refer to Figure 8-3).
Click the File Download Location pop-up menu, and choose Other.
Safari displays a standard Open dialog, allowing you to choose the destination.
- Navigate to the location where you want to store the files.
- Click the Select button.
- Click the Close button to exit Preferences.
To download a specific image on a web page, move your pointer over the image, right-click, and choose Save Image As from the shortcut menu. Safari prompts you for the location where you want to store the file.
You can choose to automatically open files that Safari considers to be safe — things like movies, text files, and PDF files that are very unlikely to store a virus or a damaging macro. By default, the Open “Safe” Files After Downloading check box is selected on the General tab of the Safari Preferences dialog. If you’re interested in preventing anything you download from running until you’ve checked it with your antivirus application, you can deselect the check box and breathe easy.
Luckily, Safari has matured to the point where it can seamlessly handle most multimedia file types that it encounters. If you’ve downloaded a multimedia file and Safari doesn’t seem to be able to play or display it, however, try loading the file in QuickTime Player. QuickTime Player is the Swiss Army knife of multimedia players, able to recognize a huge number of audio, video, and image formats. To launch the Player, click the Spotlight search icon and then type QuickTime Player.
Using History
To keep track of where you’ve been, you can display the History list by clicking the History menu in Safari. To return to a page in the list, just choose it from the History menu. Note that Safari also arranges older history items by the date when you visited a site so you can easily jump back a couple of days to that page you forgot to bookmark!
Safari also searches the History list automatically when it fills in an address you’re typing. That’s the feature I mention in “Visiting Websites” earlier in this chapter.
To view your Top Sites display, choose Bookmarks ⇒ Show Favorites, or click the Top Sites button at the far-left end of the Favorites bar or on the Safari toolbar (if you’ve added it).
You can add a site to your Top Sites manually by dragging a bookmark from the Sidebar to the Top Sites icon on the Favorites bar, or by dragging a link or URL address from another application to the Top Sites icon on the Favorites bar. (A plus sign appears next to your pointer to indicate the addition.) To rearrange screens in the Top Sites display, just drag a screen thumbnail to the desired location.
If you’re worried about security and would rather not keep track of where you’ve been online, find out how to clear the contents of the History file in the upcoming section “Handling ancient history.”
Tabs Are Your Browsing Friends
Safari also offers tabbed browsing, which many folks use to display (and organize) multiple web pages at one time. If you’re doing a bit of comparison shopping for a new piece of hardware among several online stores, for example, tabs are ideal.
When you hold down the ⌘ key and click a link or bookmark, a tab representing the new page appears at the top of the Safari window. Just click the tab to switch to that page. You create and display the tab by holding down Shift+⌘ . (If you don’t hold down ⌘ , things revert to business as usual, and Safari replaces the contents of the current tab with the new page.)
You can also open a new tab by clicking the plus sign in the top-right corner of the Safari window or pressing ⌘ +T. To move among multiple tabs, simply click the desired tab header. If you’re finished with a page, you can remove a tabbed page by hovering your pointer over the tab and clicking the X button that appears.
Trackpad fans will appreciate Safari’s two gestures that control tabs. With multiple tabs active, you can do these things:
- Pinch to display them all in the Tab Overview display (shown in Figure 8-5).
- With the Tab Overview open, swipe with two fingers to move among tabs.
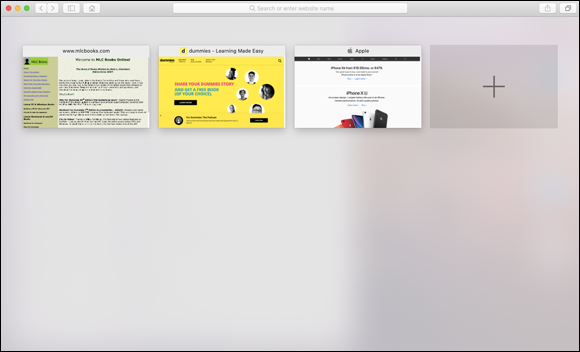
FIGURE 8-5: Hang on, Martha; we’ve struck tabs!
To display your tabs in Tab Overview without a trackpad, click the Show Tab Overview button that appears at the right end of the Safari toolbar. From All Tabs view, you can click any tab thumbnail to switch to that tab. (iCloud Tabs shared from your other Macs and iOS devices appear at the bottom of the Tab Overview display.) To close a tab in Tab Overview, move your pointer over the thumbnail and click the X button that appears in the thumbnail’s top-left corner. To close the Tab Overview display, click the Hide Tab Overview button at the right end of the Safari toolbar.
All Tabs view also displays the iCloud Tabs you’ve set on your other Macs (running OS X Lion or later) and iOS devices (running iOS 7 or later).
To fine-tune your tabbed browsing experience, choose Safari ⇒ Preferences to display the Preferences dialog, and click Tabs. From here, you can specify whether a new tab or window automatically becomes the active window in Safari and whether you want to switch tabs by pressing ⌘ +1 through ⌘ +9.
If you open a page that plays audio — as background music or as part of a video shown on the page — you can click the speaker icon that appears on the tab header to mute that audio. (Think really, really irritating video advertisements.) To unmute the audio, click the speaker icon again. You can also display the Settings for this Website sheet to disable autoplay of videos with sound across all the pages on a website. Choose Safari ⇒ Settings for This Website, click the Auto-Play drop-down menu in the resulting dialog, and choose Stop Media with Sound to banish those irritating videos from the current website.
Printing Web Pages
If you’ve encountered a page that you’d like to print, follow these steps:
- Display the desired page.
- Choose File ⇒ Print or press ⌘ +P.
- In the Print dialog, select the number of copies you want to print.
- Specify whether you’d like to print the entire page, only the current page, or a range of pages.
- Click Print.
A quick word about printing a page in Safari: Some combinations of background and text colors might conspire to render your printed copy worthless. In a case like that, use your printer’s grayscale setting (if it has one), or click the Show Details button at the bottom of the Print sheet and deselect the Print Backgrounds check box (which can save you quite a bit of ink or toner). Alternatively, you can simply click and drag to select the text on the page, press ⌘ +C to copy it, and paste the text into TextEdit, Microsoft Word, or Pages, where you can print the page on a less-offensive background while keeping the text formatting largely untouched. You can also save the contents of a page as a PDF file by choosing File ⇒ Export as PDF or clicking the PDF pop-up menu at the bottom of the Print sheet. Finally, if the page is available in Reader view, you can print it from there and avoid most color conflicts!
If you’d rather mail the contents of a web page to a friend, click the Share button and choose Email This Page from the drop-down menu. If you’ve added the Mail button to your toolbar, one click does the job. Mail loads automatically, complete with a prepared email message. Just address the message to the recipients, and click Send.
Protecting Your Privacy
No chapter on Safari would be complete without a discussion of security, against both outside intrusion from the Internet and prying eyes around your laptop. Therefore, this last section covers protecting your privacy.
Although it’s diminutive, the padlock icon that appears to the left of the website’s name in the Address box when you’re connected to a secure website means a great deal! A secure site encrypts the information that you send and receive, making it much harder for those of unscrupulous ideals to obtain private data, such as credit-card numbers and personal information. You can click the padlock icon (next to the site name) to display the security certificate in use on that particular site. A secure site web address begins with the prefix https: instead of http:. (The extra s stands for secure. A Good Thing.)
Yes, there are such things as bad cookies
First, a definition of this ridiculous term. A cookie — a small file that a website automatically saves on your Mac’s drive — contains information that the site will use on your future visits. A site might save a cookie to preserve your site preferences for the next time or (as with shopping on Amazon.com) to identify you automatically and customize the offerings that you see.
In and of themselves, cookies aren’t bad things. Unlike a virus, a cookie file isn’t going to replicate itself or wreak havoc on your system, and only the original site can read the cookie that it creates. But many folks don’t appreciate acting as a gracious host for a slew of snippets of personal information (not to mention that some cookies have highly suggestive names, which can lead to all sorts of conclusions; end of story.)
You can opt to disable cookies or set Safari to accept cookies only from the sites you choose to visit. To change your Cookie Acceptance Plan (CAP, for those who absolutely crave acronyms), follow these steps:
- Choose Safari ⇒ Preferences.
- Click the Privacy tab of the Preferences dialog.
Click Block All Cookies.
If a site’s cookies are blocked, you might have to take care of things manually, such as by providing a password on the site that used to be read automatically from the cookie.
Feeling nervous about the data stored by the websites you visit? You can always delete all that stored information with a single click. On the Privacy pane of the Safari Preferences dialog, click the Manage Website Data button; then click the Remove All button. You’ll be asked to confirm your draconian decision.
The Privacy pane also includes the Prevent Cross-Site Tracking check box, which works … sometimes. Unfortunately, it’s up to a particular website whether to honor Safari’s request for privacy. Also, some sites — such as Amazon.com — use tracking legitimately to keep track of your likes and purchases each time you return. Apple includes Intelligent Tracking Prevention to Safari; this feature is automatic and works behind the scenes, helping prevent unwanted intrusion into your browsing history. If you’re especially worried about leaving a trail of breadcrumbs behind you on the web, I recommend selecting this check box.
Finally, you can use the Websites tab of Safari Preferences to limit websites’ access to your MacBook’s Location Services feature, which can pinpoint your current location. Facebook’s website, for example, uses Location Services if you allow it to do so. Access can be set through prompting, or you can deny access to Location Services for all websites.
Banishing pesky iCloud Keychain passwords
I’m the world’s biggest critic of keychains, which Catalina uses to automatically provide all sorts of login information throughout the system. In Safari, for example, the password information is automatically entered for you whenever a website you’ve approved requires you to log in.
To be more specific, I’m sure that many readers will adopt iCloud Keychain, which stores password and credit-card information for Safari and wirelessly distributes that information automatically to other Macs and iOS devices that use the same Apple ID. Apple even says that the passwords generated by iCloud Keychain are more complex and harder to crack, which sounds more secure, right?
I’d rather keep a pet piranha in a cereal bowl than use this feature! Why? Whenever you’re logged in, anyone who’s using your MacBook gets control of your online persona (in the form of your passwords to secure websites). Safari, like an obedient puppy, automatically provides access to sites with stored keychain passwords.
If you’d like to take the far-less-convenient-but-much-safer, old-fashioned route of remembering your passwords yourself, follow my lead: Visit the Apple ID pane in System Preferences, click the iCloud entry on the left side of the dialog, and deselect the Keychain check box to turn the iCloud Keychain feature off.
Now that I’ve warned you thoroughly, I feel better about mentioning the Passwords tab of Safari’s Preferences dialog for those who do decide to use iCloud Keychain. On the Passwords tab, you can view the iCloud Keychain information that Safari uses and remove a specific password or all passwords from your iCloud Keychain.
Handling ancient history
As you might imagine, your History file leaves a very clear set of footprints indicating where you’ve been on the web. To delete the contents of the History menu, choose History ⇒ Clear History (at the bottom of the History menu).
Safari also allows you to specify an amount of time to retain entries in your History file. Open the Safari Preferences dialog, click the General tab (refer to Figure 8-3), and then make a choice from the Remove History Items pop-up menu to specify the desired amount of time. Items can be rolled off daily, weekly, biweekly, monthly, or yearly. You can also turn off automatic removal.
Setting notifications
In Catalina, Safari can allow websites you’ve approved to send you messages through Notification Center. The Website tab of Safari’s Preferences dialog controls which sites are given this functionality. To prevent a website from sending notifications, click the Notifications entry in the list on the left side of the dialog, and choose Deny from the drop-down menu next to the offending site. You can also remove a website from the list by clicking it and then clicking the Remove button.
Avoiding those @*!^%$ pop-up ads
I hate pop-up ads, and I’m sure that you do too. To block many of those pop-up windows that advertise everything from low-rate mortgages to “sure-thing” Internet casinos, open the Safari Preferences dialog, click the Websites tab, and select the Pop-up Windows entry in the list on the left side. Now you can allow or block pop-up ads for each website you visit!