Chapter 12
The Multimedia Joys of Music and TV
IN THIS CHAPTER
![]() Playing music and CDs on your MacBook
Playing music and CDs on your MacBook
![]() Arranging and organizing your music collection
Arranging and organizing your music collection
![]() Tracking your songs
Tracking your songs
![]() Doing your own ripping
Doing your own ripping
![]() Adjusting audio settings
Adjusting audio settings
![]() Tuning into Internet radio
Tuning into Internet radio
![]() Sharing music with iOS devices
Sharing music with iOS devices
![]() Burning music CDs
Burning music CDs
![]() Creating eye candy with Visualizer
Creating eye candy with Visualizer
![]() Setting restrictions
Setting restrictions
![]() Watching movies and TV shows
Watching movies and TV shows
![]() Buying the good digital stuff
Buying the good digital stuff
Sometimes, words just aren’t enough. Apple’s Music application is that kind of perfection.
To envision how Music changes your laptop, you have to paint the picture with music — music that’s easy to play, search for, and transfer from device to device. Whether it be classical, alternative, jazz, rock, hip-hop, or folk, I guarantee you won’t find a better application than Music to fill your life with … well … music! (It’s pretty doggone obvious how much I appreciate this piece of software.)
With the arrival of Catalina, Apple has transported the video you watch — both TV shows and movies you purchase or rent from the iTunes Store — to a new application named TV. I’ll provide all the details you need to start watching video on your MacBook’s spectacular screen.
In this chapter, I lead you through all the features of my absolute favorite Apple applications: Music and TV.
What Can I Play in Music?
Simply put, Music is a media player that plays audio files (and music videos). These files can be in any of many different formats. Music supports these common audio formats:
- MP3: The small size of MP3 files has made them popular for file trading on the Internet. You can reduce MP3 files to a ridiculously small size (albeit at the expense of audio fidelity), but a typical CD-quality, three-minute pop song in MP3 format has a size of 3–5MB.
- AAC: Advanced Audio Coding is an audio format that’s similar to MP3 but offers better recording quality at the same file sizes. However, this format is somewhat less compatible with non-Apple music players and software. (Luckily, you can still burn AAC tracks to an audio CD, just as you can MP3 tracks.) The tracks that you download from the Music Store are in AAC format, and AAC music files are becoming more popular for downloading on the Internet.
- Apple Lossless: Another format direct from Apple, Apple Lossless format (also known as ALAC) provides the best compromise between file size and sound quality. These tracks are encoded without loss of quality, although Apple Lossless tracks are somewhat larger than AAC. This format is generally the favorite of discerning audiophiles.
- AIFF: This standard Mac audio format produces sound of the absolute highest quality. This high quality, however, also means that the files are pretty doggone huge. AIFF recordings typically require about 10MB per minute of audio.
- WAV: Not to be outdone, Microsoft created its own audio file format (WAV) that works much like AIFF. It can reproduce sound at a higher quality than MP3, but the file sizes are very large, similar in size to AIFF files.
- CD audio: Music can play audio CDs. Because you don’t usually store CD audio anywhere but on an audio CD, file size is no big whoop — but again, 10MB of space per minute of music is a good approximation.
- MP2: A close cousin of the far more popular MP3 format, MP2 is the preferred format in radio broadcasting and is a standard audio format for HDV camcorders. It produces file sizes similar to MP3 format.
- Audiobooks: You no longer need cassettes or audio CDs to enjoy your spoken books. Music can play them for you, or you can send them to your iOS device for listening on the go.
- Streaming Internet radio: You can listen to a continuous broadcast of songs from your favorite Internet radio stations, with quality levels ranging from what you’d expect from FM radio to the full quality of an audio CD. You can’t save the streaming songs within Music, but streaming radio is still great fun. (I run my own station … more on MLC Radio later in this chapter.) Unlike services like Spotify, Pandora, and Apple Music, these streaming radio stations are free and don’t require a subscription!
Playing an Audio CD
If you have an optical drive (either internal or external), playing an audio CD in Music is simple. Just insert the CD in the drive, start Music by clicking its icon on the Dock, and click the Play button. (Note that your MacBook might be set to automatically launch Music when you insert an audio CD.) The Music interface resembles that of a traditional CD player. The main playback controls of Music are Play, Previous, Next, and the Volume slider, as shown in Figure 12-1.

FIGURE 12-1: The main playback controls: Play, Previous, and Next
Click the Play button to begin listening to a song. While a song is playing, the Play button toggles to a Pause button. As you might imagine, clicking that button again pauses the music. If you don’t feel like messing around with a mouse or trackpad, you can always use the keyboard. The spacebar acts as the Play and Pause buttons. Press the spacebar to begin playback; press it again to stop.
Click the Next button to advance to the next song on the CD. The Previous button works like the Next button but with a slight twist: If a song is currently playing and you click the Previous button, Music first returns to the beginning of the current song (just like an audio CD player). To advance to the previous song, double-click the Previous button. To change the volume of your music, click and drag the volume slider.
As with other Mac applications, you can control much of Music with the keyboard. Table 12-1 lists some of the more common Music keyboard shortcuts.
TABLE 12-1 Common Music Keyboard Shortcuts
Press This Key or Key Combination |
To Do This |
Spacebar |
Play the currently selected song if Music is idle. |
Spacebar |
Pause a playing song. |
→ |
Advance to the next song. |
← |
Go back to the beginning of a song. Press a second time to return to the previous song. |
⌘ +↑ |
Increase the volume of the music. |
⌘ +↓ |
Decrease the volume of the music. |
Playing Digital Audio Files
In addition to playing audio CDs, Music can play the digital audio files that you download from the Internet or obtain from other sources in the WAV, AAC, Apple Lossless, AIFF, MP2, and MP3 file formats.
Enjoying a digital audio file is just slightly more complicated than playing a CD. After downloading or saving your audio files to your laptop, open Finder, and navigate to wherever you stored the files. Launch Music and click the Songs entry in the Sidebar. (If the Sidebar doesn’t appear in your Music window, choose View ⇒ Show Sidebar.) Now you can simply drag the music files (or an entire folder of music) from the Finder window to the list of your songs on the right side of the window. The added files appear in your Music library. You can also drag a song file from a Finder window and drop it on the Music icon on the Dock, which adds it to your Music library as well.
 The Music Sidebar is a convenient beast indeed. You can drop the music file(s) on top of a playlist’s name in the list, and Music adds it to that particular playlist as well as to the main library. (More about playlists in a bit.) If you drop a folder of songs on top of the Playlists header in the Sidebar, Music creates a new playlist using the name of the folder and adds all the songs in the folder to the new playlist. Bam!
You can customize the Music Sidebar to display only those media types and criteria that you prefer. (I like the Composers and Music Videos entries to be visible, for example.) To edit the entries in the Sidebar, hover your pointer over the library heading and click the Edit link that appears; then enable or disable the check boxes next to each heading as desired.
Think of the library as a master list of your audio media. To view the Music library, click the Songs entry in the Sidebar, as shown in Figure 12-2. (Go figure.)
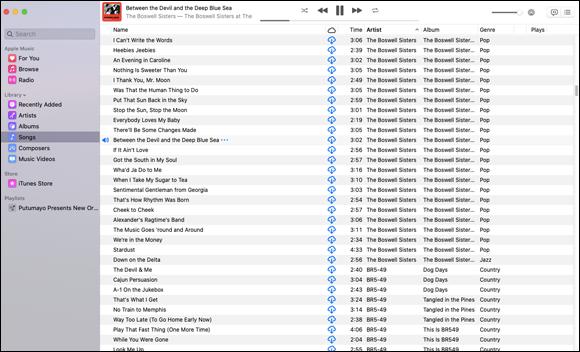
FIGURE 12-2: The Music library keeps track of all your audio files.
To play a song, just double-click it in the Music list. Alternatively, you can use the playback controls (Play, Previous, and Next) that I discuss earlier in this chapter (refer to Figure 12-1).
 The Music window can play media from a surprising number of sources:
- Library: The sidebar can display Music, Music Videos, and Audiobooks.
- iTunes Store: I discuss this music source in the final section, “Buying Digital Media the Apple Way.”
- Shared: If another Mac or PC on your local network is running Music and is set to sync its library, the songs in that Music library appear on all devices that use the same Apple ID.
- Devices: If an iPod touch is connected, it appears in the sidebar. (And yes, Virginia, other models of MP3 players from other companies also appear in the list if they’re supported in Music.) If you connect an iPhone or iPad to your Mac, it shows up here as well.
- Genius: Choose File ⇒ New ⇒ Genius Playlist to allow Music to automatically create playlists from songs in your Music library. You can also allow Genius to recommend music, movies, and TV shows based on the titles you already have in your Music library. (More on this feature in “Keeping Slim Whitman and Slim Shady Apart: Organizing with Playlists” later in this chapter.)
- Audio CD: A standard audio CD — anything from the Byrds to Justin Timberlake — shows up as an icon if you load the CD into your optical drive.
- Playlists: Think of playlists as folders you use to organize your music. (More on playlists later in this chapter.)
If you’ve invested in an Apple TV device, it appears in the list as well, allowing Music to share media with your Apple TV, which in turn sends it to your HDTV.
You can browse your Music library in several ways. By default, the application sorts by Songs, but you can choose View ⇒ Sort By to sort by different criteria (including Album, Artist (active in Figure 12-2), Genre, and Time).
If you’re using Songs view, the Music library may display information for each song that you add to it, including these items:
- Name: The title of the song
- Time: The length of the song
- Artist: The artist who performs the song
- Album: The album on which the song appears
If any song you’re adding doesn’t display anything for the title, album, or artist information, don’t panic; most MP3 files have embedded data that Music can read. If a song doesn’t include any data, you can always add the information to these fields manually. I show you how later, in “Setting or changing the song information manually.”
If you’d rather eschew the Music menu system, it’s easy to change your sort order by clicking any column heading in the Music library list; Music reorders the list according to that category. Clicking the Artist column heading, for example, alphabetizes your library by artist name. I often click the Time heading to sort my library according to the length of the songs. Oh, and you can drag column titles to reorder them any way you like (except for the check-box column displayed when you’re selecting songs to burn, which remains fixed).
While listening to your music, you can always display the tracks that Music will play next — and even change their order. (Believe me, this feature is great fun for us amateur party DJs.) Choose View ⇒ Show Up Next to display the list, and drag selected songs into the perfect order! (You can also click the button with the list icon that appears on the far-right end of the toolbar.)
Finding songs in your Music library
After your collection of audio files grows large, you may have trouble locating that Swedish remix version of “I’m Your Boogie Man.” To help you out, Music has a built-in Search function. To find a song, type some text in the Search box at the top of the Sidebar. While you type, Music tries to find a selection that matches your search text. The search is thorough, showing any matching text from your library, as well as the Apple Music service and the iTunes Store. If you type Electronic in the field, Music might return results for the band named Electronic or other tunes that you classified as electronic in the Genre field. (The section “Know Your Songs,” later in this chapter, tells you how to classify your songs by genre, among other options.)
Removing old music from the library
After you spend some time playing songs with Music, you might decide that you didn’t really want to add 40 versions of “Louie Louie” to your library. (I prefer either the original or the cast from the movie Animal House.) To remove a song from the library, click the song to select it and press the Delete key on your keyboard, or right-click the song entry and choose Delete from Library from the shortcut menu.
You can also remove a song from the library by dragging it to the Trash on the Dock.
Keeping Slim Whitman and Slim Shady Apart: Organizing with Playlists
As I mention earlier, the Music library can quickly become a fearsomely huge beastie. Each library can contain thousands upon thousands of songs. If your library grows anywhere near that large, finding all the songs in your lifelong collection of Paul Simon albums is not a fun task. Furthermore, with the library, you’re stuck playing songs in the order in which Music lists them.
To help you organize your music in groups, use the Music playlist feature. Typically, a playlist is a collection of some of your favorite songs from the library, but playlists can also include media such as movies and audiobooks. You can create as many playlists as you want, and each playlist can contain any number of items. Whereas the Music library lists all available songs, a playlist displays only the items that you add to it. Further, any changes you make in a playlist affect only that playlist, leaving the library untouched.
To create a playlist, you can do any of the following:
- Choose File ⇒ New ⇒ Playlist.
- Press ⌘ +N.
- Choose File ⇒ New ⇒ Playlist from Selection. This command creates a new playlist and automatically adds the selected tracks.
- Choose File ⇒ New ⇒ Genius Playlist. Music builds a playlist of songs that are similar in some way (typically by matching the genre of the selection or the beats per minute, but also based on recommendations from other Music members). Note that your MacBook needs an Internet connection to create a Genius playlist, and the larger your music library is, the longer it takes Music to build your playlist. You also need to turn on the Genius feature by choosing File ⇒ Library ⇒ Turn on Genius and entering your Apple ID. (Note that Genius playlists sometimes mix tracks containing explicit content with less objectionable material — especially in the comedy and rap genres.)
- Drag a folder containing audio files from a Finder window to the Playlists heading in the sidebar.
To help organize your playlists, it’s a good idea to … well, name them. (Aren’t you glad now that you have this book?) Suppose that you want to plan a party for your polka-loving friends. Instead of running to your computer after each song to change the music, you could create a polka-only playlist. Select and start the playlist at the beginning of the party, and you won’t have to worry about changing the music the whole night. (You can concentrate on playing the accordion.) To load a playlist, select it in the Sidebar list; Music displays the songs for that playlist.
The same items can appear in any number of playlists because the items in a playlist are simply pointers to the media in your Music library — not the actual songs themselves. Add and remove them at will to or from any playlist, secure in the knowledge that the items remain safe in your library. Removing a playlist is simple: Select the playlist in the Sidebar, and press Delete.
Removing a playlist doesn’t delete any songs from your library.
Know Your Songs
Besides organizing your music into Elvis and non-Elvis playlists, Music gives you the option to track your music at song level. Each song you add to the Music library has a complete set of information associated with it. Music displays this information (see Figure 12-3) on the Details tab of the Info dialog:
- Song Name: The name of the song
- Artist: The name of the artist who performed the song
- Album Artist: The name of the artist responsible for a compilation or tribute album
- Album: The album where the song appears
- Grouping: A group type that you assign
- Composer: The name of the astute individual who wrote the song
- Comments: A text field that can contain any comments on the song
- Year: The year the artist recorded the song
- Track: The position of the song on the original album
- Genre: The classification of the song (such as rock, jazz, or pop)
- Disc Number: The original disc number in a multi-CD set
- Play Count: The number of times you’ve listened to the song
- BPM: The beats per minute (indicates the song’s tempo)
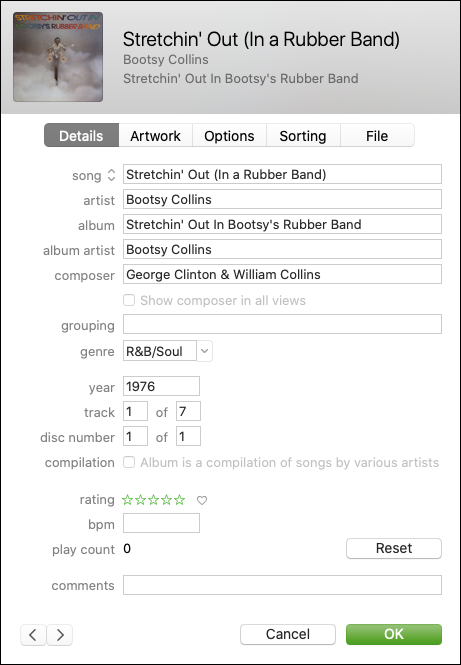
FIGURE 12-3: View and edit song information here.
You can display this information by clicking a song name and pressing ⌘ +I. The fields appear on the Details tab.
Setting the song information automatically
Each song you add to the Music library may have song information included with it. If you add music from a commercial audio CD, Music connects to a server on the Internet and attempts to find the information for each song on the CD. If you download a song from the Internet, it often comes with some information embedded in the file already; the amount of included information depends on what the creator supplied. (And it’s often misspelled as well; think Leenard Skeenard.) If you don’t have an Internet connection, Music can’t access the information and displays generic titles instead.
Setting or changing the song information manually
If Music can’t find your CD in the online database, or someone gives you an MP3 with incomplete or inaccurate information, you can change the information yourself. Believe me, you want at least the artist and song name! To view and change the information for a song, follow these steps:
- Select the song in the Song list or a playlist.
- Press ⌘ +I, or choose File ⇒ Get Info.
- Click a field to edit the song’s information on the Details tab (refer to Figure 12-3).
You can move to the next or previous track in the Music library list or playlist by clicking the Next or Previous button in the bottom-left corner of the dialog.
The more work you put into setting the information of the songs in your Music library, the easier it is to browse and use Music. Incomplete song information can make it more difficult to find your songs in a hurry. If you prefer, you don’t have to change all the information about a song (but it makes life easier later if you do). Normally, you can get away with setting only a song’s title, artist, and genre. The more information you put in, however, the faster you can locate songs and the easier they are to arrange. Music tries to help by automatically retrieving known song information, but sometimes you have to roll up your sleeves and do a little work. (Sorry, but some things just can’t be automated.)
“What about cover art, Mark?” Well, I’m overjoyed that you asked! Music can try to locate artwork automatically for the tracks you select. (Note that embedding large images can significantly increase the size of the song file.) Follow these steps:
- Select the desired songs from the track list.
- Choose File ⇒ Library ⇒ Get Album Artwork.
You can set Music to automatically attempt to add album artwork every time you rip tracks from an audio CD (as described in the next section) or when you add songs without artwork to your Music library. Choose Music ⇒ Preferences, and click the Advanced tab of the Preferences dialog; then select the Automatically Update Artwork check box. (By the way, if you buy tracks or an album from the iTunes Store, Apple includes album covers automatically!)
Want to add album covers to your song info manually? Select one or more songs in the track list, display the Info dialog, and click the Artwork tab. Now launch Safari, visit Amazon.com, and do a search for the same album (or search an online artwork library, such as AllCDCovers.com). Drag the cover image from the web page right into the Info dialog, and drop it in the center of the Artwork square. When you click OK, the image appears on the Artwork tab of the Info dialog.
Ripping Audio Files
You don’t have to rely on Internet downloads to get audio files: You can create your own MP3, AAC, Apple Lossless, AIFF, and WAV files from your audio CDs with Music. The process of converting audio files to different formats is called ripping. (Audiophiles with technical teeth also call this process digital extraction, but they’re usually ignored at parties by the popular crowd.) Depending on what hardware or software you use, each has its own unique format preferences.
The most common type of ripping is converting CD audio to MP3 (or AAC) format. To rip MP3s from an audio CD, follow these simple steps:
Launch Music by clicking its icon on the Dock.
Alternatively, you can locate Music in your Applications folder or in Launchpad.
- Choose Music ⇒ Preferences.
- In the Preferences dialog that appears, click the Files tab.
- Click the Import Settings button that appears at the bottom of the Preferences dialog.
- Choose MP3 Encoder from the Import Using pop-up menu.
Choose High Quality (160 Kbps) from the Setting pop-up menu, and click OK to return to the Preferences dialog; click OK again to return to Music.
This bit-rate setting provides the best compromise between quality (it gives you better than CD quality, which is 128 Kbps) and file size (tracks you rip will be significantly smaller than audiophile bit rates such as 192 Kbps or higher).
Load an audio CD into your Mac’s optical drive.
The CD title shows up in the Music Source list (below the Devices heading), which is on the left side of the Music window. The CD track listing appears on the right side of the window.
If Music asks whether you want to import the contents of the CD into your Music library, you can click Yes and skip the rest of the steps. If you’ve disabled this prompt, continue with the remaining two steps.Clear the check box of any song you don’t want to import from the CD.
All songs on the CD have a check box next to their title by default. Unmarked songs aren’t imported.
- Click the Import CD button.
Tweaking the Audio for Your Ears
Besides the standard volume controls that I mention earlier in this chapter, Music offers a full equalizer. An equalizer permits you to alter the volume of various frequencies in your music, allowing you to boost low sounds, lower high sounds, or anything in between.
To open the Equalizer, choose Window ⇒ Equalizer or press ⌘ +Option+E. Use the leftmost slider (Preamp) to set the overall level of the Equalizer. The remaining sliders represent various frequencies that the human ear can perceive. Setting a slider to a position in the middle of its travel causes that frequency to play back with no change. Move the slider above the midpoint to boost that frequency; conversely, move the slider below the midpoint to reduce the volume of that frequency.
Continue adjusting the sliders until your music sounds the way you like it. In case you prefer to leave frequencies to the experts, the Music Equalizer has several predefined settings to match most musical styles. Open the pop-up menu at the top of the Equalizer window to choose a genre. When you close the Equalizer window, Music remembers your settings until you change them again.
A New Kind of Radio Station
Besides playing back your favorite audio files, Music can also tune in Internet radio stations around the globe. You can add your favorite stations to your playlists. You can also subscribe to the Apple Music Radio feature to create a custom station dedicated to the genres and artists you prefer. This section shows you how to do it all.
When choosing an Internet radio station, keep your Internet connection speed in mind. If you’re using a broadband DSL or cable connection — or if you’re listening at work over your company’s high-speed network — you can listen to stations broadcasting at 128 Kbps or even higher. The higher the bit rate, the better the music sounds. At 128 Kbps in AAC format, for example, you’re listening to sound that’s as good as an audio CD.
Tuning in your own stations
To listen to an Internet radio station, you need the station’s Internet address.
In Music, choose File ⇒ Open Stream URL or press ⌘ +U. In the Open Stream dialog that appears, enter the URL of your desired radio station, and click OK. In seconds, Music tunes in your station and adds the station as an item in your Songs list so that you can listen again in the future with a single click.
Radio stations in your playlists
If you find yourself visiting a particular online radio station often, you’ll be glad to know that Music supports radio stations in its playlists. To add a radio station to a playlist from your library, follow these steps:
- Click the Songs entry in the Sidebar, and locate the radio station you’ve added to your library.
Drag the station entry from the Song list to the desired playlist on the left side of the window.
If you haven’t created any playlists yet, see the section “Keeping Slim Whitman and Slim Shady Apart: Organizing with Playlists” earlier in this chapter to find out how.
Creating a custom Music Radio station
Apple Music Radio makes it possible for you to listen to the artists, songs, and genres that you prefer in Music without selecting a specific Internet radio station. To use Apple Music Radio, click the Radio entry below the Apple Music heading in the Sidebar. After you’ve set up your subscription, type the artist name, song name, or genre in the Search field. (Remember that Apple Music Radio is an Apple Music subscription service, unlike the Internet radio stations I described in the preceding section.)
As you download new music from the iTunes Store (and listen to new artists and genres in Radio), the service learns more about your musical tastes and can automatically play and recommend new music, much like the Genius feature I discuss earlier in this chapter.
Like Internet radio, the Apple Music subscription service requires an Internet connection and an Apple ID.
Your Music Radio station is automatically shared among all your Macs running macOS (as well as any iOS devices you own). In fact, Music is connected closely with the Apple iCloud service. To download a local copy of any iCloud item, simply click the iCloud icon next to the item. After the local copy has been saved to your Mac’s drive, the iCloud icon disappears, and you’re ready to listen.
iSending iStuff to iPod touch, iPhone, and iPad
If you’re cool enough to own an iPod touch, you’ll be happy to know that Music has features for your personal audio and video jukebox as well. The iPod touch, Apple’s multimedia player, will set you back $200 to $300 (depending on storage capacity). The iPod touch can hold thousands of songs, as well as podcasts, photos, and video. This great gadget and those like it have become known worldwide as the preferred portable digital media players.
If you own an iPhone or iPad, you probably already know that these devices can act as your music player as well. You can buy all sorts of applications for these devices at the Music Store. Music even keeps track of these applications as part of your Music library.
To sync correctly, both your computer and the device must share an Apple ID.
You connect your iPod touch to any Macintosh or Windows PC that has USB 2.0 ports by using the included cable. After the iPod touch is connected, you can synchronize it with Music. By default, this process is automatic: The iPod touch and the Music software communicate and figure out what items are in your Music library (as compared with the iPod touch’s library). If they discover songs, podcasts, and video in your Music library that are missing from your iPod touch, the items automatically transfer to the iPod. Conversely, if the iPod touch contains stuff that’s no longer in Music, the iPod automatically removes those files from its drive.
 Go back and reread that last sentence: The iPod automatically removes files from its drive. (I’ll wait.) Apple added this feature in an effort to be responsive to copyright concerns. The reasoning is that if you connect your iPod touch to your friend’s computer, you can’t transfer songs from the iPod to that computer. You could always look at it from the marketing perspective as a feature that makes sure your MacBook and iPod are always in total sync. Whatever the case, pay close attention, and read all warning dialogs when connecting to a computer other than your own; otherwise, you might wipe out your iPod’s library.
You can change your settings in the device’s Summary pane so Music autosyncs only selected playlists. (Click the device icon in the top-left corner of the window to display the Summary pane). Or, if you’re really nervous, you can choose to manage the contents of your iPod touch manually, from the Summary pane.
Burning Music to Shiny Plastic Circles
Besides being a great audio player, Music is adept at creating CDs. (Your MacBook must have an internal SuperDrive or an external optical drive to record them.) Music makes the process of recording songs to a CD as simple as a few taps on the trackpad. Making the modern version of a compilation (or mix) tape is easier than getting a kid to eat ice cream! If you have an internal or external optical drive, Music lets you burn CDs in one of three formats:
- Audio CD: This format is the typical kind of commercial music CD you buy at a store. Most typical music audio CDs store up to 800MB of data, which translates into about 80 minutes of music.
- Data CD or DVD: A standard computer CD-ROM or DVD-ROM is recorded with the audio files. This disc can’t be played in any standard audio CD player even if it supports MP3 CDs, which I discuss next. Therefore, you can listen to these songs only by using your Mac and an audio player, such as Music or a PC running Windows.
- MP3 CD: As does the ordinary computer CD-ROM that I describe, an MP3 CD holds MP3 files in data format. The files, however, are arranged in such a way that they can be recognized by audio CD players that support the MP3 CD format (especially boom boxes, DVD players, personal CD players, and car stereos). Because MP3 files are so much smaller than the digital audio tracks on traditional audio CDs, you can fit as many as 160 typical four-minute songs onto one disc. You can also play these discs on your Mac via Music.
Keep in mind that MP3 CDs aren’t the same as the standard audio CDs you buy at the store, and you can’t play them in older audio CD players that don’t support the MP3 CD format. Rather, this is the kind of archival disc that you burn at home for your own collection or for use in a CD/DVD player or car audio system that supports MP3 discs.
To begin the process, build a playlist (or select an existing playlist that you want to record). If necessary, create a new playlist, and add to it whatever songs you would like to have on the CD. (See the earlier section “Keeping Slim Whitman and Slim Shady Apart: Organizing with Playlists” if you need a refresher.) With the songs in the correct order, right-click the playlist and choose Burn Playlist to Disc from the shortcut menu to commence the disc-burning process. Select the desired recording format (again, usually Audio CD) in the Burn Settings dialog that appears.
To save yourself from sonic shock, I always recommend that you enable the Use Sound Check check box before you burn. Music adjusts the volume on all the songs on your audio CD so that they play at the same volume level.
Ready to go? Click Burn, and load the blank disc. Music lets you know when the recording is complete.
Feasting on Music Visuals
By now, you know that Music is a feast for the ears, but did you know that it can provide eye candy as well? With just a click or two, you can view mind-bending graphics that stretch, move, and pulse with your music.
To begin viewing Music visuals, choose Window ⇒ Visualizer or press ⌘ +T. Immediately, most of your Music interface disappears and begins displaying groovy lava lamp–style animations (like, sassy, man). To stop the visuals, press Esc (or press ⌘ +T again). The usual sunny aluminum face of Music returns.
You can still control Music with the keyboard while the visuals are zooming around your screen. See Table 12-1 earlier in this chapter for a rundown on common keyboard shortcuts.
Exercising Parental Authority
Do young children use your Mac? I’ll be honest here: A large amount of content in the iTunes Store (including audio, movies, and even apps) is stuff I don’t consider to be suitable for kids. And what about the media that others in the family may decide to share? Such is the world we live in today, and the good folks at Apple recognize that you may not want to inadvertently allow your kids to have access to explicit content.
Luckily, you can use the Restrictions settings in Music to build a secure fence around content that’s for grownups only. Heck, you can even banish items from the Sidebar. Figure 12-4 illustrates the Restrictions pane of the Music Preferences dialog.
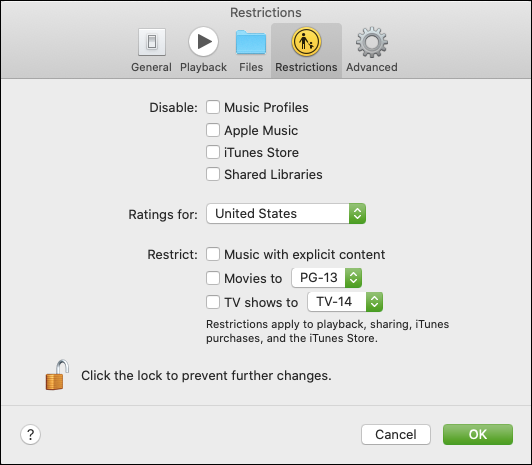
FIGURE 12-4: Protect your kids from explicit content.
You must log in with an Administrator account to change these settings. If the settings are locked — the padlock icon at the bottom of the dialog is closed — click the padlock and supply your administrator password to unlock them. (Read more about accounts in Chapter 10.)
To restrict access, follow these steps:
- Choose Music ⇒ Preferences.
- Click the Restrictions tab of the Preferences dialog.
Select any of the Disable check boxes to prevent access to those features.
Disabling features in Music applies to all user accounts, no matter who is logged in! Notice that any features you disable disappear from the Sidebar when you click OK at the end of these steps.Click the Ratings For pop-up menu, and choose your country.
Because Apple maintains separate iTunes Stores for different nations, you can choose which country’s iTunes Store to monitor.
To restrict specific content in the iTunes Store, select the check box next to the source, and make choices from the corresponding pop-up menu to choose the restriction level.
Note that these restrictions apply only to content in the iTunes Store, content that can be downloaded through iCloud, and media shared with your Mac.
- Click the padlock icon at the bottom of the dialog to close it and prevent any changes.
- Click OK.
Watching Video with TV
“But Mark, what about the TV shows and movies you mentioned earlier?” Fear not, good reader. Apple has organized all the video you’ve bought from the iTunes Store into the new TV application; full-length movies and TV shows are easy to browse and enjoy on your MacBook. (Or, with an Apple TV unit connected to your home theater system, you can watch those movies and shows from the comfort of your sofa on the other side of your living room, or even from your bedroom on the other side of your house.
Figure 12-5 illustrates the TV window, which is quite similar to the Music window. (Why mess with perfection?) You’ll note the strip of source buttons across the TV toolbar, which make it easy to display all of your films and TV shows, as well as top movies or TV shows that you can rent or purchase. (Even content for kids is included!) Note that the Movies, TV Shows, and Kids buttons take you to featured video that you haven’t purchased or rented yet. Some selections are free, but most are pay-to-view. The Library button, however, displays only the video content that you’ve already purchased, so it’s always available.

FIGURE 12-5: My collection of movies appears in TV.
Watching video in TV couldn’t be simpler. Click the Library button on the TV toolbar and then select either the Movies or TV Shows entry in the Sidebar. (Music videos appear as a Smart Playlist within the Music sidebar, which I cover in the sidebar “Some playlists are smarter than others” earlier in this chapter.)
From your collection, you can do the following:
- Double-click a video thumbnail. If you interrupted a video by quitting TV, the application continues the video at the point where the application was closed.
- Drag a QuickTime–compatible video clip from the Finder window to the TV window. (These clips typically include video files ending in
.mov,.mv4,or.mp4.)
TV plays video in full-screen mode. Move your pointer to display a control strip at the bottom of the screen, sporting the standard slider bar that you can drag to move through the video (as well as a volume control and Fast Forward/Reverse buttons). You can also pause the video by clicking the Pause button. Icons at the far-right end allow you to jump to specific scenes and select subtitles if desired. To exit the video, press Esc or click the X button in the top-left corner of the screen.
Films may display an Extras button, which you can click to view additional content, such as deleted scenes.
Buying Digital Media the Apple Way
The hottest spot on the Internet for buying music is the iTunes Store, which you can reach from the cozy confines of Music — that is, as long as you have an Internet connection. If you don’t, it’s time to turn the page to a different chapter.
Click the iTunes Store entry in the Music Sidebar, and after a few moments, you see the latest offerings, as shown in Figure 12-6. Click a link in the store list to browse according to media type. The Back and Forward buttons at the top of the iTunes Store window operate much the same as those in Safari, moving you backward or forward in sequence through pages you’ve already seen.

FIGURE 12-6: The iTunes Store offers a world of music for purchase.
To display the details on a specific album or track, just click it. If you’re interested in buying only certain tracks (for that perfect road-warrior mix), you get to listen to 90 seconds of any track — for free, no less, and at full sound quality. When you’re ready to buy, click the Buy Now button. (At the time of this writing, tracks are usually 99 cents to $1.29 a pop, and an entire album is typically $9.99. What a bargain!)
The iTunes Store uses your Apple ID to identify you, and it keeps secure track of your payment information for future purchases. After you use the iTunes Store once, you rarely have to log in or retype your credit card information again (unless you log out after each use for security).
The tracks and files that you download are saved to a separate category in the Sidebar called Recently Added. When the download is finished, you can play them, copy them to other playlists, or burn them to CD or DVD just as you can any other items in your Music library.
Music can automatically download the media you purchase on another iCloud device (including another Mac and your iPhone, iPad, or iPod touch). To set up automatic downloading, choose Music ⇒ Preferences to open the Preferences dialog, and click the General tab. Click the Sync Library check box to enable it; then click OK to save your changes.