Chapter 2
Turning On Your Portable Powerhouse
IN THIS CHAPTER
![]() Turning on your laptop
Turning on your laptop
![]() Checking your Mac for proper operation
Checking your Mac for proper operation
![]() Monitoring the battery and heat level
Monitoring the battery and heat level
![]() Setting up macOS Catalina
Setting up macOS Catalina
![]() Getting your MacBook set up and registered
Getting your MacBook set up and registered
![]() Using Migration Assistant
Using Migration Assistant
![]() Copying information from a Windows PC
Copying information from a Windows PC
In Chapter 1, you got as far as unpacking your Mac laptop and connecting a few cables to it. But unless you bought this computer solely as a work of modern art, it’s time to turn on your MacBook and begin living The Good Life. (Plus you still get to admire the design of your Apple laptop while using Music.) After you get your new beauty powered on, I show you how to run an initial checkup of your laptop’s health. Then I wax enthusiastic about maintaining (and even augmenting) your laptop battery.
I also familiarize you with the initial chores you need to complete before settling in with your favorite applications. These tasks include setting up macOS and moving the data and settings from your existing computer to your MacBook, MacBook Pro, or MacBook Air.
In this chapter, I assume that macOS Catalina was preinstalled on your Mac or you just completed an upgrade to Catalina from macOS Mojave.
Tales of the On Button
The power switch on current MacBook models is located in the top-right corner of the keyboard. If your MacBook has a Touch Bar, the Touch ID sensor acts as the power button. To turn on your laptop when it’s open, simply press the button. If your new MacBook is closed, all you have to do is open your laptop to power up!
You hear the pleasant start-up tone that’s been a hallmark of Apple computers for many years. Don’t be alarmed if you don’t immediately see anything onscreen; it takes a second or two for the initial Apple logo to appear.
 In my experience, sometimes, a quick press of the power button on some Mac laptop models just doesn’t do it. Rather, you must hold the button down for a couple of seconds before the computer turns on.
If your Mac laptop ever locks up tight and you can’t quit an application (I discuss quitting in Chapter 3), the power button gives you another option: Hold it down for five seconds or so, and your MacBook shuts off completely, even if your laptop is locked up tight. If you’re using a MacBook with a Touch Bar, press the Touch ID sensor and hold it to turn your laptop off; then press the Touch ID sensor again to turn your laptop back on.
As the Apple logo appears, you see a familiar progress-bar indicator — the sign that your MacBook is loading Catalina and checking the internal hardware for problems. Sometimes, the progress bar can take a bit longer to disappear. As long as it’s moving, though, something good is happening: Your laptop is busy loading certain file-sharing, networking, and printing components (and so on). This process won’t take long.
At last, your patience is rewarded, and your MacBook presents the initial Catalina setup screen.
Mark’s Favorite Signs of a Healthy Laptop
Before you jump into the fun stuff, don’t forget an important step: a quick preliminary check of the signs that your new mobile Mac survived shipment intact and happy.
If you can answer “yes” to each of these questions, your MacBook likely made the trip without serious damage:
Does the laptop’s chassis appear to be undamaged?
It’s pretty easy to spot damage to your MacBook’s svelte design. Look for scratches, dents, and puncture marks.
Does the LED screen work, and is it undamaged?
Does the cover open smoothly? Are any individual dots (or pixels) on the LED screen obviously malfunctioning? Bad pixels appear black or in a different color from everything surrounding them. (Techs call these irritating anarchists dead pixels.) A 13-inch MacBook Pro screen has well over 2 million pixels, and unfortunately, some new LED screens include one or two dead ones.
Do the keyboard and trackpad work?
Check your MacBook’s built-in trackpad by moving your finger across its surface; the cursor should move onscreen. To check the keyboard, press the Caps Lock key on the left side, and observe whether the Caps Lock light turns on and off.
If you do notice a problem with your laptop (and you can use your Safari browser and reach the web), you can connect with an Apple support technician at https://www.apple.com. If your MacBook remains dead — like an expensive paperweight — and you can’t get to the Internet, you can check your phone book for a local Apple service center, or call the AppleCare toll-free number at (800) 275-2273. Chapter 19 also offers troubleshooting information.
You Won’t Lecture Me about Batteries, Will You?
No, this isn’t a lecture. In fact, the only lecture I put you through in this book concerns backing up (which, naturally, you should do). Instead, consider these tips as your rules of the road for monitoring and charging your battery:
- Recharge your laptop in sleep mode or when powered off. The battery recharges faster when your laptop is off or in sleep mode. (I go into more detail on sleep mode in Chapter 5.)
Keep your laptop plugged into an AC socket (or a car inverter, which plugs into your car’s power outlet) whenever possible. I take every opportunity to top off my laptop’s battery, and so should you.
If you don’t have much time to charge your battery before you’re away from an AC socket — say, half an hour — don’t use your MacBook while it’s plugged in and charging. That way, your battery will gain the maximum benefit from the charge time. (When you’re using your MacBook while it’s charging, the charging process takes much longer.)- Save your juice. To get the most juice you can scavenge, here are some easy tricks:
- Turn off your laptop, or close it to enter sleep mode.
- Turn off unnecessary hardware. To conserve battery power as much as possible, disconnect any unnecessary USB or Thunderbolt devices. Also turn off your Wi-Fi and Bluetooth wireless hardware if you’re not connected to a network. (I cover Wi-Fi wireless networking in Chapter 11.)
- Reduce the brightness of the display from your laptop’s keyboard by pressing the F1 key.
- Avoid using processor-intensive applications (such as Adobe Photoshop or iMovie).
Monitor your battery level from the Finder menu. I love the battery-monitoring system built into macOS. Your laptop’s battery life can be displayed in the Finder menu as a simple battery icon or — my favorite — as a percentage of power remaining (with a fully charged battery registering at 100%). To display the percentage, click the battery icon on the menu bar, and choose Show Percentage.
Keep in mind that the percentage shown is an estimate based on your current System Preferences settings and power use. If you change your Energy Saver settings or remove a USB device that draws power from your laptop, you see that change reflected in the battery meter. Figure 2-1 shows the battery meter in Percentage view.
- Calibrate your battery. You can “train” your battery to provide the maximum charge by calibrating it, which Apple recommends doing monthly. The process is a snap:
- Charge your battery until the menu bar’s battery meter indicates that the unit is fully charged, at 100%.
- Keep your laptop connected to an AC socket for another two hours to ensure a maximum charge.
Disconnect the power cord, and use your laptop on battery power until it’s fully discharged and automatically switches to sleep mode.
 Make sure that you close all your applications when you see the low-battery warning dialog box so that you don’t lose anything.
- Allow your laptop to sleep (or turn it off) for a full five hours.
- Reconnect the AC cord, and fully charge your battery.
- Invest in an external battery. If you often find yourself running out of battery power on the road without an AC socket handy, consider buying an external battery. This handy unit is specially designed to charge your MacBook and other USB-powered devices when no other power source is available. A rechargeable battery can power and charge your MacBook, as well as an iPhone and other USB devices.
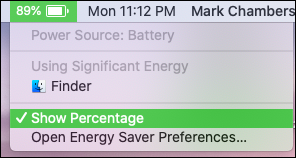
FIGURE 2-1: Monitor your MacBook’s juice from the menu bar.
 If your battery is no longer holding a charge — in other words, if you fully charge it and unplug the AC adapter, only to discover that you have only a few minutes of battery life — it’s time to invest in a replacement battery. If you use an older Mac laptop with a replaceable battery, you can buy a new battery (from Apple or an online vendor) and install it yourself. Unfortunately, owners of current MacBook models must take their computers in for servicing. Today’s Mac laptop is a sealed unit, and you can’t replace the battery.
Setting Up and Registering Your Laptop
After your MacBook is running and you give it the once-over for obvious shipping damage, your next chore is setting up your laptop. I won’t cover the setup process step by step, as I do for other tasks in this book. Apple tweaks the questions you see during setup on a regular basis, and they’re very easy to answer. Everything is explained onscreen, complete with onscreen Help if you need it.
I do want you to know what to expect, however, as well as what information you need to have at hand. I also want you to know about support opportunities and neat features like Apple’s iCloud — hence, this section. Consider it to be a study guide for whatever your MacBook’s setup procedure throws at you.
Your iCloud account is your friend
Apple offers you the chance to create an iCloud account (which you access with your Apple ID) during the initial setup of Catalina. (If you already have an iCloud account from an earlier version of macOS, or if you created an Apple ID while using your iPad or iPhone, you skipped ahead without a second thought.) If you’re careful about your online travels and decide not to supply your personal data, however, you may decide to pass up the chance to create your iCloud account during Catalina setup, most likely thinking that you’ll take care of it later.
Unfortunately, all sorts of macOS features and applications hinge on your iCloud account, including the App Store, Messages, the iTunes Store, and FaceTime. If you skip the iCloud account-creation process during setup, you can take care of that chore at any time. It’s free and painless, and makes you one of the “in crowd.”
When you’re prompted for an iCloud password by one of the aforementioned applications, click the Create Apple ID/iCloud Account button to start the ball rolling. The application leads you through the process step by step. You can also create your ID through the App Store or the iTunes Store. Click the Account link in either of these applications, and you’re prompted to create your iCloud account.
Note that Apple now uses what it calls 2 Factor Authentication for your Apple ID. This feature provides much tighter security for your Apple ID. But if you share your Apple ID among multiple Macs or between iOS devices (such as an iPhone or iPad), 2 Factor Authentication involves entering a code on each of those computers and devices. Code entry isn’t a huge hassle, but if you’re switching from a Windows PC, it may seem a little strange!
Setting up macOS Catalina
After you start your computer for the first time — or if you’ve just upgraded from macOS Mojave — your laptop launches Catalina setup automatically. The setup process takes care of several tasks:
Setup provides Catalina your personal information. As I mention in Chapter 1, your Mac ships with a bathtub full of applications, many of which use your personal data (such as your address and telephone number) to fill out your documents automatically.
If that stored personal information starts you worrying about identity theft, I congratulate you. If you’re using common sense, sharing your personal data at any time should make you uneasy. In this case, however, you’re fine. Apple doesn’t disseminate this information anywhere else, and the applications that use your personal data won’t send it anywhere either. Also, Safari (the Apple web browser) fills out forms on a web page automatically only if you give your permission.- Setup creates your user account. You’re prompted for a username and password, which Setup uses to create your administrator-level account.
- Setup configures your language and keyboard choices. macOS is a truly international operating system, so you’re offered the chance to configure your laptop to use a specific language and keyboard layout.
- Setup configures your email accounts in Apple Mail. If you already have an email account set up with your Internet service provider (ISP), keep handy the email-account information that the ISP provided to answer these questions. The info should include your email address and your login name and password. Catalina can even configure your email account automatically for you (including many web-based email services such as Google Mail, Yahoo! Mail, and Outlook) if you supply your account ID and password. Sweet.
- Setup allows you to open an iCloud account. Apple’s iCloud service just plain rocks — especially the free storage. Take my word for it: Join up, trooper, and create your iCloud account during setup. The standard iCloud service is free, and upgrading to additional space is a breeze if you decide that you like the service’s benefits. I go into these benefits in detail in Chapter 9, but for now, just sign up (or sign in, if you already have an iCloud account) and take the opportunity to feel smug about owning an Apple computer.
- Setup sends your registration information to Apple. As a proud owner of a MacBook, take advantage of the year of hardware warranty support and the free 90 days of telephone support. All you have to do to use ’em is register. Rest assured that all this info is confidential.
- Setup offers to launch Migration Assistant. This assistant guides you through the process of migrating (an engineer’s term for moving) your existing user data from your old Mac or PC to your laptop. Naturally, if your MacBook is your first Macintosh computer, you can skip this step with a song in your heart! (Read more on Migration Assistant in “Importing Stuff from Another Mac” later in this chapter.)
Registering your MacBook
I’ll be honest: Many people, myself included, don’t register every piece of computer hardware they buy. I didn’t register the wireless Bluetooth adapter I bought for my older iBook, for example, because the expenditure was only around $40, the gizmo has no moving parts, and I’m not likely to need technical support to use it or get it fixed.
Your MacBook is a different kettle of fish, so I strongly recommend that you register your purchase with Apple during the setup process. You spent a fair amount on your computer, and your investment has a significant number of very expensive parts. In fact, I heartily advocate the purchase of an AppleCare Protection Plan extended warranty with your new MacBook for the ultimate in peace of mind. If you can invest a couple of hundred dollars more, you’ll have a full three years of service coverage from the purchase date.
Even the hardiest of technowizards would agree with this important Mark’s Maxim:
 If you don’t register your new laptop, you can’t receive support.™
Rest assured that Apple isn’t one of those companies that constantly pesters you with email advertisements and near-spam. I’ve registered every Apple computer I’ve owned, and I’ve never felt pestered. (And I have an extremely low tolerance for pester.)
Importing Stuff from Another Mac
If you’re upgrading from an older Mac running macOS to your new Mac laptop, I have great news: Apple includes Migration Assistant. This utility application can help you copy (whoops — I mean migrate) all sorts of data from your old Mac to your new machine. It does so via your laptop’s wired or wireless Ethernet network connection or an existing Time Machine backup on an external hard drive.
As I mention earlier, Setup launches Migration Assistant automatically if you indicate that you want to transfer stuff during the setup process, but you can always launch Migration Assistant manually at any time. Simply click the Spotlight search icon (which looks like a magnifying glass) on the Finder menu bar; then type Migration Assistant and press Return.
The list of stuff that gets copied includes the following:
- User accounts: If you set up multiple user accounts (so that more than one person can use the computer), the utility ports them all to your new MacBook.
- Network settings: Boy howdy, this is a real treat for those with manual network settings provided by an ISP or network administrator! Migration Assistant can re-create the entire network environment of your old Mac on your new laptop.
- System Preferences settings: If you’re a fan of tweaking and customizing macOS so that it fits like a glove, rejoice. Migration Assistant copies all the changes you’ve made in System Preferences on your old Mac! (Insert sound of angelic chorus: Hallelujah!)
- Documents: The files in your Documents folder(s) are copied to your new MacBook.
- Applications: Migration Assistant tries its best to copy over third-party applications you’ve installed in your Applications folder on the older Mac. I say “tries its best” because you might have to reinstall some applications. Some developers create applications that spread all sorts of files across your hard drive, and Migration Assistant just can’t keep track of those nomadic files. Other applications make the trek just fine, but you might have to reenter their serial numbers.
By far the easiest method of using Migration Assistant is over a wired or wireless Ethernet network. Both computers should be connected to the same network. (Because today’s MacBook models don’t have an on-board Ethernet port, you may require a Thunderbolt-to-Ethernet or USB-to-Ethernet adapter if you decide to use a wired Ethernet connection.) Typically, you also have to run Migration Assistant on the source computer. If you’re migrating data from a PC, you must download and install the free Windows Migration Assistant (www.apple.com/migrate-to-mac).
If you’ve wisely saved an external hard drive containing the Time Machine backup files from your older Mac, just connect the drive to your new laptop.
After the two computers are connected (or you connect the Time Machine backup), simply follow the onscreen instructions displayed in the Migration Assistant window. The application leads you through the process step by step. If you need to return to the previous step at any time, click the Back button that appears at the bottom of the screen. Migration Assistant may take an hour (over a wired connection) or even several hours (over a wireless connection) to complete, depending on the amount of data to be moved.
Importing Stuff from Windows (If You Must)
If you’re a Windows-to-Mac switcher, you made a wise choice, especially if you’re interested in the creative applications in Apple’s digital lifestyle suite! Although you could choose to start your Apple computing life anew, you probably want to migrate some of your existing documents and files from that tired PC to your bright, shiny new MacBook.
As I mention in the preceding section, the Windows Migration Assistant provided by Apple can transfer much of the Windows data you want to take with you. If you find that some files were left behind, you can move stuff manually as well. You can copy your files to a USB flash drive or over a network. To make this manual move more manageable, Table 2-1 covers several typical Windows file locations in Windows 7, 8, and 10; their Catalina counterparts; and the Mac applications you’ll use to open them.
TABLE 2-1 Moving Media and Documents Betwixt Computers
File Type |
Windows Location |
macOS Location |
Mac Application |
Music files |
Music folder |
Music folder |
iTunes |
Video and movie files |
Videos folder |
Movies folder |
QuickTime, DVD Player, Music |
Digital photos |
Pictures folder |
Pictures folder |
Photos |
Office documents |
Documents folder |
Documents folder |
Mac Office, OpenOffice, Pages, Numbers, and Keynote |
The macOS Help system contains an entire subsection on specific tricks you can use while switching from Windows to Mac, including how to connect to a Windows network and how to connect the two computers directly.