
In This Chapter
Playing music with your MacBook
Arranging and organizing your music collection
Tuning into the world with Internet radio
Sharing your songs across a network
Creating eye candy with the Visualizer
Buying the good stuff from the iTunes Store
Good news! It's time to throw out your Dad's Hi-Fi from the early '70s (you know, the one with the 4-inch speakers that you're embarrassed to show your friends). Every installation of Mac OS X comes with the finest stereophonic gadget in town: a great audio application called iTunes. With iTunes, you can listen to your favorite songs and podcasts, organize your music collection, watch a video or a full-length movie, listen to radio stations from around the world, buy music and video online, burn CDs and DVDs, and much more! iTunes has so many features that you'll soon find yourself wondering why you even own a stereo at all. In no time, you'll be pondering how much new speakers with a subwoofer will cost for your MacBook.
In this chapter, I show you how to play audio CDs, podcasts, videos, and Internet radio, but that's just the beginning. You discover how to use iTunes' Library to get one-click access to any song in your collection. I even show you how to tune into Internet radio (and share your favorite songs with others on your network), burn audio CDs (if you have the necessary hardware), plug in your iPod, and buy the latest hits from the iTunes Store. Heck, iTunes can even suggest new music for your library based on what you're listening to now. (And I demonstrate how to make your iTunes window look just as good as your music sounds, with visualizations.)
Just in case, though, keep your Dad's Hi-Fi ...it might fetch a hefty sum as an antique on eBay.
Simply put, iTunes is a media player; it plays audio and video files. These files can be in any of many different formats. Some of the more common audio formats that iTunes supports are
MP3: The small size of MP3 files has made them popular for file trading on the Internet. You can reduce MP3 files to a ridiculously small size (at the expense of audio fidelity), but a typical CD-quality, three-minute pop song in MP3 format has a size of 3–5MB.
AAC: AAC (short for Advanced Audio Coding) is an audio format that's very similar to MP3; in fact, AAC files offer better recording quality at the same file sizes. However, this format originally supported a built-in copy protection scheme that prevented AAC music purchased from iTunes from being widely distributed on Macs. (Luckily, this copy protection is no longer applied to iTunes tracks, and you can still burn protected AAC tracks to an audio CD, just as you can MP3 tracks.) The tracks that you download from the iTunes Store are in AAC format.
Tip
The iTunes Store's iTunes Plus tracks are also in AAC format, but these tracks are not copy-protected, and they're encoded at a higher-quality 256 Kbps rate.
Apple Lossless: Another format direct from Apple, Apple Lossless format provides the best compromise between file size and sound quality: These tracks are encoded without loss of quality. However, Apple Lossless tracks are somewhat larger than AAC, so it's generally the favorite of the most discerning audiophile for his or her entire music library.
AIFF: The standard Macintosh audio format produces sound of the absolute highest quality. This high quality, however, also means that the files are pretty doggone huge. A typical pop song in AIFF format has a size of 30–50MB.
WAV: Not to be outdone, Microsoft created its own audio file format (WAV) that works much like AIFF. It can reproduce sound at higher quality than MP3, but the file sizes are very large, very similar in size to AIFF files.
CD audio: iTunes can play audio CDs. Because you don't usually store CD audio anywhere but on an audio CD, file size is no big whoop.
Movies and video: You can buy and download full-length movies, TV shows, music videos, and movie trailers from the iTunes Store ...and, with an Apple TV unit connected to your home theater system, you can watch those movies and videos from the comfort of your sofa on the other side of your house.
Podcasts: These audio downloads are like radio programs for your iPod — but iTunes can play and organize them, too. Some podcasts also include video and photos to boot.
Ringtones: iPhone owners, rejoice! iTunes automatically offers to create ringtones for your iPhone from the tracks you've bought on the iTunes Store. (You can also create ringtones with GarageBand, using songs you've added to your iTunes library.)
Audiobooks: No longer do you need cassettes or audio CDs to enjoy your spoken books — iTunes can play them for you, or you can send them to your iPod for listening on the go.
Streaming Internet radio: You can listen to a continuous broadcast of songs from one of tens of thousands of Internet radio stations, with quality levels ranging from what you'd expect from FM radio to the full quality of an audio CD. You can't save the music in iTunes, but it's still great fun. (In fact, I run my own station ...more on MLC Radio later in the chapter.)
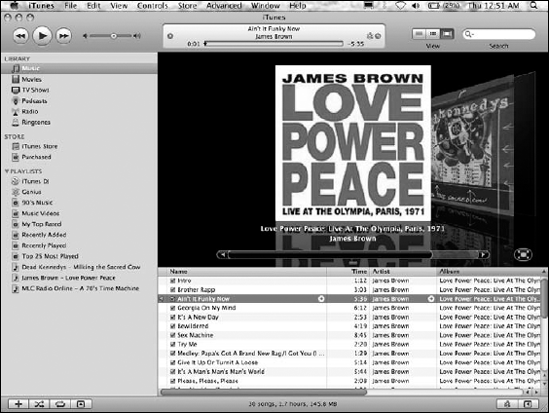
Playing an audio CD in iTunes is simple. Just insert the CD in your computer's disc tray or disc slot, start iTunes by clicking its icon in the Dock, and click the Play button. (Note that your Mac might be set to automatically launch iTunes when you insert an audio CD.) The iTunes interface resembles that of a traditional cassette or CD player. The main playback controls of the iTunes are Play, Previous Song, Next Song, and the volume slider, as shown in Figure 2-1.

Click the Play button to begin listening to a song. While a song is playing, the Play button toggles to a Pause button. As you might imagine, clicking that button again pauses the music. If you don't feel like messing around with the trackpad, you can always use the keyboard. The spacebar acts as the Play and Pause buttons. Press the spacebar to begin playback; press it again to stop.
Click the Next Song button to advance to the next song on the CD. The Previous Song button works like the Next Song button but with a slight twist: If a song is currently playing and you click the Previous Song button, iTunes first returns to the beginning of the current song (just like an audio CD player). To advance to the previous song, double-click the Previous Song button. To change the volume of your music, click and drag the volume slider.
As with other Macintosh applications, you can control much of iTunes with the keyboard. Table 2-1 lists some of the more common iTunes keyboard shortcuts.
Table 2.1. Common iTunes Keyboard Shortcuts
Press This Key Combination | To Do This |
|---|---|
Spacebar | Play the currently selected song if iTunes is idle. |
Spacebar | Pause the music if a song is playing. |
Right-arrow key | Advance to the next song. |
Left-arrow key | Go back to the beginning of a song. Press a second time to return to the previous song. |
Increase the volume of the music. | |
Decrease the volume of the music. | |
Mute the audio if any is playing. Press again to play the audio. |
In addition to playing audio CDs, iTunes can play the digital audio files that you download from the Internet or obtain from other sources in the WAV, AAC, Apple Lossless, AIFF, and MP3 file formats. Enjoying a digital audio file is just slightly more complicated than playing a CD. After downloading or saving your audio files to your Mac, open the Finder and navigate to wherever you stored the files. Then simply drag the music files (or an entire folder of music) from the Finder into the Music entry in the iTunes Source list. (The added files appear in the Music section of your iTunes Library. Think of the Library as a master list of your digital media. To view the Music Library, select the Music entry in the left-hand column of the iTunes player, as shown in Figure 2-2. Go figure.) Heck, you can also drag a song file from a Finder window and drop it on the iTunes icon in the Dock, which adds it to your Music Library as well.
Tip
If you drop the file on top of a playlist name in the Source list, iTunes adds it to that particular playlist as well as the main Library. (More about playlists in a bit.)
To play a song, just double-click it in the Music list. Alternatively, you can use the playback controls (Play, Previous Song, and Next Song) that I discuss earlier in this chapter (refer to Figure 2-1).
Note
The Source list of iTunes can list up to five possible sources for music:
Library: This section includes Music, Movies, TV Shows, Podcasts, Audiobooks, iPod Games, and Radio. (Think Internet radio, which I discuss further in the section "iTunes Radio.")
Devices: If an iPod is connected, it appears in the list. (And yes, Virginia, other models of MP3 players from other companies will also appear in the list if they support iTunes.) If you load an audio CD, it appears in the Devices heading ...anything from the Bee Gees to Fall Out Boy.
Store: I discuss this later, in the section "Buying Digital Media the Apple Way."
Shared: If another Mac or PC on your local network is running iTunes and is set to share part or all of its library, you can connect to the other computer for your music. (Shared music on another Mac appears as a separate named folder in the Source list.)
Playlists: Think of playlists as folders you use to organize your music. (More on playlists later in this chapter.)
Tip
If you've invested in an Apple TV, it will appear in the list as well, allowing iTunes to share media with your Apple TV, which in turn sends it to your ED- or HD-TV.
Notice also that the Library lists information for each song that you add to it, such as
Song Name: The title of the song
Time: The length of the song
Artist: The artist who performs the song
Album: The album on which the song appears
If some of the songs that you're adding don't display anything for the title, album, or artist information, don't panic; most MP3 files have embedded data that iTunes can read. If a song doesn't include any data, you can always add the information to these fields manually. I show you how later, in the section "Setting or changing the song information manually."
Tip
Clicking any of the column headings in the Library causes iTunes to reorder the Library according to that category. For example, clicking the Song Name column heading alphabetizes your Library by song title. I click the Time heading often to sort my Library according to the length of the songs. Oh, and you can drag column titles to reorder them any way you like (as long as the Name column remains at the far left of the named columns).
Tip
iTunes can display your Music Library in three ways: By default, the application uses the list view you see in Figure 2-1, where each song is one entry. Click the second View button (at the top of the iTunes window) to group tracks together by album artwork in grid view. Click the third View button, and you're browsing by album cover in cover flow view, complete with reflective surface!
After you add a few dozen songs to iTunes, viewing the Library can become a task. Although a master list is nice for some purposes, it becomes as cumbersome as an elephant in a subway tunnel if the list is very long. To help out, iTunes can display your Library in another format, too: namely, browsing mode. To view the Library in browsing mode, click the View menu and click the Show Browser item, or press the
The Browse mode of iTunes displays your library in a compact fashion, organizing your tunes into four sections:
Genre
Artist
Album
Song Name
Selecting an artist from the Artist list causes iTunes to display that artist's albums in the Album list. Select an album from the Album list, and iTunes displays that album's songs in the bottom section of the Browse window. (Those Apple software designers ...always thinking of you and me.)
After your collection of audio files grows large, you might have trouble locating that Swedish remix version of "I'm Your Boogie Man." To help you out, iTunes has a built-in Search function. To find a song, type some text into the search field of the main iTunes window. While you type, iTunes tries to find a selection that matches your search text. The search is quite thorough, showing any matching text from the artist, album, song title, and genre fields in the results. For example, if you type Electronic into the field, iTunes might return results for the band named Electronic or other tunes that you classified as electronic in the Genre field. (The section "Know Your Songs," later in this chapter, tells you how to classify your songs by genre, among other options.) Click the magnifying glass at the left side of the Search field to restrict the search even more: by Artists, Albums, Composers, and Songs.
After you spend some time playing songs with iTunes, you might decide that you didn't really want to add 40 different versions of "Louie Louie" to your Library. (Personally, I prefer either the original or the cast from the movie Animal House.) To remove a song from the Library, click the song to select it and then press the Delete key on your keyboard.
Tip
You can also remove a song from the Library by dragging it to the Trash in your Dock.
Watching video in iTunes is similar to listening to your music. To view your video collection, click one of these entries in the Source list:
Movies
TV Shows
If you select Movies or TV Shows, iTunes displays your videos as thumbnails or in cover flow view. Music videos appear as a smart playlist.
From your collection, you can
Double-click a video thumbnail or an entry in the list.
Drag a QuickTime–compatible video clip from the Finder window to the iTunes window. (These typically include video files ending in
.movor.mp4.)
iTunes plays video in the box below the Source list, within the iTunes window, in a separate window, or in full-screen mode, depending on the settings you've chosen on the General pane in the iTunes Preferences window. In full-screen mode, move your pointer to display a control strip at the bottom of the screen, sporting the standard slider bar that you can drag to move through the video (as well as a volume control and Fast Forward/Reverse buttons). You can also pause the video by clicking the Pause button.
As I mention earlier, the iTunes Music Library can quickly become a fearsomely huge beastie. Each Library can contain thousands upon thousands of songs: If your Library grows anywhere near that large, finding all the songs in your lifelong collection of Paul Simon albums is not a fun task. Furthermore, with the Library, you're stuck playing songs in the order that iTunes lists them.
To help you organize your music into groups, use the iTunes playlist feature. A playlist is a collection of some of your favorite songs from the Library. You can create as many playlists as you want, and each playlist can contain any number of songs. Whereas the Library lists all available songs, a playlist displays only the songs that you add to it. Further, any changes that you make to a playlist affect only that playlist, leaving the Library intact.
To create a playlist, you can do any of the following:
Choose File

Press

Choose File
Click a song to select it; then click the Genius button at the lower-right corner of the window. (The Genius button bears a striking "atom" symbol.) iTunes builds a playlist of songs that are similar in some way (typically by matching the genre of the selection or the beats per minute, but also based on recommendations from other iTunes members). Note that your MacBook needs an Internet connection to create a Genius playlist, and the larger your music library the longer it will take iTunes to build your playlist.
Click the iTunes DJ entry in the Playlist section at the left side of the window. iTunes delivers a random selection of songs taken from your iTunes Music Library — perfect for your next spontaneous party! You can change the order of the songs in the iTunes DJ playlist (known as Party Shuffle in older versions of iTunes), add songs from your Library, or delete songs that don't fit the scintillating ambience of your gathering. Enjoy!
Click the New Playlist button in the iTunes window (the plus sign button in the lower-left corner). You get a newly created empty playlist (the toe-tappin' untitled playlist).
All playlists appear in the Source list. To help organize your playlists, it's a good idea to ...well, name them. (Aren't you glad now that you have this book?) For example, suppose that you want to plan a party for your polka-loving friends. Instead of running to your computer after each song to change the music, you could create a polka-only playlist. Select and start the playlist at the beginning of the party, and you won't have to worry about changing the music the whole night. (You can concentrate on the accordion.) To load a playlist, select it in the Source list; iTunes displays the songs for that playlist.
The same song can appear in any number of playlists because the songs in a playlist are simply pointers to songs in your Music Library — not the songs themselves. Add and remove them at will to or from any playlist, secure in the knowledge that the songs remain safe in the Library. Removing a playlist is simple: Select the playlist in the Source list and then press Delete.
Note
Removing a playlist doesn't actually delete any songs from your Library.
Besides organizing your music into Elvis and non-Elvis playlists, iTunes gives you the option to track your music at the song level. Each song that you add to the Music Library has a complete set of information associated with it. iTunes displays this information in the Info dialog, including
Name: The name of the song
Artist: The name of the artist who performed the song
Composer: The name of the astute individual who actually wrote the song
Album Artist: The name of the artist responsible for a compilation or tribute album
Album: The album where the song appears
Grouping: A group type that you assign
Year: The year the artist recorded the song
BPM: The beats per minute (which indicates the song's tempo)
Track Number: The position of the song on the original album
Disc Number: The original disc number in a multi-CD set
Comments: A text field that can contain any comments on the song
Genre: The classification of the song (such as rock, jazz, or pop)
You can display this information by clicking a song name and pressing
Each song that you add to the iTunes Music Library might have song information included with it. If you add music from a commercial audio CD, iTunes connects to a server on the Internet and attempts to find the information for each song on the CD. If you download a song from the Internet, it often comes with some information embedded in the file already; the amount of included information depends on what the creator supplied. (And believe me, it's often misspelled as well — think Leenard Skeenard.) If you don't have an Internet connection, iTunes can't access the information and displays generic titles instead.
If iTunes can't find your CD in the online database or someone gives you an MP3 with incomplete or inaccurate information, you can change the information yourself — believe me, you want at least the artist and song name! To view and change the information for a song, perform the following steps:
Select the song in either the Music Library list or a Playlist.
Pressy
Edit the song's information on the Info tab, as shown in Figure 2-3.

Keep in mind that the more work you put into setting the information of the songs in your Music Library, the easier it is to browse and use iTunes. Incomplete song information can make it more difficult to find your songs in a hurry. If you prefer, you don't have to change all information about a song (it just makes life easier later if you do). Normally, you can get away with setting only a song's title, artist, and genre. The more information you put in, however, the faster you can locate songs and the easier they are to arrange. iTunes tries to help by automatically retrieving known song information, but sometimes you have to roll up your sleeves and do a little work. (Sorry, but the DataElves are out to lunch.)
"What about cover art, Mark?" Well, I'm overjoyed that you asked! iTunes can try to locate artwork automatically for the tracks you select. (Note that adding large images can significantly increase the size of the song file.) Follow these steps:
Select the desired songs from the track list.
Click Advanced
Tip
You can set iTunes to automatically attempt the addition of album artwork every time you rip tracks from an audio CD, or when you add songs without artwork to your Music Library. Click iTunes and choose Preferences; then click the Store button and click the Automatically Download Missing Album Artwork check box to enable it.
Tip
Want to manually add album covers to your song info? Select one (or all) of the songs from a single album in the track list, display the Info dialog, and click the Artwork tab. Now launch Safari, visit Amazon.com, and do a search on the same album. Drag the cover image from the Web page right into the Info dialog, and drop it on top of the "sunken square" image well. When you click OK, the image appears in the Summary pane, and you can display it while your music is playing by pressing
Tip
By the way, if you buy tracks or an album from the iTunes Store, Apple always includes album covers automatically. Thanks, Steve!
You don't have to rely on Internet downloads to get audio files: You can create your own MP3, AAC, Apple Lossless, AIFF, and WAV files from your audio CDs with iTunes. The process of converting audio files to different formats is called ripping. (Audiophiles with technical teeth also call this process digital extraction, but they're usually ignored at parties by the popular crowd.) Depending on what hardware or software you use, each has its own unique format preferences. For example, most iPod owners prefer MP3 or AAC files, but your audio CDs aren't in that format. Being able to convert files from one format to another is like having a personal translator in the digital world. You don't need to worry if you have the wrong format: You can simply convert it to the format that you need.
The most common type of ripping is to convert CD audio to AAC or MP3 format. To rip MP3s from an audio CD, follow these simple steps:
Launch iTunes by clicking its icon in the Dock.
Alternatively, you can locate it in your Applications folder.
Choose iTunes
In the Preferences window that appears, click the General toolbar button.
Click the Import Settings button.
Choose MP3 Encoder from the Import Using pop-up menu.
Choose High Quality (160 Kbps) from the Setting pop-up menu and then click OK.
This bit rate setting provides the best compromise between quality (it gives you better than CD quality, which is 128 Kbps) and file size (tracks you rip will be significantly smaller than "audiophile" bit rates such as 192 Kbps or higher).
Load an audio CD into your MacBook.
The CD title shows up in the iTunes Source list (under the Devices heading), which is on the left side of the iTunes window. The CD track listing appears on the right side of the window.
Tip
If iTunes asks you whether you want to import the contents of the CD into your Music Library, you can click Yes and skip the rest of the steps; however, if you've disabled this prompt, just continue with the remaining two steps.
Clear the check box of any song that you don't want to import from the CD.
Tip
All songs on the CD have a check box next to their title by default. Unmarked songs aren't imported.
Notice that the Browse button changes to Import CD.
After you select the songs that you want added to the Library, click the Import CD button.
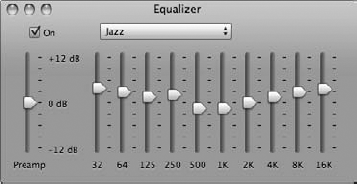
Besides the standard volume controls that I mention earlier in this chapter, iTunes offers a full equalizer. An equalizer permits you to alter the volume of various frequencies in your music, allowing you to boost low sounds, lower high sounds, or anything in between. Now you can customize the way your music sounds and adjust it to your liking.
To open the Equalizer (as shown in Figure 2-4), do one of the following:
Choose Window
Press
The Equalizer window has an impressive array of 11 sliders. Use the leftmost slider (Preamp) to set the overall level of the Equalizer. The remaining sliders represent various frequencies that the human ear can perceive. Setting a slider to a position in the middle of its travel causes that frequency to play back with no change. Move the slider above the midpoint to boost that frequency; conversely, move the slider below the midpoint to reduce the volume of that frequency.
Continue adjusting the equalizer sliders until your music sounds the way you like it. When you close the Equalizer window, iTunes remembers your settings until you change them again. In case you prefer to leave frequencies to the experts, the iTunes Equalizer has several predefined settings to match most musical styles. Click the pop-up menu at the top of the Equalizer window to select a genre.
After you adjust the sound to your satisfaction, close the Equalizer window to return to the iTunes interface and relax with those funky custom notes from James Brown.
Besides playing back your favorite audio files, iTunes can also tune in Internet radio stations from around the globe. You can listen to any of a large number of preset stations, seek out lesser-known stations not recognized by iTunes, or even add your favorite stations to your playlists. This section shows you how to do it all.
Although it's not a radio tuner in the strictest sense, iTunes Radio can locate virtual radio stations all over the world that send audio over the Internet — a process usually dubbed streaming amongst the "in" Internet crowd. iTunes can track down hundreds of Internet radio stations in a variety of styles with only a few clicks.
To begin listening to Internet radio with iTunes, click the Radio icon located beneath the Library icon in the Source list. The result is a list of more than 20 types of radio stations, organized by genre.
When you expand a Radio category by clicking its triangle, iTunes queries a tuning server and locates the name and address of dozens of radio stations for that category. Whether you like Elvis or not-Elvis (those passing fads, like new wave, classical, or alternative), something's here for everyone. The Radio also offers news, sports, and talk radio.
After iTunes fetches the names and descriptions of radio stations, double-click one that you want to hear. iTunes immediately jumps into action, loads the station, and begins to play it.
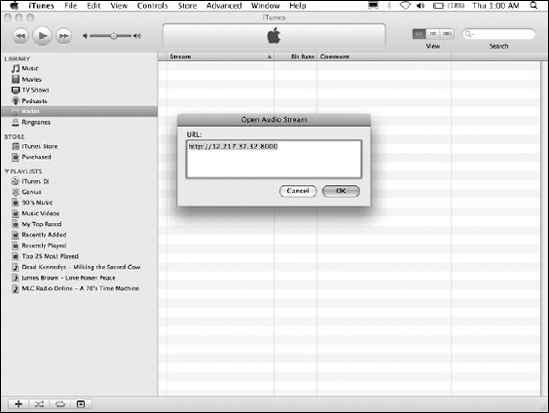
Although iTunes offers you a large list of popular radio stations on the Web, it's by no means comprehensive. Eventually, you might run across a radio station that you'd like to hear, but it's not listed in iTunes. Luckily, iTunes permits you to listen to other stations, too. To listen to a radio station that iTunes doesn't list, you need the station's Web address.
In iTunes, choose Advanced
If you find yourself visiting an online radio station more than once, you'll be glad to know that iTunes supports radio stations in its playlists. To add a radio station to a playlist from the Radio list, do the following:
Open the category that contains the station you want to add to your playlist.
Locate the station that you want to add to your playlist and drag it from the Radio list to the desired playlist on the left.
Tip
If you haven't created any playlists yet, see the section "Keeping Slim Whitman and Slim Shady Apart: Organizing with Playlists" earlier in this chapter to find out how.
Adding a radio station that doesn't appear in the Radio list is a bit trickier but possible nonetheless. Even though iTunes allows you to load a radio station URL manually by using the Open Stream command in the Advanced menu, it doesn't give you an easy way to add it to the playlist. Follow these steps to add a specific radio station to a playlist:
Add any radio station from the Radio list to your desired playlist.
Any station in the list will do, as you'll immediately change both the station's URL and name to create your new station entry in the Playlist.
Press
Click the Summary section and change the URL by clicking the Edit URL button.
Enter the desired URL and click OK.
Click the Info tab, type the new station name, and then click OK.
If you're lucky enough (like me) to own an iPod, you'll be happy to know that iTunes has features for your personal audio and video jukebox as well. iPods, Apple's multimedia players, comprise an entire family of portable devices (ranging from $79 to about $299) that can hold anywhere from about 300 songs to literally thousands of songs, as well as podcasts, photos, and video. This great gadget and those like it have become known worldwide as the preferred portable digital media player.
You connect your iPod to any Macintosh or Windows PC with USB 2.0 ports with the included cable. After the iPod's connected, it automatically synchronizes to the playlists in iTunes. The iPod and the iTunes software communicate with each other and figure out what items are in your iTunes Library (as compared with the iPod Library). If they discover songs, podcasts, and video in your iTunes Library that are missing from your iPod, the items automatically transfer to the iPod. Conversely, if the iPod contains stuff that's no longer in iTunes, the iPod automatically removes those files from its drive.
Warning
Go back and reread that last sentence above about the iPod automatically removing files from its drive. (I'll wait here.) Apple added this feature in an effort to be attentive to copyright concerns. The reasoning is that if you connect your iPod to your friend's computer, you can't transfer songs from the iPod to that computer. Of course, you could always look at it from the marketing perspective as a feature that makes sure your MacBook and iPod are always in total sync. Whatever the case, pay close attention and read all warning dialogs when connecting to a computer other than your own, or you might wipe out your iPod's library.
The best thing I can say about the iPod and iTunes combination is ...well ...that there isn't anything else to say about them. The auto-sync feature is so easy to use, you forget about it almost immediately. You can, however, auto-sync only selected playlists, or manually sync if you prefer.
Tip
This chapter — even as long as it is — just can't explain all the ins and outs of the iTunes/iPod relationship! For a complete look at both iTunes and the iPod, I can heartily recommend a fellow For Dummies book, iPod & iTunes For Dummies, 7th Edition, by Tony Bove (Wiley Publishing).
Ready to share your music, podcasts, and video — legally, mind you — with other folks on your local network? You can offer your digital media to other iTunes users across your home or office. Follow these steps:
Choose iTunes
Click Sharing.
Select the Share My Library on My Local Network check box.
Specify whether you want to share your entire library or only selected playlists and files.
Sharing selected playlists is a good idea for those Meatmen and Sex Pistols fans who work at a cubicle farm in a big corporation.
If you want to restrict access to just a few people, select the Require Password check box; then type a password in the text box.
Click OK.
Your shared folder appears within the Source list for all iTunes users who enabled the Look for Shared Libraries check box on the same pane of their iTunes Preferences dialog. Note that the music you share with others can't be imported or copied, so everything stays legal.
Tip
Want to change that frumpy default name for your shared media library to something more exotic, like "Dan's Techno Beat Palace"? No problem — display the Preferences dialog again, but this time click the General button and click in the Library Name text box. Edit your network entertainment persona to your heart's content.
Sending music elsewhere with AirTunes
If you're using an AirPort Express portable wireless Base Station, you can ship your songs right to your Base Station from within iTunes, and from there to your home stereo or boom box! (I get into some serious discussion of AirPort Express in Book VII, Chapter 3.)
After your AirPort Express Base Station is plugged in and you connect your home stereo (or a boombox, or a pair of powered stereo speakers) to the stereo minijack on the Base Station, you see a Speakers pop-up list button appear at the bottom of the iTunes window. (If the Speakers button doesn't appear, choose iTunes
Click the Speakers button, and you can choose to broadcast the music you're playing in iTunes across your wireless network. Ain't technology truly grand?
Besides being a great audio player, iTunes is adept at creating CDs, too. iTunes makes the process of recording songs to a CD as simple as a few clicks. Making the modern version of a compilation (or mix) tape is easier than getting a kid to eat ice cream. iTunes lets you burn CDs in one of three formats:
Audio CD: This is the typical kind of commercial music CD that you buy at a store. Most typical music audio CDs store 700MB of data, which translates into about 80 minutes of music.
Data CD or DVD: A standard CD-ROM or DVD-ROM is recorded with the audio files. This disc can't be played in any standard audio CD player (even if it supports MP3 CDs, which I discuss next). Therefore, you can listen to these songs only by using your MacBook and an audio player, such as iTunes on a PC running Windows.
MP3 CD: As does the ordinary computer CD-ROM that I describe, an MP3 CD holds MP3 files in data format. However, the files are arranged in such a way that they can be recognized by audio CD players that support the MP3 CD format (especially boomboxes, DVD players, personal CD players, and car stereos). Because MP3 files are so much smaller than the digital audio tracks found on traditional audio CDs, you can fit as many as 160 typical 4-minute songs on one disc. These discs can also be played on your MacBook via iTunes.
Warning
Keep in mind that MP3 CDs aren't the same as the standard audio CDs that you buy at the store, and you can't play them in older audio CD players that don't support the MP3 CD format. Rather, this is the kind of archival disc that you burn at home for your own collection.
To begin the process, build a playlist (or select an existing playlist that you want to record). If necessary, create a new Playlist and add to it whatever songs you would like to have on the CD. (See the earlier section, "Keeping Slim Whitman and Slim Shady Apart: Organizing with Playlists," if you need a refresher.) With the songs in the correct order, select the playlist. Click the Burn Disc button at the bottom of the iTunes window to commence the disc burning process. Click the desired recording format (again, usually Audio CD) in the Burn Settings dialog that appears.
Tip
To save yourself from sonic shock, I always recommend that you enable the Sound Check check box before you burn. iTunes will adjust the volume on all the songs on your audio CD so that they'll play at the same volume level.
Ready to go? Click OK, and iTunes lets you know when the recording is complete.
Backing up within iTunes
iTunes offers a built-in backup feature for your media library — I told you this was the best media player ever designed!
Choose File
Click Back Up, and iTunes will prompt you for blank CDs or DVDs. If you need to restore from your completed backup, just launch iTunes and load the first backup disc into your drive.
How often is often enough when it comes to backing up your content? That depends completely on how often your media library changes. The idea is to back up often enough so that you always have a recent copy of your media files close by.
By now, you know that iTunes is a feast for the ears, but did you know that it can provide you with eye candy as well? With just a click or two, you can view mind-bending graphics that stretch, move, and pulse with your music, as shown in Figure 2-6.
To begin viewing iTunes visuals, choose View
You can also change the viewing size of the iTunes visuals in the View menu. From the View menu item, choose Full Screen (or press
Tip
You can still control iTunes with the keyboard while the visuals are zooming around your screen. See Table 2-1 earlier in this chapter for a rundown on common keyboard shortcuts.
The iTunes Visualizer has many hidden features. While viewing the Visualizer, press ? to see a list of hidden Visualizer settings.

But wait, more Easter eggs are to be found! Again, while viewing the Visualizer, press one of following keys:
M: Changes the Visualizer pattern
P: Changes the Visualizer color scheme
Press either of these keys repeatedly to cycle through the various patterns and color schemes lurking deep within the Visualizer. (Personally, I'm a random Visualizer guy ...there are so many patterns and schemes, I just let my MacBook do all the work.)
Additionally, you'll find third-party Visualizer plug-ins available for downloading on Apple's Web site and other Mac-related download sites — heck, some even display lyrics, karaoke-style! Choose a different Visualizer plug-in from the View
Before we wave goodbye to the happy residents of iTunes iSland, I won't forget to mention the hottest spot on the Internet for buying music and video: the iTunes Store, which you can reach from the cozy confines of iTunes. (That is, as long as you have an Internet connection. If you don't, it's time to turn the page to a different chapter.) If you're not in iTunes, go to www.apple.com/itunes/store.
Click the iTunes Store item in the Source list, and after a few moments you're presented with the latest offerings. Click a link in the store list to browse according to media type, or click the Power Search link to search by song title, artist, album, or composer. The Back/Forward buttons at the top of the iTunes Store window operate much the same as those in Safari, moving you backward or forward in sequence through pages you've already seen. Clicking the Home button (which, through no great coincidence, looks like a miniature house) takes you back to the Store's main page.
To display the details on a specific album, track, video, podcast, or audiobook (whew), just click it. If you're interested in buying just certain tracks (for that perfect road warrior mix), you get to listen to 30 seconds of any track — for free, no less, and at full sound quality. To add an item to your iTunes Store shopping cart, click the Add Song/Movie/Album/Video/Podcast/Audiobook button (sheesh!). When you're ready to buy, click the Shopping Cart item in the Source list and then click the Buy Now button. (At the time of this writing, tracks are usually 99 cents a pop, and an entire album is typically $9.99 ...what a bargain!
The iTunes Store creates an account for you based on your e-mail address, and it keeps secure track of your credit card information for future purchases. After you use the iTunes Store once, you never have to log in or retype your credit card information again (as long as you're logged in using your account).
The tracks and files that you download are saved to a separate playlist called Purchased. After the download is finished, you can play them, move them to other playlists, burn them to CD or DVD, share 'em over your network, or ship them to your iPod, just as you can any other item in your iTunes Library.
You can also put the Genius button to work for you, in league with the iTunes store. Click the Show Genius Sidebar button at the lower-right corner of the iTunes window — it looks like an arrow inside a square — and iTunes displays the Genius Sidebar, where iTunes recommends music that you can buy on the iTunes Store that's similar to the albums in your Music Library. Click the button again to banish the sidebar.
Remember all those skeptics who claimed that buying digital audio and video could never work over the Internet because of piracy issues and high costs? Well, bunkie, hats off to Apple: Once again, our favorite technology leader has done something the right way!